navigation MITSUBISHI LANCER 2011 8.G Owners Handbook
[x] Cancel search | Manufacturer: MITSUBISHI, Model Year: 2011, Model line: LANCER, Model: MITSUBISHI LANCER 2011 8.GPages: 16, PDF Size: 1.57 MB
Page 7 of 16

5Audio System
navigation sYstem (if eqUiPPeD ) – PRessing the Panel keYs oR toUching the scReen bUttons can PeRfoRm vaRioUs
fUnctions. oPeRate the scReen b Y toUching lightlY with a fingeRtiP. foR a UDio s Ystem oPeRating instRUctions in
lanceRs withoUt a navigation s Ystem, Please RefeR to Y oUR owneR’s manUal.
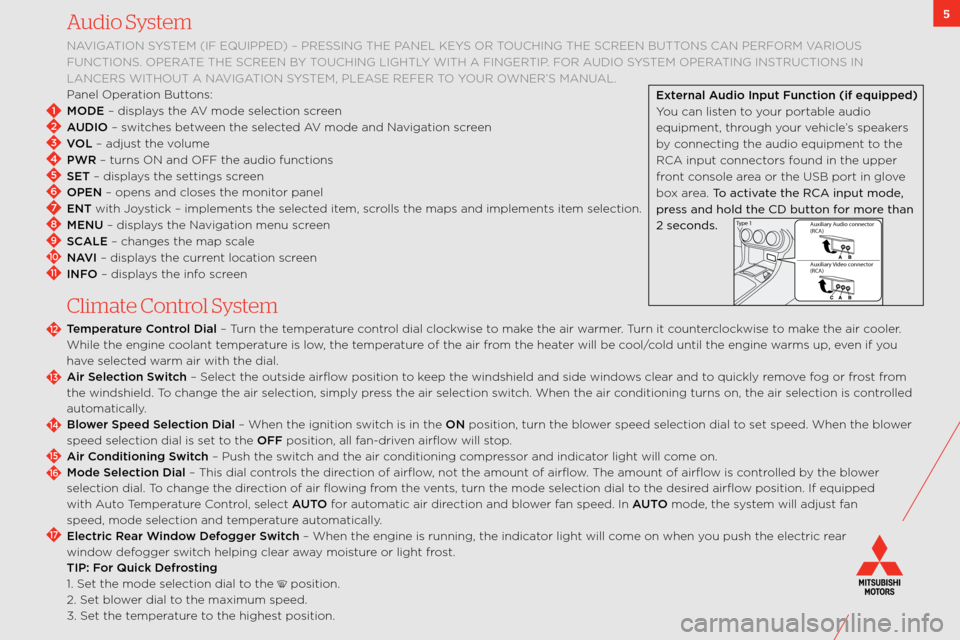
Panel operation buttons:
MODE – displays the av mode selection screen
AUDIO – switches between the selected av mode and navigation screen
VOL – adjust the volume
PWR – turns on and off the audio function\:s
SET – displays the settings screen
OPEN – opens and closes \:the monitor panel
ENT with Joystick – implements th\:e selected item, scrolls the maps and im\:plements item selection.
MENU – displays the navigation menu screen
SCALE – changes the map s\:cale
NAVI – displays the current location screen
INFO – displays the info screen
C\fimate Contro\f System
Temperature C\bntr\bl Dial – t urn the temperature control dial clockwise to make the air warmer. t urn it counterclockwise to make the air cooler.
w hile the engine coolant temperature is low, the temperature of the air from the heater will be cool/cold until the engin\:e warms up, even if you
have selected warm air with the dia\:l.
Air Sele\fti\bn Swit\fh – select the outside ai\:rflow position to keep the windshield an\:d side windows clear and to quickly remove fog or frost from
the windshield. t o change the air sel\:ection, simply press the air selection \:switch. w hen the air conditioning turns o\:n, the air selection\: is controlled
automatically.
Bl\bwer Speed Sele\fti\bn D\wial – w hen the ignition switch is in the ON position, turn the \:blower speed selection dia\:l to set speed. w hen the blower
speed selection dial \:is set to the OFF position, all fan\bdriven airflow will stop.
Air C\bnditi\bning Swit\fh – Push the switch and the air conditioning compressor and indicator light will come on.
M\bde Sele\fti\bn Dial – t his dial controls the direction of airflow, not the amount of\: airflow. t he amount of airflow is controlled by the blower
selection dial. t o change the direction of air flowing from the vents, turn the mode \:selection dial to the desired airflow position. if equipped
with a uto temperature c ontrol, select AUTO for automatic air direction and blower fan speed. in AUTO mode, the system will adjust fan
speed, mode selection \:and temperature automatically.
Ele\ftri\f Rear Wind\bw Def\bgger Swit\fh – w hen the engine is run\:ning, the indicator light will come on when you push the electric \:rear
window defogger switch helping clear away moisture or light frost.
TIP: F\br Qui\fk Defr\bsting
\f. set the mode selection\: dial to the
position.
2. set blower dial to the maximum speed.
3. set the temperature to the highest position.
2
1
3
4
5
6
7
8
9
10
11
12
13
14
15
16
17
External Audi\b Input Fun\fti\bn (if\w equipped)
You can listen to your portable audio
equipment, through your vehicle’s speakers
by connecting the audio\: equipment to the
Rca input connectors found in the upper
front console area or the Usb port in glove
box area. To activate the RCA i\fput mo\be,
press a\f\b hol\b the CD but\Cto\f for more tha\f
2 seco\f\bs.
Au xiliary Au dio connector
(RCA )
Au xiliary \fideo connecto r
(RCA )
Ty
pe 1
Page 10 of 16

Navigation Tip Sheet (if equipped)
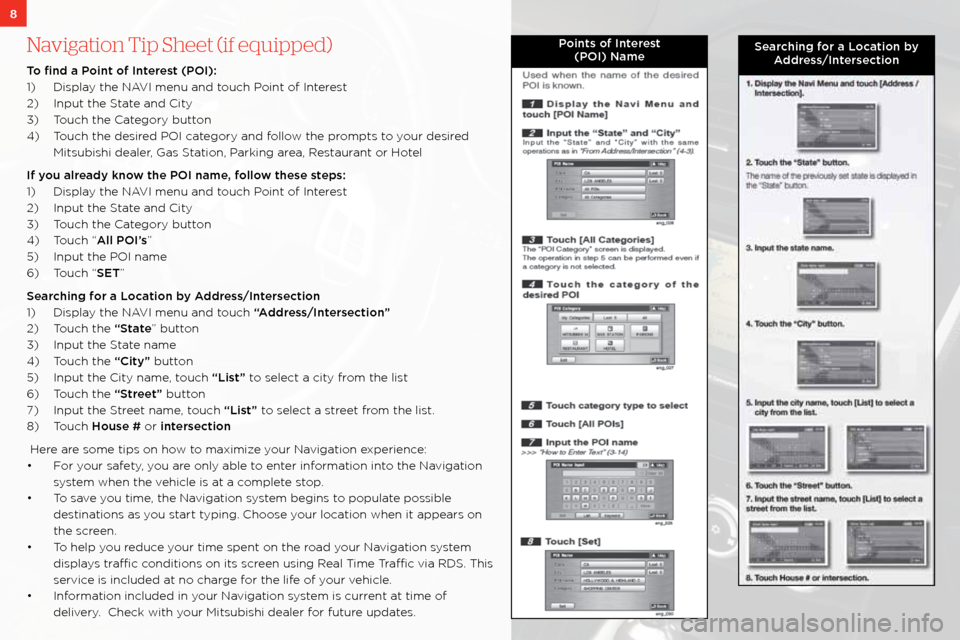
T\b find a P\bint \bf Interest (POI):
\f) Display the navi menu and touch Point of interest
2) input the s tate and city
3) t ouch the category button
4) t ouch the desired Poi category and follow the prompts to your desired
mitsubishi dealer, g as station, Parking area, Restaurant or hotel
If y\bu already kn\bw the POI name, f\bll\bw these steps:
\f) Display the navi menu and touch Point of interest
2) input the s tate and city
3) t ouch the category button
4) t ouch “All POI’s”
5) input the Poi name
6) t ouch “SET”
Sear\fhing f\br a L\b\fati\bn by Address/Interse\fti\bn
\f) Display the navi menu and touch “Address/Interse\fti\bn”
2) t ouch the “State” button
3) input the s tate name
4) t ouch the “City” button
5) input the city name, touch “List” to select a city from the list
6) t ouch the “Street” button
7) input the s treet name, touch “List” to select a street from the list.
8) t ouch H\buse # or interse\fti\bn
here are some tips on how to maximize your navigation experience:
• f or your safety, you are only able to enter information into the navigation
system when the vehicle is at a complete stop.
• t o save you time, the navigation system begins to populate possible
destinations as you start typing. choose your location when it appears \:on
the screen.
• t o help you reduce your time spent on the\: road your navigation system
displays traffic conditions on its s\:creen using Real t ime traffic via RD s. this
service is included at no charge for the life of your vehicle.
• information included in your navigation system is current at time of delivery. check with your mitsubishi dealer for future updates.
P\bints \bf Interest(POI) NameSear\fhing f\br a L\b\fati\bn by Address/Interse\fti\bn
8
Page 11 of 16

9
FUSE Tip Sheet
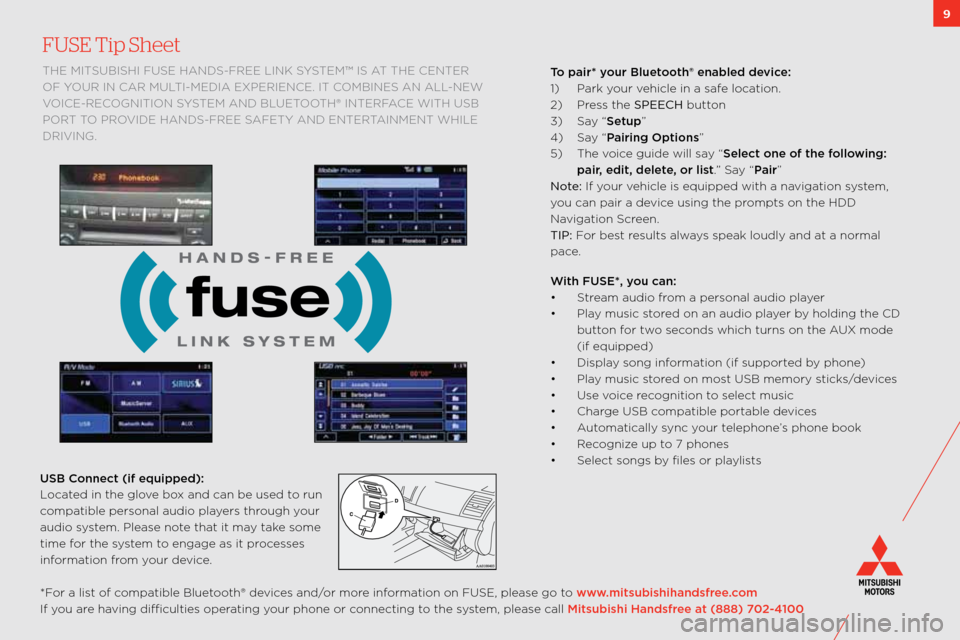
the mitsUbishi fUse hanDs\bfRee link sYstem™ is at the centeR
of Y oUR in caR mUlti\bmeDia exPeRience. it combines an all\bnew
voice\bRecognition s Ystem anD bl Uetooth® inteRface with Usb
PoR t to PRoviDe hanD s\bfRee safetY anD enteR tainment while
DRiving.
*f or a list of compatible bluetooth® devices and/or more information on fUse, please go to www.mitsubishihandsfree.\f\bm
if you are having difficulties operating your phone or connecting to the system, please call Mitsubishi Handsfree at (888) 702-4100 USB C\bnne\ft (if equipped):\w
l ocated in the glove box and can be used t\:o run
compatible personal audio \:players through your
audio system. Please note that it may take some
time for the system to engage as it processes
information from your device. T\b pair* y\bur Bluet\b\bth® enabled devi\fe:
\f)
Park your vehicle in a safe location.
2) Press the SPEECH button
3) say “Setup”
4) say “Pairing Opti\bns”
5) t he voice guide will say “Sele\ft \bne \bf the f\bll\bwing:
pair, edit, delete, \br list.” say “Pair”
Note: if your vehicle is equipped wit\:h a navigation system,
you can pair a device using the prompts on the hDD
navigation screen.
TIP: f or best results always speak loudly and a\:t a normal
pace.
With FUSE*, y\bu \fan:
• s tream audio from a personal audio \:player
• Play music stored on an audio player by holding the cD
button for two seconds which turns on\: the a Ux mode
(if equipped)
• Display song information (if supported by phone)
• Play music stored on most Usb memory sticks/devices
• Use voice recognition to select music
• charge Usb compatible portable devices
• a utomatically sync your telephone’s phone book
• Recognize up to 7 phones
• select songs by files or playlists
Page 14 of 16

12
Lancer Quick Tips and Fun Facts
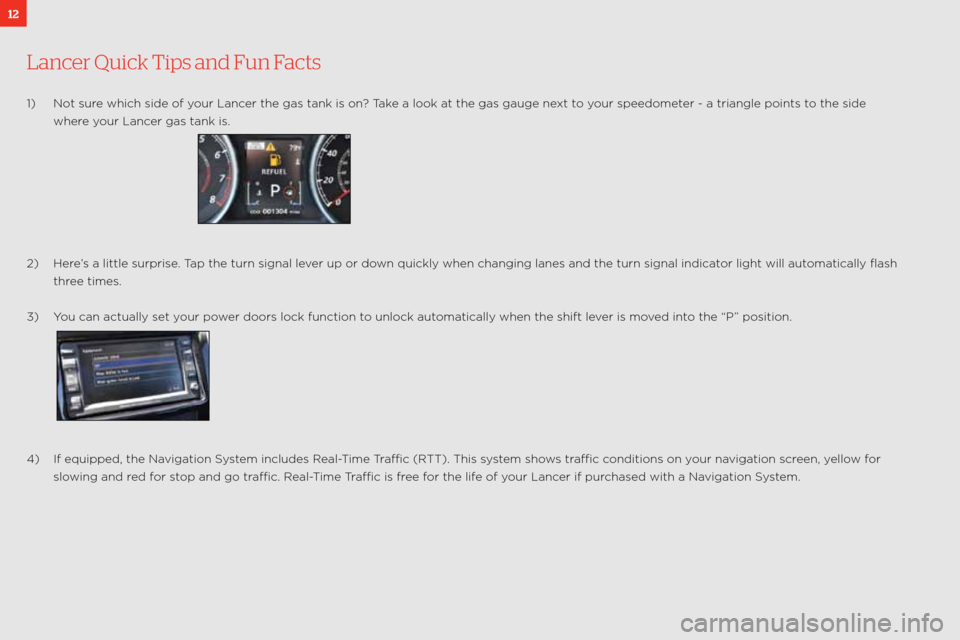
\f) not sure which side of your lancer the gas tank is o\:n? take a look at the gas gauge next to your speedometer \b a triangle points\: to the side
where your lancer gas tank is.
2) here’s a little surprise. t ap the turn signal l\:ever up or down quickly when cha\:nging lanes and the\: turn signal indica\:tor light will automatically flash
three times.
3) You can actually set\: your power doors lock functi\:on to unlock automatically when the sh\:ift lever is moved into the “P” position.
4) if equipped, the navigation s ystem includes Real\btime t raffic (R tt). this system shows traffic conditions on your navigation screen, yellow for
slowing and red for stop and go traffic. Real\b time t raffic is free for the life of your lancer if purchased with a navigation s ystem.