display MITSUBISHI LANCER 2014 8.G Display Audio Manual
[x] Cancel search | Manufacturer: MITSUBISHI, Model Year: 2014, Model line: LANCER, Model: MITSUBISHI LANCER 2014 8.GPages: 88, PDF Size: 11.63 MB
Page 2 of 88
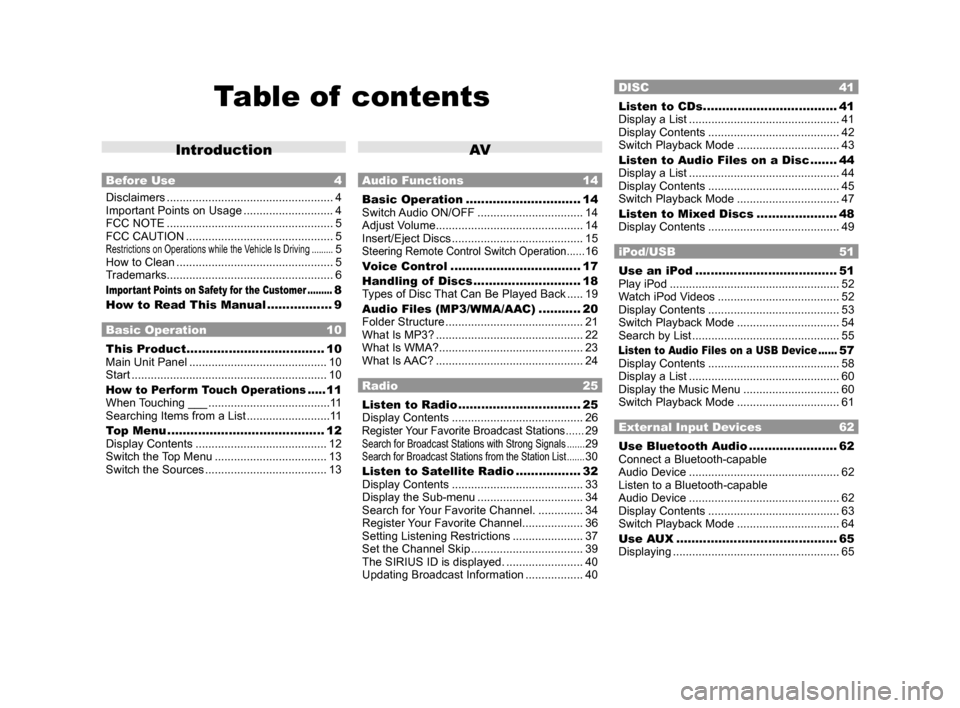
Table of contents
Introduction
Before Use 4
Disclaimers .................................................... 4
Important Points on Usage ............................ 4
FCC NOTE .................................................... 5
FCC CAUTION .............................................. 5
Restrictions on Operations while the Vehicle Is Driving .........5
How to Clean ................................................. 5
Trademarks .................................................... 6
Important Points on Safety for the Customer .........8
How to Read This Manual ................. 9
Basic Operation 10
This Product .................................... 10
Main Unit Panel ........................................... 10
Start ............................................................. 10
How to Perform Touch Operations .....11
When Touching ___ ...................................... 11
Searching Items from a List .......................... 11
Top Menu ......................................... 12
Display Contents ......................................... 12
Switch the Top Menu ................................... 13
Switch the Sources ...................................... 13
AV
Audio Functions 14
Basic Operation .............................. 14
Switch Audio ON/OFF ................................. 14
Adjust Volume .............................................. 14
Insert/Eject Discs ......................................... 15
Steering Remote Control Switch Operation ......16
Voice Control .................................. 17
Handling of Discs ............................ 18
Types of Disc That Can Be Played Back ..... 19
Audio Files (MP3/WMA/AAC) ........... 20
Folder Structure ........................................... 21
What Is MP3? .............................................. 22
What Is WMA? ............................................. 23
What Is AAC? .............................................. 24
Radio 25
Listen to Radio ................................ 25
Display Contents ......................................... 26
Register Your Favorite Broadcast Stations ......29Search for Broadcast Stations with Strong Signals .......29Search for Broadcast Stations from the Station List .......30
Listen to Satellite Radio .................32
Display Contents ......................................... 33
Display the Sub-menu ................................. 34
Search for Your Favorite Channel. ..............34
Register Your Favorite Channel ................... 36
Setting Listening Restrictions ...................... 37
Set the Channel Skip ................................... 39
The SIRIUS ID is displayed. ........................ 40
Updating Broadcast Information .................. 40
DISC 41
Listen to CDs ...................................41
Display a List ............................................... 41
Display Contents ......................................... 42
Switch Playback Mode ................................ 43
Listen to Audio Files on a Disc ....... 44
Display a List ............................................... 44
Display Contents ......................................... 45
Switch Playback Mode ................................ 47
Listen to Mixed Discs ..................... 48
Display Contents ......................................... 49
iPod/USB 51
Use an iPod ..................................... 51
Play iPod ..................................................... 52
Watch iPod Videos ...................................... 52
Display Contents ......................................... 53
Switch Playback Mode ................................ 54
Search by List .............................................. 55
Listen to Audio Files on a USB Device ......57
Display Contents ......................................... 58
Display a List ............................................... 60
Display the Music Menu .............................. 60
Switch Playback Mode ................................ 61
External Input Devices 62
Use Bluetooth Audio .......................62
Connect a Bluetooth-capable
Audio Device ............................................... 62
Listen to a Bluetooth-capable
Audio Device ............................................... 62
Display Contents ......................................... 63
Switch Playback Mode ................................ 64
Use AUX .......................................... 65
Displaying .................................................... 65
13MY_AVC(NAS).indb 22013/02/14 10:57:16
Page 3 of 88
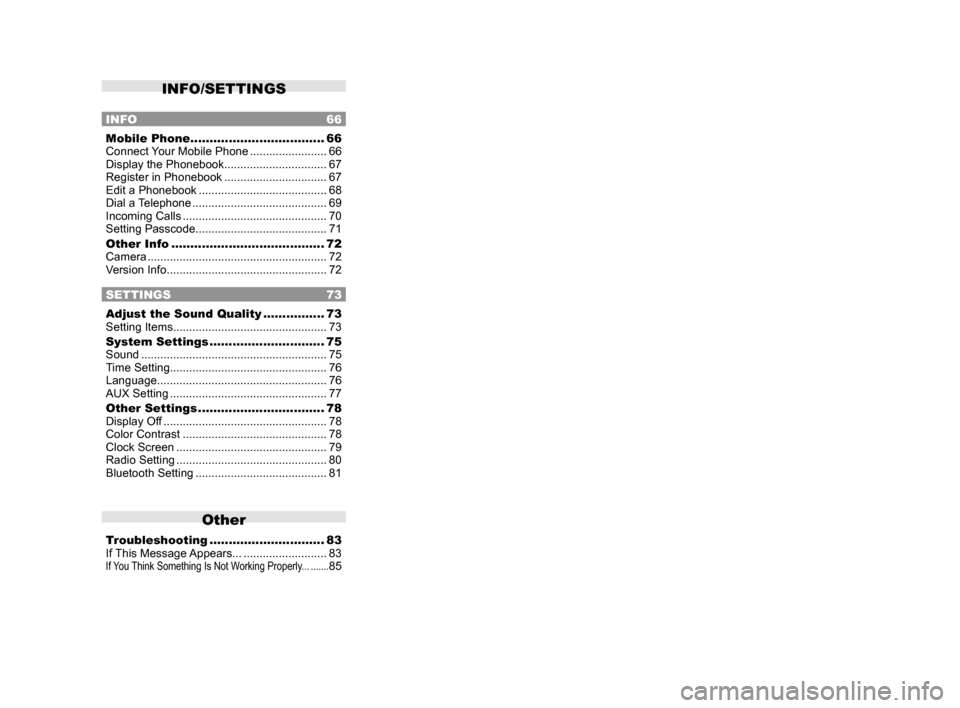
INFO/SETTINGS
INFO 66
Mobile Phone ................................... 66
Connect Your Mobile Phone ........................66
Display the Phonebook ................................ 67
Register in Phonebook ................................ 67
Edit a Phonebook ........................................ 68
Dial a Telephone .......................................... 69
Incoming Calls ............................................. 70
Setting Passcode ......................................... 71
Other Info ........................................ 72
Camera ........................................................ 72
Version Info .................................................. 72
SETTINGS 73
Adjust the Sound Quality ................73
Setting Items ................................................ 73
System Settings .............................. 75
Sound .......................................................... 75
Time Setting ................................................. 76
Language ..................................................... 76
AUX Setting ................................................. 77
Other Settings ................................. 78
Display Off ................................................... 78
Color Contrast ............................................. 78
Clock Screen ............................................... 79
Radio Setting ............................................... 80
Bluetooth Setting ......................................... 81
Other
Troubleshooting ..............................83
If This Message Appears... .......................... 83
If You Think Something Is Not Working Properly... .......85
13MY_AVC(NAS).indb 32013/02/14 10:57:16
Page 9 of 88
How to Read This Manual 9
IntroductionBefore Use
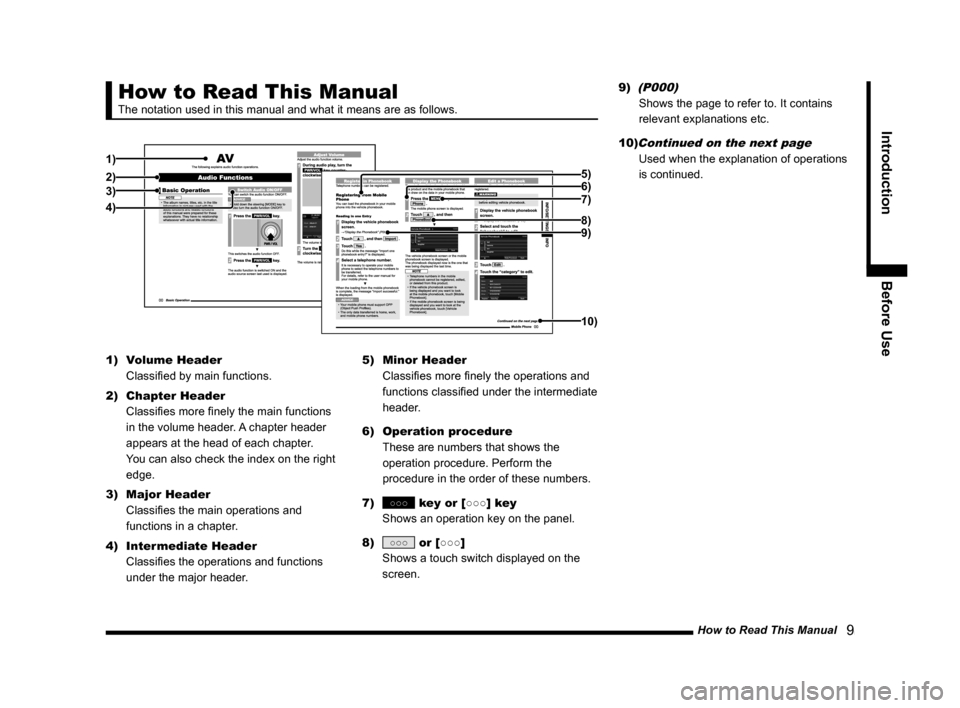
How to Read This Manual
The notation used in this manual and what it means are as follows.
1)
2)3)
4) 7) 5)
6)
8)9)
10)
1)
Volume Header
Classified by main functions.
2) Chapter Header
Classifies more finely the main functions
in the volume header. A chapter header
appears at the head of each chapter.
You can also check the index on the right
edge.
3) Major Header
Classifies the main operations and
functions in a chapter.
4) Intermediate Header
Classifies the operations and functions
under the major header. 5)
Minor Header
Classifies more finely the operations and
functions classified under the intermediate
header.
6) Operation procedure
These are numbers that shows the
operation procedure. Perform the
procedure in the order of these numbers.
7)
○○○ key or [○○○] key
Shows an operation key on the panel.
8)
○○○ or [○○○]
Shows a touch switch displayed on the
screen. 9)
(P000)
Shows the page to refer to. It contains
relevant explanations etc.
10)
Continued on the next page
Used when the explanation of operations
is continued.
13MY_AVC(NAS).indb 92013/02/14 10:57:20
Page 10 of 88
10 This Product
Basic Operation
This Product
Main Unit Panel
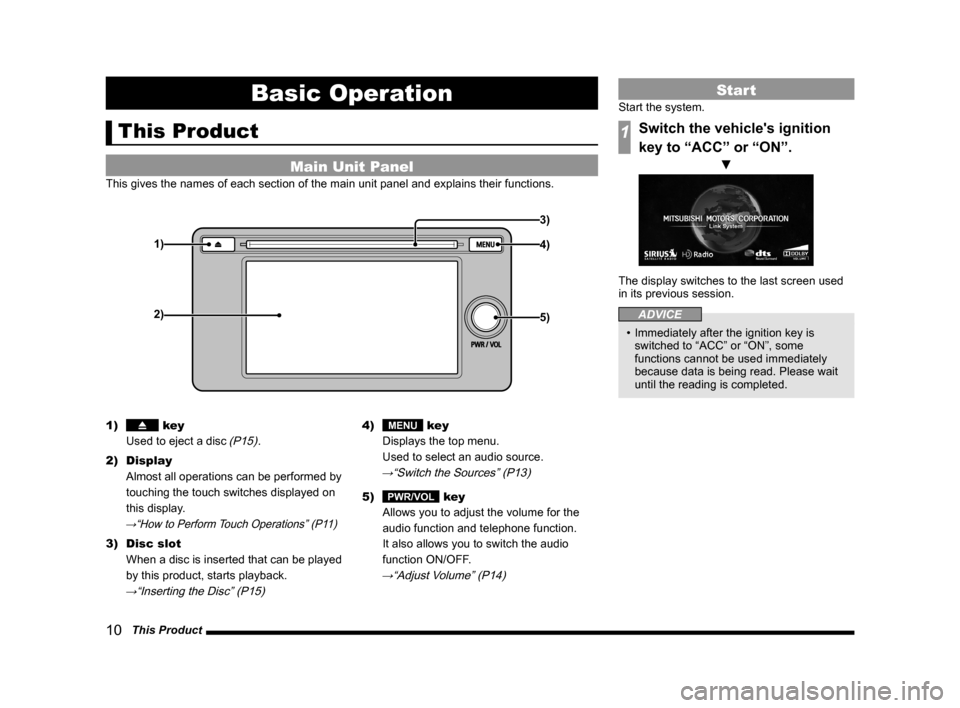
This gives the names of each section of the main unit panel and explains their functions.
1)
2)4) 3)
5)
1) key
Used to eject a disc
(P15).
2) Display Almost all operations can be performed by
touching the touch switches displayed on
this display.
→“How to Perform Touch Operations” (P11)
3) Disc slot
When a disc is inserted that can be played
by this product, starts playback.
→“Inserting the Disc” (P15)
4) MENU key
Displays the top menu.
Used to select an audio source.
→“Switch the Sources” (P13)
5) PWR/VOL key
Allows you to adjust the volume for the
audio function and telephone function.
It also allows you to switch the audio
function ON/OFF.
→“Adjust Volume” (P14)
Start
Start the system.
1Switch the vehicle's ignition
key to “ACC” or “ON”.
▼
The display switches to the last screen used
in its previous session.
ADVICE
• Immediately after the ignition key is
switched to “ACC” or “ON”, some
functions cannot be used immediately
because data is being read. Please wait
until the reading is completed.
13MY_AVC(NAS).indb 102013/02/14 10:57:21
Page 11 of 88
How to Perform Touch Operations 11
IntroductionBasic Operation
How to Perform
Touch Operations
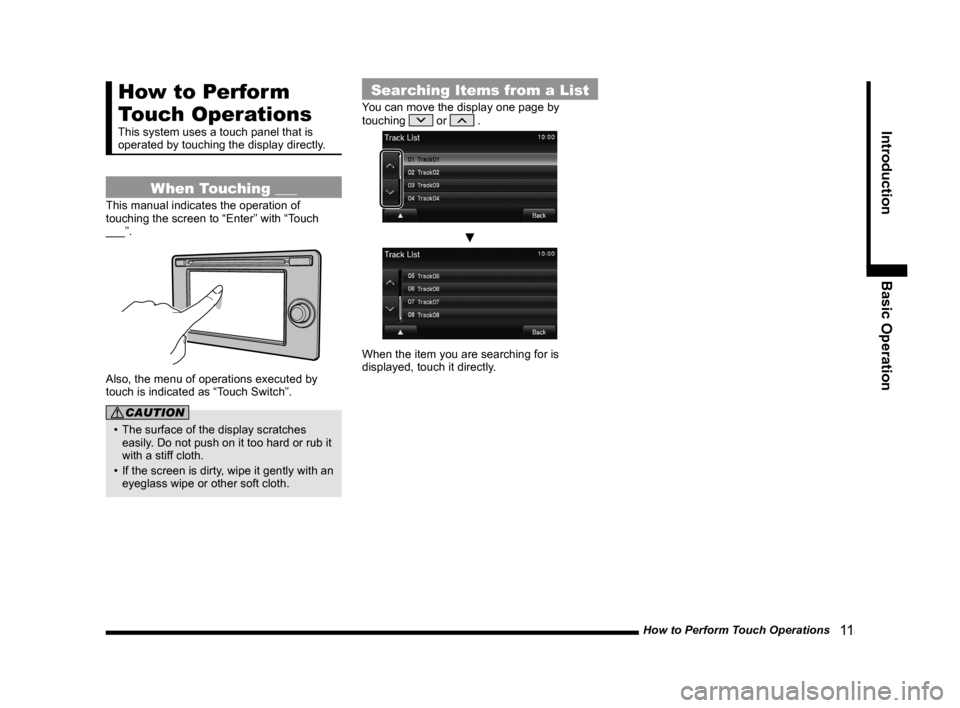
This system uses a touch panel that is
operated by touching the display directly.
When Touching ___
This manual indicates the operation of
touching the screen to “Enter” with “Touch
___”.
Also, the menu of operations executed by
touch is indicated as “Touch Switch”.
CAUTION
• The surface of the display scratches
easily. Do not push on it too hard or rub it
with a stiff cloth.
• If the screen is dirty, wipe it gently with an eyeglass wipe or other soft cloth.
Searching Items from a List
You can move the display one page by
touching or .
▼
When the item you are searching for is
displayed, touch it directly.
13MY_AVC(NAS).indb 112013/02/14 10:57:22
Page 12 of 88
![MITSUBISHI LANCER 2014 8.G Display Audio Manual 12 Top Menu
Top Menu
By pressing the [MENU] key to display the top menu, then selecting a sou\
rce from that menu,
you can use various functions.
Display Contents
TOP
5)6)7)9)8)
1)2) 3)4)
2nd TOP
1 MITSUBISHI LANCER 2014 8.G Display Audio Manual 12 Top Menu
Top Menu
By pressing the [MENU] key to display the top menu, then selecting a sou\
rce from that menu,
you can use various functions.
Display Contents
TOP
5)6)7)9)8)
1)2) 3)4)
2nd TOP
1](/img/19/7457/w960_7457-11.png)
12 Top Menu
Top Menu
By pressing the [MENU] key to display the top menu, then selecting a sou\
rce from that menu,
you can use various functions.
Display Contents
TOP
5)6)7)9)8)
1)2) 3)4)
2nd TOP
10)11)12)13)
1) FM (P25)
Allows you to use the FM radio function.
2)
AM (P25)
Allows you to use the AM radio function.
3)
SIRIUS *7 (P32)
Allows you to use the satellite radio
function.
4) Clock
Displays the current time using 24-hour
time or 12-hour time.
5)
CD
Plays media inserted into this product.
Audio CD
(P41)
Audio files (MP3/WMA/AAC)
(P44)
6) USB/iPod *1
When an iPod is connected to this
product,
iPod is displayed and when you
touch this, the iPod screen is displayed.
(P52)
When a USB device is connected to this
product,
USB is displayed and when you
touch this, the USB screen is displayed.
(P57)
When nothing is connected to this product,
USB/iPod is displayed.
7)
BT Audio *2(P62)
When a Bluetooth-capable audio device
is connected to this product, the Bluetooth
audio function can be used. 8)
Next
Displays the top menu (2nd top).
9)
Voice *3(P17)
Allows you to use the voice control
function.
10)
AUX *1, *4, *5(P65)
When an external input device is connected to this product, the audio from
the external input device is played.
11)
Phone *6(P66)
Allows you to make and receive telephone
calls.
12)
Setting (P73)
Displays the settings screen, on which you
can make various settings for this product.
13)
Back
Displays the top menu (top).
*1) An iPod and external input cable (both available separately) are required.
*2) Requires a separately-purchased Bluetooth-
capable audio device in
Equipment by type (vehicles
with a Bluetooth® 2.0 interface).
*3) Can be used with Equipment by type (vehicles with a
Bluetooth® 2.0 interface).
*4) Equipment by type Even when no external input
cable or AUX device (both available separately)
is connected to this product, [AUX] is displayed,
but touching it does not output any audio.
*5)
Equipment by type Not displayed for vehicles that do
not support AUX devices.
*6) Requires a separately-purchased Bluetooth-
capable mobile phone in
Equipment by type (vehicles
with a Bluetooth® 2.0 interface).
*7) Equipment by type Requires a satellite tuner
connection.
13MY_AVC(NAS).indb 122013/02/14 10:57:23
Page 13 of 88
Top Menu 13
IntroductionBasic Operation
Switch the Top Menu
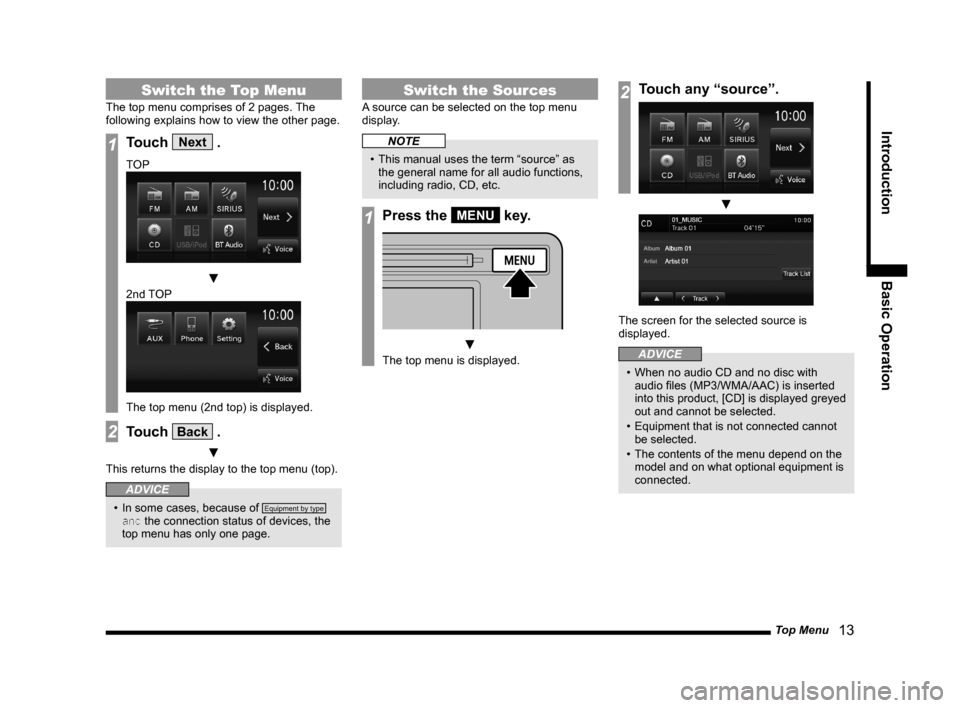
The top menu comprises of 2 pages. The
following explains how to view the other page.
1Touch Next .
TOP
▼
2nd TOP
The top menu (2nd top) is displayed.
2Touch Back .
▼
This returns the display to the top menu (top).
ADVICE
• In some cases, because of Equipment by type
and the connection status of devices, the
top menu has only one page.
Switch the Sources
A source can be selected on the top menu
display.
NOTE
• This manual uses the term “source” as the general name for all audio functions,
including radio, CD, etc.
1Press the MENU key.
▼
The top menu is displayed.
2Touch any “source”.
▼
The screen for the selected source is
displayed.
ADVICE
• When no audio CD and no disc with audio files (MP3/WMA/AAC) is inserted
into this product, [CD] is displayed greyed
out and cannot be selected.
• Equipment that is not connected cannot be selected.
• The contents of the menu depend on the model and on what optional equipment is
connected.
13MY_AVC(NAS).indb 132013/02/14 10:57:24
Page 14 of 88
14 Basic Operation
AV
The following explains audio function operations.
Audio Functions
Basic Operation
NOTE
• The album names, titles, etc. in the title information in pictures used with the
audio functions and related functions
of this manual were prepared for these
explanations. They have no relationship
whatsoever with actual title information.
Switch Audio ON/OFF
You can switch the audio function ON/OFF.
ADVICE
• Hold down the steering [MODE] key to also turn the audio function ON/OFF.
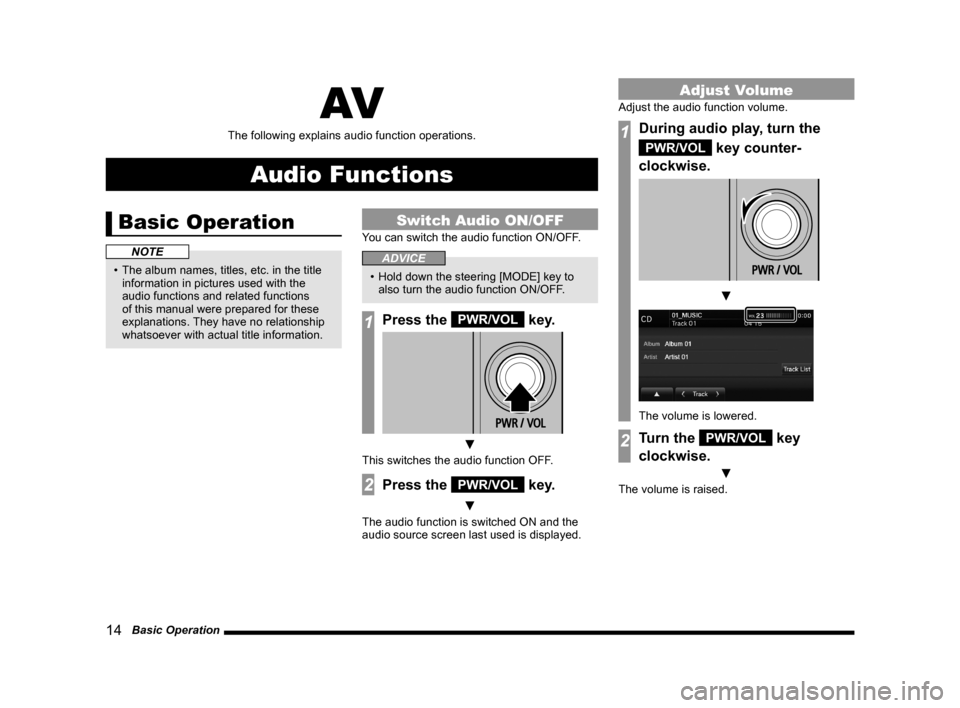
1Press the PWR/VOL key.
▼
This switches the audio function OFF.
2Press the PWR/VOL key.
▼
The audio function is switched ON and the
audio source screen last used is displayed.
Adjust Volume
Adjust the audio function volume.
1During audio play, turn the
PWR/VOL key counter-
clockwise.
▼
The volume is lowered.
2Turn the PWR/VOL key
clockwise.
▼
The volume is raised.
13MY_AVC(NAS).indb 142013/02/14 10:57:25
Page 19 of 88
Handling of Discs 19
AVAudio Functions
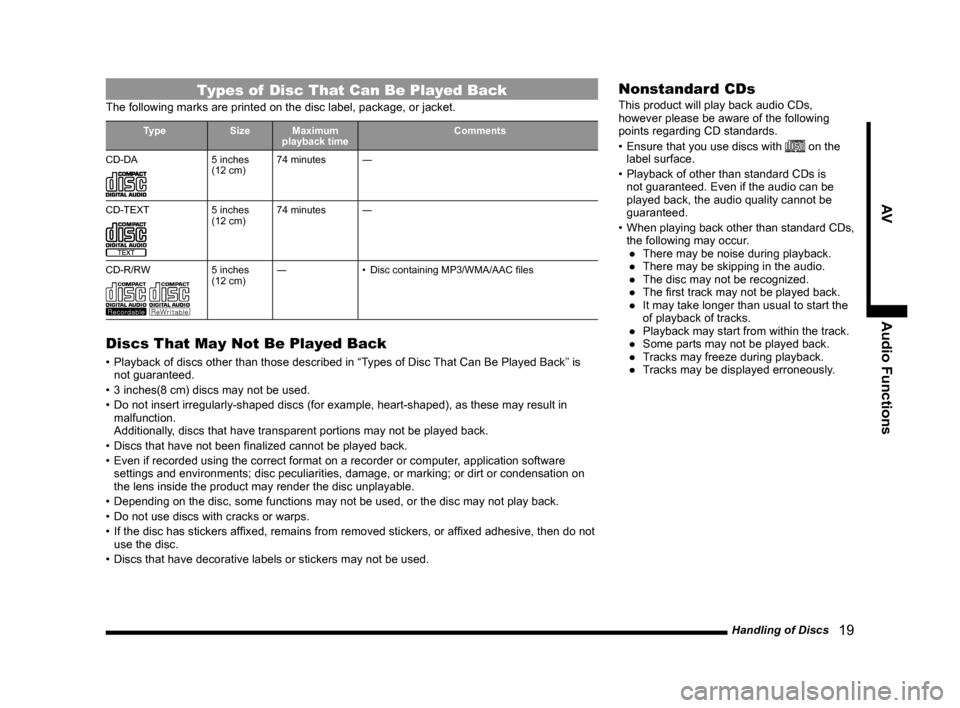
Types of Disc That Can Be Played Back
The following marks are printed on the disc label, package, or jacket.
Type SizeMaximum
playback time Comments
CD-DA
5 inches
(12 cm) 74 minutes
―
CD-TEXT
5 inches
(12 cm) 74 minutes
―
CD-R/RW
5 inches
(12 cm) ―
• Disc containing MP3/WMA/AAC files
Discs That May Not Be Played Back
• Playback of discs other than those described in “Types of Disc That Can Be Played Back” is
not guaranteed.
• 3 inches(8 cm) discs may not be used.
• Do not insert irregularly-shaped discs (for example, heart-shaped), as these may result in malfunction.
Additionally, discs that have transparent portions may not be played back.
• Discs that have not been finalized cannot be played back.
• Even if recorded using the correct format on a recorder or computer, application software settings and environments; disc peculiarities, damage, or marking; or di\
rt or condensation on
the lens inside the product may render the disc unplayable.
• Depending on the disc, some functions may not be used, or the disc may not play back.
• Do not use discs with cracks or warps.
• If the disc has stickers affixed, remains from removed stickers, or affixed adhesive, then do not use the disc.
• Discs that have decorative labels or stickers may not be used.
Nonstandard CDs
This product will play back audio CDs,
however please be aware of the following
points regarding CD standards.
• Ensure that you use discs with
on the
label surface.
• Playback of other than standard CDs is not guaranteed. Even if the audio can be
played back, the audio quality cannot be
guaranteed.
• When playing back other than standard CDs,
the following may occur. ● There may be noise during playback.
● There may be skipping in the audio.
● The disc may not be recognized.
● The first track may not be played back.
● It may take longer than usual to start the of playback of tracks.
● Playback may start from within the track.
● Some parts may not be played back.
● Tracks may freeze during playback.
● Tracks may be displayed erroneously.
13MY_AVC(NAS).indb 192013/02/14 10:57:28
Page 20 of 88
20 Audio Files (MP3/WMA/AAC)
Audio Files (MP3/
WMA/AAC)
This product can play back MP3/WMA/AAC
format audio files recorded on CD-ROM,
CD-R/RW, and USB devices.
There are limitations on the files and media
that can be used, therefore read the following
prior to recording MP3/WMA/AAC format
audio files on discs or USB devices.
Additionally, ensure you read the user
manuals for your CD-R/RW drive and the
writing software, and ensure these are used
correctly.
If the MP3/WMA/AAC format audio files
includes title information or other data, then
this can be displayed.
CAUTION
• Actions such as copying audio CDs or files and either distributing these to others
for free or for charge, or uploading files
via the Internet or other means to servers
is an infringement of the law.
• Do not append the file extensions “.mp3”, “.wma”, or “.m4a”, to other than MP3/
WMA/AAC format files. Playing back discs
with these types of files recorded upon
them may cause the files to be incorrectly
identified for playback, which may lead to
loud noise, resulting in speaker damage
or accident.
ADVICE
• Depending on the condition of the disc recorder or recording software used,
correct playback may not be possible. In
these cases, refer to the user manual for
your product or software.
• Depending on your computer's operating system, version, software, or settings,
files may not have a file extension
appended. In these cases, append the
file extensions “.mp3”, “.wma”, or “.m4a”
when copying the files.
• Files larger than 2GB in size cannot be played back.
• This product can also play back discs that
contain audio files in different formats,
MP3, WMA, and AAC.
13MY_AVC(NAS).indb 202013/02/14 10:57:28