lock MITSUBISHI LANCER 2014 8.G MMCS Manual
[x] Cancel search | Manufacturer: MITSUBISHI, Model Year: 2014, Model line: LANCER, Model: MITSUBISHI LANCER 2014 8.GPages: 226, PDF Size: 31.21 MB
Page 101 of 226
Listen to Satellite Radio 101
AVRadio
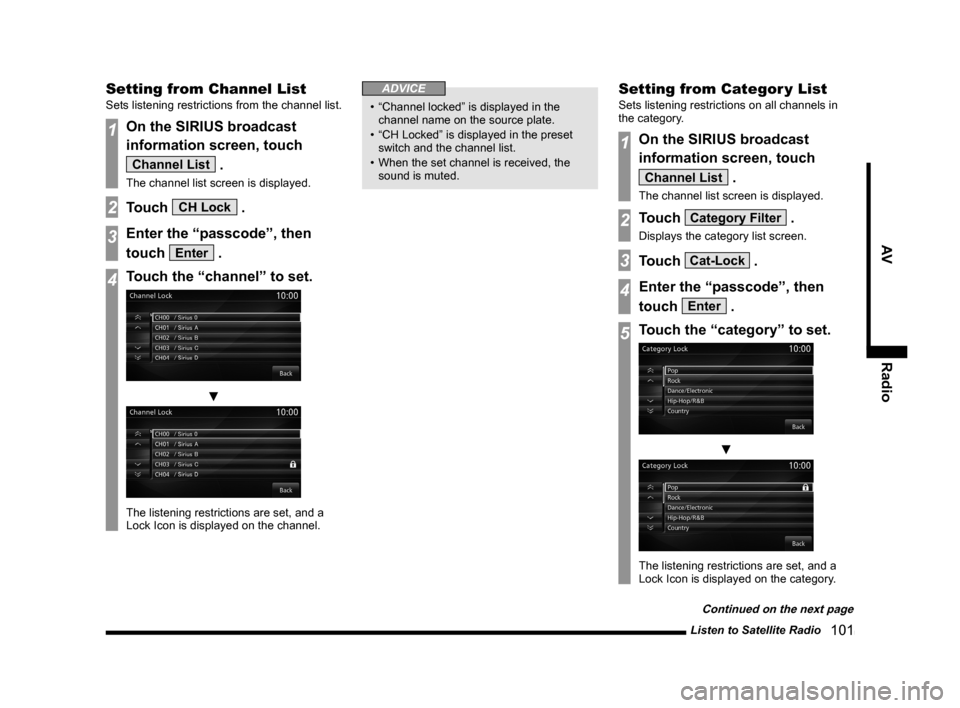
Setting from Channel List
Sets listening restrictions from the channel list.
1On the SIRIUS broadcast
information screen, touch
Channel List .
The channel list screen is displayed.
2Touch CH Lock .
3Enter the “passcode”, then
touch
Enter .
4Touch the “channel” to set.
▼
The listening restrictions are set, and a
Lock Icon is displayed on the channel.
ADVICE
• “Channel locked” is displayed in the
channel name on the source plate.
• “CH Locked” is displayed in the preset
switch and the channel list.
• When the set channel is received, the
sound is muted.
Setting from Categor y List
Sets listening restrictions on all channels in
the category.
1On the SIRIUS broadcast
information screen, touch
Channel List .
The channel list screen is displayed.
2Touch Category Filter .
Displays the category list screen.
3Touch Cat-Lock .
4Enter the “passcode”, then
touch
Enter .
5Touch the “category” to set.
▼
The listening restrictions are set, and a
Lock Icon is displayed on the category.
Continued on the next page
Page 102 of 226
102 Listen to Satellite Radio
ADVICE
• “Channel locked” is displayed in the
channel name on the source plate.
• “CH Locked” is displayed in the preset
switch and the channel list.
• When the set channel is received, the
sound is muted.
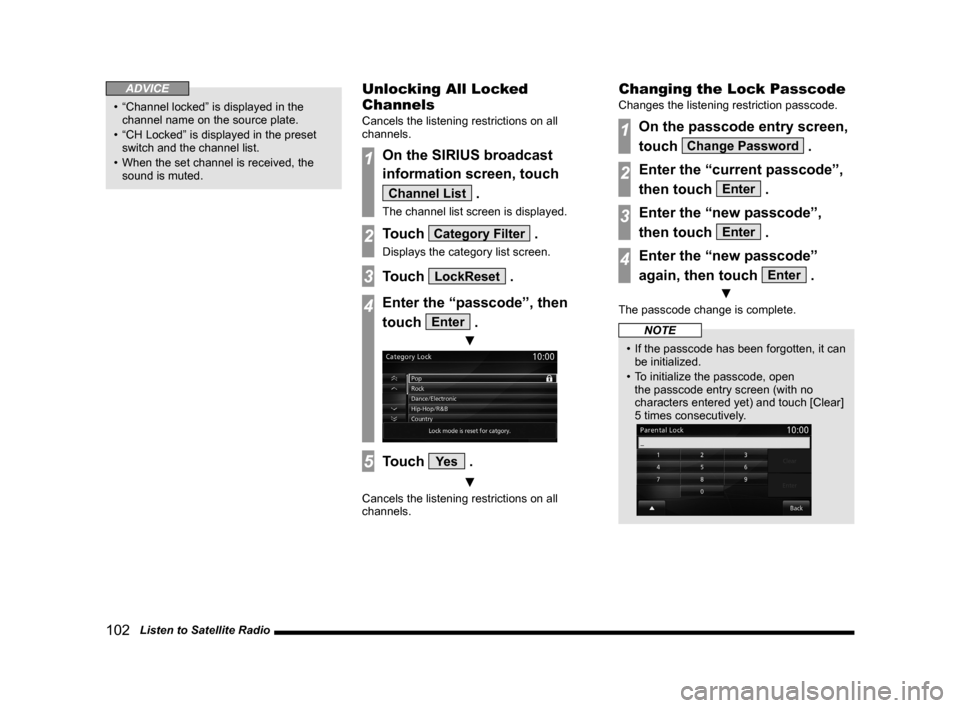
Unlocking All Locked
Channels
Cancels the listening restrictions on all
channels.
1On the SIRIUS broadcast
information screen, touch
Channel List .
The channel list screen is displayed.
2Touch Category Filter .
Displays the category list screen.
3Touch LockReset .
4Enter the “passcode”, then
touch
Enter .
▼
5Touch Ye s .
▼
Cancels the listening restrictions on all
channels.
Changing the Lock Passcode
Changes the listening restriction passcode.
1On the passcode entry screen,
touch
Change Password .
2Enter the “current passcode”,
then touch
Enter .
3Enter the “new passcode”,
then touch
Enter .
4Enter the “new passcode”
again, then touch
Enter .
▼
The passcode change is complete.
NOTE
• If the passcode has been forgotten, it can
be initialized.
• To initialize the passcode, open
the passcode entry screen (with no
characters entered yet) and touch [Clear]
5 times consecutively.
Page 143 of 226
Mobile Phone 143
INFO/SETTINGS INFO
Equipment by type
(Vehicles with a Bluetooth® 2.0 interface).
Mobile Phone
Connecting your mobile phone to this
product with Bluetooth lets you use the
hands-free function.
WARNING
• The driver should not hold the mobile
phone in their hand while driving.
• Do not leave your mobile phone
unattended in the vehicle. If your mobile
phone rolls underfoot when you stop
the vehicle or when you go around a
curve and it get under the brake pedal,
it can interfere with driving and cause an
accident.
Connect Your Mobile Phone
This product and your mobile phone use the
Bluetooth function to connect.
For details on how to connect, refer to
“Bluetooth Setting”(P209).
Operation methods below describe situations
once connection has been completed.
NOTE
• This requires a mobile phone that can be
connected to the Bluetooth.
• For the equipment supported, refer to the
vehicle's user manual.
• Cancel functions such as the mobile
phone “dial lock”, and connect while on
the standby screen.
• Some equipment cannot be connected.
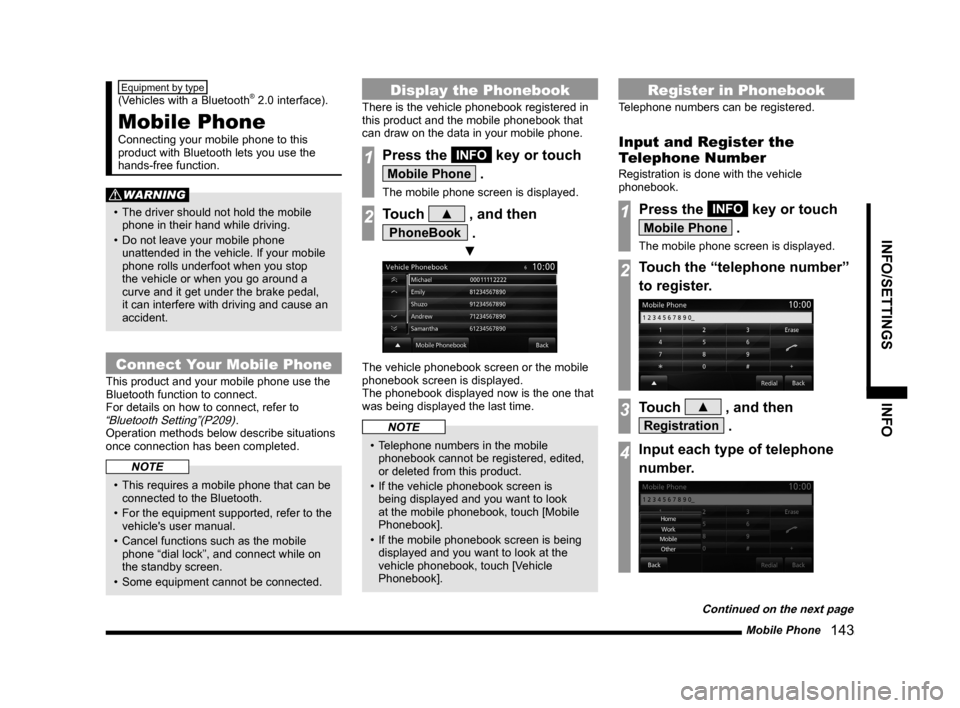
Display the Phonebook
There is the vehicle phonebook registered in
this product and the mobile phonebook that
can draw on the data in your mobile phone.
1Press the INFO key or touch
Mobile Phone .
The mobile phone screen is displayed.
2Touch ▲ , and then
PhoneBook .
▼
The vehicle phonebook screen or the mobile
phonebook screen is displayed.
The phonebook displayed now is the one that
was being displayed the last time.
NOTE
• Telephone numbers in the mobile
phonebook cannot be registered, edited,
or deleted from this product.
• If the vehicle phonebook screen is
being displayed and you want to look
at the mobile phonebook, touch [Mobile
Phonebook].
• If the mobile phonebook screen is being
displayed and you want to look at the
vehicle phonebook, touch [Vehicle
Phonebook].
Register in Phonebook
Telephone numbers can be registered.
Input and Register the
Telephone Number
Registration is done with the vehicle
phonebook.
1Press the INFO key or touch
Mobile Phone .
The mobile phone screen is displayed.
2Touch the “telephone number”
to register.
3Touch ▲ , and then
Registration .
4Input each type of telephone
number.
Continued on the next page
Page 149 of 226
Mobile Phone 149
INFO/SETTINGS INFO
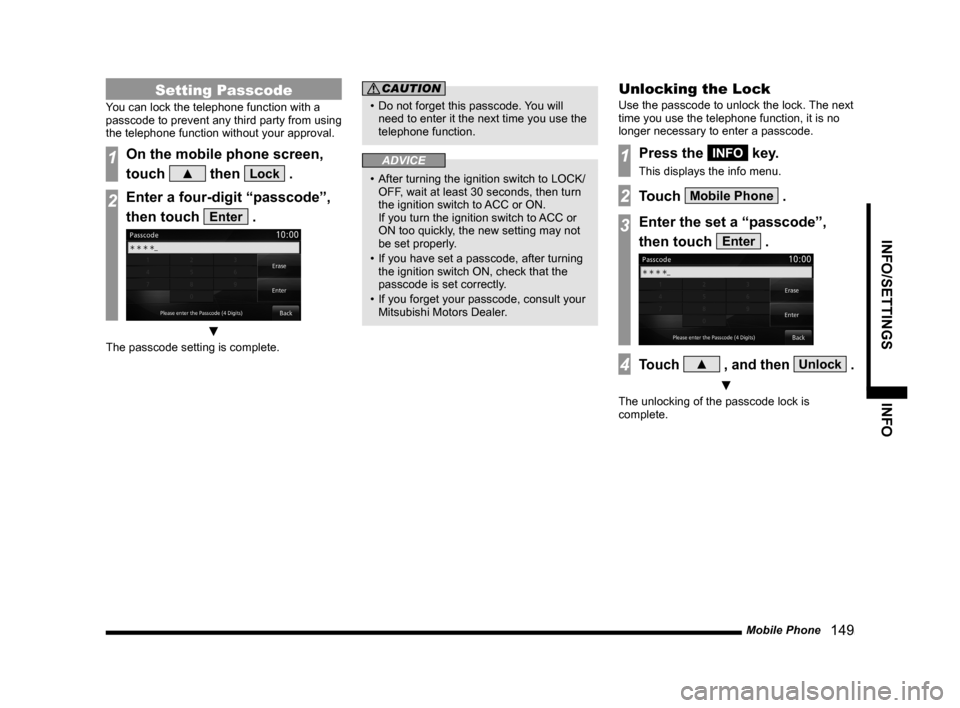
Setting Passcode
You can lock the telephone function with a
passcode to prevent any third party from using
the telephone function without your approval.
1On the mobile phone screen,
touch
▲ then Lock .
2Enter a four-digit “passcode”,
then touch
Enter .
▼
The passcode setting is complete.
CAUTION
• Do not forget this passcode. You will
need to enter it the next time you use the
telephone function.
ADVICE
• After turning the ignition switch to LOCK/
OFF, wait at least 30 seconds, then turn
the ignition switch to ACC or ON.
If you turn the ignition switch to ACC or
ON too quickly, the new setting may not
be set properly.
• If you have set a passcode, after turning
the ignition switch ON, check that the
passcode is set correctly.
• If you forget your passcode, consult your
Mitsubishi Motors Dealer.
Unlocking the Lock
Use the passcode to unlock the lock. The next
time you use the telephone function, it is no
longer necessary to enter a passcode.
1Press the INFO key.
This displays the info menu.
2Touch Mobile Phone .
3Enter the set a “passcode”,
then touch
Enter .
4Touch ▲ , and then Unlock .
▼
The unlocking of the passcode lock is
complete.
Page 183 of 226
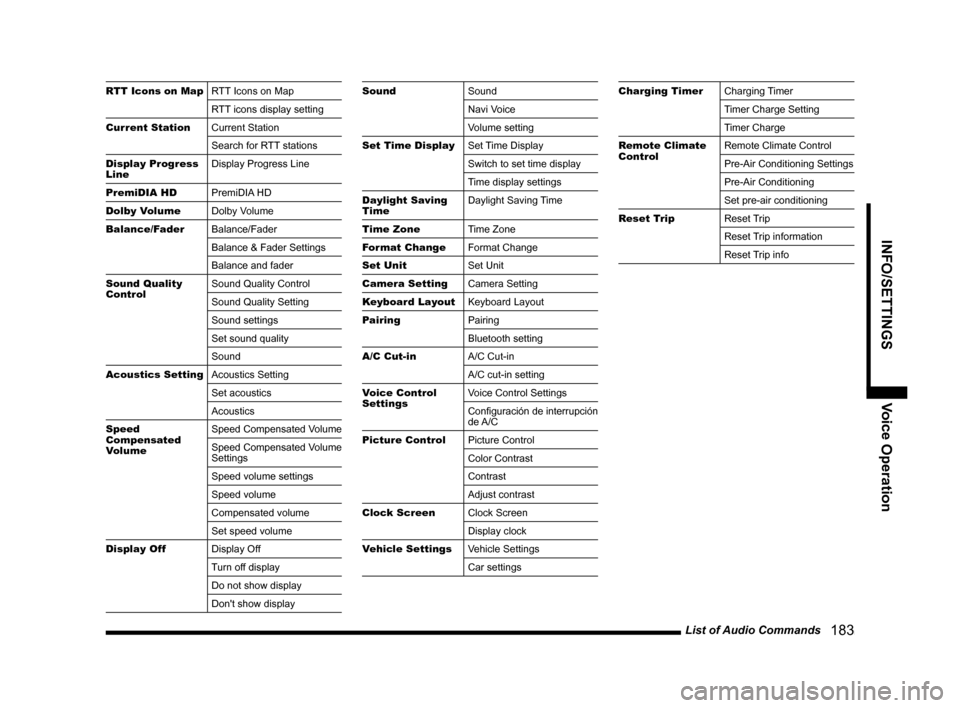
List of Audio Commands 183
INFO/SETTINGSVoice Operation
RTT Icons on MapRTT Icons on Map
RTT icons display setting
Current Station Current Station
Search for RTT stations
Display Progress
Line Display Progress Line
PremiDIA HD PremiDIA HD
Dolby Volume Dolby Volume
Balance/Fader Balance/Fader
Balance & Fader Settings
Balance and fader
Sound Quality
Control Sound Quality Control
Sound Quality Setting
Sound settings
Set sound quality
Sound
Acoustics Setting Acoustics Setting
Set acoustics
Acoustics
Speed
Compensated
Volume Speed Compensated Volume
Speed Compensated Volume
Settings
Speed volume settings
Speed volume
Compensated volume
Set speed volume
Display Off Display Off
Turn off display
Do not show display
Don't show displaySoundSound
Navi Voice
Volume setting
Set Time Display Set Time Display
Switch to set time display
Time display settings
Daylight Saving
Time Daylight Saving Time
Time Zone Time Zone
Format Change Format Change
Set Unit Set Unit
Camera Setting Camera Setting
Keyboard Layout Keyboard Layout
Pairing Pairing
Bluetooth setting
A/C Cut-in A/C Cut-in
A/C cut-in setting
Voice Control
Settings Voice Control Settings
Configuración de interrupción
de A/C
Picture Control Picture Control
Color Contrast
Contrast
Adjust contrast
Clock Screen Clock Screen
Display clock
Vehicle Settings Vehicle Settings
Car settingsCharging TimerCharging Timer
Timer Charge Setting
Timer Charge
Remote Climate
Control Remote Climate Control
Pre-Air Conditioning Settings
Pre-Air Conditioning
Set pre-air conditioning
Reset Trip Reset Trip
Reset Trip information
Reset Trip info
Page 210 of 226
210 System Settings
NOTE
• This function can be used on vehicles
equipped with a Bluetooth® 2.0 interface.
• Cancel functions such as the mobile
phone “dial lock”, and connect while on
the standby screen.
• While connected, operations on the
Bluetooth device (receiving calls, etc.)
may not function correctly.
• For details on how to enter the passkey
for your Bluetooth device, refer to its user
manual.
• The connection fails sometimes. Register
again.
• Depending on the distance between this
product and your Bluetooth device, the
conditions within the vehicle, and types
of screening, connection may not be
possible. In this case, put your Bluetooth
as close as possible to this product.
• Even though a device is Bluetooth-
capable, its characteristics and
specifications may mean that correct
operation is not possible.
• Some Bluetooth devices cannot be
connected.
• Depending on the Bluetooth device,
connecting may take some time.
• Up to 7 Bluetooth devices can be
registered.
If 7 devices are already registered, you
must delete one before you can register
a new Bluetooth device.
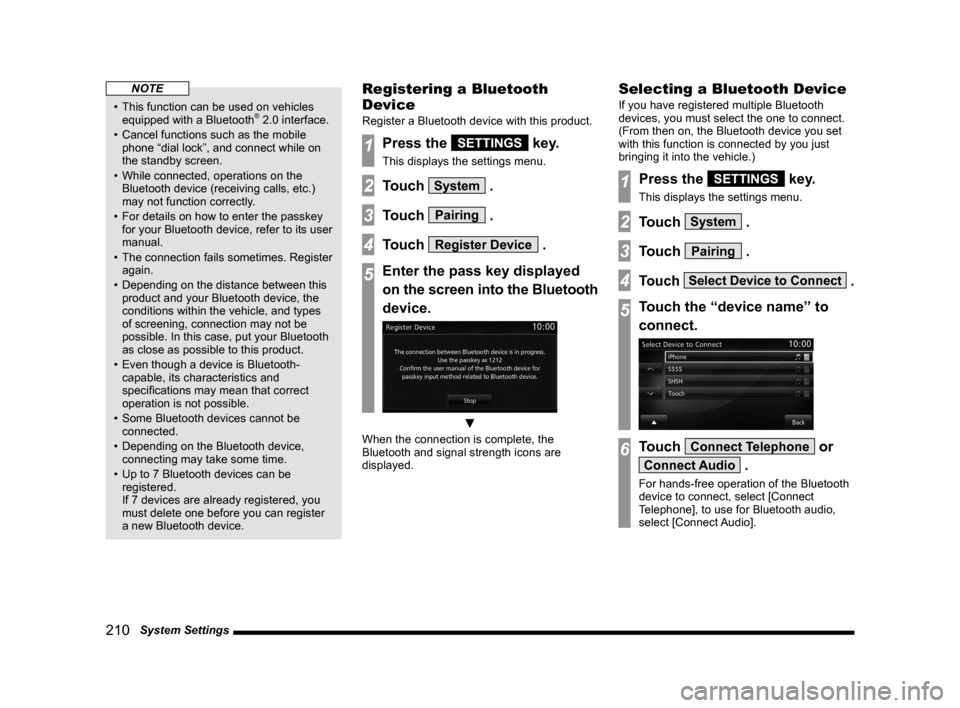
Registering a Bluetooth
Device
Register a Bluetooth device with this product.
1Press the SETTINGS key.
This displays the settings menu.
2Touch System .
3Touch Pairing .
4Touch Register Device .
5Enter the pass key displayed
on the screen into the Bluetooth
device.
▼
When the connection is complete, the
Bluetooth and signal strength icons are
displayed.
Selecting a Bluetooth Device
If you have registered multiple Bluetooth
devices, you must select the one to connect.
(From then on, the Bluetooth device you set
with this function is connected by you just
bringing it into the vehicle.)
1Press the SETTINGS key.
This displays the settings menu.
2Touch System .
3Touch Pairing .
4Touch Select Device to Connect .
5Touch the “device name” to
connect.
6Touch Connect Telephone or
Connect Audio .
For hands-free operation of the Bluetooth
device to connect, select [Connect
Telephone], to use for Bluetooth audio,
select [Connect Audio].
Page 211 of 226
System Settings 2 11
INFO/SETTINGS SETTINGS
7Touch Connect .
▼
This completes selection of the Bluetooth
device.
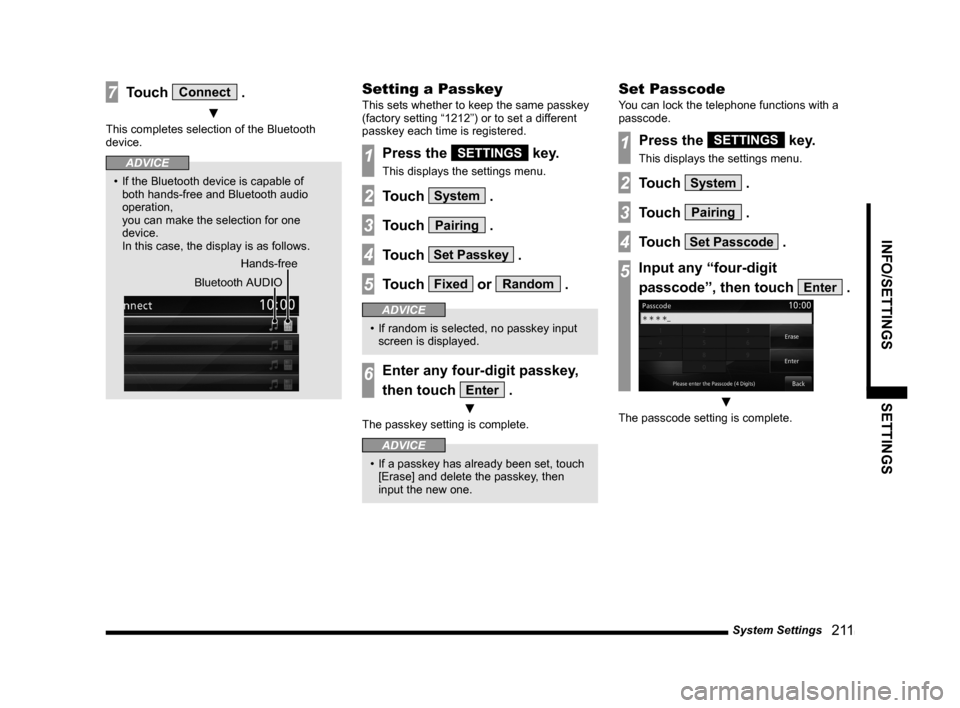
ADVICE
• If the Bluetooth device is capable of
both hands-free and Bluetooth audio
operation,
you can make the selection for one
device.
In this case, the display is as follows.
Hands-free
Bluetooth AUDIO
Setting a Passkey
This sets whether to keep the same passkey
(factory setting “1212”) or to set a different
passkey each time is registered.
1Press the SETTINGS key.
This displays the settings menu.
2Touch System .
3Touch Pairing .
4Touch Set Passkey .
5Touch Fixed or Random .
ADVICE
• If random is selected, no passkey input
screen is displayed.
6Enter any four-digit passkey,
then touch
Enter .
▼
The passkey setting is complete.
ADVICE
• If a passkey has already been set, touch
[Erase] and delete the passkey, then
input the new one.
Set Passcode
You can lock the telephone functions with a
passcode.
1Press the SETTINGS key.
This displays the settings menu.
2Touch System .
3Touch Pairing .
4Touch Set Passcode .
5Input any “four-digit
passcode”, then touch
Enter .
▼
The passcode setting is complete.
Page 214 of 226
214 Other Settings
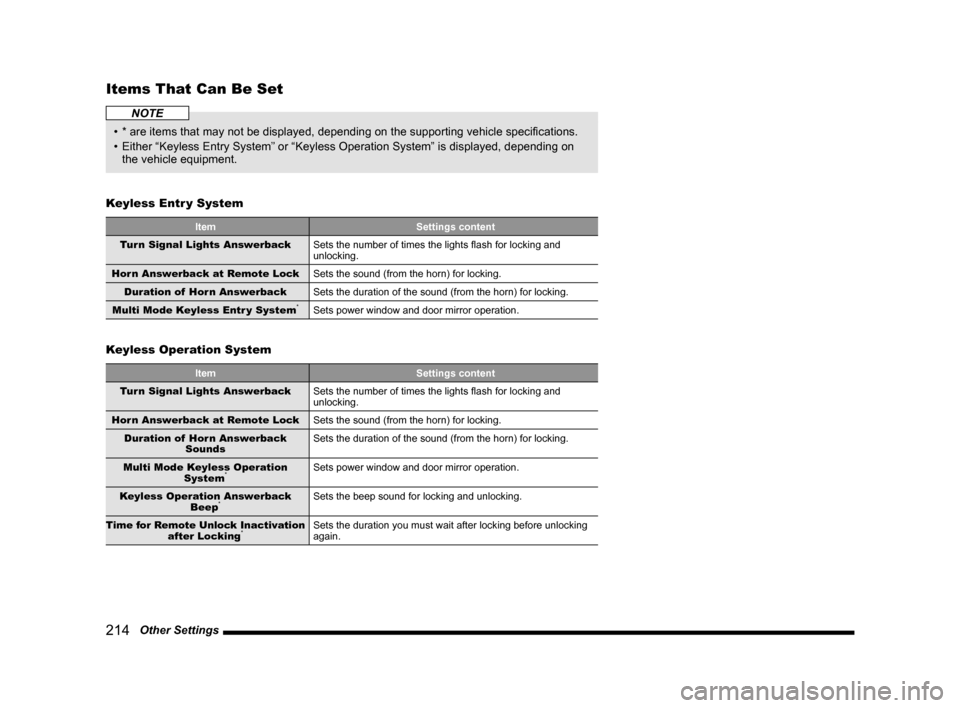
Items That Can Be Set
NOTE
• * are items that may not be displayed, depending on the supporting vehicle specifications.
• Either “Keyless Entry System” or “Keyless Operation System” is displayed, depending on
the vehicle equipment.
Keyless Entr y System
Item Settings content
Turn Signal Lights Answerback Sets the number of times the lights flash for locking and
unlocking.
Horn Answerback at Remote Lock Sets the sound (from the horn) for locking.
Duration of Horn Answerback Sets the duration of the sound (from the horn) for locking.
Multi Mode Keyless Entr y System
*Sets power window and door mirror operation.
Keyless Operation System
Item Settings content
Turn Signal Lights Answerback Sets the number of times the lights flash for locking and
unlocking.
Horn Answerback at Remote Lock Sets the sound (from the horn) for locking.
Duration of Horn Answerback Sounds Sets the duration of the sound (from the horn) for locking.
Multi Mode Keyless Operation System
*Sets power window and door mirror operation.
Keyless Operation Answerback Beep
*Sets the beep sound for locking and unlocking.
Time for Remote Unlock Inactivation after Locking
*Sets the duration you must wait after locking before unlocking
again.
Page 215 of 226
Other Settings 215
INFO/SETTINGS SETTINGS
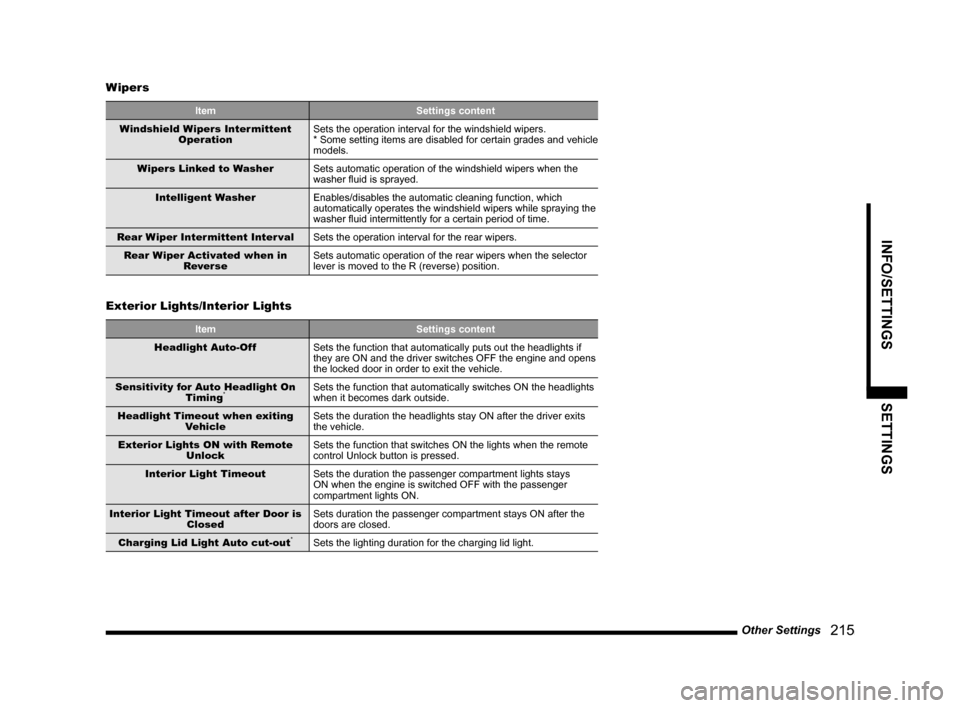
Wipers
Item Settings content
Windshield Wipers Intermittent Operation Sets the operation interval for the windshield wipers.
* Some setting items are disabled for certain grades and vehicle
models.
Wipers Linked to Washer Sets automatic operation of the windshield wipers when the
washer fluid is sprayed.
Intelligent Washer Enables/disables the automatic cleaning function, which
automatically operates the windshield wipers while spraying the
washer fluid intermittently for a certain period of time.
Rear Wiper Intermittent Inter val Sets the operation interval for the rear wipers.
Rear Wiper Activated when in Rever se Sets automatic operation of the rear wipers when the selector
lever is moved to the R (reverse) position.
Exterior Lights/Interior Lights
Item
Settings content
Headlight Auto-Off Sets the function that automatically puts out the headlights if
they are ON and the driver switches OFF the engine and opens
the locked door in order to exit the vehicle.
Sensitivity for Auto Headlight On Timing
*Sets the function that automatically switches ON the headlights
when it becomes dark outside.
Headlight Timeout when exiting Vehicle Sets the duration the headlights stay ON after the driver exits
the vehicle.
Exterior Lights ON with Remote Unlock Sets the function that switches ON the lights when the remote
control Unlock button is pressed.
Interior Light Timeout Sets the duration the passenger compartment lights stays
ON when the engine is switched OFF with the passenger
compartment lights ON.
Interior Light Timeout after Door is Closed Sets duration the passenger compartment stays ON after the
doors are closed.
Charging Lid Light Auto cut-out
*Sets the lighting duration for the charging lid light.
Page 216 of 226
216 Other Settings
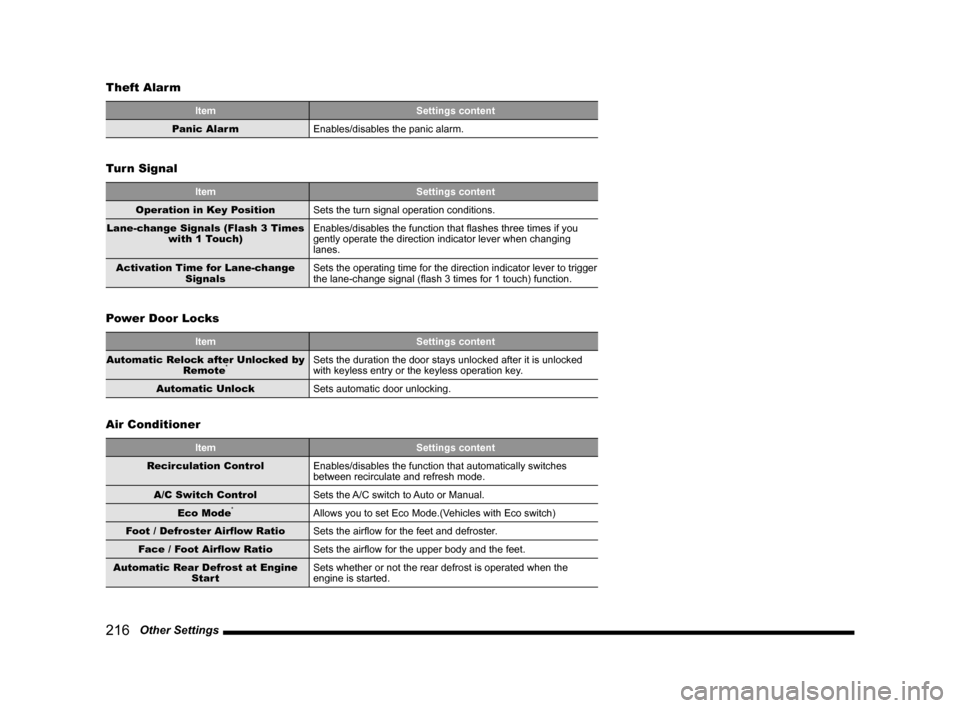
Theft Alarm
Item
Settings content
Panic Alarm Enables/disables the panic alarm.
Turn Signal
Item Settings content
Operation in Key Position Sets the turn signal operation conditions.
Lane-change Signals (Flash 3 Times with 1 Touch) Enables/disables the function that flashes three times if you
gently operate the direction indicator lever when changing
lanes.
Activation Time for Lane-change Signals Sets the operating time for the direction indicator lever to trigger
the lane-change signal (flash 3 times for 1 touch) function.
Power Door Locks
Item
Settings content
Automatic Relock after Unlocked by Remote
*Sets the duration the door stays unlocked after it is unlocked
with keyless entry or the keyless operation key.
Automatic Unlock Sets automatic door unlocking.
Air Conditioner
Item Settings content
Recirculation Control Enables/disables the function that automatically switches
between recirculate and refresh mode.
A/C Switch Control Sets the A/C switch to Auto or Manual.
Eco Mode
*Allows you to set Eco Mode.(Vehicles with Eco switch)
Foot / Defroster Airflow Ratio Sets the airflow for the feet and defroster.
Face / Foot Airflow Ratio Sets the airflow for the upper body and the feet.
Automatic Rear Defrost at Engine Start Sets whether or not the rear defrost is operated when the
engine is started.