change time MITSUBISHI LANCER 2014 8.G MMCS Manual
[x] Cancel search | Manufacturer: MITSUBISHI, Model Year: 2014, Model line: LANCER, Model: MITSUBISHI LANCER 2014 8.GPages: 226, PDF Size: 31.21 MB
Page 123 of 226
Use Bluetooth Audio 123
AVExternal Input Devices
External Input Devices
Equipment by type
(Vehicles with a Bluetooth® 2.0 interface).
Use Bluetooth Audio
This product can play back tracks on
commercially-available Bluetooth-capable
audio devices.
CAUTION
• Never hold a Bluetooth-capable audio
device in your hand to operate while
driving, as this is dangerous.
• Do not leave the Bluetooth audio device
unattended in the vehicle.
• No indemnification for Bluetooth audio
data loss will be possible.
• Depending on how the devices are
handled, audio files being damaged or
lost, therefore it is recommended that
data be backed up.
NOTE
• Depending on the type of Bluetooth-
capable audio devices, usage may not be
possible, or functions that can be used
may be restricted.
• Updating your software sometimes
changes the functions that can be used
connected with this product.
NOTE
• Confirm together with the user manuals
for the commercially-available Bluetooth-
capable audio devices.
• Depending on the type of Bluetooth-
capable audio devices, volume levels
may differ. There is the danger of
loud volumes, so prior to use, it is
recommended that you turn the volume
down.
→“Adjust Volume”(P79)
• Depending on the status of the Bluetooth
audio device, it may take some time until
the device is recognized, or playback
starts.
• Bluetooth audio device specifications
and settings may mean that connection
is not possible, or result in differences in
operation or display.
• Depending on audio data in the Bluetooth
audio device, track information may not
be displayed correctly.
• Depending on the status of the vehicle
and device, the iPod/iPhone may not play
back after starting the engine.
• Data containing copyright information
may not play back.
• It is recommended that the Bluetooth
audio device equalizer settings be set to
flat.
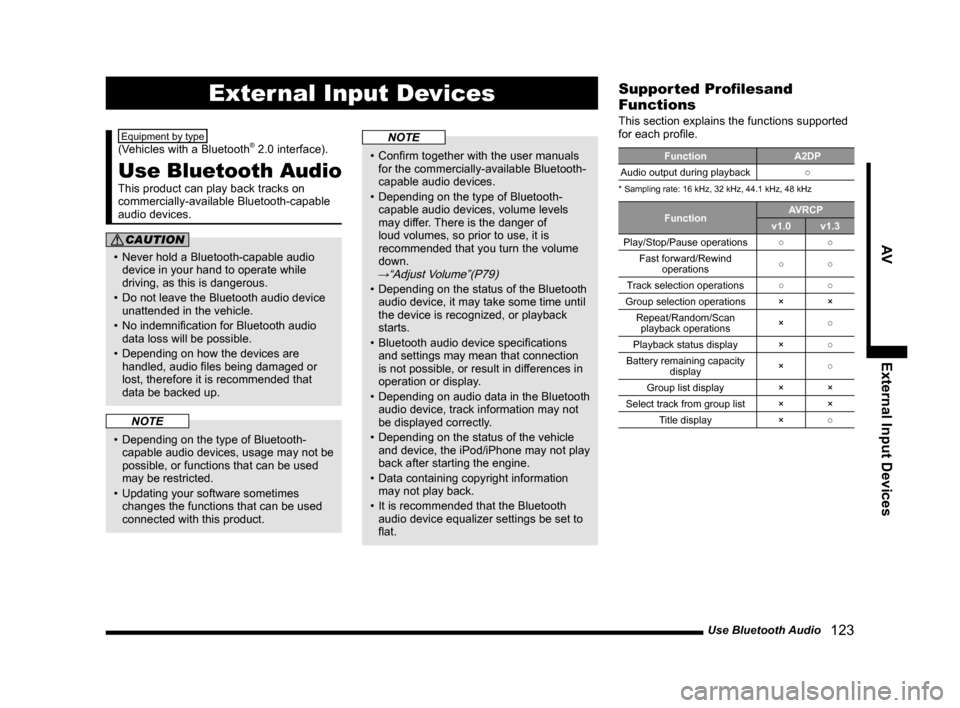
Supported Profilesand
Functions
This section explains the functions supported
for each profile.
Function A2DP
Audio output during playback ○
* Sampling rate: 16 kHz, 32 kHz, 44.1 kHz, 48 kHz
Function AVRCP
v1.0 v1.3
Play/Stop/Pause operations ○○
Fast forward/Rewind operations ○
○
Track selection operations ○○
Group selection operations ××
Repeat/Random/Scan playback operations ×
○
Playback status display ×○
Battery remaining capacity display ×
○
Group list display ××
Select track from group list ××
Title display ×○
Page 125 of 226
Use Bluetooth Audio 125
AVExternal Input Devices
Display Contents
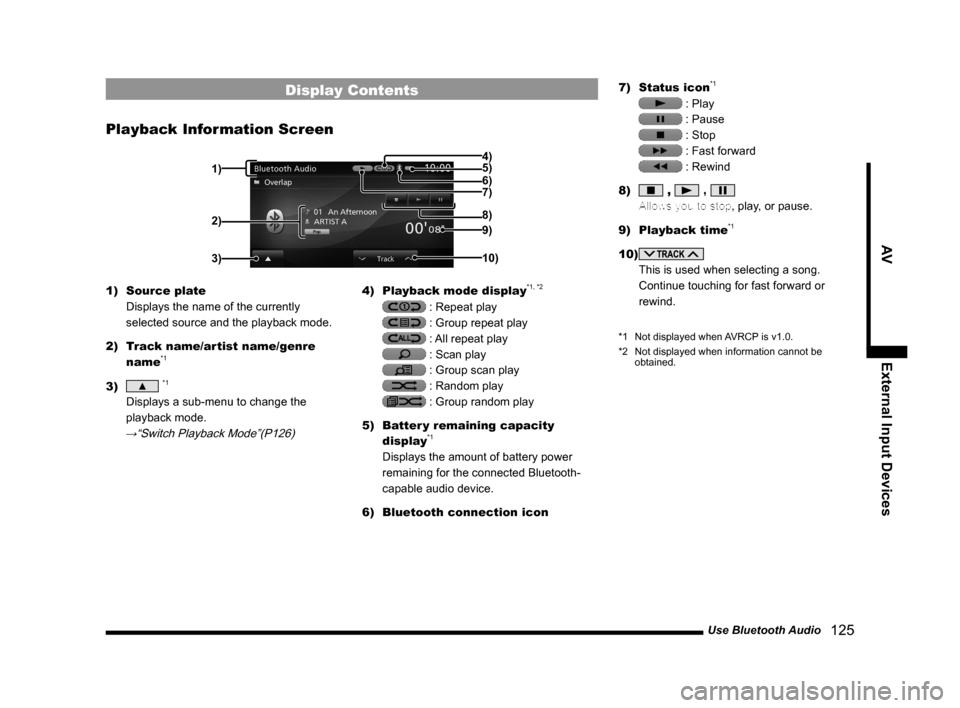
Playback Information Screen
2)
3)
4)
5)
6)
7)
9)
10) 8)
1)
1) Source plate
Displays the name of the currently
selected source and the playback mode.
2) Track name/artist name/genre
name
*1
3) ▲ *1
Displays a sub-menu to change the
playback mode.
→“Switch Playback Mode”(P126)
4) Playback mode display*1, *2
: Repeat play
: Group repeat play
: All repeat play
: Scan play
: Group scan play
: Random play
: Group random play
5) Batter y remaining capacity
display
*1
Displays the amount of battery power
remaining for the connected Bluetooth-
capable audio device.
6) Bluetooth connection icon 7)
Status icon
*1
: Play
: Pause
: Stop
: Fast forward
: Rewind
8)
, ,
Allows you to stop, play, or pause.
9) Playback time
*1
10)
This is used when selecting a song.
Continue touching for fast forward or
rewind.
*1 Not displayed when AVRCP is v1.0.
*2 Not displayed when information cannot be
obtained.
Page 126 of 226
126 Use Bluetooth Audio
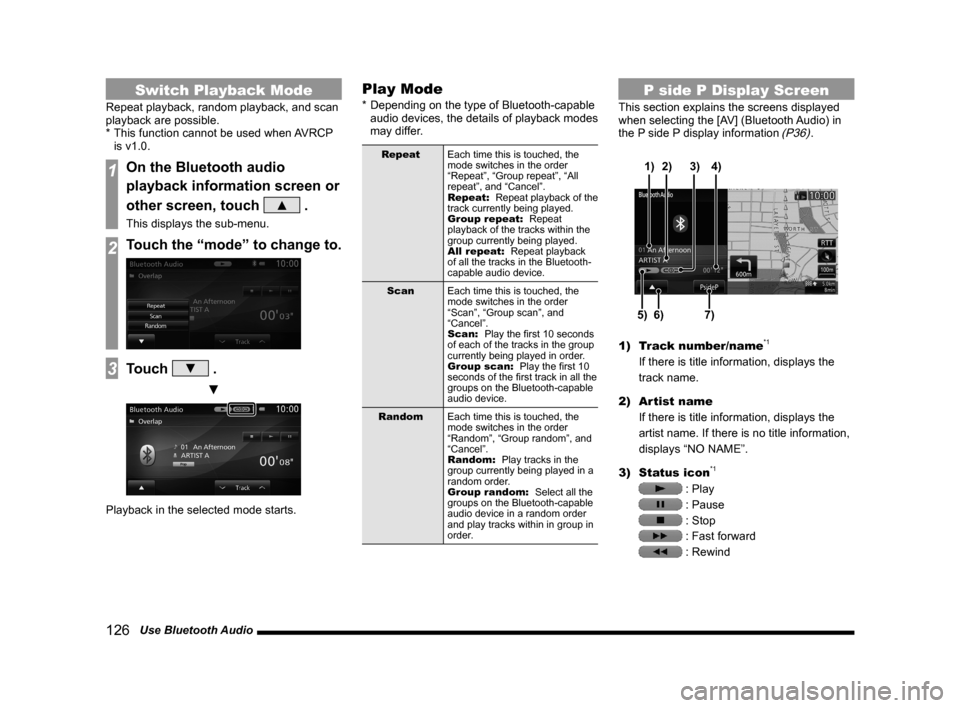
Switch Playback Mode
Repeat playback, random playback, and scan
playback are possible.
* This function cannot be used when AVRCP
is v1.0.
1On the Bluetooth audio
playback information screen or
other screen, touch
▲ .
This displays the sub-menu.
2Touch the “mode” to change to.
3Touch ▼ .
▼
Playback in the selected mode starts.
Play Mode
* Depending on the type of Bluetooth-capable
audio devices, the details of playback modes
may differ.
Repeat Each time this is touched, the
mode switches in the order
“Repeat”, “Group repeat”, “All
repeat”, and “Cancel”.
Repeat: Repeat playback of the
track currently being played.
Group repeat: Repeat
playback of the tracks within the
group currently being played.
All repeat: Repeat playback
of all the tracks in the Bluetooth-
capable audio device.
Scan Each time this is touched, the
mode switches in the order
“Scan”, “Group scan”, and
“Cancel”.
Scan: Play the first 10 seconds
of each of the tracks in the group
currently being played in order.
Group scan: Play the first 10
seconds of the first track in all the
groups on the Bluetooth-capable
audio device.
Random Each time this is touched, the
mode switches in the order
“Random”, “Group random”, and
“Cancel”.
Random: Play tracks in the
group currently being played in a
random order.
Group random: Select all the
groups on the Bluetooth-capable
audio device in a random order
and play tracks within in group in
order.
P side P Display Screen
This section explains the screens displayed
when selecting the [AV] (Bluetooth Audio) in
the P side P display information
(P36).
6)5)7)
3)
2)
4)
1)
1) Track number/name*1
If there is title information, displays the
track name.
2) Artist name
If there is title information, displays the
artist name. If there is no title information,
displays “NO NAME”.
3) Status icon
*1
: Play
: Pause
: Stop
: Fast forward
: Rewind
Page 127 of 226
Use Bluetooth Audio 127
AVExternal Input Devices
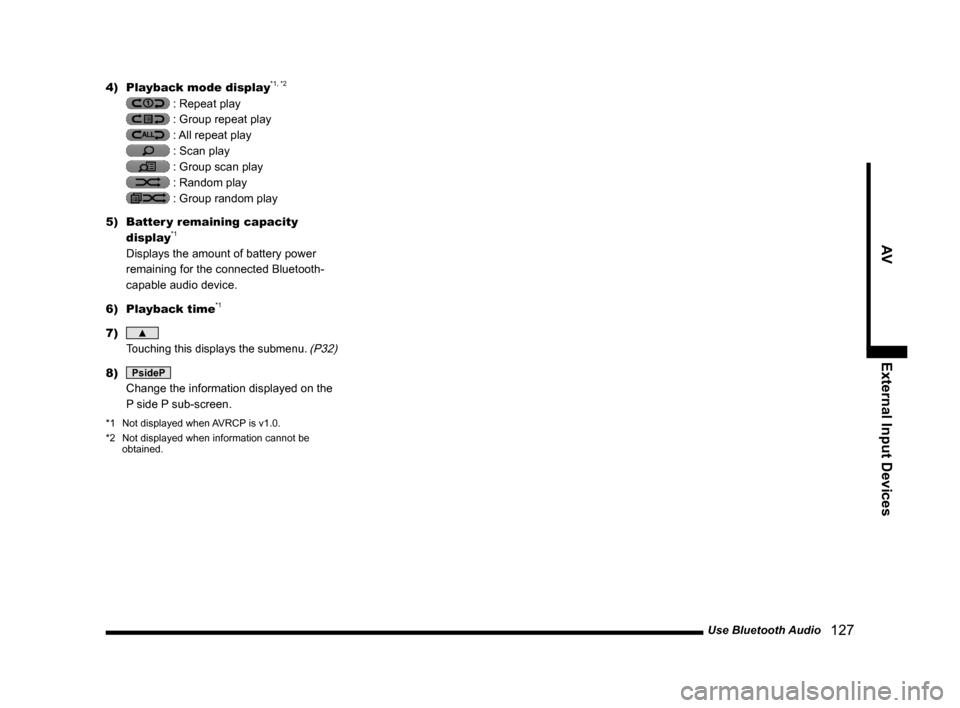
4) Playback mode display*1, *2
: Repeat play
: Group repeat play
: All repeat play
: Scan play
: Group scan play
: Random play
: Group random play
5) Batter y remaining capacity
display
*1
Displays the amount of battery power
remaining for the connected Bluetooth-
capable audio device.
6) Playback time
*1
7) ▲
Touching this displays the submenu. (P32)
8) PsideP
Change the information displayed on the
P side P sub-screen.
*1 Not displayed when AVRCP is v1.0.
*2 Not displayed when information cannot be
obtained.
Page 136 of 226
136 Trip
Equipment by type
Trip
You can check and set trip information.
Displaying
1Press the INFO key.
This displays the info menu.
2Touch Trip .
▼
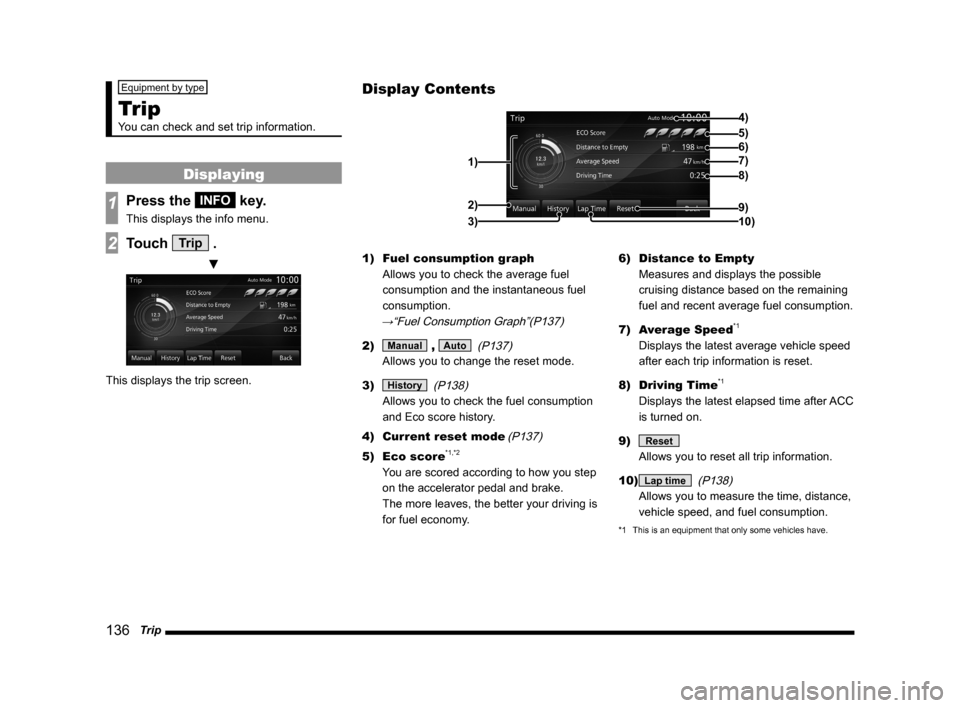
This displays the trip screen. 1)
Fuel consumption graph
Allows you to check the average fuel
consumption and the instantaneous fuel
consumption.
→“Fuel Consumption Graph”(P137)
2) Manual , Auto (P137)
Allows you to change the reset mode.
3)
History (P138)
Allows you to check the fuel consumption
and Eco score history.
4) Current reset mode
(P137)
5) Eco score*1,*2
You are scored according to how you step
on the accelerator pedal and brake.
The more leaves, the better your driving is
for fuel economy. 6)
Distance to Empty
Measures and displays the possible
cruising distance based on the remaining
fuel and recent average fuel consumption.
7) Average Speed
*1
Displays the latest average vehicle speed
after each trip information is reset.
8) Driving Time
*1
Displays the latest elapsed time after ACC
is turned on.
9)
Reset
Allows you to reset all trip information.
10)
Lap time (P138)
Allows you to measure the time, distance,
vehicle speed, and fuel consumption.
*1 This is an equipment that only some vehicles have.
Display Contents
4)
6)5)
7)
8)
9)
10)
1)2)
3)
Page 138 of 226
138 Trip
Check the Histor y
You can check the fuel consumption and Eco
score history.*1
1On the trip screen,
touch
History .
▼
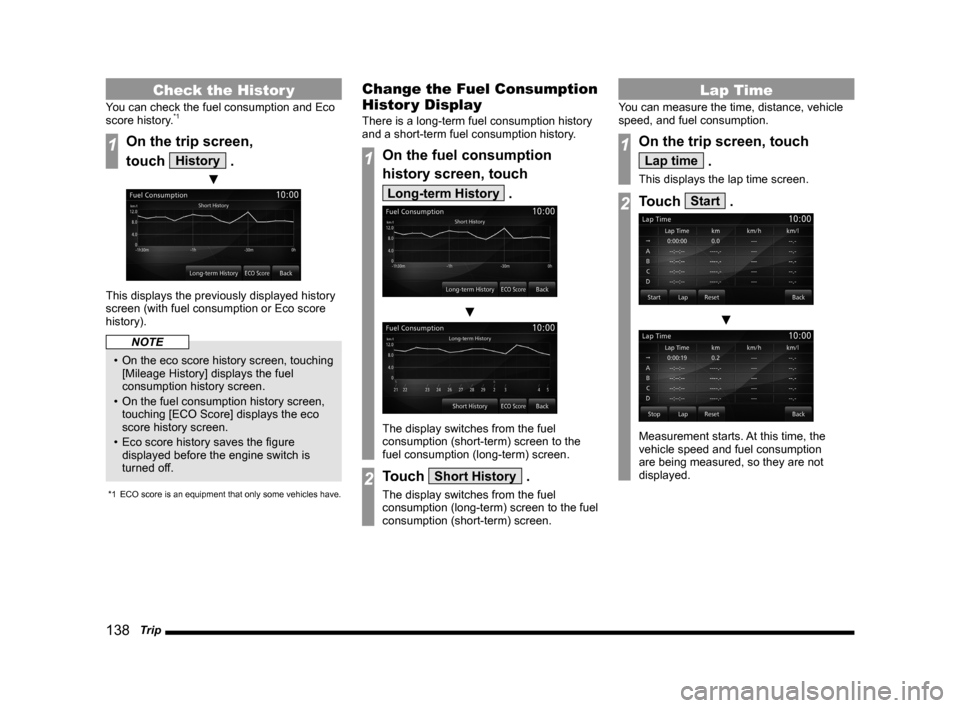
This displays the previously displayed history
screen (with fuel consumption or Eco score
history).
NOTE
• On the eco score history screen, touching
[Mileage History] displays the fuel
consumption history screen.
• On the fuel consumption history screen,
touching [ECO Score] displays the eco
score history screen.
• Eco score history saves the figure
displayed before the engine switch is
turned off.
*1 ECO score is an equipment that only some vehicles have.
Change the Fuel Consumption
Histor y Display
There is a long-term fuel consumption history
and a short-term fuel consumption history.
1On the fuel consumption
history screen, touch
Long-term History .
▼
The display switches from the fuel
consumption (short-term) screen to the
fuel consumption (long-term) screen.
2Touch Short History .
The display switches from the fuel
consumption (long-term) screen to the fuel
consumption (short-term) screen.
Lap Time
You can measure the time, distance, vehicle
speed, and fuel consumption.
1On the trip screen, touch
Lap time .
This displays the lap time screen.
2Touch Start .
▼
Measurement starts. At this time, the
vehicle speed and fuel consumption
are being measured, so they are not
displayed.
Page 151 of 226
Environment 151
INFO/SETTINGS INFO
Equipment by type
Environment
You can check the altitude, air pressure,
and outside temperature.
Displaying
1Press the INFO key.
This displays the info menu.
2Touch Environment .
▼
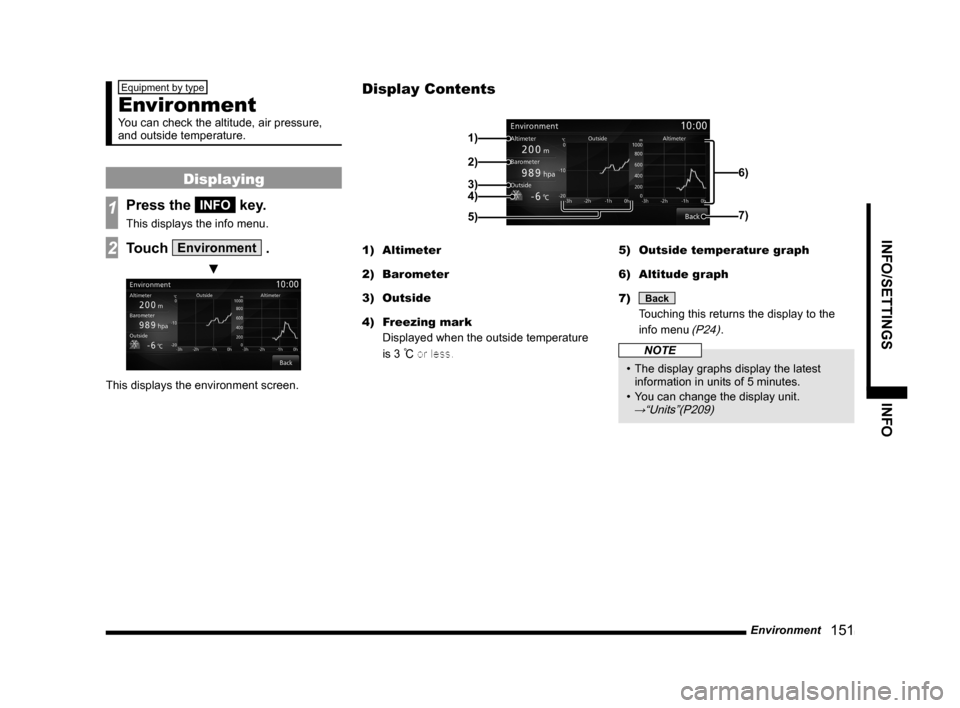
This displays the environment screen. 1) Altimeter
2) Barometer
3) Outside
4)
Freezing mark
Displayed when the outside temperature
is 3
°C or less. 5)
Outside temperature graph
6) Altitude graph
7)
Back
Touching this returns the display to the
info menu
(P24).
NOTE
• The display graphs display the latest
information in units of 5 minutes.
• You can change the display unit.
→“Units”(P209)
Display Contents
2)
3)4) 1)
6)
7)
5)
Page 153 of 226
Maintenance 153
INFO/SETTINGS INFO
Display Contents
2)
3)
4) 1)
9)
8)
7) 6) 5)
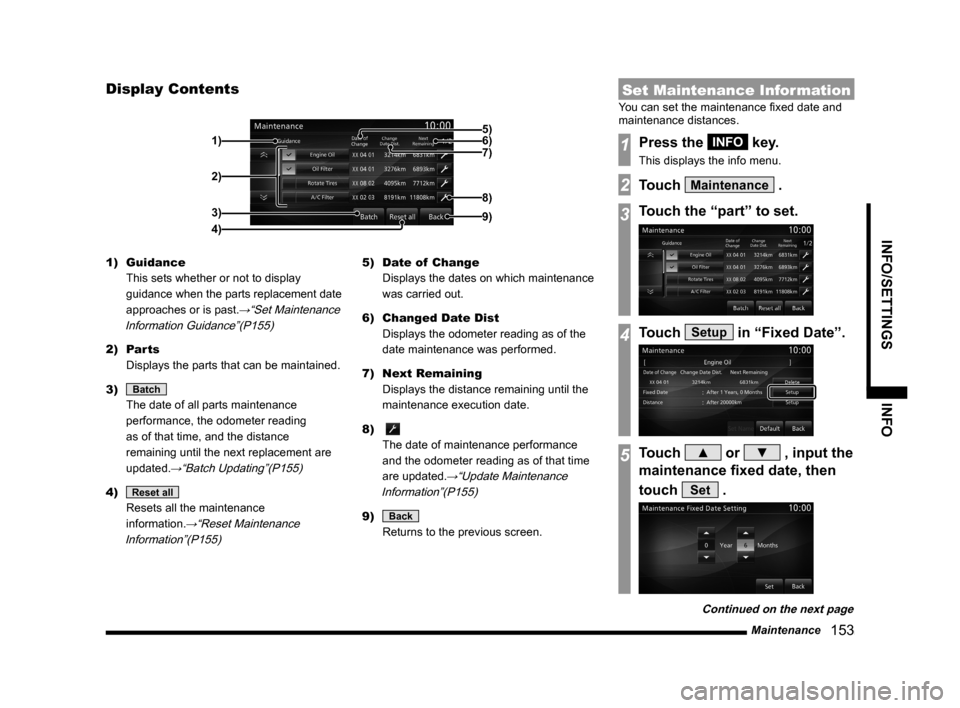
1) Guidance
This sets whether or not to display
guidance when the parts replacement date
approaches or is past.
→“Set Maintenance
Information Guidance”(P155)
2) Parts
Displays the parts that can be maintained.
3)
Batch
The date of all parts maintenance
performance, the odometer reading
as of that time, and the distance
remaining until the next replacement are
updated.
→“Batch Updating”(P155)
4) Reset all
Resets all the maintenance
information.
→“Reset Maintenance
Information”(P155)
5) Date of Change
Displays the dates on which maintenance
was carried out.
6) Changed Date Dist
Displays the odometer reading as of the
date maintenance was performed.
7) Next Remaining
Displays the distance remaining until the
maintenance execution date.
8)
The date of maintenance performance
and the odometer reading as of that time
are updated.
→“Update Maintenance
Information”(P155)
9) Back
Returns to the previous screen.
Set Maintenance Information
You can set the maintenance fixed date and
maintenance distances.
1Press the INFO key.
This displays the info menu.
2Touch Maintenance .
3Touch the “part” to set.
4Touch Setup in “Fixed Date”.
5Touch ▲ or ▼ , input the
maintenance fixed date, then
touch
Set .
Continued on the next page
Page 166 of 226
166 Voice Control
About the Learning Function
The voice control system has a learning
function. (This function cannot be used by
voice control systems using a Bluetooth
®
2.0 interface.) This learning function inputs
the driver's voice and way of speaking, and
makes voice recognition easier.
Also, the learned data can be reset (deleted), so
reset the data if the user will change for a long
period of time.
→“Voice control settings” (P212)
Skip Audio Guide
During audio guide, press the “SPEECH” key
again to skip the guide.
End Voice Control
• To stop voice control after starting up,
execute one of the following procedures.
- Press and hold down “SPEECH” key.
- Press a key such as
MODE key.
• If you do not speak after starting up voice
control, the system will automatically be in
pause mode.
(Press the “SPEECH” key again to restart
voice control.) If there is no operation for
a while in pause mode, voice control will
automatically end.
• If voice control is forced to shut down such
as by pressing the
MODE key, the voice
control cannot restart from where you left off.
Page 167 of 226
Navigation Function Operation 167
INFO/SETTINGSVoice Operation
Navigation Function
Operation
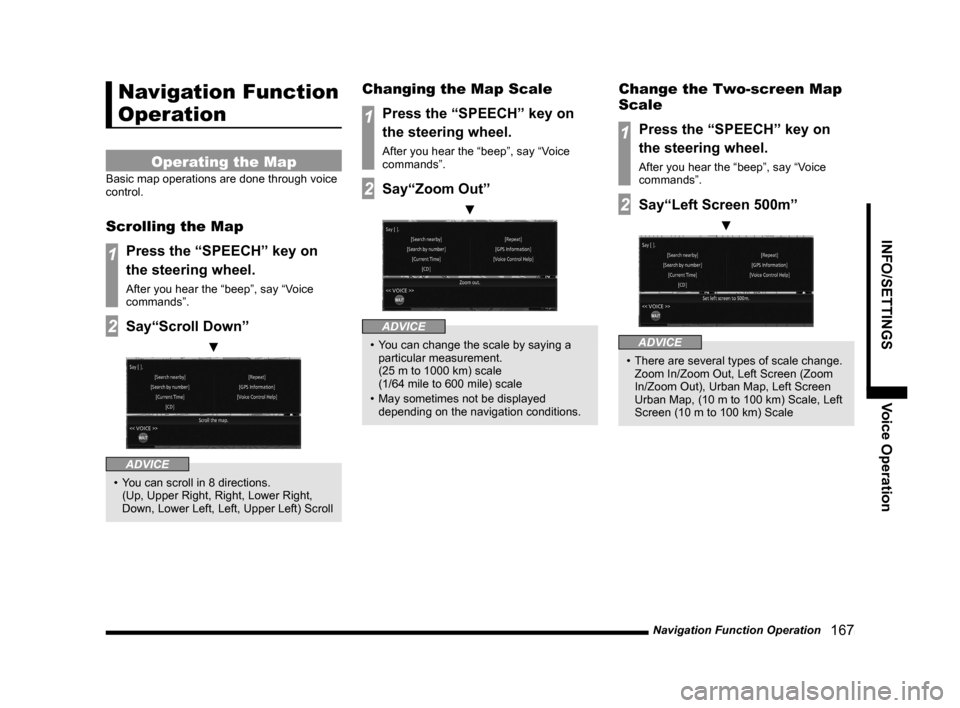
Operating the Map
Basic map operations are done through voice
control.
Scrolling the Map
1Press the “SPEECH” key on
the steering wheel.
After you hear the “beep”, say “Voice
commands”.
2Say“Scroll Down”
▼
ADVICE
• You can scroll in 8 directions.
(Up, Upper Right, Right, Lower Right,
Down, Lower Left, Left, Upper Left) Scroll
Changing the Map Scale
1Press the “SPEECH” key on
the steering wheel.
After you hear the “beep”, say “Voice
commands”.
2Say“Zoom Out”
▼
ADVICE
• You can change the scale by saying a
particular measurement.
(25 m to 1000 km) scale
(1/64 mile to 600 mile) scale
• May sometimes not be displayed
depending on the navigation conditions.
Change the Two-screen Map
Scale
1Press the “SPEECH” key on
the steering wheel.
After you hear the “beep”, say “Voice
commands”.
2Say“Left Screen 500m”
▼
ADVICE
• There are several types of scale change.
Zoom In/Zoom Out, Left Screen (Zoom
In/Zoom Out), Urban Map, Left Screen
Urban Map, (10 m to 100 km) Scale, Left
Screen (10 m to 100 km) Scale