key MITSUBISHI LANCER 2014 8.G Owners Handbook
[x] Cancel search | Manufacturer: MITSUBISHI, Model Year: 2014, Model line: LANCER, Model: MITSUBISHI LANCER 2014 8.GPages: 16, PDF Size: 0.87 MB
Page 2 of 16
Please Place coPies of the following items in the Pocket below:
1.
Pre-Delivery Inspection Form (Customer Copy)
2.
T
riple Diamond Delivery Checklist (Customer Copy)
3.
Salesperson or Key Dealership Contact’
s Business Card
Owner’s Handbook
(5/13)
www .mitsubishicars.c om
2014 LANCER SERIES
2014 LANCER SERIES
Dieline -DO NOT PRINT!
Page 9 of 16
![MITSUBISHI LANCER 2014 8.G Owners Handbook 7TECHNOLOGY
multi-information meter switch (info button)
k
eyless e ntry s ystem
[F.A.S.T.-Key]
[Normal Key]
LOCK
Press:
o nce – l ock all doors
UNLOCK
Press:
o nce – Unlock driver door
MITSUBISHI LANCER 2014 8.G Owners Handbook 7TECHNOLOGY
multi-information meter switch (info button)
k
eyless e ntry s ystem
[F.A.S.T.-Key]
[Normal Key]
LOCK
Press:
o nce – l ock all doors
UNLOCK
Press:
o nce – Unlock driver door](/img/19/7459/w960_7459-8.png)
7TECHNOLOGY
multi-information meter switch (info button)
k
eyless e ntry s ystem
[F.A.S.T.-Key]
[Normal Key]
LOCK
Press:
o nce – l ock all doors
UNLOCK
Press:
o nce – Unlock driver door
t
wice – Unlock all doors
TRUNK (except Sportback)
Press twice to open trunk lid.
P
ANIC
Press and hold. Press any button to
turn off panic.
to lock or unlock the doors while
carrying the f. a . s . t.-key , press the
driver’s or front passenger’s door
lock/unlock switch A .
c
hange display
information by pushing
the
info button:
warnings,
o dometer/
tripmeter
, s ervice
Reminder,
e ngine c oolant
temperature,
a
verage
and
m omentary f uel
c
onsumption, Driving
Range and
a
verage s
peed, etc.
eco Driving
when the eco indicator light
is on, your current driving style
supports good fuel economy
.
multi-informationmeter
A
tire Pressure m onitoring s ystem ( t P ms )
the tire Pressure m onitoring s ystem light illuminates when one or more
of your tires is significantly underinflated. Please note that changes in the
outside temperature may decrease tire pressure causing the
t P ms light to
turn on.
i f the t P ms light remains illuminated, check your tire pressure.
warning light
illuminates when tire pressure is
too low.i f warning light
illuminates, contact your local
m itsubishi dealer.
(
m ay be a t P ms system
issue or malfunction).
Page 11 of 16
9DISPLAY AUDIO SYSTEM (if equipped)
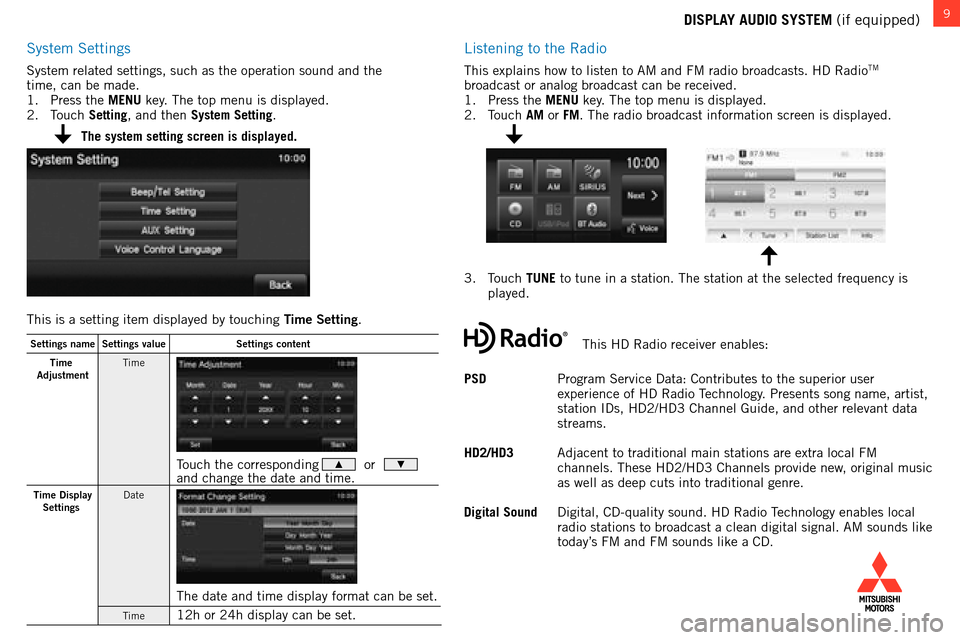
system settings
system related settings, such as the operation sound and the
time, can be made.
1.
Press the
MENU key. t he top menu is displayed.
2.
t
ouch
Setting, and then System Setting.
listening to the Radio
this explains how to listen to am and fm radio broadcasts. hD Radiotm
broadcast or analog broadcast can be received.
1.
Press the
MENU key.
t
he top menu is displayed.
2.
t
ouch
AM or FM.
t
he radio broadcast information screen is displayed.
3.
t
ouch
TUNE to tune in a station.
t
he station at the selected frequency is
played.
PSD
Program
s
ervice Data:
c
ontributes to the superior user
experience of
h
D Radio
t
echnology
. Presents song name, artist,
station
i
Ds,
h
D2/
h
D3
c
hannel
g
uide, and other relevant data
streams.
HD2/HD3
a
djacent to traditional main stations are extra local
fm
channels.
t
hese
h
D2/
h
D3
c
hannels provide new, original music
as well as deep cuts into traditional genre.
Digital Sound
Digital,
c
D-quality sound.
h
D Radio
t
echnology enables local
radio stations to broadcast a clean digital signal.
am
sounds like
today’s
fm
and
fm
sounds like a
c
D.
The system setting screen is displayed.
This is a setting item displayed by touching Time Setting.
Settings name Settings value Settings content
Time
Adjustmen tTime
Touch the corresponding � or �and change the date and time.
Time Display
Settings Date
The date and time display format can be set.
Time12h or 24h display can be set.
this hD Radio receiver enables:
Page 12 of 16
10
**see navigation owner’s manual
DISPLAY AUDIO SYSTEM (continued) AND NAVIGATION SYSTEM (if equipped)
fm
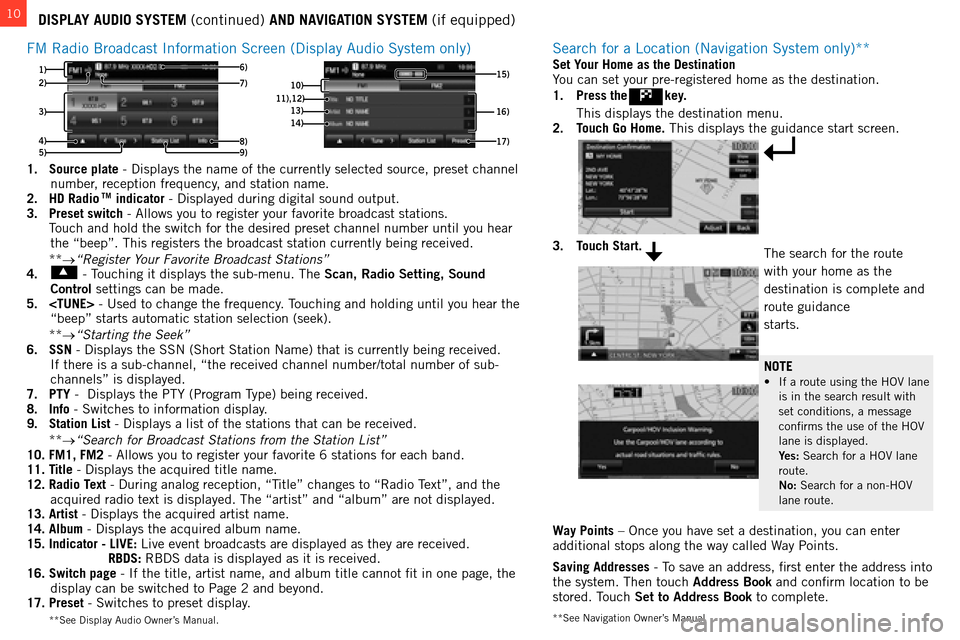
Radio b roadcast i nformation s creen (Display a udio s ystem only)
3)
4) 1)
8)
6)
5)
2)
9)7)10) 16)11),12)13)14)
17)
15)
1. Source plate - Displays the name of the currently selected source, preset channel
number, reception frequency, and station name.
2.
HD Radio TM indicator - Displayed during digital sound output.
3.
Preset switch - a llows you to register your favorite broadcast stations.
t
ouch and hold the switch for the desired preset channel number until you\
hear
the “beep”.
t his registers the broadcast station currently being received.
**
→“Register Your Favorite Broadcast Stations”
4.
- touching it displays the sub-menu. t he Scan, Radio Setting, Sound
Control settings can be made.
5.
ouching and holding until you hear the
“beep” starts automatic station selection (seek).
**
→“Starting the Seek”
6.
SSN - Displays the ssn ( s hort s tation n ame) that is currently being received.
i
f there is a sub-channel, “the received channel number/total number o\
f sub-
channels” is displayed.
7.
PTY - Displays the P t Y (Program t
ype) being received.
8.
Info - s witches to information display.
9.
Station List
- Displays a list of the stations that can be received.
**
→“Search for Broadcast Stations from the Station List”
10.
FM1, FM2 - a llows you to register your favorite 6 stations for each band.
11.
Title - Displays the acquired title name.
12.
Radio Text - During analog reception, “ t
itle” changes to “Radio
t
ext”, and the
acquired radio text is displayed.
t he “artist” and “album” are not displayed.
13.
Artist - Displays the acquired artist name.
14.
Album - Displays the acquired album name.
15.
Indicator - LIVE:
l ive event broadcasts are displayed as they are received.
RBDS:
R b D s data is displayed as it is received.
16.
Switch page - i f the title, artist name, and album title cannot fit in one page, the \
display can be switched to Page 2 and beyond.
17.
Preset - s witches to preset display.
** s ee Display a udio o wner’s m anual.
search for a location (navigation system only)**
Way Points – once you have set a destination, you can enter
additional stops along the way called way Points.
Saving Addresses
- t
o save an address, first enter the address into
the system.
t hen touch Address Book and confirm location to be
stored.
t
ouch
Set to Address Book to complete.
Set Your Home as the Destination
You can set your pre-registered home as the destination.
1.
Press the
key.
t his displays the destination menu.
2.
T
ouch Go Home. t his displays the guidance start screen.
3. Touch Start.the search for the route
with your home as the
destination is complete and
route guidance
starts.
NOTE
• If a route using the HOV lane is in the search result with
set conditions, a message
confirms the use of the
ho V
lane is displayed.
Y
es: s earch for a ho V lane
route.
No:
s earch for a non- ho V
lane route.
Page 13 of 16
11BLUETOOTH® OPERATION WITH DISPLAY AUDIO AND NAVIGATION SYSTEM (if equipped)
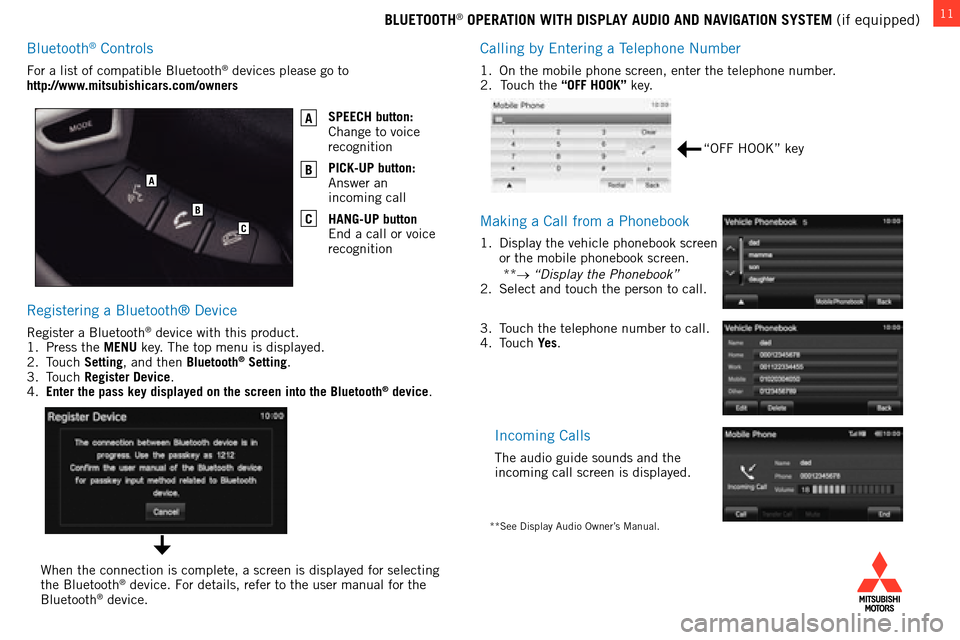
c
alling by e ntering a t
elephone
n umber
1. on the mobile phone screen, enter the telephone number.
2. touch the “OFF HOOK” key.
making a call from a Phonebook
1. Display the vehicle phonebook screen
or the mobile phonebook screen.
**
→ “Display the Phonebook”
2.
s elect and touch the person to call.
incoming calls
the audio guide sounds and the
incoming call screen is displayed.
Registering a bluetooth® Device
Register a bluetooth® device with this product.
1.
Press the
MENU key. t he top menu is displayed.
2.
t
ouch Setting
, and then Bluetooth
® Setting.
3.
touch Register Device
.
4.
Enter the pass key displayed on the screen into the Bluetooth® device.
f
or a list of compatible
b
luetooth
® devices please go to
http://www.mitsubishicars.com/owners
SPEECH button:
c
hange to voice
recognition
PICK-UP button:
a
nswer an
incoming call
HANG-UP button
e
nd a call or voice
recognition
A
B
C
when the connection is complete, a screen is displayed for selecting
the b luetooth® device. for details, refer to the user manual for the b
luetooth® device.
“off hook” key
3. touch the telephone number to call.
4. touch Ye
s.
**see Display audio owner’s manual.
A
B
C
bluetooth® controls
Page 15 of 16
13
Q: My Lancer has two 12V accessory outlets. What devices can be plugged int\
o these outlets?a: b oth of these outlets are protected with 15 amp fuses. a lways check the current draw rating of any device prior to use in the ve\
hicle. i f the device is
rated
above 12 amps, this could lead to circuit overload and the electrical fuse opening (no current flow).
Q:
I only have one remote for the remote start system on my Lancer
. Can I get a second one?
a
: n o. o nly one remote can be programmed per vehicle for security reasons.
Q:
How can I get the MPG stated on the window sticker?a
:
V
ehicle driving styles will greatly affect m P g . a
void sudden abrupt starts from a stop and let the vehicle coast to the t\
raffic light.
b oth of these styles
will increase mileage and reduce brake lining wear.
• Vehicles
are designed to achieve the best fuel mileage when they are driven at the speed limits on the freeway. Avoid driving over 65 mph.
• Under
inflated tires will increase rolling resistance and will reduce fuel mileage. Check tire pressure frequently to increase miles per gallon.
Proper tire pressure also ensures optimum tire performance (including t\
ire wear
.)
Q:
How does the Navigation System choose a certain route?a
: t he system takes into account traffic conditions, road types, distance \
and road width to recommend the route.
Q:
Why does my Anti-Lock Braking System (ABS) make a noise?a
: e ach time your vehicle is started and driven a short distance, you will h\
ear the sound of the abs motor operating from the right front engine
compartment.
t his is the normal sound the a nti- l ock b raking s ystem makes when performing a self check.
Q:
Why do my Rain Sensing Windshield Wipers operate on their own when it’\
s not raining?
A: • When
the lever is in the AUTO position, the rain sensor detects rain or snow and automatically turns on the wipers.
• The
wipers may automatically operate when things such as insects or foreign objects are affixed to the windshield on top of the rain sensor or
when the windshield is frosted over
.
• To
stop the wipers, place the lever in the OFF position.
Q:
Why does my check engine light come on after I put gas in my car?a
: t here are many reasons why your check engine light may illuminate. b efore calling your dealership, make sure the fuel cap is fully engaged a\
nd
you have heard three clicks when tightening it.
a fter checking and hearing three clicks and driving for a while, if the l\
ight is still on, contact your
dealership.
Q:
How do I use the emergency key when the F
.A.S.T.-key battery or vehicle battery is run down?
a
:
Remove the emergency key from the
f
.
a . s . t
.-key fob and manually unlock the door
. o nce inside the vehicle remove the ignition switch cover
by pressing the release buttons on the top and bottom of the ignition sw\
itch cover.
o nce the ignition switch cover is removed insert the
emergency key into the ignition switch then re-insert (backwards) the \
f
.
a . s . t
.-key fob onto the emergency key
. o nce the f
.
a . s . t
.-key fob
is re-inserted (backwards) turn the emergency key to start the engine.\
FAQ’s