relay MITSUBISHI LANCER 2014 8.G Owners Manual
[x] Cancel search | Manufacturer: MITSUBISHI, Model Year: 2014, Model line: LANCER, Model: MITSUBISHI LANCER 2014 8.GPages: 434, PDF Size: 57.5 MB
Page 389 of 434

Fuses 9-30 Vehicle care and maintenance
9
* - Fusible link Some fuses may not be installed on your vehicle, depending on the vehicle model or specifications. The table above shows the main equip- ment corresponding to each fuse.
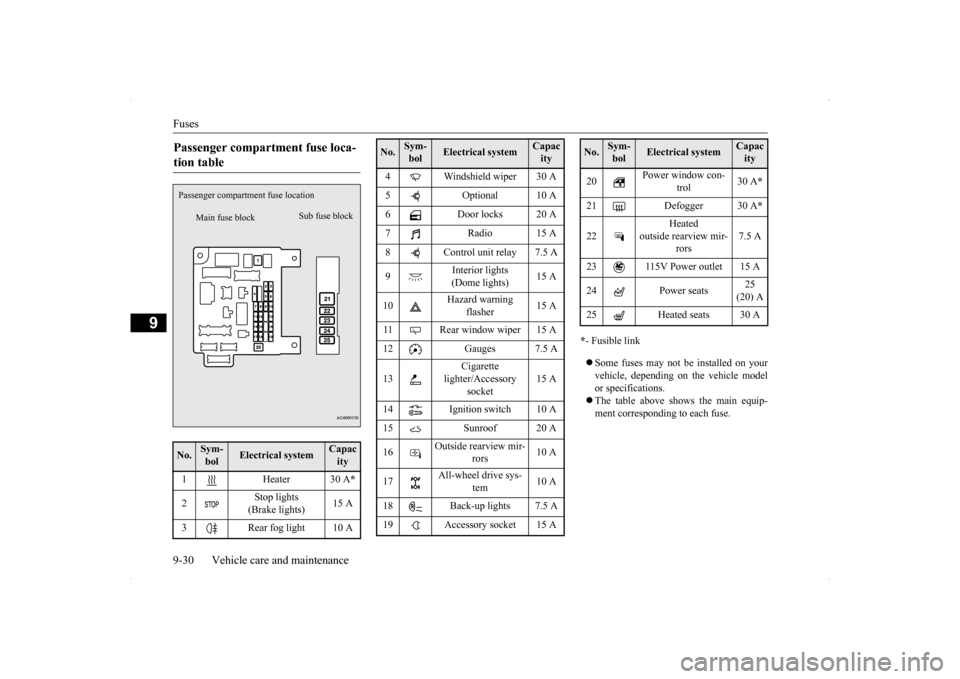
Passenger compartment fuse loca- tion table No.
Sym- bol
Electrical system
Capacity
1 Heater 30 A
*
2
Stop lights (Brake lights)
15 A
3 Rear fog light 10 A
Main fuse block
Sub fuse block
Passenger compartme
nt fuse location
4 Windshield wiper 30 A 5 Optional 10 A 6 Door locks 20 A 7 Radio 15 A8 Control unit relay 7.5 A 9
Interior lights (Dome lights)
15 A
10
Hazard warning
flasher
15 A
11 Rear window wiper 15 A 12 Gauges 7.5 A 13
Cigarette
lighter/Accessory
socket
15 A
14 Ignition switch 10 A 15 Sunroof 20 A 16
Outside rearview mir-
rors
10 A
17
All-wheel drive sys-
tem
10 A
18 Back-up lights 7.5 A 19 Accessory socket 15 ANo.
Sym- bol
Electrical system
Capacity
20
Power window con-
trol
30 A
*
21 Defogger 30 A
*
22
Heated
outside rearview mir-
rors
7.5 A
23 115V Power outlet 15 A 24 Power seats
25 (20) A
25 Heated seats 30 ANo.
Sym- bol
Electrical system
Capacity
Page 395 of 434

Replacement of light bulbs 9-36 Vehicle care and maintenance
9
N00943100872
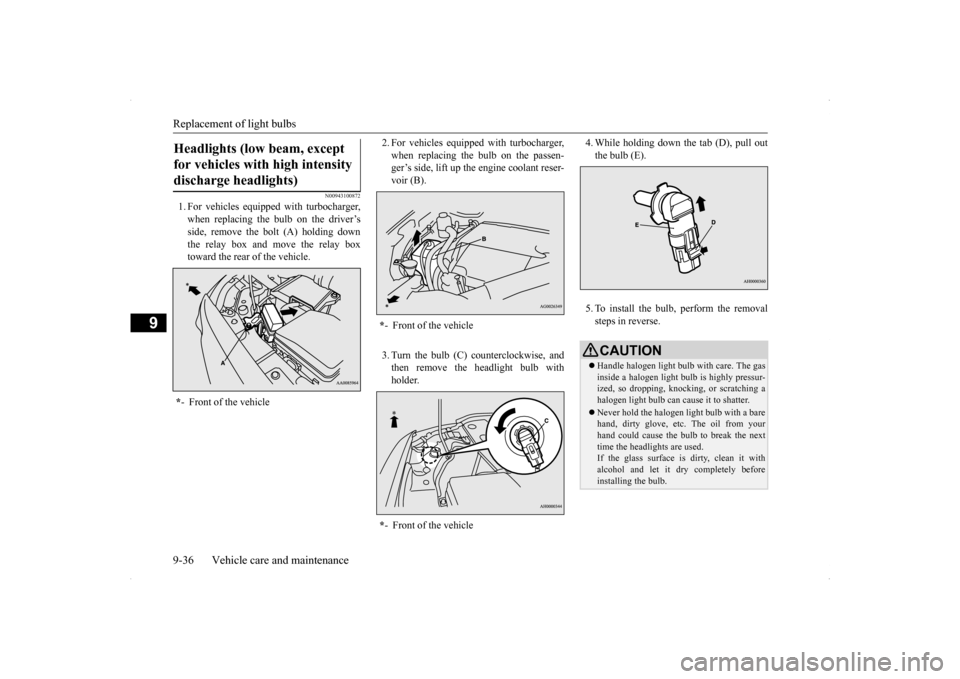
1. For vehicles equipped with turbocharger, when replacing the bulb on the driver’s side, remove the bolt (A) holding downthe relay box and move the relay box toward the rear of the vehicle.
2. For vehicles equipped with turbocharger, when replacing the bulb on the passen- ger’s side, lift up the engine coolant reser- voir (B). 3. Turn the bulb (C) counterclockwise, and then remove the headlight bulb with holder.
4. While holding down
the tab (D), pull out
the bulb (E). 5. To install the bulb, perform the removal steps in reverse.
Headlights (low beam, except for vehicles with high intensity discharge headlights) * - Front of the vehicle
*- Front of the vehicle * - Front of the vehicle
CAUTIONHandle halogen light bulb with care. The gas inside a halogen light bulb is highly pressur- ized, so dropping, knocking, or scratching ahalogen light bulb can cause it to shatter. Never hold the halogen light bulb with a bare hand, dirty glove, etc. The oil from your hand could cause the bulb to break the next time the headlights are used. If the glass surface is dirty, clean it with alcohol and let it dry completely before installing the bulb.
Page 398 of 434

Replacement of light bulbs
Vehicle care and maintenance 9-39
9
N00943200121
The alignment of the headlights should be checked by an authorized Mitsubishi Motorsdealer or a repair facility of your choice.
N00917300512
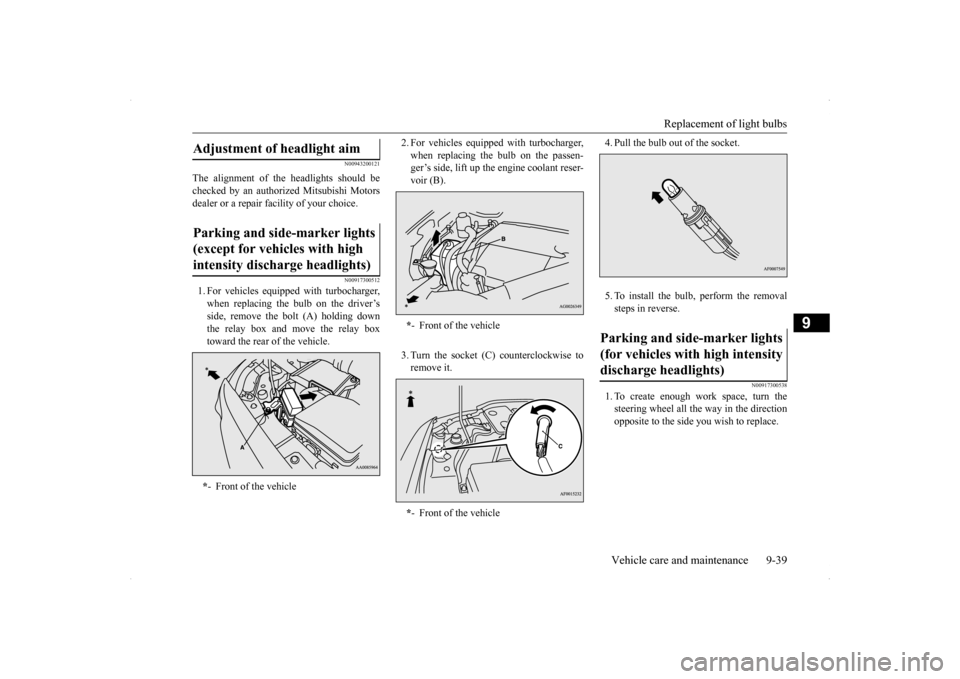
1. For vehicles equipped with turbocharger, when replacing the bulb on the driver’s side, remove the bolt (A) holding downthe relay box and move the relay box toward the rear of the vehicle.
2. For vehicles equipped with turbocharger, when replacing the bulb on the passen- ger’s side, lift up the engine coolant reser- voir (B). 3. Turn the socket (C) counterclockwise to remove it.
4. Pull the bulb out of the socket. 5. To install the bulb, perform the removal steps in reverse.
N00917300538
1. To create enough work space, turn the steering wheel all the way in the direction opposite to the side you wish to replace.
Adjustment of headlight aim Parking and side-marker lights (except for vehicles with high intensity discharge headlights) * - Front of the vehicle
*- Front of the vehicle * - Front of the vehicle
Parking and side-marker lights (for vehicles with high intensity discharge headlights)