MITSUBISHI LANCER 2016 8.G Owners Manual
Manufacturer: MITSUBISHI, Model Year: 2016, Model line: LANCER, Model: MITSUBISHI LANCER 2016 8.GPages: 392, PDF Size: 13.12 MB
Page 111 of 392
Steering wheel tilt lock lever Features and controls 5-49
5
N00511500215
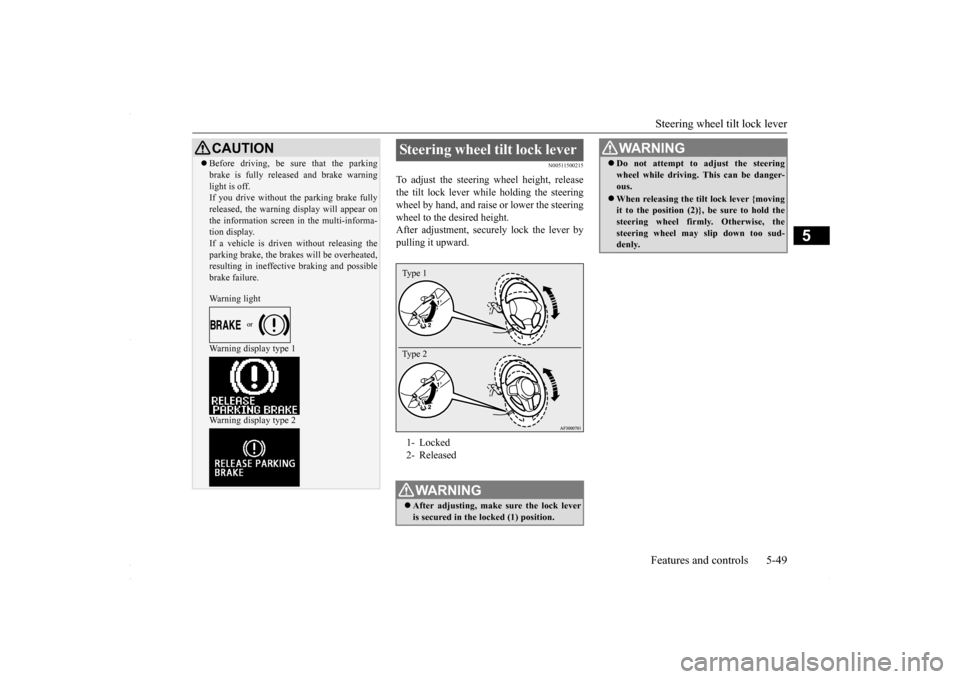
To adjust the steering wheel height, release the tilt lock lever while holding the steeringwheel by hand, and raise or lower the steering wheel to the desired height. After adjustment, securely lock the lever bypulling it upward.
CAUTION Before driving, be sure that the parking brake is fully released and brake warning light is off. If you drive without the parking brake fully released, the warning display will appear onthe information screen in the multi-informa- tion display. If a vehicle is driven without releasing theparking brake, the brakes will be overheated, resulting in ineffective braking and possible brake failure. Warning light Warning display type 1 Warning display type 2
Steering wheel tilt lock lever 1- Locked 2- ReleasedWA R N I N G After adjusting, make sure the lock lever is secured in the locked (1) position. Type 1 Type 2
Do not attempt to adjust the steering wheel while driving. This can be danger- ous. When releasing the tilt lock lever {moving it to the position (2)}, be sure to hold the steering wheel firmly. Otherwise, the steering wheel may slip down too sud-denly. WA R N I N G
BK0230300US.bo
ok 49 ページ 2015年7月30日 木曜日 午後8時38分
Page 112 of 392
Inside day/night rearview mirror 5-50 Features and controls
5
N00548601080
Adjust the inside rear
view mirror only after
making any seat adjustme
nts so as to have a
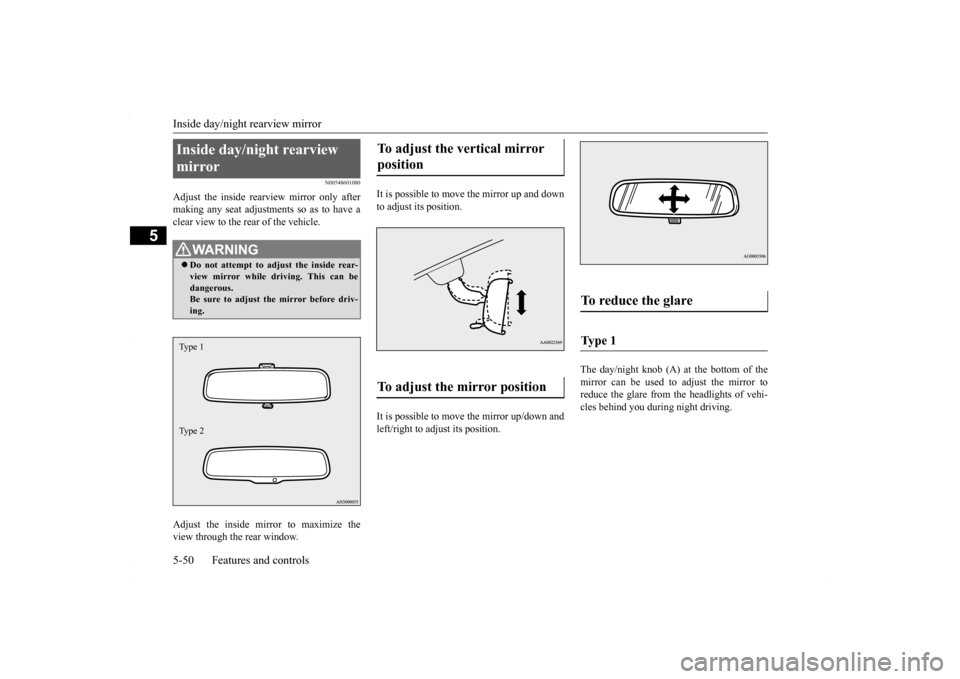
clear view to the rear of the vehicle. Adjust the inside mirror to maximize the view through the rear window.
It is possible to move
the mirror up and down
to adjust its position. It is possible to move the mirror up/down and left/right to adjust its position.
The day/night knob (A) at the bottom of the mirror can be used to adjust the mirror toreduce the glare from the headlights of vehi-cles behind you during night driving.
Inside day/night rearview mirror
WA R N I N G Do not attempt to adjust the inside rear- view mirror while driving. This can be dangerous.Be sure to adjust the mirror before driv- ing.Type 1 Type 2
To adjust the vertical mirror position To adjust the mirror position
To reduce the glare Ty p e 1
BK0230300US.bo
ok 50 ページ 2015年7月30日 木曜日 午後8時38分
Page 113 of 392
Outside rearview mirrors
Features and controls 5-51
5
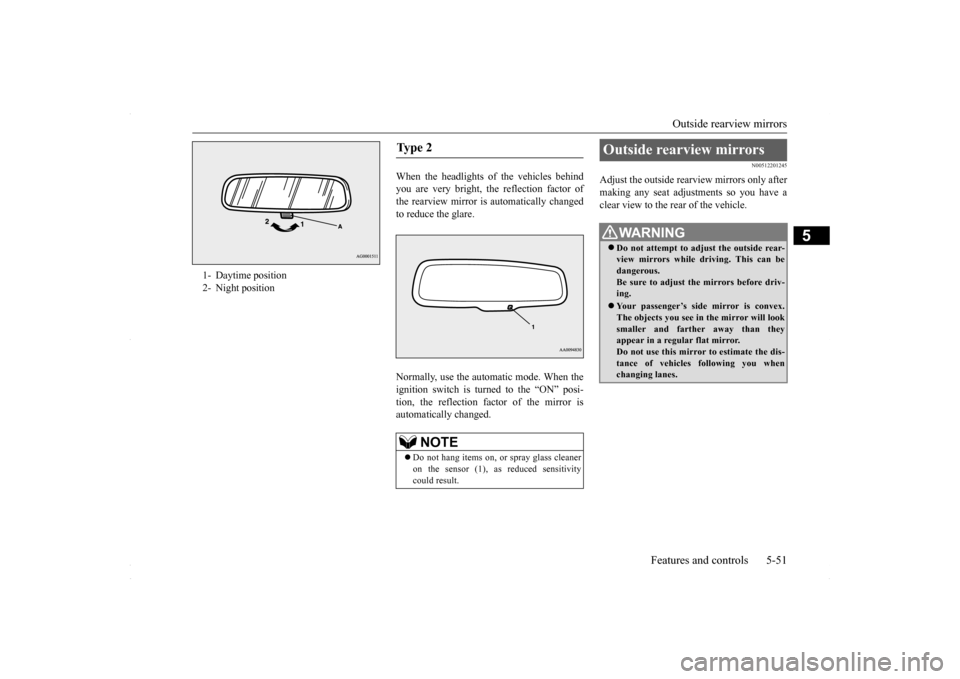
When the headlights of the vehicles behind you are very bright, the reflection factor ofthe rearview mirror is automatically changed to reduce the glare. Normally, use the automatic mode. When the ignition switch is turned to the “ON” posi-tion, the reflection fact
or of the mirror is
automatically changed.
N00512201245
Adjust the outside rearview mirrors only after making any seat adjustments so you have aclear view to the rear of the vehicle.
1- Daytime position 2- Night position
Ty p e 2
NOTE
Do not hang items on, or spray glass cleaner on the sensor (1), as reduced sensitivitycould result.
Outside rearview mirrors
WA R N I N G Do not attempt to adjust the outside rear- view mirrors while driving. This can be dangerous.Be sure to adjust the mirrors before driv- ing. Your passenger’s side mirror is convex. The objects you see in the mirror will look smaller and farther away than theyappear in a regular flat mirror. Do not use this mirror to estimate the dis- tance of vehicles following you whenchanging lanes.
BK0230300US.bo
ok 51 ページ 2015年7月30日 木曜日 午後8時38分
Page 114 of 392
Ignition switch 5-52 Features and controls
5
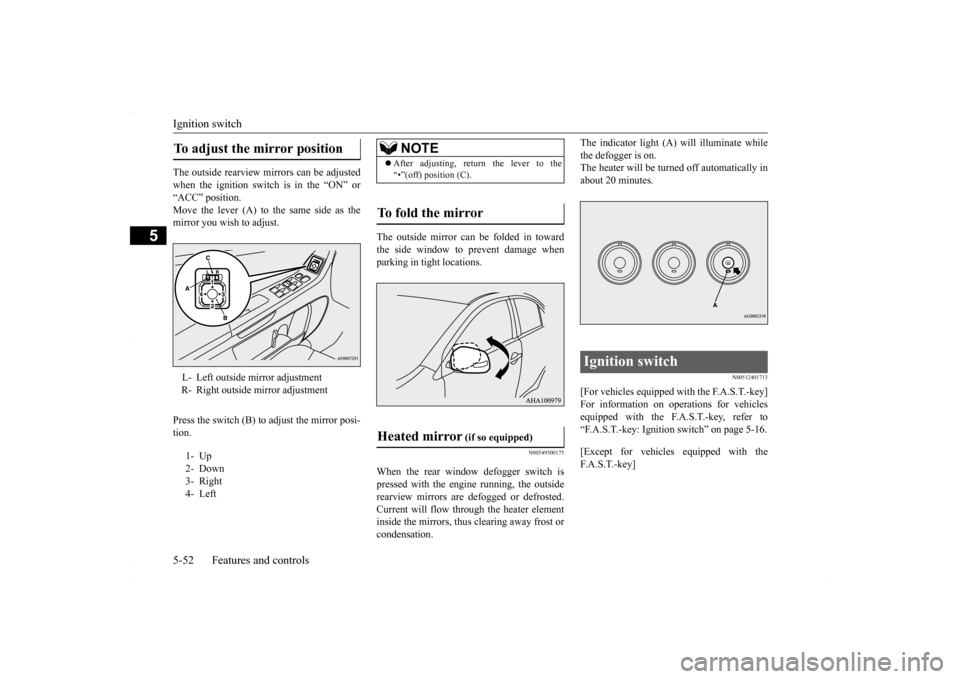
The outside rearview mirrors can be adjusted when the ignition switch is in the “ON” or “ACC” position.Move the lever (A) to the same side as the mirror you wish to adjust. Press the switch (B) to adjust the mirror posi- tion.
The outside mirror can be folded in toward the side window to prevent damage whenparking in tight locations.
N00549300175
When the rear window defogger switch ispressed with the engine running, the outside rearview mirrors are defogged or defrosted. Current will flow through the heater elementinside the mirrors, thus clearing away frost or condensation.
The indicator light (A) will illuminate while the defogger is on. The heater will be turned off automatically in about 20 minutes.
N00512401713
[For vehicles equipped with the F.A.S.T.-key] For information on operations for vehicles equipped with the F.A.S.T.-key, refer to“F.A.S.T.-key: Ignition switch” on page 5-16. [Except for vehicles equipped with the F. A . S . T. - k e y ]
To adjust the mirror position L- Left outside mirror adjustmentR- Right outside mirror adjustment 1- Up 2- Down 3- Right4- Left
NOTE
After adjusting, return the lever to the “•”(off) position (C).
To fold the mirror Heated mirror
(if so equipped)
Ignition switch
BK0230300US.bo
ok 52 ページ 2015年7月30日 木曜日 午後8時38分
Page 115 of 392
Ignition switch
Features and controls 5-53
5
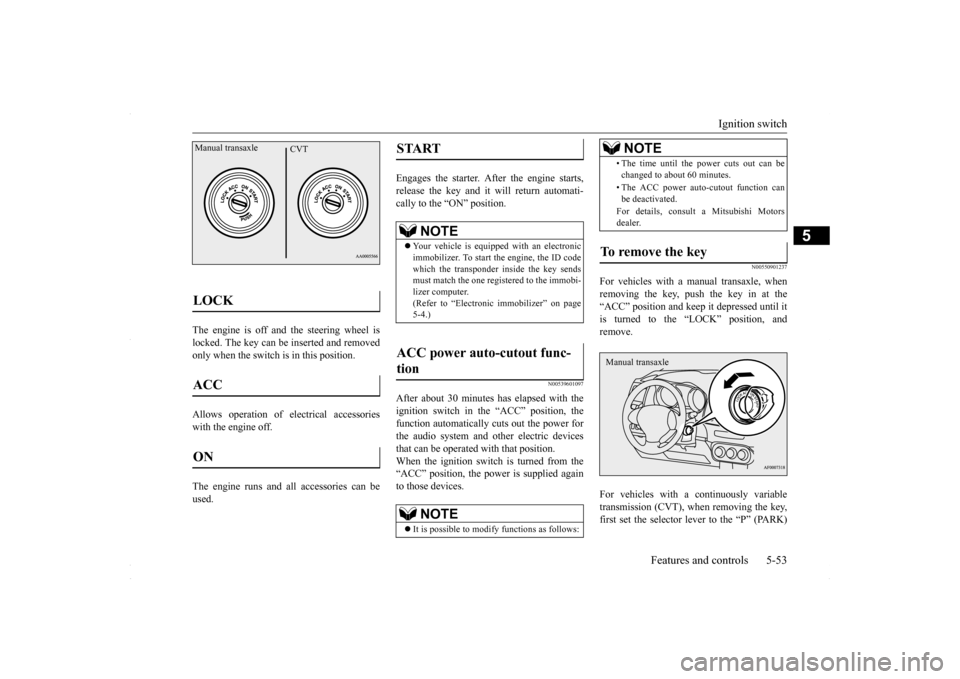
The engine is off and the steering wheel is locked. The key can be inserted and removedonly when the switch is in this position. Allows operation of electrical accessories with the engine off. The engine runs and all accessories can be used.
Engages the starter. After the engine starts, release the key and it will return automati-cally to the “ON” position.
N00539601097
After about 30 minutes has elapsed with theignition switch in the “ACC” position, the function automatically cuts out the power for the audio system and other electric devicesthat can be operated with that position. When the ignition switch is turned from the “ACC” position, the power is supplied againto those devices.
N00550901237
For vehicles with a manual transaxle, whenremoving the key, push the key in at the“ACC” position and keep it depressed until it is turned to the “LOCK” position, and remove. For vehicles with a continuously variable transmission (CVT), when removing the key,first set the selector lever to the “P” (PARK)
LOCK ACC ON Manual transaxle
CVT
START
NOTE
Your vehicle is equipped with an electronic immobilizer. To start the engine, the ID code which the transponder inside the key sendsmust match the one registered to the immobi- lizer computer. (Refer to “Electronic immobilizer” on page5-4.)
ACC power auto-cutout func- tion
NOTE
It is possible to modify functions as follows:
• The time until the power cuts out can be changed to about 60 minutes. • The ACC power auto-cutout function can be deactivated. For details, consult a Mitsubishi Motors dealer.
To remove the key
NOTE
Manual transaxle
BK0230300US.bo
ok 53 ページ 2015年7月30日 木曜日 午後8時38分
Page 116 of 392
![MITSUBISHI LANCER 2016 8.G Owners Manual Steering wheel lock 5-54 Features and controls
5
position, and then turn the key to the “LOCK” position and remove it.
N00512500195
[For vehicles equipped with the F.A.S.T.-key]For information on MITSUBISHI LANCER 2016 8.G Owners Manual Steering wheel lock 5-54 Features and controls
5
position, and then turn the key to the “LOCK” position and remove it.
N00512500195
[For vehicles equipped with the F.A.S.T.-key]For information on](/img/19/7463/w960_7463-115.png)
Steering wheel lock 5-54 Features and controls
5
position, and then turn the key to the “LOCK” position and remove it.
N00512500195
[For vehicles equipped with the F.A.S.T.-key]For information on operations for vehicles equipped with the F.A.S.T.-key, refer to “F.A.S.T.-key: Steering wheel lock” on page5-20. [Except for vehicles equipped with the F. A . S . T. - k e y ]
Remove the key at the “LOCK” position. Turn the steering wheel until it is locked. Turn the key to the “ACC” position while moving the steering wheel slightly.
NOTE
For vehicles with a CVT, the key cannot be removed unless the selector lever is set to the“P” (PARK) position, wh
ich allows the igni-
tion switch to turn to the “LOCK” position.CAUTION Do not remove the ignition key from the ignition switch while driving. The steering wheel will lock, causing loss of control. If the engine is turned off while driving, the power brake booster will stop functioning and braking efficiency will be reduced. Also,the power steering system will not function and it will require greater effort to manually steer the vehicle.CVT
Do not leave the key in the “ON” position for a long time when the engine is not running. This will cause the battery to run down. Do not turn the key to the “START” position when the engine is running. It will damage the starter motor.
Steering wheel lock
CAUTION
To l o c k To u n l o c k
CAUTION Remove the key when leaving the vehicle.NOTE
If the front wheels are turned, the anti-theft lock may sometimes make it difficult to turn the key from “LOCK” position to “ACC” position. Firmly turn the steering wheel tothe left or to the right as you turn the key.
BK0230300US.bo
ok 54 ページ 2015年7月30日 木曜日 午後8時38分
Page 117 of 392
Starting and stopping the engine Features and controls 5-55
5
N00542101096
Do not operate the starter motor continu- ously for longer than
15 seconds as this
could run the battery down or damage thestarter motor. If the engine does not start,turn the ignition switch back to the “LOCK” position, wait a few seconds, and then try again. Trying repeatedly withthe engine or starter motor still turning will damage the starter mechanism. If the engine will not start because the bat- tery is weak or discharged, refer to “Jump-starting the engine” (on page 8-2) for instructions. The engine is warmed up enough for driv- ing when the bar graph of engine coolant temperature display starts to move. A lon-ger warm up period will only consume extra fuel.
N00542201198
[For vehicles equipped with the F.A.S.T.- key.]For information on operation for vehicles equipped with the F.A.S.T.-key, refer to “F.A.S.T.-key: Starting the engine” on page5-20. [Except for vehicles equipped with the F. A . S . T. - k e y. ]Your vehicle is equipped with an electroni- cally controlled fuel injection system, which automatically controls the release of fuel.
There is usually no need to depress the accel- erator pedal when starting the engine. The starter should not be run for more than 15 seconds at a time.To prevent battery drain, wait a few seconds between attempts to restart the engine. 1. Make sure all occupants are properly seated with seat belts fastened 2. Insert the ignition key. 3. Make sure the parking brake is applied.4. Press and hold the brake pedal downfirmly with your right foot. 5. Press and hold the clutch pedal all the way down (manual transaxle). 6. On vehicles with manual transaxle, place the gearshift lever in the “N” (Neutral) position.On vehicles with continuously variable transmission (CVT), make sure the selec- tor lever is in the “P” (PARK) position.
Starting and stopping the engine Tips for starting
WA R N I N G Never run the engine in a closed or poorly ventilated area any longer than is needed to move your vehicle out of the area. Car- bon monoxide gas, which is odorless and extremely poisonous, could build up andcause serious injury or death.CAUTION Do not push-start the vehicle.Do not run the engine
at high rpms or drive
at high speeds until the engine has had a chance to warm up. Release the ignition switch as soon as the engine starts. Otherwise, the starter motorwill be damaged.
Starting the engine
NOTE
For models equipped with a manual trans- axle, the starter will not operate unless the clutch pedal is fully depressed (Clutch inter-lock). This is a safety feature.
BK0230300US.bo
ok 55 ページ 2015年7月30日 木曜日 午後8時38分
Page 118 of 392
Starting and stopping the engine 5-56 Features and controls
5
7. Turn the ignition switch to the “ON” posi- tion and make certain that all warning lights are functioning properly beforestarting the engine.8. Turn the ignition switch to the “START” pedal. Release the key when the enginestarts.
After several attempts, you may experience that the engine still does not start. 1. Make sure that all electric devices, such as lights, air conditioning blower and rearwindow defogger, are turned off.
2. While depressing the brake pedal on vehi- cles equipped with continuously variable transmission (CVT) or the clutch pedal on the vehicles equipped with manual trans-axle, press the accelerator pedal halfway and hold it there, then crank the engine. Release the accelerator pedal, immedi-ately after the engine starts. 3. If the engine still will not start, the engine could be flooded with too much gasoline.While depressing the brake pedal on vehi-cles equipped with CVT or the clutch pedal on the vehicles
equipped with man-
ual transaxle, push the accelerator pedalall the way down and hold it there, then crank the engine for 5 to 6 seconds. Return the ignition switch to the “LOCK”position and release the accelerator pedal. Wait a few seconds, and then crank the engine again for 5 to 6 seconds whiledepressing the brake pedal or the clutch pedal, but do not push the accelerator pedal. Release the ignition key if theengine starts. If the engine fails to start, repeat these procedures. If the engine still will not start, contact your local Mitsubi-shi Motors dealer or a repair facility of your choice for assistance.
When the ambient temperature is -4 °F (-20 °C) or lower on vehicles with CVT, itmay not be possible to start from a standstill even with the selector lever in the “D” (DRIVE) or “R” (REVERSE) position.This phenomenon occurs because the trans-axle has not warmed up sufficiently; it does not indicate a problem. If it occurs, place the selector lever in the “P” (PARK) position andlet the engine idle for at least 10 minutes. The transaxle will warm up, and you will be able to start normally.Do not leave the vehicle during warm-up operation.
N00542301102
1. Bring the vehicle to a complete stop. 2. Fully engage the parking brake while depressing the brake pedal. 3. For vehicles with a manual transaxle, turn the ignition switch to the “LOCK” posi- tion to stop the engine, and then move thegearshift lever to the 1st (on a uphill) or “R” (Reverse) (on a downhill) position.
NOTE
On vehicles with CVT, the starter will not operate unless the selector lever is in the “P” (PARK) or “N” (NEUTRAL) position. For safety reasons, start the engine in the “P” (PARK) position so that the wheels arelocked.NOTE
Minor noises may be heard on engine start- up. These will disappear as the engine warms up.
When the engine is hard to start
Startability of continuously vari- able transmission (CVT) vehicles at extremely cold ambient temper- ature Stopping the engine
BK0230300US.bo
ok 56 ページ 2015年7月30日 木曜日 午後8時38分
Page 119 of 392
Manual transaxle (if so equipped)
Features and controls 5-57
5
For vehicles with continuously variable transmission (CVT), place the selector lever in the “P” (PARK) position, and then turn the ignition switch to the“LOCK” position to stop the engine.
N00512701165
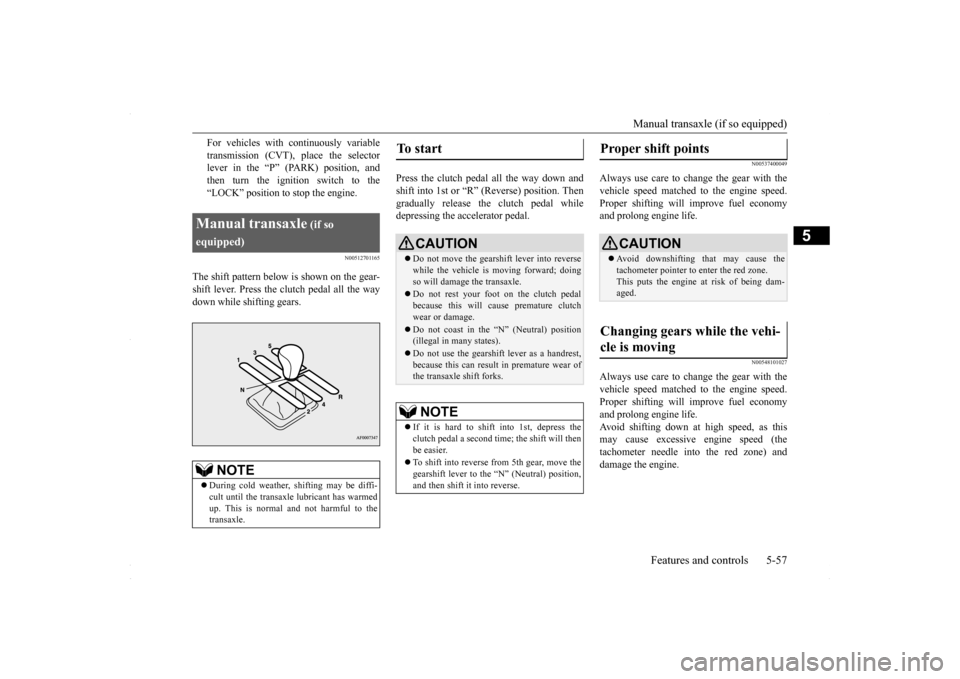
The shift pattern below is shown on the gear-shift lever. Press the clutch pedal all the way down while shifting gears.
Press the clutch pedal all the way down and shift into 1st or “R” (Reverse) position. Thengradually release the clutch pedal while depressing the accelerator pedal.
N00537400049
Always use care to change the gear with the vehicle speed matched to the engine speed.Proper shifting will improve fuel economy and prolong engine life.
N00548101027
Always use care to change the gear with thevehicle speed matched to the engine speed. Proper shifting will improve fuel economyand prolong engine life. Avoid shifting down at high speed, as this may cause excessive engine speed (thetachometer needle into the red zone) and damage the engine.
Manual transaxle
(if so
equipped)
NOTE
During cold weather, shifting may be diffi- cult until the transaxle lubricant has warmed up. This is normal and not harmful to the transaxle.
To start
CAUTION Do not move the gearshift lever into reverse while the vehicle is moving forward; doing so will damage the transaxle. Do not rest your foot on the clutch pedal because this will cause premature clutch wear or damage. Do not coast in the “N” (Neutral) position (illegal in many states). Do not use the gearshift lever as a handrest, because this can result in premature wear ofthe transaxle shift forks.NOTE
If it is hard to shift into 1st, depress the clutch pedal a second time; the shift will then be easier. To shift into reverse from 5th gear, move the gearshift lever to the “N” (Neutral) position, and then shift it into reverse.
Proper shift points
CAUTION Avoid downshifting that may cause the tachometer pointer to enter the red zone. This puts the engine at risk of being dam- aged.
Changing gears while the vehi- cle is moving
BK0230300US.bo
ok 57 ページ 2015年7月30日 木曜日 午後8時38分
Page 120 of 392
Manual transaxle (if so equipped) 5-58 Features and controls
5
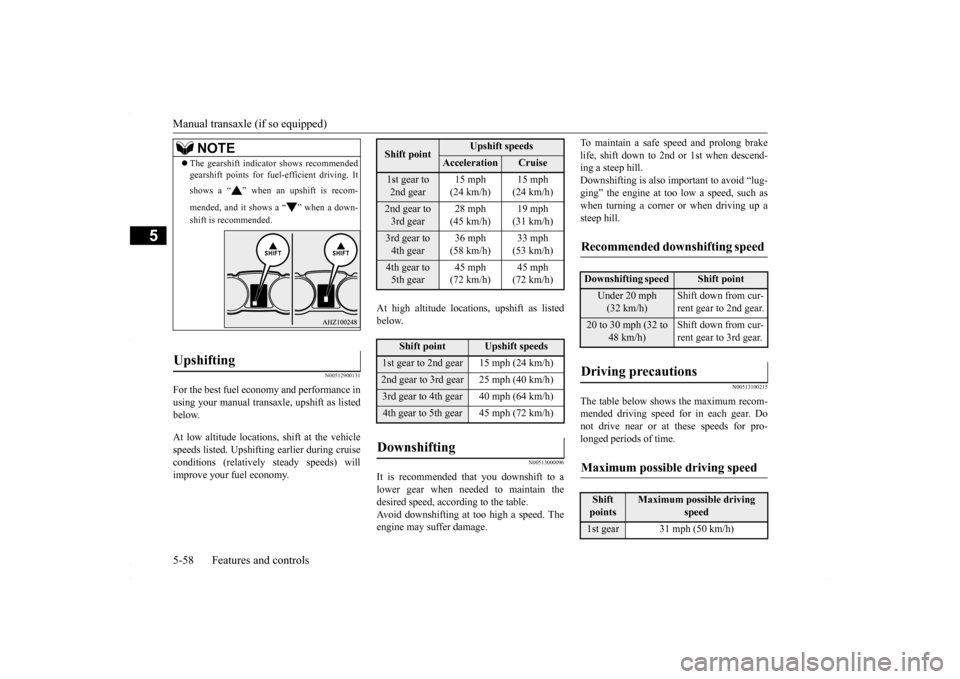
N00512900131
For the best fuel economy and performance in using your manual transaxle, upshift as listed below. At low altitude locations, shift at the vehicle speeds listed. Upshifting earlier during cruiseconditions (relatively steady speeds) will improve your fuel economy.
At high altitude locations, upshift as listed below.
N00513000096
It is recommended that you downshift to alower gear when needed to maintain thedesired speed, according to the table.Avoid downshifting at too high a speed. The engine may suffer damage.
To maintain a safe speed and prolong brake life, shift down to 2nd or 1st when descend- ing a steep hill. Downshifting is also important to avoid “lug-ging” the engine at too low a speed, such as when turning a corner or when driving up a steep hill.
N00513100215
The table below shows the maximum recom- mended driving speed for in each gear. Do not drive near or at these speeds for pro-longed periods of time.
NOTE
The gearshift indicator shows recommended gearshift points for fuel-efficient driving. It shows a “ ” when an upshift is recom- mended, and it shows a “ ” when a down- shift is recommended.
Upshifting
Shift point
Upshift speeds
Acceleration
Cruise
1st gear to 2nd gear
15 mph (24 km/h)
15 mph (24 km/h)
2nd gear to 3rd gear
28 mph (45 km/h)
19 mph (31 km/h)
3rd gear to 4th gear
36 mph (58 km/h)
33 mph (53 km/h)
4th gear to 5th gear
45 mph (72 km/h)
45 mph (72 km/h)
Shift point
Upshift speeds
1st gear to 2nd gear 15 mph (24 km/h)2nd gear to 3rd gear 25 mph (40 km/h)3rd gear to 4th gear 40 mph (64 km/h)4th gear to 5th gear 45 mph (72 km/h)Downshifting
Recommended downshifting speed
Downshifting speed
Shift point
Under 20 mph (32 km/h)
Shift down from cur- rent gear to 2nd gear.
20 to 30 mph (32 to
48 km/h)
Shift down from cur- rent gear to 3rd gear.
Driving precautions
Maximum possible driving speed
Shift points
Maximum possible driving
speed
1st gear 31 mph (50 km/h)
BK0230300US.bo
ok 58 ページ 2015年7月30日 木曜日 午後8時38分