abs connector MITSUBISHI LANCER EVOLUTION 2007 Service User Guide
[x] Cancel search | Manufacturer: MITSUBISHI, Model Year: 2007, Model line: LANCER EVOLUTION, Model: MITSUBISHI LANCER EVOLUTION 2007Pages: 1449, PDF Size: 56.82 MB
Page 364 of 1449
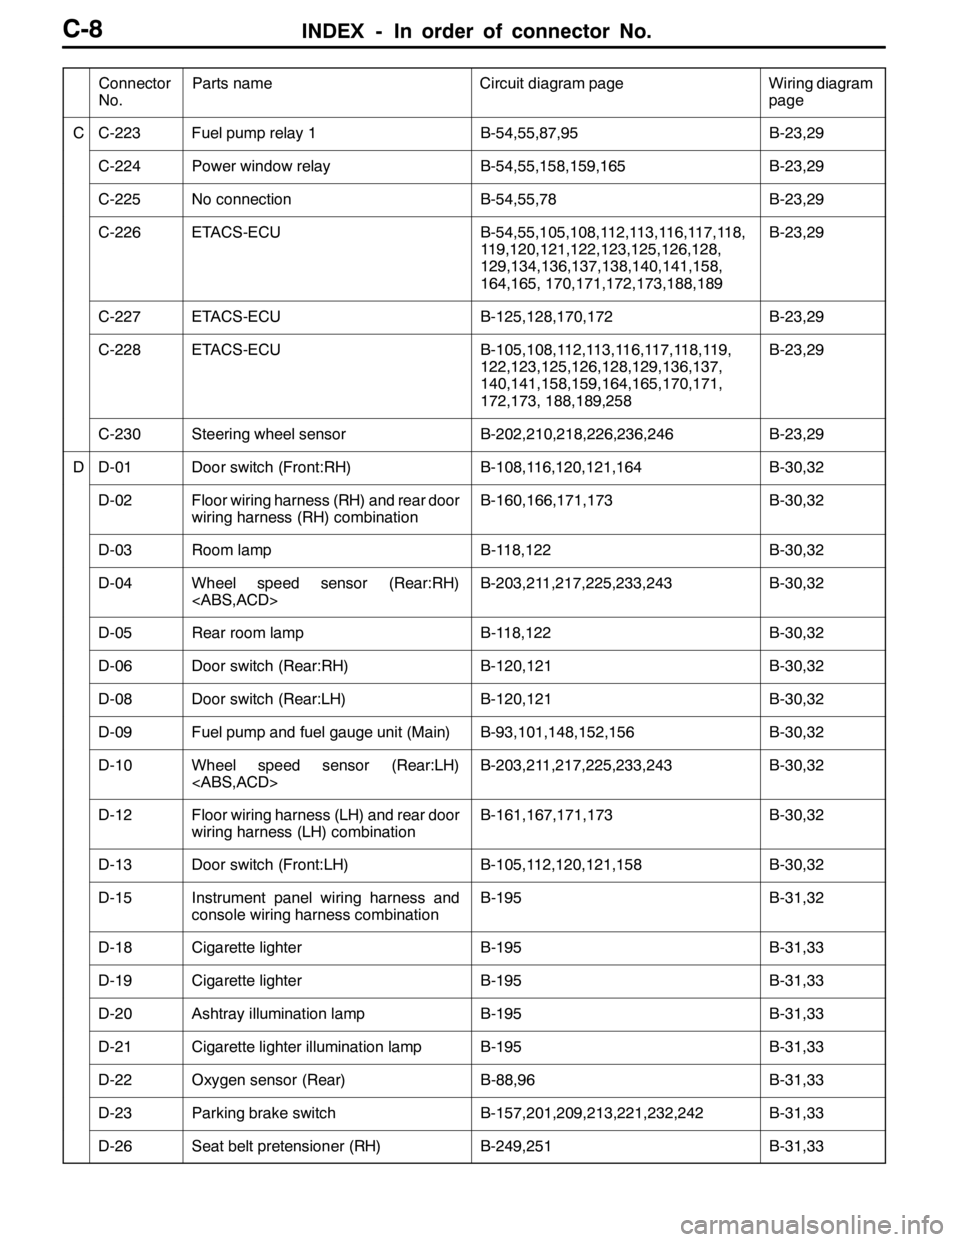
INDEX - In order of connector No.C-8
Wiring diagram
page Circuit diagram page Parts name Connector
No.
CC-223Fuel pump relay 1B-54,55,87,95B-23,29
C-224Power window relayB-54,55,158,159,165B-23,29
C-225No connectionB-54,55,78B-23,29
C-226ETACS-ECUB-54,55,105,108,112,113,116,117,118,
119,120,121,122,123,125,126,128,
129,134,136,137,138,140,141,158,
164,165, 170,171,172,173,188,189B-23,29
C-227ETACS-ECUB-125,128,170,172B-23,29
C-228ETACS-ECUB-105,108,112,113,116,117,118,119,
122,123,125,126,128,129,136,137,
140,141,158,159,164,165,170,171,
172,173, 188,189,258B-23,29
C-230Steering wheel sensorB-202,210,218,226,236,246B-23,29
DD-01Door switch (Front:RH)B-108,116,120,121,164B-30,32
D-02Floor wiring harness (RH) and rear door
wiring harness (RH) combinationB-160,166,171,173B-30,32
D-03Room lampB-118,122B-30,32
D-04Wheel speed sensor (Rear:RH)
D-05Rear room lampB-118,122B-30,32
D-06Door switch (Rear:RH)B-120,121B-30,32
D-08Door switch (Rear:LH)B-120,121B-30,32
D-09Fuel pump and fuel gauge unit (Main)B-93,101,148,152,156B-30,32
D-10Wheel speed sensor (Rear:LH)
D-12Floor wiring harness (LH) and rear door
wiring harness (LH) combinationB-161,167,171,173B-30,32
D-13Door switch (Front:LH)B-105,112,120,121,158B-30,32
D-15Instrument panel wiring harness and
console wiring harness combinationB-195B-31,32
D-18Cigarette lighterB-195B-31,33
D-19Cigarette lighterB-195B-31,33
D-20Ashtray illumination lampB-195B-31,33
D-21Cigarette lighter illumination lampB-195B-31,33
D-22Oxygen sensor (Rear)B-88,96B-31,33
D-23Parking brake switchB-157,201,209,213,221,232,242B-31,33
D-26Seat belt pretensioner (RH)B-249,251B-31,33
Page 367 of 1449
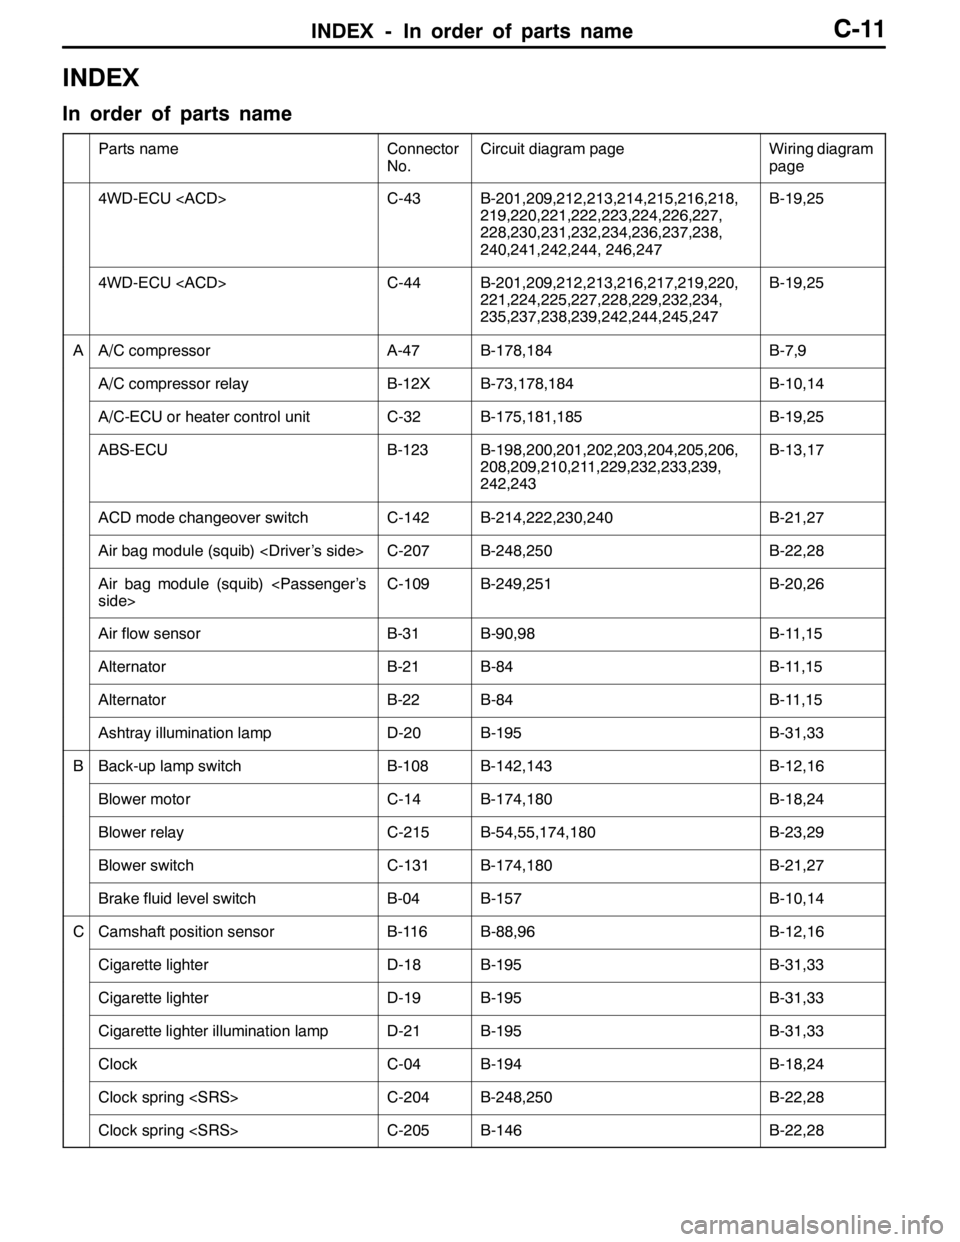
INDEX - In order of parts nameC-11
INDEX
In order of parts name
Parts nameConnector
No.Circuit diagram pageWiring diagram
page
4WD-ECU
219,220,221,222,223,224,226,227,
228,230,231,232,234,236,237,238,
240,241,242,244, 246,247B-19,25
4WD-ECU
221,224,225,227,228,229,232,234,
235,237,238,239,242,244,245,247B-19,25
AA/C compressorA-47B-178,184B-7,9
A/C compressor relayB-12XB-73,178,184B-10,14
A/C-ECU or heater control unitC-32B-175,181,185B-19,25
ABS-ECUB-123B-198,200,201,202,203,204,205,206,
208,209,210,211,229,232,233,239,
242,243B-13,17
ACD mode changeover switchC-142B-214,222,230,240B-21,27
Air bag module (squib)
Air bag module (squib)
Air flow sensorB-31B-90,98B-11,15
AlternatorB-21B-84B-11,15
AlternatorB-22B-84B-11,15
Ashtray illumination lampD-20B-195B-31,33
BBack-up lamp switchB-108B-142,143B-12,16
Blower motorC-14B-174,180B-18,24
Blower relayC-215B-54,55,174,180B-23,29
Blower switchC-131B-174,180B-21,27
Brake fluid level switchB-04B-157B-10,14
CCamshaft position sensorB-116B-88,96B-12,16
Cigarette lighterD-18B-195B-31,33
Cigarette lighterD-19B-195B-31,33
Cigarette lighter illumination lampD-21B-195B-31,33
ClockC-04B-194B-18,24
Clock spring
Clock spring
Page 370 of 1449
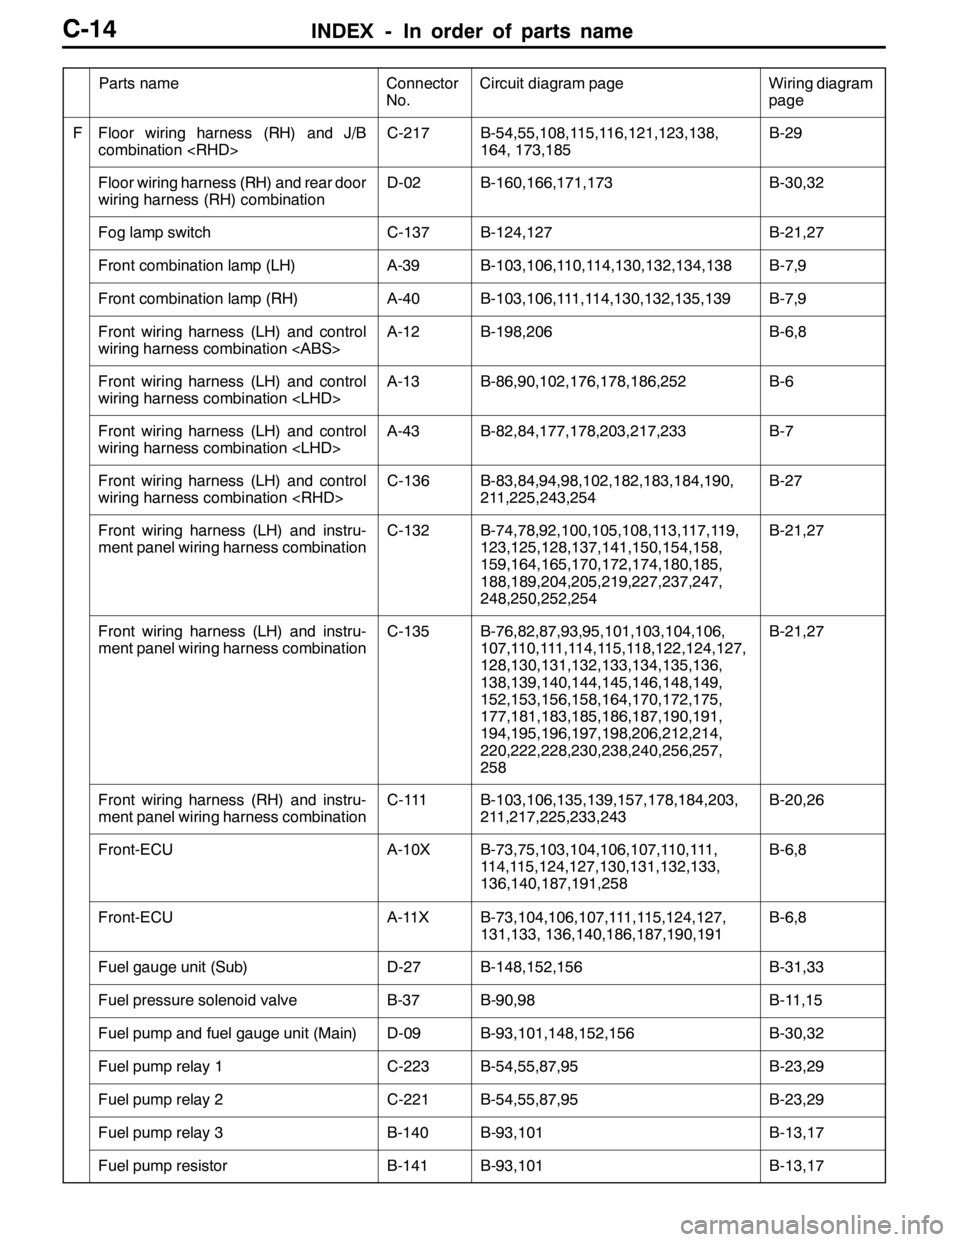
INDEX - In order of parts nameC-14
Wiring diagram
page Circuit diagram page Connector
No. Parts name
FFloor wiring harness (RH) and J/B
combination
164, 173,185B-29
Floor wiring harness (RH) and rear door
wiring harness (RH) combinationD-02B-160,166,171,173B-30,32
Fog lamp switchC-137B-124,127B-21,27
Front combination lamp (LH)A-39B-103,106,110,114,130,132,134,138B-7,9
Front combination lamp (RH)A-40B-103,106,111,114,130,132,135,139B-7,9
Front wiring harness (LH) and control
wiring harness combination
Front wiring harness (LH) and control
wiring harness combination
Front wiring harness (LH) and control
wiring harness combination
Front wiring harness (LH) and control
wiring harness combination
211,225,243,254B-27
Front wiring harness (LH) and instru-
ment panel wiring harness combinationC-132B-74,78,92,100,105,108,113,117,119,
123,125,128,137,141,150,154,158,
159,164,165,170,172,174,180,185,
188,189,204,205,219,227,237,247,
248,250,252,254B-21,27
Front wiring harness (LH) and instru-
ment panel wiring harness combinationC-135B-76,82,87,93,95,101,103,104,106,
107,110,111,114,115,118,122,124,127,
128,130,131,132,133,134,135,136,
138,139,140,144,145,146,148,149,
152,153,156,158,164,170,172,175,
177,181,183,185,186,187,190,191,
194,195,196,197,198,206,212,214,
220,222,228,230,238,240,256,257,
258B-21,27
Front wiring harness (RH) and instru-
ment panel wiring harness combinationC-111B-103,106,135,139,157,178,184,203,
211,217,225,233,243B-20,26
Front-ECUA-10XB-73,75,103,104,106,107,110,111,
114,115,124,127,130,131,132,133,
136,140,187,191,258B-6,8
Front-ECUA-11XB-73,104,106,107,111,115,124,127,
131,133, 136,140,186,187,190,191B-6,8
Fuel gauge unit (Sub)D-27B-148,152,156B-31,33
Fuel pressure solenoid valveB-37B-90,98B-11,15
Fuel pump and fuel gauge unit (Main)D-09B-93,101,148,152,156B-30,32
Fuel pump relay 1C-223B-54,55,87,95B-23,29
Fuel pump relay 2C-221B-54,55,87,95B-23,29
Fuel pump relay 3B-140B-93,101B-13,17
Fuel pump resistorB-141B-93,101B-13,17
Page 376 of 1449
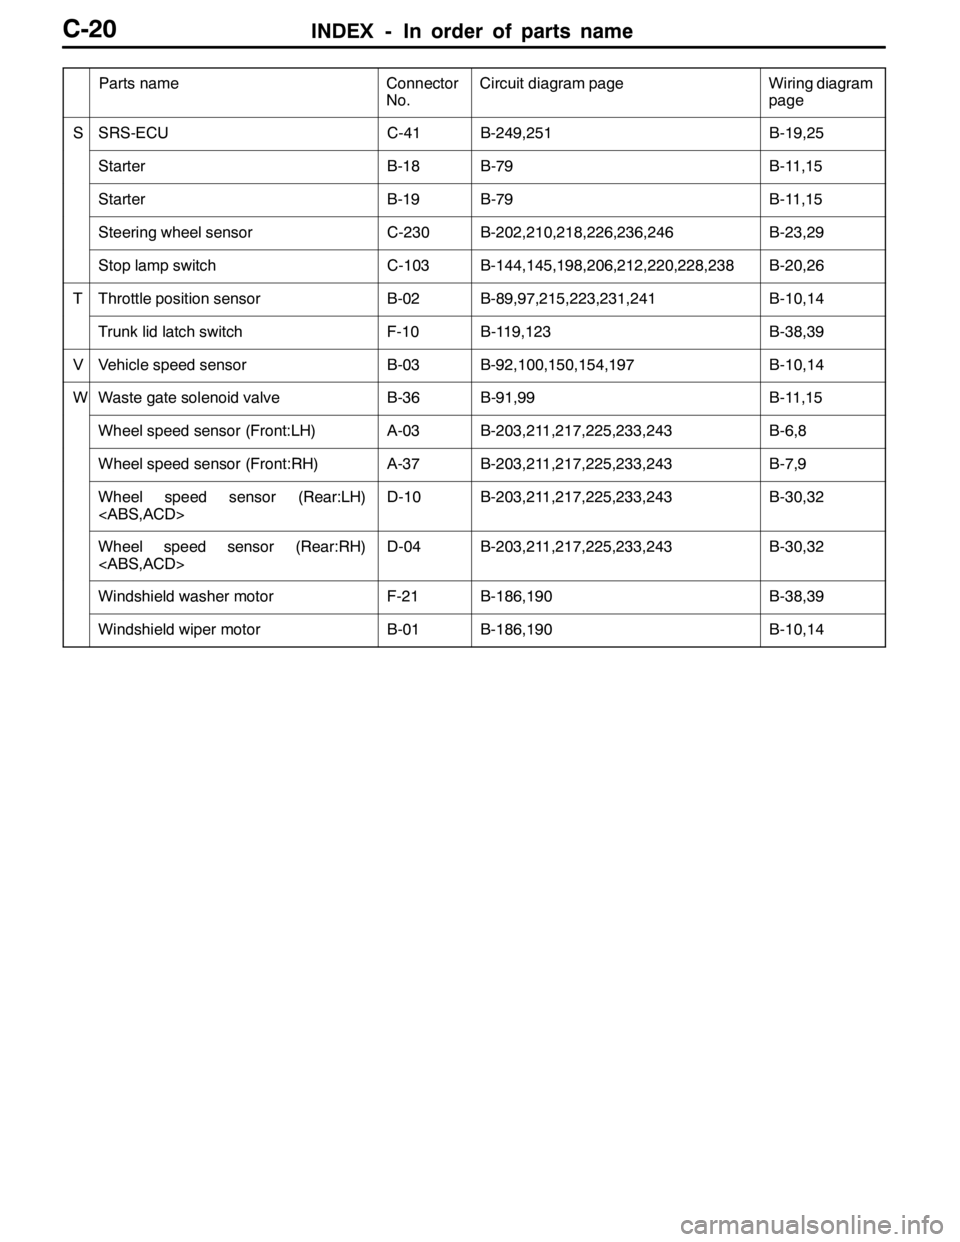
INDEX - In order of parts nameC-20
Wiring diagram
page Circuit diagram page Connector
No. Parts name
SSRS-ECUC-41B-249,251B-19,25
StarterB-18B-79B-11,15
StarterB-19B-79B-11,15
Steering wheel sensorC-230B-202,210,218,226,236,246B-23,29
Stop lamp switchC-103B-144,145,198,206,212,220,228,238B-20,26
TThrottle position sensorB-02B-89,97,215,223,231,241B-10,14
Trunk lid latch switchF-10B-119,123B-38,39
VVehicle speed sensorB-03B-92,100,150,154,197B-10,14
WWaste gate solenoid valveB-36B-91,99B-11,15
Wheel speed sensor (Front:LH)A-03B-203,211,217,225,233,243B-6,8
Wheel speed sensor (Front:RH)A-37B-203,211,217,225,233,243B-7,9
Wheel speed sensor (Rear:LH)
Wheel speed sensor (Rear:RH)
Windshield washer motorF-21B-186,190B-38,39
Windshield wiper motorB-01B-186,190B-10,14
Page 386 of 1449
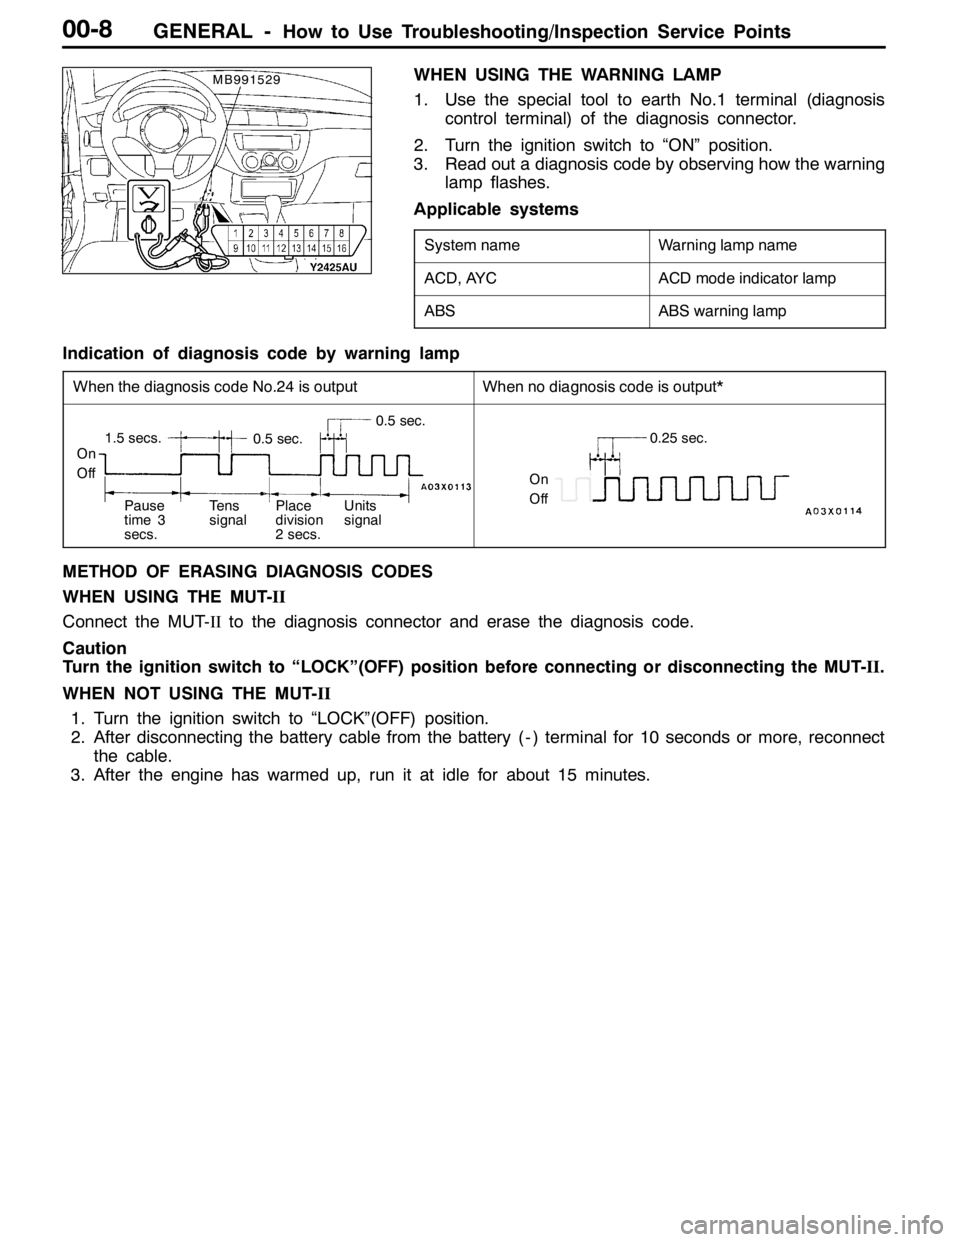
GENERAL -How to Use Troubleshooting/Inspection Service Points00-8
WHEN USING THE WARNING LAMP
1. Use the special tool to earth No.1 terminal (diagnosis
control terminal) of the diagnosis connector.
2. Turn the ignition switch to “ON” position.
3. Read out a diagnosis code by observing how the warning
lamp flashes.
Applicable systems
System nameWarning lamp name
ACD, AYCACD mode indicator lamp
ABSABS warning lamp
Indication of diagnosis code by warning lamp
When the diagnosis code No.24 is outputWhen no diagnosis code is output*
On
Off
1.5 secs.0.5 sec.
0.5 sec.
Pause
time 3
secs.Tens
signalPlace
division
2 secs.Units
signal
On
Off
0.25 sec.
METHOD OF ERASING DIAGNOSIS CODES
WHEN USING THE MUT-II
Connect the MUT-IIto the diagnosis connector and erase the diagnosis code.
Caution
Turn the ignition switch to “LOCK”(OFF) position before connecting or disconnecting the MUT-II.
WHEN NOT USING THE MUT-II
1. Turn the ignition switch to “LOCK”(OFF) position.
2. After disconnecting the battery cable from the battery ( - ) terminal for 10 seconds or more, reconnect
the cable.
3. After the engine has warmed up, run it at idle for about 15 minutes.
MB991529
Page 817 of 1449
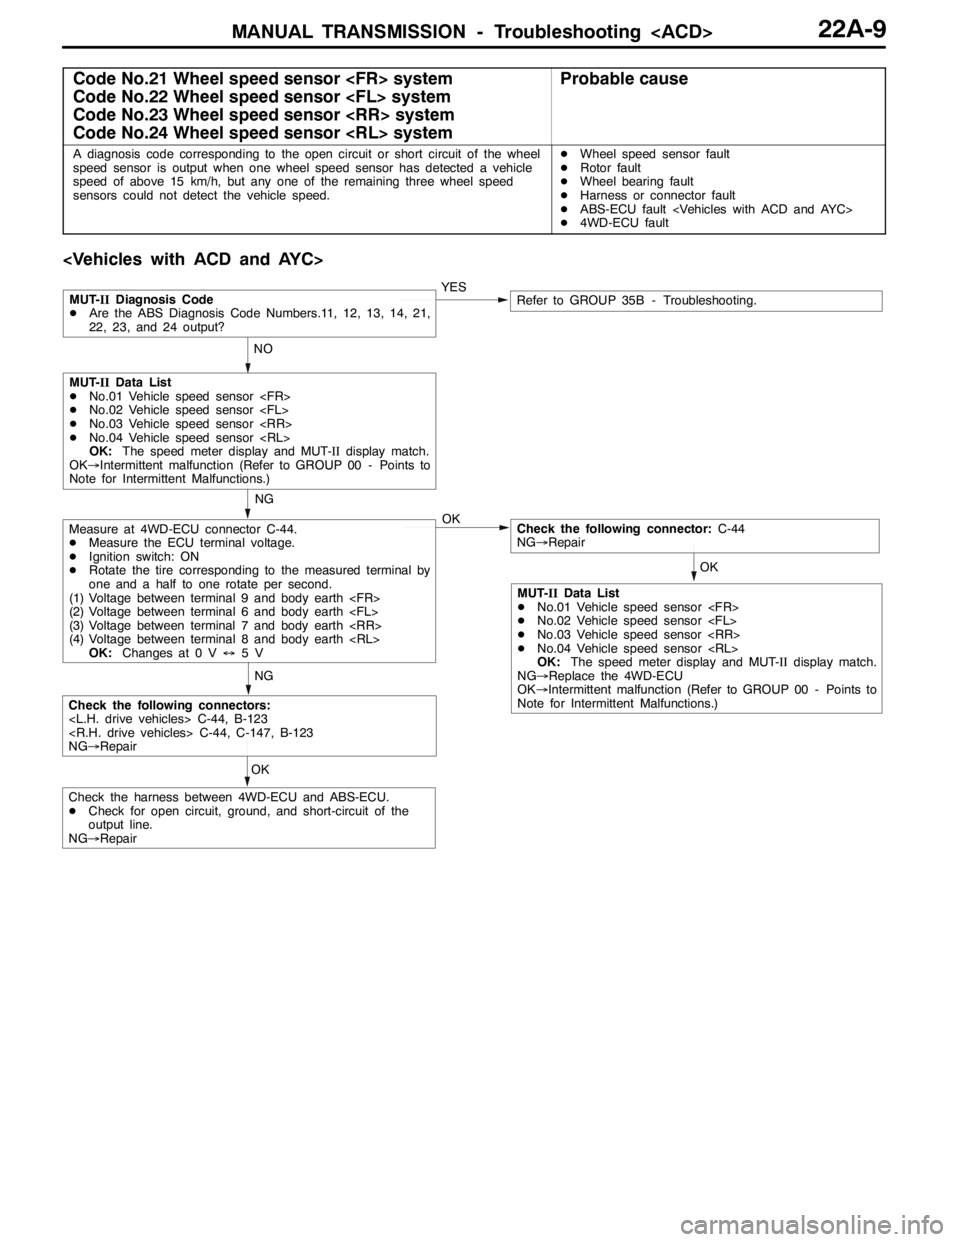
MANUAL TRANSMISSION - Troubleshooting
Code No.21 Wheel speed sensor
Code No.22 Wheel speed sensor
Code No.23 Wheel speed sensor
Code No.24 Wheel speed sensor
A diagnosis code corresponding to the open circuit or short circuit of the wheel
speed sensor is output when one wheel speed sensor has detected a vehicle
speed of above 15 km/h, but any one of the remaining three wheel speed
sensors could not detect the vehicle speed.DWheel speed sensor fault
DRotor fault
DWheel bearing fault
DHarness or connector fault
DABS-ECU fault
D4WD-ECU fault
OKNGYES
NO
OK
Measure at 4WD-ECU connector C-44.
DMeasure the ECU terminal voltage.
DIgnition switch: ON
DRotate the tire corresponding to the measured terminal by
one and a half to one rotate per second.
(1) Voltage between terminal 9 and body earth
(2) Voltage between terminal 6 and body earth
(3) Voltage between terminal 7 and body earth
(4) Voltage between terminal 8 and body earth
OK:Changes at 0 V↔5VCheck the following connector:C-44
NG→Repair
Check the following connectors:
NG→Repair
MUT-IIDiagnosis Code
DAre the ABS Diagnosis Code Numbers.11, 12, 13, 14, 21,
22, 23, and 24 output?Refer to GROUP 35B - Troubleshooting.
NG
MUT-IIData List
DNo.01 Vehicle speed sensor
DNo.02 Vehicle speed sensor
DNo.03 Vehicle speed sensor
DNo.04 Vehicle speed sensor
OK:The speed meter display and MUT-IIdisplay match.
OK→Intermittent malfunction (Refer to GROUP 00 - Points to
Note for Intermittent Malfunctions.)
OK
Check the harness between 4WD-ECU and ABS-ECU.
DCheck for open circuit, ground, and short-circuit of the
output line.
NG→Repair
MUT-IIData List
DNo.01 Vehicle speed sensor
DNo.02 Vehicle speed sensor
DNo.03 Vehicle speed sensor
DNo.04 Vehicle speed sensor
OK:The speed meter display and MUT-IIdisplay match.
NG→Replace the 4WD-ECU
OK→Intermittent malfunction (Refer to GROUP 00 - Points to
Note for Intermittent Malfunctions.)
Page 819 of 1449
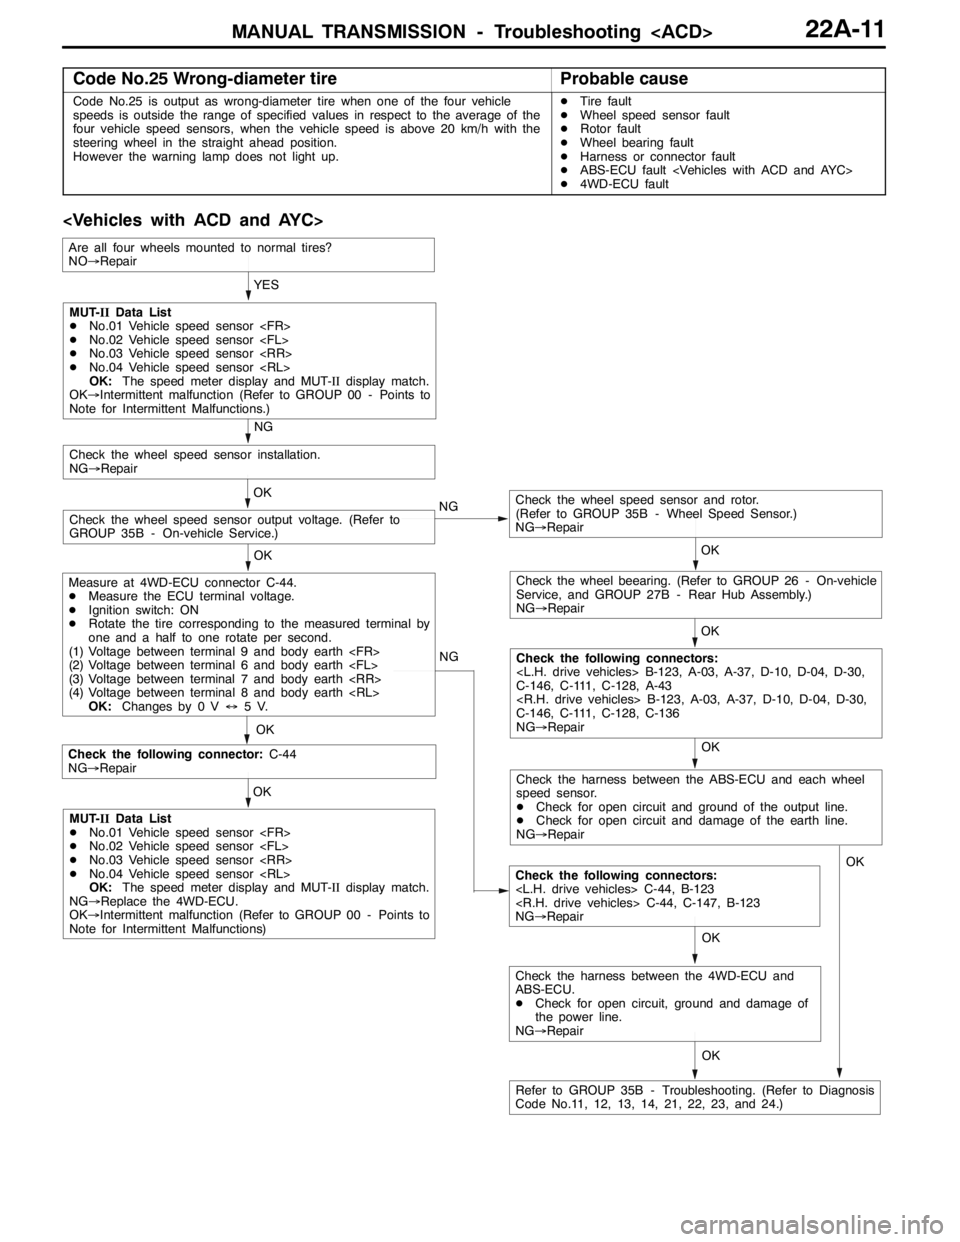
MANUAL TRANSMISSION - Troubleshooting
Code No.25 Wrong-diameter tireProbable cause
Code No.25 is output as wrong-diameter tire when one of the four vehicle
speeds is outside the range of specified values in respect to the average of the
four vehicle speed sensors, when the vehicle speed is above 20 km/h with the
steering wheel in the straight ahead position.
However the warning lamp does not light up.DTire fault
DWheel speed sensor fault
DRotor fault
DWheel bearing fault
DHarness or connector fault
DABS-ECU fault
D4WD-ECU fault
OK NG
OK
Check the following connector:C-44
NG→Repair
Check the following connectors:
NG→Repair OKYES
OK
OK
Check the wheel speed sensor and rotor.
(Refer to GROUP 35B - Wheel Speed Sensor.)
NG→Repair
Check the wheel speed sensor output voltage. (Refer to
GROUP 35B - On-vehicle Service.)OK
Check the wheel speed sensor installation.
NG→Repair
NG
OK
Check the wheel beearing. (Refer to GROUP 26 - On-vehicle
Service, and GROUP 27B - Rear Hub Assembly.)
NG→Repair
OK
Check the following connectors:
C-146, C-111, C-128, A-43
C-146, C-111, C-128, C-136
NG→Repair NG
MUT-IIData List
DNo.01 Vehicle speed sensor
DNo.02 Vehicle speed sensor
DNo.03 Vehicle speed sensor
DNo.04 Vehicle speed sensor
OK:The speed meter display and MUT-IIdisplay match.
OK→Intermittent malfunction (Refer to GROUP 00 - Points to
Note for Intermittent Malfunctions.)
Measure at 4WD-ECU connector C-44.
DMeasure the ECU terminal voltage.
DIgnition switch: ON
DRotate the tire corresponding to the measured terminal by
one and a half to one rotate per second.
(1) Voltage between terminal 9 and body earth
(2) Voltage between terminal 6 and body earth
(3) Voltage between terminal 7 and body earth
(4) Voltage between terminal 8 and body earth
OK:Changes by 0 V↔5V.
MUT-IIData List
DNo.01 Vehicle speed sensor
DNo.02 Vehicle speed sensor
DNo.03 Vehicle speed sensor
DNo.04 Vehicle speed sensor
OK:The speed meter display and MUT-IIdisplay match.
NG→Replace the 4WD-ECU.
OK→Intermittent malfunction (Refer to GROUP 00 - Points to
Note for Intermittent Malfunctions)
Refer to GROUP 35B - Troubleshooting. (Refer to Diagnosis
Code No.11, 12, 13, 14, 21, 22, 23, and 24.)
Are all four wheels mounted to normal tires?
NO→Repair
Check the harness between the ABS-ECU and each wheel
speed sensor.
DCheck for open circuit and ground of the output line.
DCheck for open circuit and damage of the earth line.
NG→Repair
OK
Check the harness between the 4WD-ECU and
ABS-ECU.
DCheck for open circuit, ground and damage of
the power line.
NG→RepairOK
Page 821 of 1449
MANUAL TRANSMISSION - Troubleshooting
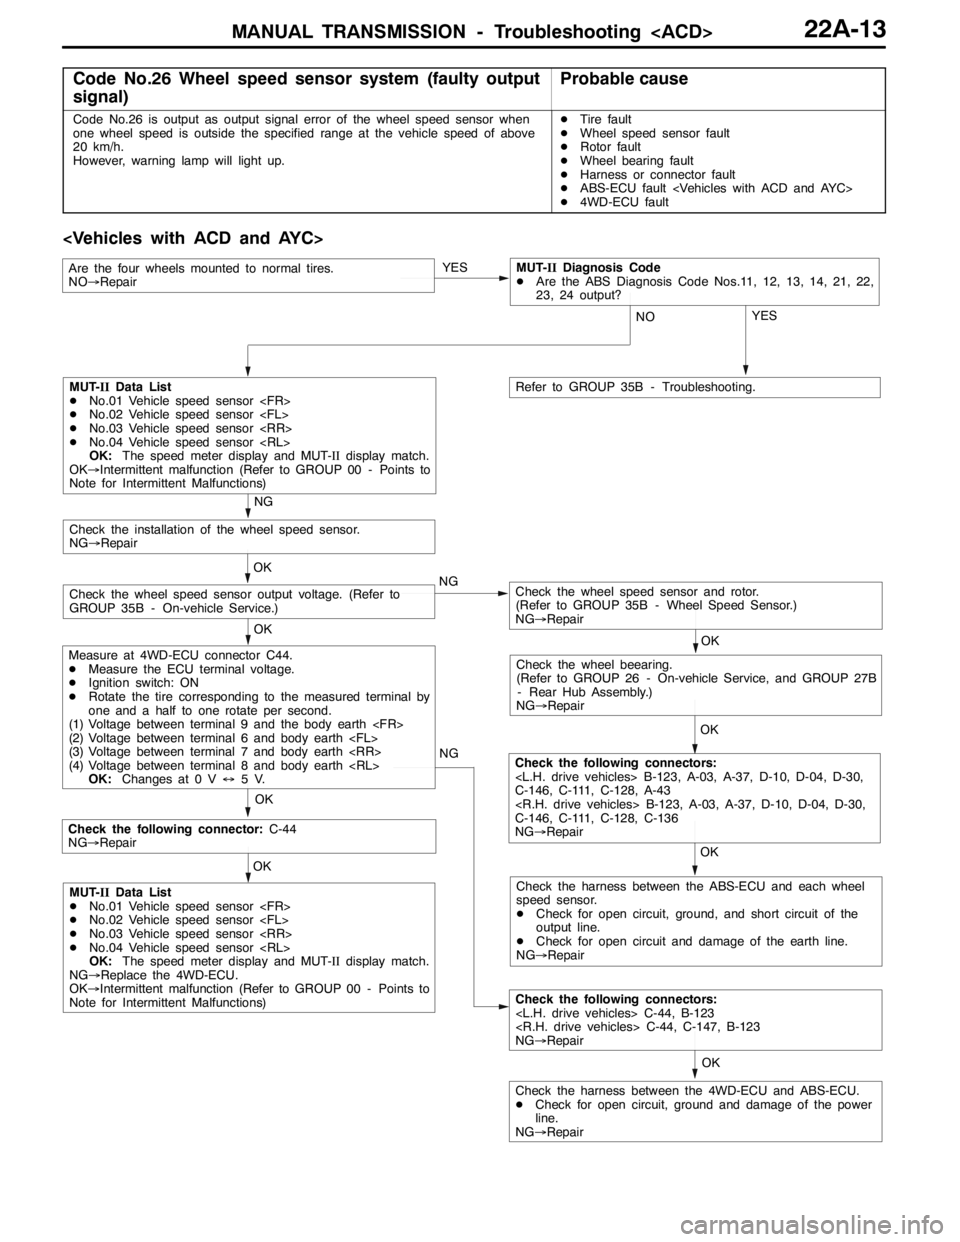
Code No.26 Wheel speed sensor system (faulty output
signal)Probable cause
Code No.26 is output as output signal error of the wheel speed sensor when
one wheel speed is outside the specified range at the vehicle speed of above
20 km/h.
However, warning lamp will light up.DTire fault
DWheel speed sensor fault
DRotor fault
DWheel bearing fault
DHarness or connector fault
DABS-ECU fault
D4WD-ECU fault
OK NG
OK
Check the following connector:C-44
NG→Repair
Check the following connectors:
NG→Repair OK
Check the harness between the 4WD-ECU and ABS-ECU.
DCheck for open circuit, ground and damage of the power
line.
NG→RepairYES
OK OK
Check the wheel speed sensor and rotor.
(Refer to GROUP 35B - Wheel Speed Sensor.)
NG→RepairCheck the wheel speed sensor output voltage. (Refer to
GROUP 35B - On-vehicle Service.)OK
Check the installation of the wheel speed sensor.
NG→Repair
NG
OK
Check the wheel beearing.
(Refer to GROUP 26 - On-vehicle Service, and GROUP 27B
- Rear Hub Assembly.)
NG→Repair
OK
Check the following connectors:
C-146, C-111, C-128, A-43
C-146, C-111, C-128, C-136
NG→Repair NG
MUT-IIData List
DNo.01 Vehicle speed sensor
DNo.02 Vehicle speed sensor
DNo.03 Vehicle speed sensor
DNo.04 Vehicle speed sensor
OK:The speed meter display and MUT-IIdisplay match.
OK→Intermittent malfunction (Refer to GROUP 00 - Points to
Note for Intermittent Malfunctions)
Measure at 4WD-ECU connector C44.
DMeasure the ECU terminal voltage.
DIgnition switch: ON
DRotate the tire corresponding to the measured terminal by
one and a half to one rotate per second.
(1) Voltage between terminal 9 and the body earth
(2) Voltage between terminal 6 and body earth
(3) Voltage between terminal 7 and body earth
(4) Voltage between terminal 8 and body earth
OK:Changes at 0 V↔5V.
MUT-IIData List
DNo.01 Vehicle speed sensor
DNo.02 Vehicle speed sensor
DNo.03 Vehicle speed sensor
DNo.04 Vehicle speed sensor
OK:The speed meter display and MUT-IIdisplay match.
NG→Replace the 4WD-ECU.
OK→Intermittent malfunction (Refer to GROUP 00 - Points to
Note for Intermittent Malfunctions)Check the harness between the ABS-ECU and each wheel
speed sensor.
DCheck for open circuit, ground, and short circuit of the
output line.
DCheck for open circuit and damage of the earth line.
NG→Repair YES
NO
Refer to GROUP 35B - Troubleshooting.
Are the four wheels mounted to normal tires.
NO→RepairMUT-IIDiagnosis Code
DAre the ABS Diagnosis Code Nos.11, 12, 13, 14, 21, 22,
23, 24 output?
Page 823 of 1449
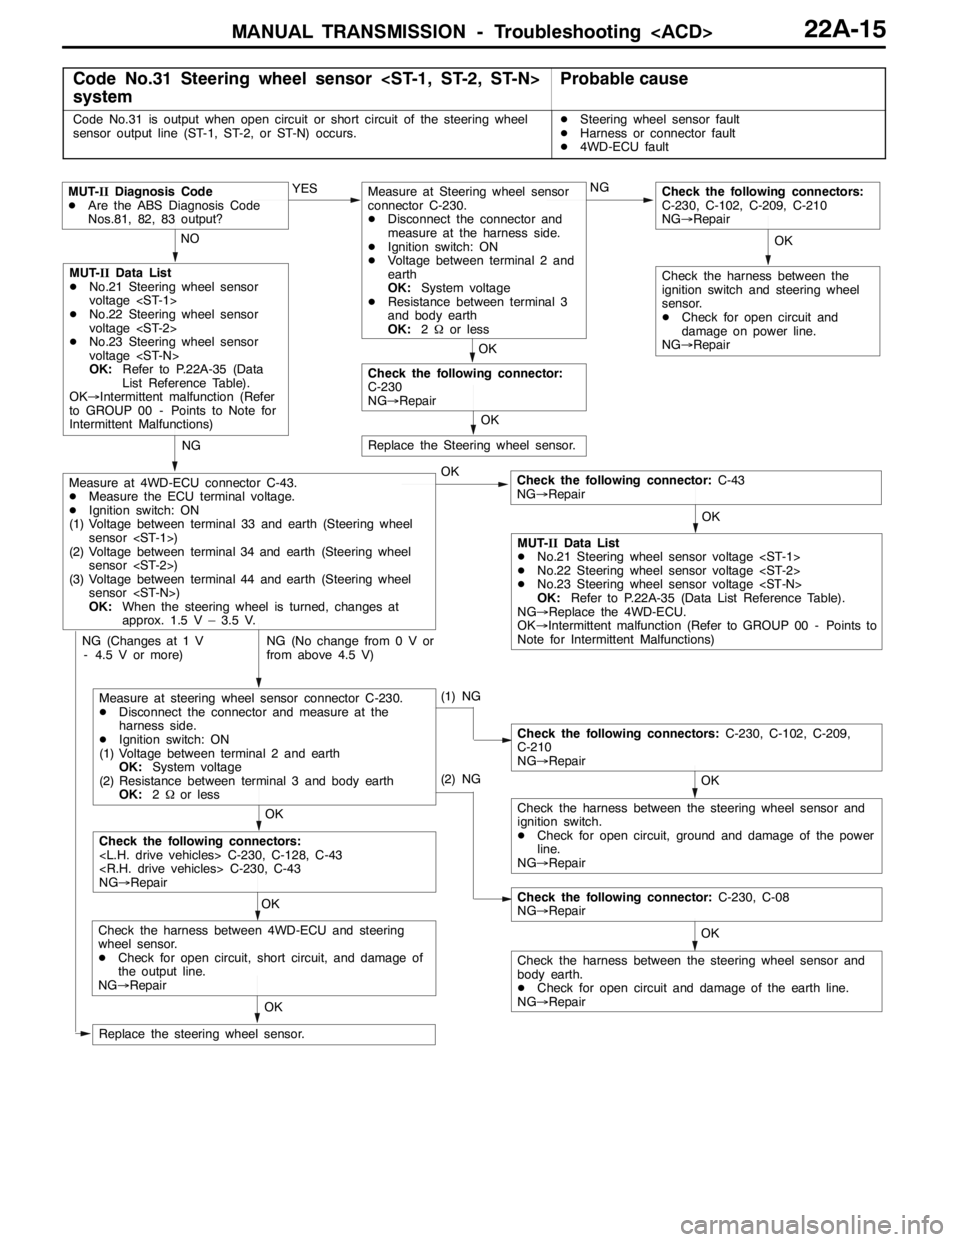
MANUAL TRANSMISSION - Troubleshooting
Code No.31 Steering wheel sensor
systemProbable cause
Code No.31 is output when open circuit or short circuit of the steering wheel
sensor output line (ST-1, ST-2, or ST-N) occurs.DSteering wheel sensor fault
DHarness or connector fault
D4WD-ECU fault
OK NG NO
OK
MUT-IIData List
DNo.21 Steering wheel sensor
voltage
DNo.22 Steering wheel sensor
voltage
DNo.23 Steering wheel sensor
voltage
OK:Refer to P.22A-35 (Data
List Reference Table).
OK→Intermittent malfunction (Refer
to GROUP 00 - Points to Note for
Intermittent Malfunctions)
Check the following connector:C-43
NG→Repair YES
MUT-IIDiagnosis Code
DAre the ABS Diagnosis Code
Nos.81, 82, 83 output?
MUT-IIData List
DNo.21 Steering wheel sensor voltage
DNo.22 Steering wheel sensor voltage
DNo.23 Steering wheel sensor voltage
OK:Refer to P.22A-35 (Data List Reference Table).
NG→Replace the 4WD-ECU.
OK→Intermittent malfunction (Refer to GROUP 00 - Points to
Note for Intermittent Malfunctions)
NG (No change from 0 V or
from above 4.5 V)
Measure at 4WD-ECU connector C-43.
DMeasure the ECU terminal voltage.
DIgnition switch: ON
(1) Voltage between terminal 33 and earth (Steering wheel
sensor
(2) Voltage between terminal34and earth (Steering wheel
sensor
(3) Voltage between terminal44 andearth (Steering wheel
sensor
OK:When the steering wheel is turned, changes at
approx. 1.5 V – 3.5 V.
(1) NG
NG (Changes at 1 V
- 4.5 V or more)
OK
Check the harness between the steering wheel sensor and
ignition switch.
DCheck for open circuit, ground and damage of the power
line.
NG→Repair
Check the following connectors:C-230, C-102, C-209,
C-210
NG→Repair
OKOK
Check the following connectors:
NG→Repair
OK
Check the harness between 4WD-ECU and steering
wheel sensor.
DCheck for open circuit, short circuit, and damage of
the output line.
NG→Repair
Replace the steering wheel sensor.
Replace the Steering wheel sensor.
OK
OK
Check the following connector:
C-230
NG→RepairNG
Measure at Steering wheel sensor
connector C-230.
DDisconnect the connector and
measure at the harness side.
DIgnition switch: ON
DVoltage between terminal 2 and
earth
OK:System voltage
DResistance between terminal 3
and body earth
OK:2Ωor less
OK
Check the following connectors:
C-230, C-102, C-209, C-210
NG→Repair
Check the harness between the
ignition switch and steering wheel
sensor.
DCheck for open circuit and
damage on power line.
NG→Repair
(2) NG
OK
Check the harness between the steering wheel sensor and
body earth.
DCheck for open circuit and damage of the earth line.
NG→Repair
Check the following connector:C-230, C-08
NG→Repair
Measure at steering wheel sensor connector C-230.
DDisconnect the connector and measure at the
harness side.
DIgnition switch: ON
(1) Voltage between terminal 2 and earth
OK:System voltage
(2) Resistance between terminal 3 and body earth
OK:2Ωor less
Page 829 of 1449
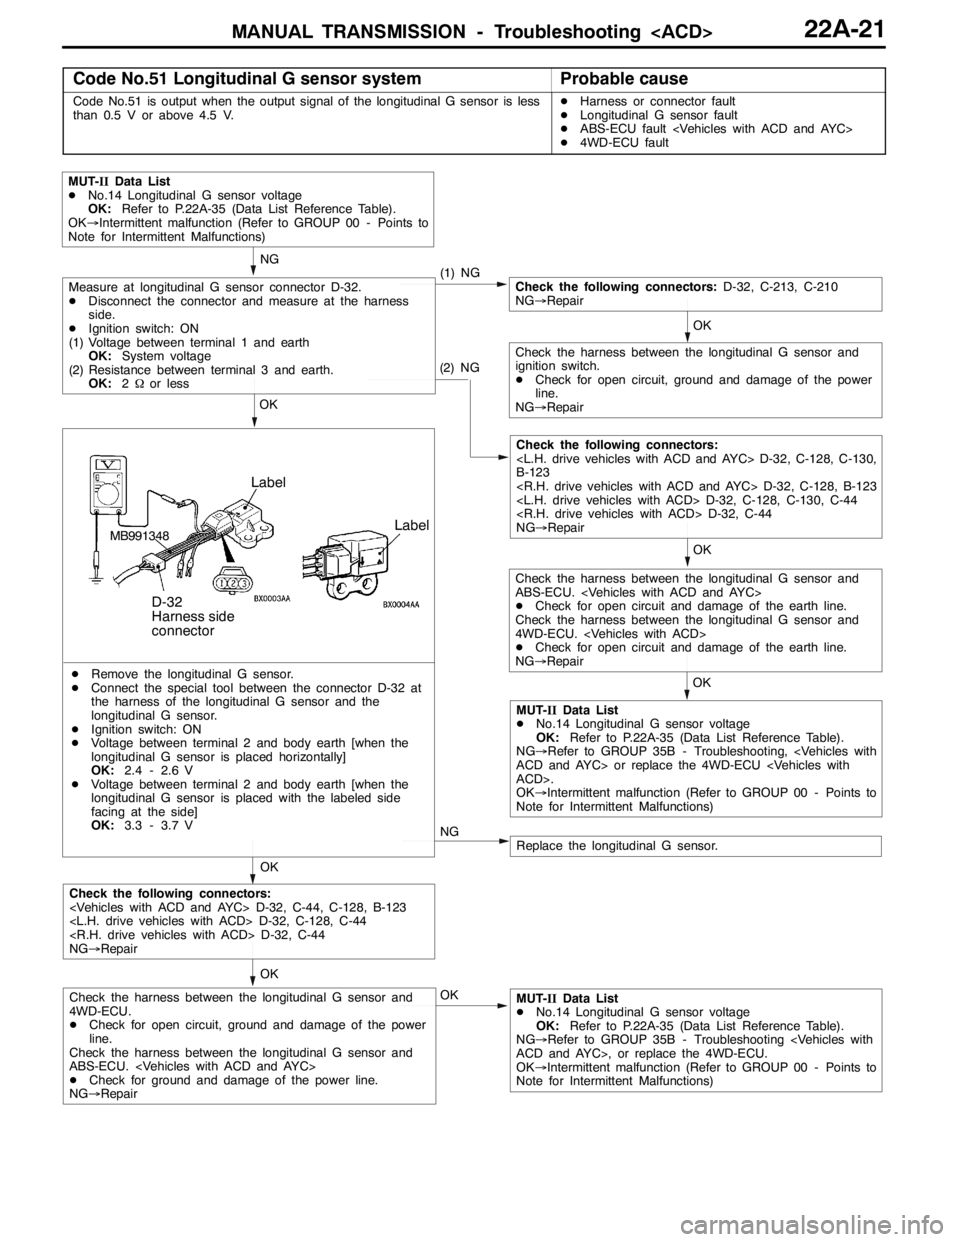
MANUAL TRANSMISSION - Troubleshooting
Code No.51 Longitudinal G sensor systemProbable cause
Code No.51 is output when the output signal of the longitudinal G sensor is less
than 0.5 V or above 4.5 V.DHarness or connector fault
DLongitudinal G sensor fault
DABS-ECU fault
D4WD-ECU fault
MB991348OK
OK
(1) NGNG
Check the following connectors:D-32, C-213, C-210
NG→Repair
MUT-IIData List
DNo.14 Longitudinal G sensor voltage
OK:Refer to P.22A-35 (Data List Reference Table).
OK→Intermittent malfunction (Refer to GROUP 00 - Points to
Note for Intermittent Malfunctions)
Check the harness between the longitudinal G sensor and
ignition switch.
DCheck for open circuit, ground and damage of the power
line.
NG→Repair
Measure at longitudinal G sensor connector D-32.
DDisconnect the connector and measure at the harness
side.
DIgnition switch: ON
(1) Voltage between terminal 1 and earth
OK:System voltage
(2) Resistance between terminal 3 and earth.
OK:2Ωor less
(2) NG
OK
Check the following connectors:
B-123
NG→Repair
OK
Check the harness between the longitudinal G sensor and
ABS-ECU.
DCheck for open circuit and damage of the earth line.
Check the harness between the longitudinal G sensor and
4WD-ECU.
DCheck for open circuit and damage of the earth line.
NG→Repair
MUT-IIData List
DNo.14 Longitudinal G sensor voltage
OK:Refer to P.22A-35 (Data List Reference Table).
NG→Refer to GROUP 35B - Troubleshooting,
OK→Intermittent malfunction (Refer to GROUP 00 - Points to
Note for Intermittent Malfunctions)
NG
DRemove the longitudinal G sensor.
DConnect the special tool between the connector D-32 at
the harness of the longitudinal G sensor and the
longitudinal G sensor.
DIgnition switch: ON
DVoltage between terminal 2 and body earth [when the
longitudinal G sensor is placed horizontally]
OK:2.4 - 2.6 V
DVoltage between terminal 2 and body earth [when the
longitudinal G sensor is placed with the labeled side
facing at the side]
OK:3.3 - 3.7 V
Label
D-32
Harness side
connector
Label
Replace the longitudinal G sensor.
OK
OK
Check the following connectors:
NG→Repair
OKMUT-IIData List
DNo.14 Longitudinal G sensor voltage
OK:Refer to P.22A-35 (Data List Reference Table).
NG→Refer to GROUP 35B - Troubleshooting
OK→Intermittent malfunction (Refer to GROUP 00 - Points to
Note for Intermittent Malfunctions)Check the harness between the longitudinal G sensor and
4WD-ECU.
DCheck for open circuit, ground and damage of the power
line.
Check the harness between the longitudinal G sensor and
ABS-ECU.
DCheck for ground and damage of the power line.
NG→Repair