ad blue MITSUBISHI LANCER EVOLUTION 2007 Service Owner's Manual
[x] Cancel search | Manufacturer: MITSUBISHI, Model Year: 2007, Model line: LANCER EVOLUTION, Model: MITSUBISHI LANCER EVOLUTION 2007Pages: 1449, PDF Size: 56.82 MB
Page 167 of 1449

CIRCUIT DIAGRAMSB-69
DEDICATED FUSE
Power supply
circuitNo.Rated
capacity (A)Identification
colourCircuit
Battery/alternator
(FusiblelinkNo6)
115BlueSpare connectors
(FusiblelinkNo.6)210RedHorn relay
320YellowEngine control relay and ignition control relay
410RedA/C compressor
515BlueABS-ECU, 4WD-ECU, high-mounted stop lamp and rear
combination lamp
630GreenCondenser fan motor
77.5BrownAlternator
810RedETACS-ECU
9---
1015BlueFuel pump
Front-ECU
(Headlamprelay:
1110RedHeadlamp
(Headlamp relay:
HI)1210RedHeadlamp
Front-ECU
(Headlamprelay:
1310RedFront combination lamp
(Headlamp relay:
LO)1410RedFront combination lamp
Front-ECU
(Tail lamp relay)157.5BrownHeater control unit or A/C-ECU, clock, combination
meter, fog lamp switch, hazard warning switch, radio,
rear combination lamp, headlamp leveling switch, front
combination lamp, cigarette lighter illumination lamp,
ashtray illumination lamp, ACD mode changeover switch
and inter cooler water splay switch
167.5BrownFront combination lamp, licence plate lamp and rear
combination lamp
Ignition switch
(ACC)1710RedClock
Battery/alternator
(Fusible link No. 6)1810RedEngine-ECU, ETACS-ECU, front-ECU and combination
meter
-19---
Fusible link No. 52120YellowIntercooler water splay
-22---
Ignition switch
(IG2)23---
-24---
Battery/alternator
(Fusible link No. 6)2530GreenCondenser fan motor
Page 169 of 1449

CIRCUIT DIAGRAMSB-71
MULTI-PURPOSE FUSE (In junction block)
Power supply
circuitNo.Rated
capacity (A)Identification
colourCircuit
Ignition
switch
IG1110RedIgnition coil
switch
27.5BrownColumn switch, combination meter, ETACS-ECU,
SRS-ECU, vehicle speed sensor and ACD mode
changeover switch
37.5BrownETACS-ECU and SRS-ECU
4---
IG257.5BrownA/C compressor relay, A/C-ECU, blower relay,
condenser fan relay, defogger relay, front-ECU,
4WD-ECU, steering wheel sensor and inter cooler
water splay relay
Multi-purpose fuse
No. 20 (Defogger
relay)6---
Ignition
switch
ACC720YellowFront-ECU and windshield wiper motor
switch
IG187.5BrownEngine-ECU and fuel pump relay (1) and fuel pump
relay (2)
ACC915BlueCigarette lighter
10---
117.5BrownA/C-ECU and remote controlled mirror switch
IG2127.5BrownABS-ECU, G-sensor (longitudinal) and G-sensor
(lateral)
ACC13---
14---
Fusible link No. 1
Battery/alternator
1515BlueDiagnosis connector
Battery/alternator
1610RedRear fog lamp relay
1710RedETACS-ECU
18---
1930GreenBlower motor and resistor
2030GreenDefogger
Page 513 of 1449

ENGINE OVERHAUL -Piston and Connecting Rod11B-59
"BAOIL RING INSTALLATION
1. Assemble the oil ring’s spacer into the piston ring groove.
Next, assemble the upper side rail, and then assemble
the lower side rail.
NOTE
(1) Install so that the side rail and spacer closed gaps
are at the position shown in the illustration.
(2) The following identification colours are applied on
the spacer and side rail (new parts) according to the
size.
SizeIdentification colour
S.T.D.None
0.50 mm O.S.Blue
1.00 mm O.S.Yellow
2. The side rail can be assembled easily by fitting one end
of the side rail into the piston groove and then pressing
on it with fingers as shown in the illustration.
Caution
The side rail’s closed gap could break if it is spread
open with a ring expander in the same manner as
the other piston rings.
3. After assembling into the piston, check that the side rail
rotates smoothly in either direction.
"CAPISTON RING NO. 2/PISTON RING NO. 1
INSTALLATION
Using a piston ring expander, assemble the ring with the
identification mark facing upward.
Identification mark
No. 1 ring 1R
No. 2 ring 2R
NOTE
The following size marks are stamped on the piston ring
according to the size.
SizeSize mark
S.T.D.(None)
0.50 mm O.S.50
1.00 mm O.S.100
Spacer closed gap Upper
side
rail
closed
gapLower
side
rail
closed
gap
Side rail edge
Piston ring expander
Identification
mark: 2RSize marks
No. 1
No. 2 Identification mark: 1R
Page 666 of 1449

MPI -On-vehicle Service13A-134
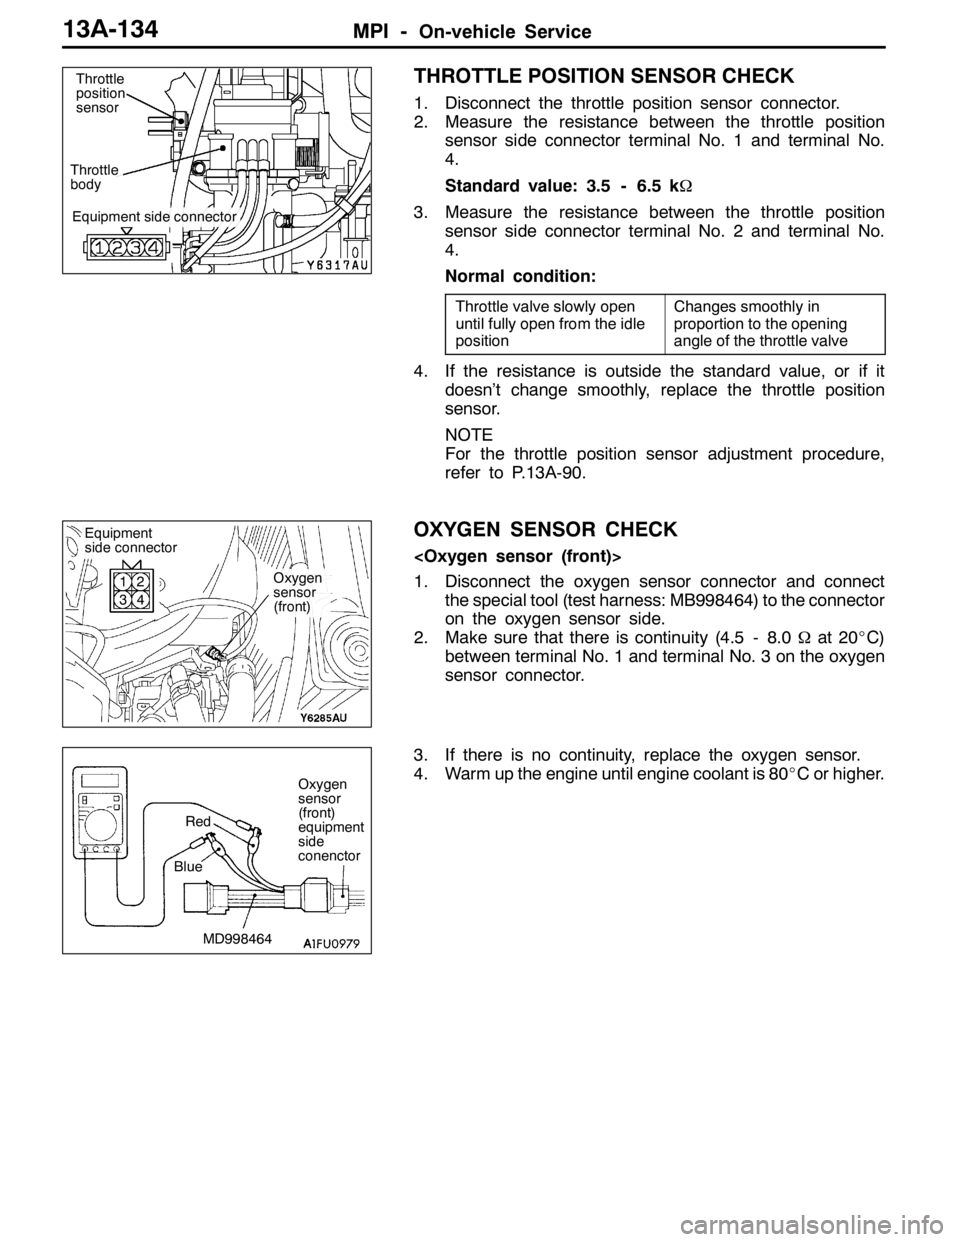
THROTTLE POSITION SENSOR CHECK
1. Disconnect the throttle position sensor connector.
2. Measure the resistance between the throttle position
sensor side connector terminal No. 1 and terminal No.
4.
Standard value: 3.5 - 6.5 kΩ
3. Measure the resistance between the throttle position
sensor side connector terminal No. 2 and terminal No.
4.
Normal condition:
Throttle valve slowly open
until fully open from the idle
positionChanges smoothly in
proportion to the opening
angle of the throttle valve
4. If the resistance is outside the standard value, or if it
doesn’t change smoothly, replace the throttle position
sensor.
NOTE
For the throttle position sensor adjustment procedure,
refer to P.13A-90.
OXYGEN SENSOR CHECK
1. Disconnect the oxygen sensor connector and connect
the special tool (test harness: MB998464) to the connector
on the oxygen sensor side.
2. Make sure that there is continuity (4.5 - 8.0Ωat 20_C)
between terminal No. 1 and terminal No. 3 on the oxygen
sensor connector.
3. If there is no continuity, replace the oxygen sensor.
4. Warm up the engine until engine coolant is 80_C or higher.
Equipment side connector
Throttle
bodyThrottle
position
sensor
Oxygen
sensor
(front)
Equipment
side connector
1
32
4
Oxygen
sensor
(front)
equipment
side
conenctor
MD998464 BlueRed
Page 667 of 1449

MPI -On-vehicle Service13A-135
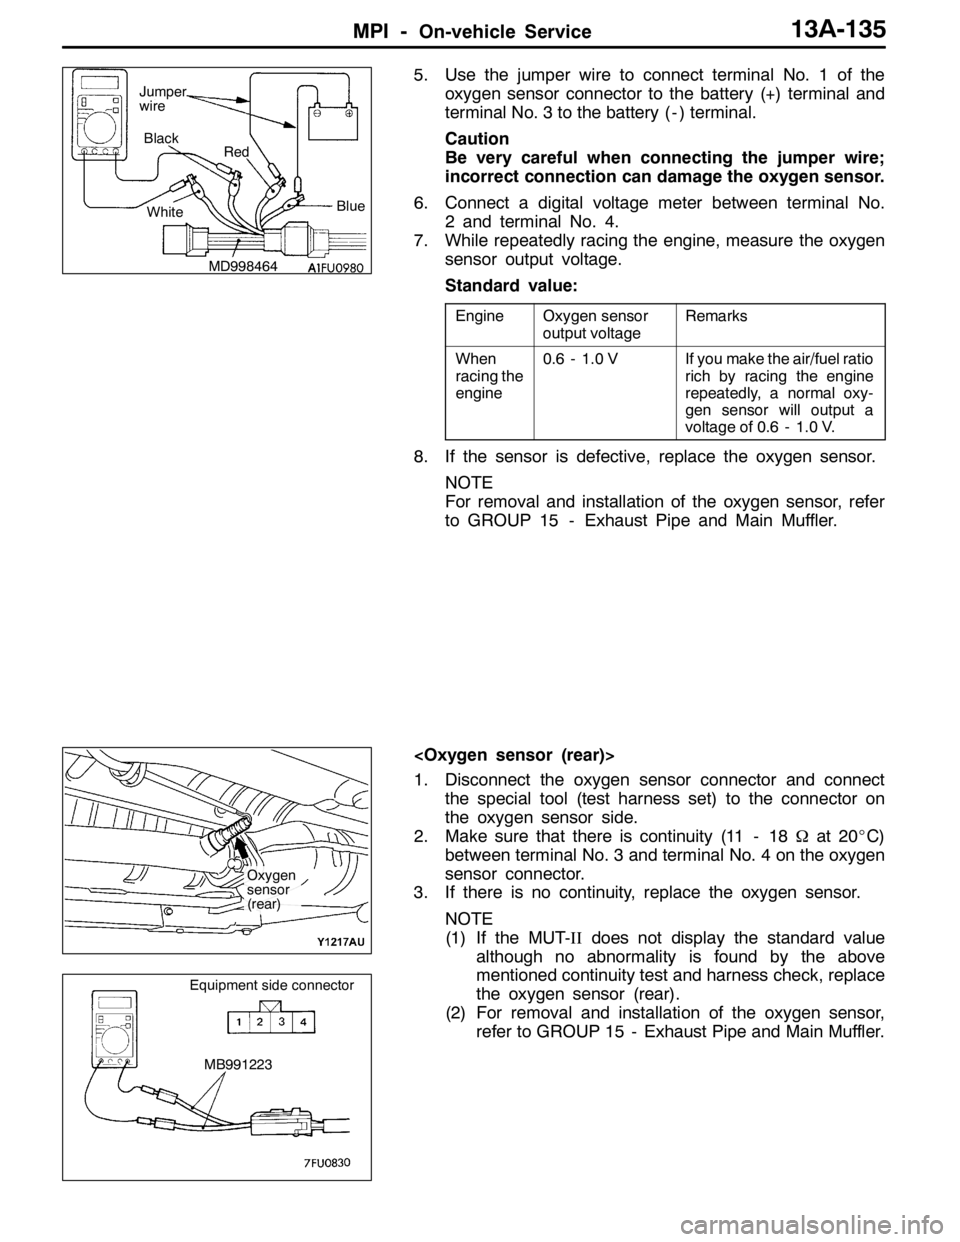
5. Use the jumper wire to connect terminal No. 1 of the
oxygen sensor connector to the battery (+) terminal and
terminal No. 3 to the battery ( - ) terminal.
Caution
Be very careful when connecting the jumper wire;
incorrect connection can damage the oxygen sensor.
6. Connect a digital voltage meter between terminal No.
2 and terminal No. 4.
7. While repeatedly racing the engine, measure the oxygen
sensor output voltage.
Standard value:
EngineOxygen sensor
output voltageRemarks
When
racing the
engine0.6 - 1.0 VIf you make the air/fuel ratio
rich by racing the engine
repeatedly, a normal oxy-
gen sensor will output a
voltage of 0.6 - 1.0 V.
8. If the sensor is defective, replace the oxygen sensor.
NOTE
For removal and installation of the oxygen sensor, refer
to GROUP 15 - Exhaust Pipe and Main Muffler.
1. Disconnect the oxygen sensor connector and connect
the special tool (test harness set) to the connector on
the oxygen sensor side.
2. Make sure that there is continuity (11 - 18Ωat 20_C)
between terminal No. 3 and terminal No. 4 on the oxygen
sensor connector.
3. If there is no continuity, replace the oxygen sensor.
NOTE
(1) If the MUT-IIdoes not display the standard value
although no abnormality is found by the above
mentioned continuity test and harness check, replace
the oxygen sensor (rear).
(2) For removal and installation of the oxygen sensor,
refer to GROUP 15 - Exhaust Pipe and Main Muffler.
MD998464Blue Black
Red
White Jumper
wire
Oxygen
sensor
(rear)
MB991223
Equipment side connector
Page 739 of 1449

ENGINE ELECTRICAL -Charging System16-7
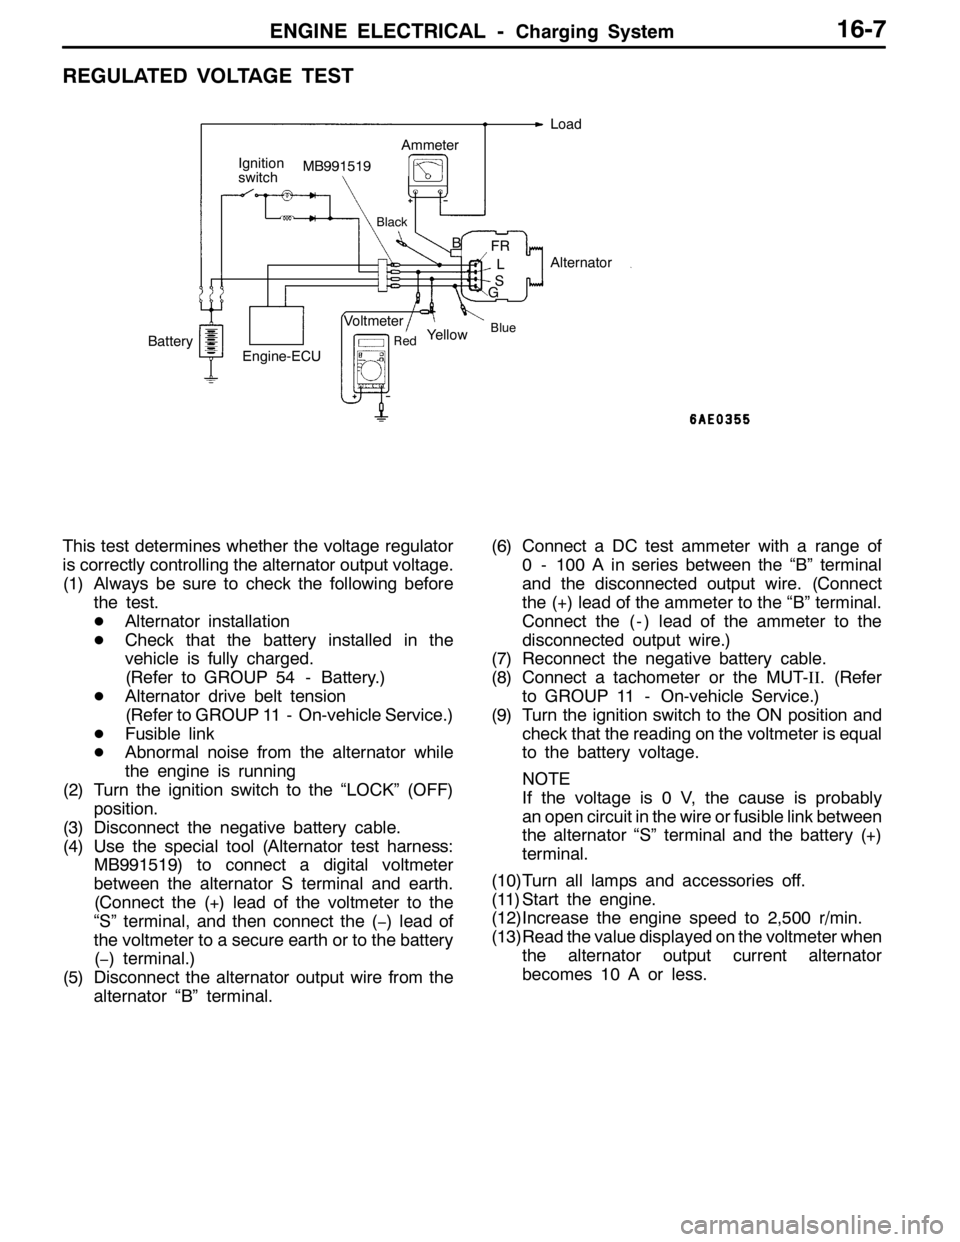
REGULATED VOLTAGE TEST
B
BlueRed
Ignition
switchLoad
FR
L
S
GMB991519
Alternator
BatteryVoltmeterAmmeter
Yellow
Engine-ECU
Black
This test determines whether the voltage regulator
is correctly controlling the alternator output voltage.
(1) Always be sure to check the following before
the test.
DAlternator installation
DCheck that the battery installed in the
vehicle is fully charged.
(Refer to GROUP 54 - Battery.)
DAlternator drive belt tension
(Refer to GROUP 11 - On-vehicle Service.)
DFusible link
DAbnormal noise from the alternator while
the engine is running
(2) Turn the ignition switch to the “LOCK” (OFF)
position.
(3) Disconnect the negative battery cable.
(4) Use the special tool (Alternator test harness:
MB991519) to connect a digital voltmeter
between the alternator S terminal and earth.
(Connect the (+) lead of the voltmeter to the
“S” terminal, and then connect the (−) lead of
the voltmeter to a secure earth or to the battery
(−) terminal.)
(5) Disconnect the alternator output wire from the
alternator “B” terminal.(6) Connect a DC test ammeter with a range of
0 - 100 A in series between the “B” terminal
and the disconnected output wire. (Connect
the (+) lead of the ammeter to the “B” terminal.
Connect the ( - ) lead of the ammeter to the
disconnected output wire.)
(7) Reconnect the negative battery cable.
(8) Connect a tachometer or the MUT-II. (Refer
to GROUP 11 - On-vehicle Service.)
(9) Turn the ignition switch to the ON position and
check that the reading on the voltmeter is equal
to the battery voltage.
NOTE
If the voltage is 0 V, the cause is probably
an open circuit in the wire or fusible link between
the alternator “S” terminal and the battery (+)
terminal.
(10)Turn all lamps and accessories off.
(11) Start the engine.
(12)Increase the engine speed to 2,500 r/min.
(13)Read the value displayed on the voltmeter when
the alternator output current alternator
becomes 10 A or less.
Page 776 of 1449

ENGINE AND EMISSION CONTROL -Emission Control System17-6
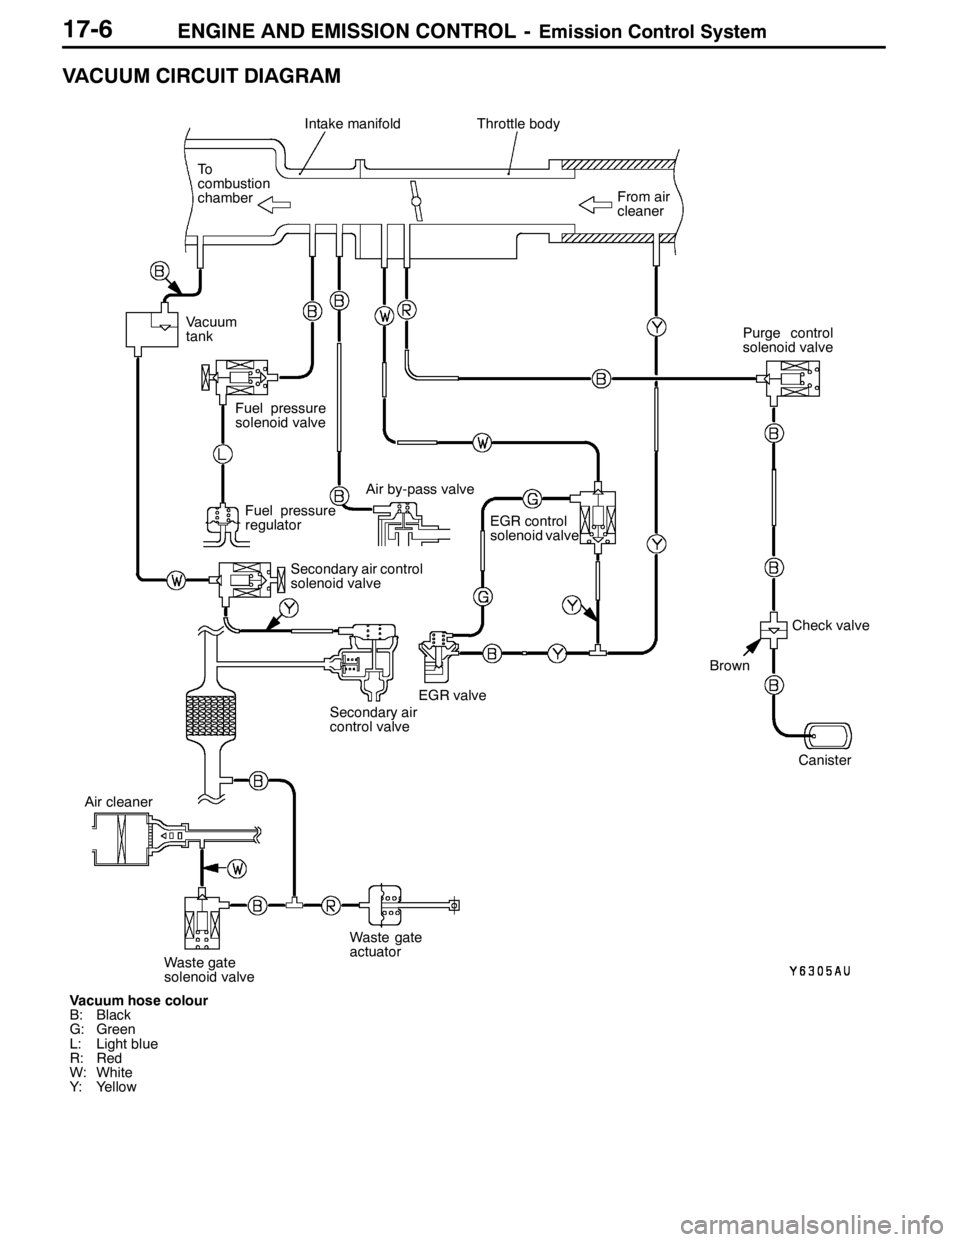
VACUUM CIRCUIT DIAGRAM
Vacuum hose colour
B: Black
G: Green
L: Light blue
R: Red
W: White
Y: YellowFrom air
cleaner
Intake manifoldThrottle body
To
combustion
chamber
Fuel pressure
regulator
EGR control
solenoid valve
Canister
EGR valve
Brown
Check valve Vacuum
tank
Fuel pressure
solenoid valve
Air by-pass valve
Secondary air control
solenoid valve
Secondary air
control valvePurge control
solenoid valve
Air cleaner
Waste gate
solenoid valveWaste gate
actuator
Page 875 of 1449

MANUAL TRANSMISSION OVERHAUL -Snap Rings, Spacers and Thrust
Plates for Adjustment22B-9
SNAP RINGS, SPACERS AND THRUST PLATES FOR ADJUSTMENT
SPACERS (FOR ADJUSTMENT OF INPUT SHAFT END PLAY)
Thickness mmIdentificationPart No.Thickness mmIdentificationPart No.
1.34
1.43
1.5234
43
52MD723600
MD723603
MD7236061.61
1.70
1.7961
70
79MD723609
MD756760
MD756763
SNAP RINGS (FOR ADJUSTMENT OF INPUT SHAFT FRONT BEARING
CLEARANCE)
Thickness mmIdentificationPart No.Thickness mmIdentificationPart No.
1.43
1.51Green, two pieces
White, two piecesMD746708
MD7467091.59Yellow, two piecesMD746710
SNAP RINGS (FOR ADJUSTMENT OF INPUT SHAFT REAR BEARING
CLEARANCE)
Thickness mmIdentificationPart No.Thickness mmIdentificationPart No.
1.44
1.51None
BlueMD746602
MD7466031.58BrownMD746604
THRUST PLATES (FOR ADJUSTMENT OF INPUT SHAFT 5TH SPEED GEAR
CLEARANCE)
Thickness mmIdentificationPart No.Thickness mmIdentificationPart No.
3.82
3.86
3.90
3.940
2
3
5MD748465
MD748466
MD748467
MD7484683.98
4.02
4.06
4.106
7
8
9MD748469
MD748470
MD748471
MD748472
SPACERS (FOR ADJUSTMENT OF OUTPUT SHAFT PRELOAD)
Thickness mmIdentificationPart No.Thickness mmIdentificationPart No.
0.86
0.89
0.92
0.95
0.98
1.01
1.04
1.07
1.10
1.13
1.1686
89
92
95
98
01
04
07
J
D
KMD720938
MD720939
MD720940
MD720941
MD720942
MD720943
MD720944
MD720945
MD710454
MD700270
MD7104551.19
1.22
1.25
1.28
1.31
1.34
1.37
1.40
1.43
1.46L
G
M
N
E
O
P
None
Q
RMD710456
MD700271
MD710457
MD710458
MD706574
MD710459
MD710460
MD706573
MD710461
MD710462
Page 876 of 1449

MANUAL TRANSMISSION OVERHAUL -Snap Rings, Spacers and Thrust
Plates for Adjustment22B-10
SNAP RINGS (FOR ADJUSTMENT OF OUTPUT SHAFT BEARING CLEARANCE)
Thickness mmIdentificationPart No.Thickness mmIdentificationPart No.
1.36
1.40
1.44
1.48
1.51Yellow
Green
None
Black
BlueMD748449
MD748450
MD746602
MD748451
MD7466031.55
1.58
1.63
1.68White
Brown
Orange
BlueMD748452
MD746604
MD748453
MD748454
SNAP RINGS (FOR ADJUSTMENT OF OUTPUT SHAFT 3RD SPEED GEAR
CLEARANCE)
Thickness mmIdentificationPart No.Thickness mmIdentificationPart No.
2.81
2.85
2.89
2.93None
Blue
Brown
YellowMD746594
MD746595
MD746596
MD7465972.97
3.01
3.05
3.09Green
Black
White
OrangeMD746598
MD746599
MD746600
MD746601
SPACERS (FOR ADJUSTMENT OF CENTER DIFFERENTIAL CASE PRELOAD)
Thickness mmIdentificationPart No.Thickness mmIdentificationPart No.
0.74
0.77
0.80
0.83
0.86
0.89
0.92
0.95
0.98
1.0174
77
80
83
86
89
92
95
98
01MD727660
MD754476
MD727661
MD720937
MD720938
MD720939
MD720940
MD720941
MD720942
MD7209431.04
1.07
1.10
1.13
1.16
1.19
1.22
1.25
1.28
1.3104
07
J
D
K
L
G
M
N
EMD720944
MD750945
MD710454
MD700270
MD710455
MD710456
MD700271
MD710457
MD710458
MD706547
SPACERS (FOR ADJUSTMENT OF CENTER DIFFERENTIAL CASE PINION
BACKLASH)
Thickness mmIdentificationPart No.Thickness mmIdentificationPart No.
0.6
0.7
0.8-
-
-MD748362
MD748363
MD7483640.9
1.0
1.1-
-
-MD748365
MD748366
MD748367
Page 985 of 1449

REAR AXLE -Differential Carrier
DISASSEMBLY SERVICE POINTS
AA"INSPECTION BEFORE DISASSEMBLY
1. Remove the cover.
2. Hold the special tool in a vise, and install the differential
carrier assembly to the special tool.
DRIVE GEAR BACKLASH
1. With the drive pinion locked in place, use a dial gauge
to measure the drive gear backlash in four or more places
on the drive gear.
Standard value: 0.11 - 0.16 mm
2. If the backlash is not within the standard value, adjust
the final drive gear backlash. (Refer to P.27B-49.)
3. After the adjustment, inspect the drive gear tooth contact.
DRIVE GEAR RUNOUT
1. Measure the drive gear runout at the shoulder on the
reverse side of the drive gear.
Limit: 0.05 mm
2. When runout exceeds the limit value, check for foreign
object between drive gear rear side and differential case,
or for loose drive gear installation bolts.
3. When check (2) gives normal results, reposition drive
gear and differential case and remeasure.
4. If adjustment is impossible, replace differential case, or
replace drive gear and pinion as a set.
DRIVE GEAR TOOTH CONTACT
Check the tooth contact of drive gear by following the steps
below.
1. Apply a thin, uniform coat of machine blue to both surfaces
of the drive gear teeth.MB990909 and
MB991116