reset MITSUBISHI LANCER EVOLUTION 2015 10.G MMCS Manual
[x] Cancel search | Manufacturer: MITSUBISHI, Model Year: 2015, Model line: LANCER EVOLUTION, Model: MITSUBISHI LANCER EVOLUTION 2015 10.GPages: 229, PDF Size: 58.35 MB
Page 105 of 229
Listen to Satellite Radio
105
AV Radio
Set the channel skip.
You can set Skip on channels and categories.
Channels in which Skip is set will be skipped
and not received when cycling up and down
through channels and during scans.
Setting on Received Channel
Sets Skip on the current channel being
received.
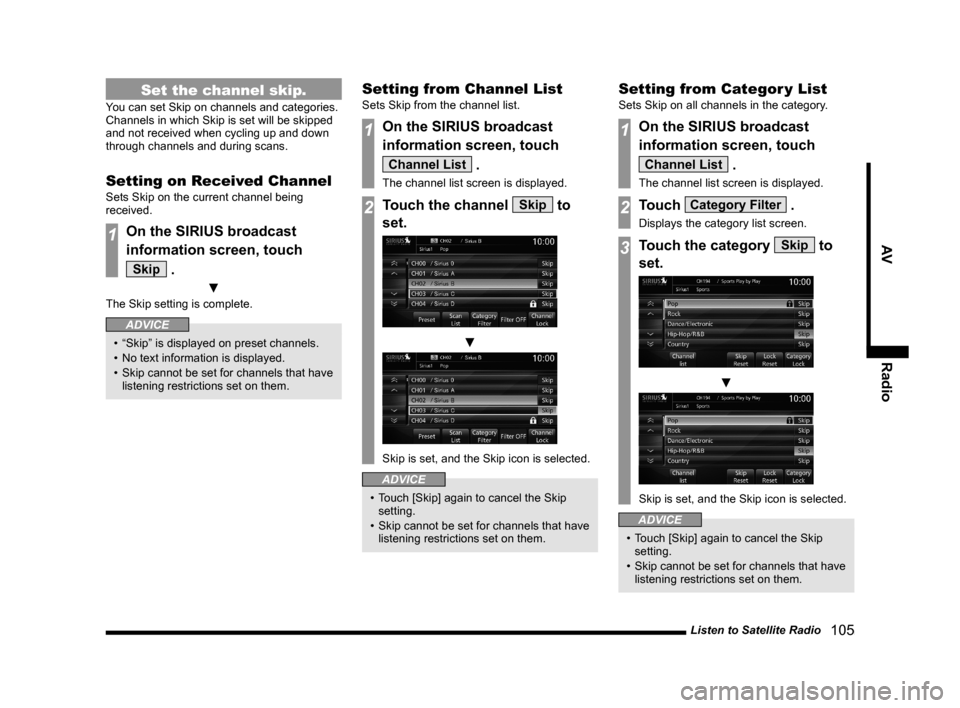
1On the SIRIUS broadcast
information screen, touch
Skip .
▼
The Skip setting is complete.
ADVICE
• “Skip” is displayed on preset channels.
• No text information is displayed.
• Skip cannot be set for channels that have
listening restrictions set on them.
Setting from Channel List
Sets Skip from the channel list.
1On the SIRIUS broadcast
information screen, touch
Channel List .
The channel list screen is displayed.
2Touch the channel Skip to
set.
▼
Skip is set, and the Skip icon is selected.
ADVICE
• Touch [Skip] again to cancel the Skip
setting.
• Skip cannot be set for channels that have
listening restrictions set on them.
Setting from Categor y List
Sets Skip on all channels in the category.
1On the SIRIUS broadcast
information screen, touch
Channel List .
The channel list screen is displayed.
2Touch Category Filter .
Displays the category list screen.
3Touch the category Skip to
set.
▼
Skip is set, and the Skip icon is selected.
ADVICE
• Touch [Skip] again to cancel the Skip
setting.
• Skip cannot be set for channels that have
listening restrictions set on them.
Page 106 of 229
106 Listen to Satellite Radio
Canceling Skip on All
Channels
Cancels the Skip setting on all channels.
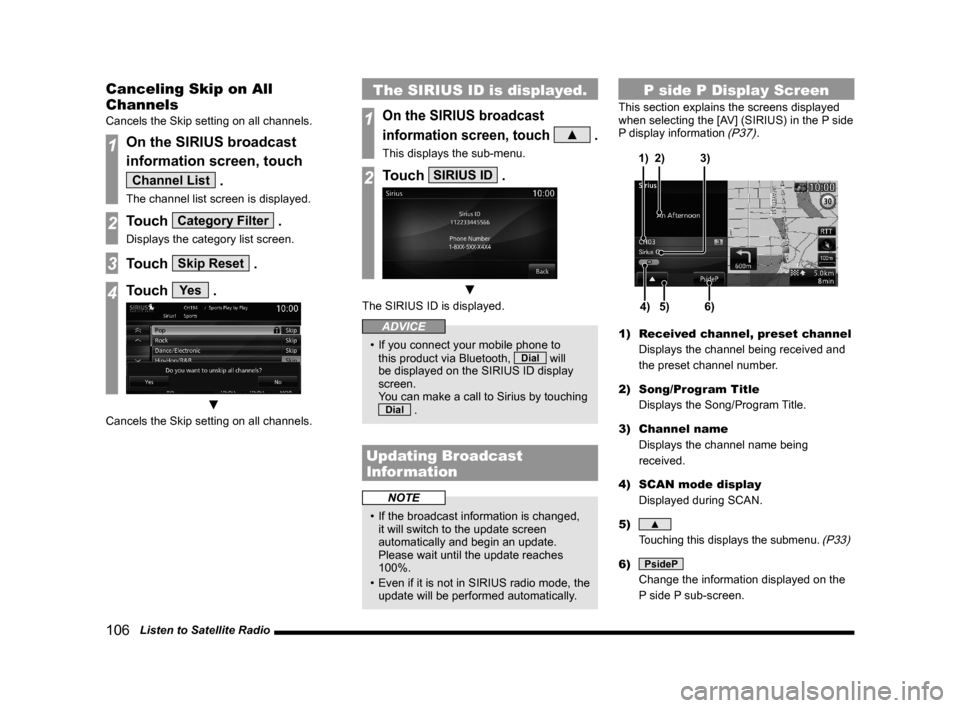
1On the SIRIUS broadcast
information screen, touch
Channel List .
The channel list screen is displayed.
2Touch Category Filter .
Displays the category list screen.
3Touch Skip Reset .
4Touch Ye s .
▼
Cancels the Skip setting on all channels.
The SIRIUS ID is displayed.
1On the SIRIUS broadcast
information screen, touch
▲ .
This displays the sub-menu.
2Touch SIRIUS ID .
▼
The SIRIUS ID is displayed.
ADVICE
• If you connect your mobile phone to
this product via Bluetooth, Dial will
be displayed on the SIRIUS ID display
screen.
You can make a call to Sirius by touching
Dial .
Updating Broadcast
Information
NOTE
• If the broadcast information is changed,
it will switch to the update screen
automatically and begin an update.
Please wait until the update reaches
100%.
• Even if it is not in SIRIUS radio mode, the
update will be performed automatically.
P side P Display Screen
This section explains the screens displayed
when selecting the [AV] (SIRIUS) in the P side
P display information
(P37).
5)4)6) 3) 2) 1)
1) Received channel, preset channel
Displays the channel being received and
the preset channel number.
2) Song/Program Title
Displays the Song/Program Title.
3) Channel name
Displays the channel name being
received.
4) SCAN mode display
Displayed during SCAN.
5)
▲
Touching this displays the submenu. (P33)
6) PsideP
Change the information displayed on the
P side P sub-screen.
Page 114 of 229
11 4 Play iPod
iPod/USB/SD
Equipment by type
Play iPod
By connecting commercially-available iPod/
iPhone devices to this product, you can play
back tracks on these through the product.
CAUTION
• Never hold an iPod/iPhone in your hand
and operate it while driving, as this is
dangerous.
• Do not leave the iPod/iPhone unattended
in the vehicle.
• No indemnifi cation for data loss resulting
when the iPod/iPhone is connected to the
product will be possible.
• Depending on how the devices are
handled, audio fi les being damaged or
lost, therefore it is recommended that
data be backed up.
NOTE
• This function can only be used in vehicles
that have a USB port.
• Please refer to your vehicle's user
manual regarding how to connect the
iPod/iPhone.
NOTE
• For information regarding details such
as types of iPod/iPhone that can be
connected to and types of fi les that can
be played back, if your car is equipped
with a Bluetooth
® 2.0 interface, refer to
the vehicle's user manual; if your car
is not equipped with a Bluetooth
® 2.0
interface, refer to this manual (→ P8).
Also, sometimes playback as explained
in this document may not be possible.
• Usage of iPod/iPhone hardware with the
latest software version is recommended.
• Updating your software sometimes
changes the functions that can be used
connected with this product.
• Operate the iPod/iPhone while connected
to this product.
• Depending on the generation, model,
or software version of the iPod/iPhone,
playback on this product may not be
possible.
(→P8)Additionally, playback as
explained in this document may not be
possible.
• If the iPod/iPhone is connected via
Bluetooth as a Bluetooth-capable audio
device, then do not connect the iPod/
iPhone using an iPod cable. Connection
using both methods will result in
erroneous operation.
• If an iPod/iPhone does not operate
correctly, then remove the iPod/iPhone
from the product, reset, then reconnect.
• This product does not support video
playback.
NOTE
• When connecting an iPod/iPhone, use
the connection cable included in the iPod/
iPhone.
• Set up the device in order that no
unsafe actions, such as plugging in the
connection cable are taken while driving.
• When inserting and removing the iPod/
iPhone, for safety's sake fi rst stop the
vehicle.
• Depending on the status of the iPod/
iPhone, it may take some time until the
device is recognized, or playback starts.
• Buttons on the product will not operate
while iPod/iPhone is connected.
• iPod/iPhone specifi cations and settings
may mean that connection is not
possible, or result in differences in
operation or display.
• Depending on audio data in the iPod/
iPhone, track information may not be
displayed correctly.
• Depending on the status of the vehicle
and device, the iPod/iPhone may not play
back after starting the engine.
• Data containing copyright information
may not play back.
• It is recommended that the iPod/iPhone
equalizer settings be set to fl at.
Page 138 of 229
138 Trip
Equipment by type
Trip
You can check and set trip information.
Displaying
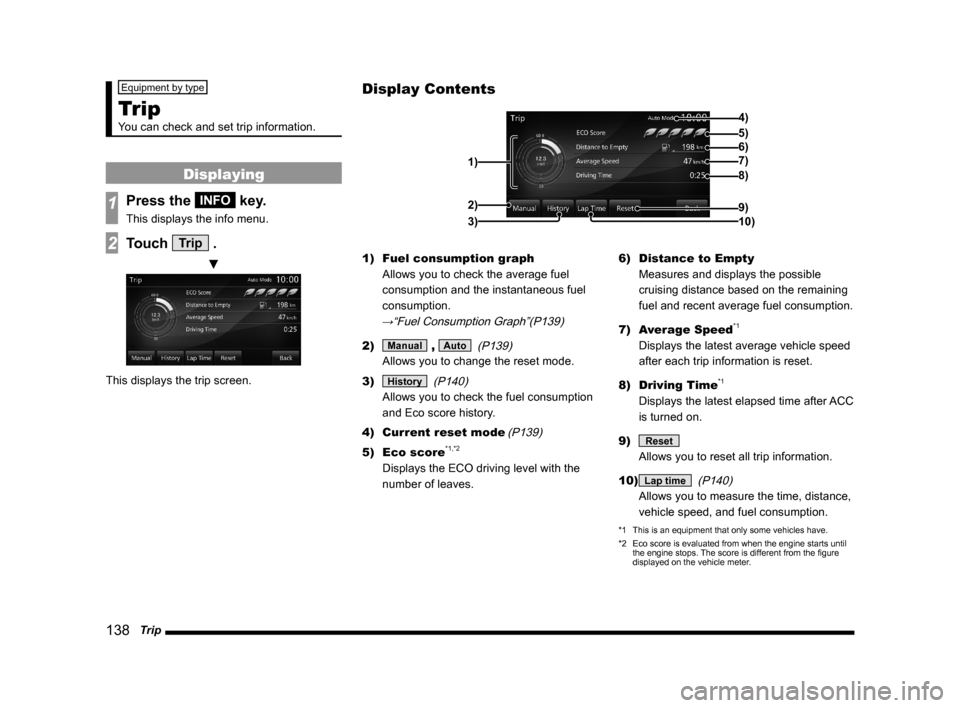
1Press the INFO key.
This displays the info menu.
2Touch Trip .
▼
This displays the trip screen.1) Fuel consumption graph
Allows you to check the average fuel
consumption and the instantaneous fuel
consumption.
→“Fuel Consumption Graph”(P139)
2) Manual , Auto
(P139)
Allows you to change the reset mode.
3)
History
(P140)
Allows you to check the fuel consumption
and Eco score history.
4) Current reset mode
(P139)
5) Eco score*1,*2
Displays the ECO driving level with the
number of leaves.6) Distance to Empty
Measures and displays the possible
cruising distance based on the remaining
fuel and recent average fuel consumption.
7) Average Speed
*1
Displays the latest average vehicle speed
after each trip information is reset.
8) Driving Time
*1
Displays the latest elapsed time after ACC
is turned on.
9)
Reset
Allows you to reset all trip information.
10)
Lap time
(P140)
Allows you to measure the time, distance,
vehicle speed, and fuel consumption.
*1 This is an equipment that only some vehicles have.
*2 Eco score is evaluated from when the engine starts until
the engine stops. The score is different from the fi gure
displayed on the vehicle meter.
Display Contents
4)
6)5)
7)
8)
9)
10) 1)2)
3)
Page 139 of 229

Trip
139
INFO/SETTINGS INFO
Fuel Consumption Graph
1) 2)3) 4)
1) Average fuel consumption
2) Average fuel consumption graph
Displays the fuel consumption with 16
levels.
3) Instantaneous fuel consumption
graph
Displays the fuel consumption with 16
levels.
4) Scale
Shows the scales of the average fuel
consumption and instantaneous fuel
consumption graphs. The values may vary
depending on the units.
Unit Value
km/l
0~60
l/100km
0~20
mpg(US)
0~150
mpg(UK)
0~180
Changing the Reset Mode
1On the trip screen,
touch
Manual .
▼
This switches from auto mode to manual
mode.
2Touch Auto .
This switches from manual mode to auto
mode.
Auto mode
The trip information will reset 4
hours after the engine switch is
turned to “ACC” or “OFF”.
Manual mode
The trip information is reset when
[Reset] on the Trip screen is
touched.
Reset Trip Information
Standard vehicle
Average Fuel Economy
Average Speed
Page 141 of 229
Trip
141
INFO/SETTINGS INFO
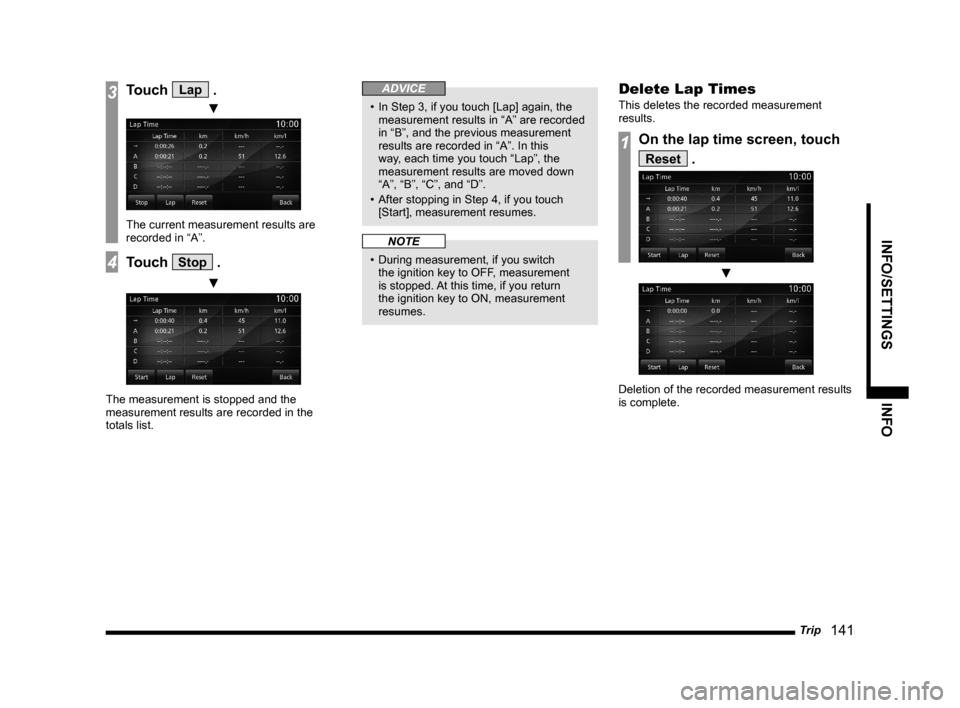
3Touch Lap .
▼
The current measurement results are
recorded in “A”.
4Touch Stop .
▼
The measurement is stopped and the
measurement results are recorded in the
totals list.
ADVICE
• In Step 3, if you touch [Lap] again, the
measurement results in “A” are recorded
in “B”, and the previous measurement
results are recorded in “A”. In this
way, each time you touch “Lap”, the
measurement results are moved down
“A”, “B”, “C”, and “D”.
• After stopping in Step 4, if you touch
[Start], measurement resumes.
NOTE
• During measurement, if you switch
the ignition key to OFF, measurement
is stopped. At this time, if you return
the ignition key to ON, measurement
resumes.
Delete Lap Times
This deletes the recorded measurement
results.
1On the lap time screen, touch
Reset .
▼
Deletion of the recorded measurement results
is complete.
Page 155 of 229

Maintenance
155
INFO/SETTINGS INFO
Display Contents
2)
3)
4) 1)
9)
8)
7) 6) 5)
1) Guidance
This sets whether or not to display
guidance when the parts replacement date
approaches or is past.
→“Set Maintenance
Information Guidance”(P157)
2) Parts
Displays the parts that can be maintained.
3)
Batch
The date of all parts maintenance
performance, the odometer reading
as of that time, and the distance
remaining until the next replacement are
updated.
→“Batch Updating”(P157)
4) Reset all
Resets all the maintenance
information.
→“Reset Maintenance
Information”(P157)
5) Date of Change
Displays the dates on which maintenance
was carried out.
6) Next Remaining
Displays the distance remaining until the
maintenance execution date.
7) Changed Date Dist
Displays the odometer reading as of the
date maintenance was performed.
8)
The date of maintenance performance
and the odometer reading as of that time
are updated.
→“Update Maintenance
Information”(P157)
9) Back
Returns to the previous screen.
Set Maintenance Information
You can set the maintenance fi xed date and
maintenance distances.
1Press the INFO key.
This displays the info menu.
2Touch Maintenance .
3Touch the “part” to set.
4Touch Setup in “Fixed Date”.
5Touch ▲ or ▼ , input the
maintenance fi xed date, then
touch
Set .
Continued on the next page
Page 157 of 229
Maintenance
157
INFO/SETTINGS INFO
Update Maintenance
Information
When parts are replaced, the maintenance
information is updated.
1Press the INFO key.
This displays the info menu.
2Touch Maintenance .
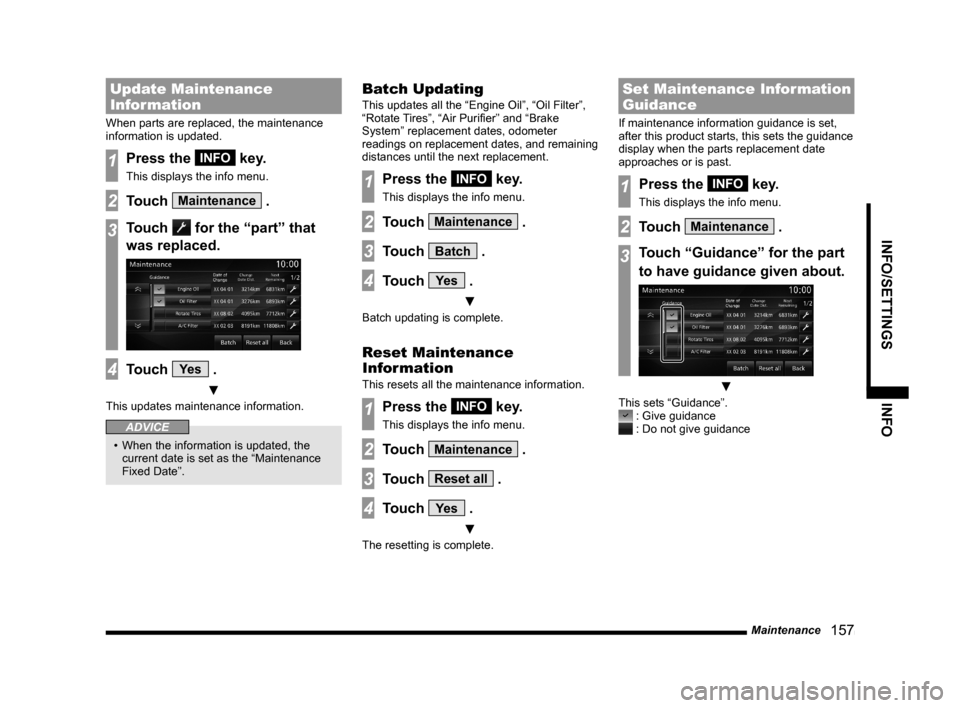
3Touch for the “part” that
was replaced.
4Touch Ye s .
▼
This updates maintenance information.
ADVICE
• When the information is updated, the
current date is set as the “Maintenance
Fixed Date”.
Batch Updating
This updates all the “Engine Oil”, “Oil Filter”,
“Rotate Tires”, “Air Purifi er” and “Brake
System” replacement dates, odometer
readings on replacement dates, and remaining
distances until the next replacement.
1Press the INFO key.
This displays the info menu.
2Touch Maintenance .
3Touch Batch .
4Touch Ye s .
▼
Batch updating is complete.
Reset Maintenance
Information
This resets all the maintenance information.
1Press the INFO key.
This displays the info menu.
2Touch Maintenance .
3Touch Reset all .
4Touch Ye s .
▼
The resetting is complete.
Set Maintenance Information
Guidance
If maintenance information guidance is set,
after this product starts, this sets the guidance
display when the parts replacement date
approaches or is past.
1Press the INFO key.
This displays the info menu.
2Touch Maintenance .
3Touch “Guidance” for the part
to have guidance given about.
▼
This sets “Guidance”. : Give guidance : Do not give guidance
Page 168 of 229
168 Voice Control
About the Learning Function
The voice control system has a learning
function. (This function cannot be used by
voice control systems using a Bluetooth
®
2.0 interface.) This learning function inputs
the driver's voice and way of speaking, and
makes voice recognition easier.
Also, the learned data can be reset (deleted), so
reset the data if the user will change for a long
period of time.
→“Voice control settings” (P215)
Skip Audio Guide
During audio guide, press the “SPEECH” key
again to skip the guide.
End Voice Control
• To stop voice control after starting up,
execute one of the following procedures.
- Press and hold down “SPEECH” key.
- Press a key such as
MODE key.
• If you do not speak after starting up voice
control, the system will automatically be in
pause mode.
(Press the “SPEECH” key again to restart
voice control.) If there is no operation for
a while in pause mode, voice control will
automatically end.
• If voice control is forced to shut down such
as by pressing the
MODE key, the voice
control cannot restart from where you left off.
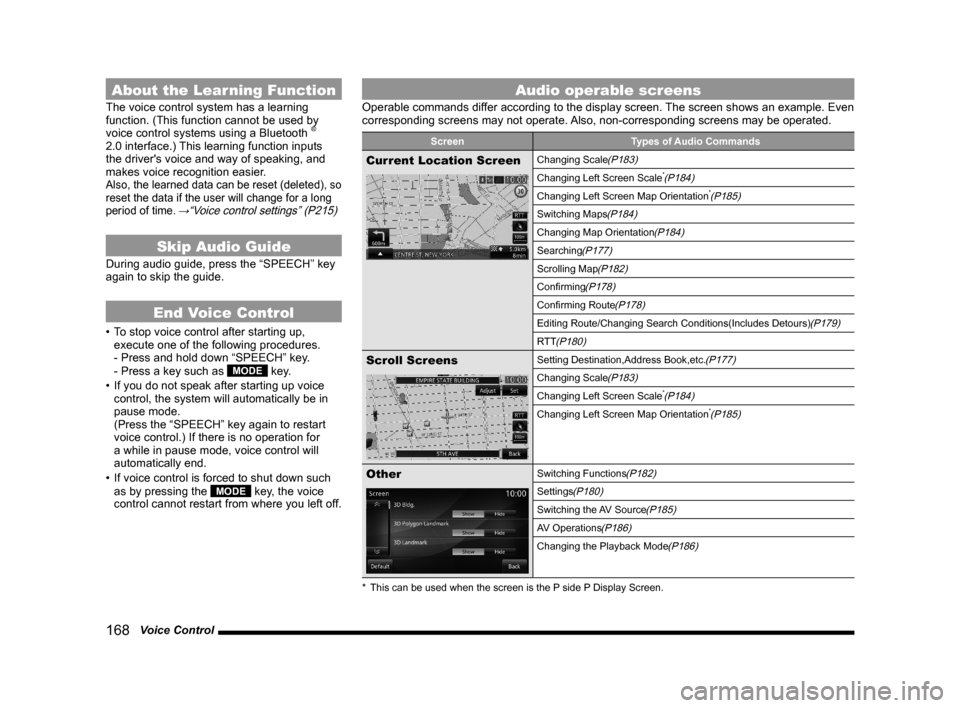
Audio operable screens
Operable commands differ according to the display screen. The screen shows an example. Even
corresponding screens may not operate. Also, non-corresponding screens may be operated.
Screen Types of Audio Commands
Current Location ScreenChanging Scale(P183)
Changing Left Screen Scale*(P184)
Changing Left Screen Map Orientation*(P185)
Switching Maps(P184)
Changing Map Orientation(P184)
Searching(P177)
Scrolling Map(P182)
Confi rming(P178)
Confi rming Route(P178)
Editing Route/Changing Search Conditions(Includes Detours)(P179)
RTT
(P180)
Scroll ScreensSetting Destination,Address Book,etc.(P177)
Changing Scale(P183)
Changing Left Screen Scale*(P184)
Changing Left Screen Map Orientation*(P185)
OtherSwitching Functions(P182)
Settings(P180)
Switching the AV Source(P185)
AV Operations(P186)
Changing the Playback Mode(P186)
* This can be used when the screen is the P side P Display Screen.
Page 182 of 229
182 List of Accepted Commands
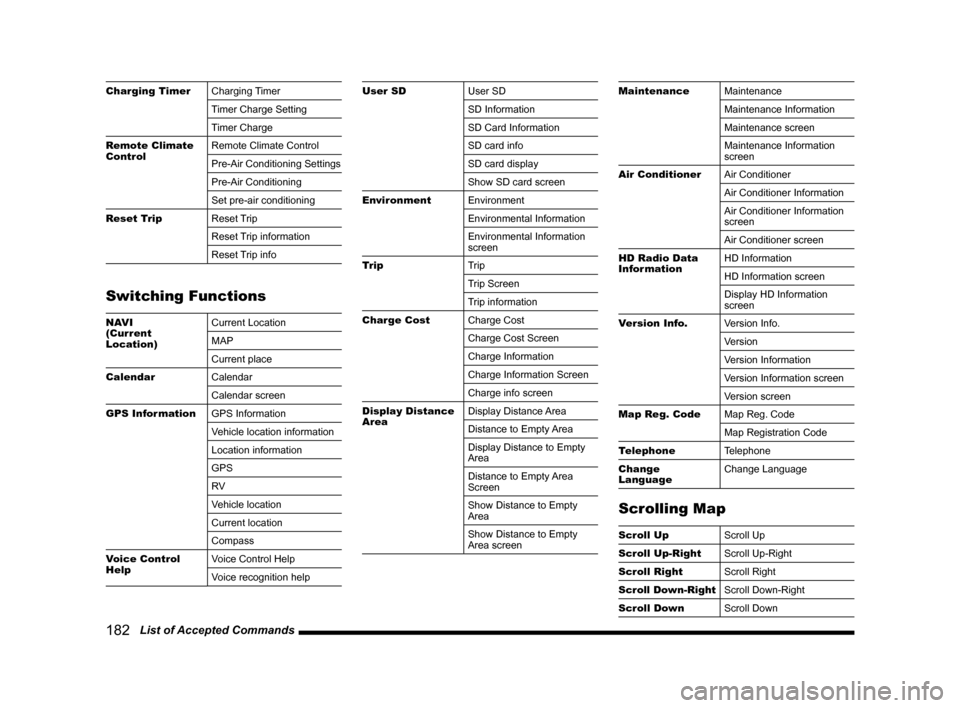
Charging Timer
Charging Timer
Timer Charge Setting
Timer Charge
Remote Climate
ControlRemote Climate Control
Pre-Air Conditioning Settings
Pre-Air Conditioning
Set pre-air conditioning
Reset Trip
Reset Trip
Reset Trip information
Reset Trip info
Switching Functions
NAVI
(Current
Location)Current Location
MAP
Current place
Calendar
Calendar
Calendar screen
GPS Information
GPS Information
Vehicle location information
Location information
GPS
RV
Vehicle location
Current location
Compass
Voice Control
HelpVoice Control Help
Voice recognition help
User SD
User SD
SD Information
SD Card Information
SD card info
SD card display
Show SD card screen
Environment
Environment
Environmental Information
Environmental Information
screen
Trip
Trip
Trip Screen
Trip information
Charge Cost
Charge Cost
Charge Cost Screen
Charge Information
Charge Information Screen
Charge info screen
Display Distance
AreaDisplay Distance Area
Distance to Empty Area
Display Distance to Empty
Area
Distance to Empty Area
Screen
Show Distance to Empty
Area
Show Distance to Empty
Area screenMaintenance
Maintenance
Maintenance Information
Maintenance screen
Maintenance Information
screen
Air Conditioner
Air Conditioner
Air Conditioner Information
Air Conditioner Information
screen
Air Conditioner screen
HD Radio Data
InformationHD Information
HD Information screen
Display HD Information
screen
Version Info.
Version Info.
Version
Version Information
Version Information screen
Version screen
Map Reg. Code
Map Reg. Code
Map Registration Code
Telephone
Telephone
Change
LanguageChange Language
Scrolling Map
Scroll Up
Scroll Up
Scroll Up-Right
Scroll Up-Right
Scroll Right
Scroll Right
Scroll Down-Right
Scroll Down-Right
Scroll Down
Scroll Down