mirror MITSUBISHI LANCER IX 2006 Service Manual
[x] Cancel search | Manufacturer: MITSUBISHI, Model Year: 2006, Model line: LANCER IX, Model: MITSUBISHI LANCER IX 2006Pages: 800, PDF Size: 45.03 MB
Page 284 of 800
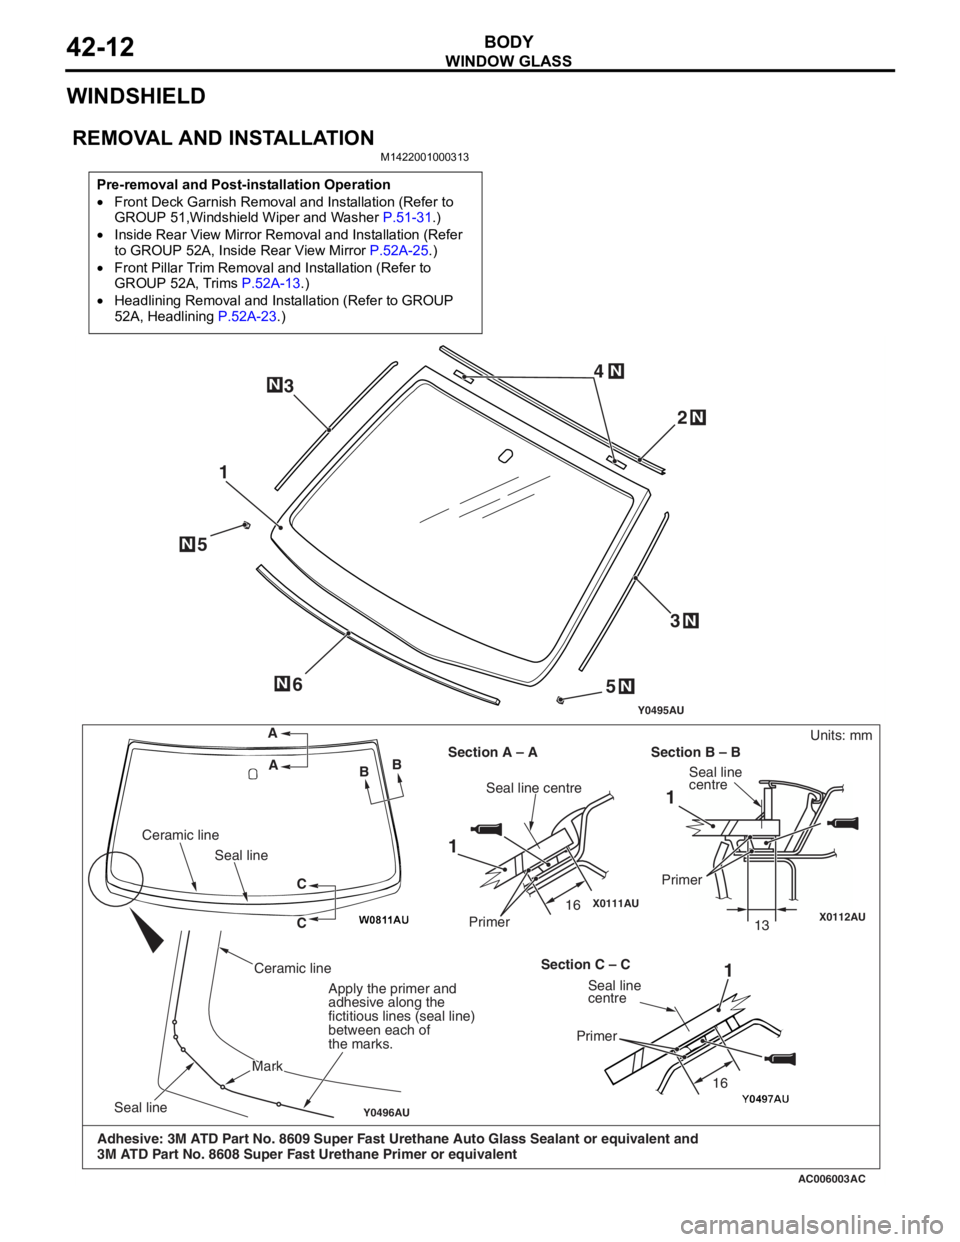
WINDOW GLASS
BODY42-12
WINDSHIELD
REMOVAL AND INSTALLATION
M1422001000313
Pre-removal and Post-installation Operation
•Front Deck Garnish Removal and Installation (Refer to
GROUP 51,Windshield Wiper and Washer P.51-31.)
•Inside Rear View Mirror Removal and Installation (Refer
to GROUP 52A, Inside Rear View Mirror P.52A-25.)
•Front Pillar Trim Removal and Installation (Refer to
GROUP 52A, Trims P.52A-13.)
•Headlining Removal and Installation (Refer to GROUP
52A, Headlining P.52A-23.)
AC006003
X0111AUX0112AU
Y0496AU
12
3
4
6 1
1
3
N
N
N
N
N
AC
Y0495AU
A
A BB
C C
Ceramic line
Seal line
Seal line
Ceramic line
MarkMark
Apply the primer and
adhesive along the
fictitious lines (seal line)
between each of
the marks.
Seal line centre
Primer
Section A – A Section B – B
Section C – C
Seal line
centre
Primer
5N
5N
Units: mm
Adhesive: 3M ATD Part No. 8609 Super Fast Urethane Auto Glass Sealant or equivalent and
3M ATD Part No. 8608 Super Fast Urethane Primer or equivalent
16 16
1
Seal line
centre
Primer
13
Page 311 of 800
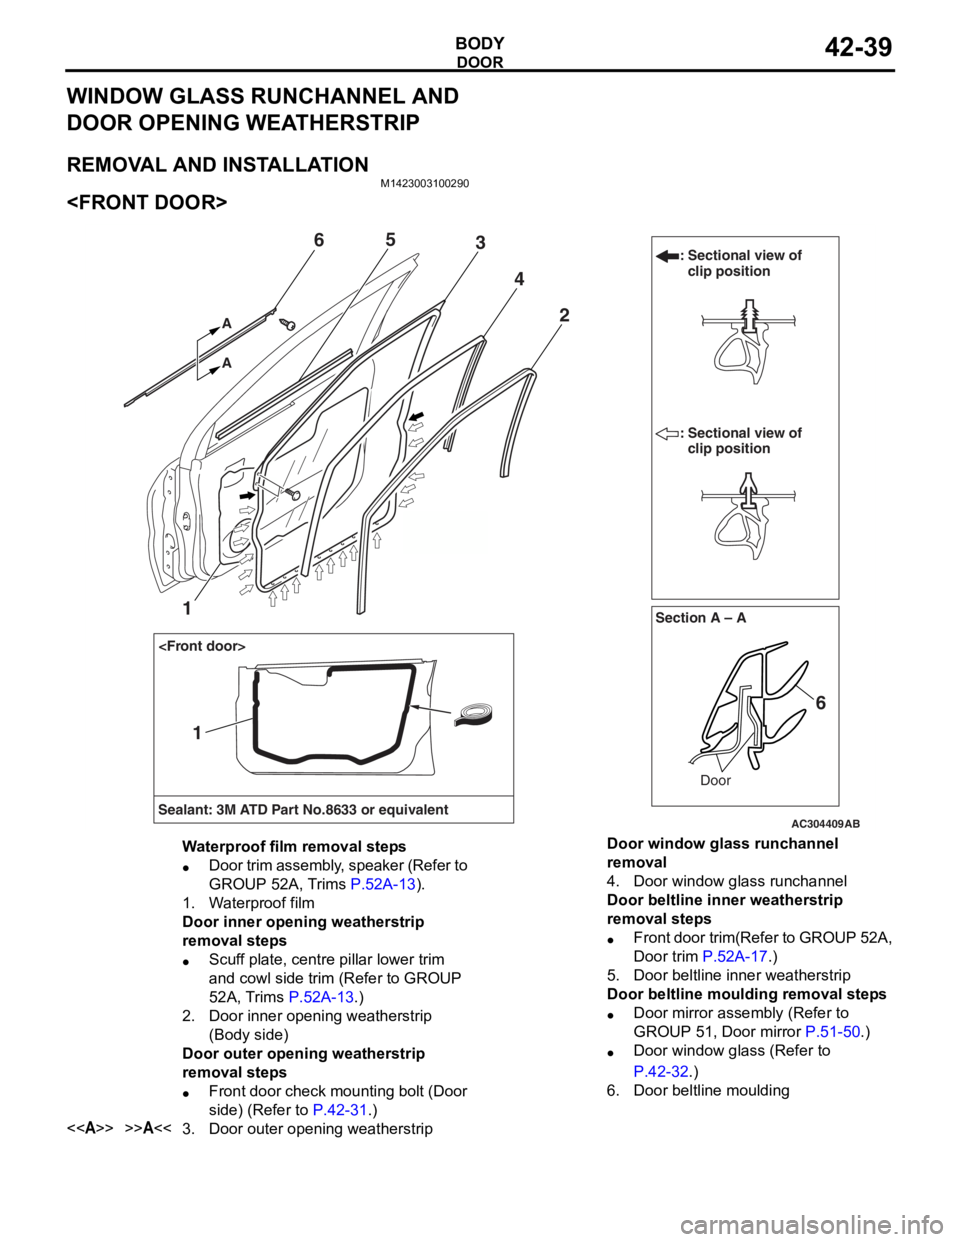
DOOR
BODY42-39
WINDOW GLASS RUNCHANNEL AND
DOOR OPENING WEATHERSTRIP
REMOVAL AND INSTALLATION
M1423003100290
AC304409AB
Section A – A
Sealant: 3M ATD Part No.8633 or equivalent Door
: Sectional view of
clip position
: Sectional view of clip position
6
2
1
4
365
A A
1
Waterproof film removal steps
•Door trim assembly, speaker (Refer to
GROUP 52A, Trims
P.52A-13).
1.Waterproof film
Door inner opening weatherstrip
removal steps
•Scuff plate, centre pillar lower trim
and cowl side trim (Refer to GROUP
52A, Trims
P.52A-13.)
2.Door inner opening weatherstrip
(Body side)
Door outer opening weatherstrip
removal steps
•Front door check mounting bolt (Door
side) (Refer to
P.42-31.)
<>>>A<<3.Door outer opening weatherstrip
Door window glass runchannel
removal
4.Door window glass runchannel
Door beltline inner weatherstrip
removal steps
•Front door trim(Refer to GROUP 52A,
Door trim
P.52A-17.)
5.Door beltline inner weatherstrip
Door beltline moulding removal steps
•Door mirror assembly (Refer to
GROUP 51, Door mirror
P.51-50.)
•Door window glass (Refer to
P.42-32.)
6.Door beltline moulding
Page 334 of 800
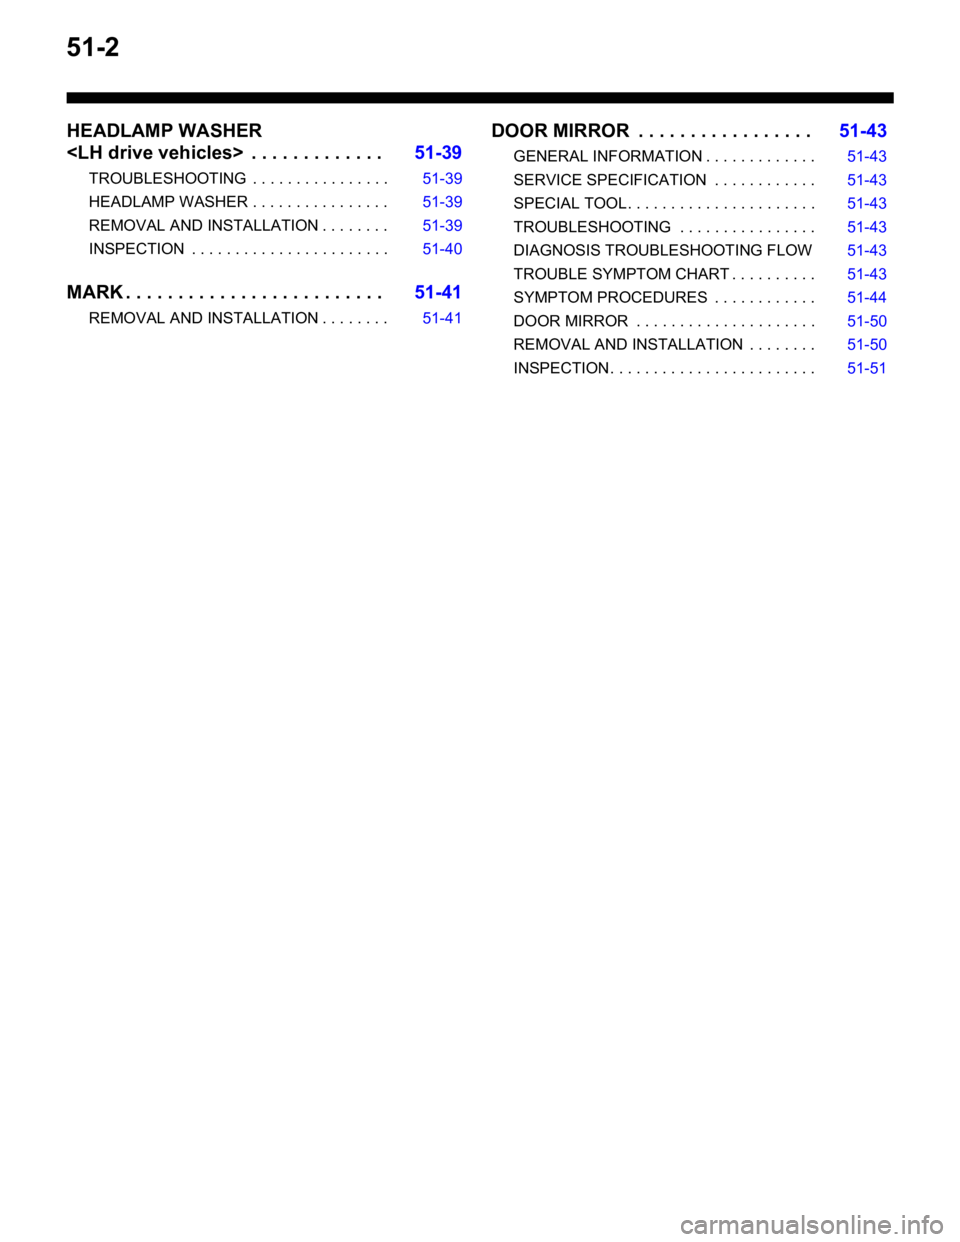
51-2
HEADLAMP WASHER
TROUBLESHOOTING . . . . . . . . . . . . . . . . 51-39
HEADLAMP WASHER . . . . . . . . . . . . . . . . 51-39
REMOVAL AND INSTALLATION . . . . . . . . 51-39
INSPECTION . . . . . . . . . . . . . . . . . . . . . . . 51-40
MARK . . . . . . . . . . . . . . . . . . . . . . . . .51-41
REMOVAL AND INSTALLATION . . . . . . . . 51-41
DOOR MIRROR . . . . . . . . . . . . . . . . .51-43
GENERAL INFORMATION . . . . . . . . . . . . . 51-43
SERVICE SPECIFICATION . . . . . . . . . . . . 51-43
SPECIAL TOOL. . . . . . . . . . . . . . . . . . . . . . 51-43
TROUBLESHOOTING . . . . . . . . . . . . . . . . 51-43
DIAGNOSIS TROUBLESHOOTING FLOW 51-43
TROUBLE SYMPTOM CHART . . . . . . . . . . 51-43
SYMPTOM PROCEDURES . . . . . . . . . . . . 51-44
DOOR MIRROR . . . . . . . . . . . . . . . . . . . . . 51-50
REMOVAL AND INSTALLATION . . . . . . . . 51-50
INSPECTION. . . . . . . . . . . . . . . . . . . . . . . . 51-51
Page 375 of 800
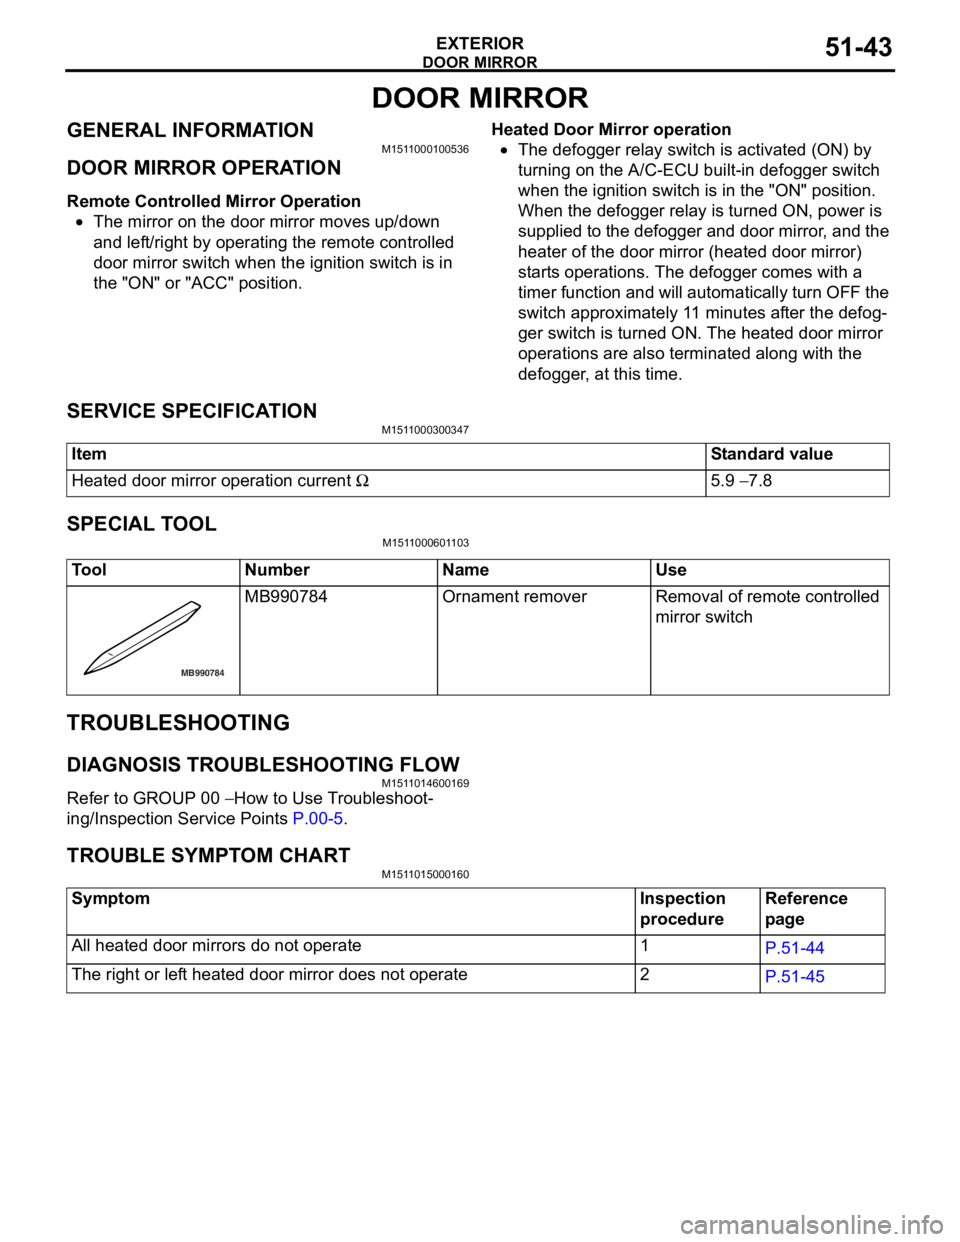
DOOR MIRROR
EXTERIOR51-43
DOOR MIRROR
GENERAL INFORMATIONM1511000100536
DOOR MIRROR OPERATION
Remote Controlled Mirror Operation
•The mirror on the door mirror moves up/down
and left/right by operating the remote controlled
door mirror switch when the ignition switch is in
the "ON" or "ACC" position.
Heated Door Mirror operation
•The defogger relay switch is activated (ON) by
turning on the A/C-ECU built-in defogger switch
when the ignition switch is in the "ON" position.
When the defogger relay is turned ON, power is
supplied to the defogger and door mirror, and the
heater of the door mirror (heated door mirror)
starts operations. The defogger comes with a
timer function and will automatically turn OFF the
switch approximately 11 minutes after the defog
-
ger switch is turned ON. The heated door mirror
operations are also terminated along with the
defogger, at this time.
SERVICE SPECIFICATION
M1511000300347
ItemStandard value
Heated door mirror operation current Ω5.9 − 7.8
SPECIAL TOOL
M1511000601103
ToolNumberNameUse
MB990784
MB990 784Ornament removerRemoval of remote controlled
mirror switch
TROUBLESHOOTING
DIAGNOSIS TROUBLESHOOTING FLOW
M151 1 0146 0016 9
Refe r to GROUP 00 − How to Use T r o ubleshoot-
ing/Inspectio n Service Point s P.00-5.
TR OUBLE SYM PT OM CHARTM151 1 0150 0016 0
SymptomInspection
procedureReference
page
All heated door mirrors do not operate1P.51-44
The right or left heated door mirror does not operate2P.51-45
Page 376 of 800
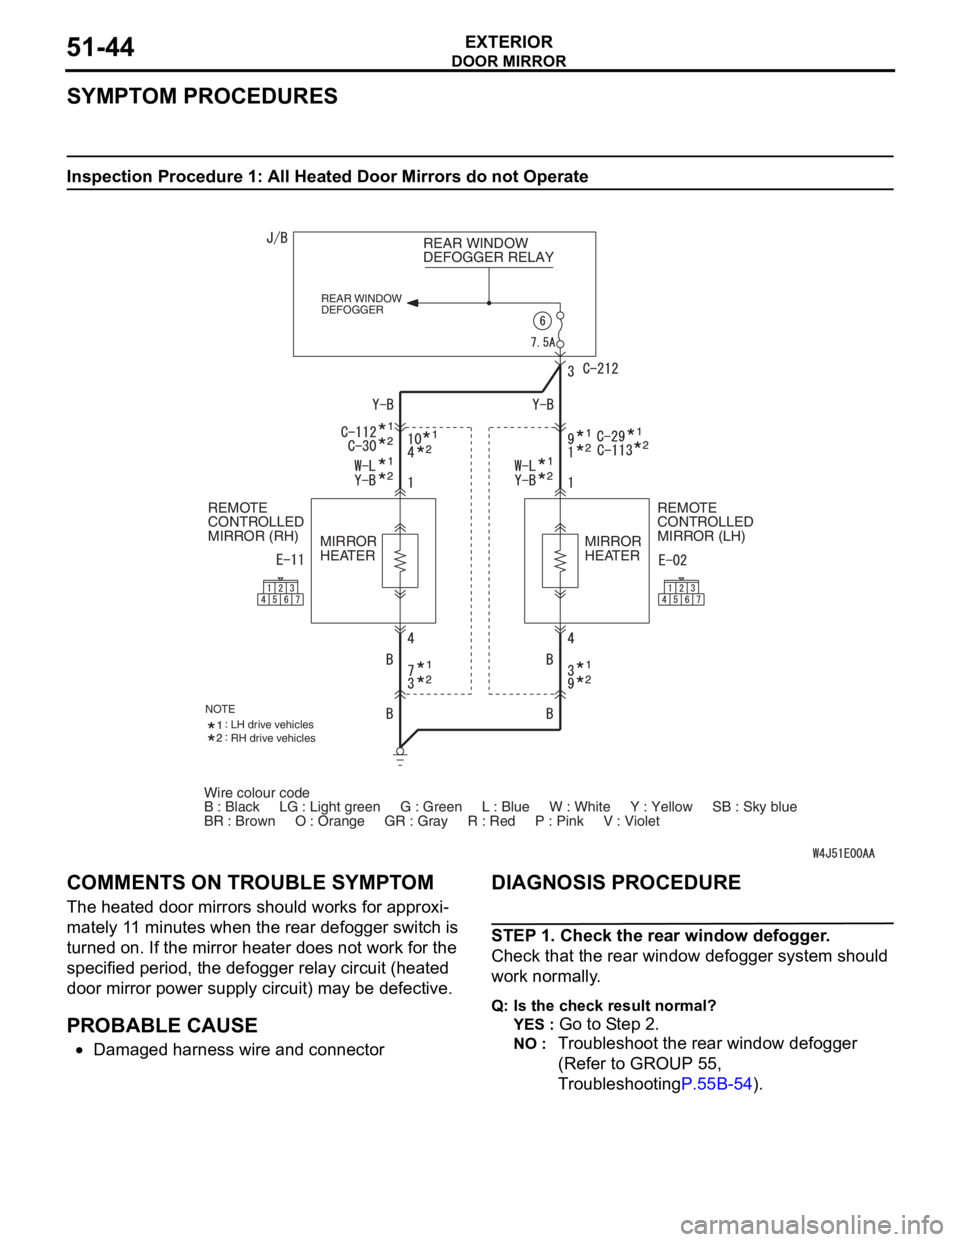
DOOR MIRROR
EXTERIOR51-44
SYMPTOM PROCEDURES
Inspection Procedure 1: All Heated Door Mirrors do not Operate
Wire colour code
B : Black LG : Light green G : Green L : Blue W : White \
Y : Yellow SB : Sky blue
BR : Brown O : Orange GR : Gray R : Red P : Pink V :\
Violet REAR WINDOW
DEFOGGER RELAY
REAR WINDOW
DEFOGGER
REMOTE
CONTROLLED
MIRROR (LH)
REMOTE
CONTROLLED
MIRROR (RH)
MIRROR
HEATER MIRROR
HEATER
NOTELH drive vehicles
RH drive vehicles
COMM
ENT S ON TROUBL E SYMPT O M
The heated do or mirrors shou ld works for approxi-
mately 11 minu tes whe n the re ar defo gger switch is
turned o
n . If th e mirror hea ter doe s no t work fo r the
specified period, th
e defo gger relay circuit (heated
door mirror p
o wer sup p ly circuit) may be d e fective .
PROBABLE CAUSE
•Damaged h a rness wire and connector
DIAGNOSIS PROCEDURE
STEP 1 . Check the rear wind ow de fogger .
Check that th e rear window def ogger system shou ld
wo
rk normally .
Q:Is t h e che c k r esu lt n o rmal?
YES : Go to S t ep 2 .
NO : Tr oublesh oot the rear win dow defog ger
(Refer to
GROUP 55 ,
T
r oublesh ootin g
P.55B-54).
Page 377 of 800
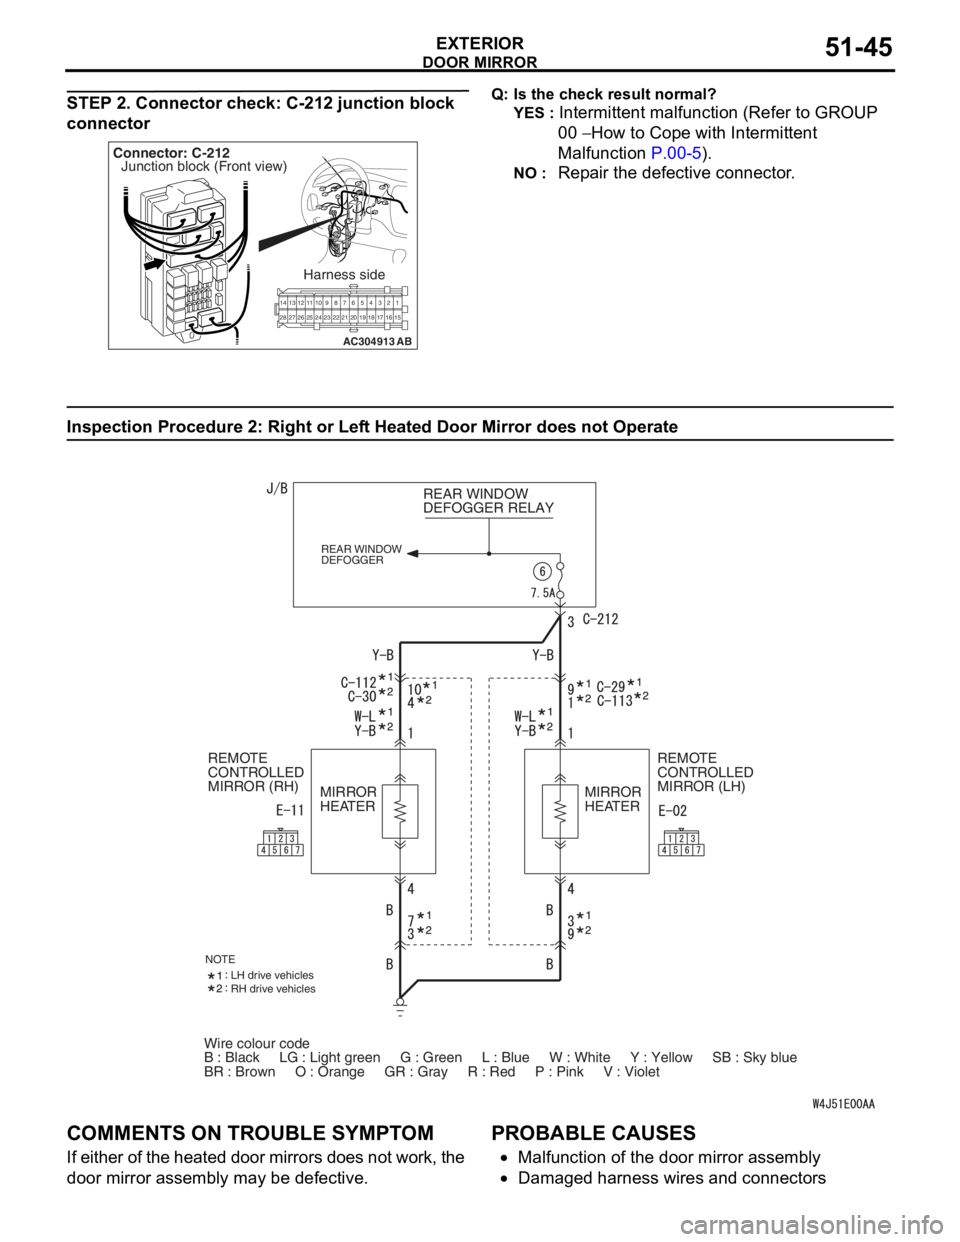
DOOR MIRROR
EXTERIOR51-45
STEP 2. Connector check: C-212 junction block
connector
AC304913
21716151718
201912345
623 222425282627981011141213
Connector: C-212
Harness side
AB
Junction block (Front view)
Q: Is t h e che c k r esu lt n o rmal?
YES : Intermittent malfun ctio n (Refer to GROUP
00
− Ho w to Cope wit h Intermitte nt
Ma
lfunction
P.00-5).
NO : Repa ir th e defective connector .
Inspection Procedure 2 : Ri ght or Lef t Hea t ed Door Mirror does not Operate
Wire colour code
B : Black LG : Light green G : Green L : Blue W : White \
Y : Yellow SB : Sky blue
BR : Brown O : Orange GR : Gray R : Red P : Pink V :\
Violet REAR WINDOW
DEFOGGER RELAY
REAR WINDOW
DEFOGGER
REMOTE
CONTROLLED
MIRROR (LH)
REMOTE
CONTROLLED
MIRROR (RH)
MIRROR
HEATER MIRROR
HEATER
NOTELH drive vehicles
RH drive vehicles
COMM
ENT S ON TROUBL E SYMPT O M
If eit her of t he hea ted d oor mirrors does n o t work, the
door mirror a
sse mbly may b e defe c tive.
PROBABLE CAUSES
•Malfunctio n of th e door mirro r assemb ly
•Damaged ha rness wires and con necto rs
Page 378 of 800
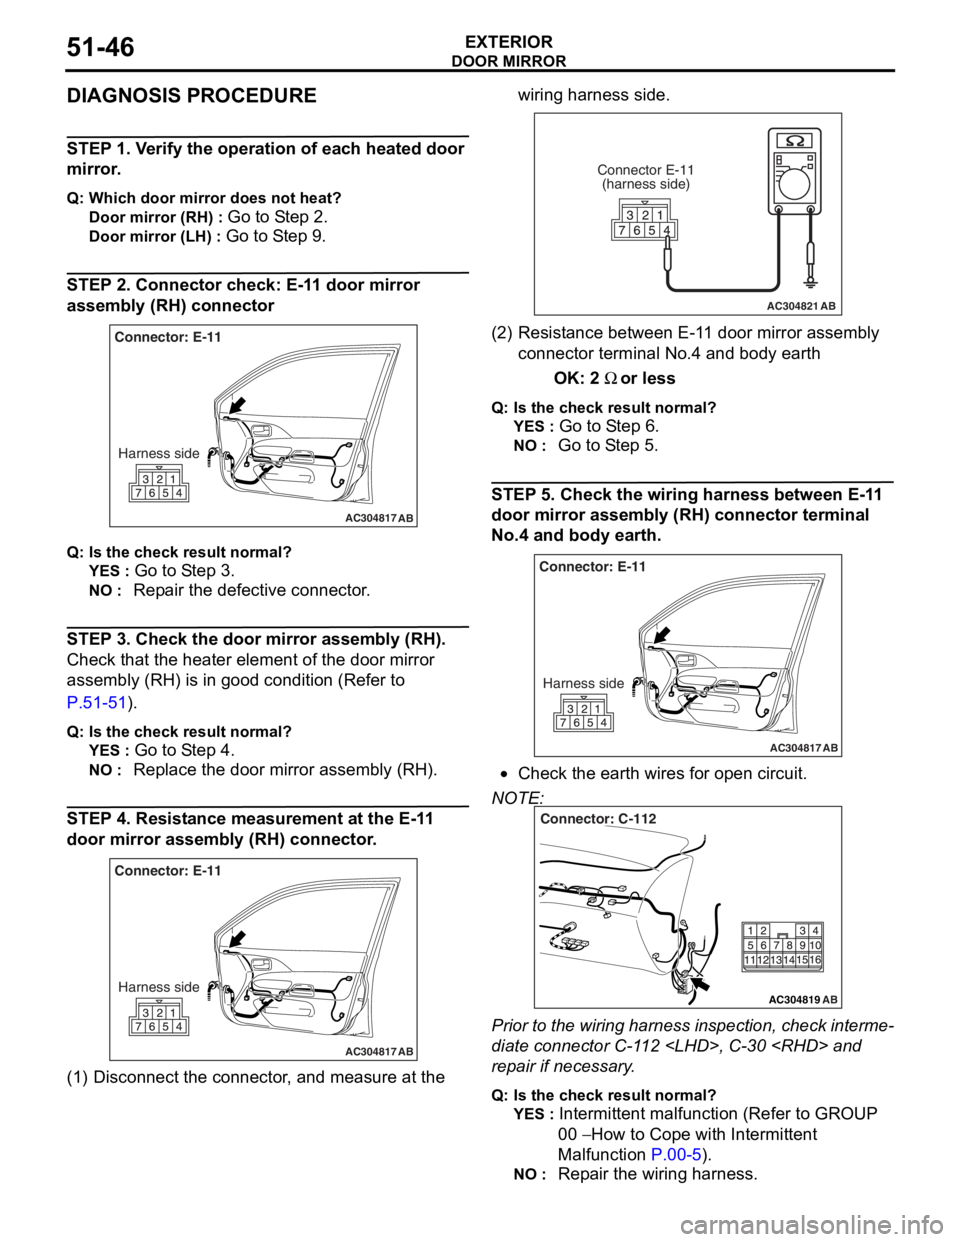
DOOR MIRROR
EXTERIOR51-46
DIAGNOSIS PROCEDURE
STEP 1. Verify the operation of each heated door
mirror.
Q: Which door mirror does not heat?
Door mirror (RH) : Go to Step 2.
Door mirror (LH) : Go to Step 9.
STEP 2. Connector check: E-11 door mirror
assembly (RH) connector
AC304817
Connector: E-11Harness side
AB
Q : Is the check result normal?
YES : Go to S t ep 3.
NO : Repa ir the defective connector .
STEP 3. Ch eck the door mirror assem bly (RH).
Chec k that th e heat er ele m ent of the door mirror
assembly (RH) is in
good condition (Refer to
P.5 1 -51).
Q: Is the check result normal?
YES : Go to S t ep 4.
NO : Replac e th e door mirro r assemb ly ( R H).
STEP 4. Re sist an ce mea surement at the E-1 1
door mirror
assem bly (RH) connec tor .
AC304817
Connector: E-11
Harness side
AB
(1) D isconn ect t he co nnector , an d me asure at the wiring harn e ss side.
AC304821
Connector E-11
(harness side)
AB
(2) R esist ance bet we en E-1 1 door mirro r assemb ly
connector termina l No.4 a nd bod y ea rth
OK: 2 Ω or less
Q:Is t h e che c k r esu lt n o rmal?
YES : Go to S t ep 6 .
NO : Go to S t ep 5.
STEP 5 . Check the wiring harness b e twee n E-1 1
door mirror assem
bly (RH) conne ctor terminal
No.
4 and bo dy earth.
AC304817
Connector: E-11
Harness side
AB
•Check th e earth wires f o r open circuit.
NOTE:
AC304819
Connector: C-112
AB
Prior to the wiring harness insp ection, check interme-
diate connector C-1 1 2
rep
a ir if necessary .
Q:Is t h e che c k r esu lt n o rmal?
YES : Intermittent malfun ctio n (Refer to GROUP
00
− Ho w to Cope wit h Intermitte nt
Ma
lfunction
P.00-5).
NO : Repa ir th e wirin g harne ss.
Page 379 of 800
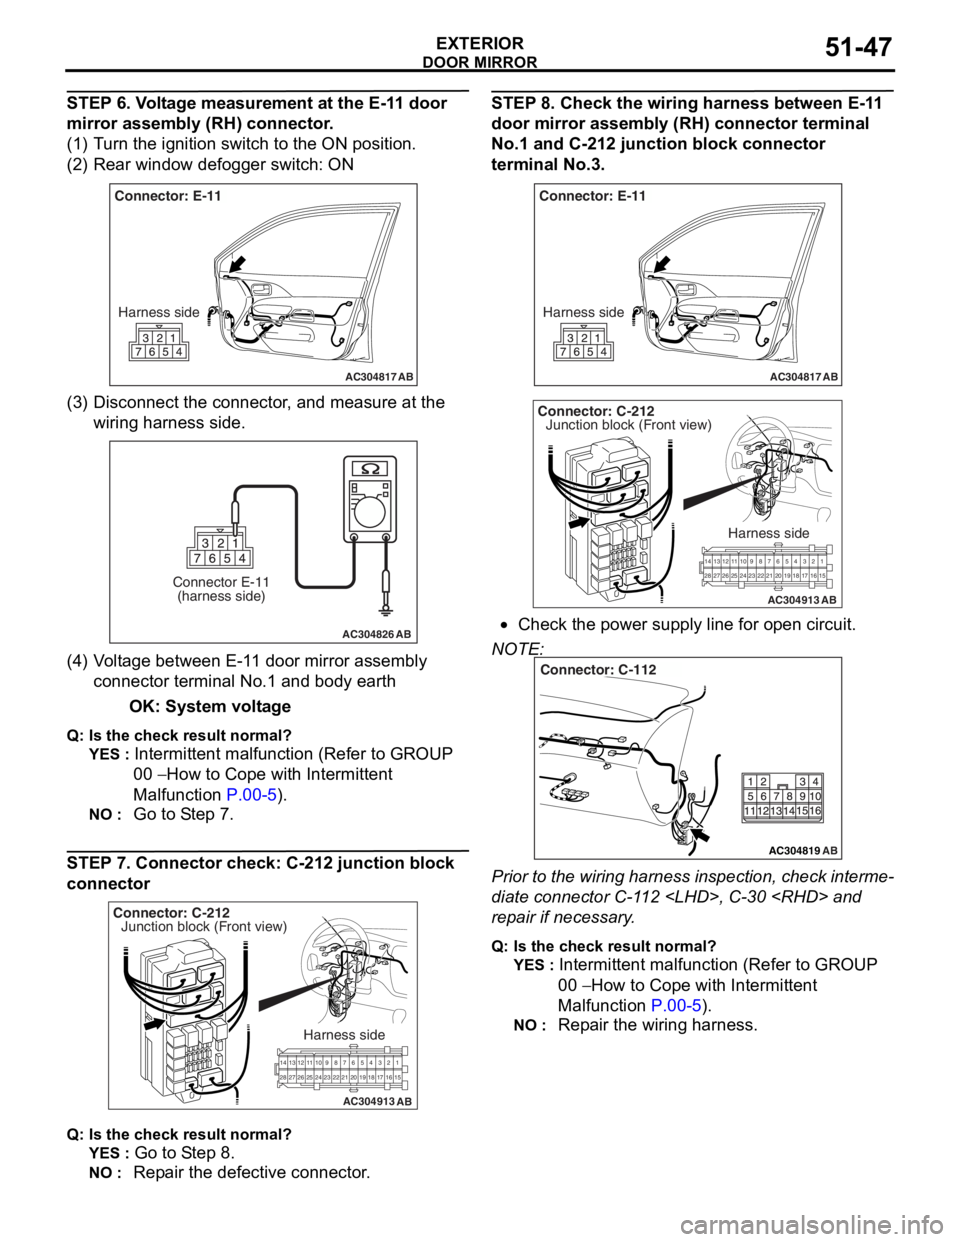
DOOR MIRROR
EXTERIOR51-47
STEP 6. Voltage measurement at the E-11 door
mirror assembly (RH) connector.
(1) Turn the ignition switch to the ON position.
(2) Rear window defogger switch: ON
AC304817
Connector: E-11Harness side
AB
(3) D isconn ect t he co nnector , an d me asure at the
wiring harn e ss side.
AC304826
Connector E-11(harness side)
AB
(4) V olt a g e between E-1 1 door mirror assembly
co nnector termina l No.1 a nd bod y ea rth
OK: System vo lt age
Q: Is the check result normal?
YES : Intermittent ma lfun ctio n (Refer to GROUP
00
− Ho w t o Cope wit h Intermitte nt
Malfunction
P.00-5).
NO : Go to S t ep 7.
STEP 7. Co nnector ch eck: C-212 junction block
connecto
r
AC304913
21716151718
201912345
623 222425282627981011141213
Connector: C-212
Harness side
AB
Junction block (Front view)
Q : Is the check result normal?
YES : Go to S t ep 8.
NO : Repa ir the defective connector .
STEP 8 . Check the wiring harness b e twee n E-1 1
door mirror assem
bly (RH) conne ctor terminal
No.
1 and C-21 2 junctio n block connec tor
terminal No.3
.
AC304817
Connector: E-11
Harness side
AB
AC304913
21716151718
201912345
623 222425282627981011141213
Connector: C-212
Harness side
AB
Junction block (Front view)
•Check th e power supply line fo r open circuit.
NOTE:
AC304819
Connector: C-112
AB
Prior to the wiring harness insp ection, check interme-
diate connector C-1 1 2
rep
a ir if necessary .
Q:Is t h e che c k r esu lt n o rmal?
YES : Intermittent malfun ctio n (Refer to GROUP
00
− Ho w to Cope wit h Intermitte nt
Ma
lfunction
P.00-5).
NO : Repa ir th e wirin g harne ss.
Page 380 of 800
DOOR MIRROR
EXTERIOR51-48
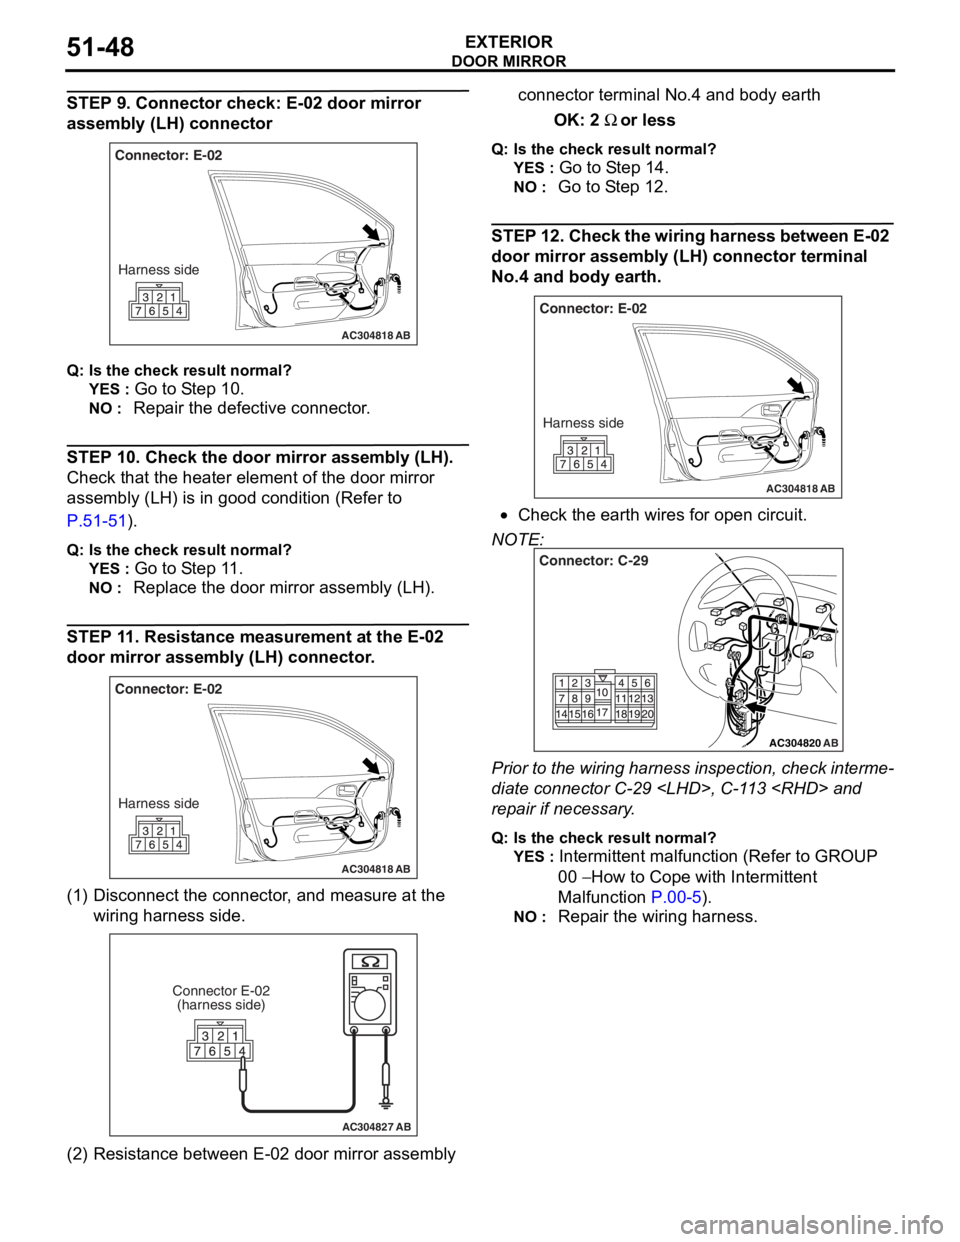
STEP 9. Connector check: E-02 door mirror
assembly (LH) connector
AC304818
Connector: E-02Harness side
AB
Q : Is the check result normal?
YES : Go to S t ep 10 .
NO : Repa ir the defective connector .
STEP 10 . Check th e door mirror asse mbly (L H).
Chec k that th e heat er ele m ent of the door mirror
assembly (L
H) is in goo d con d ition (Refer to
P.5 1 -51).
Q: Is the check result normal?
YES : Go to S t ep 1 1 .
NO : Replac e th e door mirro r assemb ly ( L H) .
STEP 11 . Resist ance m easureme n t at the E-0 2
door mirror
assem bly (LH) con nector .
AC304818
Connector: E-02
Harness side
AB
(1) D isconn ect t he co nnector , an d me asure at the
wiring harn e ss side.
AC304827
Connector E-02(harness side)
AB
(2) R esist ance betwee n E-02 do or mirror assembly connector termina l No.4 a nd bod y ea rth
OK
: 2 Ω or less
Q:Is t h e che c k r esu lt n o rmal?
YES : Go to S t ep 1 4 .
NO : Go to S t ep 12 .
STEP 1 2 . Chec k the wiring ha rnes s betwe en E-02
door mirror assem
bly (LH) con nector termina l
No.
4 and bo dy earth.
AC304818
Connector: E-02
Harness side
AB
•Check th e earth wires f o r open circuit.
NOTE:
AC304820
Connector: C-29
AB
Prior to the wiring harness insp ection, check interme-
diate connector C-29
rep
a ir if necessary .
Q:Is t h e che c k r esu lt n o rmal?
YES : Intermittent malfun ctio n (Refer to GROUP
00
− Ho w to Cope wit h Intermitte nt
Ma
lfunction
P.00-5).
NO : Repa ir th e wirin g harne ss.
Page 381 of 800
DOOR MIRROR
EXTERIOR51-49
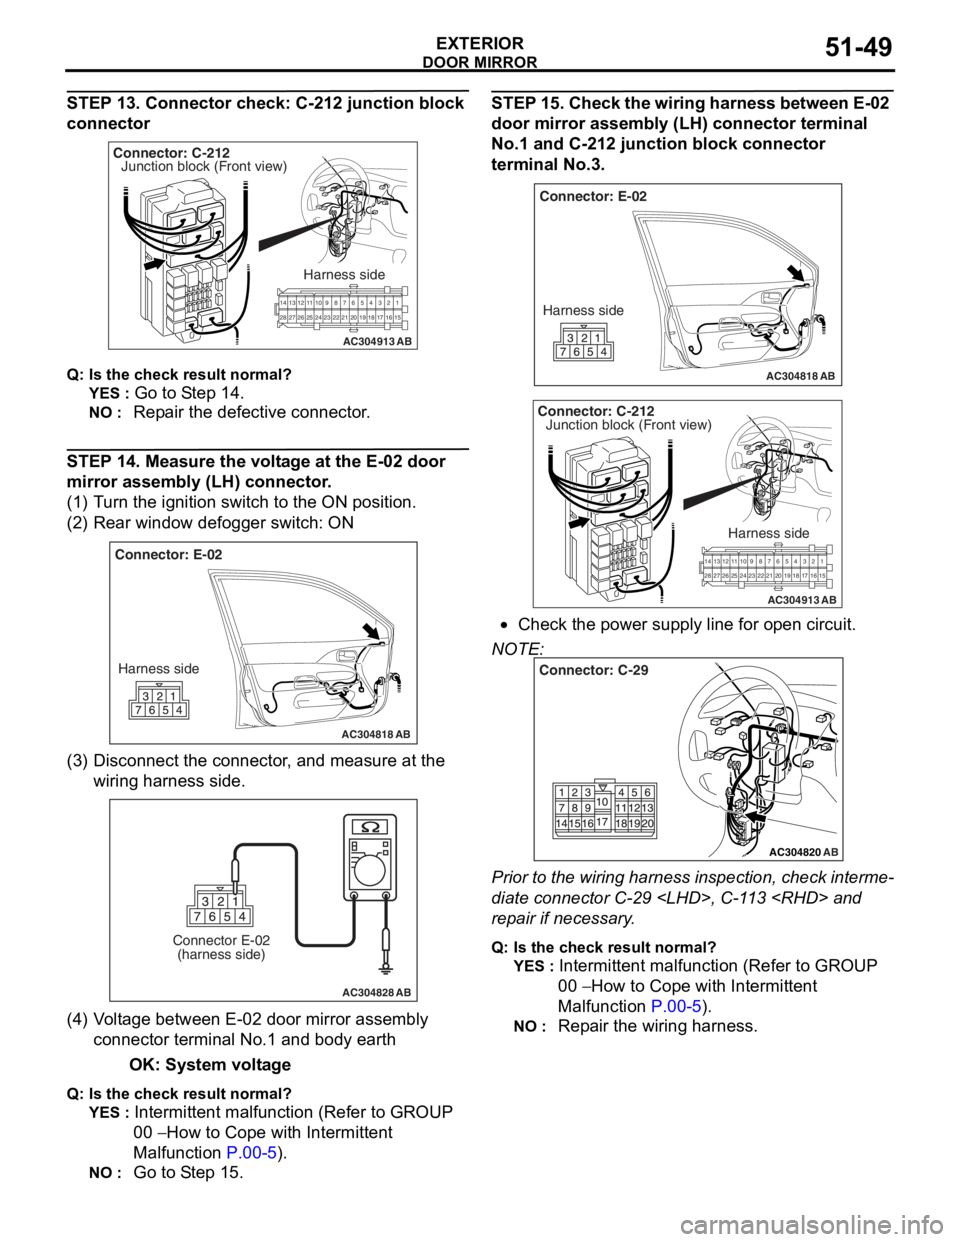
STEP 13. Connector check: C-212 junction block
connector
AC304913
21716151718
201912345
623 222425282627981011141213
Connector: C-212
Harness side
AB
Junction block (Front view)
Q : Is the check result normal?
YES : Go to S t ep 14 .
NO : Repa ir the defective connector .
STEP 14 . Me asure the volt age at the E-02 door
mirror a
ssembl y (LH) conne ctor .
(1)T urn t he ig nition switch to the ON positio n.
(2)R ear win dow defo gger switch : ON
AC304818
Connector: E-02
Harness side
AB
(3) D isconn ect t he co nnector , an d me asure at the
wiring harn e ss side.
AC304828
Connector E-02(harness side)
AB
(4) V olt a g e between E-02 doo r mirror assembly
co nnector termina l No.1 a nd bod y ea rth
OK: System vo lt age
Q: Is the check result normal?
YES : Intermittent ma lfun ctio n (Refer to GROUP
00
− Ho w t o Cope wit h Intermitte nt
Malfunction
P.00-5).
NO : Go to S t ep 15 .
STEP 1 5 . Chec k the wiring ha rnes s betwe en E-02
door mirror assem
bly (LH) con nector termina l
No.
1 and C-21 2 junctio n block connec tor
terminal No.3
.
AC304818
Connector: E-02
Harness side
AB
AC304913
21 716151718
201912345
623 222425282627981011141213
Connector: C-212
Harness side
AB
Junction block (Front view)
•Check th e power supply line fo r open circuit.
NOTE:
AC304820
Connector: C-29
AB
Prior to the wiring harness insp ection, check interme-
diate connector C-29
rep
a ir if necessary .
Q:Is t h e che c k r esu lt n o rmal?
YES : Intermittent malfun ctio n (Refer to GROUP
00
− Ho w to Cope wit h Intermitte nt
Ma
lfunction
P.00-5).
NO : Repa ir th e wirin g harne ss.