page 9 MITSUBISHI LANCER RALLIART 2014 8.G Owners Manual
[x] Cancel search | Manufacturer: MITSUBISHI, Model Year: 2014, Model line: LANCER RALLIART, Model: MITSUBISHI LANCER RALLIART 2014 8.GPages: 434, PDF Size: 57.5 MB
Page 16 of 434
2-1
2
If this warning light comes on or
flashes while you’re driving...
Quick index
N00200701048
If this warning light comes on or flashes while you’re driving...
NOTE
For information regarding warning displays in the multi-informat
ion display, refer to “Multi-information display indicators” on
page 5-112.
These warning lights will come on for a few seconds for a bul
b check when the ignition switc
h is first turned to “ON”.
Warning light
Do this
Ref. page
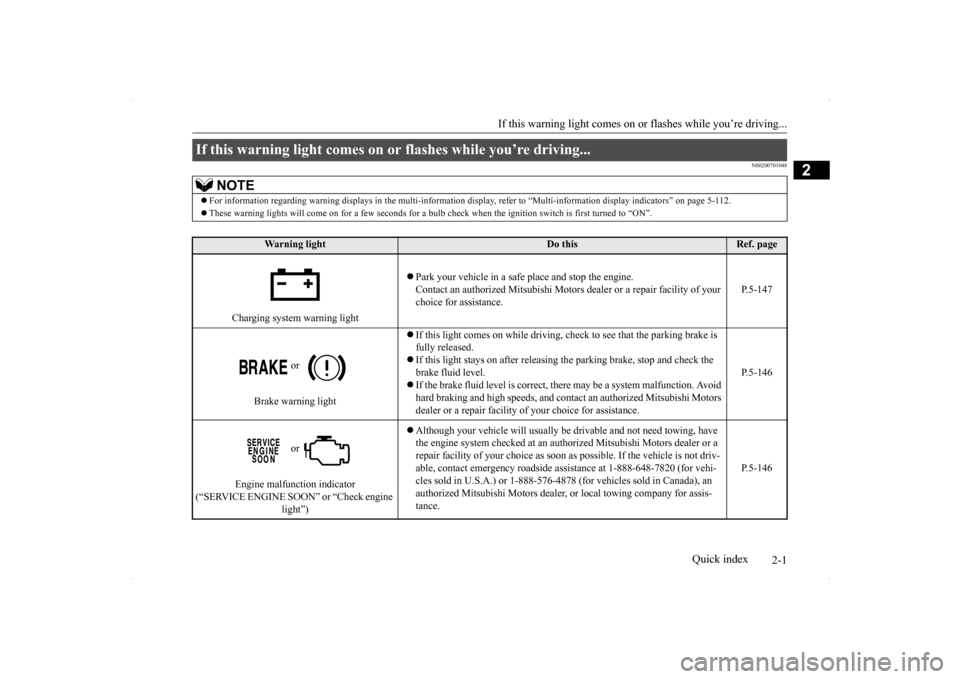
Charging system warning light
Park your vehicle in a safe
place and stop the engine.
Contact an authorized Mitsubishi Motors
dealer or a repair facility of your
choice for assistance.
P.5-147
or
Brake warning light
If this light comes on while driving, check to see that the parking brake is fully released. If this light stays on after releasing the parking brake, stop and check the brake fluid level. If the brake fluid level is correct, th
ere may be a system malfunction. Avoid
hard braking and high speeds, and contact an authorized Mitsubishi Motors dealer or a repair facility of your choice for assistance.
P.5-146
or
Engine malfunction indicator
(“SERVICE ENGINE SOON” or “Check engine
light”)
Although your vehicle will usually be drivable and not need towing, have the engine system checked at an aut
horized Mitsubishi Motors dealer or a
repair facility of your choice as soon
as possible. If the vehicle is not driv-
able, contact emergency roadside assistance at 1-888-648-7820 (for vehi- cles sold in U.S.A.) or 1-888-576-487
8 (for vehicles sold in Canada), an
authorized Mitsubishi Motors dealer
, or local towing company for assis-
tance.
P.5-146
Page 17 of 434
If this warning light comes on or
flashes while you’re driving...
2-2 Quick index
2
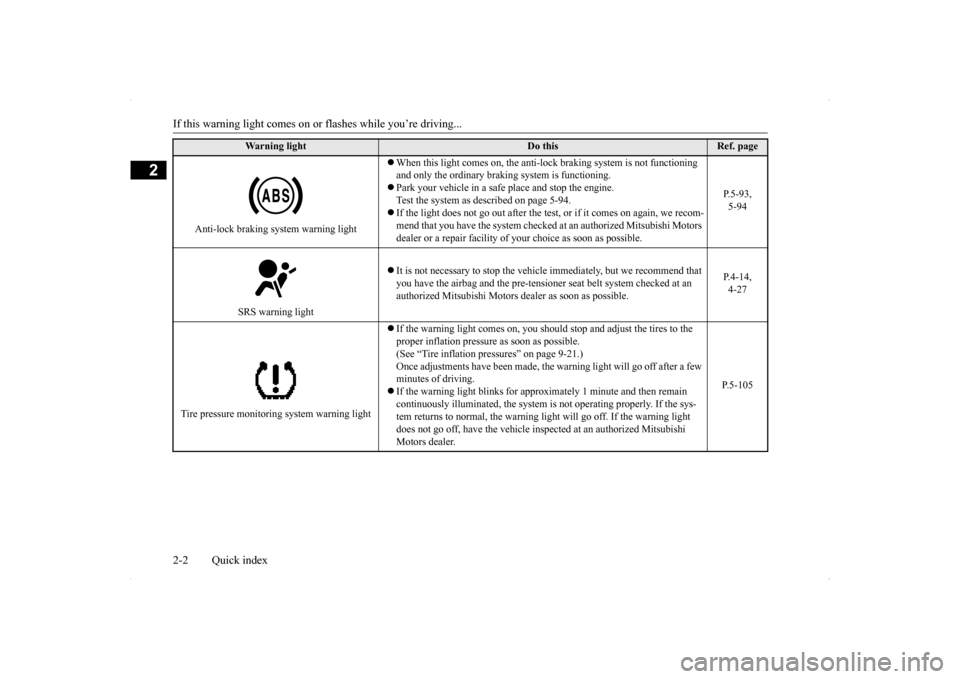
Anti-lock braking system warning light
When this light comes on, the anti-lock braking system is not functioning and only the ordinary braking system is functioning. Park your vehicle in a safe
place and stop the engine.
Test the system as described on page 5-94. If the light does not go out after the test
, or if it comes on again, we recom-
mend that you have the system checked at
an authorized Mitsubishi Motors
dealer or a repair facility of your choice as soon as possible.
P.5-93, 5-94
SRS warning light
It is not necessary to stop the vehicl
e immediately, but we recommend that
you have the airbag and the pre-tensione
r seat belt system checked at an
authorized Mitsubishi Motors dealer as soon as possible.
P.4-14, 4-27
Tire pressure monitoring system warning light
If the warning light comes on, you should
stop and adjust the tires to the
proper inflation pressure as soon as possible. (See “Tire inflation pressures” on page 9-21.)Once adjustments have been made, the
warning light will go off after a few
minutes of driving. If the warning light blinks for approximately 1 minute and then remain continuously illuminated, the system is not operating properly. If the sys- tem returns to normal, the warning light will go off. If the warning light does not go off, have the vehicle inspected at an authorized Mitsubishi Motors dealer.
P.5-105
Warning light
Do this
Ref. page
Page 18 of 434
If this problem occurs...
Quick index 2-3
2
N00200900838
If this problem occurs...
Problem
Do this
Ref. Page
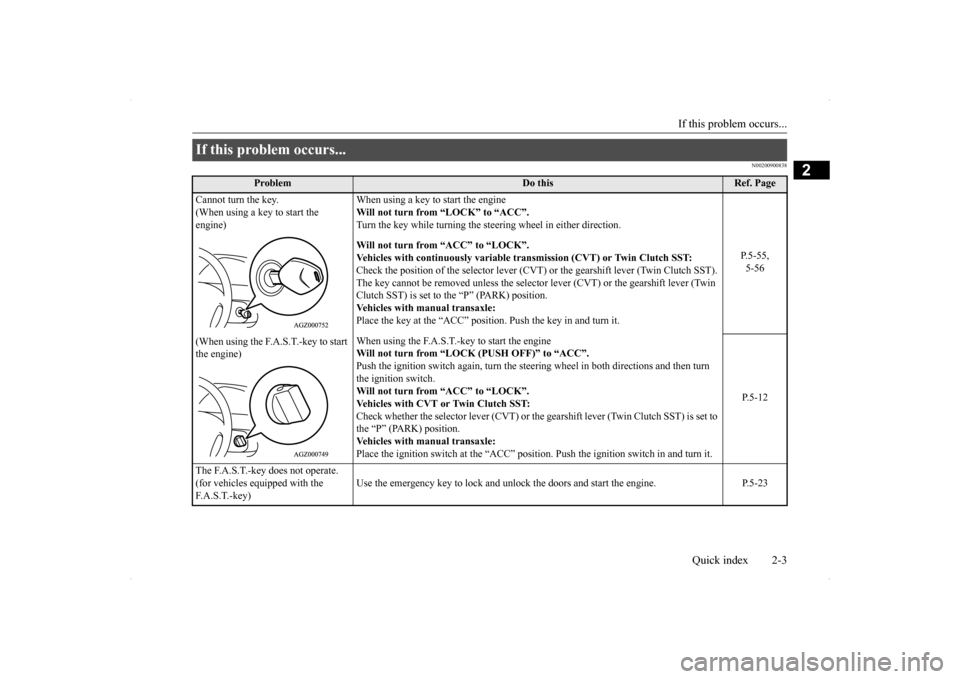
Cannot turn the key. (When using a key to start the engine)
When using a key to start the engine Will not turn from “LOCK” to “ACC”. Turn the key while turning the steering wheel in either direction.
P.5-55, 5-56
Will not turn from “ACC” to “LOCK”. Vehicles with continuously variable tr
ansmission (CVT) or Twin Clutch SST:
Check the position of the selector lever (CVT)
or the gearshift lever (Twin Clutch SST).
The key cannot be removed unless the selector lever (CVT) or the gearshift lever (Twin Clutch SST) is set to the “P” (PARK) position.Vehicles with manual transaxle:Place the key at the “ACC” position. Push the key in and turn it.
(When using the F.A.S.T.-key to start the engine)
When using the F.A.S.T.-key to start the engine Will not turn from “LOCK (PUSH OFF)” to “ACC”. Push the ignition switch again, turn the steeri
ng wheel in both directions and then turn
the ignition switch. Will not turn from “ACC” to “LOCK”. Vehicles with CVT or Twin Clutch SST:Check whether the selector lever (CVT) or the gearshift lever (Twin Clutch SST) is set to the “P” (PARK) position. Vehicles with manual transaxle:Place the ignition switch at the “ACC” positi
on. Push the ignition switch in and turn it.
P.5-12
The F.A.S.T.-key does not operate. (for vehicles equipped with the F.A.S.T.-key)
Use the emergency key to lock and unlock the doors and start the engine. P.5-23
Page 19 of 434
If this problem occurs... 2-4 Quick index
2
Cannot shift the selector lever (CVT) or the gearshift lever (Twin Clutch SST) from the “P” (PARK) position. (for vehicles with CVT or Twin Clutch SST)
Shift the selector lever (CVT) or the gearsh
ift lever (Twin Clutch SST) while pressing
the brake pedal.Check that the ignition key or igniti
on switch is in the “ON” position.
P.5-63, 5-71
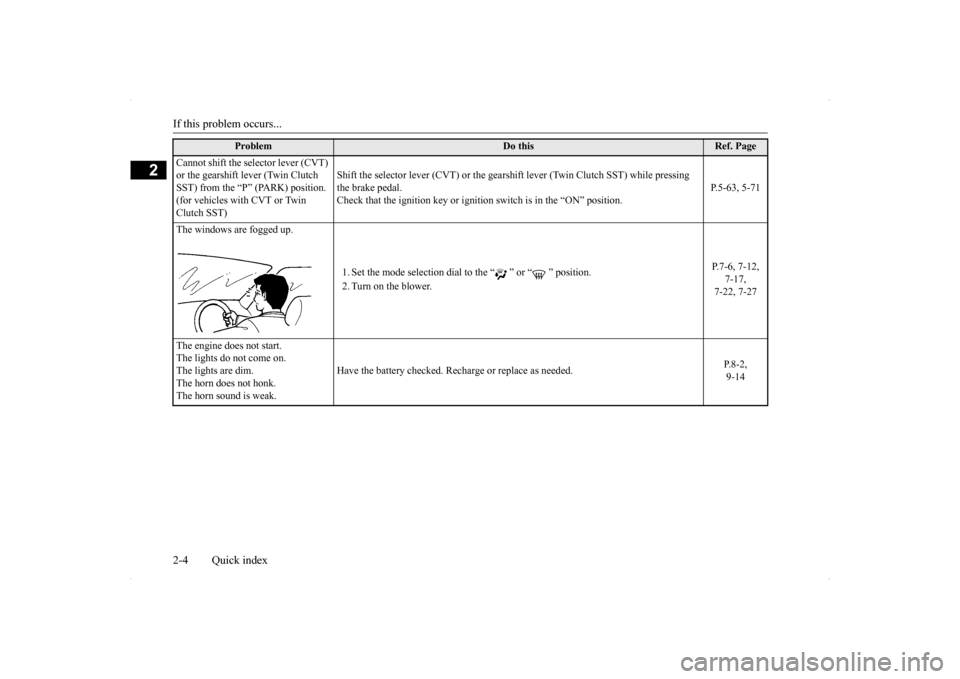
The windows are fogged up.
1. Set the mode selection dial to the “ ” or “ ” position. 2. Turn on the blower.
P.7-6, 7-12,
7-17, 7-22, 7-27
The engine does not start. The lights do not come on. The lights are dim. The horn does not honk.The horn sound is weak.
Have the battery checked. Recharge or replace as needed.
P.8-2, 9-14
Problem
Do this
Ref. Page
Page 20 of 434
If this problem occurs...
Quick index 2-5
2
Problem
Do this
Ref. page
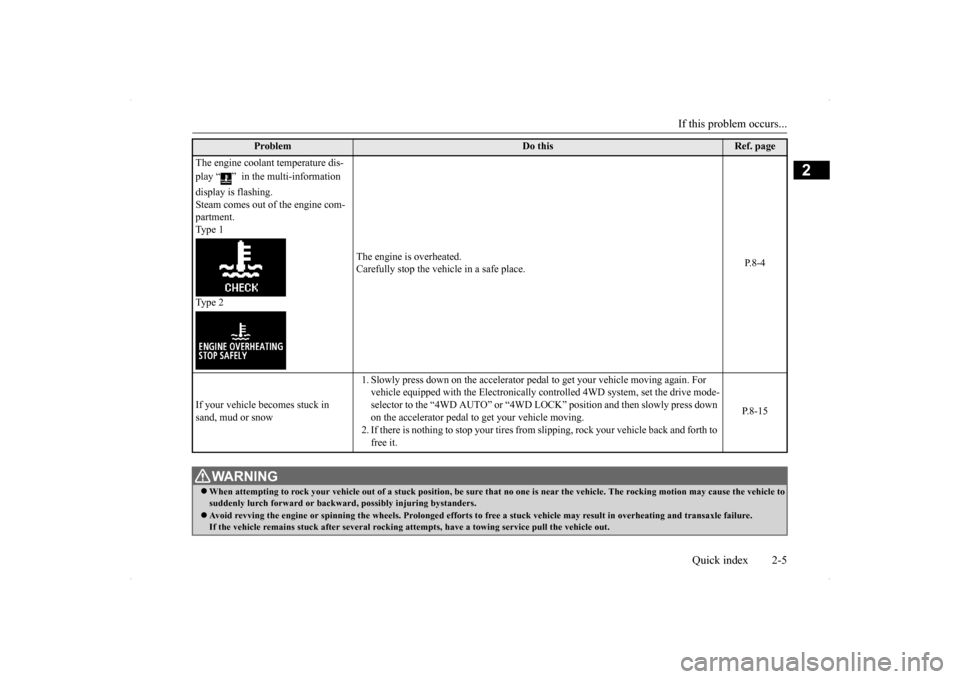
The engine coolant temperature dis- play “ ” in the multi-information display is flashing. Steam comes out of the engine com- partment. Type 1 Type 2
The engine is overheated. Carefully stop the vehicle in a safe place.
P.8-4
If your vehicle becomes stuck in sand, mud or snow
1. Slowly press down on the accelerator peda
l to get your vehicle moving again. For
vehicle equipped with the Electronically controlled 4WD system, set the drive mode- selector to the “4WD AUTO” or “4WD LO
CK” position and then slowly press down
on the accelerator pedal to get your vehicle moving.2. If there is nothing to stop your tires from
slipping, rock your vehicle back and forth to
free it.
P.8-15
WA R N I N G When attempting to rock your vehicle out of
a stuck position, be sure that no one is
near the vehicle. The rocking motion may c
ause the vehicle to
suddenly lurch forward or backward, possibly injuring bystanders. Avoid revving the engine or spinning the
wheels. Prolonged efforts to free a stuck ve
hicle may result in overheating and transa
xle failure.
If the vehicle remains stuck after several rocking at
tempts, have a towing service pull the vehicle out.
Page 21 of 434
If this problem occurs... 2-6 Quick index
2
Problem
Do this
Ref. page
The brakes are not functioning prop- erly after driving through water.
Dry out the brakes by driving slowly whil
e lightly pressing the brake pedal. P.6-5
The CVT makes no engine speed to vehicle speed ratio change when accelerating. The initial movement of the vehicle is slow when the vehicle starts moving.(for vehicles with CVT)
There may be a problem in the CVT. If the or warning lights on the multi-infor
mation display will not turn off, or if
they are coming on frequently, please have
the vehicle checked at your nearest Mitsubi-
shi Motors dealer.
P.5-71
Twin Clutch SST does not shift. Vehicle cannot move. Acceleration is slow.The vehicle does not creep. A large shock is felt when shifting. Shifting occurs at higher engine speed. Response is slow. (for vehicles with Twin Clutch SST)
The temperature of the Twin Clutch SST fluid
is high, a safety device in the Twin Clutch
SST has been activated due to a possible malfun
ction in the Twin Clutch SST, or there is
a possible malfunction in the engine electronic control module.
P.5-74, 5-82,
5-146
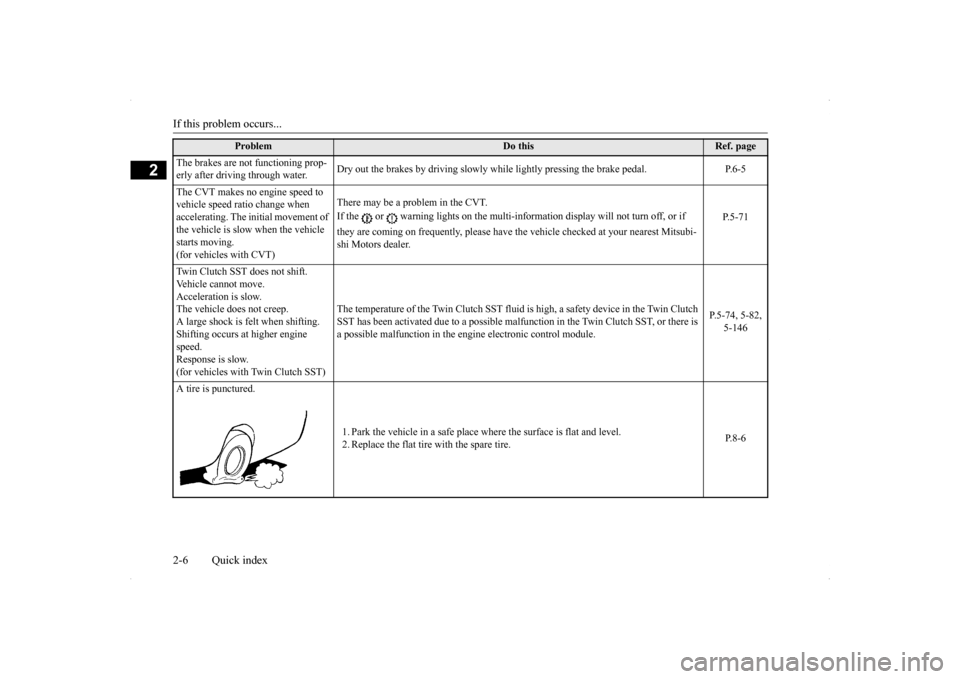
A tire is punctured.
1. Park the vehicle in a safe place
where the surface is flat and level.
2. Replace the flat tire with the spare tire.
P.8-6
Page 35 of 434
Head restraints 4-6 Seat and restraint systems
4
N00403000294
Tilt the arm rest down for use as shown. The arm rest includes a cup holder. (Refer to “Cup holder” on page 5-192.)
N00404300539 N00409400030
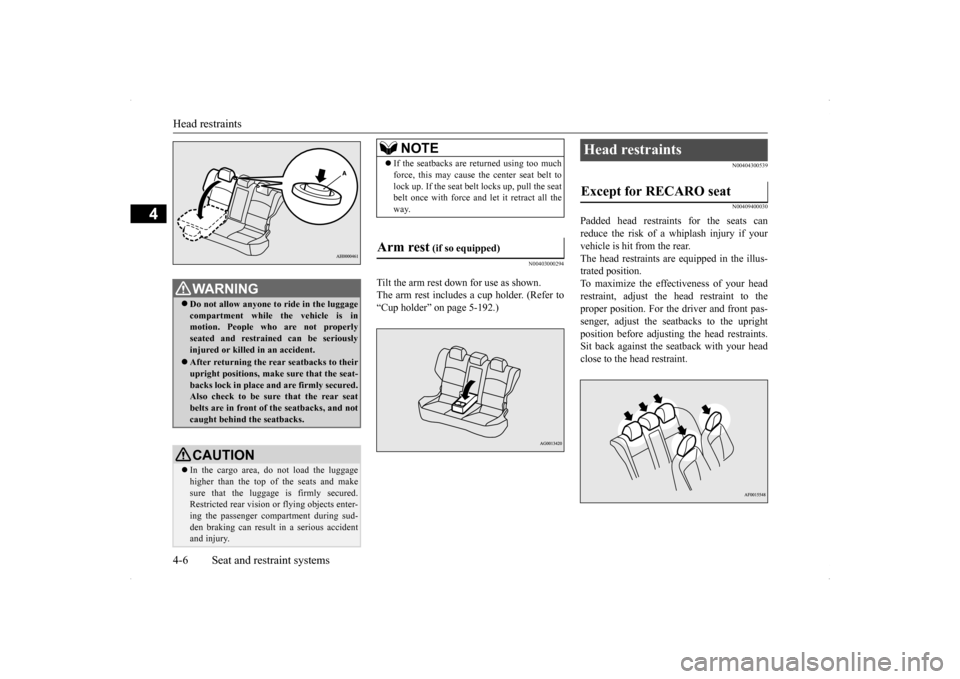
Padded head restraints for the seats can reduce the risk of a whiplash injury if yourvehicle is hit from the rear. The head restraints are equipped in the illus- trated position.To maximize the effectiveness of your headrestraint, adjust the head restraint to the proper position. For the driver and front pas- senger, adjust the seatbacks to the uprightposition before adjusting the head restraints. Sit back against the seatback with your head close to the head restraint.
WA R N I N G Do not allow anyone to ride in the luggage compartment while the vehicle is in motion. People who are not properlyseated and restrained can be seriously injured or killed in an accident. After returning the rear seatbacks to their upright positions, make sure that the seat- backs lock in place and are firmly secured.Also check to be sure that the rear seat belts are in front of the seatbacks, and not caught behind the seatbacks.CAUTION In the cargo area, do not load the luggage higher than the top of the seats and make sure that the luggage is firmly secured.Restricted rear vision or flying objects enter- ing the passenger compartment during sud- den braking can result in a serious accidentand injury.
NOTE
If the seatbacks are returned using too much force, this may cause the center seat belt to lock up. If the seat belt locks up, pull the seat belt once with force and let it retract all the way.
Arm rest
(if so equipped)
Head restraints Except for RECARO seat
Page 38 of 434
Seat belts
Seat and restraint systems 4-9
4
senger in the event of an accident. Always use the provided seat belts. Carefully review the following information for proper seat belt usage.
N00406201470
All seats are equipped with a seat belt whichuses one combined lap-and-shoulder belt withan emergency locking retractor. This system is designed to provide both com- fort and safety. It permits full extension and automatic retraction of the belts during nor-mal vehicle operation. A sensing device inside the belt retractor is designed to lock the retractor in the event of a sudden change inthe vehicle’s motion.
WA R N I N G To help reduce the risk of injury or death in an accident, seat belts and childrestraint systems must always be used. Refer to “Child restraint systems” on page 4-14 for additional information. Never use one seat belt for more than one person. Never carry more people in your vehicle than there are seat belts. Always adjust the seat belt for a snug fit.Always place the shoulder belt over your shoulder and across your chest. Never put it behind you or under your arm. Always wear the lap belt as low as possible across your hips, not around your waist. Never modify or alter the seat belts in your vehicle. To reduce the risk to the driver of serious injury or death during deployment of thedriver’s airbag, always properly wear the seat belt and adjust th
e driver’s seat as far
back as possible while maintaining a posi- tion that still enables
you to fully apply the
pedals, easily control the steering wheel,and safely operate the vehicle.
To reduce the risk to a front seat passen- ger of serious injury or death from a deploying airbag, make sure the passenger always wears the seat belt properly, remains seated all the way back andupright in their seat, and moves the seat as far back as possible. Refer to “Supplemen- tal Restraint System (SRS) - airbag” onpage 4-22 for additional information. Never hold an infant or child in your arms or on your lap when riding in this vehicle even when you are wearing your seat belt. Never place any part of the seat belt youare wearing around an infant or child. Failure to follow these simple instructions creates a risk of serious injury or death toyour child in the event of an accident or sudden stop. Children 12 years old and under should always ride in the rear seat and be prop- erly restrained. This reduces their risk ofserious injury or death in an accident, especially due to a deploying front passen- ger airbag. Refer to “Child restraint sys-tems” on page 4-14 for additional information.WA R N I N G
Any child who is too small to properly wear a seat belt must be properly restrained in an appropriate child restraint system. Children 12 years old and under should be seated only in therear seat to reduce their risk of serious injury or death in an accident, especially from the deployment of a front passengerairbag. Infants MUST be placed in a rear-facing child safety seat and positioned in the rear seat. In the event of an accident, all seat belt assemblies, including retractors and attachment hardware, should be inspectedby an authorized Mitsubishi Motors dealer to determine whether replacement is necessary.
Seat belt instructions
WA R N I N G
Page 39 of 434
Seat belts 4-10 Seat and restraint systems
4
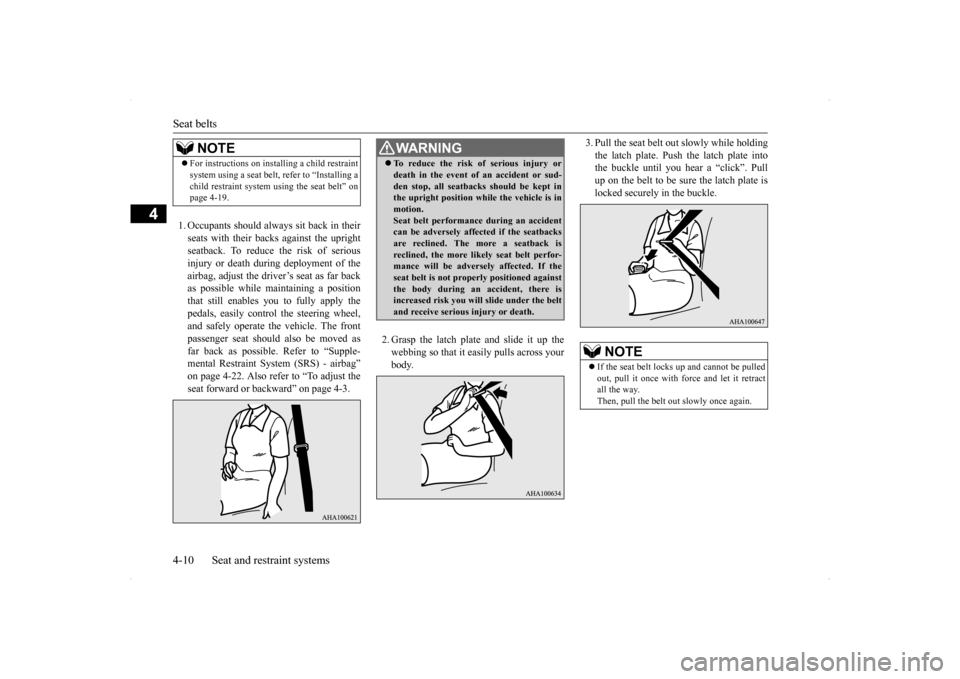
1. Occupants should always sit back in their seats with their backs against the upright seatback. To reduce the risk of seriousinjury or death during deployment of theairbag, adjust the driver’s seat as far back as possible while maintaining a position that still enables you to fully apply thepedals, easily control the steering wheel, and safely operate the vehicle. The front passenger seat should also be moved asfar back as possible. Refer to “Supple- mental Restraint System (SRS) - airbag” on page 4-22. Also refer to “To adjust theseat forward or backward” on page 4-3.
2. Grasp the latch plate and slide it up the webbing so that it easily pulls across yourbody.
3. Pull the seat belt out slowly while holding the latch plate. Push the latch plate into the buckle until you hear a “click”. Pull up on the belt to be sure the latch plate islocked securely in the buckle.
NOTE
For instructions on installing a child restraint system using a seat belt, refer to “Installing a child restraint system using the seat belt” on page 4-19.
WA R N I N G To reduce the risk of serious injury or death in the event of an accident or sud- den stop, all seatbacks should be kept in the upright position while the vehicle is in motion.Seat belt performance during an accident can be adversely affected if the seatbacks are reclined. The more a seatback isreclined, the more likely seat belt perfor- mance will be adversely affected. If the seat belt is not properly positioned againstthe body during an accident, there is increased risk you will slide under the belt and receive serious injury or death.
NOTE
If the seat belt locks up and cannot be pulled out, pull it once with force and let it retractall the way. Then, pull the belt out slowly once again.
Page 40 of 434
Seat belts
Seat and restraint systems 4-11
4
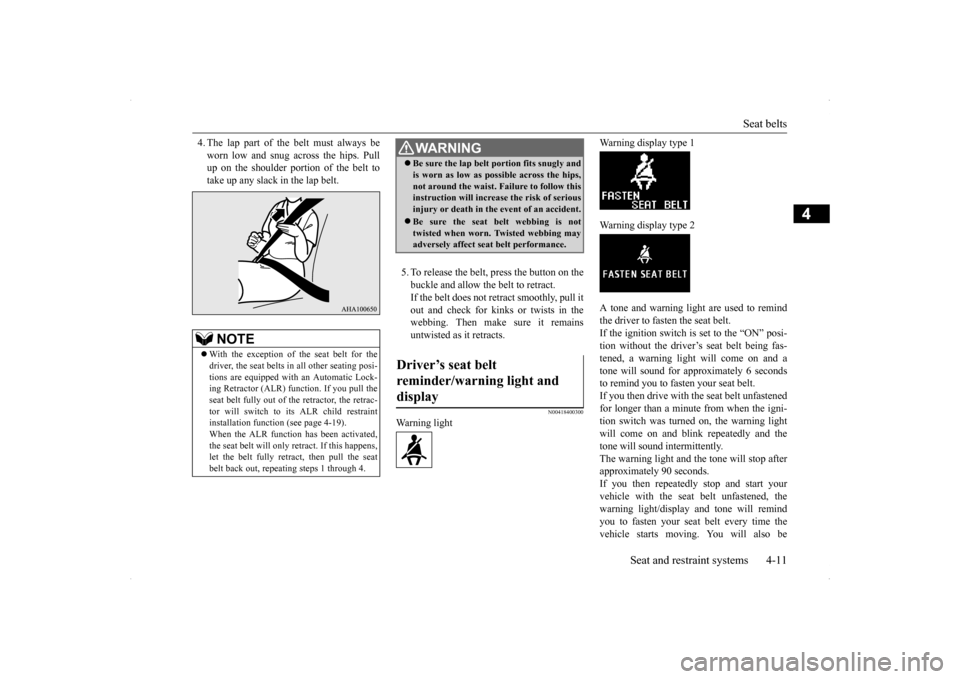
4. The lap part of the belt must always be worn low and snug across the hips. Pull up on the shoulder portion of the belt to take up any slack in the lap belt.
5. To release the belt, press the button on the buckle and allow the belt to retract. If the belt does not retract smoothly, pull itout and check for kinks or twists in the webbing. Then make sure it remains untwisted as it retracts.
N00418400300
Warning light
Warning display type 1 Warning display type 2 A tone and warning light are used to remind the driver to fasten the seat belt.If the ignition switch is set to the “ON” posi- tion without the driver’s seat belt being fas- tened, a warning light will come on and atone will sound for approximately 6 seconds to remind you to fasten your seat belt. If you then drive with
the seat belt unfastened
for longer than a minute from when the igni- tion switch was turned on, the warning light will come on and blink repeatedly and thetone will sound intermittently.The warning light and the tone will stop after approximately 90 seconds. If you then repeatedly stop and start yourvehicle with the seat belt unfastened, the warning light/display and tone will remind you to fasten your seat belt every time thevehicle starts moving. You will also be
NOTE
With the exception of the seat belt for the driver, the seat belts in all other seating posi- tions are equipped with an Automatic Lock- ing Retractor (ALR) function. If you pull theseat belt fully out of the retractor, the retrac- tor will switch to its ALR child restraint installation function (see page 4-19).When the ALR function has been activated, the seat belt will only retract. If this happens, let the belt fully retract, then pull the seatbelt back out, repeating steps 1 through 4.
WA R N I N G Be sure the lap belt portion fits snugly and is worn as low as possible across the hips, not around the waist. Failure to follow this instruction will increase the risk of serious injury or death in the
event of an accident.
Be sure the seat belt webbing is not twisted when worn. Twisted webbing mayadversely affect seat belt performance.
Driver’s seat belt reminder/warning light and display