lock MITSUBISHI LANCER SPORTBACK 2014 8.G Owners Manual
[x] Cancel search | Manufacturer: MITSUBISHI, Model Year: 2014, Model line: LANCER SPORTBACK, Model: MITSUBISHI LANCER SPORTBACK 2014 8.GPages: 422, PDF Size: 55.11 MB
Page 3 of 422
Instruments and controls (Driver’s area) 1-1
1
Overview
N00100202531
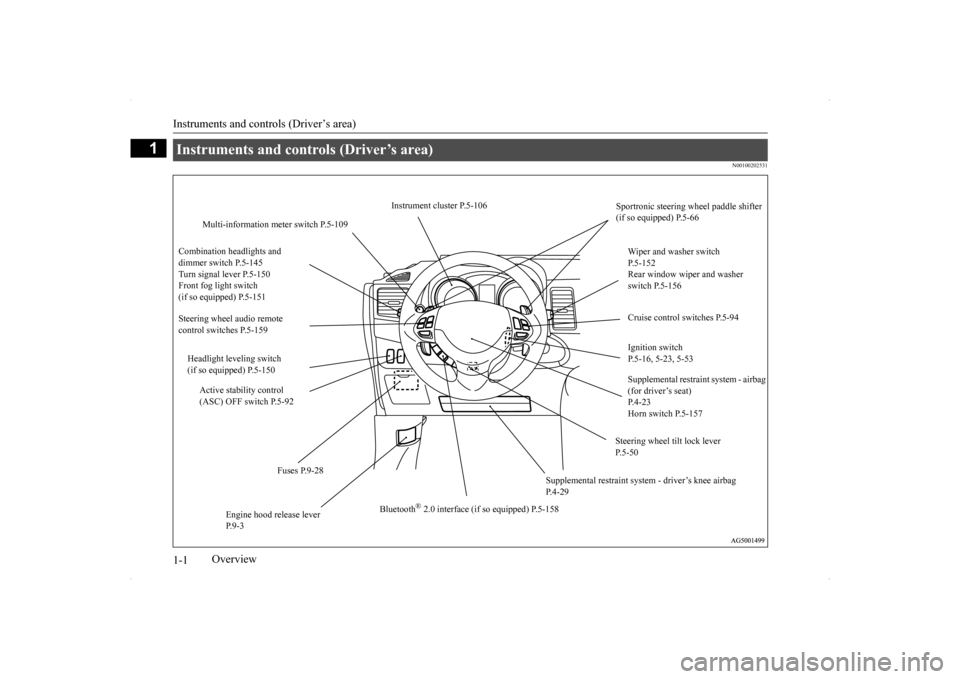
Instruments and controls (Driver’s area)
Instrument cluster P.5-106
Sportronic steering wheel paddle shifter (if so equipped) P.5-66
Multi-information meter switch P.5-109
Combination headlights and dimmer switch P.5-145 Turn signal lever P.5-150Front fog light switch (if so equipped) P.5-151
Wiper and washer switch P.5-152 Rear window wiper and washer switch P.5-156 Cruise control switches P.5-94
Steering wheel audio remote control switches P.5-159
Ignition switch P.5-16, 5-23, 5-53
Headlight leveling switch (if so equipped) P.5-150
Supplemental restraint system - airbag (for driver’s seat) P.4-23Horn switch P.5-157
Active stability control (ASC) OFF switch P.5-92
Steering wheel tilt lock lever P.5-50
Fuses P.9-28
Supplemental restraint system - driver’s knee airbag P.4-29
Bluetooth
® 2.0 interface (if so equipped) P.5-158
Engine hood release lever P.9-3
BK0200700US.bo
ok 1 ページ 2013年2月15日 金曜日 午後12時17分
Page 7 of 422
Interior 1-5 Overview
1
N00100302268
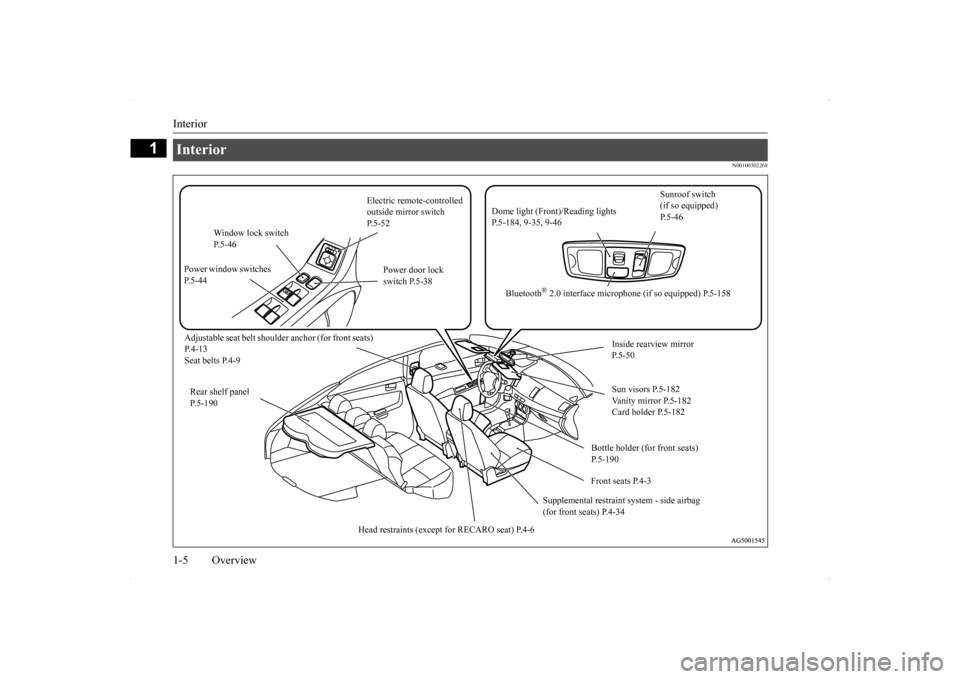
Interior
Sunroof switch (if so equipped) P.5-46
Electric remote-controlled outside mirror switch P. 5 - 5 2
Dome light (Front)/Reading lights P.5-184, 9-35, 9-46
Window lock switch P.5-46
Power window switches P.5-44
Power door lock switch P.5-38
Bluetooth
® 2.0 interface microphone (if so equipped) P.5-158
Adjustable seat belt shoulde
r anchor (for front seats)
P.4-13 Seat belts P.4-9
Inside rearview mirror P.5-50 Sun visors P.5-182 Vanity mirror P.5-182 Card holder P.5-182
Rear shelf panel P.5-190
Bottle holder (for front seats) P.5-190 Front seats P.4-3
Supplemental restraint
system - side airbag
(for front seats) P.4-34
Head restraints (except for RECARO seat) P.4-6
BK0200700US.bo
ok 5 ページ 2013年2月15日 金曜日 午後12時17分
Page 10 of 422
Outside (Front)
Overview 1-8
1
N00100601323
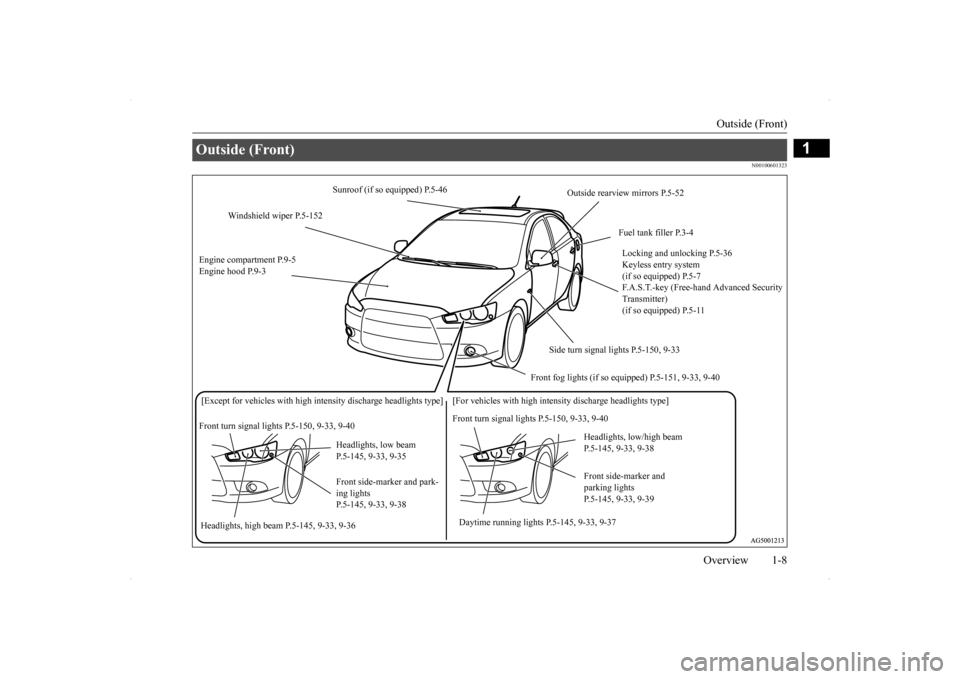
Outside (Front)
Sunroof (if so equipped) P.5-46
Outside rearview mirrors P.5-52
Windshield wiper P.5-152
Fuel tank filler P.3-4 Locking and unlocking P.5-36 Keyless entry system (if so equipped) P.5-7 F.A.S.T.-key (Free-ha
nd Advanced Security
Transmitter) (if so equipped) P.5-11
Engine compartment P.9-5 Engine hood P.9-3
Side turn signal lights P.5-150, 9-33
Front fog lights (if so equi
pped) P.5-151, 9-33, 9-40
[Except for vehicles with high intensity di
scharge headlights type] [For vehicles with
high intensity discharge headlights type]
Front turn signal lights P.5-150, 9-33, 9-40
Front turn signal lights P.5-150, 9-33, 9-40
Headlights, low/high beam P.5-145, 9-33, 9-38
Headlights, low beam P.5-145, 9-33, 9-35
Front side-marker and parking lights P.5-145, 9-33, 9-39
Front side-marker and park- ing lights P.5-145, 9-33, 9-38
Daytime running lights P.5-145, 9-33, 9-37
Headlights, high beam P.5-145, 9-33, 9-36
BK0200700US.bo
ok 8 ページ 2013年2月15日 金曜日 午後12時17分
Page 13 of 422
If this warning light comes on or
flashes while you’re driving...
2-2 Quick index
2
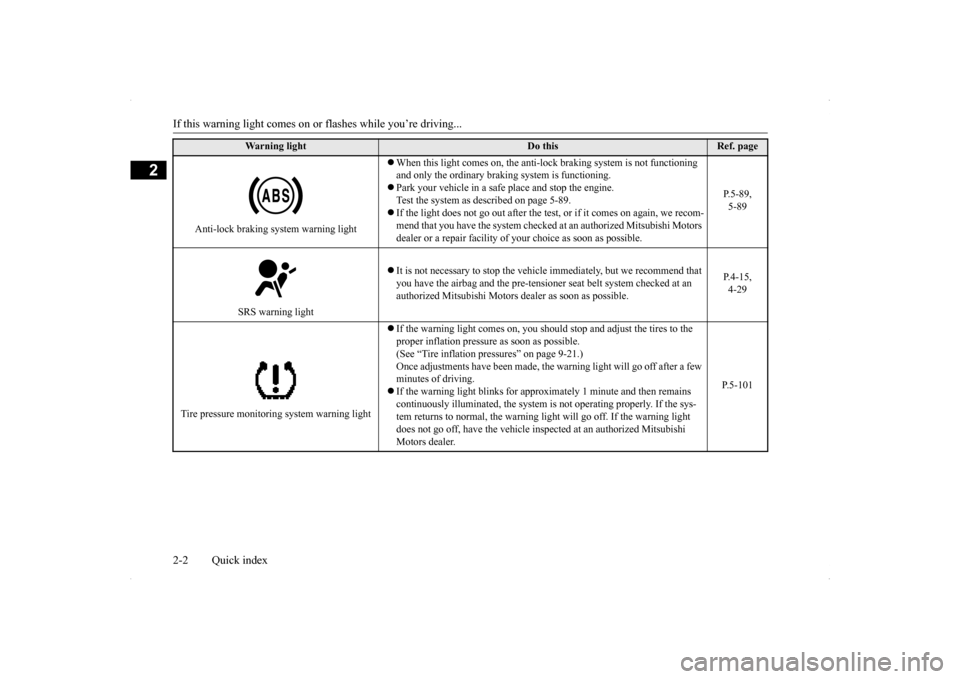
Anti-lock braking system warning light
When this light comes on, the anti-lock braking system is not functioning and only the ordinary braking system is functioning. Park your vehicle in a safe
place and stop the engine.
Test the system as described on page 5-89. If the light does not go out after the test
, or if it comes on again, we recom-
mend that you have the system checked at
an authorized Mitsubishi Motors
dealer or a repair facility of your choice as soon as possible.
P.5-89, 5-89
SRS warning light
It is not necessary to stop the vehicl
e immediately, but we recommend that
you have the airbag and the pre-tensione
r seat belt system checked at an
authorized Mitsubishi Motors dealer as soon as possible.
P.4-15, 4-29
Tire pressure monitoring system warning light
If the warning light comes on, you should
stop and adjust the tires to the
proper inflation pressure as soon as possible. (See “Tire inflation pressures” on page 9-21.)Once adjustments have been made, the
warning light will go off after a few
minutes of driving. If the warning light blinks for approximately 1 minute and then remains continuously illuminated, the system is not operating properly. If the sys- tem returns to normal, the warning light will go off. If the warning light does not go off, have the vehicle inspected at an authorized Mitsubishi Motors dealer.
P.5-101
Warning light
Do this
Ref. page
BK0200700US.bo
ok 2 ページ 2013年2月15日 金曜日 午後12時17分
Page 14 of 422
If this problem occurs...
Quick index 2-3
2
N00200900740
If this problem occurs...
Problem
Do this
Ref. Page
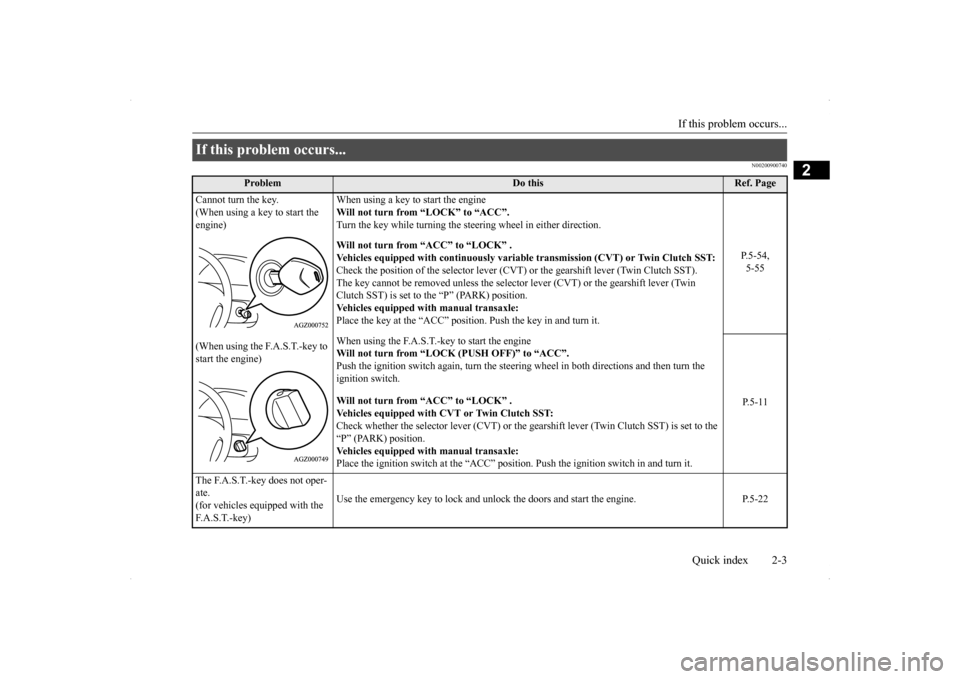
Cannot turn the key. (When using a key to start the engine)
When using a key to start the engine Will not turn from “LOCK” to “ACC”. Turn the key while turning the steering wheel in either direction.
P.5-54, 5-55
Will not turn from “ACC” to “LOCK” . Vehicles equipped with continuously variab
le transmission (CVT) or Twin Clutch SST:
Check the position of the selector lever (CVT) or the gearshift lever (Twin Clutch SST). The key cannot be removed unless the selector lever (CVT) or the gearshift lever (Twin Clutch SST) is set to the “P” (PARK) position.Vehicles equipped with manual transaxle:Place the key at the “ACC” position. Push the key in and turn it.
(When using the F.A.S.T.-key to start the engine)
When using the F.A.S.T.-key to start the engine Will not turn from “LOCK (PUSH OFF)” to “ACC”. Push the ignition switch again, turn the steering
wheel in both directions and then turn the
ignition switch. Will not turn from “ACC” to “LOCK” . Vehicles equipped with CVT or Twin Clutch SST: Check whether the selector lever (CVT) or the g
earshift lever (Twin Clutch SST) is set to the
“P” (PARK) position. Vehicles equipped with manual transaxle: Place the ignition switch at the “ACC” position.
Push the ignition switch in and turn it.
P. 5 - 1 1
The F.A.S.T.-key does not oper- ate.(for vehicles equipped with the F. A . S . T. - k e y )
Use the emergency key to lock and unlock the doors and start the engine. P.5-22
BK0200700US.bo
ok 3 ページ 2013年2月15日 金曜日 午後12時17分
Page 23 of 422
Filling the fuel tank 3-4 General information
3
N00301101910
1. Before filling with fuel, stop the engine.
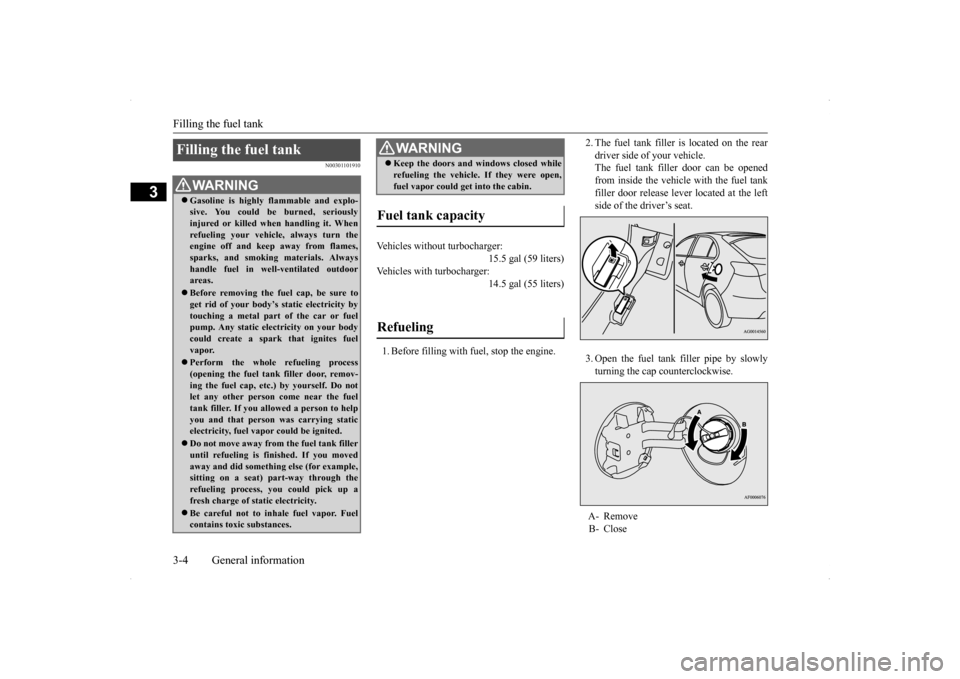
2. The fuel tank filler is located on the rear driver side of your vehicle. The fuel tank filler door can be opened from inside the vehicle with the fuel tankfiller door release lever located at the left side of the driver’s seat. 3. Open the fuel tank filler pipe by slowly turning the cap counterclockwise.
Filling the fuel tank
WA R N I N G Gasoline is highly flammable and explo- sive. You could be burned, seriously injured or killed when handling it. When refueling your vehicle, always turn theengine off and keep away from flames, sparks, and smoking materials. Always handle fuel in well-ventilated outdoorareas. Before removing the fuel cap, be sure to get rid of your body’s static electricity by touching a metal part of the car or fuel pump. Any static electricity on your bodycould create a spark that ignites fuel vapor. Perform the whole refueling process (opening the fuel tank filler door, remov- ing the fuel cap, etc.) by yourself. Do notlet any other person come near the fuel tank filler. If you allowed a person to help you and that person was carrying staticelectricity, fuel vapor could be ignited. Do not move away from the fuel tank filler until refueling is finished. If you moved away and did something else (for example, sitting on a seat) part-way through the refueling process, you could pick up a fresh charge of static electricity. Be careful not to inhale fuel vapor. Fuel contains toxic substances.
Keep the doors and windows closed while refueling the vehicle. If they were open, fuel vapor could get into the cabin.
Fuel tank capacity Vehicles without turbocharger:
15.5 gal (59 liters)
Vehicles with turbocharger:
14.5 gal (55 liters)
Refueling
WA R N I N G
A- Remove B- Close
BK0200700US.bo
ok 4 ページ 2013年2月15日 金曜日 午後12時17分
Page 24 of 422
Modifications to and racing of your vehicle
General information 3-5
3
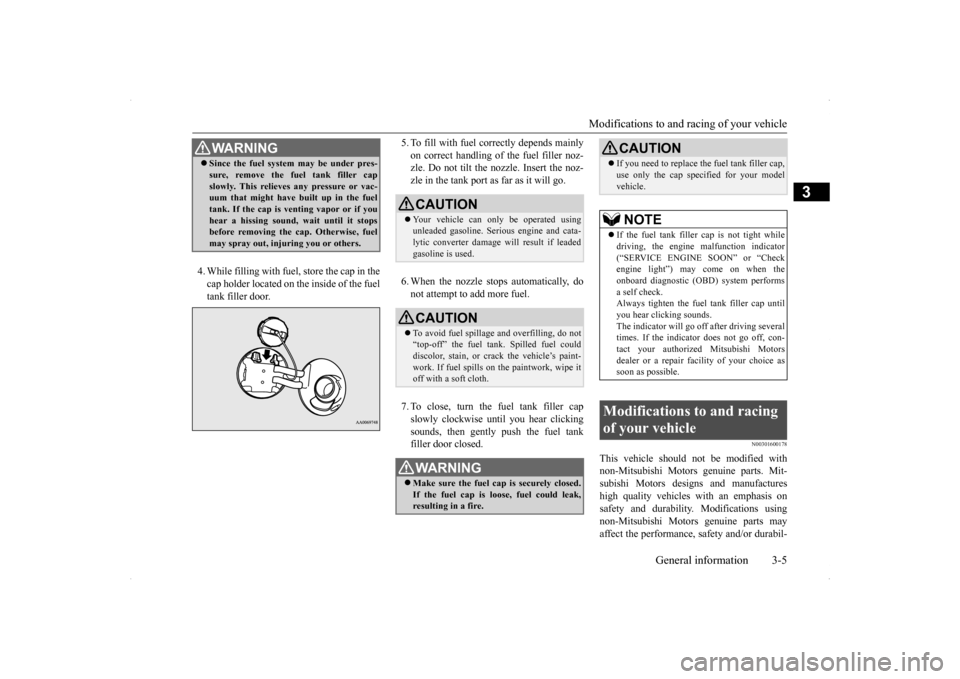
4. While filling with fuel, store the cap in the cap holder located on the inside of the fueltank filler door.
5. To fill with fuel correctly depends mainly on correct handling of the fuel filler noz- zle. Do not tilt the nozzle. Insert the noz- zle in the tank port as far as it will go. 6. When the nozzle stops automatically, do not attempt to add more fuel. 7. To close, turn the fuel tank filler cap slowly clockwise until you hear clickingsounds, then gently push the fuel tank filler door closed.
N00301600178
This vehicle should not be modified with non-Mitsubishi Motors genuine parts. Mit- subishi Motors designs and manufactures high quality vehicles
with an emphasis on
safety and durability. Modifications using non-Mitsubishi Motors genuine parts may affect the performance, safety and/or durabil-
WA R N I N G Since the fuel system may be under pres- sure, remove the fuel tank filler cap slowly. This relieves any pressure or vac- uum that might have built up in the fuel tank. If the cap is venting vapor or if youhear a hissing sound, wait until it stops before removing the cap. Otherwise, fuel may spray out, injuring you or others.
CAUTION Your vehicle can only be operated using unleaded gasoline. Serious engine and cata- lytic converter damage will result if leaded gasoline is used.CAUTION To avoid fuel spillage and overfilling, do not “top-off” the fuel tank. Spilled fuel coulddiscolor, stain, or crack the vehicle’s paint- work. If fuel spills on the paintwork, wipe it off with a soft cloth.WA R N I N G Make sure the fuel cap is securely closed. If the fuel cap is loose, fuel could leak, resulting in a fire.
CAUTION If you need to replace the fuel tank filler cap, use only the cap specified for your model vehicle. NOTE
If the fuel tank filler
cap is not tight while
driving, the engine malfunction indicator (“SERVICE ENGINE SOON” or “Check engine light”) may come on when theonboard diagnostic (OBD) system performs a self check. Always tighten the fuel tank filler cap untilyou hear clicking sounds. The indicator will go off after driving several times. If the indicator does not go off, con-tact your authorized Mitsubishi Motors dealer or a repair facility of your choice as soon as possible.
Modifications to and racing of your vehicle
BK0200700US.bo
ok 5 ページ 2013年2月15日 金曜日 午後12時17分
Page 29 of 422
Seats 4-2 Seat and restraint systems
4
N00408400408
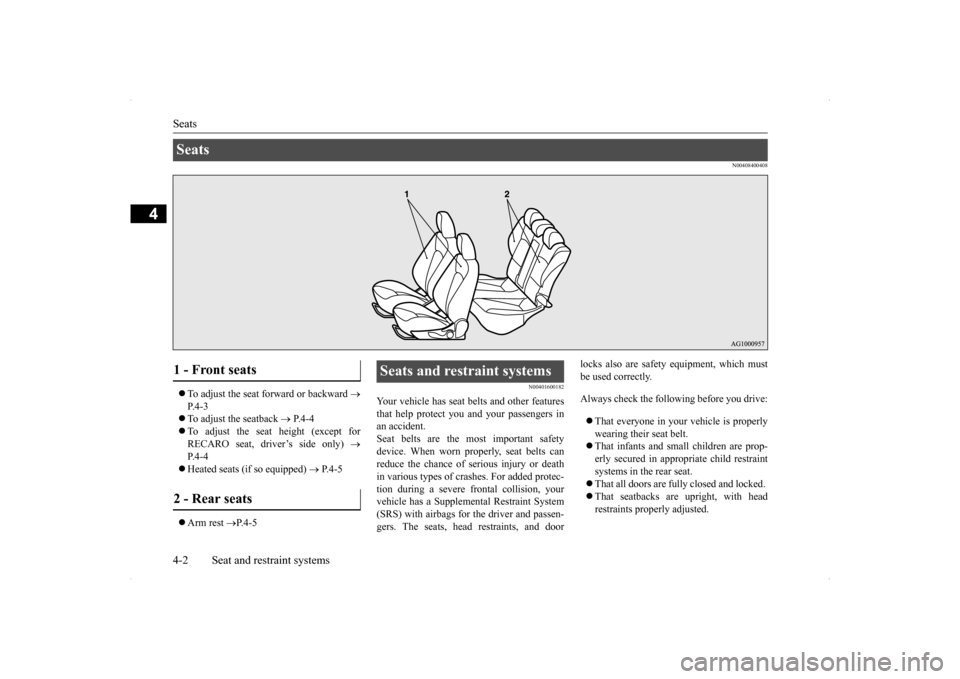
To adjust the seat forward or backward
P.4-3 To adjust the seatback
P.4-4
To adjust the seat height (except for RECARO seat, driver’s side only)
P.4-4 Heated seats (if so equipped)
P.4-5
Arm rest
P.4-5
N00401600182
Your vehicle has seat belts and other features that help protect you and your passengers in an accident. Seat belts are the most important safetydevice. When worn properly, seat belts can reduce the chance of serious injury or death in various types of crashes. For added protec-tion during a severe frontal collision, your vehicle has a Supplemental Restraint System (SRS) with airbags for the driver and passen-gers. The seats, head restraints, and door
locks also are safety equipment, which must be used correctly. Always check the following before you drive: That everyone in your vehicle is properly wearing their seat belt. That infants and small children are prop- erly secured in appropriate child restraint systems in the rear seat. That all doors are full
y closed and locked.
That seatbacks are upright, with head restraints properly adjusted.
Seats 1 - Front seats 2 - Rear seats
Seats and restraint systems
BK0200700US.bo
ok 2 ページ 2013年2月15日 金曜日 午後12時17分
Page 30 of 422
Front seats
Seat and restraint systems 4-3
4
Safety equipment cannot prevent injury or death in all motor vehicle accidents. You can help reduce the risk of injury or death, how- ever, by following the
instructions in this
manual.
N00401800328
Position the driver’s seat
as far back as possi-
ble while maintaining a position that stillenables you to fully apply the pedals, easily control the steering wheel and safely operate the vehicle.
N00401900257
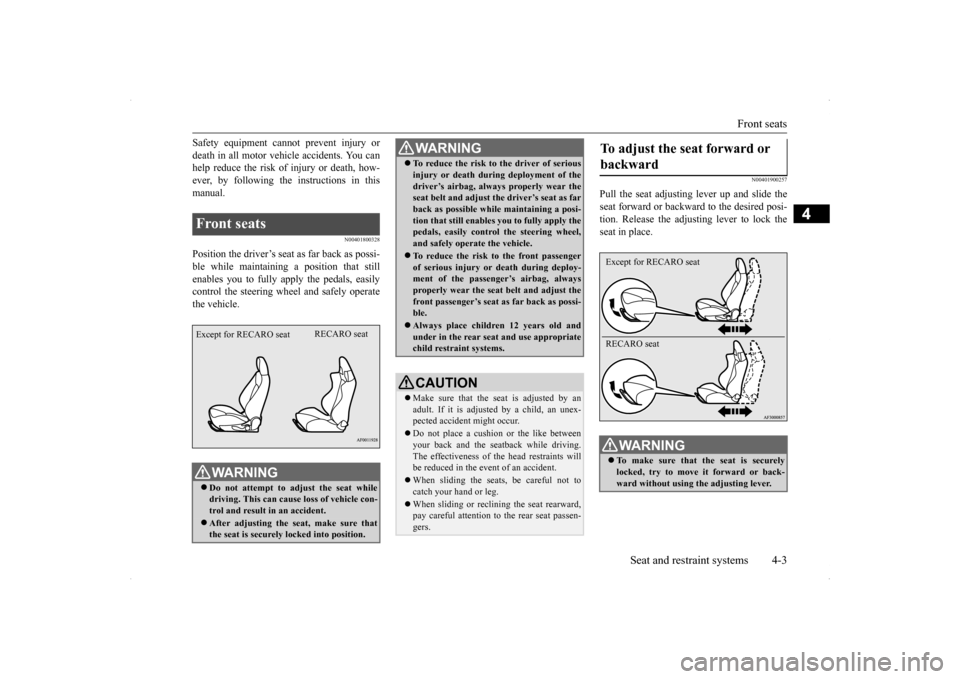
Pull the seat adjusting lever up and slide theseat forward or backward to the desired posi- tion. Release the adjusting lever to lock the seat in place.
Front seats
WA R N I N G Do not attempt to adjust the seat while driving. This can cause loss of vehicle con-trol and result in an accident. After adjusting the seat, make sure that the seat is securely locked into position.
Except for RECARO seat
RECARO seat
To reduce the risk to the driver of serious injury or death during deployment of the driver’s airbag, always properly wear the seat belt and adjust th
e driver’s seat as far
back as possible while maintaining a posi-tion that still enables
you to fully apply the
pedals, easily control the steering wheel, and safely operate the vehicle. To reduce the risk to the front passenger of serious injury or death during deploy-ment of the passenger’s airbag, always properly wear the seat belt and adjust the front passenger’s seat as far back as possi-ble. Always place children 12 years old and under in the rear seat and use appropriate child restraint systems.CAUTION Make sure that the seat is adjusted by an adult. If it is adjusted by a child, an unex-pected accident might occur. Do not place a cushion or the like between your back and the seatback while driving. The effectiveness of the head restraints will be reduced in the event of an accident. When sliding the seats, be careful not to catch your hand or leg. When sliding or reclining the seat rearward, pay careful attention to the rear seat passen- gers.WA R N I N G
To adjust the seat forward or backward
WA R N I N G To make sure that the seat is securely locked, try to move it forward or back- ward without using the adjusting lever. Except for RECARO seat RECARO seat
BK0200700US.bo
ok 3 ページ 2013年2月15日 金曜日 午後12時17分
Page 31 of 422
Front seats 4-4 Seat and restraint systems
4
N00402000343
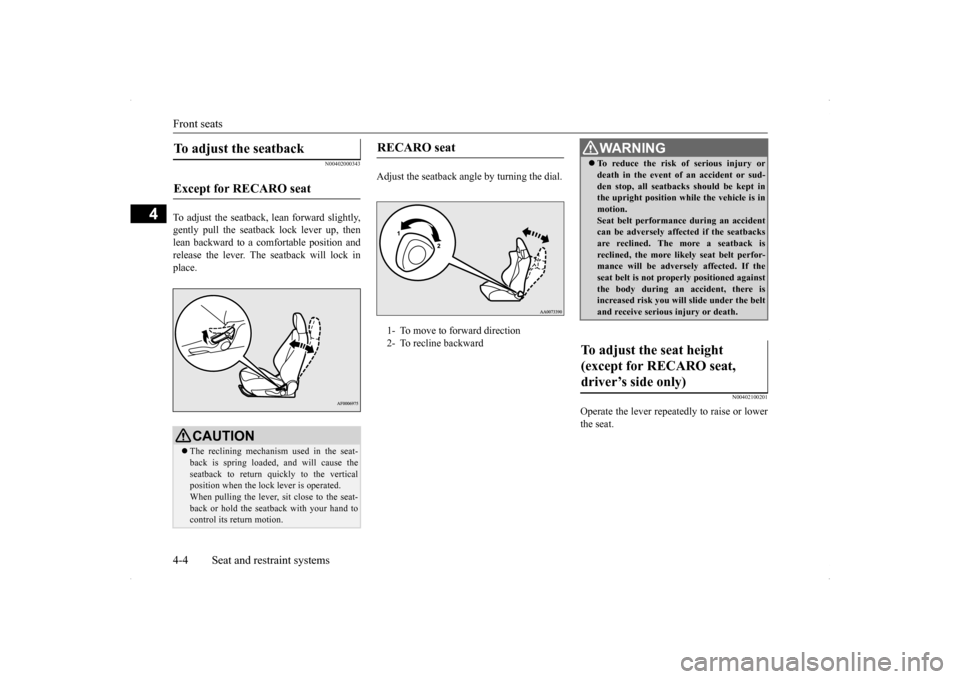
To adjust the seatback,
lean forward slightly,
gently pull the seatb
ack lock lever up, then
lean backward to a comfortable position and release the lever. The seatback will lock in place.
Adjust the seatback angle by turning the dial.
N00402100201
Operate the lever repeatedly to raise or lower the seat.
To adjust the seatback Except for RECARO seat
CAUTION The reclining mechanism used in the seat- back is spring loaded, and will cause the seatback to return quickly to the vertical position when the lock lever is operated. When pulling the lever, sit close to the seat- back or hold the seatback with your hand to control its return motion.
RECARO seat 1- To move to forward direction 2- To recline backward�ç
WA R N I N G To reduce the risk of serious injury or death in the event of an accident or sud- den stop, all seatbacks should be kept in the upright position while the vehicle is in motion.Seat belt performance during an accident can be adversely affected if the seatbacks are reclined. The more a seatback isreclined, the more likely seat belt perfor- mance will be adversely affected. If the seat belt is not properly positioned againstthe body during an accident, there is increased risk you will slide under the belt and receive serious injury or death.
To adjust the seat height (except for RECARO seat, driver’s side only)
BK0200700US.bo
ok 4 ページ 2013年2月15日 金曜日 午後12時17分