tow MITSUBISHI MIRAGE 2015 6.G Owner's Guide
[x] Cancel search | Manufacturer: MITSUBISHI, Model Year: 2015, Model line: MIRAGE, Model: MITSUBISHI MIRAGE 2015 6.GPages: 300, PDF Size: 43.44 MB
Page 242 of 300
Towing
For emergencies 8-17
8
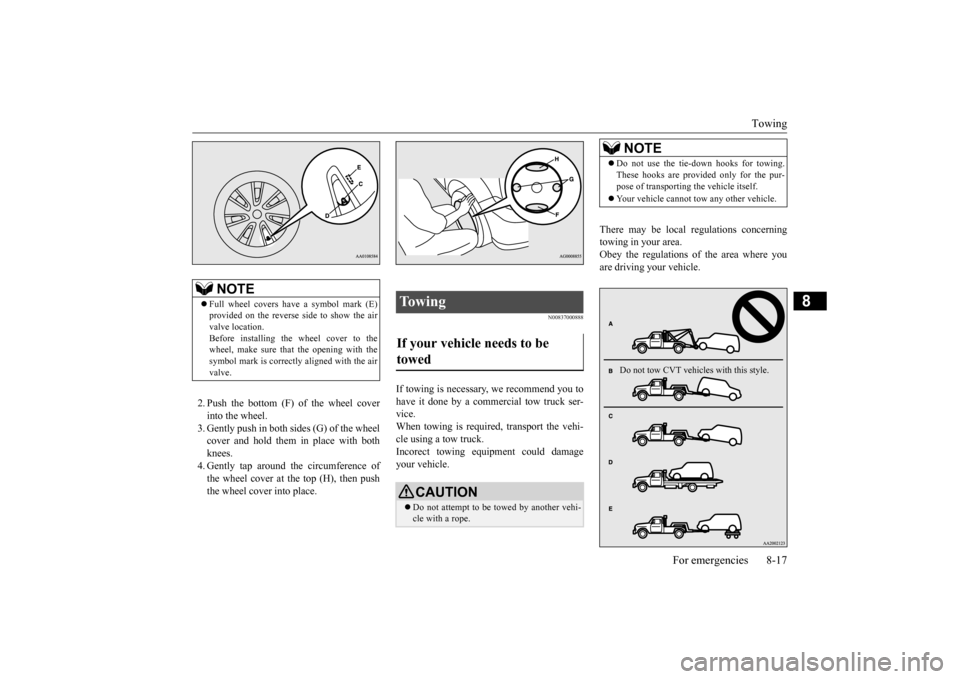
2. Push the bottom (F) of the wheel cover into the wheel. 3. Gently push in both sides (G) of the wheelcover and hold them in place with both knees. 4. Gently tap around th
e circumference of
the wheel cover at the top (H), then push the wheel cover into place.
N00837000888
If towing is necessary,
we recommend you to
have it done by a commercial tow truck ser- vice.When towing is required, transport the vehi- cle using a tow truck. Incorect towing equipment could damageyour vehicle.
There may be local regulations concerning towing in your area. Obey the regulations of the area where you are driving your vehicle.
NOTE
Full wheel covers have
a symbol mark (E)
provided on the reverse side to show the airvalve location. Before installing the wheel cover to the wheel, make sure that the opening with thesymbol mark is correctl
y aligned with the air
valve.
To w i n g If your vehicle needs to be towed
CAUTION Do not attempt to be towed by another vehi- cle with a rope.
NOTE
Do not use the tie-down hooks for towing. These hooks are provided only for the pur-pose of transporting the vehicle itself. Your vehicle cannot tow any other vehicle.Do not tow CVT vehicles with this style.
BK0212400US.book 17 ページ 2014年4月1日 火曜日 午後2時21分
Page 243 of 300
Operation under adverse driving conditions 8-18 For emergencies
8
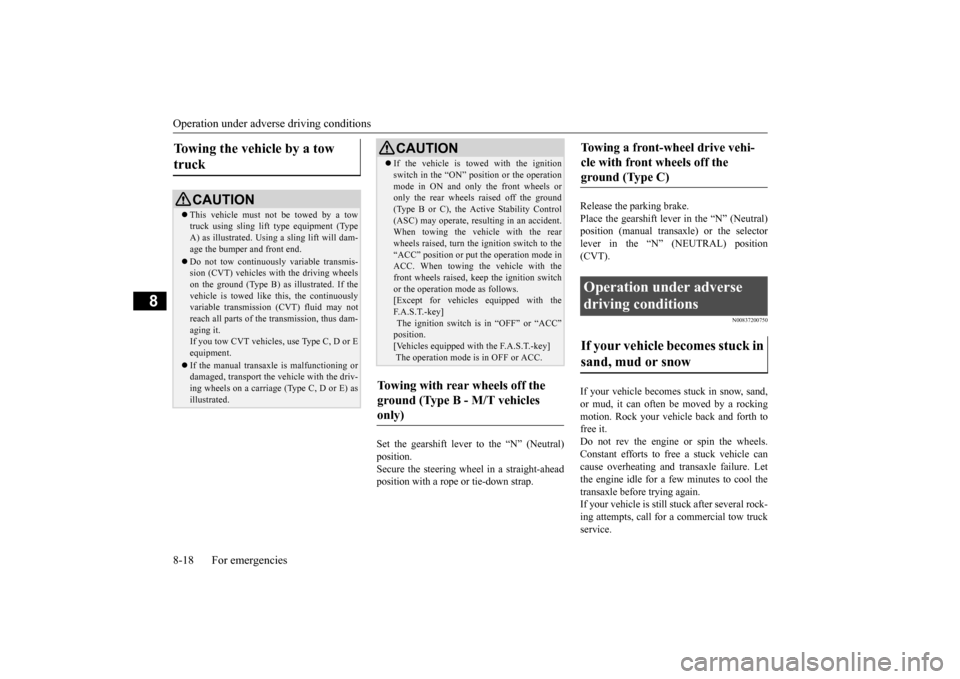
Set the gearshift lever to the “N” (Neutral) position. Secure the steering whee
l in a straight-ahead
position with a rope or tie-down strap.
Release the parking brake. Place the gearshift lever in the “N” (Neutral)position (manual transaxle) or the selector lever in the “N” (NEUTRAL) position (CVT).
N00837200750
If your vehicle becomes
stuck in snow, sand,
or mud, it can often be moved by a rocking motion. Rock your vehicle back and forth tofree it. Do not rev the engine or spin the wheels. Constant efforts to free a stuck vehicle cancause overheating and tr
ansaxle failure. Let
the engine idle for a few minutes to cool the transaxle before trying again.If your vehicle is still
stuck after several rock-
ing attempts, call for a commercial tow truck service.
Towing the vehicle by a tow truck
CAUTION This vehicle must not be towed by a tow truck using sling lift
type equipment (Type
A) as illustrated. Usi
ng a sling lift will dam-
age the bumper and front end. Do not tow continuously variable transmis- sion (CVT) vehicles with the driving wheels on the ground (Type B) as illustrated. If the vehicle is towed like
this, the continuously
variable transmission (CVT) fluid may not reach all parts of the transmission, thus dam- aging it.If you tow CVT vehicles, use Type C, D or E equipment. If the manual transaxle is malfunctioning or damaged, transport the
vehicle with the driv-
ing wheels on a carriage (Type C, D or E) asillustrated.
If the vehicle is towed with the ignition switch in the “ON” pos
ition or the operation
mode in ON and only the front wheels oronly the rear wheels raised off the ground (Type B or C), the Acti
ve Stability Control
(ASC) may operate, resul
ting in an accident.
When towing the vehicle with the rear wheels raised, turn the ignition switch to the “ACC” position or put
the operation mode in
ACC. When towing the vehicle with the front wheels raised, ke
ep the ignition switch
or the operation mode as follows.[Except for vehicles equipped with the F. A . S . T. - k e y ] The ignition switch is in “OFF” or “ACC”position. [Vehicles equipped with the F.A.S.T.-key] The operation mode is in OFF or ACC.
Towing with rear wheels off the ground (Type B - M/T vehicles only)
CAUTION
Towing a front-wheel drive vehi- cle with front wheels off the ground (Type C) Operation under adverse driving conditions If your vehicle becomes stuck in sand, mud or snow
BK0212400US.book 18 ページ 2014年4月1日 火曜日 午後2時21分
Page 248 of 300
Catalytic converter
Vehicle care and maintenance 9-3
9
N00937400450
The catalytic converter requires you to use unleaded fuel only. Leaded gasoline will destroy the emission-c
ontrol effectiveness of
the converter. Normally, the catalyti
c converter does not
require maintenance. However, it is important to keep the engine properly tuned for the con- verter to continue to work properly.
To reduce the possibili
ty of catalytic con-
verter damage: Use UNLEADED GASOLINE ONLY of the type of recommended in the “Fuel selection”. Do not drive with an extremely low fuel level. Running out of gas could damage the catalytic converter. Do not try to start the engine by pushing or towing the vehicle. If the battery is weak or run down, use jumper cables toproperly start the engine.
Do not idle the engine with any spark plug wires disconnected or
removed, such as
when performing diagnostic tests. Do not idle the engine for a long time if it is idling roughly or otherwise obviouslymalfunctioning. To prevent the catalytic converter from being damaged from unburned gas, do notrace the engine when stopping the engine. Stop driving the vehicle if you think the performance is noticeably low, or the engine has a malfunction such as with the ignition, etc. If you are not able to stopdriving immediately, slow down and drive for only a short time.
Have your vehicle
checked at an authorized MitsubishiMotors dealer or a repair facility of your choice as soon
as possible.
In unusual situations involving major engine problems, a burning odor may indicate severe a
nd abnormal catalytic
converter overheating. If this occurs, stopin a safe place, shut
the engine off and let
the vehicle cool. Once the engine is cool, immediately take your
vehicle to a dealer
or a repair facility of
your choice for ser-
vice.
WA R N I N G Set a garage jack only at the position shown here. If the gar
age jack is set a
wrong position, it could damage yourvehicle and/or your
vehicle might fall
from the jack causing injury or death. Do not use the jack on a tilted or soft sur- face. Otherwise, the jack might slip and causepersonal injury. Always
use the jack on a
flat, hard surface. Before setting the jack, make sure there are no sand or pebblesunder the jack base.
Catalytic converter
CAUTION Damage to the catalytic
converter can result
if your vehicle is not
kept in proper operating
condition. If the engine
malfunctions or mis-
fires, or if your vehi
cle performance suffers,
have it serviced
promptly. Running your
vehicle when it is ove
rheated may result in
damage to the conve
rter and vehicle.
WA R N I N GDo not park or run your vehicle in areas where combustible materials such as dry grass or leaves can come
in contact with a
hot exhaust, since a fire could occur. Do not put undercoat paint on the cata- lytic converter.
BK0212400US.book 3 ページ 2014年4月1日 火曜日 午後2時21分
Page 249 of 300
Engine hood 9-4 Vehicle care and maintenance
9
N00937501575
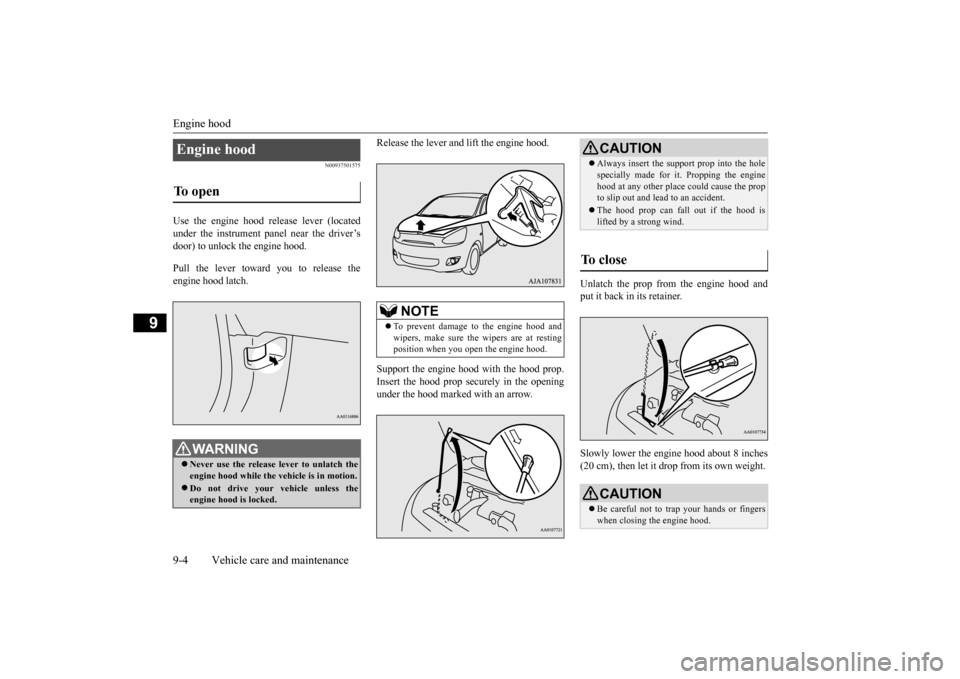
Use the engine hood re
lease lever (located
under the instrument panel near the driver’s door) to unlock the engine hood. Pull the lever toward you to release the engine hood latch.
Release the lever and
lift the engine hood.
Support the engine hood with the hood prop. Insert the hood prop securely in the opening under the hood marked with an arrow.
Unlatch the prop from the engine hood and put it back in its retainer. Slowly lower the engine hood about 8 inches (20 cm), then let it drop from its own weight.
Engine hood To open
WA R N I N G Never use the release lever to unlatch the engine hood while the
vehicle is in motion.
Do not drive your vehicle unless the engine hood is locked.
NOTE
To prevent damage to the engine hood and wipers, make sure the wipers are at restingposition when you open the engine hood.
CAUTION Always insert the support prop into the hole specially made for
it. Propping the engine
hood at any other place could cause the propto slip out and lead to an accident. The hood prop can fall out if the hood is lifted by a strong wind.
To close
CAUTION Be careful not to trap your hands or fingers when closing the engine hood.
BK0212400US.book 4 ページ 2014年4月1日 火曜日 午後2時21分
Page 275 of 300
Replacement of light bulbs 9-30 Vehicle care and maintenance
9
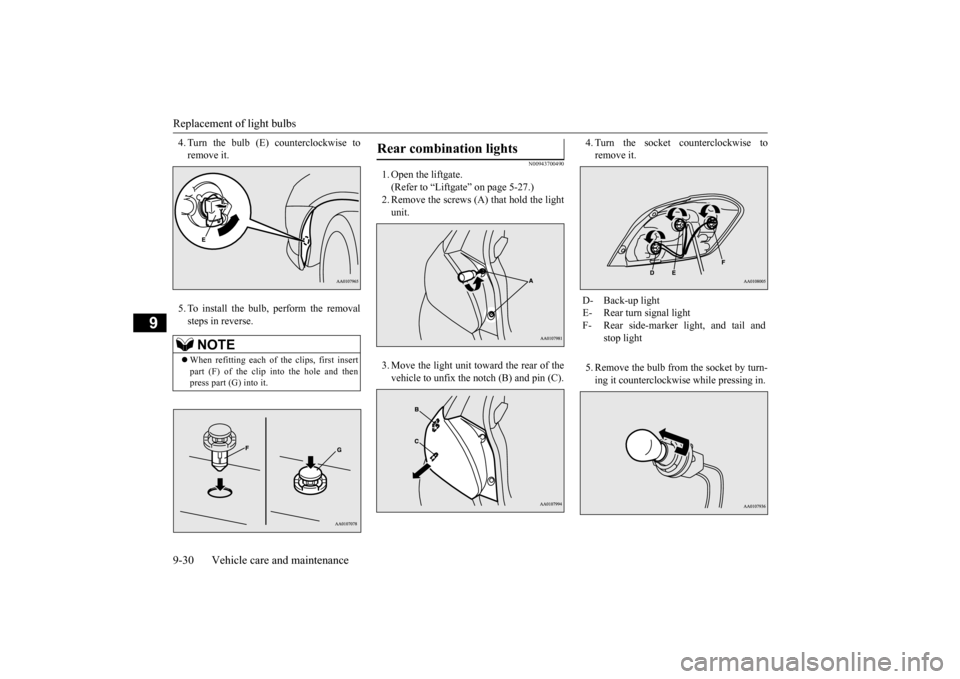
4. Turn the bulb (E) counterclockwise to remove it. 5. To install the bulb, perform the removal steps in reverse.
N00943700490
1. Open the liftgate.(Refer to “Liftgate” on page 5-27.) 2. Remove the screws (A) that hold the lightunit. 3. Move the light unit toward the rear of the vehicle to unfix the notch (B) and pin (C).
4. Turn the socket counterclockwise to remove it. 5. Remove the bulb from the socket by turn- ing it counterclockwis
e while pressing in.
NOTE
When refitting each of the clips, first insert part (F) of the clip into the hole and then press part (G) into it.
Rear combination lights
D- Back-up light E- Rear turn signal lightF- Rear side-marker
light, and tail and
stop light
BK0212400US.book 30 ページ 2014年4月1日 火曜日 午後2時21分
Page 298 of 300
Alphabetical index
12-5
12
To change a tire
..............................
8-11
Tread wear indicator
.......................
9-16
Tire pressure monitoring system
...........
5-56
Tire repair kit
.......................................
8-6
Tires
..................................................
9-12
Tire and loading information placard 11-3 Tire chains
.....................................
9-17
Tools
...................................................
8-5
Storage
............................................
8-5
Towing
..............................................
8-17
Trailer towing
.....................................
6-10
Turn signal light
Indicators
.......................................
5-71
Lever
.............................................
5-76
U
USB input terminal
...........................
5-101
How to connect a USB memory device
....
5-101 How to connect an iPod
.................
5-102
V
Vanity mirror
...................................
5-105
Vehicle care precautions
......................
9-31
Vehicle dimensions
.............................
11-3
Vehicle labeling
..................................
11-2
Vehicle preparation before driving
..........
6-3
Vehicle weights
..................................
11-3
Vents
..................................................
7-2
W
Warning lights
...................................
5-72
Washer
Fluid
.......................................
9-9
, 11-5
Rear window washer
......................
5-79
Switch
...................................
5-78
, 5-79
Washing
............................................
9-33
Waxing
.............................................
9-34
Weights
.............................................
11-3
Wheel
Covers
...........................................
8-16
Specification
..................................
11-5
Wiper
Rear window wiper
........................
5-79
Switch
...................................
5-78
, 5-79
Wiper blades
..................................
9-19
BK0212400US.book 5 ページ 2014年4月1日 火曜日 午後2時21分