display MITSUBISHI MIRAGE G4 2017 (in English) Owner's Guide
[x] Cancel search | Manufacturer: MITSUBISHI, Model Year: 2017, Model line: MIRAGE G4, Model: MITSUBISHI MIRAGE G4 2017Pages: 307, PDF Size: 9.02 MB
Page 133 of 307
Multi-information display 5-72 Features and controls
5
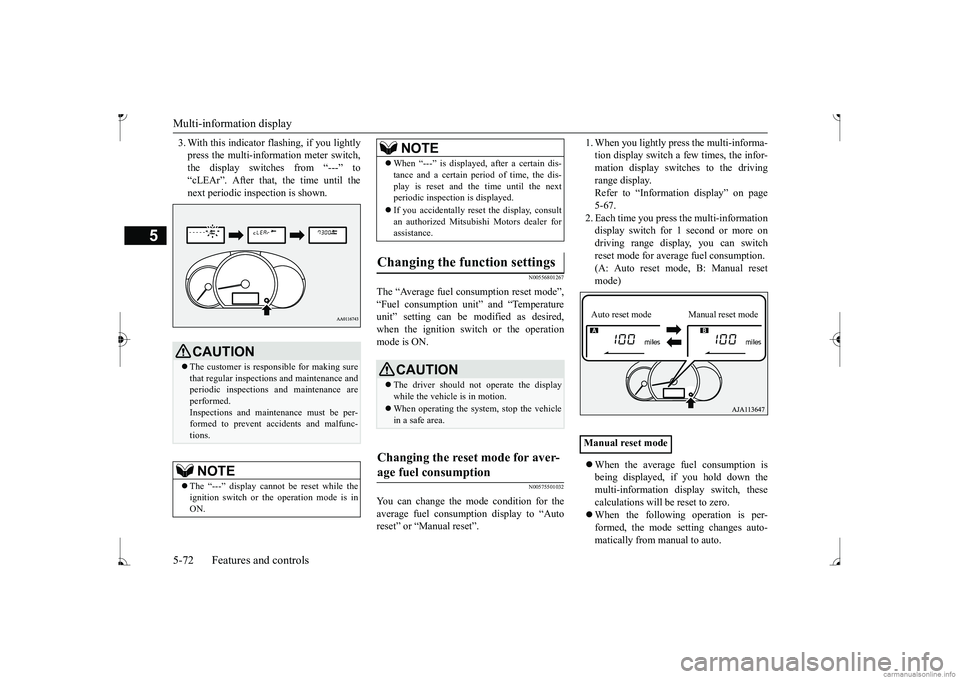
3. With this indicator flashing, if you lightly press the multi-information meter switch,the display switches from “---” to “cLEAr”. After that, the time until the next periodic inspection is shown.
N00556801267
The “Average fuel co
nsumption reset mode”, it” and “Temperature
unit” setting can be
modified as desired,
when the ignition switch or the operation mode is ON.
N00575501032
You can change the mode condition for theaverage fuel consumption display to “Auto reset” or “Manual reset”.
tion display switch a few times, the infor-mation display switches to the driving range display. Refer to “Information display” on page5-67. 2. Each time you press the multi-information display switch for 1 second or more ondriving range display, you can switch reset mode for average fuel consumption. (A: Auto reset mode, B: Manual reset mode) When the average fuel consumption is being displayed, if you hold down themulti-information display switch, these calculations will
be reset to zero.
When the following operation is per- formed, the mode setting changes auto- matically from manual to auto.
CAUTION The customer is responsible for making sure that regular inspections
and maintenance and
periodic inspections
and maintenance are
performed.Inspections and mainte
nance must be per-
formed to prevent accidents and malfunc- tions.NOTE
The “---” display cannot
be reset while the
ignition switch or th
e operation mode is in
ON.
When “---” is displaye
d, after a certain dis-
tance and a certain pe
riod of time, the dis-
play is reset and the time until the nextperiodic inspecti
on is displayed.
If you accidentally rese
t the display, consult
an authorized Mitsubishi Motors dealer for assistance.
Changing the function settings
CAUTION The driver should not operate the display while the vehicle is in motion. When operating the system, stop the vehicle in a safe area.
Changing the reset mode for aver- age fuel consumption
NOTE
Manual reset modeAuto reset mode Manual reset mode
BK0236100US.book 72 ページ 2016年2月1日 月曜日 午前10時15分
Page 134 of 307
![MITSUBISHI MIRAGE G4 2017 (in English) Owners Guide Multi-information display
Features and controls 5-73
5
[Except for vehicles equipped with the F. A . S . T. - k e y ]Turn the ignition switch to the “ON” posi- tion from the “ACC” or “OFF� MITSUBISHI MIRAGE G4 2017 (in English) Owners Guide Multi-information display
Features and controls 5-73
5
[Except for vehicles equipped with the F. A . S . T. - k e y ]Turn the ignition switch to the “ON” posi- tion from the “ACC” or “OFF�](/img/19/34854/w960_34854-133.png)
Multi-information display
Features and controls 5-73
5
[Except for vehicles equipped with the F. A . S . T. - k e y ]Turn the ignition switch to the “ON” posi- tion from the “ACC” or “OFF” position. [For vehicles equipped with the F.A.S.T.- key]Change the operation mode to ON from ACC or OFF. When the average fuel consumption is being displayed, if you hold down the multi-information display switch, these calculations will be reset to zero. When the engine switch or the operation mode is in the following conditions, the average fuel consumption display willautomatically reset. [Except for vehicles equipped with the F. A . S . T. - k e y ] The ignition switch has been set to the“ACC” or “OFF” position for about 4 hours or more. [For vehicles equipped with the F.A.S.T.- key]The operation mode has been set to ACC or OFF for about 4 hours or more.
N00557100156
The fuel consumption display unit can bechanged. The distance and amount units are also switched to match the selected fuel con-sumption unit. 1. When you lightly press the multi-informa- tion display switch a few times, the infor- mation display switches to the averagefuel consumption display. Refer to “Information display” on page 5-67.2. Press and hold the multi-information dis- play switch for about 5 seconds or more until buzzer sound
is heard twice.
3. Press and hold the mu
lti-information dis-
play switch to switch in sequence from“km/L”
“L/100 km”
“km/L”.
The distance units is also changed in the fol- lowing combinations to match the selected fuel consumption unit.
Auto reset mode
NOTE
The average fuel cons
umption display can be
reset separately for the auto reset mode andfor the manual reset mode. Disconnecting the batt
ery cable will erase
from memory the manual reset mode or autoreset mode setting for the average fuel con- sumption display. The initial (default) setting is “Auto reset mode”.
Changing the fuel consumption display unit
NOTE
The display units for the driving range, the average fuel consumption are changed, but the units for the indica
ting needle (speedom-
eter), the odometer, the trip odometer and theservice reminder will
remain unchanged.
If the battery is disconnected, the memory of the unit setting is erased and it returns auto- matically to fa
ctory setting.
BK0236100US.book 73 ページ 2016年2月1日 月曜日 午前10時15分
Page 135 of 307
Multi-information display 5-74 Features and controls
5
N00557201183
The temperature display unit can be switched. 1. When you lightly press the multi-informa- tion display switch a few times, the infor- mation display switches to the outsidetemperature display. Refer to “Information display” on page 5-67. 2. Each time you press the multi-information display switch for 5 seconds or more onoutside temperatur
e display, you can
switch from °F to °C or from °C to °F unit of outside temperature display.Fuel consumption
Distance
(driving range)
L/100 km km mpg mile (s)
Changing the temperature unit
(if
so equipped)
NOTE
The temperature value on air conditioning panel is switched in
conjunction with outside
temperature display unit of the multi-infor-mation display. However, “°F” or “°C” are not shown to tem- perature display of
an air conditioning.
BK0236100US.book 74 ページ 2016年2月1日 月曜日 午前10時15分
Page 136 of 307
Indicator and warning light package
Features and controls 5-75
5
N00519801905
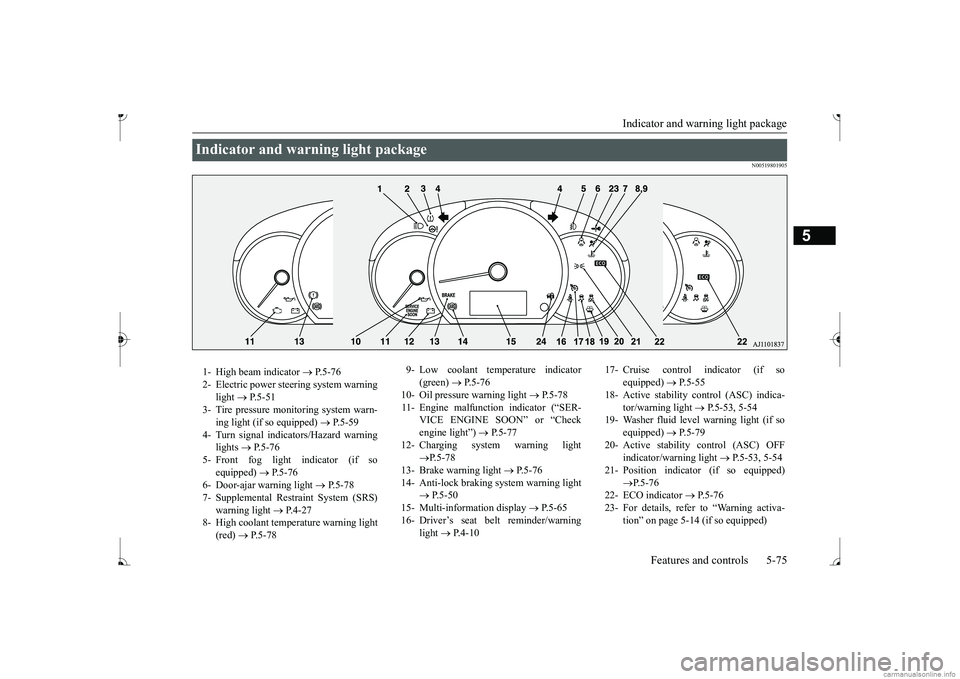
Indicator and warning light package 1- High beam indicator
P. 5 - 7 6
2- Electric power stee
ring system warning
light
P. 5 - 5 1
3- Tire pressure moni
toring system warn-
ing light (if so equipped)
P.5-59
4- Turn signal indicators/Hazard warning
lights
P.5-76
5- Front fog light indicator (if so
equipped)
P.5-76
6- Door-ajar warning light
P.5-78
7- Supplemental Restraint System (SRS)
warning light
P.4-27
8- High coolant temperature warning light
(red)
P.5-78
9- Low coolant temperature indicator
(green)
P.5-76
10- Oil pressure warning light
P.5-78
11- Engine malfunction indicator (“SER-
VICE ENGINE SOON” or “Check engine light”)
P. 5 - 7 7
12- Charging system warning light
P.5-78
13- Brake warning light
P. 5 - 7 6
14- Anti-lock braking system warning light
P.5-50
15- Multi-information display
P.5-65
16- Driver’s seat belt reminder/warning
light
P.4-10
17- Cruise control indicator (if so
equipped)
P.5-55
18- Active stability control (ASC) indica-
tor/warning light
P.5-53, 5-54
19- Washer fluid level warning light (if so
equipped)
P.5-79
20- Active stability control (ASC) OFF
indicator/wa
rning light
P.5-53, 5-54
21- Position indicato
r (if so equipped)
P.5-76
22- ECO indicator
P.5-76
23- For details, refer to “Warning activa-
tion
Page 148 of 307
Bluetooth® 2.0 interface (if so equipped)
Features and controls 5-87
5
N00564000072
Press this button to increase the volume.
Press this button to decrease the volume. Press this button to ch
ange to voice recog-
nition mode.While the system is in voice recognition mode, “Listening” w
ill appear on the
audio display. If you press the button briefly while in voice recogniti
on mode, it will interrupt
prompting and allow voice command input. Pressing the button lo
nger will deactivate
the voice recognition mode. Pressing this button briefly during a call will enable voice
recognition and allow
voice command input. Press this button when an incoming call is received to answer the telephone. When another call is received during a call, press this button to put the first caller on hold and talk to the new caller.
• In such circumstance
s, you can press the
button briefly to switch between callers.You will switch to the first caller and the other caller will
be put on hold.
• To establish a three-way call in such situ-ations, press the SPEECH button to enter voice recognition mode and then say “Join calls.”
Press this button when an incoming call is received to refuse the call. Press this button during a call to end the current call. When another call is on hold, you willswitch to that call. If this button is pressed in the voice recog- nition mode, the voice recognition modewill be de
activated.
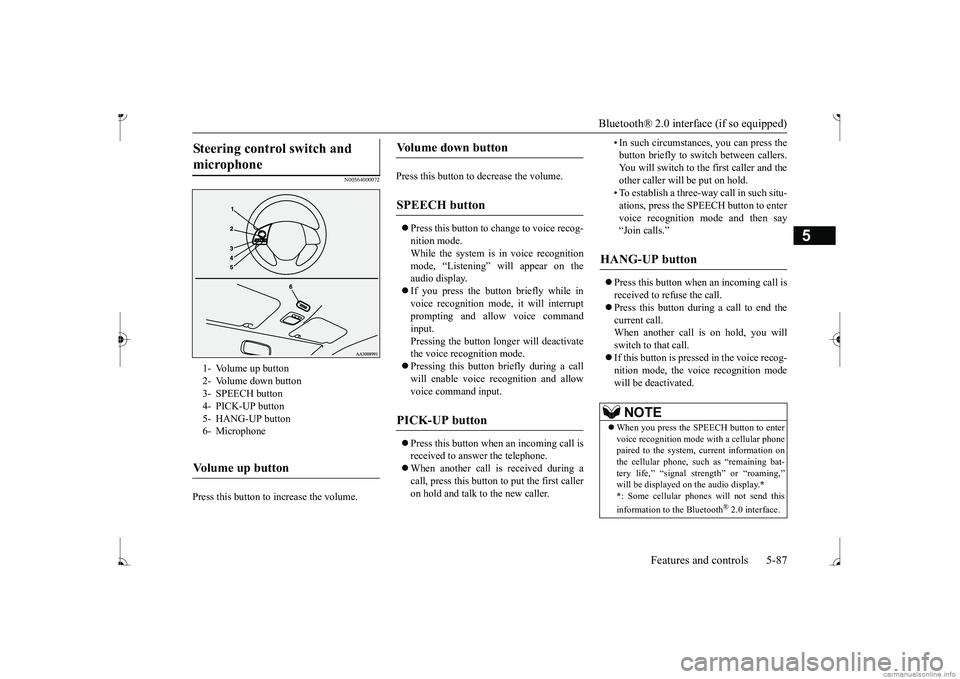
Steering control switch and microphone
1- Volume up button 2- Volume down button 3- SPEECH button4- PICK-UP button 5- HANG-UP button 6- MicrophoneVolume up button
Volume down button
SPEECH button
PICK-UP button
HANG-UP button
NOTE
When you press the SPEECH button to enter voice recognition mode
with a cellular phone
paired to the system, current information on the cellular phone, such as “remaining bat-tery life,” “signal st
rength” or “roaming,”
*
* : Some cellular phones
will not send this
information to the Bluetooth
® 2.0 interface.
BK0236100US.book 87 ページ 2016年2月1日 月曜日 午前10時15分
Page 175 of 307
HomeLink® Wireless Control System (if so equipped) 5-114 Features and controls
5
3. Once the door has stopped, press and release the “Learn”
or “Smart” button on
the garage door opener (refer to your garage door opener owner’s manual for the location of the “Learn” button). Both the HomeLink
® garage door operation
indicators will fl
ash rapidly green upon
successful synchronization with the dooropener (within 5 seconds).
N00585000020
To operate, simply press and release the pro- grammed HomeLink
® button. Activation will
now occur for the trained device (i.e. garagedoor opener, gate operat
or, security system,
entry door lock, home/of
fice lighting, etc.).
For convenience, the hand-held transmitter ofthe device may also be
used at any time.
N00585200022
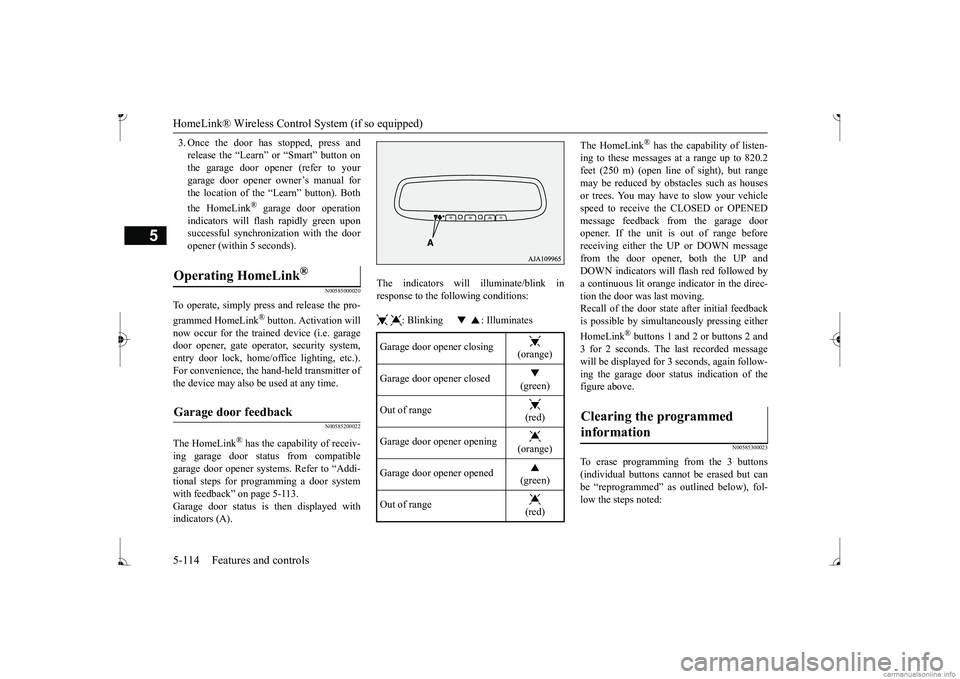
The HomeLink
® has the capability of receiv-
ing garage door status from compatible garage door opener systems. Refer to “Addi- tional steps for programming a door systemwith feedback” on page 5-113. Garage door status is then displayed with indicators (A).
The indicators will illuminate/blink in response to the following conditions: : Blinking : Illuminates
The HomeLink
® has the capability of listen-
ing to these messages at a range up to 820.2feet (250 m) (open line of sight), but range may be reduced by obst
acles such as houses
or trees. You may have to slow your vehiclespeed to receive the CLOSED or OPENED message feedback from the garage door opener. If the unit is out of range beforereceiving either the UP or DOWN message from the door opener, both the UP and DOWN indicators will
flash red followed by
a continuous lit orange indicator in the direc- tion the door was last moving.Recall of the door state after initial feedback is possible by simulta
neously pressing either
HomeLink
® buttons 1 and 2 or buttons 2 and
3 for 2 seconds. The la
st recorded message
will be displayed for 3 seconds, again follow- ing the garage door stat
us indication of the
figure above.
N00585300023
To erase programming from the 3 buttons (individual buttons cannot
be erased but can
be “reprogrammed” as
outlined below), fol-
low the steps noted:
Operating HomeLink
®
Garage door feedback
Garage door opener closing
(orange) (green)
Out of range
(red)
Garage door opener opening
(orange) (green)
Out of range
(red)
Clearing the programmed information
BK0236100US.book 114 ページ 2016年2月1日 月曜日 午前10時15分
Page 184 of 307
Vehicle preparatio
n before driving
Driving safety 6-3
6
N00629001770
For a safer and more enjoyable trip, always check for the following: Before starting the vehicle, make certain that you and all passengers are seated andwearing their seat
belts properly (with
children in the rear seat, in appropriate restraints), and that all the doors arelocked.
Move the driver’s seat as far backward as possible, while keeping good visibility,and good control of the steering wheel, brakes, accelerator, and controls. Check the instrument panel indicators and multi-information display for any possible prob- lem. Similarly, the front
passenger seat should
also be moved as fa
r back as possible.
Make sure that infants and small children are properly restrained in accordance with all laws and regulations.
Check these by selectin
g the defroster mode,
and set the blower switch on high. You should be able to feel the air blowing against thewindshield. Refer to “Defrosti
ng or defogging (wind-
shield, door windows)” on page 7-6, 7-10,7-17. Check all the tires for heavy tread wear or uneven wear patterns. Look for stones, nails, glass, or other objects
stuck in the tread. Look
for any tread cuts or
sidewall cracks. Check
the wheel nuts for tightness, and the tires (including spare tire) for proper pressure.
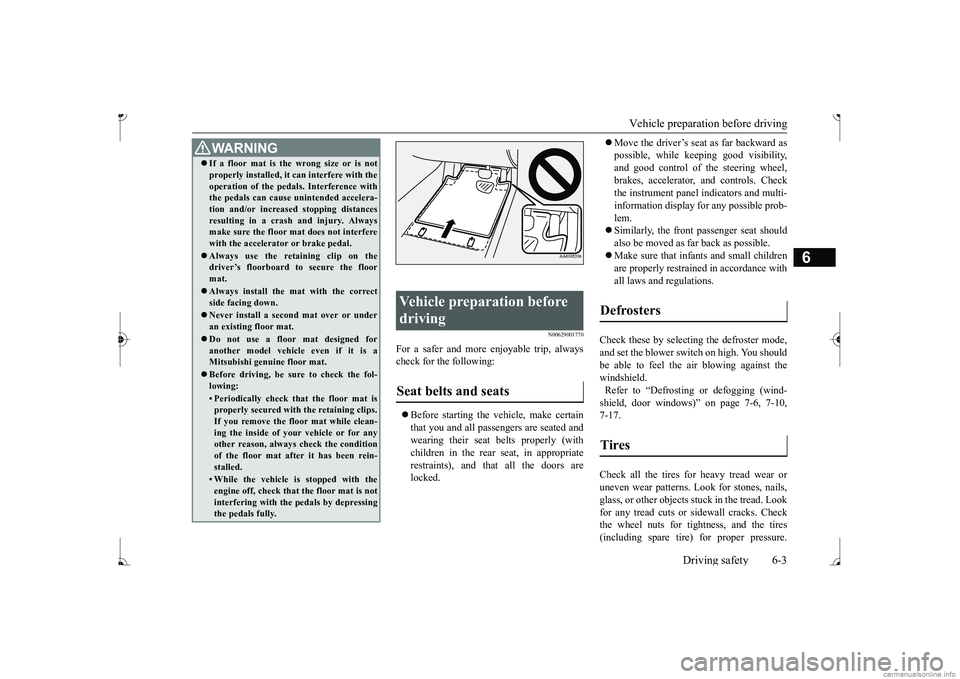
WA R N I N G If a floor mat is the
wrong size or is not
properly installed, it can interfere with theoperation of the pedals. Interference withthe pedals can cause unintended accelera- tion and/or increase
d stopping distances
resulting in a cras
h and injury. Always
make sure the floor mat does not interfere with the accelerator or brake pedal. Always use the retaining clip on the driver’s floorboard to secure the floor mat. Always install the mat with the correct side facing down. Never install a second mat over or under an existing floor mat. Do not use a floor mat designed for another model vehicle even if it is aMitsubishi genu
ine floor mat.
Before driving, be sure to check the fol- lowing:• Periodically check that the floor mat isproperly secured with the retaining clips. If you remove the fl
oor mat while clean-
ing the inside of you
r vehicle or for any
other reason, always
check the condition
of the floor mat afte
r it has been rein-
stalled.• While the vehicle is stopped with theengine off, check that
the floor mat is not
interfering with the pedals by depressing the pedals fully.
Vehicle preparation before driving Seat belts and seats
Defrosters Tires
BK0236100US.book 3 ページ 2016年2月1日 月曜日 午前10時15分
Page 205 of 307
Automatic air conditioning (if so equipped)
7
N00731501353
The air conditioning can only be used
while the engine is running.
N00711801624
Automatic air conditioning
(if so equipped)
Ty p e 1 Ty p e 2
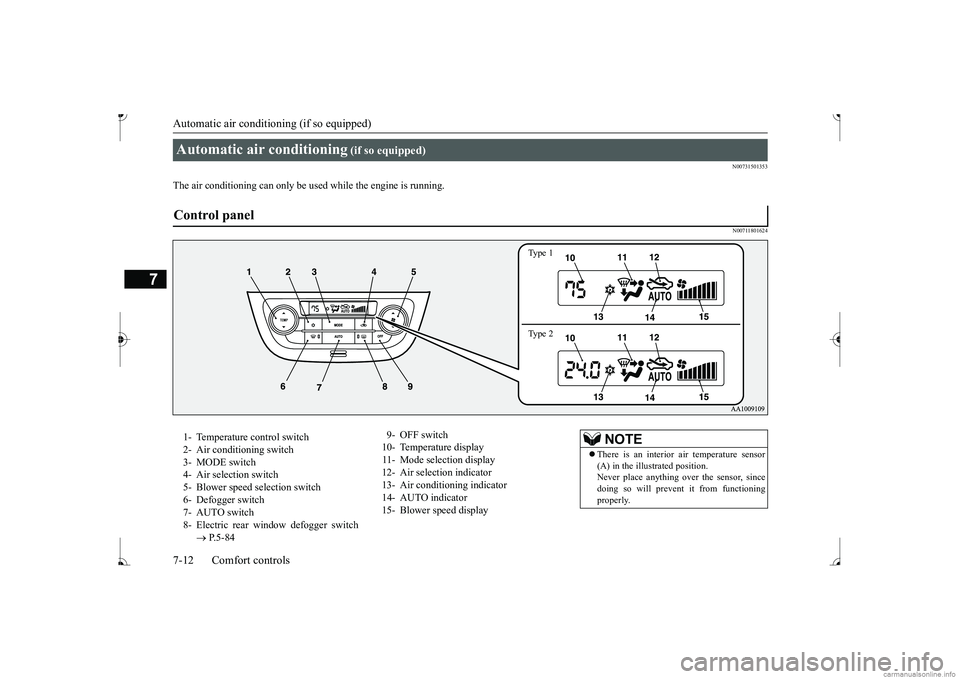
1- Temperature control switch 2- Air conditioning switch 3- MODE switch4- Air selection switch 5- Blower speed selection switch 6- Defogger switch7- AUTO switch 8- Electric rear window defogger switch
P.5-84
9- OFF switch 10- Temperature display 11- Mode selection display 12- Air selecti
on indicator
13- Air conditioning indicator 14- AUTO indicator 15- Blower speed display
NOTE
There is an interior air temperature sensor (A) in the illustrated position. Never place anything ov
er the sensor, since
doing so will prevent it from functioningproperly.
BK0236100US.book 12 ページ 2016年2月1日 月曜日 午前10時15分
Page 206 of 307
Automatic air conditioning (if so equipped)
Comfort controls 7-13
7
N00736900179
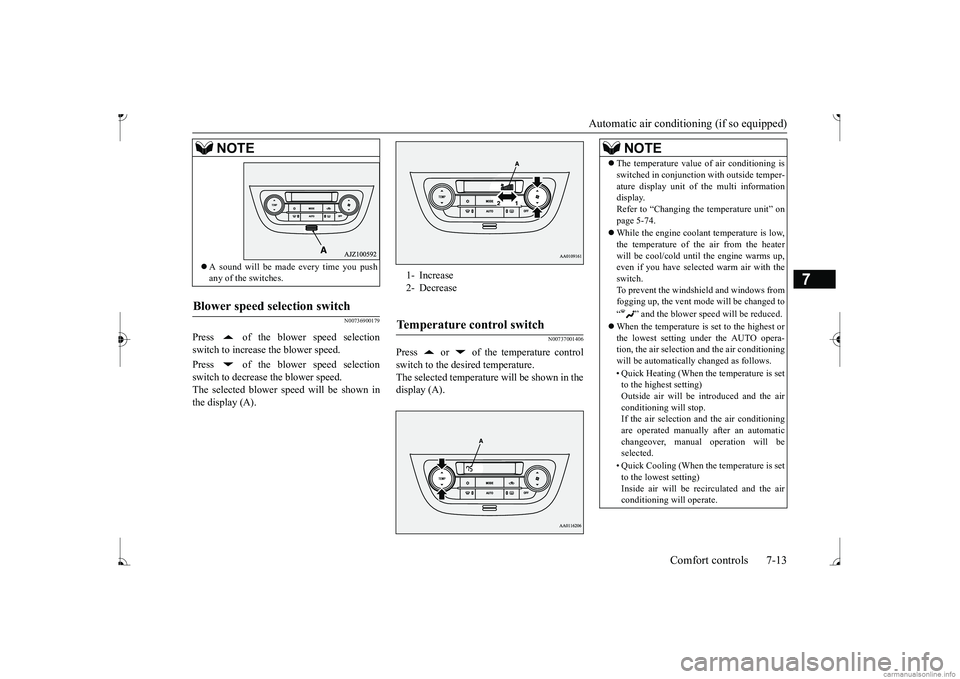
Press of the blower speed selection switch to increase the blower speed. Press of the blower speed selection switch to decrease the blower speed.The selected blower speed will be shown in the display (A).
N00737001406
Press or of the temperature controlswitch to the desired temperature. The selected temperature will be shown in thedisplay (A).
A sound will be made every time you push any of the switches.
Blower speed selection switch
NOTE
1- Increase 2- DecreaseTemperature control switch
NOTE
The temperature value
of air conditioning is
switched in conjunction
with outside temper-
ature display unit of the multi informationdisplay. Refer to “Changing the
temperature unit” on
page 5-74. While the engine coolant temperature is low, the temperature of the air from the heaterwill be cool/cold unti
l the engine warms up,
even if you have selected warm air with the switch.To prevent the windshield and windows from fogging up, the vent mode
will be changed to
“ ” and the blower speed will be reduced. When the temperature is set to the highest or the lowest setting under the AUTO opera-tion, the air selection
and the air conditioning
will be automatically changed as follows. • Quick Heating (When the temperature is set to the highest setting) Outside air will be introduced and the airconditioning will stop. If the air selection
and the air conditioning
are operated manually after an automaticchangeover, manual
operation will be
selected. • Quick Cooling (When th
e temperature is set
to the lowest setting) Inside air will be re
circulated and the air
conditioning will operate.
BK0236100US.book 13 ページ 2016年2月1日 月曜日 午前10時15分
Page 207 of 307
Automatic air conditioning (if so equipped)
7
The above indicates the
factory settings. You
can personalize the air
selection switch and
air conditioning switch to match your per- sonal preferences. Contact your Mitsubishi
Motors dealer or a
repair facility of your choice for assistance. Refer to “Personalizi
ng the air conditioning
switch (Changing the function setting)” onpage7-16. Refer to “Personalizing the air selection (Changing the function setting)” on page7-15.
N00737101247
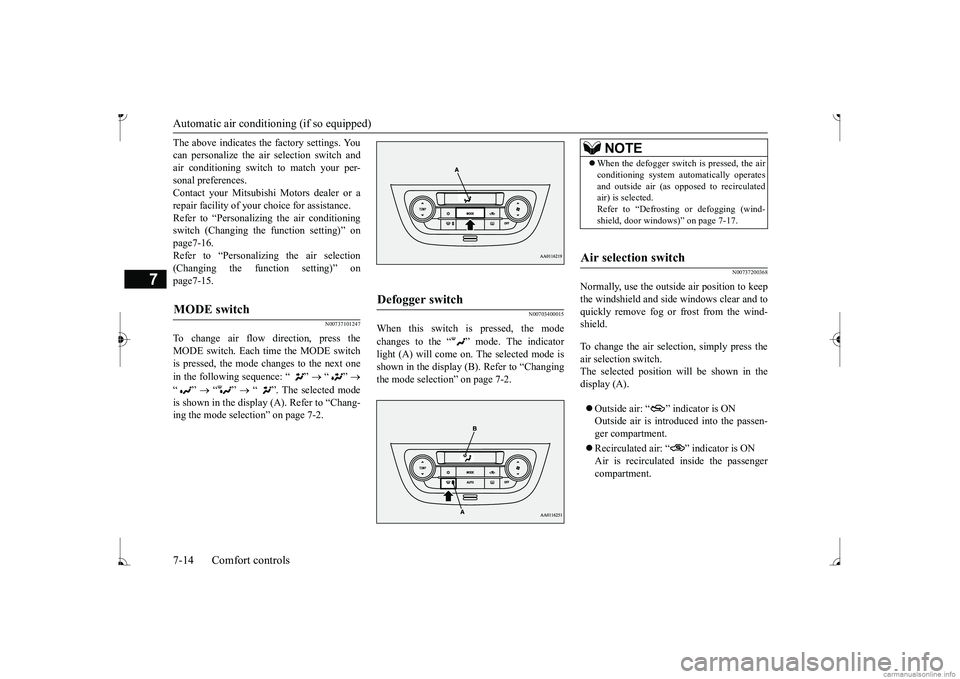
To change air flow
direction, press the
MODE switch. Each time the MODE switch is pressed, the mode changes to the next one in the following sequence: “ ”
“”
“”
“”
“ ”. The selected mode
is shown in the display (A). Refer to “Chang- ing the mode selection” on page 7-2.
N00703400015
When this switch is pressed, the mode changes to the “ ” mode. The indicator light (A) will come on.
The selected mode is
shown in the display (B). Refer to “Changing the mode selection” on page 7-2.
N00737200368
Normally, use the outside air position to keepthe windshield and side windows clear and to quickly remove fog or frost from the wind-shield. To change the air selection, simply press the air selection switch. The selected position wi
ll be shown in the
display (A). Outside air: “ ” indicator is ON Outside air is introduced into the passen- ger compartment. Recirculated air: “ ” indicator is ON Air is recirculated inside the passengercompartment.
MODE switch
Defogger switch
NOTE
When the defogger switch is pressed, the air conditioning system au
tomatically operates
and outside air (as oppos
ed to recirculated
air) is selected. Refer to “Defrosting or defogging (wind- shield, door windows)