instrument panel MITSUBISHI MIRAGE G4 2019 (in English) User Guide
[x] Cancel search | Manufacturer: MITSUBISHI, Model Year: 2019, Model line: MIRAGE G4, Model: MITSUBISHI MIRAGE G4 2019Pages: 267, PDF Size: 38.31 MB
Page 132 of 267
Multi-information display
Features and controls 5-67
5
N00574801054
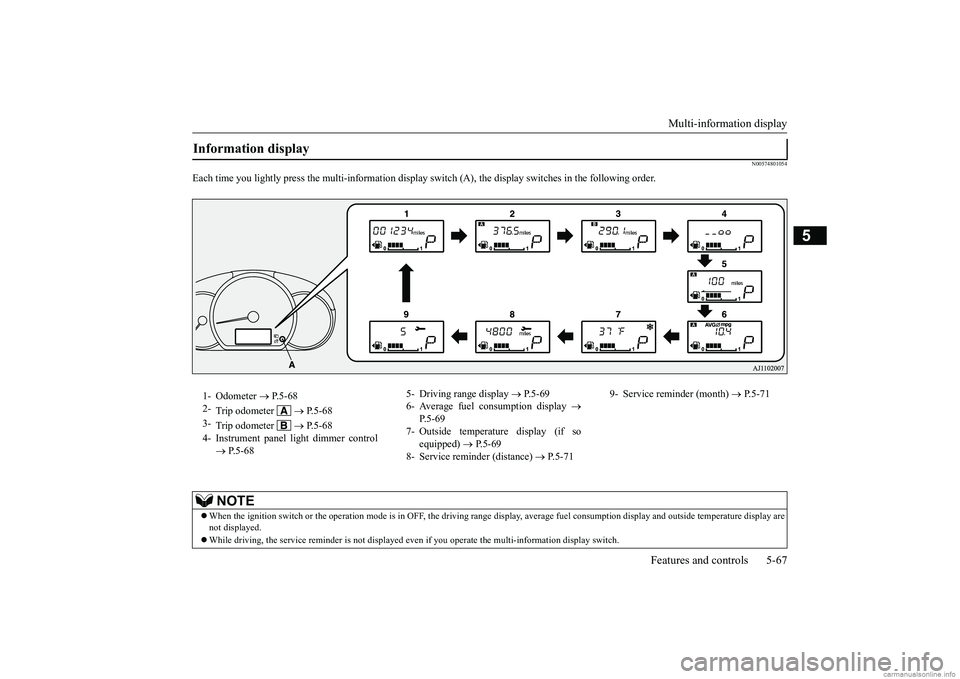
Each time you lightly press the multi-inf
ormation display switch (A), the disp
lay switches in the following order.
Information display 1- Odometer
P.5-68
2-
Trip odometer
P.5-68
3-
Trip odometer
P.5-68
4- Instrument panel li
ght dimmer control
P.5-68
5- Driving range display
P.5-69
6- Average fuel consumption display
P.5-69
7- Outside temperature display (if so
equipped)
P.5-69
8- Service reminder (distance)
P.5-71
9- Service reminder (month)
P.5-71
NOTE
When the ignition switch or the
operation mode is in OFF, the driving range di
splay, average fuel cons
umption display and outsi
de temperature display are
not displayed. While driving, the service reminder is
not displayed even if you operate th
e multi-information
display switch.
BK0267800US.book 67 ページ 2018年5月30日 水曜日 午後4時24分
Page 133 of 267
Multi-information display 5-68 Features and controls
5
N00574900016
The odometer indicates the total distance the vehicle has traveled.
N00575000014
The trip odometer indicates the distance trav-eled between two points. To return the display to 0, hold down the multi-information displa
y switch for about 1
second or more. Only the currently displayed value will be reset. Example
If trip odometer is displayed, only trip odometer will be reset.
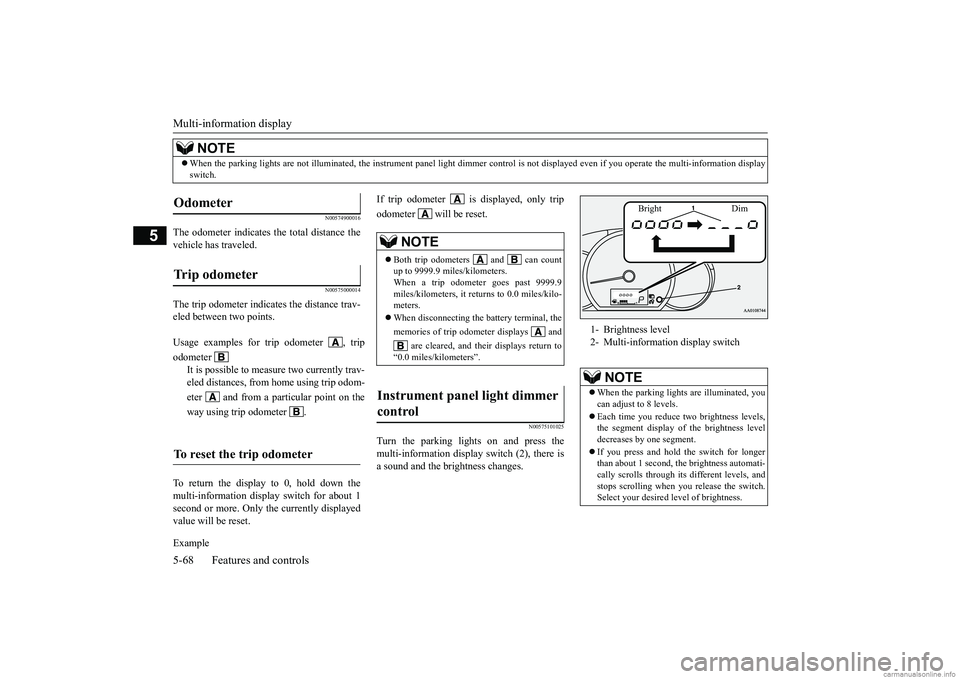
N00575101025
Turn the parking lights on and press the multi-information display switch (2), there is a sound and the brightness changes.
When the parking lights are not illuminated,
the instrument panel light
dimmer control is not displa
yed even if you operate the
multi-information display
switch.NOTE
Odometer Trip odometer Usage examples for trip odometer , trip odometer
It is possible to meas
ure two currently trav-
eled distances, from home using trip odom- eter and from a particular point on theway using trip odometer .
To reset the trip odometer
NOTE
Both trip odometers and can count up to 9999.9 miles/kilometers. When a trip odometer goes past 9999.9miles/kilometers, it returns to 0.0 miles/kilo- meters. When disconnecting the battery terminal, the memories of trip odom
eter displays and
are cleared, and thei
r displays return to
“0.0 miles/kilometers”.
Instrument panel light dimmer control
1- Brightness level 2- Multi-informati
on display switch
NOTE
When the parking lights are illuminated, you can adjust to 8 levels. Each time you reduce tw
o brightness levels,
the segment display of the brightness level decreases by one segment. If you press and hold the switch for longer than about 1 second, the brightness automati-cally scrolls through its different levels, and stops scrolling when you release the switch. Select your desired
level of brightness.
Bright Dim
BK0267800US.book 68 ページ 2018年5月30日 水曜日 午後4時24分
Page 144 of 267

Combination headlights and dimmer switch
Features and controls 5-79
5
N00590300021
This light comes on when the washer fluid is running low.If the light comes on, replenish the container with washer fluid. Refe
r to “Washer fluid” on
page 9-9.
N00522501889
Rotate the switch to operate the lights.
The combinations of
switch operations and
illuminated lights differ in accordance withthe following conditions. [When the engine is st
arted, and the parking
brake is released]
The daytime running light
s will be illumi-
nated: [When the engine is not running, or when the engine is running but the parking brake is not released] The engine starts when the lights are off.
NOTE
When the auto cut-out function of the doom light is been activa
ted, the light goes out
automatically after about 30 minutes.Refer to “Dome light” on page 5-93.
Washer fluid level warning light
(if so equipped)
Combination headlights and dimmer switch Headlights
Except for vehicles equipped with day- time running lights OFF All lights off
Parking, tail, front and rear side- marker lights, license plate and instrument panel lights on Headlights and other lights on
Vehicles equipped with daytime running lights
OFF
The daytime running lights illumi- nated The daytime running lights illumi- nated Parking, tail, front and rear side-marker lights, lic
ense plate and
instrument panel lights on Headlights and other lights onNOTE
Once the daytime running light come on, they do not go out until the ignition switch isturned to the “OFF” or “ACC” position or the operation mode is changed to OFF or ACC.
OFF All lights off
Parking, tail, front and rear side- marker lights, lic
ense plate and
instrument panel lights on Headlights and other lights on
BK0267800US.book 79 ページ 2018年5月30日 水曜日 午後4時24分
Page 146 of 267

Turn signal lever
Features and controls 5-81
5
the light switch to the “OFF” position to stop the tone.
N00549900142
To change the headlights from high beam tolow beam and vice vers
a, pull the turn signal
lever to (1). Switch the headlights to low beam as a courtesy whenever there are oncoming vehicles, or when there is traffic moving ahead of you. An illuminated bluelight in the instrument
cluster i
ndicates when
the headlights are on high beam.
N00550000185
You can flash the high beams by pulling the lever gently toward you (2). The lights will
go back to normal when you let go. While the high beam is on, you will
see a blue light on
the instrument panel.
N00522600519
When changing lanes, or
to making a gradual
turn, hold the lever in the “lane change” posi- tion (1). It will return
to the neutral position
when you let go. Use the full position (2) when making a normal turn. The lever will return to the neutral position when the turn iscomplete. There may be times when the lever does not return to the neutral position. This usually happens when the steering wheel isturned only slightly. You
can easily return the
lever by hand. Also, when you move the lever to (1) slightlythen release it, the turn signal lights and the indicator light in the instrument cluster will flash three times.
Dimmer (high/low beam change) Headlight flasher
NOTE
You can flash the high beams by pulling the lever toward you, even if the light switch isoff. If you turn the lights off with the head lights set to high-beam illumin
ation, the headlights
are automatically returned to their low-beam setting when the light
switch is next turned
to the “ ” position.
Turn signal lever
NOTE
A light in the instrument panel flashes to show when the turn signal lights are workingproperly. If this light flashes fa
ster than usual, check
for a burned out turn signal light bulb or mal-functioning connection in the signal. If the panel light does not come on when the lever is moved, check for a blown fuse or aburned out bulb in the panel. Have the system inspected by your autho- rized Mitsubishi Motors dealer or a repairfacility of your choice. It is possible to modi
fy functions as follows:
• Deactivate the turn signal light 3-flash function for lane changes. • Adjust the time required to operate the lever for the 3-flash function. • Changing of the tone of a sounding buzzer as the turn signal lights flash.
BK0267800US.book 81 ページ 2018年5月30日 水曜日 午後4時24分
Page 164 of 267
Vehicle preparatio
n before driving
Driving safety 6-3
6
N00629001770
For a safer and more enjoyable trip, always check for the following:
Before starting the ve
hicle, make certain
that you and all passengers are seated and wearing their seat belts properly (with children in the rear seat, in appropriaterestraints), and that all the doors are locked. Move the driver’s seat as far backward as possible, while keeping good visibility, and good control of the steering wheel, brakes, accelerator, and controls. Check the instrument panel indicators and multi- information display for any possible prob-lem. Similarly, the front
passenger seat should
also be moved as fa
r back as possible.
Make sure that infants and small children are properly restrained in accordance with all laws and regulations.
Check these by selectin
g the defroster mode,
and set the blower switch on high. You shouldbe able to feel the air blowing against the windshield. Refer to “Defrosti
ng or defogging (wind-
shield, door windows)” on page 7-6, 7-10, 7-17.
NOTE
The shape of the mat and the number of retaining clips may
vary depending on the
vehicle model.WA R N I N G If a floor mat is the
wrong size or is not
properly installed, it can interfere with the operation of the pedals. Interference with the pedals can cause unintended accelera-tion and/or increase
d stopping distances
resulting in a cras
h and injury. Always
make sure the floor mat does not interferewith the accelerator or brake pedal. Always use the retaining clip on the driver’s floorboard to secure the floor mat. Always install the mat with the correct side facing down. Never install a second mat over or under an existing floor mat. Do not use a floor mat designed for another model vehicle even if it is a Mitsubishi Motors Genuine floor mat. Before driving, be sure to check the fol- lowing:• Periodically check that the floor mat is properly secured with the retaining clips. If you remove the fl
oor mat while clean-
ing the inside of you
r vehicle or for any
other reason, always
check the condition
of the floor mat afte
r it has been rein-
stalled.
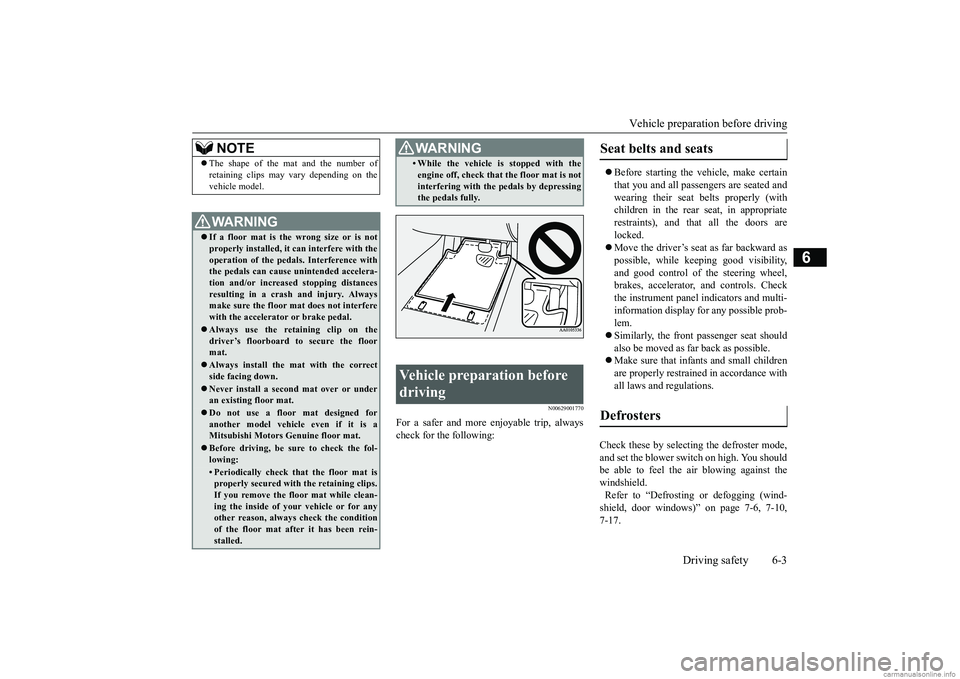
• While the vehicle is stopped with theengine off, check that the floor mat is notinterfering with the pedals by depressingthe pedals fully.
Vehicle preparation before driving
WA R N I N G
Seat belts and seats Defrosters
BK0267800US.book 3 ページ 2018年5月30日 水曜日 午後4時24分
Page 165 of 267

Safe driving techniques 6-4 Driving safety
6
Check all the tires for heavy tread wear or uneven wear patterns.
Look for stones, nails,
glass, or other objects
stuck in the tread. Look
for any tread cuts or sidewall cracks. Check the wheel nuts for tightness, and the tires (including spare tire) for proper pressure.Replace your tires before they are heavily worn out. On vehicles equipped with a tire pressure monitoring system, there
is a risk of damage
to the tire inflation pressure sensors when thetire is replaced on the
rim. Tire replacement
should, only be perform
ed by an authorized
Mitsubishi Motors dealer. Have someone watch while you turn all the exterior lights on and off. Also check the turnsignal indicators and hi
gh-beam indicators on
the instrument panel. Check the ground under the vehicle after parking overnight, for
fuel, water, oil, or
other leaks. Make sure
all the fluid levels are
correct. Also, if you
can smell fuel, you need
to find out why imme
diately and have it
fixed.
N00629200137
Even this vehicle’s safety equipment, andyour safest driving, cannot guarantee that youcan avoid an accident or injury. However, if you give extra attention to the following areas, you can better protect yourself and your passengers: Drive defensively. Be aware of traffic, road and weather c
onditions. Leave plenty
of stopping distance
between your vehicle
and the vehicle ahead. Before changing lanes, check your mir- rors, your blind spots, and use your turn- signal light. While driving, watch the behavior of other drivers, bicycl
ists, and pedestrians.
Always obey applicab
le laws and regula-
tions. Be a polite and alert driver. Alwaysleave room for unexpected events, such as sudden braking. If you plan to drive in another country, obey their vehicle re
gistration laws and
make sure you will be able to get the right fuel.
N00629400474
Check the battery. At the same time, check the terminals and wiring. During extremely cold weather, the battery willnot be as strong. Al
so, the battery power
level may drop because more power is used for cold starting and driving.Before driving the vehicle, check to see if the engine runs at the proper speed and if the headlights are as bright as normally. Charge or replace the battery if necessary. During extreme cold weather, it is possi-ble that a very low battery could freeze. Warm the engine sufficiently. After start- ing the engine, allow a short warm-uptime to distribute oil to all cylinders. Then drive your vehicle slowly. Stay at low speeds at first so that the man- ual transaxle oil or the automatic transaxle fluid has time to spread to all the lubrica- tion points.
Tires Lights Fluid leaks
Safe driving techniques
Driving during cold weather
WA R N I N G The battery gives off explosive hydrogen gas. Any spark or flame can cause the bat- tery to explode, which could cause seriousinjury or death. Always wear protecti
ve clothes and a face
mask when working wi
th your battery, or
let a skilled mechanic do it.
BK0267800US.book 4 ページ 2018年5月30日 水曜日 午後4時24分
Page 215 of 267

Engine hood 9-4 Vehicle care and maintenance
9
Stop driving the vehicle if you think the performance is noticeably low, or theengine has a malfunction such as with the ignition, etc. If you are not able to stop driving immediately,
slow down and drive
for only a short time. Have your vehicle checked at an authorized Mitsubishi Motors dealer or a repair facility of yourchoice as soon
as possible.
In unusual situations involving major engine problems, a burning odor may indicate severe a
nd abnormal catalytic
converter overheating.
If this occurs, stop
in a safe place, shut
the engine off and let
the vehicle cool. Once the engine is cool, immediately take your
vehicle to a dealer
or a repair facility of your choice for ser- vice.
N00937501647
Use the engine hood re
lease lever (located
under the instrument panel near the driver’s door) to unlock the engine hood.
Pull the lever toward you to release the engine hood latch. Release the lever and
lift the engine hood.
Support the engine hood with the hood prop. Insert the hood prop securely in the opening under the hood marked with an arrow.
Engine hood To open
WA R N I N G Never use the release lever to unlatch the engine hood while the
vehicle is in motion.
Do not drive your vehicle unless the engine hood is locked.
NOTE
To prevent damage to the engine hood and wipers, make sure the
wipers are at resting
position when you open the engine hood.CAUTION Always insert the support prop into the hole specially made for
it. Propping the engine
hood at any other place could cause the propto slip out and lead to an accident. The hood prop can fall out if the hood is lifted by a strong wind.
BK0267800US.book 4 ページ 2018年5月30日 水曜日 午後4時24分
Page 262 of 267

Alphabetical index
12-3
12
Replacement
..................................
9-29
Switch
...........................................
5-79
Heater without air conditioning function
.7-4
High beam indicator
............................
5-76
High coolant temperature warning light 5-78High-mounted stop light
Bulb capacity
.................................
9-27
Hill start assist
....................................
5-48
HomeLink® Wirele
ss Control System
..5-87
Hood lock release me
chanism and safety
catch
................................................
9-22
Hook
Convenience hook
..........................
5-95
Horn switch
........................................
5-85
I
If the vehicle breaks down
.....................
8-2
Ignition switch
....................................
5-37
Important facts to know in
case of an accident
10-4 Indicator and warning light package
.....
5-75
Indicators
...........................................
5-76
Information display
.............................
5-67
Inside emergency trunk lid release
........
5-29
Inside rearview mirror
.........................
5-34
Instrument panel light dimmer control
..5-68
Interior lights
......................................
5-92
J
Jack
Garage jack up position
.....................
9-3
Storage
............................................
8-5
Jump-starting the engine
.......................
8-2
K
Key slot
.............................................
5-19
Keyless entry system
....................
5-6
, 5-22
Keys
...................................................
5-2
L
Labeling
............................................
11-2
License plate lights
Bulb capacity
.................................
9-27
Replacement
..................................
9-32
Link System
.......................................
5-85
Loading information
.............................
6-6
Lubricants
.........................................
11-6
M
Malfunction indicator light
..................
5-77
Manual air conditioning
........................
7-7
Manual transaxle
................................
5-40
Oil
..........................................
9-9
, 11-6
Shift points
....................................
5-41
Manual window control
.......................
5-30
Modifications to and
racing of your vehicle
..
3-5 Multi-information display
...........
5-64
, 5-65
O
Octane number
.....................................
3-2
Oil
Engine oil
...............................
9-5
, 11-6
Manual transaxle oil
.................
9-9
, 11-6
Oil pressure warning light
....................
5-78
Operation mode
..................................
5-14
Operation under adverse driving conditions
..
8-13 Outside rearview mirrors
.....................
5-36
Overheating
..........................................
8-4
P
Parking
................................................
6-5
Parking brake lever stroke
...............
9-19
Parking brake
............................
5-33
, 9-19
Parking lights
Bulb capacity
.................................
9-27
Replacement
...................................
9-29
Polishing
............................................
9-35
Power brakes
......................................
5-47
Power outlet
.......................................
5-87
BK0267800US.book 3 ページ 2018年5月30日 水曜日 午後4時24分