reverse parking MITSUBISHI MIRAGE G4 2019 Owner's Manual (in English)
[x] Cancel search | Manufacturer: MITSUBISHI, Model Year: 2019, Model line: MIRAGE G4, Model: MITSUBISHI MIRAGE G4 2019Pages: 267, PDF Size: 38.31 MB
Page 84 of 267
Free-hand Advanced Securi
ty Transmitter (F.A.S.T.-key) (if so equipped)
Features and controls 5-19
5
1. Stop the vehicle. 2. Fully engage the parking brake while depressing the brake pedal. 3. On vehicles with
a manual transaxle,
press the engine switch to stop the engine, and then move the gearshift lever to the 1st (on a uphill) or “R” (Reverse) (on adownhill) position. On vehicles equippe
d with continuously
variable transmission (CVT), move theselector lever to th
e “P” (PARK) position,
and then press the engine switch to stop the engine.
N00568301139
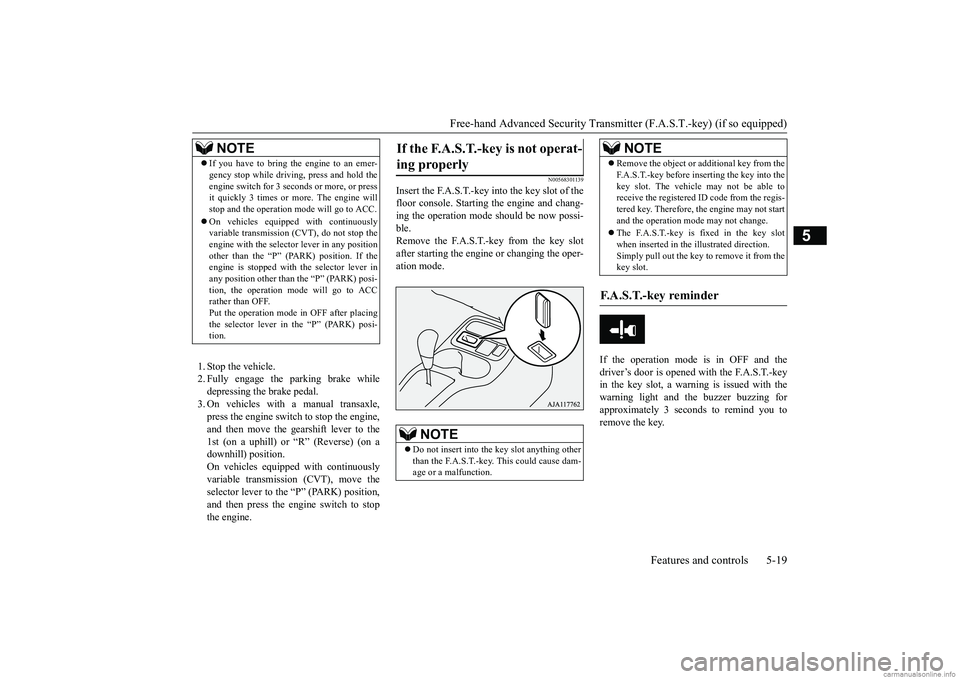
Insert the F.A.S.T.-key into the key slot of thefloor console. Starting
the engine and chang-
ing the operation mode
should be now possi-
ble. Remove the F.A.S.T.-key from the key slotafter starting the engine or changing the oper- ation mode.
If the operation mode is in OFF and the driver’s door is opened with the F.A.S.T.-key in the key slot, a warning is issued with thewarning light and the buzzer buzzing for approximately 3 seconds to remind you to remove the key.
NOTE
If you have to bring the engine to an emer- gency stop while drivi
ng, press and hold the
engine switch for 3 sec
onds or more, or press
it quickly 3 times or more. The engine will stop and the operation mode will go to ACC. On vehicles equippe
d with continuously
variable transmission (CVT), do not stop the engine with the select
or lever in any position
other than the “P” (PARK) position. If the engine is stopped with
the selector lever in
any position other than the “P” (PARK) posi-tion, the operation mode will go to ACC rather than OFF. Put the operation mode
in OFF after placing
the selector lever in the “P” (PARK) posi- tion.
If the F.A.S.T.-key is not operat- ing properly
NOTE
Do not insert into the
key slot anything other
than the F.A.S.T.-key. This could cause dam-age or a malfunction.
Remove the object or ad
ditional key from the
F.A.S.T.-key before inserting the key into thekey slot. The vehicle
may not be able to
receive the registered ID code from the regis- tered key. Therefore, the engine may not start and the operation mode may not change. The F.A.S.T.-key is fixed in the key slot when inserted in the illustrated direction.Simply pull out the key to remove it from the key slot.
F.A.S.T.-key reminder
NOTE
BK0267800US.book 19 ページ 2018年5月30日 水曜日 午後4時24分
Page 98 of 267
Parking brake
Features and controls 5-33
5
N00511400399
To park the vehicle, fi
rst bring it to a com-
plete stop, fully engage the parking brake, and then move the gearshift lever to 1st (on auphill) or “R” (Reverse) (on a downhill) posi- tion for vehicles equi
pped with a manual
transaxle, set the se
lector lever to “P”
(PARK) position for vehicles equipped with a continuously variable transmission (CVT).
When parking on a hill, set the parking brake, and turn the front wheels toward the curb on a downhill, or away from the curb on an uphill.
Parking brake
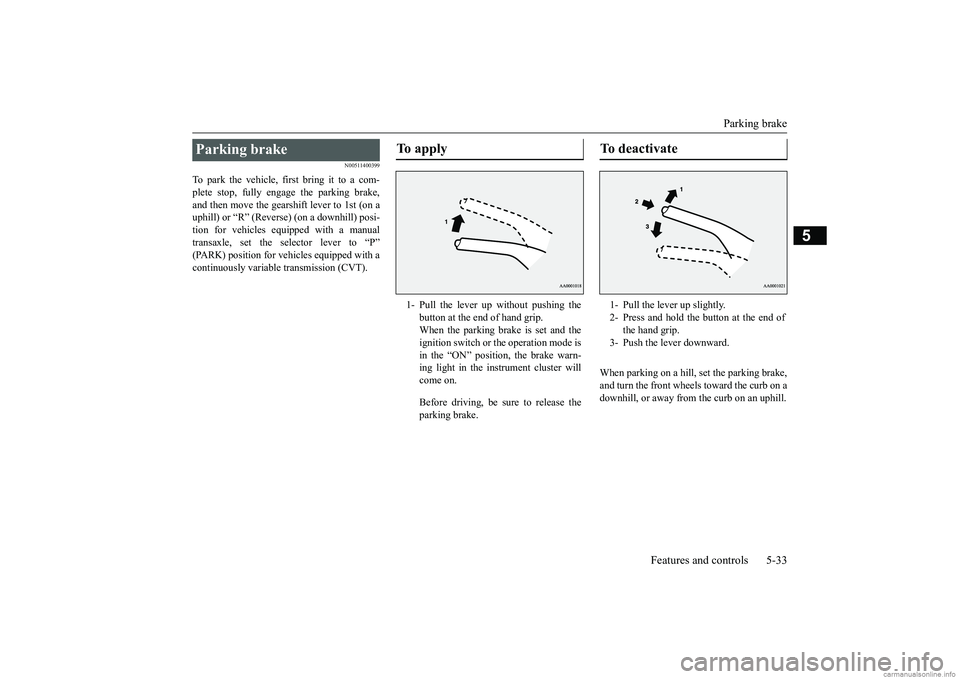
To apply 1- Pull the lever up without pushing the
button at the end of hand grip. When the parking brake is set and theignition switch or the operation mode is in the “ON” position, the brake warn- ing light in the instrument cluster willcome on. Before driving, be sure to release the parking brake.
To deactivate 1- Pull the lever up slightly.2- Press and hold the button at the end of
the hand grip.
3- Push the lever downward.
BK0267800US.book 33 ページ 2018年5月30日 水曜日 午後4時24分
Page 111 of 267
Continuously variable transmission (CVT) (if so equipped) 5-46 Features and controls
5
N00560801095
To gain extra acceleration in “D” (DRIVE) position (when passing another vehicle) push the accelerator to the floor. The CVT will automatically downshift.
For short waiting periods, such as at traffic lights, the vehicle can be
left in selector lever
position and held stationary with the servicebrake. For longer waiting periods with the engine running, place th
e selector lever in the “N”
(NEUTRAL) position a
nd apply the parking
brake, while holding the vehicle stationary with the service brake. Prior to moving off after having stopped the vehicle, make sure that
the selector lever is in
“D” (DRIVE) position. To park the vehicle, first bring it to a com- plete stop, fully engage the parking brake,
Operation of the CVT
CAUTION Before selecting a pos
ition with the engine
running and the vehicl
e stationary, firmly
depress the brake pedal to prevent the vehi- cle from creeping. The vehicle will begin to
move as soon as the
CVT is engaged, especi
ally when the engine
speed or idle speed is
high, or with the air
conditioning operating.Do not release the br
ake pedal until you are
ready to drive away. Depress the brake pedal with the right foot at all times. Using the left foot c
ould cause driver move-
ment delay in case of an emergency. To prevent sudden acceleration, never run the engine at high rpms when shifting from the “P” (PARK) or “N” (NEUTRAL). Operating the accelerator pedal while the other foot is resting
on the brake pedal will
affect braking efficien
cy and may cause pre-
mature wear of brake pads.
Use the selector lever in the correct shift position in accordance with driving condi-tions.Never coast downhill backward in the driv- ing shift position “D” (DRIVE), “Ds” (DOWNSHIFT & SPORTY DRIVING), “L”(LOW) or coast forward in the “R” (REVERSE) position. Engine stopping and increased brake pedaland steering effort could
lead to an accident.
Do not rev the engine
with the brake pedal
pressed when the vehicle is stationary. This can damage the CVT. Also, when you depress
the accelerator pedal
while holding down the brake pedal with the selector lever in th
e “D” (DRIVE) position,
the engine revolutions
may not rise as high
as when performing the same operation with the selector lever in the “N” (NEUTRAL) position.
Passing acceleration
CAUTION
Waiting
CAUTION To avoid transmission
overheating, never try
to keep your vehicle st
ationary on a hill by
using the accelerator
pedal. Always apply
the parking brake and/or service brake. Do not rev the engine unnecessarily while the vehicle is stationary. Unexpected acceler-ation may occur if the selector lever is in a position other than “P” (PARK) or “N” (NEUTRAL).
Parking
BK0267800US.book 46 ページ 2018年5月30日 水曜日 午後4時24分
Page 114 of 267
Brake assist system
Features and controls 5-49
5
N00562800092
If an abnormal condition occurs in the sys- tem, the following indicator will turn on.
N00567301116
The brake assist system is a device assisting drivers who cannot depress the brake pedalfirmly such as in em
ergency stop situations
and provides greater braking force.
If the brake pedal is depressed suddenly, the brakes will be applied with more force thanusual.
• On vehicles with ma
nual transaxle, the
gearshift lever is in the following position.[When starting an uphill slope forwards.]The gearshift lever is in any position other than “R” (Reverse). (The hill start assist will operate, even if thegearshift lever is in the “N” (Neutral) posi- tion.) [When starting an uphill slope backwards.]The gearshift lever is in the “R” (Reverse) position. (The hill start assist
will not operate when
the gearshift lever is in the “N” (Neutral) position.) • On vehicles with CVT, the selector lever is in any position other
than “P” (PARK) or
“N” (NEUTRAL). • The vehicle is completely stationary, with the brake pedal depressed. • The parking brake is released. The hill start assist will not operate if the accelerator pedal is
depressed before the
brake pedal is released. The hill start assist also operates when reversing on an uphill slope. When the hill start assist is activated, you may feel the operating sound or vibrationfrom under the body. This is a normal result of the hill start assist operation, and does not
indicate a problem.
NOTE
Warning indicator
-
ASC indicator
CAUTION If the warning is displayed, the hill start assist will not operate
. Start off carefully.
Park your vehicle in a
safe place and stop the
engine.Restart the engine and check whether the indicator goes out, in whic
h case the hill start
assist is again working normally. If they remain displa
yed or reappear fre-
quently, it is not necessary
to stop the vehicle
immediately, but th
e vehicle should be
inspected by an authorized Mitsubishi Motors dealer or a repair facility of your choice as soon as possible.
Brake assist system
CAUTION The brake assist system is not a device designed to exercise
braking force greater
than its capacity. Make
sure to always keep a
sufficient distance be
tween your vehicle and
a vehicle in front of
you without relying too
much on the brake assist system.NOTE
Once the brake assist system is operational, it maintains great braki
ng force even if the
brake pedal is lightly released.To stop its operation, completely remove your foot from the brake pedal. When the brake assist system is in use while driving, you may feel as if the depressed brake pedal is soft, the pedal moves in smallmotions in conjuncti
on with the operation
noise, or the vehicle body and the steering wheel vibrate. This occurs when the brakeassist system is ope
rating normally and does
not indicate faulty
operation. Continue to
depress the brake pedal. When the anti-lock brake system warning light is illuminated, the brake assist system is not functioning.
BK0267800US.book 49 ページ 2018年5月30日 水曜日 午後4時24分
Page 166 of 267
Braking
Driving safety 6-5
6
Manual transaxle can be harder to shift in cold weather conditions. This is normaland shifting will get ea
sier as the transaxle
warms up. Check the engine antifreeze. If there is not enough coolant because of a leak or from engine
overheating, add
Mitsubishi Motors Ge
nuine Super Long
Life Coolant Premium or equivalent. Please read this section in conjunction with the “Engine coolant” on page 9-7.
N00629500521
All parts of the brake system are critical to safety. Have the vehicle serviced by an autho- rized Mitsubishi Motors dealer or a repairfacility of your choice at regular intervals according to the “WARRANTY AND MAINTENANCE MANUAL”. Check the brake system while driving at a low speed immediately
after starting, espe-
cially when the brakes are wet, to confirm they work normally.A film of water can be formed on the brake discs or brake drums, and prevent normal braking after driving in heavy rain or throughlarge puddles, or after the vehicle is washed. If this occurs, dry the brakes out by driving slowly while lightly depressing the brakepedal. On snowy roads, ice can form on the braking system, making the brak
es less effective.
While driving in such conditions, pay closeattention to surrounding
vehicles and to the
condition of the road surface. From time to time, lightly depress the brake pedal andcheck how effective the brakes are. It is important to take
advantage of the engine
braking by downshifting while driving on steep downhill roads in order to prevent the brakes from overheating.
N00629601372
When parking on a hill, set the parking brake, and turn the front wheels toward the curb on a downhill, or away from the curb on an uphill.If necessary, apply chocks to the wheels. Place the gearshift lever into the “R” (Reverse) position when parking on a down- hill slope, into the 1st position when parking on an uphill slope. Be sure that the parking brake is firmly set when parked and that the selector lever is in the “P” (PARK) position. When parking on a hill, it is important to setthe parking brake before
moving the selector
lever to the “P” (PARK) position. This pre- vents loading the parking brake against the
WA R N I N G Never open the radiator cap when the radiator is hot. You could be seriously burned.
Braking When brakes are wet
When driving in cold weather When driving downhill
Parking Parking on a hill For vehicles equipped with man- ual transaxle For vehicles equipped with contin- uously variable transmission (CVT)
BK0267800US.book 5 ページ 2018年5月30日 水曜日 午後4時24分
Page 198 of 267

Jump-starting the engine For emergencies 8-3
8
3. You could be injured if the vehicles move. Set the parking brake firmly on each vehi-cle. Put an automatic transaxle or CVT in “P” (PARK) or a manual transaxle in “N” (Neutral).4. Turn the ignition switch to the “OFF” position or put the operation mode in OFF. 5. Make sure your batt
ery electrolyte is at
the proper level. (Refer to “Battery” on page 9-11.) 6. Connect one end of one jumper cable to the positive (+) terminal of the dis- charged battery (A),
and then connect the
other end to the positive (+) terminal of the booster battery (B).
7. Connect one end of the other jumper cable
to the negative (-) terminal of the booster battery (B), a
nd then connect the
other end to the designated ground location of the vehicl
e with the discharged
battery (A) at the point farthest from the battery. 8. Start the engine in the vehicle providing the boost. Let the engine idle a few min- utes, then start the engine in the vehiclewith the discharged battery. 9. After the engine is
started, disconnect the
cables in the reverse order from the wayyou connected them.
NOTE
Turn off all lights, heat
er, and other electrical
loads. This will avoid sparks and help save both batteries.WA R N I N G If the electrolyte flui
d is not visible, or
looks frozen, DO NOT ATTEMPT JUMP STARTING!! The battery might split open or explode ifthe temperature is below the freezing point or if it is not filled to the proper level.
WA R N I N G Make sure that the jumper cables and your clothing are clear of the cooling fansand drive belts. Entanglement with the fans or belts can ca
use serious personal
injury.NOTE
Open the terminal cover before connecting the jumper cable to the positive terminal ofthe battery. (Refer to “Battery:
Disconnection and con-
nection” on page 9-11.) Use the proper cables suitable for the battery size.Otherwise heat damage
to the cables could
result.
WA R N I N G Be sure to follow the proper order when connecting the batteries, of:
Make sure that the connection is made to the correct designated location (as shown in the illustration) properly. If theconnection is directly made to the negative (-) terminal of the battery, the flammable gases from inside the battery might catchfire and explode, caus
ing personal injury.
When connecting the jumper cable, do not connect the positive (+) cable to the nega- tive (-) terminal. Sparks can make the bat- tery explode.
BK0267800US.book 3 ページ 2018年5月30日 水曜日 午後4時24分
Page 201 of 267
How to change a tire 8-6 For emergencies
8
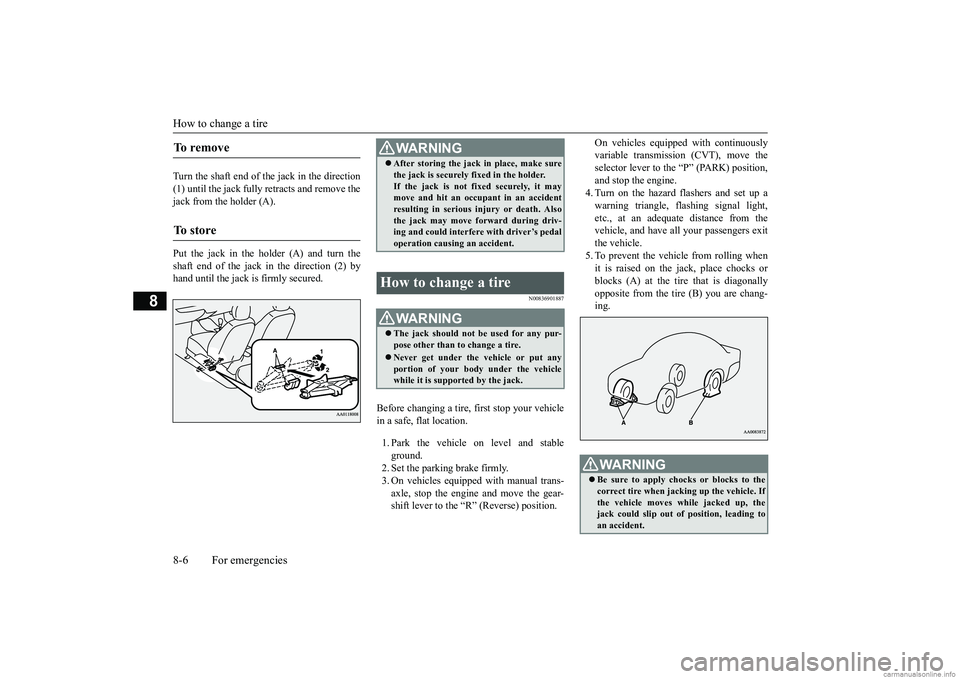
Turn the shaft end of the jack in the direction (1) until the jack fully retracts and remove the jack from the holder (A). Put the jack in the holder (A) and turn the shaft end of the jack in the direction (2) by hand until the jack is firmly secured.
N00836901887
Before changing a tire, first stop your vehiclein a safe, flat location. 1. Park the vehicle on level and stable ground. 2. Set the parking brake firmly.3. On vehicles equipped with manual trans- axle, stop the engine and move the gear- shift lever to the “R” (Reverse) position.
On vehicles equippe
d with continuously
variable transmission (CVT), move theselector lever to the “P” (PARK) position, and stop the engine. 4. Turn on the hazard flashers and set up awarning triangle, flashing signal light, etc., at an adequate distance from the vehicle, and have al
l your passengers exit
the vehicle. 5. To prevent the vehicle from rolling when it is raised on the jack, place chocks or blocks (A) at the ti
re that is diagonally
opposite from the tire (B) you are chang-ing.
To r e m o v e To s t o r e
WA R N I N G After storing the jack in place, make sure the jack is securely fixed in the holder.If the jack is not fixed securely, it maymove and hit an
occupant in an accident
resulting in serious injury or death. Also the jack may move forward during driv-ing and could interfere with driver’s pedal operation causing an accident.
How to change a tire
WA R N I N G The jack should not be used for any pur- pose other than to change a tire. Never get under the
vehicle or put any
portion of your body under the vehiclewhile it is supported by the jack.
WA R N I N G Be sure to apply choc
ks or blocks to the
correct tire when jacking up the vehicle. If the vehicle moves while jacked up, the jack could slip out of
position, leading to
an accident.
BK0267800US.book 6 ページ 2018年5月30日 水曜日 午後4時24分
Page 240 of 267
Replacement of light bulbs
Vehicle care and maintenance 9-29
9
N00901801203
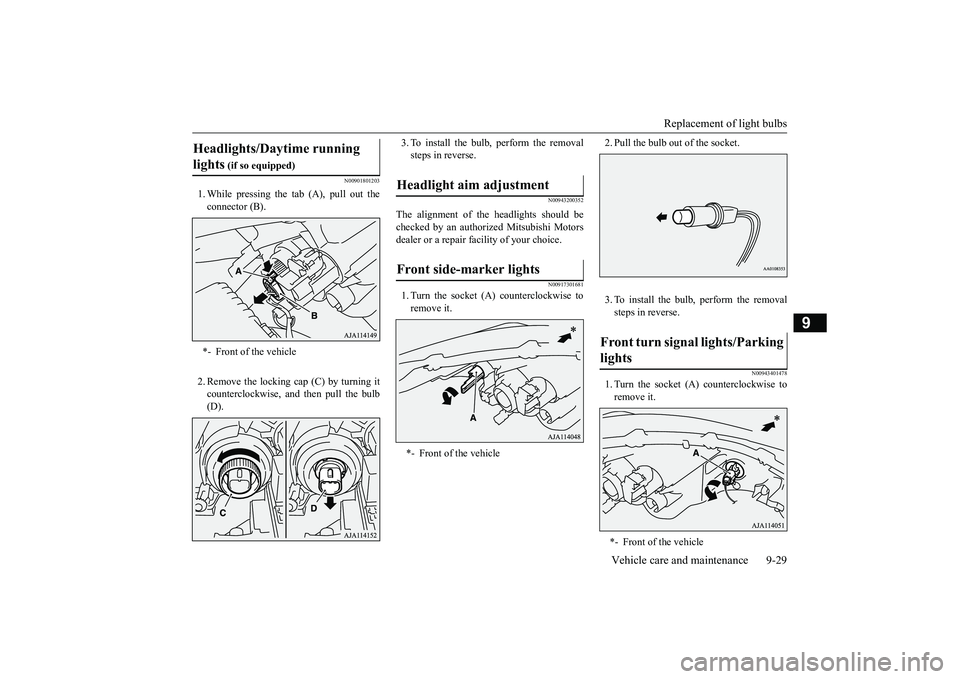
1. While pressing the tab (A), pull out the connector (B). 2. Remove the locking cap (C) by turning it counterclockwise, and then pull the bulb (D).
3. To install the bulb, perform the removal steps in reverse.
N00943200352
The alignment of th
e headlights should be
checked by an authorized Mitsubishi Motorsdealer or a repair facility of your choice.
N00917301681
1. Turn the socket (A) counterclockwise to remove it.
2. Pull the bulb out of the socket. 3. To install the bulb, perform the removal steps in reverse.
N00943401478
1. Turn the socket (A
) counterclockwise to
remove it.
Headlights/Daytime running lights
(if so equipped)
*- Front of the vehicle
Headlight aim adjustment Front side-marker lights *- Front of the vehicle
Front turn signal lights/Parking lights *- Front of the vehicle
BK0267800US.book 29 ページ 2018年5月30日 水曜日 午後4時24分