start engine MITSUBISHI MIRAGE G4 2020 (in English) Service Manual
[x] Cancel search | Manufacturer: MITSUBISHI, Model Year: 2020, Model line: MIRAGE G4, Model: MITSUBISHI MIRAGE G4 2020Pages: 253, PDF Size: 36.39 MB
Page 151 of 253

Interior lights 5-86 Features and controls
5
N00525301644 N00525801421
1- ( ) The light illuminates regardless of whether a door is open or closed. 2- (•) Delayed off function
The light illuminates when a door is opened. It goes off approximately 30 sec-onds after the door is closed. However, the light goes off immediately with all doors closed in the followingcases: • When the ignition switch is turned to the “ON” position or the operation mode isput in ON. • When the power door lock function is used to lock the vehicle. • When the remote control transmitter of the keyless entry system or the F.A.S.T.-key is used to lock the vehicle. • When the door lock/unlock switch is pressed to lock the vehicle while carry-ing the F.A.S.T.-key. Auto cut-out function If the light is left switched on with theignition switch in the “OFF” or “ACC” position or the operation mode in OFF or ACC, and a door is opened, it goes offautomatically after approximately 30 min- utes. The light will illuminate again after itautomatically goes off in the following cases: • When the ignition switch is turned to the“ON” position or the operation mode is put in ON. • When the keyless entry system or theF.A.S.T.-key is operated.
• When all doors are closed. 3- ( ) The light goes off regardless of whether a door is open or closed.
Interior lights
NOTE
Be aware that leaving the light illuminated with the engine off may run the batterydown. Never leave the vehi
cle without checking
that the light is off.
Dome light
NOTE
When the key was used to start the engine: if the key is removed while the doors areclosed, the light is illuminated and after approximately 30 seconds it goes off. When the F.A.S.T.-key was used to start the engine: if the operation mode is put in OFF while the doors are closed, the light illumi-nates and after approximately 30 seconds it goes off. The time until the light
goes off (delayed off)
can be adjusted. See your authorized Mitsubishi Motors dealer for details. The auto cut-out func
tion cannot be
operated
when the dome light switch is in the “ ” position. Also, this function can
be deactivated. See
your authorized Mitsubish
i Motors dealer for
details.
BK0284300US.book 86 ページ 2019年5月23日 木曜日 午後12時22分
Page 158 of 253
Vehicle preparatio
n before driving
Driving safety 6-3
6
N00629001868
For a safer and more enjoyable trip, always check for the following:
Before starting the ve
hicle, make certain
that you and all passengers are seated and wearing their seat belts properly (with children in the rear seat, in appropriaterestraints), and that all the doors are locked. Move the driver’s seat as far backward as possible, while keeping good visibility, and good control of the steering wheel, brakes, accelerator, and controls. Check the instrument panel indicators and multi- information display for any possible prob-lem. Similarly, the front
passenger seat should
also be moved as fa
r back as possible.
Make sure that infants and small children are properly restrained in accordance with all laws and regulations.
Check these by selectin
g the defroster mode,
and set the blower switch on high. You shouldbe able to feel the air blowing against the windshield. Refer to “Defrosti
ng or defogging (wind-
shield, door windows)” on page 7-9.
NOTE
The shape of the mat and the number of retaining clips may
vary depending on the
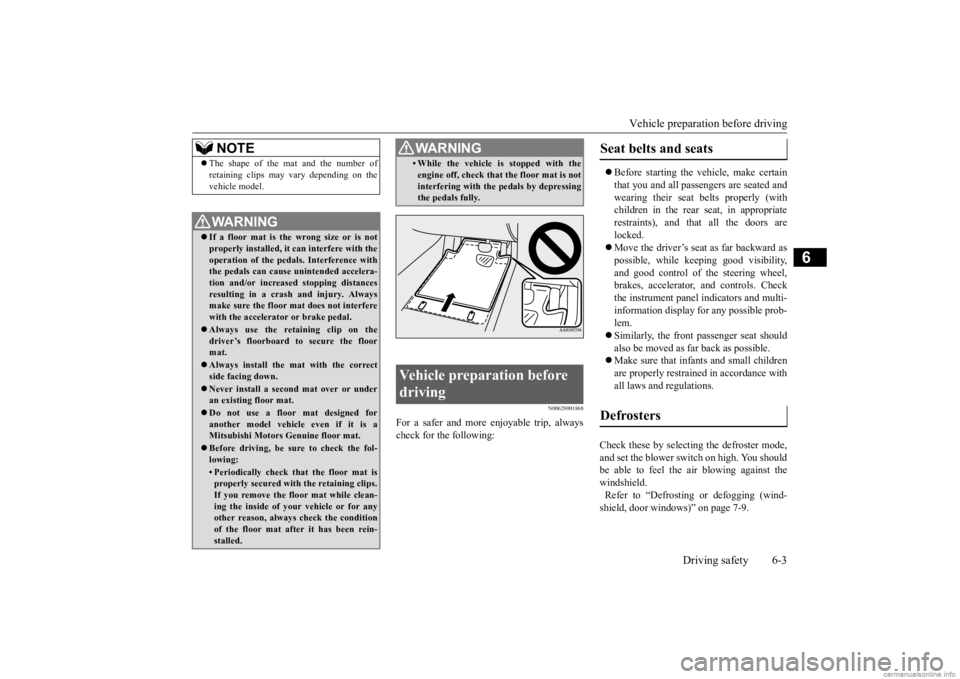
vehicle model.WA R N I N G If a floor mat is the
wrong size or is not
properly installed, it can interfere with the operation of the pedals. Interference with the pedals can cause unintended accelera-tion and/or increase
d stopping distances
resulting in a cras
h and injury. Always
make sure the floor mat does not interferewith the accelerator or brake pedal. Always use the retaining clip on the driver’s floorboard to secure the floor mat. Always install the mat with the correct side facing down. Never install a second mat over or under an existing floor mat. Do not use a floor mat designed for another model vehicle even if it is a Mitsubishi Motors Genuine floor mat. Before driving, be sure to check the fol- lowing:• Periodically check that the floor mat is properly secured with the retaining clips. If you remove the fl
oor mat while clean-
ing the inside of you
r vehicle or for any
other reason, always
check the condition
of the floor mat afte
r it has been rein-
stalled.
• While the vehicle is stopped with theengine off, check that the floor mat is notinterfering with the pedals by depressingthe pedals fully.
Vehicle preparation before driving
WA R N I N G
Seat belts and seats Defrosters
BK0284300US.book 3 ページ 2019年5月23日 木曜日 午後12時22分
Page 159 of 253
Safe driving techniques 6-4 Driving safety
6
Check all the tires for heavy tread wear or uneven wear patterns.
Look for stones, nails,
glass, or other objects
stuck in the tread. Look
for any tread cuts or sidewall cracks. Check the wheel nuts for tightness, and the tires (including spare tire) for proper pressure.Replace your tires before they are heavily worn out. As your vehicle is equi
pped with a tire pres-
sure monitoring system, there is a risk of damage to the tire inflation pressure sensorswhen the tire is replaced on the rim. Tire replacement should, onl
y be performed by an
authorized Mitsubishi Motors dealer. Have someone watch while you turn all the exterior lights on and off. Also check the turnsignal indicators and hi
gh-beam indicators on
the instrument panel. Check the ground under the vehicle after parking overnight, for
fuel, water, oil, or
other leaks. Make sure
all the fluid levels are
correct. Also, if you
can smell fuel, you need
to find out why imme
diately and have it
fixed.
N00629200137
Even this vehicle’s safety equipment, andyour safest driving, cannot guarantee that youcan avoid an accident or injury. However, if you give extra attention to the following areas, you can better protect yourself and your passengers: Drive defensively. Be aware of traffic, road and weather c
onditions. Leave plenty
of stopping distance
between your vehicle
and the vehicle ahead. Before changing lanes, check your mir- rors, your blind spots, and use your turn- signal light. While driving, watch the behavior of other drivers, bicycl
ists, and pedestrians.
Always obey applicab
le laws and regula-
tions. Be a polite and alert driver. Alwaysleave room for unexpected events, such as sudden braking. If you plan to drive in another country, obey their vehicle re
gistration laws and
make sure you will be able to get the right fuel.
N00629400474
Check the battery. At the same time, check the terminals and wiring. During extremely cold weather, the battery willnot be as strong. Al
so, the battery power
level may drop because more power is used for cold starting and driving.Before driving the vehicle, check to see if the engine runs at the proper speed and if the headlights are as bright as normally. Charge or replace the battery if necessary. During extreme cold weather, it is possi-ble that a very low battery could freeze. Warm the engine sufficiently. After start- ing the engine, allow a short warm-uptime to distribute oil to all cylinders. Then drive your vehicle slowly. Stay at low speeds at first so that the man- ual transaxle oil or the automatic transaxle fluid has time to spread to all the lubrica- tion points.
Tires Lights Fluid leaks
Safe driving techniques
Driving during cold weather
WA R N I N G The battery gives off explosive hydrogen gas. Any spark or flame can cause the bat- tery to explode, which could cause seriousinjury or death. Always wear protecti
ve clothes and a face
mask when working wi
th your battery, or
let a skilled mechanic do it.
BK0284300US.book 4 ページ 2019年5月23日 木曜日 午後12時22分
Page 160 of 253
Braking
Driving safety 6-5
6
Manual transaxle can be harder to shift in cold weather conditions. This is normaland shifting will get ea
sier as the transaxle
warms up. Check the engine antifreeze. If there is not enough coolant because of a leak or from engine
overheating, add
Mitsubishi Motors Ge
nuine Super Long
Life Coolant Premium or equivalent. Please read this section in conjunction with the “Engine coolant” on page 9-7.
N00629500521
All parts of the brake system are critical to safety. Have the vehicle serviced by an autho- rized Mitsubishi Motors dealer or a repairfacility of your choice at regular intervals according to the “WARRANTY AND MAINTENANCE MANUAL”. Check the brake system while driving at a low speed immediately
after starting, espe-
cially when the brakes are wet, to confirm they work normally.A film of water can be formed on the brake discs or brake drums, and prevent normal braking after driving in heavy rain or throughlarge puddles, or after the vehicle is washed. If this occurs, dry the brakes out by driving slowly while lightly depressing the brakepedal. On snowy roads, ice can form on the braking system, making the brak
es less effective.
While driving in such conditions, pay closeattention to surrounding
vehicles and to the
condition of the road surface. From time to time, lightly depress the brake pedal andcheck how effective the brakes are. It is important to take
advantage of the engine
braking by downshifting while driving on steep downhill roads in order to prevent the brakes from overheating.
N00629601372
When parking on a hill, set the parking brake, and turn the front wheels toward the curb on a downhill, or away from the curb on an uphill.If necessary, apply chocks to the wheels. Place the gearshift lever into the “R” (Reverse) position when parking on a down- hill slope, into the 1st position when parking on an uphill slope. Be sure that the parking brake is firmly set when parked and that the selector lever is in the “P” (PARK) position. When parking on a hill, it is important to setthe parking brake before
moving the selector
lever to the “P” (PARK) position. This pre- vents loading the parking brake against the
WA R N I N G Never open the radiator cap when the radiator is hot. You could be seriously burned.
Braking When brakes are wet
When driving in cold weather When driving downhill
Parking Parking on a hill For vehicles equipped with man- ual transaxle For vehicles equipped with contin- uously variable transmission (CVT)
BK0284300US.book 5 ページ 2019年5月23日 木曜日 午後12時22分
Page 172 of 253
Automatic air conditioning Comfort controls 7-5
7
N00736901307
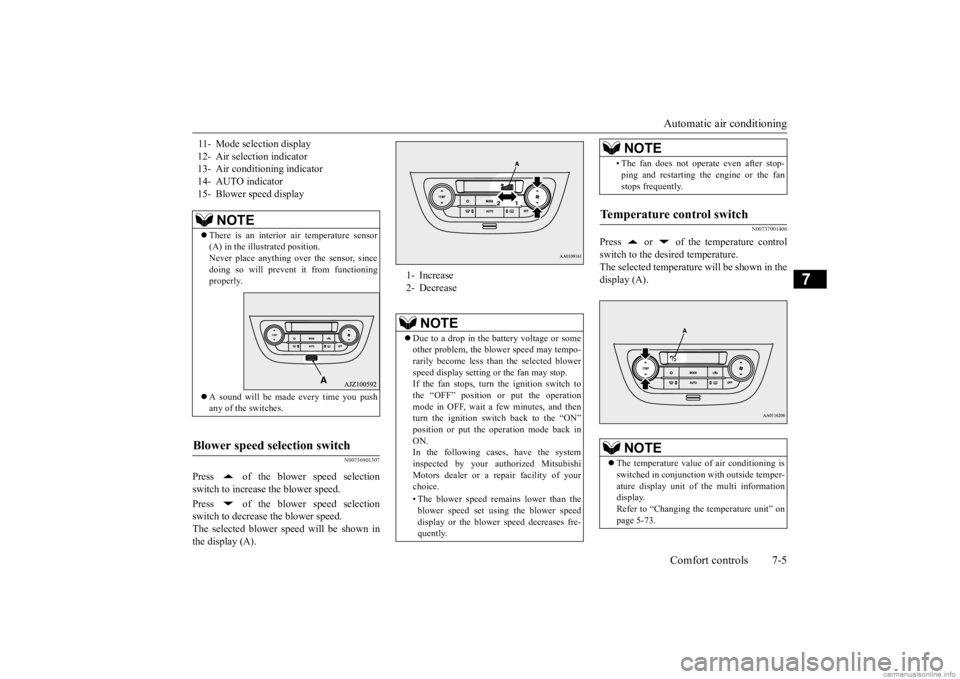
Press of the blower speed selection switch to increase the blower speed. Press of the blower speed selection switch to decrease the blower speed. The selected blower speed will be shown in the display (A).
N00737001406
Press or of the temperature controlswitch to the desired temperature.The selected temperature will be shown in the display (A).
11- Mode selection display 12- Air selecti
on indicator
13- Air conditioning indicator14- AUTO indicator 15- Blower speed display
NOTE
There is an interior air temperature sensor (A) in the illustrated position. Never place anything ove
r the sensor, since
doing so will prevent it from functioning properly. A sound will be made every time you push any of the switches.
Blower speed selection switch
1- Increase 2- Decrease
NOTE
Due to a drop in the battery voltage or some other problem, the blower speed may tempo-rarily become less than the selected blower speed display setting or the fan may stop. If the fan stops, turn the ignition switch tothe “OFF” position or put the operation mode in OFF, wait a
few minutes, and then
turn the ignition switch back to the “ON”position or put the ope
ration mode back in
ON. In the following cases, have the systeminspected by your authorized Mitsubishi Motors dealer or a repair facility of your choice. • The blower speed remains lower than the blower speed set using the blower speeddisplay or the blower
speed decreases fre-
quently.
• The fan does not opera
te even after stop-
ping and restarting the engine or the fanstops frequently.
Temperature control switch
NOTE
The temperature value
of air conditioning is
switched in conjunction
with outside temper-
ature display unit of the multi information display. Refer to “Changing the
temperature unit” on
page 5-73.NOTE
BK0284300US.book 5 ページ 2019年5月23日 木曜日 午後12時22分
Page 182 of 253
8
For emergenciesIf the vehicle breaks down ...............................................................8-2 If the operation mode ca
nnot be changed to OFF
(vehicles equipped with the F.A.S.T.-key) ...................................8-2Jump-starting the engine ..................................................................8-2 Engine overheating ..........................................................................8-4 Jack and tools ...................................................................................8-5How to change a tire ........................................................................8-6 Towing ...........................................................................................8-12 Operation under adverse driving conditions
...........
.........
.........
.....8-13
Fuel Pump Shut-off System ...........................................................8-15
BK0284300US.book 1 ページ 2019年5月23日 木曜日 午後12時22分
Page 183 of 253
If the vehicle breaks down 8-2 For emergencies
8
N00836300233
If your vehicle breaks down on the road, move to the shoulder and turn on the hazard warning flashers. If there is no shoulder, orthe shoulder is not safe, drive in the right lane slowly with the haza
rd lights flashing until
you come to a safe stopping place. Keep theflashers flashing. If the engine stops, there will be no power assist to the steering and brakes, making these difficult to use. The brake booster will not work, so the brakes will not grip well. The brake pedal will be harder to press than usual. Since there is no power steering assist, the steering wheel will be hard to turn.
Get help from your passengers, bystanders, etc. to push the vehicle
and move it to a safe
area.
N00860700117
If the operation mode
cannot be changed to
OFF, perform the following procedure. 1. Move the selector lever to the “P” (PARK) position, and then change the operation mode to OF
F. (For vehicles
with continuously variable transmission(CVT)) 2. One of the other causes could be low bat- tery voltage. If this occurs, the keylessentry system and the F.A.S.T.-key opera- tion will also not operate. Contact an authorized Mitsubish
i Motors dealer.
N00836401837
If the engine cannot be started because the battery is weak or de
ad, you can start it with
the battery from anothe
r vehicle using jumper
cables.
1. Take off any metal jewelry such as watch bands or bracelets th
at might create an
accidental electrical contact. 2. Position the vehicles close enoughtogether so that the jumper cables can reach, but be sure the vehicles aren’t touching each other.
If the vehicle breaks down If the engine stops/fails When the engine fails at the intersection
If the operation mode can- not be changed to OFF (vehicles equipped with the F.A.S.T.-key) Jump-starting the engine
WA R N I N G To reduce the risk of igniting flammable gas that may be emi
tted from the battery,
carefully read this section before jump-starting the vehicle. Do not try to start you
r vehicle by pushing
or towing. This can cause an accident resulting in serious
injury or death and
can damage the vehicle.NOTE
Do not use jumper cables if they have dam- age or corrosion.CAUTION Check the other vehicle.
It must have a 12-
volt battery. If the other system isn’t 12-volt,both systems can be damaged.
BK0284300US.book 2 ページ 2019年5月23日 木曜日 午後12時22分
Page 184 of 253
Jump-starting the engine For emergencies 8-3
8
3. You could be injured if the vehicles move. Set the parking brake firmly on each vehi-cle. Put an automatic transaxle or CVT in “P” (PARK) or a manual transaxle in “N” (Neutral).4. Turn the ignition switch to the “OFF” position or put the operation mode in OFF. 5. Make sure your batt
ery electrolyte is at
the proper level. (Refer to “Battery” on page 9-11.) 6. Connect one end of one jumper cable to the positive (+) terminal of the dis- charged battery (A),
and then connect the
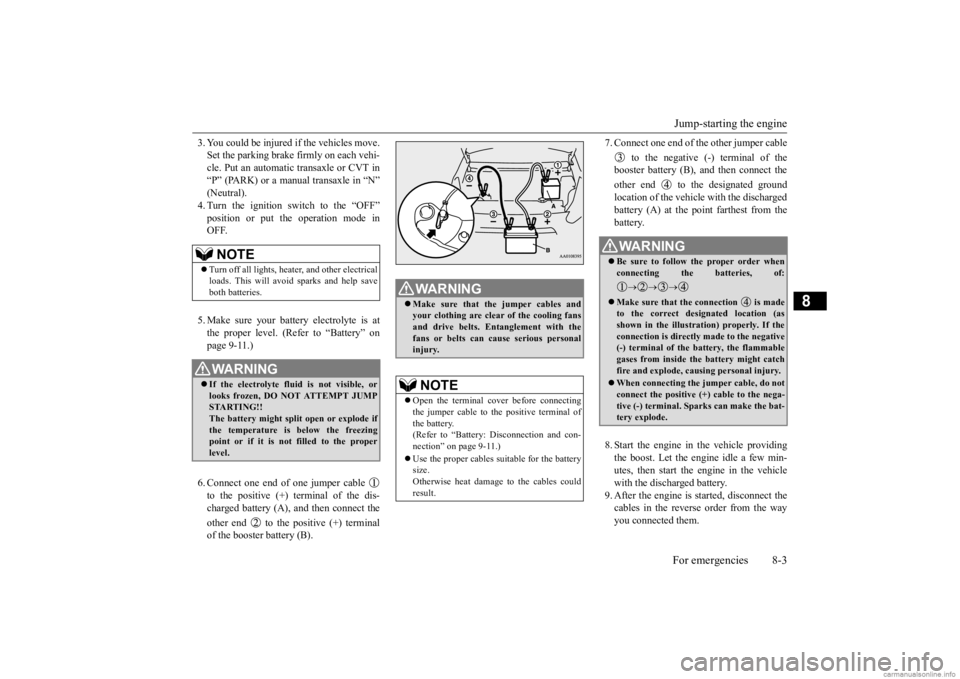
other end to the positive (+) terminal of the booster battery (B).
7. Connect one end of the other jumper cable
to the negative (-) terminal of the booster battery (B), a
nd then connect the
other end to the designated ground location of the vehicl
e with the discharged
battery (A) at the point farthest from the battery. 8. Start the engine in the vehicle providing the boost. Let the engine idle a few min- utes, then start the engine in the vehiclewith the discharged battery. 9. After the engine is
started, disconnect the
cables in the reverse order from the wayyou connected them.
NOTE
Turn off all lights, heat
er, and other electrical
loads. This will avoid sparks and help save both batteries.WA R N I N G If the electrolyte flui
d is not visible, or
looks frozen, DO NOT ATTEMPT JUMP STARTING!! The battery might split open or explode ifthe temperature is below the freezing point or if it is not filled to the proper level.
WA R N I N G Make sure that the jumper cables and your clothing are clear of the cooling fansand drive belts. Entanglement with the fans or belts can ca
use serious personal
injury.NOTE
Open the terminal cover before connecting the jumper cable to the positive terminal ofthe battery. (Refer to “Battery:
Disconnection and con-
nection” on page 9-11.) Use the proper cables suitable for the battery size.Otherwise heat damage
to the cables could
result.
WA R N I N G Be sure to follow the proper order when connecting the batteries, of:
Make sure that the connection is made to the correct designated location (as shown in the illustration) properly. If theconnection is directly made to the negative (-) terminal of the battery, the flammable gases from inside the battery might catchfire and explode, caus
ing personal injury.
When connecting the jumper cable, do not connect the positive (+) cable to the nega- tive (-) terminal. Sparks can make the bat- tery explode.
BK0284300US.book 3 ページ 2019年5月23日 木曜日 午後12時22分
Page 185 of 253
Engine overheating 8-4 For emergencies
8
If you drive your vehicl
e with a low battery
charge after the engine has been started byusing jumper cables, th
e engine may misfire.
This can cause the anti-lock braking system warning light to blink on
and off. This is only
due to the low battery voltage. It is not a problem with the brake system. If this hap- pens, fully charge the battery and ensure the charging system is operating properly.
N00836501418
If the high coolant temperature warning lightilluminates while the e
ngine is running, the
engine may be overhea
ting. If this happens:
1. Stop the vehicle in a safe place. Turn on the hazard warning flashers. 2. With the engine still running, carefully raise the engine hood to vent the enginecompartment. 3. Check that the cooling fan is running. If the fan is not turning, stop the engineimmediately and contact an authorized Mitsubishi Motors dealer or a repair facil- ity of your choice for assistance.
4. If you see steam or spray coming from under the hood, turn off the engine. 5. If you do not see steam or spray coming from under the hood, leave the engine onuntil the high coolant
temperature warn-
ing light goes off. After the high coolant temperature warning light has gone off,you can start driving again. If the high coolant temperature warning light stays on, turn off the engine. 6. When you do not see any more steam or spray, open the hood. Look for obviousleaks, such as a split radiator hose. Be careful as components will be hot. Any leak source must be repaired.
Charging the battery by using an external battery charger
WA R N I N G Always remove the
battery from your
vehicle when the battery is charged by an external battery charger. Keep sparks, cigarette
s, and flames away
from the battery because the battery couldexplode. Keep your work area well vented when charging or using
the battery in an
enclosed space. Remove all the caps before charging the battery. Electrolyte (battery acid) is made of corro- sive diluted sulfuric acid. If electrolyte comes in contact with your hands, eyes,clothes, or the pain
ted surface of your
vehicle, thoroughly
flush with water. If
electrolyte gets in your eyes, flush themimmediately and thor
oughly with water,
and get prompt medical attention. Always wear protective clothing and gog- gles when working near the battery. Keep the battery out of the reach of chil- dren.
As your vehicle has anti-lock brakes Engine overheating
WA R N I N G To avoid personal injury, keep hands, hair, jewelry and clothes aw
ay from the cooling
fan. The cooling fan ca
n start at any time.
WA R N I N GBefore raising the en
gine hood, check to
see if there is steam or spray coming fromunder the hood. Steam or spray coming from an overheated en
gine could seriously
scald you.Do not open the hood until there is no steam or spray.
BK0284300US.book 4 ページ 2019年5月23日 木曜日 午後12時22分
Page 186 of 253
Jack and tools
For emergencies 8-5
8
7. If there is no obvious leak source, check the coolant level in th
e engine coolant res-
ervoir. If there is none, or if it is too low, slowly add coolant. 8. If the engine coolant reservoir needs cool-ant, you will probably also need to add coolant to the radiator. Do not loosen or remove the radiator cap until the enginehas cooled down. 9. Start the engine, and slowly add coolant, up to the bottom of the filler neck. Useplain water if you have to (and replace it with the right coolant as soon as possible).
10. Replace the radiator
cap and tighten it
fully. Check the coolant temperature warning light. You can start driving again when the high coolant temperature warn-ing light does not come on.
11. Have the system inspected by your autho-
rized Mitsubishi Motors
dealer or a repair
facility of your choice.
N00836601464
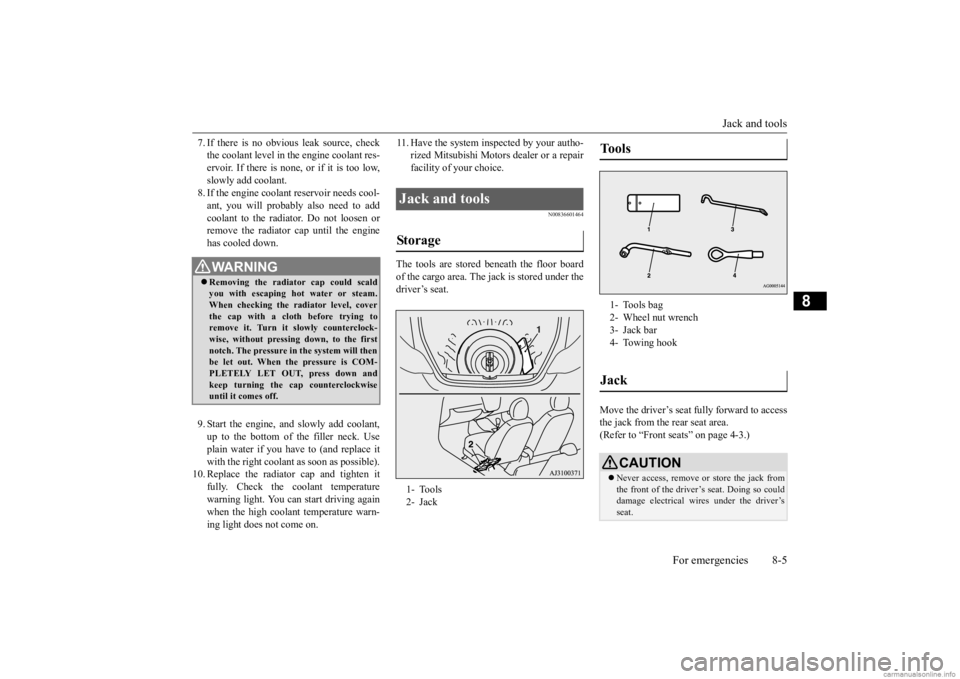
The tools are stored beneath the floor boardof the cargo area. The jack is stored under the driver’s seat.
Move the driver’s seat fully forward to access the jack from the rear seat area.(Refer to “Front seats” on page 4-3.)
WA R N I N G Removing the radiat
or cap could scald
you with escaping hot water or steam. When checking the radiator level, cover the cap with a cloth before trying toremove it. Turn it slowly counterclock- wise, without pressing down, to the first notch. The pressure in the system will thenbe let out. When the pressure is COM- PLETELY LET OUT, press down and keep turning the cap counterclockwiseuntil it comes off.
Jack and tools Storage 1- Tools 2- Jack
Tools 1- Tools bag 2- Wheel nut wrench 3- Jack bar4- Towing hookJack
CAUTION Never access, remove or store the jack from the front of the driver’s seat. Doing so could damage electr
ical wires under the driver’s
seat.
BK0284300US.book 5 ページ 2019年5月23日 木曜日 午後12時22分