Eco button MITSUBISHI MIRAGE G4 2020 Owner's Manual (in English)
[x] Cancel search | Manufacturer: MITSUBISHI, Model Year: 2020, Model line: MIRAGE G4, Model: MITSUBISHI MIRAGE G4 2020Pages: 253, PDF Size: 36.39 MB
Page 26 of 253
California Perchlorate Materials Requirements
General information 3-7
3
vehicle has a selecti
on of Mitsubishi Motors
authorized accessories to choose from to tai-lor your new vehicle to your own personal preference. Your Mitsubishi Motors dealer’s Parts Manager has in
formation on various
audio systems,
protection items, as well as
interior and exterior ac
cessories available for
your specific model.
N00300100017
Certain components of this vehicle, such asairbag modules, seat belt pretensioners, and button cell batteries, ma
y contain perchlorate
materials.Special handling may apply. For additional information, see www.d
tsc.ca.gov/hazardous-
waste/perchlorate.
N00302700033
This vehicle is equipped with an event datarecorder (EDR).The main purpose of an EDR is to record, in certain crash or near
crash-like situations,
such as an airbag deployment or hitting aroad obstacle, data that
will assist in under-
standing how a vehicl
e’s systems performed.
The EDR is designed to
record data related to
vehicle dynamics and safety systems for ashort period of time,
typically 30 seconds or
less. The EDR in this vehicle is designed to record such data as: How various systems in your vehicle were operating; Whether or not the driver and front pas- senger safety belts
were buckled/fastened;
How far (if at all) the driver was depress- ing the accelerator and/or brake pedal;and, How fast the vehicle was traveling.
These data can help provide a better under- standing of the circumstances in whichcrashes and injuries occur.
To read data recorded
by an EDR, special
equipment is requi
red, and access to the vehi-
cle or the EDR is needed. In addition to the vehicle manufacturer, ot
her parties, such as
law enforcement, that have the special equip-ment, can read the information if they have access to the vehicle or the EDR.
California Perchlorate Materials Requirements Event Data Recording
NOTE
EDR data are recorded by your vehicle only if a non-trivial crash si
tuation occurs; no data
are recorded by the EDR under normal driv- ing conditions and no personal data (e.g.,name, gender, age, a
nd crash location) are
recorded. However, ot
her parties, such as
law enforcement, could combine the EDRdata with the type of
personally identifying
data routinely acquire
d during a crash inves-
tigation.
BK0284300US.book 7 ページ 2019年5月23日 木曜日 午後12時22分
Page 37 of 253
Seat belts 4-10 Seat and restraint systems
4
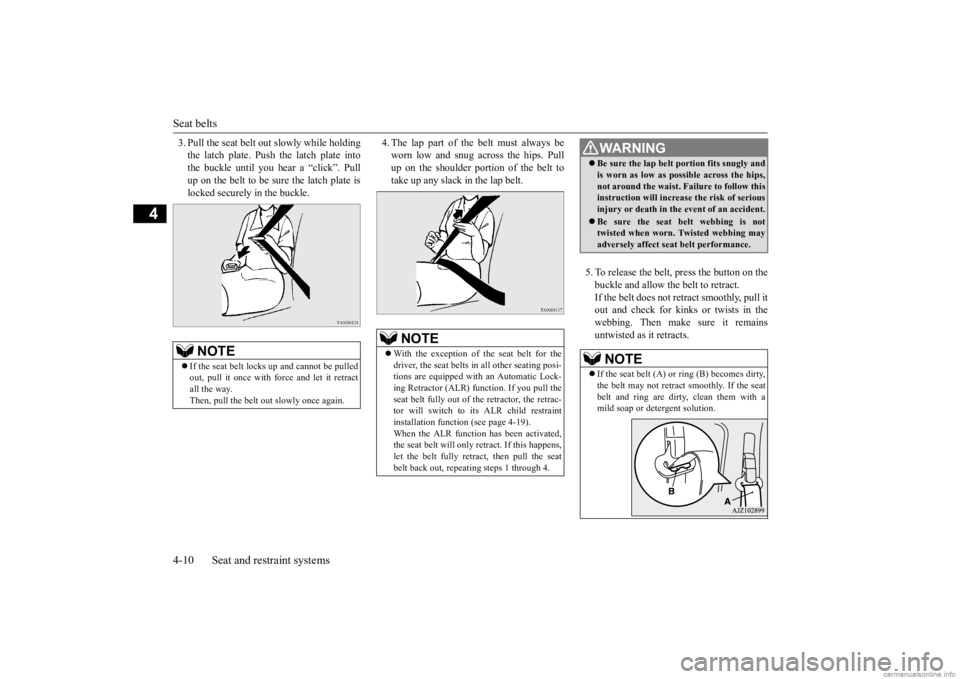
3. Pull the seat belt out slowly while holding the latch plate. Push the latch plate intothe buckle until you hear a “click”. Pull up on the belt to be su
re the latch plate is
locked securely in the buckle.
4. The lap part of the belt must always be worn low and snug across the hips. Pullup on the shoulder portion of the belt to take up any slack
in the lap belt.
5. To release the belt,
press the button on the
buckle and allow the belt to retract. If the belt does not retract smoothly, pull it out and check for kinks or twists in thewebbing. Then make sure it remains untwisted as it retracts.
NOTE
If the seat belt locks
up and cannot be pulled
out, pull it once with force and let it retract all the way. Then, pull the belt out
slowly once again.
NOTE
With the exception of the seat belt for the driver, the seat belts in all other seating posi-tions are equipped with an Automatic Lock- ing Retractor (ALR) function. If you pull the seat belt fully out of th
e retractor, the retrac-
tor will switch to its ALR child restraint installation function
(see page 4-19).
When the ALR function has been activated,the seat belt will only re
tract. If this happens,
let the belt fully retract, then pull the seat belt back out, repeating steps 1 through 4.
WA R N I N G Be sure the lap belt portion fits snugly and is worn as low as possible across the hips,not around the waist. Failure to follow thisinstruction will increase the risk of serious injury or death in the
event of an accident.
Be sure the seat belt webbing is not twisted when worn. Twisted webbing may adversely affect seat belt performance.NOTE
If the seat belt (A) or
ring (B) becomes dirty,
the belt may not retrac
t smoothly. If the seat
belt and ring are dirty, clean them with a mild soap or detergent solution.
BK0284300US.book 10 ページ 2019年5月23日 木曜日 午後12時22分
Page 71 of 253
Keyless entry system (if so equipped) 5-6 Features and controls
5
N00509002057
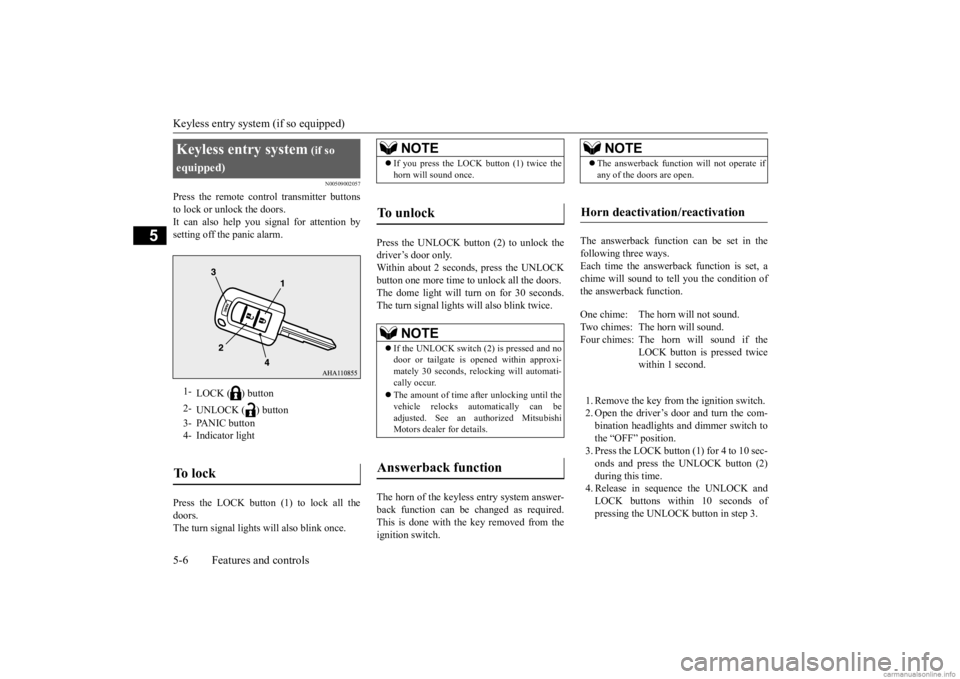
Press the remote control transmitter buttons to lock or unlock the doors. It can also help you
signal for attention by
setting off the panic alarm. Press the LOCK button (1) to lock all the doors.The turn signal lights will also blink once.
Press the UNLOCK button (2) to unlock the driver’s door only.Within about 2 seconds, press the UNLOCK button one more time to
unlock all the doors.
The dome light will turn on for 30 seconds.The turn signal lights will also blink twice. The horn of the keyless entry system answer- back function can be
changed as required.
This is done with the key removed from the ignition switch.
The answerback function can be set in the following three ways.Each time the answerback function is set, a chime will sound to
tell you the condition of
the answerback function. 1. Remove the key from
the ignition switch.
2. Open the driver’s door and turn the com- bination headlights a
nd dimmer switch to
the “OFF” position.3. Press the LOCK button (1) for 4 to 10 sec- onds and press the UNLOCK button (2) during this time.4. Release in sequence the UNLOCK and LOCK buttons within 10 seconds of pressing the UNLOCK button in step 3.
Keyless entry system
(if so
equipped)1-
LOCK ( ) button
2-
UNLOCK ( ) button
3- PANIC button 4- Indicator lightTo l o c k
NOTE
If you press the LOCK button (1) twice the horn will sound once.
To unlock
NOTE
If the UNLOCK switch
(2) is pressed and no
door or tailgate is
opened within approxi-
mately 30 seconds, relocking will automati- cally occur. The amount of time af
ter unlocking until the
vehicle relocks automatically can beadjusted. See an authorized Mitsubishi Motors dealer for details.
Answerback function
NOTE
The answerback functi
on will not operate if
any of the doors are open.
Horn deactivation/reactivation
One chime: The horn will not sound. Two chimes: The horn will sound.Four chimes: The hor
n will sound if the
LOCK button is pressed twice within 1 second.
BK0284300US.book 6 ページ 2019年5月23日 木曜日 午後12時22分
Page 72 of 253
Keyless entry system (if so equipped)
Features and controls 5-7
5
The turn signal lights answerback function can be changed. If you want to change the answerback func- tion, please contact an
authorized Mitsubishi
Motors dealer.
N00543700034
If you are near your vehicle and feel threat- ened, you may acti-vate the alarm to call attention as follows: 1. Press the PANIC button (3) for more than 1 second. 2. The headlights will blink on and off and the horn will sound intermittently forabout 3 minutes. 3. To turn off the alarm, press any button on the remote control transmitter.
N00543801090
Only remote control transmitters pro-grammed with the vehicle’s electronics can lock or unlock all doors.
If you lose the remote control transmitter, you can order a remote c
ontrol transmitter from
your authorized Mitsubi
shi Motors dealer by
referring to the key number. To prevent vehicle theft, the ID code for theremote control transmitter must be changed. Take your vehicle and all remote control transmitters to your authorized MitsubishiMotors dealer to have your ID code changed.
N00543900078
To add a remote control transmitter, you mustalready have 1 registered remote controltransmitter. Registering the ID code can be done by your authorized Mitsubishi Motors dealer.Take your vehicle and any remaining keys to your authorized Mitsub
ishi Motors dealer.
N00546101153
Your keyless entry system operates on a radio frequency subject to
Federal Communica-
tions Commission (FCC) Rules. This device complies with Part 15 of FCC Rules.Operation is subject to the following two con- ditions. This device may not
cause harmful inter-
ference. This device must ac
cept any interference
received, including interference that may cause undesired operation of this device.
N00544101263
Turn signal lights deactiva- tion/reactivation
Using the panic alarm
Replacement remote control transmitters
Additional remote control transmitters
NOTE
You are provided with 2 remote control transmitters, but you may register up to 4remote control transmitters.
General information
WA R N I N G Changes or modifica
tions not expressly
approved by the party responsible for compliance could void the user’s authority to operate the equipment.
Procedure for replacing the remote control transmitter bat-tery
WA R N I N G Do not swallow a coin type battery.• This product contains coin type battery. If a coin type battery is swallowed, it cancause severe internal
burns and can lead
to death. There have been cases where a swallowedbattery has caused severe internal burns in just 2 hours.
BK0284300US.book 7 ページ 2019年5月23日 木曜日 午後12時22分
Page 73 of 253
Keyless entry system (if so equipped) 5-8 Features and controls
5
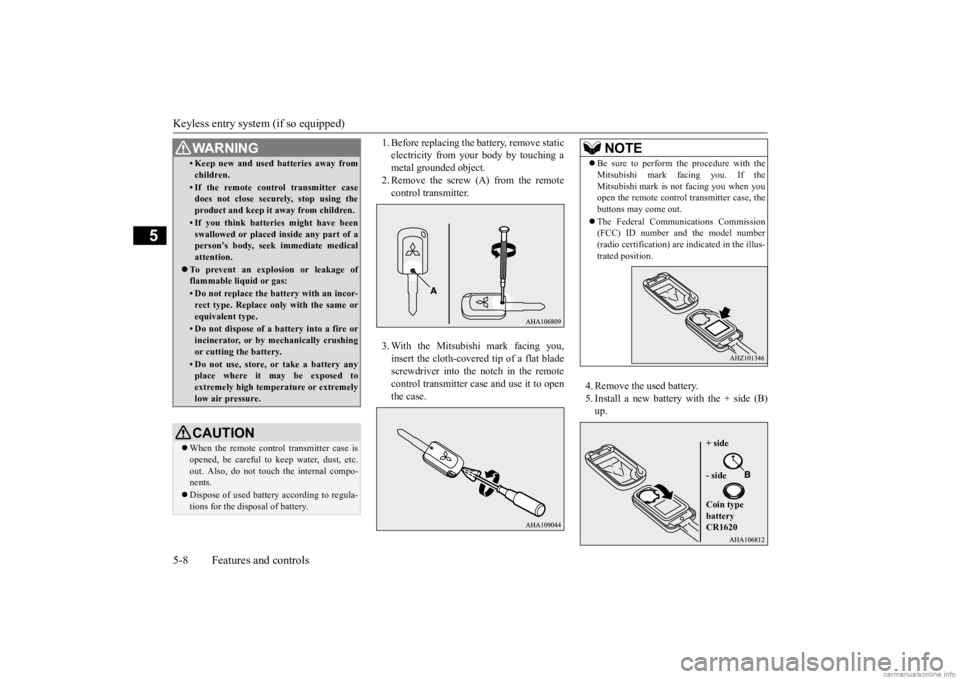
1. Before replacing the battery, remove static electricity from your body by touching ametal grounded object. 2. Remove the screw (A) from the remote control transmitter. 3. With the Mitsubishi mark facing you, insert the cloth-covere
d tip of a flat blade
screwdriver into the notch in the remotecontrol transmitter case and use it to open the case.
4. Remove the used battery. 5. Install a new battery with the + side (B) up.
• Keep new and used batteries away from children.• If the remote control transmitter case does not close securely, stop using the product and keep it away from children.• If you think batter
ies might have been
swallowed or placed in
side any part of a
person’s body, seek immediate medical attention.
To prevent an explosion or leakage of flammable liquid or gas:• Do not replace the battery with an incor-rect type. Replace only with the same or equivalent type.• Do not dispose of a battery into a fire orincinerator, or by mechanically crushingor cutting the battery.• Do not use, store, or take a battery anyplace where it may be exposed to extremely high temperature or extremely low air pressure.CAUTION When the remote control transmitter case is opened, be careful to
keep water, dust, etc.
out. Also, do not touch the internal compo-nents. Dispose of used battery according to regula- tions for the disposal of battery.WA R N I N G
NOTE
Be sure to perform the procedure with the Mitsubishi mark fa
cing you. If the
Mitsubishi mark is not facing you when youopen the remote control
transmitter case, the
buttons may come out. The Federal Communications Commission (FCC) ID number and the model number (radio certification) are
indicated in the illus-
trated position.
+ side - side Coin type battery CR1620
BK0284300US.book 8 ページ 2019年5月23日 木曜日 午後12時22分
Page 86 of 253
Free-hand Advanced Securi
ty Transmitter (F.A.S.T.-key) (if so equipped)
Features and controls 5-21
5
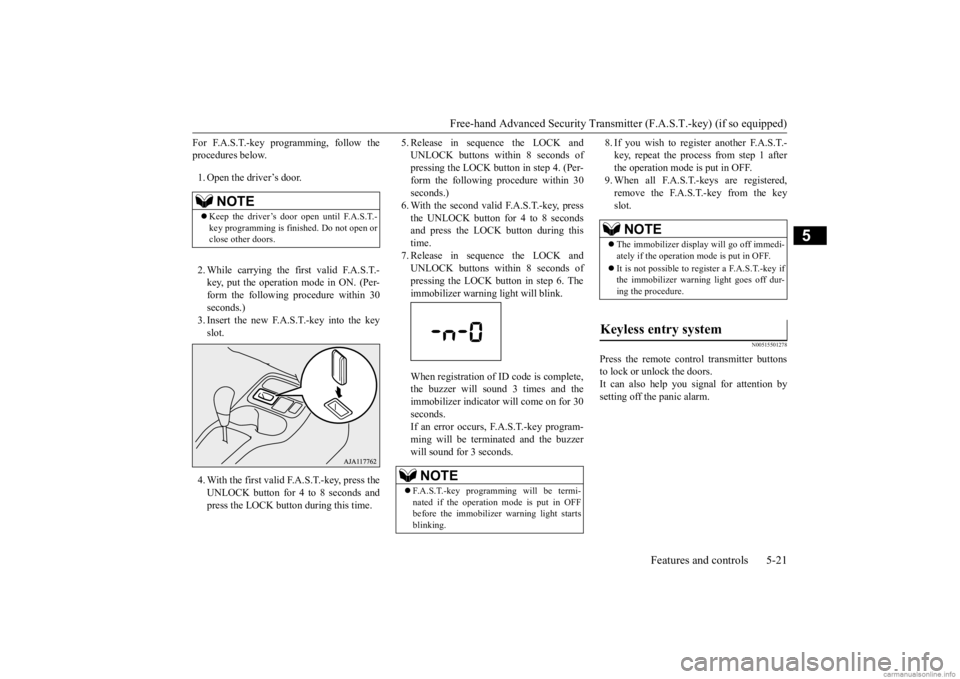
For F.A.S.T.-key programming, follow the procedures below. 1. Open the driver’s door. 2. While carrying the fi
rst valid F.A.S.T.-
key, put the operation mode in ON. (Per-form the following procedure within 30 seconds.) 3. Insert the new F.A.S.T.-key into the keyslot. 4. With the first valid F.A.S.T.-key, press the UNLOCK button for 4 to 8 seconds and press the LOCK button during this time.
5. Release in sequence the LOCK and UNLOCK buttons within 8 seconds ofpressing the LOCK button in step 4. (Per- form the following procedure within 30 seconds.)6. With the second valid F.A.S.T.-key, press the UNLOCK button for 4 to 8 seconds and press the LOCK button during thistime. 7. Release in sequence the LOCK and UNLOCK buttons within 8 seconds of pressing the LOCK button in step 6. The immobilizer warning light will blink. When registration of ID code is complete, the buzzer will sound 3 times and theimmobilizer indicator will come on for 30 seconds. If an error occurs, F.A.S.T.-key program-ming will be terminated and the buzzer will sound for 3 seconds.
8. If you wish to register another F.A.S.T.- key, repeat the proc
ess from step 1 after
the operation mode is put in OFF. 9. When all F.A.S.T.-keys are registered, remove the F.A.S.T.-key from the keyslot.
N00515501278
Press the remote control transmitter buttonsto lock or unlock the doors.It can also help you signal for attention by setting off the panic alarm.
NOTE
Keep the driver’s door open until F.A.S.T.- key programming is finished. Do not open or close other doors.
NOTE
F.A.S.T.-key programming will be termi- nated if the operation
mode is put in OFF
before the immobilize
r warning light starts
blinking.
NOTE
The immobilizer displa
y will go off immedi-
ately if the operation mode is put in OFF. It is not possible to re
gister a F.A.S.T.-key if
the immobilizer warni
ng light goes off dur-
ing the procedure.
Keyless entry system
BK0284300US.book 21 ページ 2019年5月23日 木曜日 午後12時22分
Page 87 of 253
Free-hand Advanced
Security Transmitter (F.A.S
.T.-key) (if so equipped)
5-22 Features and controls
5
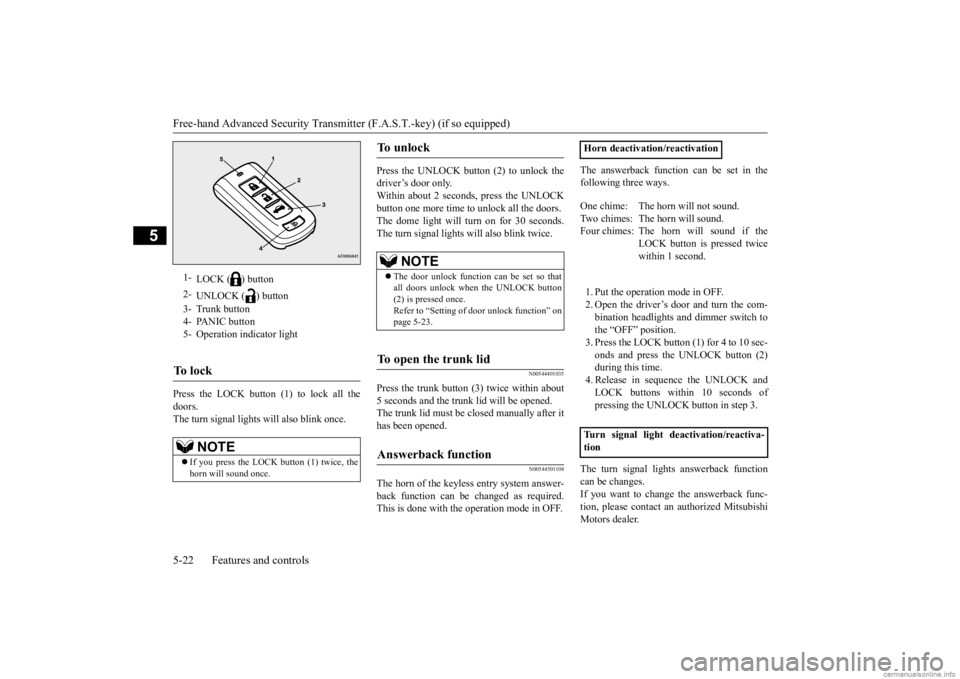
Press the LOCK button (1) to lock all the doors.The turn signal lights will also blink once.
Press the UNLOCK button (2) to unlock the driver’s door only. Within about 2 seconds, press the UNLOCK button one more time to
unlock all the doors.
The dome light will turn on for 30 seconds. The turn signal lights will also blink twice.
N00544401035
Press the trunk button (3) twice within about 5 seconds and the tru
nk lid will be opened.
The trunk lid must be closed manually after it has been opened.
N00544501108
The horn of the keyless entry system answer-back function can be
changed as required.
This is done with the operation mode in OFF.
The answerback function can be set in the following three ways. 1. Put the operation mode in OFF. 2. Open the driver’s door and turn the com- bination headlights a
nd dimmer switch to
the “OFF” position. 3. Press the LOCK button (1) for 4 to 10 sec- onds and press the UNLOCK button (2)during this time. 4. Release in sequence the UNLOCK and LOCK buttons within 10 seconds ofpressing the UNLOCK button in step 3.
The turn signal lights answerback function can be changes.If you want to change the answerback func- tion, please contact an
authorized Mitsubishi
Motors dealer.
1-
LOCK ( ) button
2-
UNLOCK ( ) button
3- Trunk button 4- PANIC button 5- Operation indicator lightTo l o c k
NOTE
If you press the LOCK button (1) twice, the horn will sound once.
To u n l o c k
NOTE
The door unlock function
can be set so that
all doors unlock when the UNLOCK button (2) is pressed once.Refer to “Setting of
door unlock function” on
page 5-23.
To open the trunk lid
Answerback function
Horn deactivation/reactivation One chime: The horn will not sound. Two chimes: The horn will sound.Four chimes: The hor
n will sound if the
LOCK button is pressed twice within 1 second.
Turn signal light
deactivation/reactiva-
tion
BK0284300US.book 22 ページ 2019年5月23日 木曜日 午後12時22分
Page 88 of 253
Free-hand Advanced Securi
ty Transmitter (F.A.S.T.-key) (if so equipped)
Features and controls 5-23
5
The buzzer answerback function can be turned ON or OFF as required.
N00544601138
The door unlock function can be set to thefollowing two conditions.Each time the door unlock function is set, a chime will sound to tell you the condition of the door unlock function. 1. Put the operation mode in OFF. 2. Open the driver’s door and turn the com-bination headlights and dimmer switch to the “OFF” position. 3. Press the LOCK button (1) for 4 to 10 sec-onds and press the UNLOCK button (2) during this time. 4. Release in sequence the LOCK andUNLOCK buttons within 10 seconds of pressing the LOCK button in step 3.
N00544701171
If you are near your vehicle and feel threat-ened, you can activate the alarm to call atten- tion as follows: 1. Press the PANIC button (4) for more than 1 second. 2. The headlights will blink on and off and the horn will sound intermittently forabout 3 minutes. 3. To turn off the alarm, press any button on the remote control transmitter.
N00562001118
Your F.A.S.T.-key operates on a radio fre-quency subject to
Federal Communications
Commission (FCC) Rules. This device com- plies with Part 15 of FCC Rules.Operation is subject to the following two con- ditions. This device may not
cause harmful inter-
ference. This device must ac
cept any interference
received, including interference that may cause undesired operation of this device.
Buzzer deactivation/reactivationSetting of door unlock function
Number of chimes
Condition
One chime All doors unlock Two chimes Driver’s door unlock only
Using the panic alarm
NOTE
The indicator light (5) comes on each time a button is pressed. The F.A.S.T.-key can be used from about 40 feet (12 m) away. However, this distance may change if your vehicle is near a TV transmitting tower, a power station, or aradio station. If the following conditi
ons are observed after
pressing the LOCK (1) or UNLOCK (2) but- ton on the remote control transmitter, the buttery in the F.A.S.T.-key may need to bereplaced. • The doors cannot be locked or unlocked.• The panic alarm cannot be operated. • The indicator light
(5) is dim or does not
come on.
If you lose your F.A.S.T.-key, please contact an authorized Mitsubishi Motors dealer for areplacement. If you wish to obtain an additional F.A.S.T.- key, please contact an
authorized Mitsubishi
Motors dealer. A maximum of four F.A.S.T.- key can be programme
d for your vehicle.
To use the new remote control transmitters, it is necessary to register the key with the elec- tronic immobilizer and
keyless entry system.
Refer to “Electronic immobilizer (Anti-theft starting system): Customer F.A.S.T.-key pro- gramming” on page 5-20.
General information
NOTE
BK0284300US.book 23 ページ 2019年5月23日 木曜日 午後12時22分
Page 94 of 253
Inside emergency trunk lid release
Features and controls 5-29
5
Press the trunk button (Vehicles with F.A.S.T.-key). (See “Free-hand Advanced Security Transmitter
(F.A.S.T.-key)” on page
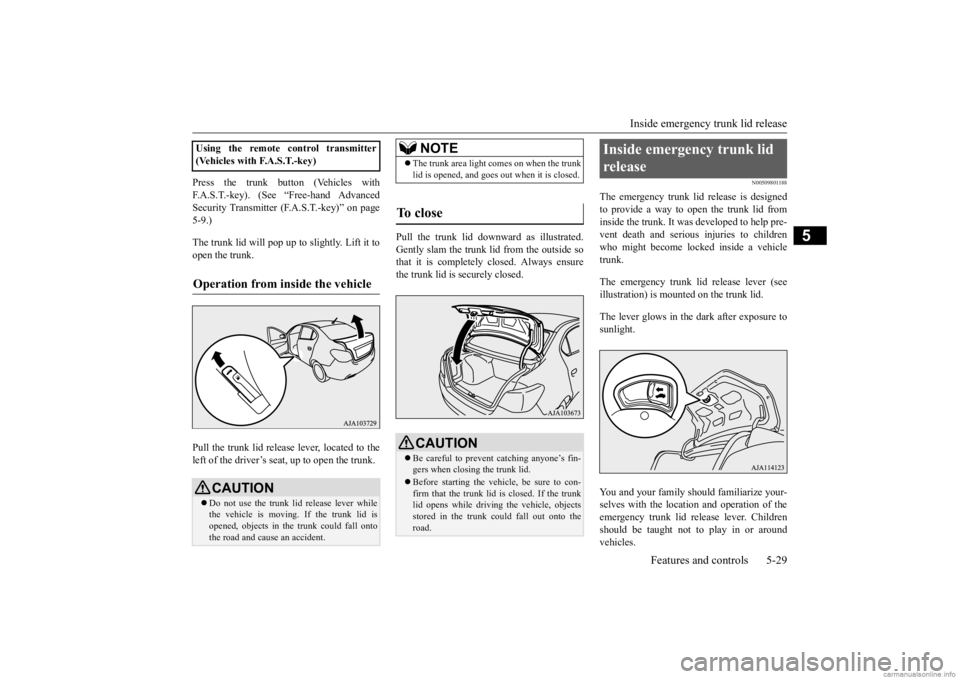
5-9.) The trunk lid will pop up to slightly. Lift it to open the trunk. Pull the trunk lid release
lever, located to the
left of the driver’s seat, up to open the trunk.
Pull the trunk lid downward as illustrated. Gently slam the trunk lid from the outside so that it is completely closed. Always ensurethe trunk lid is securely closed.
N00509801188
The emergency trunk lid release is designed to provide a way to open the trunk lid from inside the trunk. It was developed to help pre-vent death and serious
injuries to children
who might become locked inside a vehicle trunk. The emergency trunk lid
release lever (see
illustration) is mounted on the trunk lid. The lever glows in the dark after exposure to sunlight. You and your family should familiarize your- selves with the location and operation of theemergency trunk lid release lever. Children should be taught not to play in or around vehicles.
Using the remote co
ntrol transmitter
(Vehicles with F.A.S.T.-key)Operation from inside the vehicle
CAUTION Do not use the trunk lid release lever while the vehicle is moving. If the trunk lid is opened, objects in th
e trunk could fall onto
the road and cause an accident.
NOTE
The trunk area light comes on when the trunk lid is opened, and goes out
when it is closed.
To close
CAUTIONBe careful to prevent
catching anyone’s fin-
gers when closing the trunk lid. Before starting the vehi
cle, be sure to con-
firm that the trunk lid is closed. If the trunk lid opens while driving the vehicle, objects stored in the trunk could fall out onto theroad.
Inside emergency trunk lid release
BK0284300US.book 29 ページ 2019年5月23日 木曜日 午後12時22分