Fuel gauge MITSUBISHI MONTERO 1987 1.G Workshop Manual
[x] Cancel search | Manufacturer: MITSUBISHI, Model Year: 1987, Model line: MONTERO, Model: MITSUBISHI MONTERO 1987 1.GPages: 284, PDF Size: 14.74 MB
Page 21 of 284
8-1
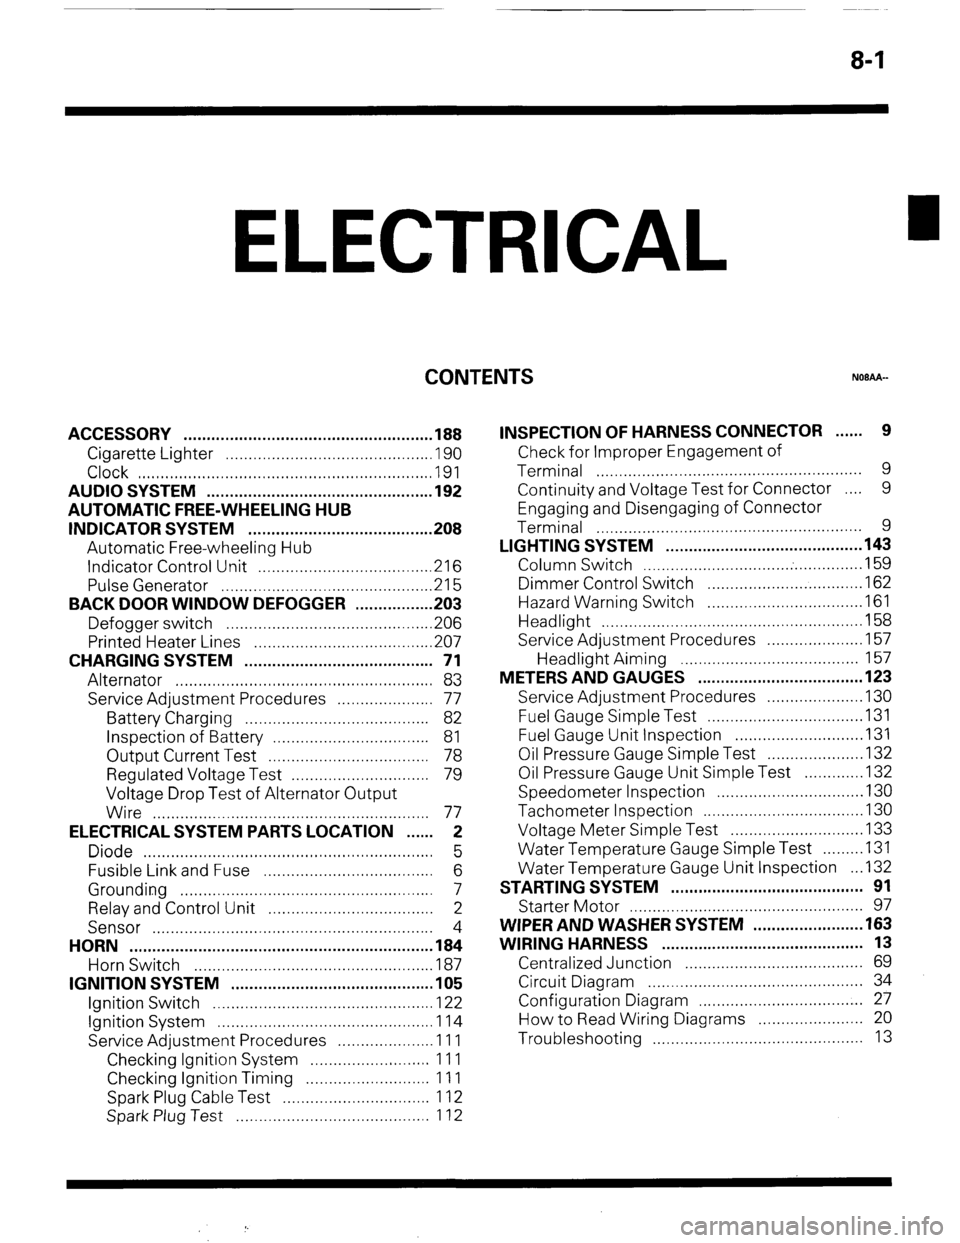
ELECTRICAL
CONTENTS
NOBAA-
ACCESSORY ......................................................
188
Cigarette Lighter ............................................
,190
Clock ...............................................................
,191
AUDIO SYSTEM ................................................
.192
AUTOMATIC FREE-WHEELING HUB
INDICATOR SYSTEM ........................................
208
Automatic Free-wheeling Hub
Indicator Control Unit
..................................... ,216
Pulse Generator ..............................................
215
BACK DOOR WINDOW DEFOGGER
................ .203
Defogger switch ............................................
,206
Printed Heater Lines
...................................... ,207
CHARGING SYSTEM .........................................
71
Alternator ........................................................
83
Service Adjustment Procedures
..................... 77
Battery Charging ........................................
82
Inspection of Battery ..................................
81
Output Current Test ...................................
78
Regulated Voltage Test ..............................
79
Voltage Drop Test of Alternator Output
Wire ............................................................
77
ELECTRICAL SYSTEM PARTS LOCATION
...... 2
Diode ...............................................................
5
Fusible Link and Fuse
..................................... 6
Grounding .......................................................
7
Relay and Control Unit ....................................
2
Sensor .............................................................
4
HORN ..................................................................
184
Horn Switch
.................................................... 187
IGNITION SYSTEM ............................................
105
Ignition Switch
................................................ 122
Ignition System ...............................................
1 14
Service Adjustment Procedures
.................... .l 1 1
Checking Ignition System
..........................
11 1
Checking Ignition Timing
...........................
11 1
Spark Plug Cable Test
................................
1 12
Spark Plug Test
.......................................... 1 12 INSPECTION OF HARNESS CONNECTOR ...... 9
Check for Improper Engagement of
Terminal .......................................................... 9
Continuity and Voltage Test for Connector .... 9
Engaging and Disengaging of Connector
Terminal ..........................................................
9
LIGHTING SYSTEM ........................................... 143
Column Switch
................................ .
.............. .I59
Dimmer Control Switch
................................. .I62
Hazard Warning Switch
................................. .I61
Headlight ........................................................ ,158
Service Adjustment Procedures
.................... .I57
Headlight Aiming .......................................
157
METERS AND GAUGES .................................... 123
Service Adjustment Procedures
.................... .I30
Fuel Gauge Simple Test ................................. .I31
Fuel Gauge Unit Inspection ........................... .I31
Oil Pressure Gauge Simple Test
.................... .I32
Oil Pressure Gauge Unit Simple Test
............ ,132
Speedometer Inspection
............................... .I30
Tachometer Inspection .................................. ,130
Voltage Meter Simple Test
............................ .I33
Water Temperature Gauge Simple Test
....... ..I3 1
Water Temperature Gauge Unit Inspection
. ..I3 2
STARTING SYSTEM .......................................... 91
Starter Motor ............ ....................................... 97
WIPER AND WASHER SYSTEM
....................... .163
WIRING HARNESS ............................................ 13
Centralized Junction ....................................... 69
Circuit Diagram ............................................... 34
Configuration Diagram .................................... 27
How to Read Wiring Diagrams ....................... 20
Troubleshooting .............................................. 13
Page 51 of 284
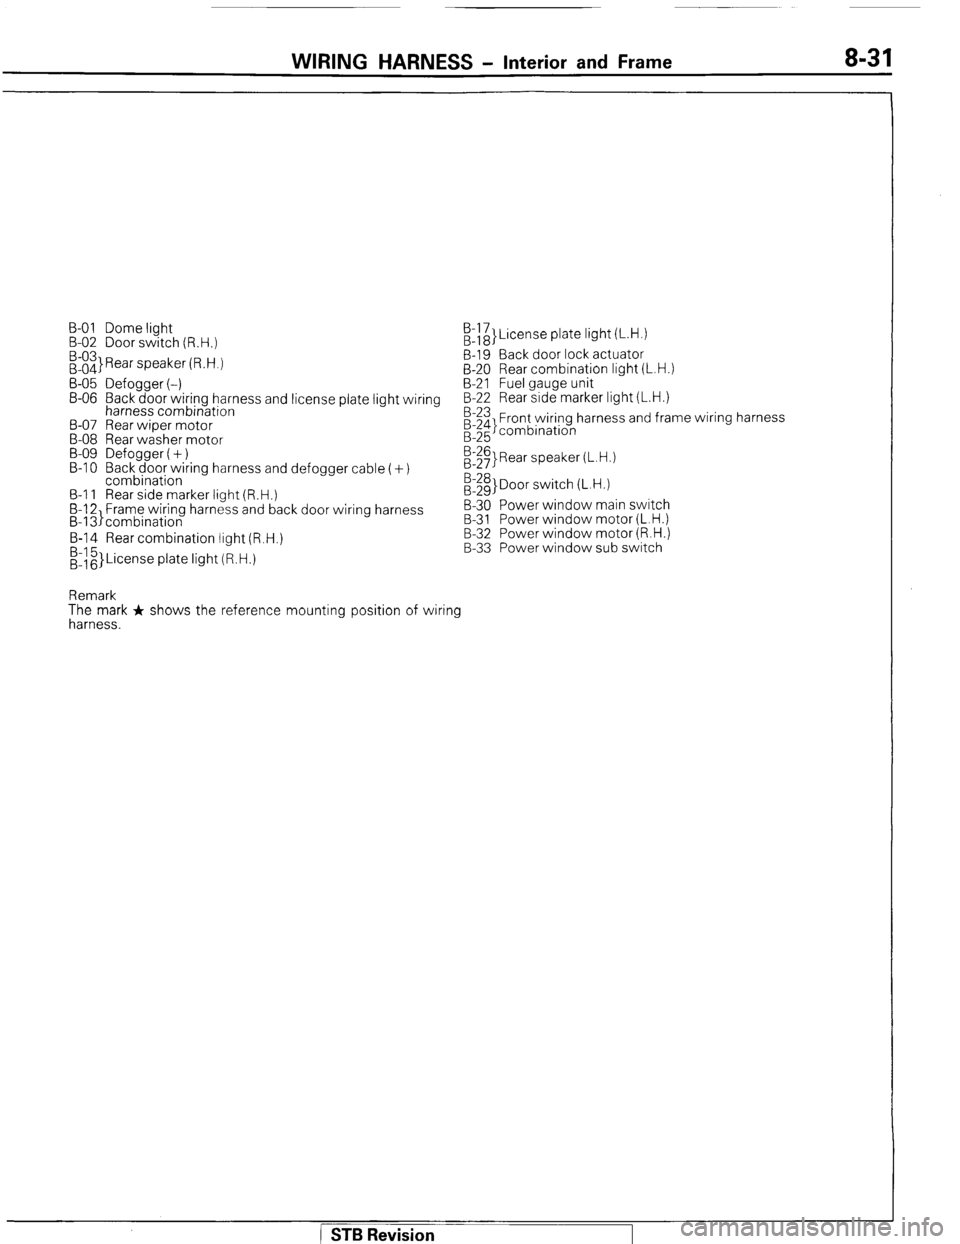
WIRING HARNESS - Interior and Frame 8-31
B-01 Dome light
B-02 Door switch (R.H.)
:::3 Rear speaker (R.H.) /&}License plate light (L.H.)
B-19 Back door lock actuator
B-20 Rear combination light (L.H.)
B-05 Defogger (-) B-21 Fuel gauge unit
B-06 Back door wiring harness and license plate light wiring B-22 Rear side marker light (L.H.)
harness combination
B-07 Rear wiper motor
B-08 Rear washer motor
B-09 Defogger (+)
B-l 0 Back door wiring harness and defogger cable (+)
combination
B-l 1 Rear side marker light (R.H.)
B-12 Frame wiring harness and back door wiring harness
B-13)combination B-23 Front wiring harness and frame wiring harness
;:g combination
E$ Rear speaker (L.H.)
:::g> Door switch (L.H.)
B-30 Power window main switch
B-31 Power window motor (L.H.)
B-14 Rear combination light (R.H.)
&z}License plate light (R.H.) B-32 Power window motor (R.H.)
B-33 Power window sub switch
Remark
The mark + shows the reference mounting position of wiring
harness.
STB Revision
Page 73 of 284
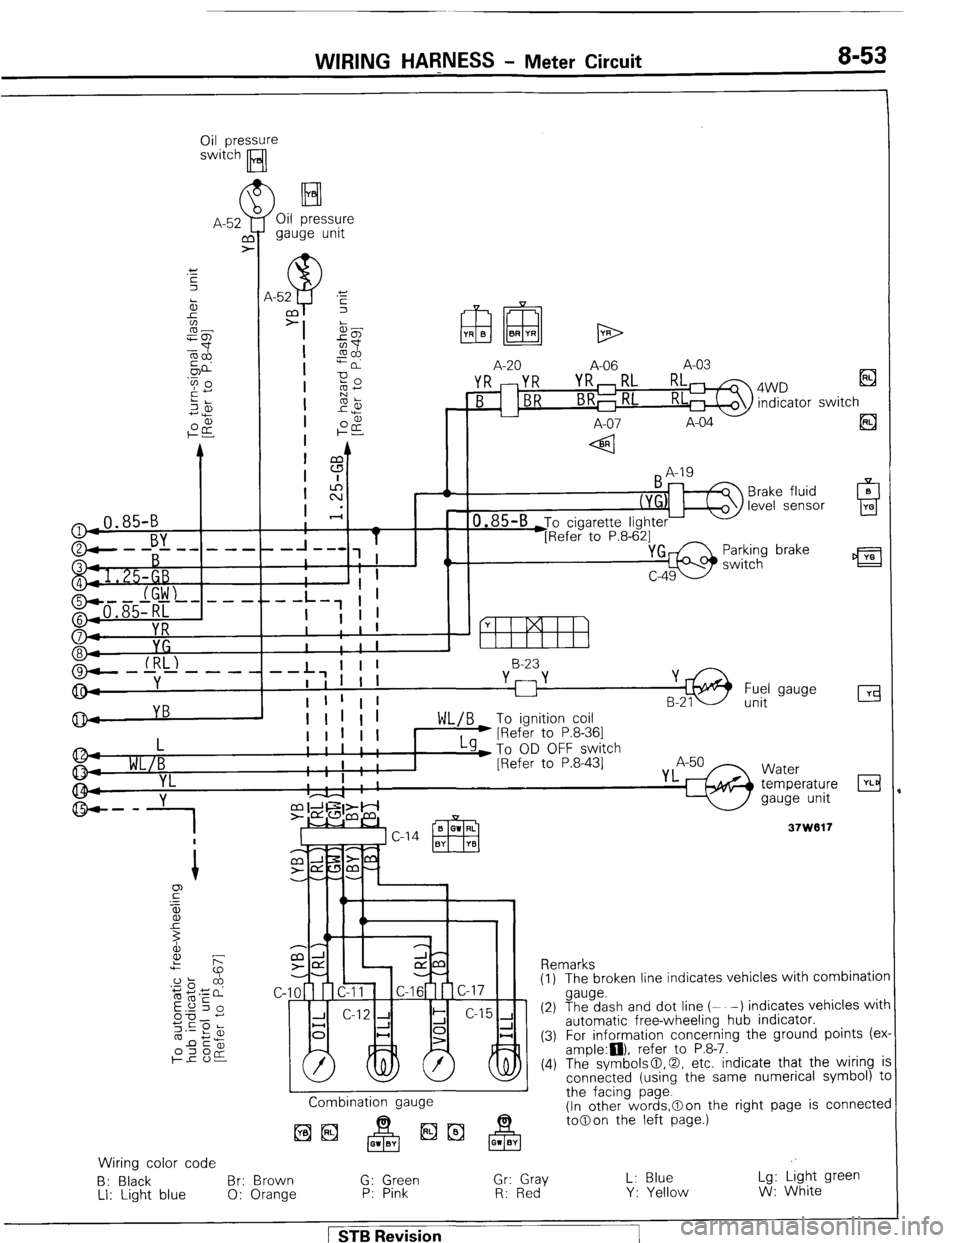
WIRING HAFNESS - Meter Circuit 8-53
O&y-ssure
[Eal
* - -,,- - - - -
YB
> El Oil pressure
gauge unit
ElxQ YR B BR YR
I.+
A-20
A-06 A-03
4WD Ei
indicator switch
A-07 A-04 I r-
’ fs A
I I
I
E
1 ,’
-I T
-- m-w
I ? I
I I ’
k-1 1 I
.- -
I
I ' 1
I I
I I I I 4
0.85-B Jo
cigarette lighter
[Refer to P.8-621 Brake fluid
level sensor
Parking brake
switch
L, I I 1 B-23
-- I , I I I
I !
Fuel gauge
unit
Water
temperature
gauge unit
37W617
les with combinatior
(2) %?zgdeash and dot line (- -) indicates vehicles wit1
automatic free-wheeling hub indicator.
(3) For information concerning the ground points (er
ample:n), refer to P.8-7.
(4) The symbols@,@, etc. indicate that the wiring i
connected (using the same numerical symbol) tl
Combination gauge the facing page.
(In other words,Oon the right page is connecter
to@on the left page.)
Wiring color code
B: Black Br: Brown G: Green Gr: Gray L: Blue Lg: Light green
LI: Light blue 0: Orange P: Pink R: Red Y: Yellow W: White
1 STB Revision
Page 90 of 284
WIRING HARNESS - Centralized Junction
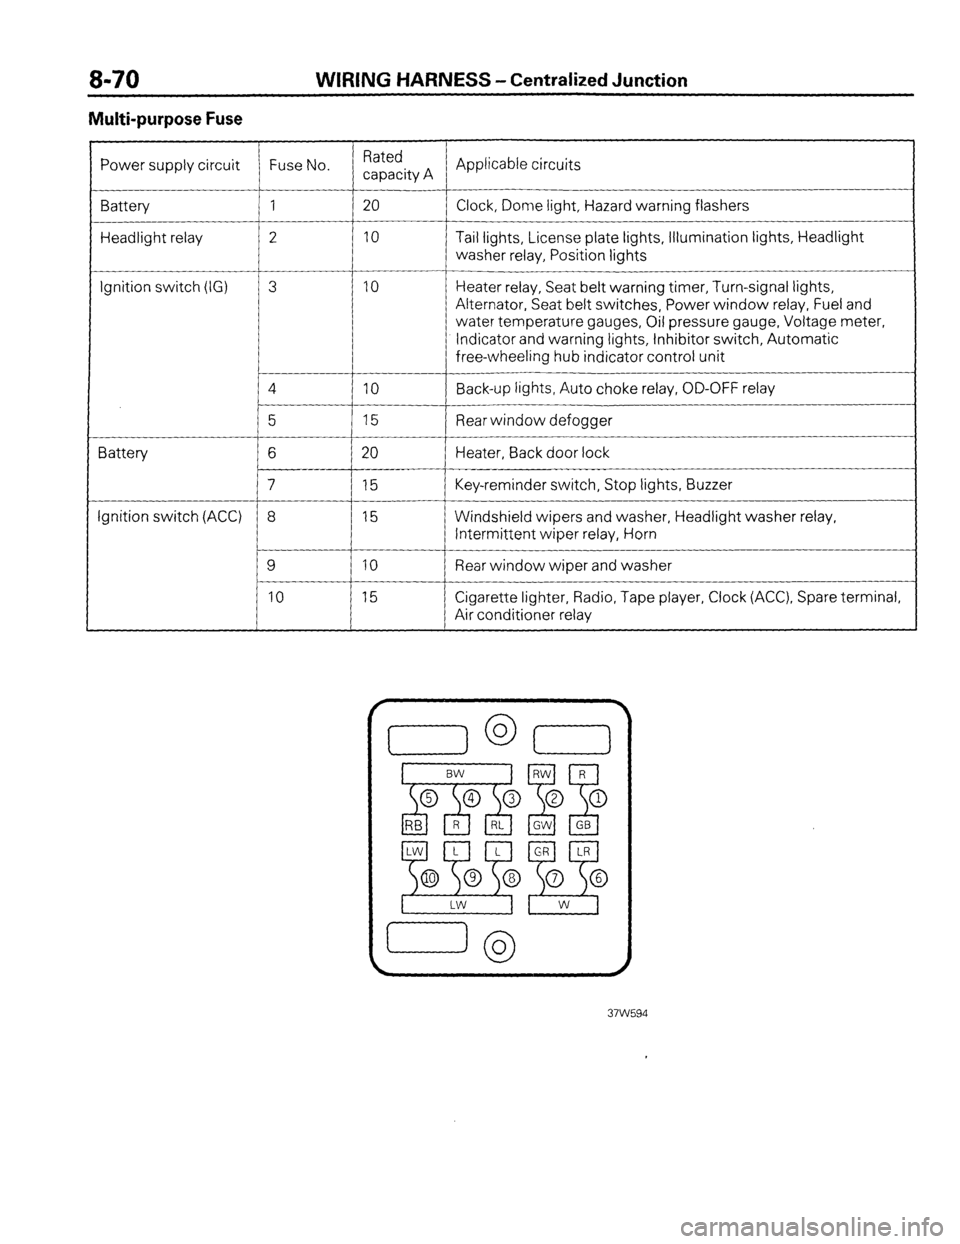
Multi-purpose Fuse
Power supply circuit Fuse No. Rated
capacity A Applicable circuits
Battery 1 20
Clock, Dome light, Hazard warning flashers
Headlight relay 2 10 Tail lights, License plate lights, Illumination lights, Headlight
washer relay, Position lights
__-
Ignition switch (IG) 3 10 Heater relay, Seat belt warning timer, Turn-signal lights,
Alternator, Seat belt switches, Power window relay, Fuel and
water temperature gauges, Oil pressure gauge, Voltage meter,
Indicator and warning lights, Inhibitor switch, Automatic
free-wheeling hub indicator control unit
4
IO Back-up lights, Auto choke relay, OD-OFF relay
__-
5 15 Rear window defogger
Battery 6 20 Heater, Back door lock
7 15 Key-reminder switch, Stop lights, Buzzer
Ignition switch (ACC) 8 15 Windshield wipers and washer, Headlight washer relay,
Intermittent wiper relay, Horn
9 10 Rear window wiper and washer
10 15 Cigarette lighter, Radio, Tape player, Clock (ACC), Spare terminal,
Air conditioner relay
Page 143 of 284
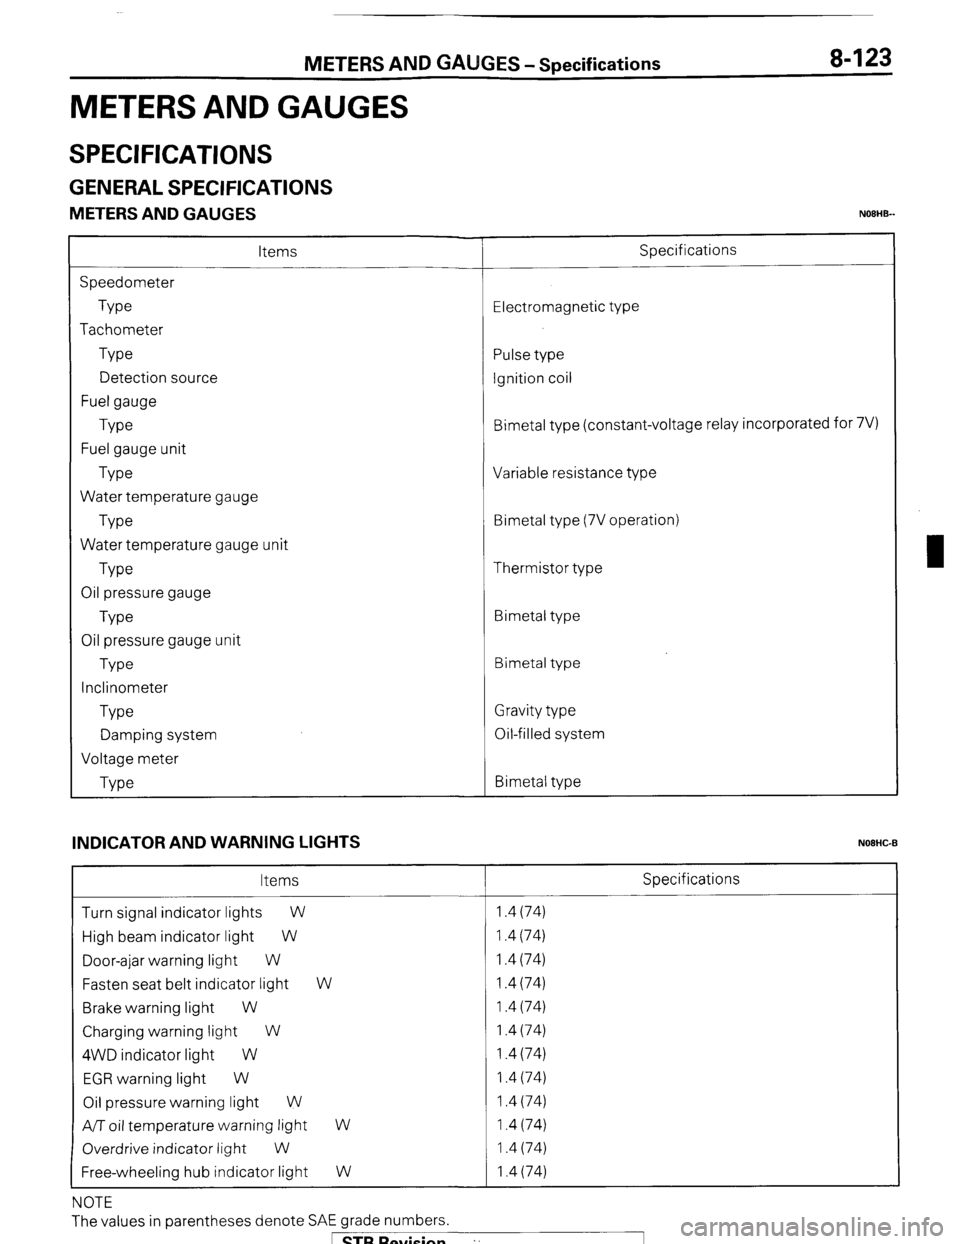
METERS AND GAUGES-Specifications
METERS AND GAUGES
8-123
SPECIFICATIONS
GENERAL SPECIFICATIONS
METERS AND GAUGES NOEHB-
Items
Speedometer
Type
Tachometer
Type
Detection source
Fuel gauge
Type
Fuel gauge unit
Type
Water temperature gauge
Type
Water temperature gauge unit
Type
Oil pressure gauge
Type
Oil pressure gauge unit
Type
Inclinometer
Type
Damping system
Voltage meter
Type Specifications
Electromagnetic type
Pulse type
Ignition coil
Bimetal type (constant-voltage relay incorporated for 7V)
Variable resistance type
Bimetal type (7V operation)
Thermistor type
Bimetal type
Bimetal type
Gravity type
Oil-filled system
Bimetal type
INDICATOR AND WARNING LIGHTS
NOEHC-B
Items Specifications
Turn signal indicator lights
W 1.4 (74)
High beam indicator light W 1.4 (74)
Door-ajar warning light W 1.4 (74)
Fasten seat belt indicator light W 1.4 (74)
Brake warning light W 1.4 (74)
Charging warning light W 1.4 (74)
4WD indicator light W 1.4 (74)
EGR warning light W 1.4 (74)
Oil pressure warning light W 1.4 (74)
A/T oil temperature warning light
W 1.4 (74)
Overdrive indicator light
W 1.4 (74)
Free-wheeling hub indicator light W 1.4 (74)
NOTE
The values in parentheses denote SAE grade numbers.
1 STB Revision ”
Page 144 of 284
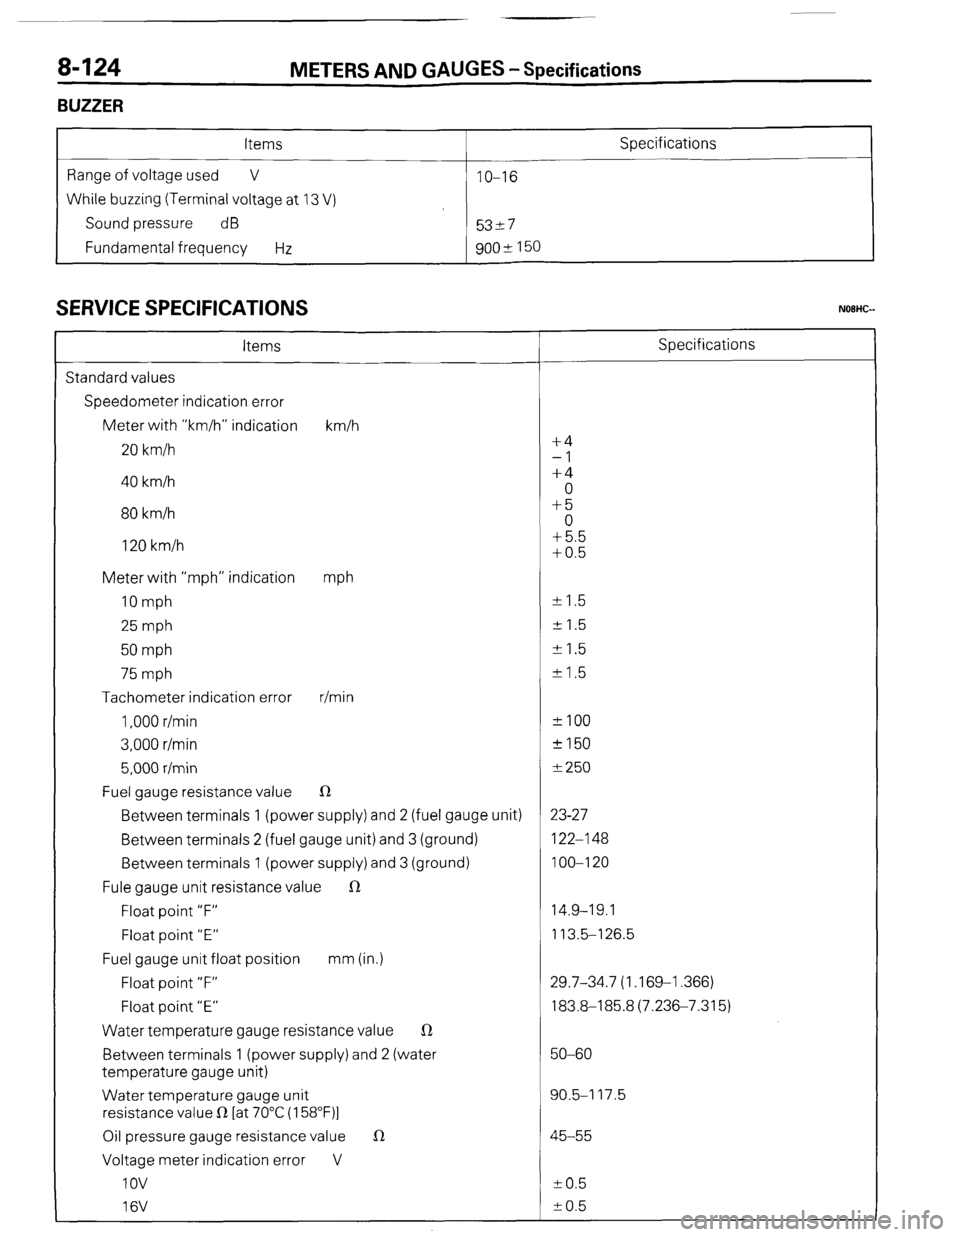
8-124
BUZZER METERS AND
GAUGES - Specifications
Items
Range of voltage used V
While buzzing (Terminal voltage at 13 V)
Sound pressure dB
Fundamental frequency Hz IO-16
53-7
goo* 150 Specifications
SERVICE SPECIFICATIONS
Items Specifications
Standard values
Speedometer indication error
Meter with “km/h” indication km/h
20 km/h f4
-1
40 km/h +4
0
80 km/h +5
0
120 km/h +5.5
+0.5
Meter with “mph” indication
mph
10 mph +- 1.5
25 mph + 1.5
50 mph +I.5
75 mph k 1.5
Tachometer indication error r/min
1,000 r/min *IO0
3,000 r/min +150
5,000 r/min f 250
Fuel gauge resistance value R
Between terminals 1 (power supply) and 2 (fuel gauge unit) 23-27
Between terminals 2 (fuel gauge unit) and 3 (ground) 122-l 48
Between terminals 1 (power supply) and 3 (ground) 100-l 20
Fule gauge unit resistance value R
Float point “F” 14.9-19.1
Float point “E” 113.5-l 26.5
Fuel gauge unit float position mm (in.)
Float point “F” 29.7-34.7 (1.169-l .366)
Float point “E” 183.8-185.8(7.236-7.315)
Water temperature gauge resistance value R
Between terminals 1 (power supply) and 2 (water 50-60
temperature gauge unit)
Water temperature gauge unit 90.5-I 17.5
resistance value R [at 70°C (158”F)l
Oil pressure gauge resistance value 1R 45-55
Voltage meter indication error V
IOV to.5
16V k 0.5
( ST6 Revision
-7
Page 145 of 284
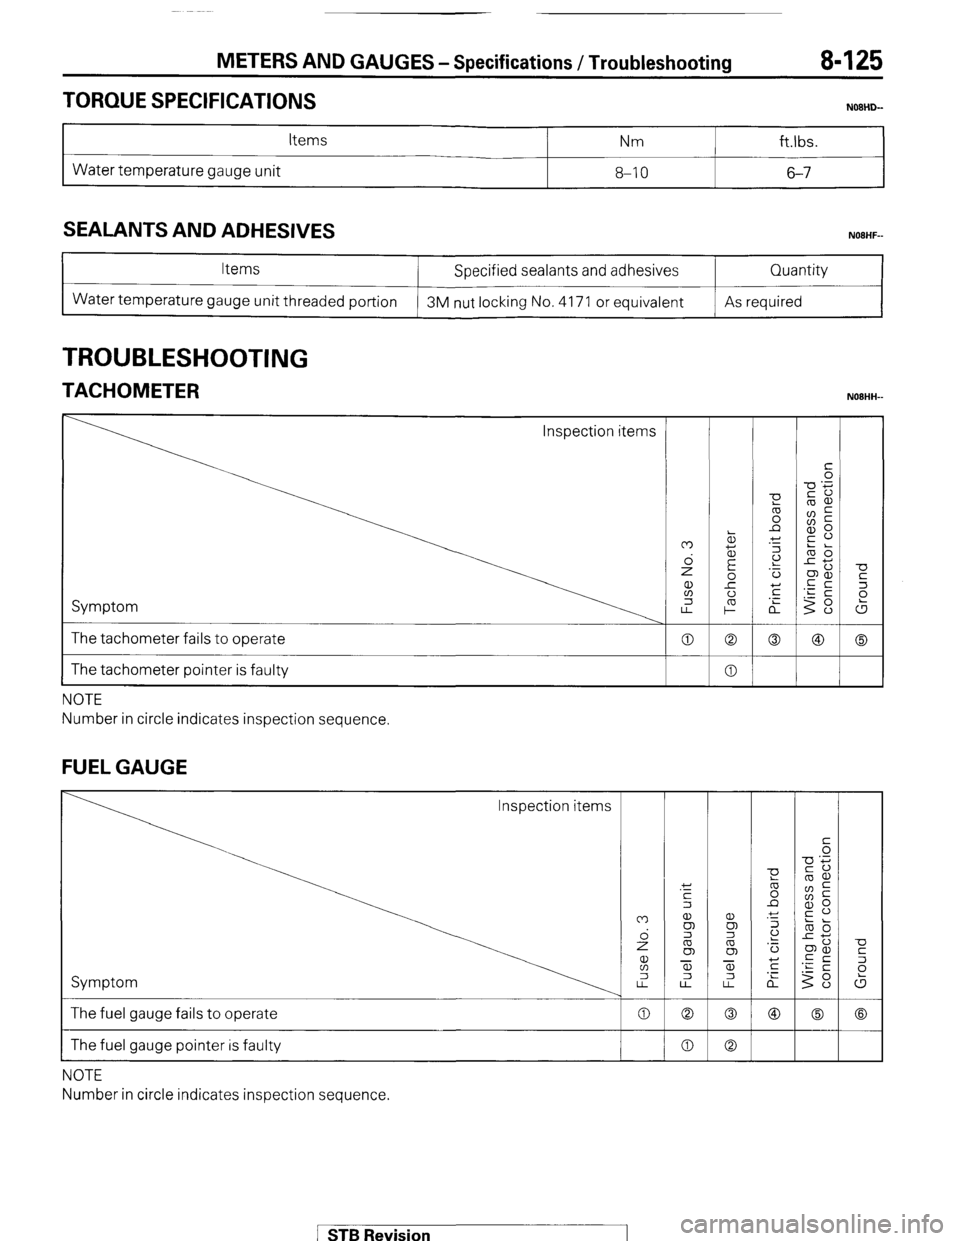
METERS AND GAUGES-Specifications /Troubleshooting 8425
TORQUE SPECIFICATIONS
Items Nm ft.lbs.
Water temperature gauge unit 8-10 6-7
SEALANTS AND ADHESIVES
Items
Water temperature gauge unit threaded portion Specified sealants and adhesives
3M nut locking No. 4171 or equivalent Quantity
As required
TROUBLESHOOTING
TACHOMETER NOBHH-
Inspection items
Symptom
The tachometer fails to operate
I The tachometer pointer is faulty
NOTE
Number in circle indicates inspection sequence.
FUEL GAUGE
Inspection items
Symptom
The fuel gauge fails to operate
The fuel gauge pointer is faulty
NOTE
Number in circle indicates inspection sequence.
1 STB Revision
Page 149 of 284
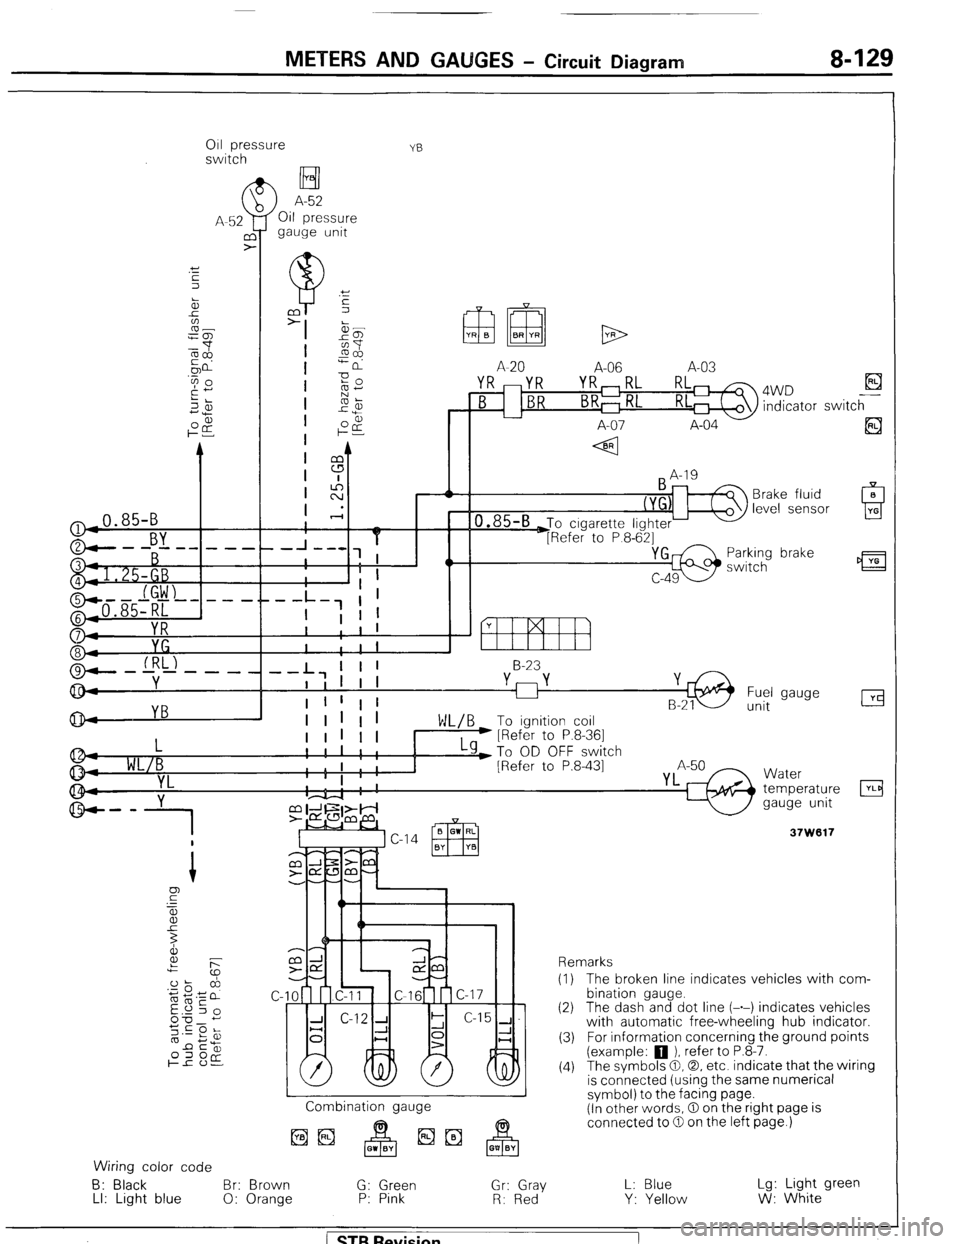
METERS AND GAUGES - Circuit Diagram 8-129
011 pressure
switch YB
H I
>
A-52
Oil pressure
gauge unit
(
A-52
UY
>
-0.85-B
r.., !
YB
A-20 A-06 A-03
YR mYR YR,RL RL 4WD El B indicator switch
-- L7 I I 1 8-23
I I I I I
I 1 !
Fuel 1 1 gauge
unit
L
WL/B
YL
g-- y
1
I
I I I I I I LY)T~ OD OFF switch
1 1 I
I ' ; [Refer to P.8-431 I I
I . . I
'4 8.
Combination gauge
Wiring color code
6: Black Br: Brown G: Green Gr: Gray
LI: Light blue 0: Orange P: Pink
R: Red
Y Water
temperature
gauge unit
Remarks
(I) The broken line indicates vehicles with com-
bination gauge.
(2) The dash and dot line (-.-) indicates vehicles
with automatic free-wheeling hub indicator.
(3) For information concerning the ground points
(example: 0 ). refer to P.8-7.
(4) The symbols @I,@, etc. indicate that the wiring
is connected (using the same numerical
symbol) to the facing page.
(In other words, 0 on the right page is
connected to 0 on the left page.)
L: Blue
Y: Yellow Lg: Light green
W: White
/ STB Revision
Page 151 of 284
METERS AND GAUGES - Service Adiustment Procedures 8-131
r
(harness side) 16W834
Stopper (upper)
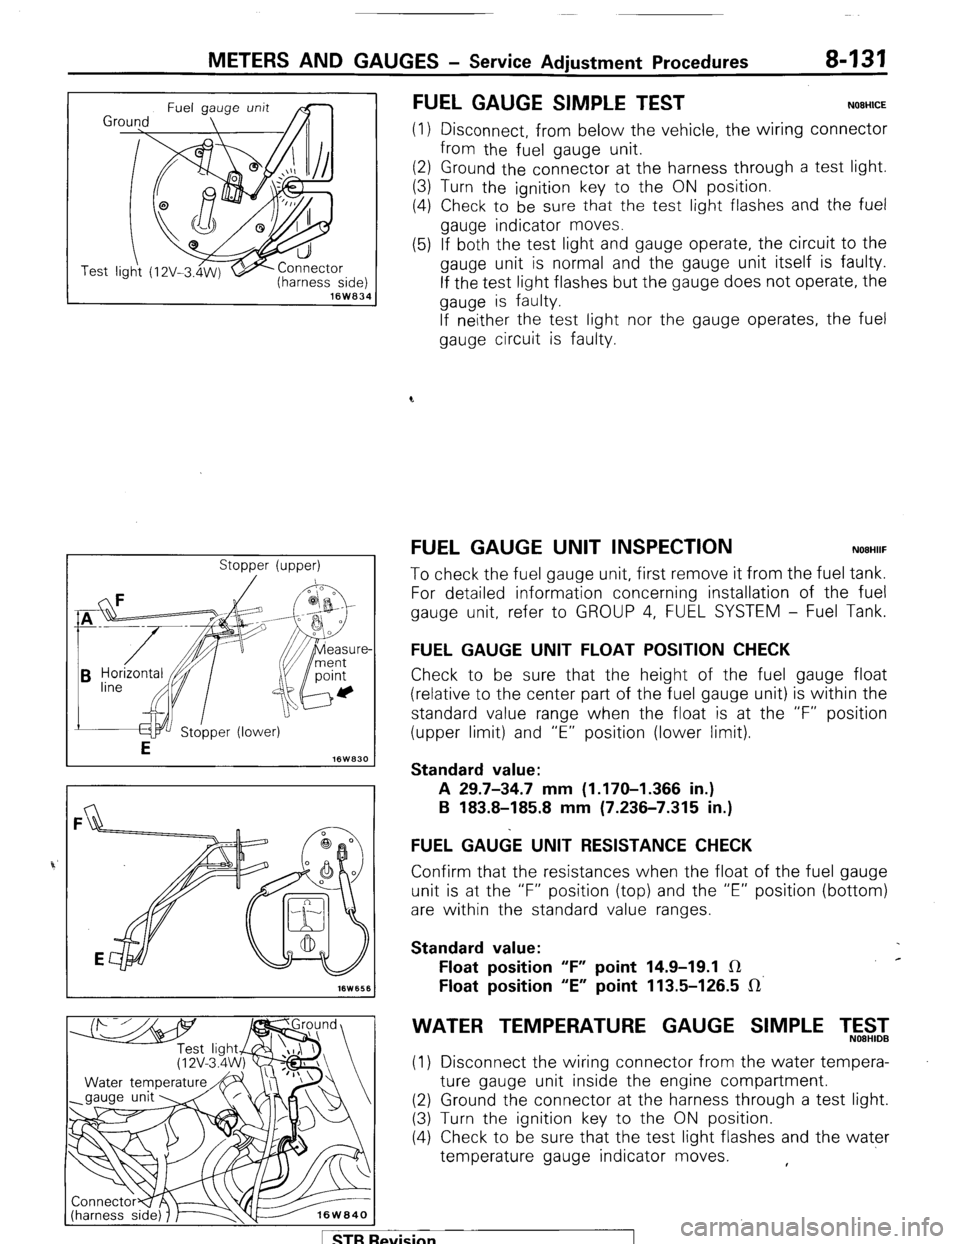
FUEL GAUGE SIMPLE TEST NOEHICE
(1) Disconnect, from below the vehicle, the wiring connector
from the fuel gauge unit.
(2) Ground the connector at the harness through a test light.
(3) Turn the ignition key to the ON position.
(4) Check to be
sure that the test light flashes and the fuel
gauge indicator moves.
(5) If both the test light and gauge operate, the circuit to the
gauge unit is normal and the gauge unit itself is faulty.
If the test light flashes but the gauge does not operate, the
gauge is faulty.
If neither the test light nor the gauge operates, the fuel
gauge circuit is faulty.
FUEL GAUGE UNIT INSPECTION NOEHIIF
To check the fuel gauge unit, first remove it from the fuel tank.
For detailed information concerning installation of the fuel
gauge unit, refer to GROUP 4, FUEL SYSTEM - Fuel Tank.
FUEL GAUGE UNIT FLOAT POSITION CHECK
Check to be sure that the height of the fuel gauge float
(relative to the center part of the fuel gauge unit) is within the
standard value range when the float is at the “F” position
(upper limit) and “E” position (lower limit).
Standard value:
A 29.7-34.7 mm (1.170-I .366 in.)
B 183.8-185.8 mm (7.236-7.315 in.)
FUEL GA&E UNIT RESISTANCE CHECK
Confirm that the resistances when the float of the fuel gauge
unit is at the “F” position (top) and the “E” position (bottom)
are within the standard value ranges.
Standard value:
Float position “F” point 14.9-19.1 IR c
Float position “E” point 113.5-126.5 IR’
WATER TEMPERATURE GAUGE SIMPLE T,5$2
(1) Disconnect the wiring connector from the water tempera-
ture gauge unit inside the engine compartment.
(2) Ground the connector at the harness through a test light.
(3) Turn the ignition key to the ON position.
(4) Check to be sure that the test light flashes and the water
temperature gauge indicator moves. ,
1 STB Revision
Page 155 of 284
METERS AND GAUGES - Combination Meter 8-135
.3
16WQ25
16W925
10W926
16F554
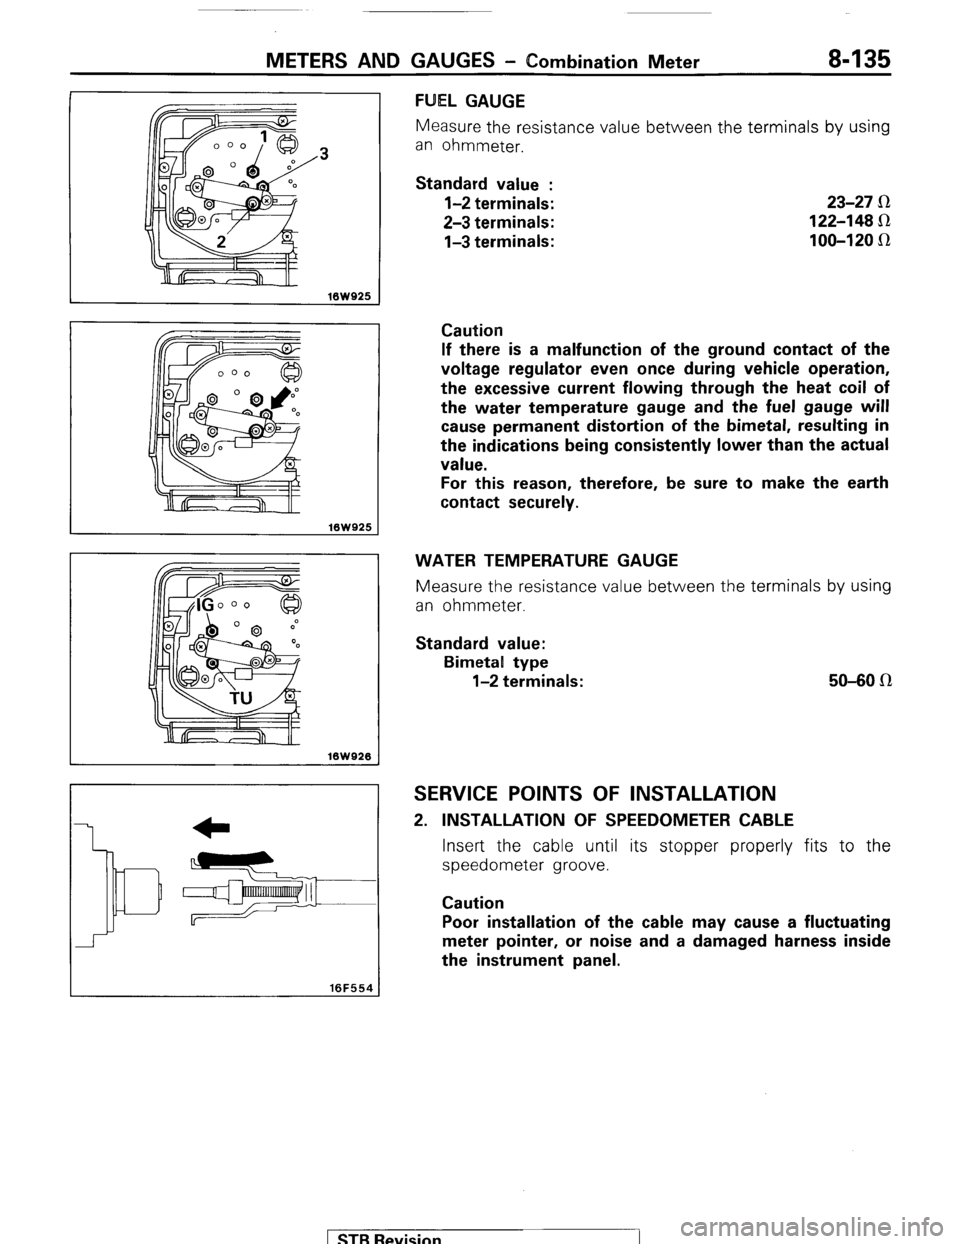
FUEL GAUGE
Measure the resistance value between t.he terminals by using
an ohmmeter.
Standard value :
l-2 terminals:
2-3 terminals:
l-3 terminals: 23-27 R
122-148 Sz
100-120 IR
Caution
If there is a malfunction of the ground contact of the
voltage regulator even once during vehicle operation,
the excessive current flowing through the heat coil of
the water temperature gauge and the fuel gauge will
cause permanent distortion of the bimetal, resulting in
the indications being consistently lower than the actual
value.
For this reason, therefore, be sure to make the earth
contact securely.
WATER TEMPERATURE GAUGE
Measure the resistance value between the terminals by using
an ohmmeter.
Standard value:
Bimetal type
l-2 terminals: 50-80 n
SERVICE POINTS OF INSTALLATION
2. INSTALLATION OF SPEEDOMETER CABLE
Insert the cable until its stopper properly fits to the
speedometer groove.
Caution
Poor installation of the cable may cause a fluctuating
meter pointer, or noise and a damaged harness inside
the instrument panel.
) STB Revision