tailgate MITSUBISHI OUTLANDER 2005 2.G Owners Handbook
[x] Cancel search | Manufacturer: MITSUBISHI, Model Year: 2005, Model line: OUTLANDER, Model: MITSUBISHI OUTLANDER 2005 2.GPages: 9, PDF Size: 1.57 MB
Page 7 of 9

Downloaded from www.Manualslib.com manuals search engine 1110Bluetooth® Operation with FUSE Hands-free Link System™
(if so equipped)Folding and Stowing the Third Row Seat (if so equipped)
Getting Started:
Before using FUSE the first time, press the HELP button. This
will walk you through some tips and help set-up your voice
recognition profile.
For a list of compatible Bluetooth® devices please go to
http://www.mitsubishicars.com/MMNA/jsp/owners-site/
technology-features.do
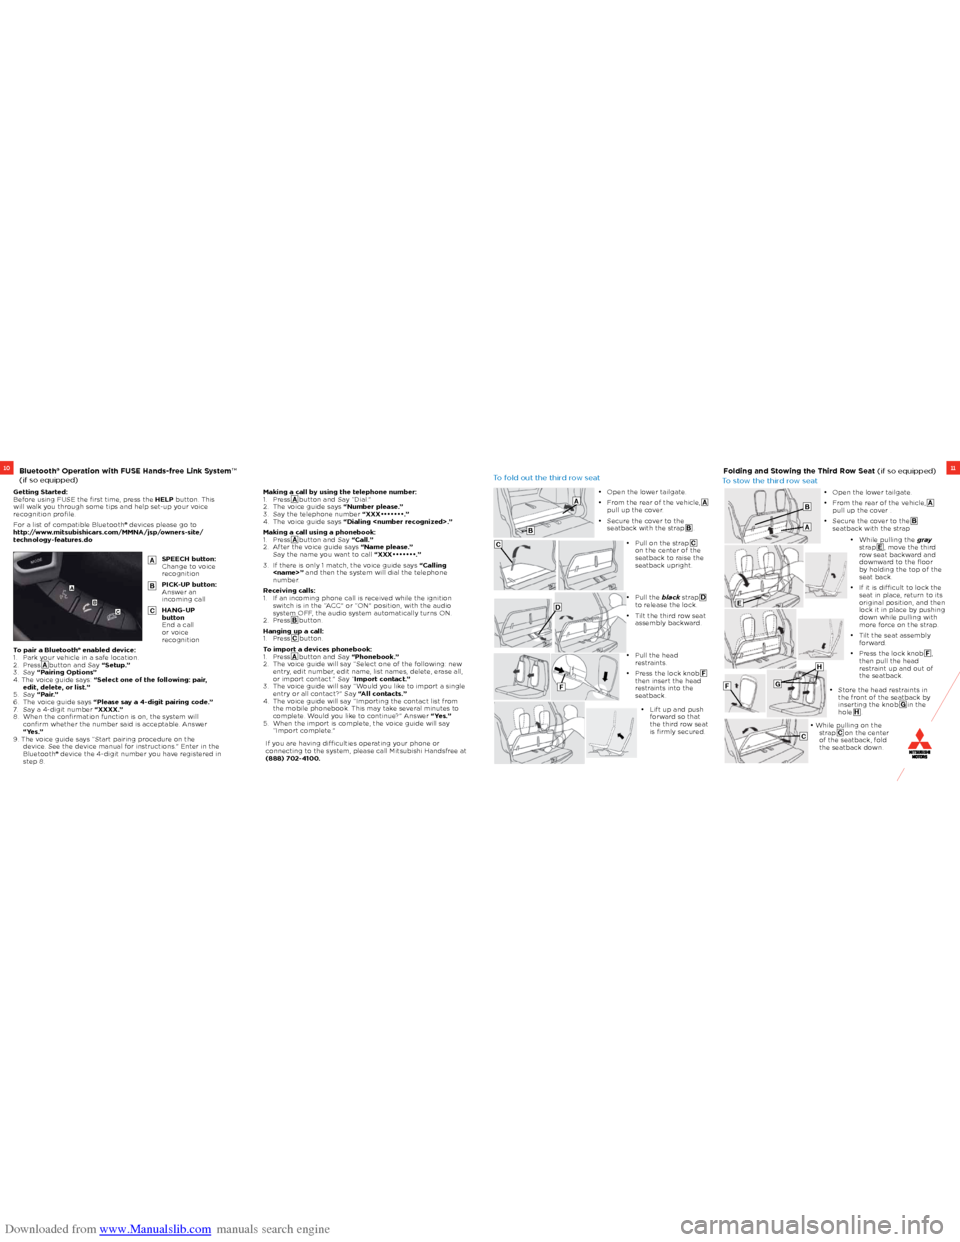
To fold out the third row seat
To stow the third row seat
If you are having difficulties operating your phone or
connecting to the system, please call Mitsubishi Handsfree at
(888) 702-4100.
Making a call by using the telephone number:
1.
Press A button and Say “Dial.”
2. The voice guide says “Number please.”
3. Say the telephone number “XXX•••••••.”
4. The voice guide says “Dialing
Making a call using a phonebook:
1. Press A button and Say “Call.”
2. After the voice guide says “Name please.”
Say the name you want to call “XXX•••••••.”
3. If there is only 1 match, the voice guide says “Calling
number.
Receiving calls:
1. If an incoming phone call is received while the ignition
switch is in the “ACC” or “ON” position, with the audio
system OFF, the audio system automatically turns ON.
2. Press B button.
Hanging up a call:
1. Press C button.
To import a devices phonebook:
1. Press A button and Say “Phonebook.”
2. The voice guide will say “Select one of the following: new
entry, edit number, edit name, list names, delete, erase all,
or import contact.” Say “Import contact.”
3. The voice guide will say “Would you like to import a single
entry or all contact?” Say “All contacts.”
4. The voice guide will say “Importing the contact list from
the mobile phonebook. This may take several minutes to
complete. Would you like to continue?” Answer “Yes.”
5. When the import is complete, the voice guide will say
“Import complete.”
SPEECH button:
Change to voice
recognition
PICK-UP button:
Answer an
incoming call
HANG-UP
button
End a call
or voice
recognition
A
B
C
A
B
C
• Open the lower tailgate.
• From the rear of the vehicle, A pull up the cover.
• Secure the cover to the seatback with the strap B . • Open the lower tailgate.
• From the rear of the vehicle, A
pull up the cover .
• Secure the cover to the B seatback with the strap
• Pull on the strap C on the center of the
seatback to raise the
seatback upright.
• Pull the black strap D to release the lock.
• Tilt the third row seat assembly backward.
• Pull the head restraints.
• Press the lock knob F then insert the head
restraints into the
seatback.
• Lift up and push forward so that
the third row seat
is firmly secured.
A
A
E
FG
H
C
B
B
C
D
F
• While pulling the gray
strap E , move the third
row seat backward and
downward to the floor
by holding the top of the
seat back.
• If it is difficult to lock the seat in place, return to its
original position, and then
lock it in place by pushing
down while pulling with
more force on the strap.
• Tilt the seat assembly forward.
• Press the lock knob F ,
then pull the head
restraint up and out of
the seatback.
• Store the head restraints in the front of the seatback by
inserting the knob G in the
hole H .
• While pulling on the strap C on the center
of the seatback, fold
the seatback down.
To pair a Bluetooth® enabled device:
1. Park your vehicle in a safe location.
2. Press A button and Say “Setup.”
3. Say “Pairing Options”
4. The voice guide says: “Select one of the following: pair, edit, delete, or list.”
5. Say “Pair.”
6. The voice guide says “Please say a 4-digit pairing code.”
7. Say a 4-digit number “XXXX.”
8. When the confirmation function is on, the system will
confirm whether the number said is acceptable. Answer
“Yes.”
9. The voice guide says “Start pairing procedure on the device. See the device manual for instructions.” Enter in the
Bluetooth® device the 4-digit number you have registered in
step 8.