under seat MITSUBISHI OUTLANDER 2016 3.G Owners Manual
[x] Cancel search | Manufacturer: MITSUBISHI, Model Year: 2016, Model line: OUTLANDER, Model: MITSUBISHI OUTLANDER 2016 3.GPages: 464, PDF Size: 60.77 MB
Page 22 of 464
Filling the fuel tank 3-4 General information
3
All-wheel drive vehicles: 15.8 gal (60 L) Front-wheel drive vehi
cles: 16.6 gal (63 L)
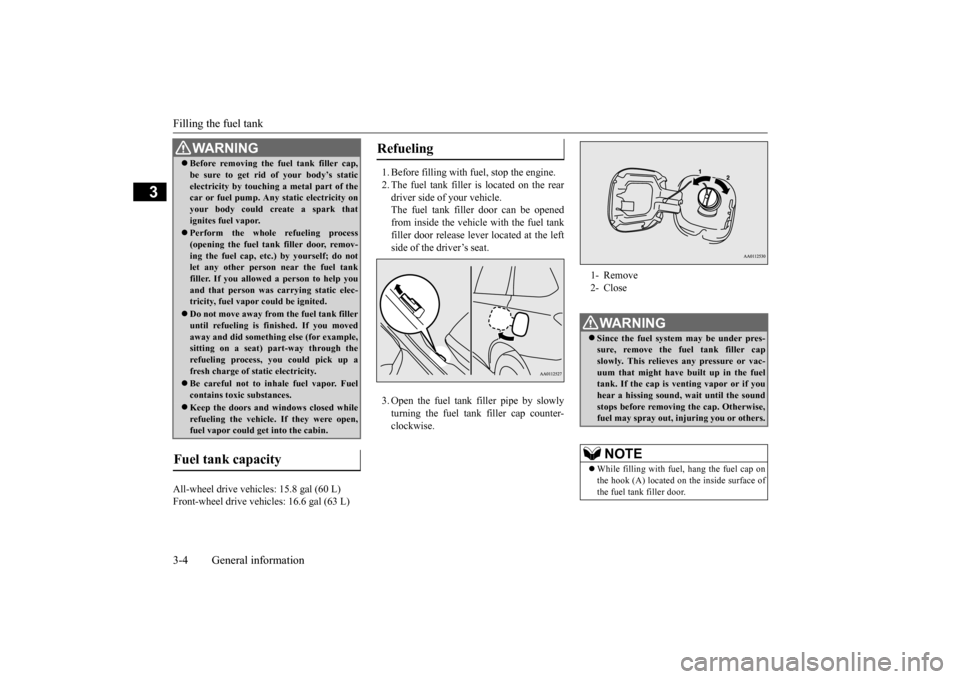
1. Before filling with fuel, stop the engine. 2. The fuel tank filler is located on the rear driver side of your vehicle. The fuel tank filler door can be openedfrom inside the vehicle with the fuel tank filler door release lever located at the left side of the driver’s seat. 3. Open the fuel tank filler pipe by slowly turning the fuel tank filler cap counter- clockwise.
Before removing the fuel tank filler cap, be sure to get rid of your body’s staticelectricity by touching a metal part of thecar or fuel pump. Any
static electricity on
your body could create a spark that ignites fuel vapor. Perform the whole
refueling process
(opening the fuel tank filler door, remov-ing the fuel cap, etc.) by yourself; do not let any other
person near the fuel tank
filler. If you allowed
a person to help you
and that person was ca
rrying static elec-
tricity, fuel vapor could be ignited. Do not move away from
the fuel tank filler
until refueling is fi
nished. If you moved
away and did somethin
g else (for example,
sitting on a seat) part-way through the refueling process, you could pick up a fresh charge of st
atic electricity.
Be careful not to inhale fuel vapor. Fuel contains toxic substances. Keep the doors and wi
ndows closed while
refueling the vehicle. If they were open,fuel vapor could ge
t into the cabin.
Fuel tank capacity
WA R N I N G
Refueling
1- Remove 2- CloseWA R N I N G Since the fuel system may be under pres- sure, remove the fuel tank filler capslowly. This relieves
any pressure or vac-
uum that might have built up in the fuel tank. If the cap is venting vapor or if youhear a hissing sound, wait until the sound stops before removing the cap. Otherwise, fuel may spray out, in
juring you or others.
NOTE
While filling with fuel
, hang the fuel cap on
the hook (A) located on the inside surface ofthe fuel tank filler door.
BK0223400US.book 4 ページ 2015年2月13日 金曜日 午後12時15分
Page 30 of 464
Seats and restraint systems 4-4 Seat and restraint systems
4
N00401601219
Your vehicle has seat
belts and other safety
features that help protect you and your pas- sengers in an accident.Seat belts are the most important safety device. When worn properly, seat belts can reduce the chance of serious injury or deathin various types of crashes. For added protec- tion during a severe fr
ontal collision, your
vehicle has a Supplemental Restraint System (SRS) with airbags for the driver and passen- gers. The seats, head restraints, and doorlocks also are safety equipment, which must be used correctly. Always check the following before you drive: That everyone in your vehicle is properly wearing their seat belt. That infants and small children are prop- erly secured in an appropriate child restraint system in the rear seat. That all doors are fully closed and locked. That seatbacks are upright, with head restraints properly adjusted.
Safety equipment cannot prevent injury or death in all motor ve
hicle accidents. How-
ever, you can help reduce the risk of injury or death, by following the instructions in thismanual.
N00401801426
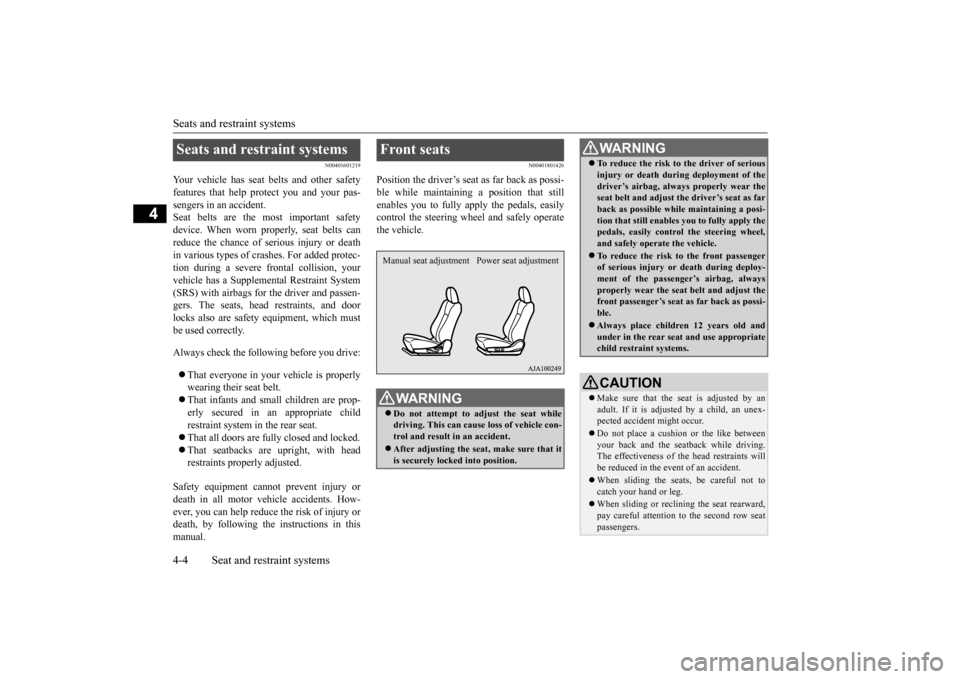
Position the driver’s seat
as far back as possi-
ble while maintaining a position that still enables you to fully apply the pedals, easilycontrol the steering wh
eel and safely operate
the vehicle.
Seats and restraint systems
Front seats
WA R N I N G Do not attempt to adjust the seat while driving. This can cause loss of vehicle con-trol and result
in an accident.
After adjusting the seat, make sure that it is securely locked into position.Manual seat adjustment Power seat adjustment
To reduce the risk to the driver of serious injury or death duri
ng deployment of the
driver’s airbag, always
properly wear the
seat belt and adjust th
e driver’s seat as far
back as possible while maintaining a posi- tion that still enables
you to fully apply the
pedals, easily control the steering wheel, and safely operate the vehicle. To reduce the risk to the front passenger of serious injury or
death during deploy-
ment of the passeng
er’s airbag, always
properly wear the seat
belt and adjust the
front passenger’s seat as far back as possi- ble. Always place childr
en 12 years old and
under in the rear seat
and use appropriate
child restraint systems.CAUTION Make sure that the seat is adjusted by an adult. If it is adjusted by a child, an unex- pected accident might occur. Do not place a cushion
or the like between
your back and the seatback while driving. The effectiveness of the head restraints willbe reduced in the event of an accident. When sliding the seat
s, be careful not to
catch your hand or leg. When sliding or reclin
ing the seat rearward,
pay careful attention
to the second row seat
passengers.WA R N I N G
BK0223400US.book 4 ページ 2015年2月13日 金曜日 午後12時15分
Page 32 of 464
Front seats 4-6 Seat and restraint systems
4
N00402001379
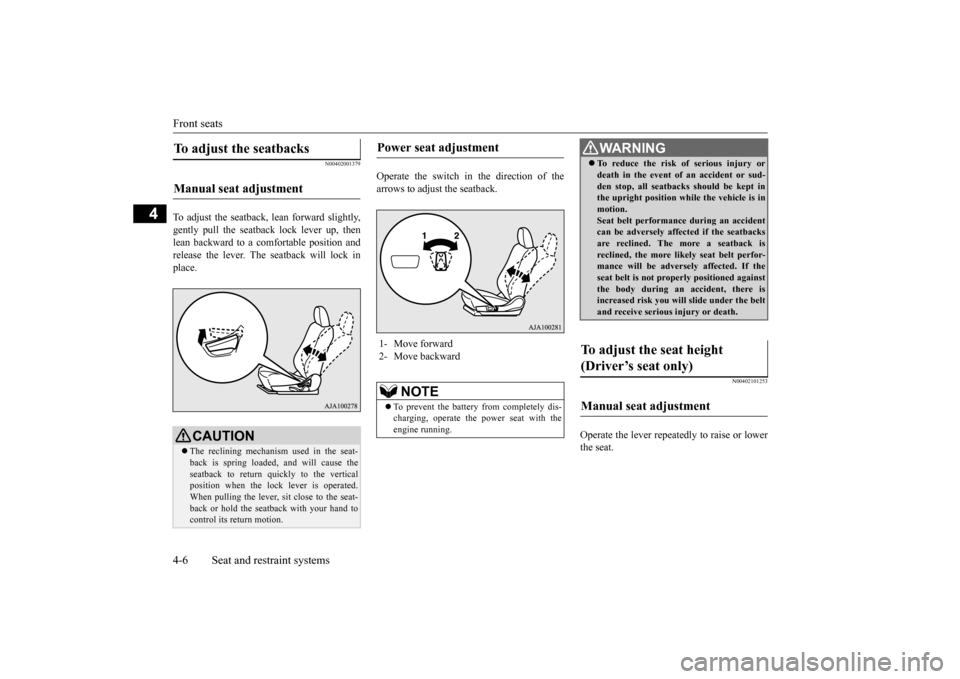
To adjust the seatback, lean forward slightly, gently pull the seatback lock lever up, then lean backward to a comfortable position andrelease the lever. The seatback will lock in place.
Operate the switch in the direction of the arrows to adjust the seatback.
N00402101253
Operate the lever repeatedly to raise or lower the seat.
To adjust the seatbacks Manual seat adjustment
CAUTION The reclining mechanism used in the seat- back is spring loaded, and will cause theseatback to return quickly to the vertical position when the lock lever is operated. When pulling the lever, sit close to the seat-back or hold the seatback with your hand to control its return motion.
Power seat adjustment 1- Move forward 2- Move backward
NOTE
To prevent the battery from completely dis- charging, operate the
power seat with the
engine running.
WA R N I N G To reduce the risk of serious injury or death in the event of
an accident or sud-
den stop, all seatbacks should be kept inthe upright position while the vehicle is in motion. Seat belt performance during an accidentcan be adversely affect
ed if the seatbacks
are reclined. The more a seatback is reclined, the more likely seat belt perfor-mance will be adversely affected. If the seat belt is not proper
ly positioned against
the body during an accident, there isincreased risk you will slide under the belt and receive serious
injury or death.
To adjust the seat height (Driver’s seat only) Manual seat adjustment
BK0223400US.book 6 ページ 2015年2月13日 金曜日 午後12時15分
Page 35 of 464
Second row seats
Seat and restraint systems 4-9
4
Pull the lever up and adjust the seatback by hand to the desired posit
ion, and release the
lever. The seatback will lock in place.
N00403001318
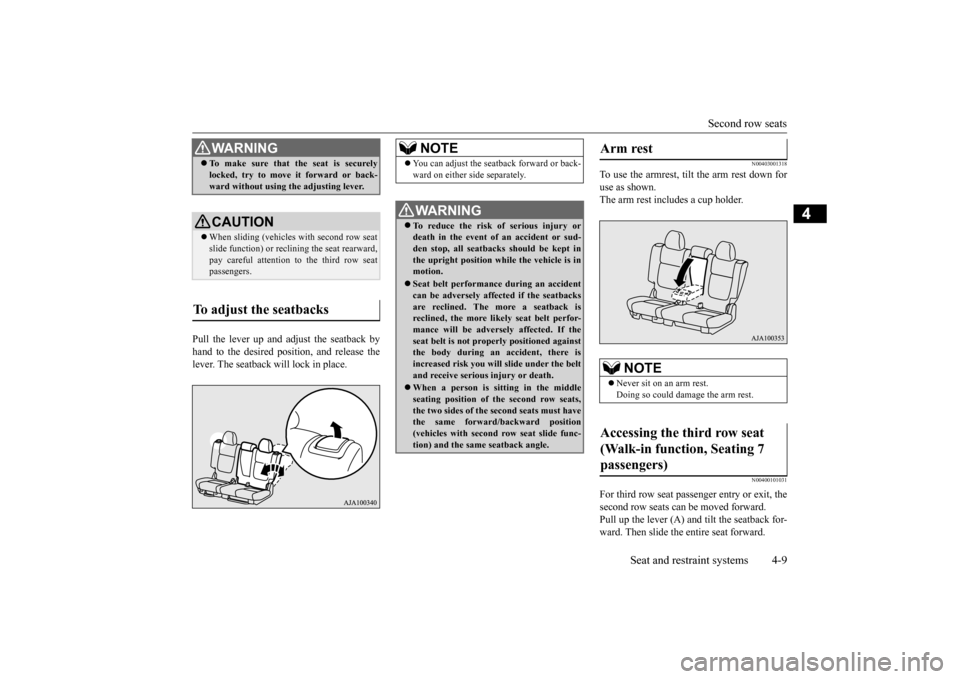
To use the armrest, tilt the arm rest down for use as shown. The arm rest includes a cup holder.
N00400101031
For third row seat passenger entry or exit, thesecond row seats can
be moved forward.
Pull up the lever (A) and tilt the seatback for- ward. Then slide the entire seat forward.
WA R N I N G To make sure that the seat is securely locked, try to move
it forward or back-
ward without using
the adjusting lever.
CAUTIONWhen sliding (vehicles with second row seat slide function) or reclin
ing the seat rearward,
pay careful attention to the third row seat passengers.
To adjust the seatbacks
NOTE
You can adjust the seat
back forward or back-
ward on either side separately.WA R N I N G To reduce the risk of serious injury or death in the event of
an accident or sud-
den stop, all seatbacks should be kept in the upright position while the vehicle is in motion. Seat belt performance during an accident can be adversely affect
ed if the seatbacks
are reclined. The more a seatback is reclined, the more likely seat belt perfor- mance will be advers
ely affected. If the
seat belt is not proper
ly positioned against
the body during an accident, there is increased risk you will slide under the beltand receive serious
injury or death.
When a person is si
tting in the middle
seating position of the second row seats, the two sides of the second seats must have the same forward/backward position(vehicles with second row seat slide func- tion) and the same seatback angle.
Arm rest
NOTE
Never sit on an arm rest. Doing so could damage the arm rest.
Accessing the third row seat (Walk-in function, Seating 7 passengers)
BK0223400US.book 9 ページ 2015年2月13日 金曜日 午後12時15分
Page 40 of 464
Making a cargo area 4-14 Seat and restraint systems
4
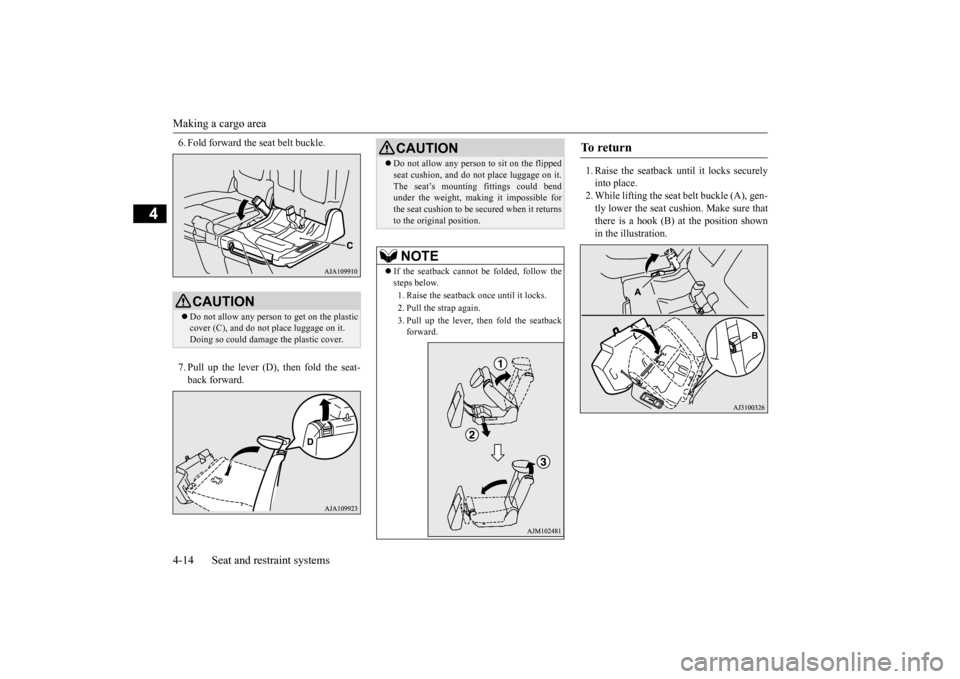
6. Fold forward the seat belt buckle. 7. Pull up the lever (D), then fold the seat- back forward.
1. Raise the seatback until it locks securely into place. 2. While lifting the seat
belt buckle (A), gen-
tly lower the seat cushion. Make sure thatthere is a hook (B) at the position shown in the illustration.
CAUTION Do not allow any person
to get on the plastic
cover (C), and do not
place luggage on it.
Doing so could damage
the plastic cover.
CAUTIONDo not allow any person to sit on the flipped seat cushion, and do no
t place luggage on it.
The seat’s mounting
fittings could bend
under the weight, maki
ng it impossible for
the seat cushion to be secured when it returns to the original position.NOTE
If the seatback cannot be folded, follow the steps below. 1. Raise the seatback once until it locks.2. Pull the strap again. 3. Pull up the lever, then fold the seatback forward.
To r e t u r n
BK0223400US.book 14 ページ 2015年2月13日 金曜日 午後12時15分
Page 43 of 464
Seat belts
Seat and restraint systems 4-17
4
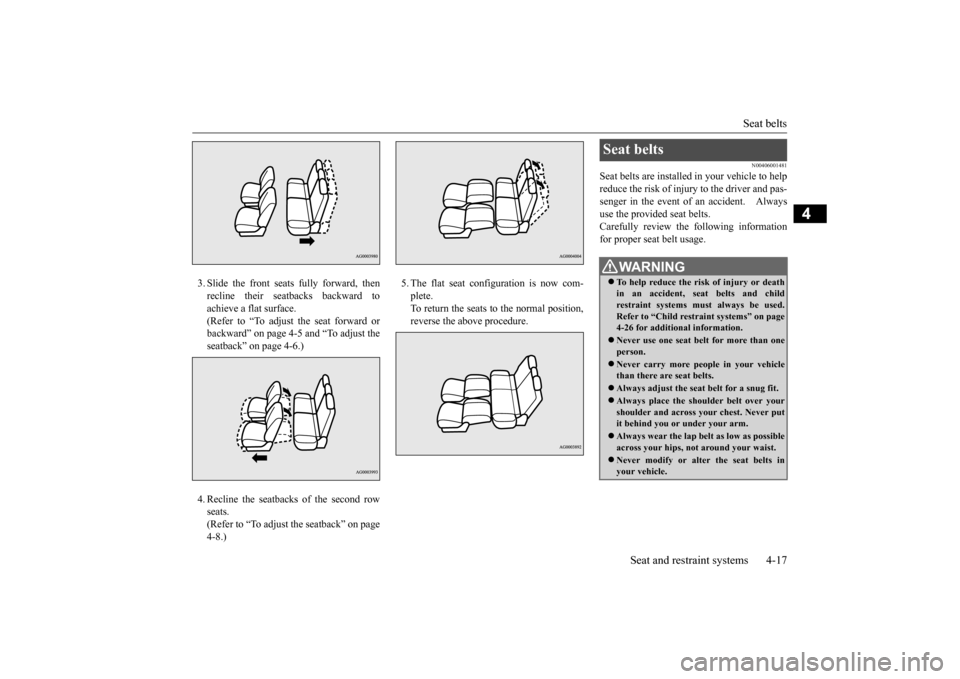
3. Slide the front seats fully forward, then recline their seatbacks backward toachieve a flat surface. (Refer to “To adjust the seat forward or backward” on page 4-5 and “To adjust theseatback” on page 4-6.) 4. Recline the seatbacks of the second row seats.(Refer to “To adjust the seatback” on page 4-8.)
5. The flat seat configuration is now com- plete.To return the seats to the normal position, reverse the above procedure.
N00406001481
Seat belts are installed in your vehicle to helpreduce the risk of injury to the driver and pas- senger in the event of an accident. Alwaysuse the provided seat belts. Carefully review the
following information
for proper seat belt usage.Seat belts
WA R N I N G To help reduce the risk of injury or death in an accident, se
at belts and child
restraint systems must always be used. Refer to “Child restra
int systems” on page
4-26 for additional information. Never use one seat belt for more than one person. Never carry more peop
le in your vehicle
than there are seat belts. Always adjust the seat
belt for a snug fit.
Always place the shou
lder belt over your
shoulder and across you
r chest. Never put
it behind you or
under your arm.
Always wear the lap belt as low as possible across your hips, not around your waist. Never modify or alter the seat belts in your vehicle.
BK0223400US.book 17 ページ 2015年2月13日 金曜日 午後12時15分
Page 44 of 464
Seat belts 4-18 Seat and restraint systems
4
N00406201467
All seats are equipped with a seat belt which uses one combined lap-and-shoulder belt with an emergency locking retractor. This system is designed to provide both com- fort and safety. It perm
its full extension and
automatic retraction of the belts during nor- mal vehicle operation.
A sensing device
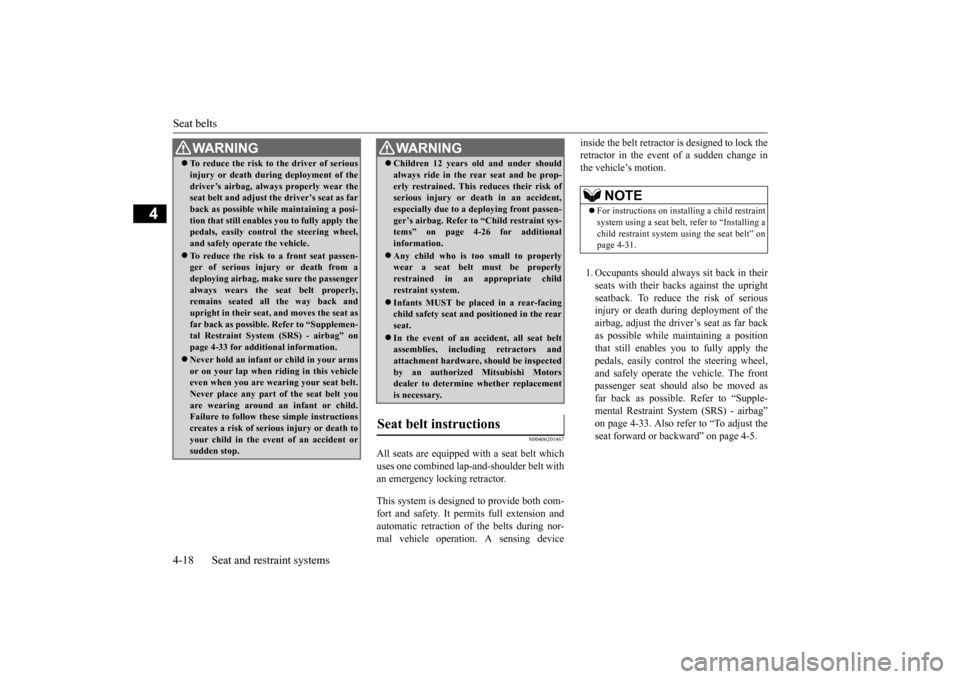
inside the belt retractor is designed to lock the retractor in the event of a sudden change inthe vehicle’s motion. 1. Occupants should always
sit back in their
seats with their backs against the upright seatback. To reduce
the risk of serious
injury or death during deployment of the airbag, adjust the driver’s seat as far back as possible while maintaining a positionthat still enables you to fully apply the pedals, easily contro
l the steering wheel,
and safely operate the vehicle. The frontpassenger seat should also be moved as far back as possible.
Refer to “Supple-
mental Restraint Syst
em (SRS) - airbag”
on page 4-33. Also refer to “To adjust the seat forward or backward” on page 4-5.
To reduce the risk to the driver of serious injury or death duri
ng deployment of the
driver’s airbag, always
properly wear the
seat belt and adjust th
e driver’s seat as far
back as possible while maintaining a posi- tion that still enables
you to fully apply the
pedals, easily control the steering wheel, and safely operate the vehicle. To reduce the risk to a front seat passen- ger of serious injury or death from a deploying airbag, make sure the passengeralways wears the seat belt properly, remains seated all the way back and upright in their seat,
and moves the seat as
far back as possible. Refer to “Supplemen- tal Restraint System (SRS) - airbag” on page 4-33 for additional information. Never hold an infant
or child in your arms
or on your lap when ri
ding in this vehicle
even when you are we
aring your seat belt.
Never place any part of the seat belt you are wearing around an infant or child.Failure to follow these simple instructions creates a risk of serious injury or death to your child in the even
t of an accident or
sudden stop.WA R N I N G
Children 12 years ol
d and under should
always ride in the re
ar seat and be prop-
erly restrained. This reduces their risk ofserious injury or de
ath in an accident,
especially due to a deploying front passen- ger’s airbag. Refer to
“Child restraint sys-
tems” on page 4-26 for additional information. Any child who is t
oo small to properly
wear a seat belt must be properly restrained in an
appropriate child
restraint system. Infants MUST be placed in a rear-facing child safety seat and
positioned in the rear
seat. In the event of an ac
cident, all seat belt
assemblies, including retractors and attachment hardware, should be inspectedby an authorized Mitsubishi Motors dealer to determine whether replacement is necessary.
Seat belt instructions
WA R N I N G
NOTE
For instructions on inst
alling a child restraint
system using a seat belt
, refer to “Installing a
child restraint system using the seat belt” on page 4-31.
BK0223400US.book 18 ページ 2015年2月13日 金曜日 午後12時15分
Page 45 of 464
Seat belts
Seat and restraint systems 4-19
4
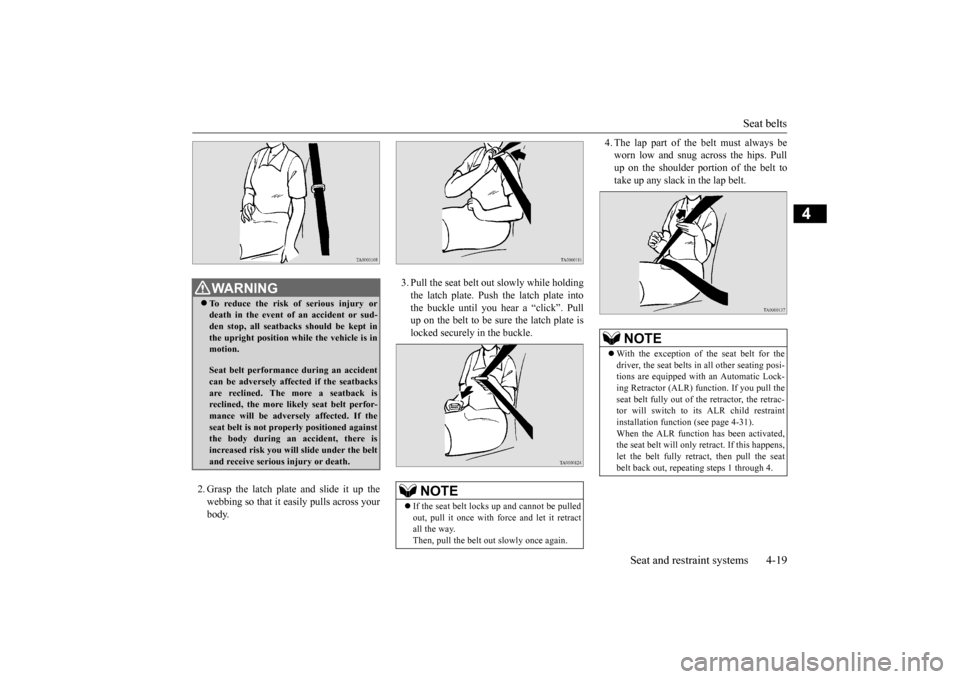
2. Grasp the latch plate and slide it up the webbing so that it easily pulls across your body.
3. Pull the seat belt out slowly while holding the latch plate. Push the latch plate into the buckle until you hear a “click”. Pull up on the belt to be sure the latch plate islocked securely in the buckle.
4. The lap part of the belt must always be worn low and snug across the hips. Pullup on the shoulder portion of the belt to take up any slack
in the lap belt.
WA R N I N GTo reduce the risk of serious injury or death in the event of
an accident or sud-
den stop, all seatbacks should be kept in the upright position wh
ile the vehicle is in
motion. Seat belt performance during an accident can be adversely affect
ed if the seatbacks
are reclined. The more a seatback is reclined, the more likely seat belt perfor-mance will be advers
ely affected. If the
seat belt is not prop
erly positioned against
the body during an accident, there isincreased risk you will slide under the belt and receive serious
injury or death.
NOTE
If the seat belt locks
up and cannot be pulled
out, pull it once with force and let it retract all the way. Then, pull the belt out
slowly once again.
NOTE
With the exception of the seat belt for the driver, the seat belts in all other seating posi-tions are equipped with an Automatic Lock- ing Retractor (ALR) function. If you pull the seat belt fully out of the retractor, the retrac-tor will switch to its ALR child restraint installation function
(see page 4-31).
When the ALR function has been activated,the seat belt will only re
tract. If this happens,
let the belt fully retract, then pull the seat belt back out, repeating steps 1 through 4.
BK0223400US.book 19 ページ 2015年2月13日 金曜日 午後12時15分
Page 51 of 464
Seat belt pre-tensioner an
d force limiter systems
Seat and restraint systems 4-25
4
The driver and front pa
ssenger seat
belts are
equipped with a seat
belt pre-tensioner sys-
tem. In a moderate-to-severe frontal or sidecollision or when a rollover or overturning of the vehicle is detected
, the pre-tensioner sys-
tem operates simultane
ously with the deploy-
ment of the front airb
ags, side airbags or
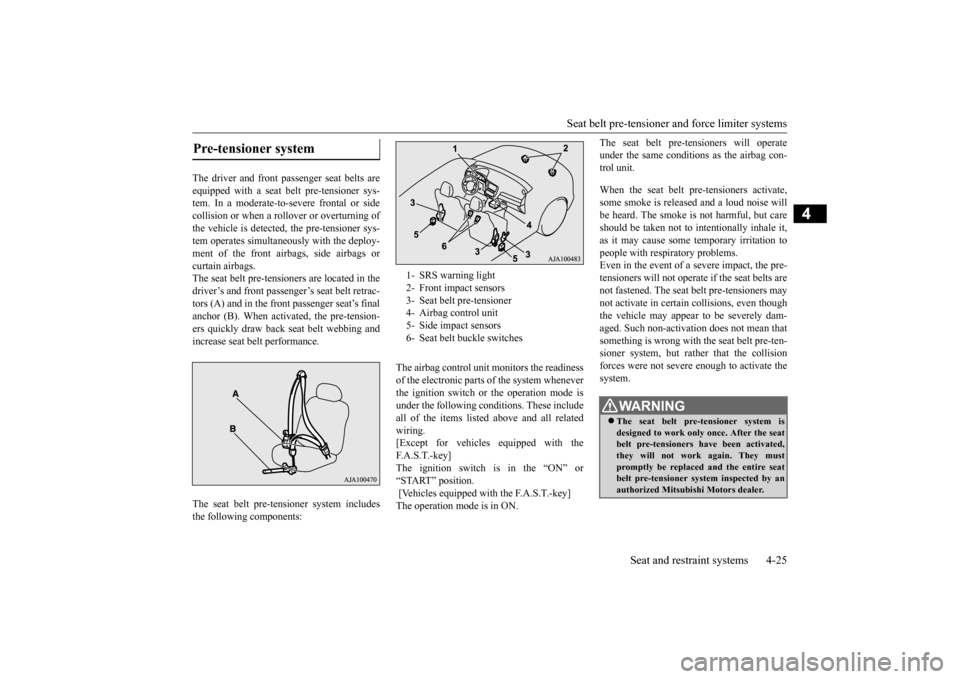
curtain airbags. The seat belt pre-tensioners are located in the driver’s and front passe
nger’s seat belt retrac-
tors (A) and in the front
passenger seat’s final
anchor (B). When activated, the pre-tension- ers quickly draw back
seat belt webbing and
increase seat belt performance. The seat belt pre-tensioner system includes the following components:
The airbag control unit
monitors the readiness
of the electronic parts of the system whenever the ignition switch or the operation mode is under the following conditions. These includeall of the item
s listed above a
nd all related
wiring. [Except for vehicles equipped with theF. A . S . T. - k e y ] The ignition switch is in the “ON” or “START” position. [Vehicles equipped with the F.A.S.T.-key] The operation mode is in ON.
The seat belt pre-tensioners will operate under the same conditions as the airbag con-trol unit. When the seat belt pr
e-tensioners activate,
some smoke is released and a loud noise will be heard. The smoke is
not harmful, but care
should be taken not to in
tentionally inhale it,
as it may cause some temporary irritation to people with respiratory problems.Even in the event of a severe impact, the pre- tensioners will not operate if the seat belts are not fastened. The seat belt pre-tensioners may not activate in certain collisions, even though the vehicle may appear
to be severely dam-
aged. Such non-activation does not mean that something is wrong with the seat belt pre-ten- sioner system, but rather that the collisionforces were not severe
enough to activate the
system.
Pre-tensioner system
1- SRS warning light 2- Front impact sensors 3- Seat belt pre-tensioner 4- Airbag control unit5- Side impact sensors 6- Seat belt buckle switches
WA R N I N G The seat belt pre-tensioner system is designed to work only
once. After the seat
belt pre-tensioners have been activated, they will not work again. They must promptly be replaced and the entire seatbelt pre-tensioner system inspected by an authorized Mitsubis
hi Motors dealer.
BK0223400US.book 25 ページ 2015年2月13日 金曜日 午後12時15分
Page 56 of 464
Child restraint systems 4-30 Seat and restraint systems
4
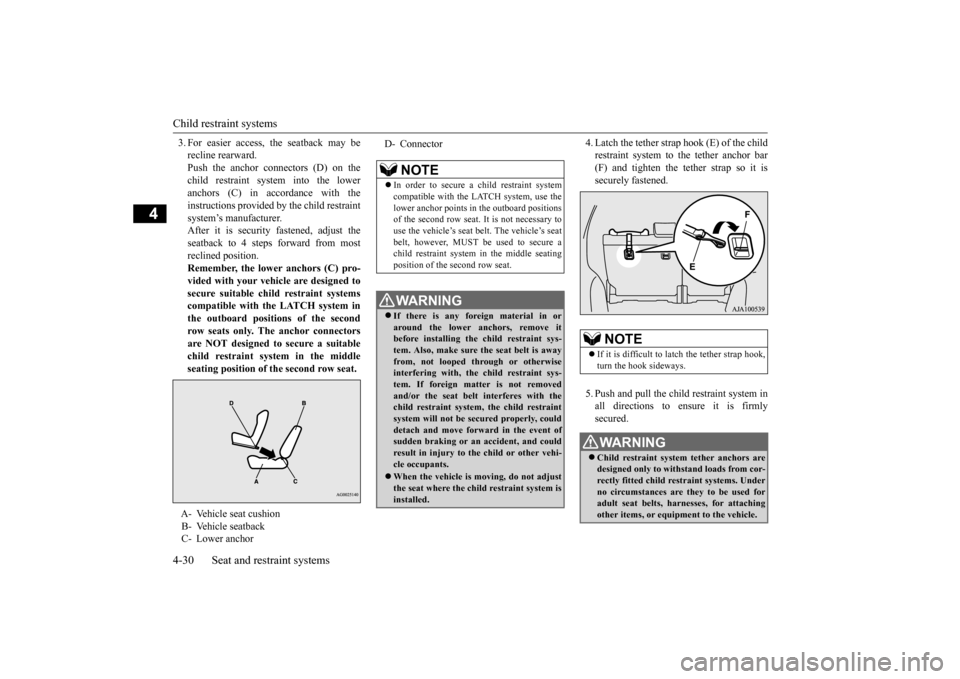
3. For easier access, the seatback may be recline rearward.Push the anchor connectors (D) on the child restraint system into the lower anchors (C) in accordance with theinstructions provided by
the child restraint
system’s manufacturer. After it is security fastened, adjust theseatback to 4 steps forward from most reclined position. Remember, the lower anchors (C) pro- vided with your vehi
cle are designed to
secure suitable child restraint systemscompatible with the LATCH system in the outboard positions of the second row seats only. The anchor connectorsare NOT designed to
secure a suitable
child restraint system in the middle seating position of the second row seat.
4. Latch the tether strap hook (E) of the child restraint system to the tether anchor bar(F) and tighten the tether strap so it is securely fastened. 5. Push and pull the child restraint system in all directions to ensure it is firmlysecured.
A- Vehicle seat cushion B- Vehicle seatback C- Lower anchor
D- Connector
NOTE
In order to secure a child restraint system compatible with the LATCH system, use thelower anchor points in
the outboard positions
of the second row seat.
It is not necessary to
use the vehicle’s seat
belt. The vehicle’s seat
belt, however, MUST be
used to secure a
child restraint system in the middle seating position of the second row seat.WA R N I N G If there is any foreign material in or around the lower anchors, remove it before installing the child restraint sys- tem. Also, make sure the seat belt is awayfrom, not looped through or otherwise interfering with, the child restraint sys- tem. If foreign matter is not removedand/or the seat belt interferes with the child restraint system, the child restraint system will not be secured properly, coulddetach and move forward in the event of sudden braking or an
accident, and could
result in injury to the child or other vehi-cle occupants. When the vehicle is moving, do not adjust the seat where the child restraint system isinstalled.
NOTE
If it is difficult to la
tch the tether strap hook,
turn the hook sideways.WA R N I N G Child restraint system tether anchors are designed only to with
stand loads from cor-
rectly fitted child restraint systems. Underno circumstances are they to be used for adult seat belts, harnesses, for attaching other items, or equipment to the vehicle.
BK0223400US.book 30 ページ 2015年2月13日 金曜日 午後12時15分