ECU MITSUBISHI OUTLANDER 2020 (in English) User Guide
[x] Cancel search | Manufacturer: MITSUBISHI, Model Year: 2020, Model line: OUTLANDER, Model: MITSUBISHI OUTLANDER 2020Pages: 443, PDF Size: 60.03 MB
Page 52 of 443

Seat belts
Seat and restraint systems 4-23
4
3. After the seat belt has retracted com- pletely, insert the latch plate (B) into theupper slit (F), and th
en insert the small
latch plate (A) into the lower slit (G). 4. Store the detachable anchor in the storage pocket on the seatback.
N00418401453
A tone and warning light are used to remindthe driver to fasten the seat belt.If the ignition switch is turned to the “ON” position or the operation mode is put in ON without the driver’s seat belt being fastened, awarning light will co
me on and a tone will
sound for approximately
6 seconds to remind
you to fasten your seat belt.If the vehicle is driven with the seat belt still unfastened, the warning light will blink and the tone will sound inte
rmittently until the
seat belt is fastened. At the same time, “FAS- TEN SEAT BELT” is displayed on the infor- mation screen in the multi informationdisplay.Driver’s seat belt reminder/warning light and display
WA R N I N G In order to reduce the risk of serious injury or death in an
accident, always fas-
ten your own seat belt. Do not allow any-one to ride in your ve
hicle unless he or she
is also seated and fastening a seat belt. Children should additi
onally be restrained
in a secure child restraint system.NOTE
If the seat belt subs
equently remains unfas-
tened, the warning li
ght and the tone will
issue further warnings
each time the vehicle
starts moving from a stop.
BK0278200US.book 23 ページ 2019年4月10日 水曜日 午前10時59分
Page 53 of 443
Seat belts 4-24 Seat and restraint systems
4
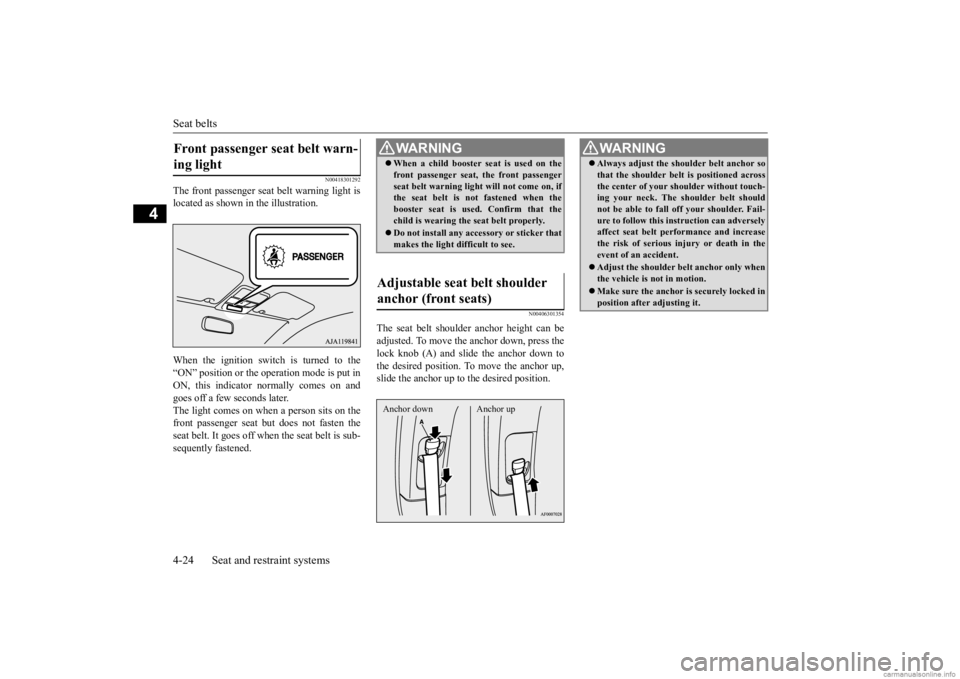
N00418301292
The front passenger seat
belt warning light is
located as shown in the illustration. When the ignition switch is turned to the “ON” position or the ope
ration mode is put in
ON, this indicator
normally comes on and
goes off a few seconds later. The light comes on when a person sits on thefront passenger seat but does not fasten the seat belt. It goes off wh
en the seat belt is sub-
sequently fastened.
N00406301354
The seat belt shoulder
anchor height can be
adjusted. To move the anchor down, press thelock knob (A) and slide the anchor down to the desired position. To
move the anchor up,
slide the anchor up to the desired position.
Front passenger seat belt warn- ing light
WA R N I N G When a child booster se
at is used on the
front passenger seat, the front passengerseat belt warning ligh
t will not come on, if
the seat belt is not fastened when the booster seat is used
. Confirm that the
child is wearing the
seat belt properly.
Do not install any acce
ssory or sticker that
makes the light difficult to see.
Adjustable seat belt shoulder anchor (front seats) Anchor down Anchor up
WA R N I N G Always adjust the shou
lder belt anchor so
that the shoulder belt
is positioned across
the center of your shoulder without touch-ing your neck. The sh
oulder belt should
not be able to fall off your shoulder. Fail- ure to follow this instruction can adverselyaffect seat belt performance and increase the risk of serious in
jury or death in the
event of an accident. Adjust the shoulder be
lt anchor only when
the vehicle is not in motion. Make sure the anchor is securely locked in position after adjusting it.
BK0278200US.book 24 ページ 2019年4月10日 水曜日 午前10時59分
Page 58 of 443
Child restraint systems
Seat and restraint systems 4-29
4
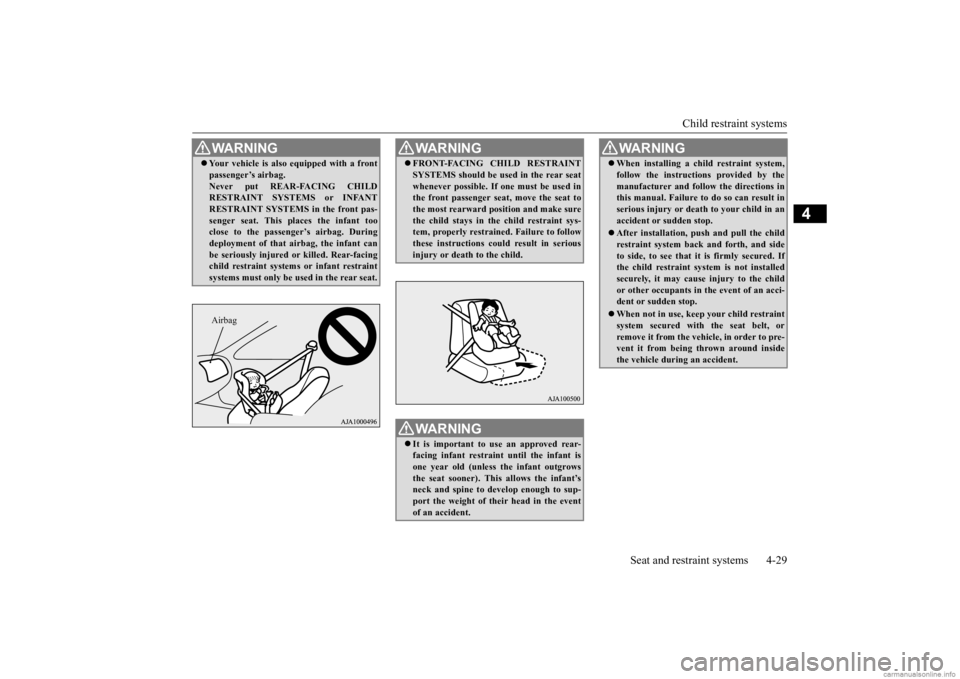
WA R N I N G Your vehicle is also
equipped with a front
passenger’s airbag.Never put REAR-FACING CHILDRESTRAINT SYSTEMS or INFANT RESTRAINT SYSTEMS in the front pas- senger seat. This pl
aces the infant too
close to the passenger’s airbag. During deployment of that airbag, the infant can be seriously injured or
killed. Rear-facing
child restraint systems or infant restraint systems must only be used in the rear seat.Airbag
WA R N I N G FRONT-FACING CHILD RESTRAINT SYSTEMS should be used in the rear seatwhenever possible. If one must be used inthe front passenger seat, move the seat to the most rearward po
sition and make sure
the child stays in the child restraint sys-tem, properly restrained. Failure to follow these instructions could result in serious injury or death to the child.WA R N I N G It is important to use an approved rear- facing infant restraint until the infant is one year old (unless
the infant outgrows
the seat sooner). This allows the infant’s neck and spine to de
velop enough to sup-
port the weight of their head in the eventof an accident.
When installing a child restraint system, follow the instructions provided by themanufacturer and follow the directions inthis manual. Failure to do so can result in serious injury or deat
h to your child in an
accident or
sudden stop.
After installation, push
and pull the child
restraint system back and forth, and sideto side, to see that it is firmly secured. If the child restraint system is not installed securely, it may cause injury to the childor other occupants in
the event of an acci-
dent or sudden stop. When not in use, keep your child restraint system secured with the seat belt, or remove it from the vehicle, in order to pre-vent it from being
thrown around inside
the vehicle during an accident.WA R N I N G
BK0278200US.book 29 ページ 2019年4月10日 水曜日 午前10時59分
Page 59 of 443

Child restraint systems 4-30 Seat and restraint systems
4
N00418801167
The outboard seating positions in the second row seat of your vehicle are equipped with lower anchors for attaching child restraint systems compatible with the LATCH system.
N00418901201
Your vehicle has 3 attachment points on thebackside of the second row seats. These are for securing a child restraint system tetherstrap to each of the 3
rear seating positions in
your vehicle.
NOTE
Before purchasing a child restraint system, try installing it in the rear seat to ensureproper fit. Due to the location of the seat beltbuckles and the shape of the seat cushion, it may be difficult to securely install some manufacturer’s child restraint systems.If the child restraint system can be pulled forward or to either side easily on the seat cushion after the seat
belt has been tightened,
choose another manufactu
rer’s child restraint
system. Depending on the seating position in thevehicle and the child restraint system that you have, the child restraint system can be attached using one of
the following 2 meth-
ods: • Attach to the lower anchorage in the second row seat ONLY if the child restraint system is compatible with the LATCH system (See page 4-30). • Attach to the seat belt (See page 4-32).
Installing a child restraint sys- tem using the LATCH (Lower Anchors and Tethers for chil- dren) system Lower anchor locations
NOTE
The symbols on the seatback show the loca- tion of the lower anchor points.
Tether anchor locations
BK0278200US.book 30 ページ 2019年4月10日 水曜日 午前10時59分
Page 60 of 443
Child restraint systems
Seat and restraint systems 4-31
4
N00419000198 N00419101301
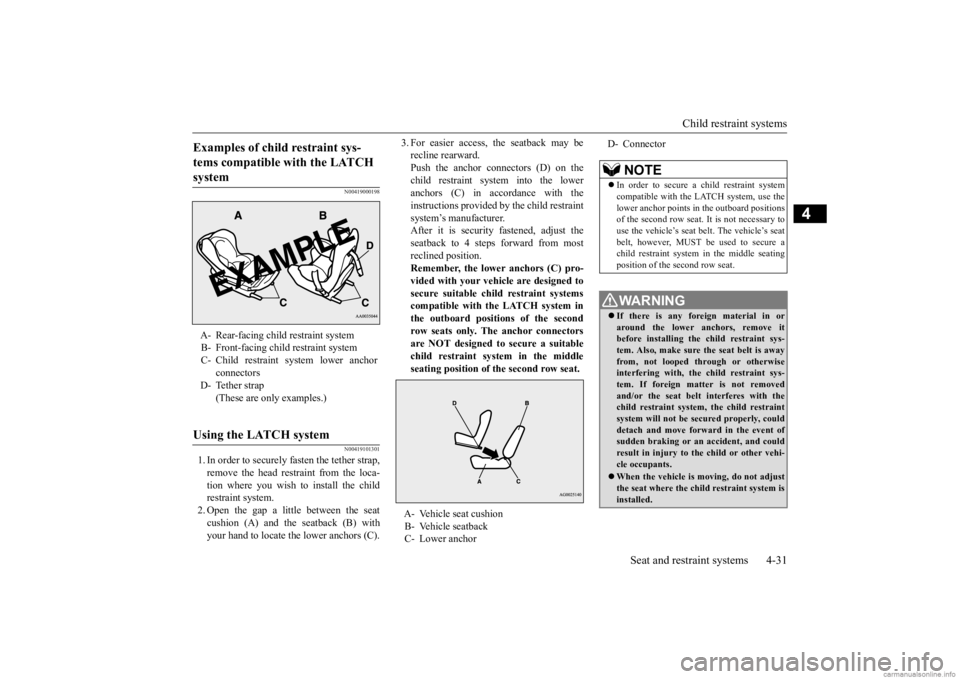
1. In order to securely fasten the tether strap, remove the head restraint from the loca- tion where you wish to install the child restraint system.2. Open the gap a little between the seat cushion (A) and the seatback (B) with your hand to locate the lower anchors (C).
3. For easier access, the seatback may be recline rearward.Push the anchor connectors (D) on the child restraint system into the lower anchors (C) in accordance with theinstructions provided by the child restraint system’s manufacturer. After it is security fastened, adjust theseatback to 4 steps forward from most reclined position. Remember, the lower anchors (C) pro- vided with your vehi
cle are designed to
secure suitable child restraint systemscompatible with the LATCH system in the outboard positions of the second row seats only. The anchor connectorsare NOT designed to secure a suitable child restraint system in the middle seating position of the second row seat.
Examples of child restraint sys- tems compatible with the LATCH system A- Rear-facing child
restraint system
B- Front-facing child restraint system C- Child restraint system lower anchor
connectors
D- Tether strap
(These are only examples.)
Using the LATCH system
A- Vehicle seat cushionB- Vehicle seatback C- Lower anchor
D- Connector
NOTE
In order to secure a child restraint system compatible with the LATCH system, use thelower anchor points in the outboard positions of the second row seat. It is not necessary to use the vehicle’s seat
belt. The vehicle’s seat
belt, however, MUST be
used to secure a
child restraint system in the middle seating position of the second row seat.WA R N I N G If there is any foreign material in or around the lower anchors, remove it before installing the child restraint sys- tem. Also, make sure the seat belt is awayfrom, not looped through or otherwise interfering with, the child restraint sys- tem. If foreign matter is not removedand/or the seat belt interferes with the child restraint system, the child restraint system will not be secured properly, coulddetach and move forward in the event of sudden braking or an
accident, and could
result in injury to the child or other vehi-cle occupants. When the vehicle is moving, do not adjust the seat where the child restraint system isinstalled.
BK0278200US.book 31 ページ 2019年4月10日 水曜日 午前10時59分
Page 61 of 443

Child restraint systems 4-32 Seat and restraint systems
4
4. Latch the tether strap hook (E) of the child restraint system to the tether anchor bar(F) and tighten the tether strap so it is securely fastened. 5. Push and pull the child restraint system in all directions to ensure it is firmlysecured.
N00407301553
With the exception of the driver, the seat beltin all other seating pos
itions can be converted
from normal Emergency Locking Retractor (ELR) mode, to Automatic Locking Retractor(ALR) mode. This means that when you pull the seat belt fully out of the retractor, the retractor will switch to its ALR child restraint
installation function.
Always use the ALR
child restraint instal
lation function when you
install a child restraint system using the seat belt. Children 12 years old and under shouldalways be restrained in the rear seat, when- ever possible, although the front passenger seat belt can also be
converted to ALR mode.
NOTE
If it is difficult to la
tch the tether strap hook,
turn the hook sideways.WA R N I N G Child restraint system tether anchors are designed only to with
stand loads from cor-
rectly fitted child restraint systems. Underno circumstances are they to be used for adult seat belts, harnesses, for attaching other items, or equipment to the vehicle.
When using a child restraint in a rear seating position, always review theinstructions provided with that restraintto make sure it is compatible with this vehicle and to understand how to properly install it.Child restraints, incl
uding booster seats,
come in different sizes and configurations. Depending on where you place these childrestraints, and depending on their size and configuration, you may not be able to access or properly use one or more adja-cent seat belt assemblies. If this occurs, the adjacent seating po
sition or positions
should not be used. Failure to use a seatbelt or improper use
of a seat belt can
result in serious injury or death should a crash occur.
Installing a child restraint sys- tem using the seat belt (with emergency/automatic locking mechanism)
WA R N I N G
WA R N I N G When you install a child restraint system using the seat belt, always make sure the retractor has been switched to the ALR child restraint instal
lation function. The
ALR function will keep the child restraint system tightly secured to the seat. Failure to convert the retractor to theALR function may allow the child restraint system to move forward during sudden braking
or an accide
nt, resulting
in serious injury or
death to the child or
other occupants.
BK0278200US.book 32 ページ 2019年4月10日 水曜日 午前10時59分
Page 63 of 443
Child restraint systems 4-34 Seat and restraint systems
4
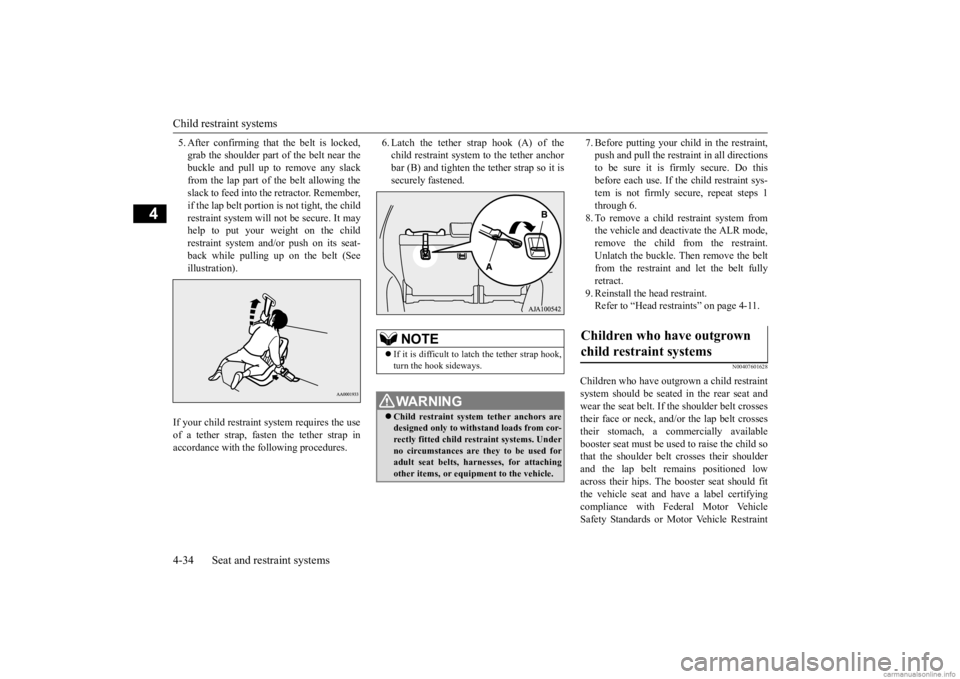
5. After confirming that the belt is locked, grab the shoulder part of the belt near thebuckle and pull up to remove any slack from the lap part of the belt allowing the slack to feed into the retractor. Remember,if the lap belt portion is not tight, the child restraint system will
not be secure. It may
help to put your weight on the childrestraint system and/or push on its seat- back while pulling up on the belt (See illustration).
6. Latch the tether strap hook (A) of the child restraint system to the tether anchorbar (B) and tighten the tether strap so it is securely fastened.
7. Before putting your child in the restraint, push and pull the restraint in all directionsto be sure it is firmly secure. Do this before each use. If
the child restraint sys-
tem is not firmly se
cure, repeat steps 1
through 6. 8. To remove a child restraint system from the vehicle and deactivate the ALR mode,remove the child from the restraint. Unlatch the buckle. Then remove the belt from the restraint and let the belt fully retract. 9. Reinstall the head restraint.Refer to “Head restra
ints” on page 4-11.
N00407601628
Children who have outgrown a child restraint system should be
seated in the rear seat and
wear the seat belt. If the shoulder belt crossestheir face or neck, and/or the lap belt crosses their stomach, a commercially available booster seat must be used
to raise the child so
that the shoulder belt
crosses their shoulder
and the lap belt re
mains positioned low
across their hips. The
booster seat should fit
the vehicle seat and ha
ve a label certifying
compliance with Federal Motor Vehicle Safety Standards or Motor Vehicle Restraint
If your child restraint system requires the use of a tether strap, fasten the tether strap in accordance with the following procedures.
NOTE
If it is difficult to
latch the tether strap hook,
turn the hook sideways.WA R N I N G Child restraint system tether anchors are designed only to with
stand loads from cor-
rectly fitted child restraint systems. Underno circumstances are they to be used for adult seat belts, harnesses, for attaching other items, or equipment to the vehicle.
Children who have outgrown child restraint systems
BK0278200US.book 34 ページ 2019年4月10日 水曜日 午前10時59分
Page 69 of 443
Supplemental Restraint System (SRS) - airbag 4-40 Seat and restraint systems
4
N00418101391
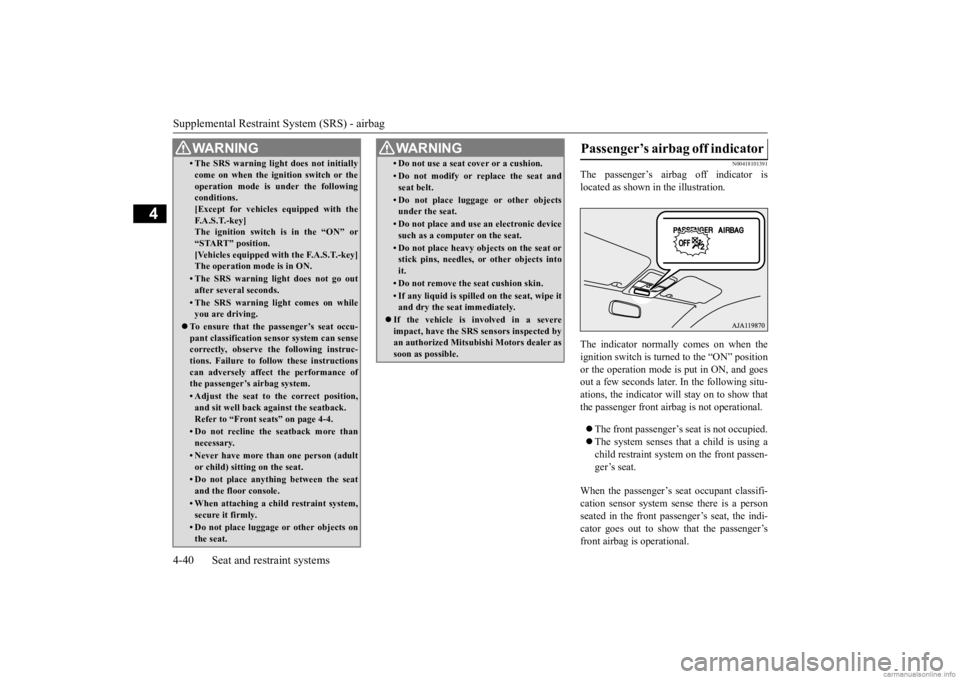
The passenger’s airbag off indicator is located as shown in
the illustration.
The indicator normally comes on when the ignition switch is turned to the “ON” position or the operation mode is put in ON, and goesout a few seconds later.
In the following situ-
ations, the indicator will stay on to show that the passenger front airb
ag is not operational.
The front passenger’s seat is not occupied. The system senses that a child is using a child restraint system on the front passen- ger’s seat.
When the passenger’s seat occupant classifi- cation sensor sy
stem sense there is a person
seated in the front passenger’s seat, the indi- cator goes out to show that the passenger’sfront airbag is operational.
• The SRS warning light does not initially come on when the ignition switch or theoperation mode is under the followingconditions. [Except for vehicles equipped with the F. A . S . T. - k e y ]The ignition switch is in the “ON” or “START” position. [Vehicles equipped with the F.A.S.T.-key]The operation mode is in ON.• The SRS warning light does not go outafter several seconds.• The SRS warning li
ght comes on while
you are driving.
To ensure that the passenger’s seat occu- pant classification sensor system can sense correctly, observe the following instruc- tions. Failure to follow these instructionscan adversely affect
the performance of
the passenger’s airbag system.• Adjust the seat to the correct position,and sit well back
against the seatback.
Refer to “Front seats” on page 4-4.• Do not recline the seatback more thannecessary.• Never have more than one person (adultor child) sitting
on the seat.
• Do not place anything between the seat and the floor console.• When attaching a chil
d restraint system,
secure it firmly.• Do not place luggage or other objects onthe seat.WA R N I N G
• Do not use a seat cover or a cushion.• Do not modify or re
place the seat and
seat belt.• Do not place luggage or other objectsunder the seat.• Do not place and use
an electronic device
such as a computer on the seat.• Do not place heavy obje
cts on the seat or
stick pins, needles, or other objects into it.• Do not remove the seat cushion skin.• If any liquid is spille
d on the seat, wipe it
and dry the seat immediately.
If the vehicle is involved in a severe impact, have the SRS sensors inspected by an authorized
Mitsubishi Motors dealer as
soon as possible.WA R N I N G
Passenger’s airbag off indicator
BK0278200US.book 40 ページ 2019年4月10日 水曜日 午前10時59分
Page 82 of 443
5
Features and controlsBreak-in recommendations ..............................................................5-3 Keys .................................................................................................5-3 Electronic immobilizer (Anti-theft starting system) ........................5-4Keyless entry system (if so equipped) ..............................................5-7 Free-hand Advanced Security
Transmitter (F.A.S.T.-key)
(if so equipped) ..........................................................................5-15Door locks ......................................................................................5-36 Power door locks ......
...........
...........
...........
...........
...........
.........
.....5-38
Child safety locks for rear door ..........
...........
.........
.........
.........
.....5-40
Liftgate (except for vehi
cles equipped with the
power liftgate) ....5-40
Power liftgate (if so equipped) .......................................................5-42 Inside liftgate release .....................................................................5-48Theft-alarm system ........................................................................5-49 Power window control ...................................................................5-51 Sunroof (if so equipped) .................................................................5-54Parking brake .................................................................................5-56 Steering wheel height and reach adjustment ..................................5-60 Inside rearview mirror ...................................................................5-60Outside rearview mirrors ...............................................................5-63 Ignition switch (if so equipped) ......................................................5-66 Steering wheel lock (if so equipped) ..............................................5-68Starting the engine .........................................................................5-68 Automatic transaxle (if so equipped)..............................................5-70 Continuously variable transmission
(CVT) (if so equipped)..........5-76
Electronically controlled
4WD system (if so equipped).................5-83
S-AWC (Super-All Wheel Control) (if
so equipped) .....................5-85
4-wheel drive operation .................................................................5-88Inspection and maintenance followi
ng rough road operation ........5-91
Cautions on the handling of 4-wheel dr
ive vehicles ..................... 5-91
Service brake ................................................................................. 5-92 Brake auto hold (if so equipped) .................................................... 5-93Hill start assist (if so equipped) ...................................................... 5-96 Brake assist system ........................................................................ 5-97 Anti-lock braking system .............................................................. 5-97Electric power steering system (EPS) ........................................... 5-99 Active stability control (ASC) ..................................................... 5-100 Cruise control (if so equipped) ..................................................... 5-103Adaptive Cruise Control System (ACC)
(if so equipped) ............ 5-107
Forward Collision Mitigation System
(FCM) (if so equipped) .... 5-118
Blind Spot Warning (BSW) (w
ith Lane Change Assist)
(if so equipped) ........................................................................ 5-127 Rear Cross Traffic Alert (RCTA) (if so equipped) ....................... 5-133 Lane Departure Warning System (LDW
) (if so equipped)........... 5-137
Tire pressure monitoring system ................................................. 5-140 Rear-view camera (if so equipped)............................................... 5-145 Multi Around Monitor (if so
equipped)..................
...........
........... 5-147
Instrument cluster ........................................................................ 5-156 Multi Information display ............................................................ 5-157 Indicator light, warning light, and information screen display list ..................................................................... 5-176 Indicators ..................................................................................... 5-195 Warning lights .............................................................................. 5-196Information screen display .......................................................... 5-198 Combination headlights and dimmer switch ............................... 5-199 Turn signal lever .......................................................................... 5-208Hazard warning flasher switch .................................................... 5-209
BK0278200US.book 1 ページ 2019年4月10日 水曜日 午前10時59分
Page 85 of 443

Electronic immobilizer (Anti-theft starting system) 5-4 Features and controls
5
N00509101891
[For vehicles equippe
d with the Free-hand
Advanced Security Transmitter (F.A.S.T.- key)]
For information on operations for vehicles equipped with the Free-hand Advanced Secu-rity Transmitter (F.A.S.T.-key), refer to “Free-hand Advanced Se
curity Transmitter
(F.A.S.T.-key): Electronic immobilizer (Anti-theft starting system)” on page 5-29. [Except for vehicles equipped with the Free- hand Advanced Security Transmitter (F.A.S.T.-key)]The electronic immobilize
r is designed to sig-
nificantly reduce the
possibility of vehicle
theft. The purpose of the system is to immo- bilize the vehicle if
an invalid start is
attempted. A valid st
art attempt can only be
achieved (subject to ce
rtain conditions) using
a key “registered” to the immobilizer system. All of the keys provided with your new vehi-cle have been program
med to the vehicle’s
electronics.
• Do not leave where it may be exposed to heat caused by
direct sunlight, such as on
top of the dashboard. • Do not take the remote control transmitter apart. • Do not excessively be
nd the key or subject
it to strong impacts. • Keep the remote control transmitter dry. • Keep away from magnetic objects such as key rings. • Keep away from devi
ces that produce mag-
netism, such as audio systems, computers and televisions. • Keep away from devices that emit strong electromagneti
c waves, such as cellular
phones, wireless devices and high fre- quency equipment (i
ncluding medical
devices). • Do not clean with
ultrasonic cleaners.
• Do not leave the key where it may be exposed to high temperature or high humid- ity.
If you lose your key, to prevent the theft of the vehicle immediatel
y contact an autho-
rized Mitsubishi Motors dealer. If you notify an authorized Mitsubishi Motors dealer of the key number, they canmake a new key. The key number is stamped on the key number plate. Keep the key num- ber plate in a safe pl
ace separate from the
key itself.NOTE
No keys other than those registered in advance can be used
to start the engine.
Refer to “Electronic immobilizer (Anti-theftstarting system)” on page 5-4. Refer to “Free-hand
Advanced Security
Transmitter (F.A.S.T.-key): “Electronicimmobilizer (Anti-thef
t starting system)” on
page 5-29. When the theft-alarm is in the system opera- tional status, the alarm operates if a door or liftgate is opened after using the key, thedoor lock knob or the power door lock switch to unlock the vehicle. The system does not enter the preparation status if the keyless entry system or the F.A.S.T.-key operation was not used to lockthe vehicle.
Electronic immobilizer (Anti-theft starting system)
CAUTION Do not make any altera
tions or additions to
the immobilizer system.
Alterations or addi-
tions could cause failur
e of the immobilizer.
NOTE
NOTE
In the following cases, the vehicle may not be able to recognize
the registered ID code
from the key. This mean
s the engine will not
start even when the key is turned to the “START” position.
BK0278200US.book 4 ページ 2019年4月10日 水曜日 午前10時59分