clock MITSUBISHI OUTLANDER 2020 (in English) User Guide
[x] Cancel search | Manufacturer: MITSUBISHI, Model Year: 2020, Model line: OUTLANDER, Model: MITSUBISHI OUTLANDER 2020Pages: 443, PDF Size: 60.03 MB
Page 370 of 443
How to change a tire
For emergencies 8-17
8
N00832300046
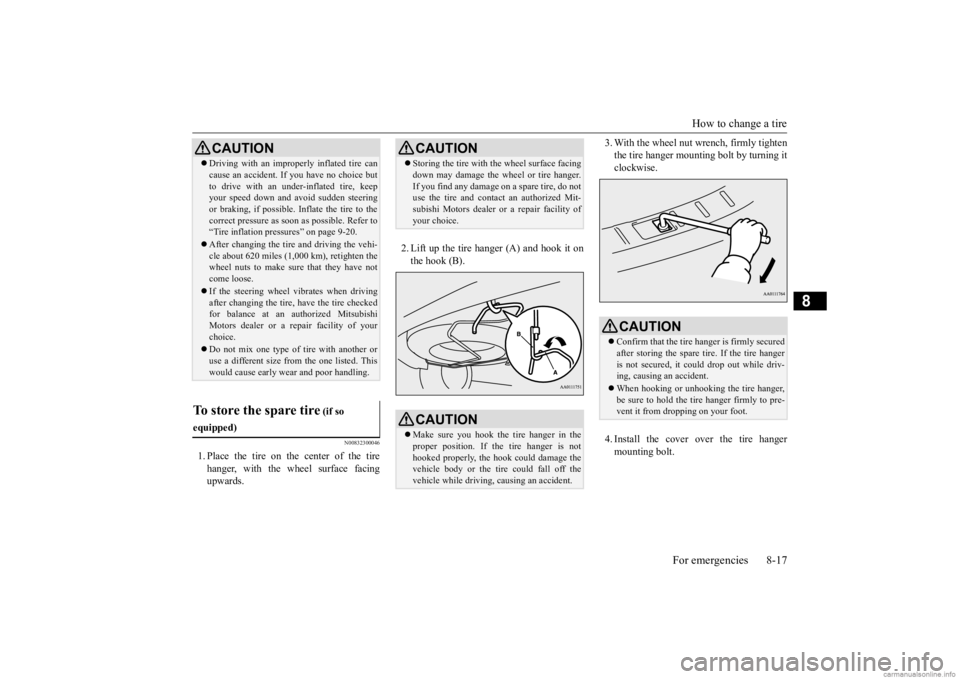
1. Place the tire on the center of the tire hanger, with the wheel surface facing upwards.
2. Lift up the tire hanger (A) and hook it on the hook (B).
3. With the wheel nut wrench, firmly tighten the tire hanger mounting bolt by turning itclockwise. 4. Install the cover over the tire hanger mounting bolt.
CAUTION Driving with an imprope
rly inflated tire can
cause an accident. If
you have no choice but
to drive with an under-inflated tire, keepyour speed down and avoid sudden steering or braking, if possible. Inflate the tire to the correct pressure as s
oon as possible. Refer to
“Tire inflation pressures” on page 9-20. After changing the tire
and driving the vehi-
cle about 620 miles (1,000 km), retighten the wheel nuts to make sure
that they have not
come loose. If the steering wheel vibrates when driving after changing the tire, have the tire checkedfor balance at an authorized Mitsubishi Motors dealer or a repair facility of your choice. Do not mix one type of tire with another or use a different size from the one listed. Thiswould cause ea
rly wear and poor handling.
To store the spare tire
(if so
equipped)
CAUTION Storing the tire with the wheel surface facing down may damage the wheel or tire hanger.If you find any damage
on a spare tire, do not
use the tire and contact an authorized Mit- subishi Motors dealer or a repair facility of your choice.CAUTION Make sure you hook the tire hanger in the proper position. If the tire hanger is nothooked properly, the hook could damage the vehicle body or the tire could fall off the vehicle while driving,
causing an accident.
CAUTIONConfirm that the tire ha
nger is firmly secured
after storing the spare
tire. If the tire hanger
is not secured, it could drop out while driv- ing, causing
an accident.
When hooking or unhooking the tire hanger, be sure to hold the tire hanger firmly to pre- vent it from dropping on your foot.
BK0278200US.book 17 ページ 2019年4月10日 水曜日 午前10時59分
Page 409 of 443
Replacement of light bulbs 9-36 Vehicle care and maintenance
9
N00901801216
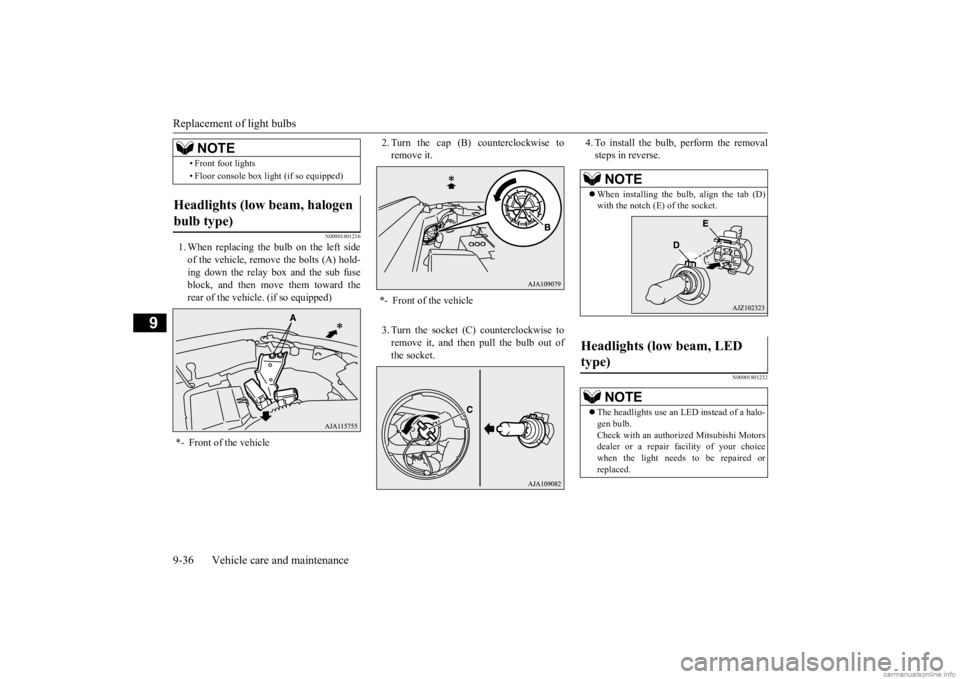
1. When replacing the bulb on the left side of the vehicle, remove the bolts (A) hold- ing down the relay box and the sub fuseblock, and then move them toward the rear of the vehicle. (if so equipped)
2. Turn the cap (B) counterclockwise to remove it. 3. Turn the socket (C) counterclockwise to remove it, and then pull the bulb out of the socket.
4. To install the bulb, perform the removal steps in reverse.
N00901801232
• Front foot lights • Floor console box light (if so equipped)
Headlights (low beam, halogen bulb type) *- Front of the vehicle
NOTE
*- Front of the vehicle
NOTE
When installing the bulb, align the tab (D) with the notch (E) of the socket.
Headlights (low beam, LED type)
NOTE
The headlights use an LED instead of a halo- gen bulb.Check with an authorized Mitsubishi Motors dealer or a repair fa
cility of your choice
when the light needs to be repaired orreplaced.
BK0278200US.book 36 ページ 2019年4月10日 水曜日 午前10時59分
Page 410 of 443
Replacement of light bulbs
Vehicle care and maintenance 9-37
9
N00901901158
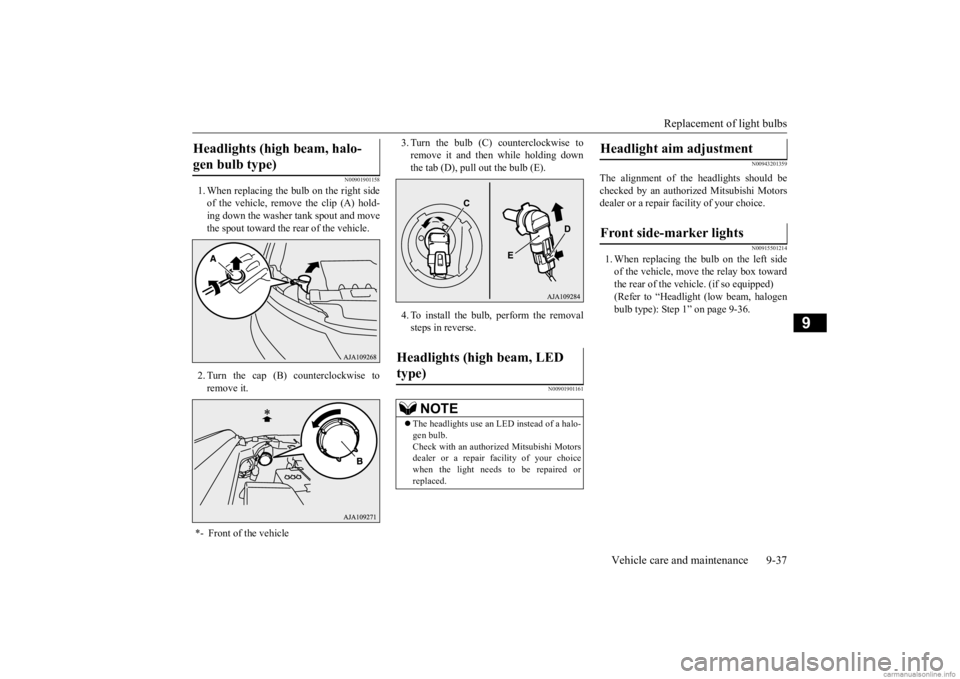
1. When replacing the bulb on the right side of the vehicle, rem
ove the clip (A) hold-
ing down the washer tank spout and move the spout toward the rear of the vehicle. 2. Turn the cap (B) counterclockwise to remove it.
3. Turn the bulb (C) counterclockwise to remove it and then while holding downthe tab (D), pull out the bulb (E). 4. To install the bulb, perform the removal steps in reverse.
N00901901161
N00943201359
The alignment of the headlights should be checked by an authorized Mitsubishi Motors dealer or a repair fa
cility of your choice.
N00915501214
1. When replacing the bulb on the left side of the vehicle, move the relay box toward the rear of the vehicle. (if so equipped) (Refer to “Headlight
(low beam, halogen
bulb type): Step 1” on page 9-36.
Headlights (high beam, halo- gen bulb type) *- Front of the vehicle
Headlights (high beam, LED type)
NOTE
The headlights use an LED instead of a halo- gen bulb.Check with an authorized Mitsubishi Motors dealer or a repair fa
cility of your choice
when the light needs to be repaired orreplaced.
Headlight aim adjustment Front side-marker lights
BK0278200US.book 37 ページ 2019年4月10日 水曜日 午前10時59分
Page 411 of 443
Replacement of light bulbs 9-38 Vehicle care and maintenance
9
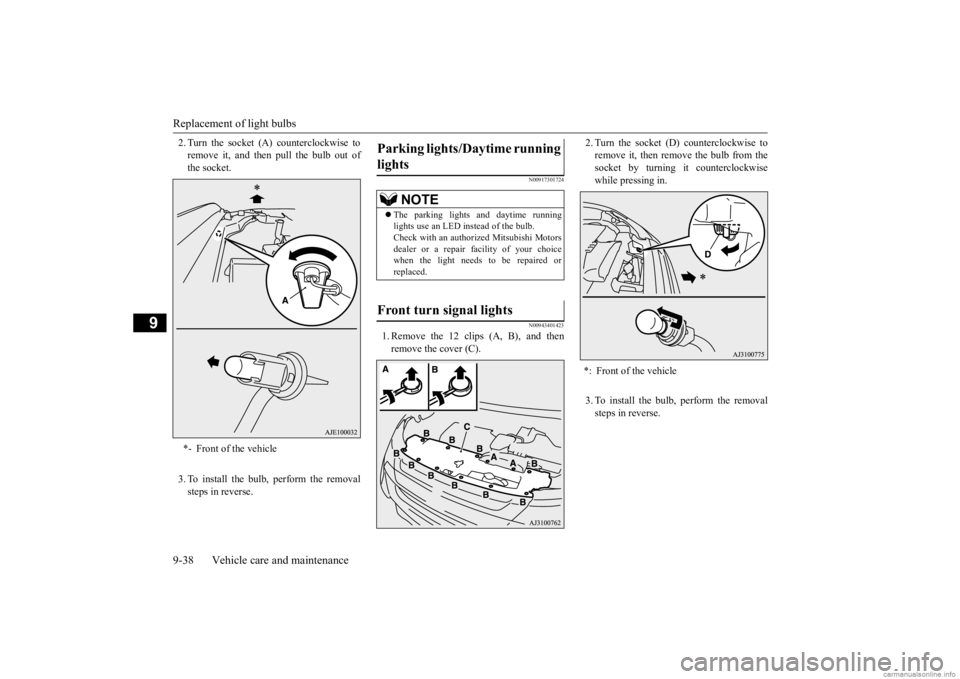
2. Turn the socket (A) counterclockwise to remove it, and then pull the bulb out ofthe socket. 3. To install the bulb, perform the removal steps in reverse.
N00917301724 N00943401423
1. Remove the 12 clips (A, B), and then remove the cover (C).
2. Turn the socket (D) counterclockwise to remove it, then remove the bulb from thesocket by turning it counterclockwise while pressing in. 3. To install the bulb, perform the removal steps in reverse.
*- Front of the vehicle
Parking lights/Daytime running lights
NOTE
The parking lights
and daytime running
lights use an LED instead of the bulb. Check with an authorized Mitsubishi Motorsdealer or a repair facility of your choice when the light needs to be repaired or replaced.
Front turn signal lights
*: Front of the vehicle
BK0278200US.book 38 ページ 2019年4月10日 水曜日 午前10時59分
Page 412 of 443
Replacement of light bulbs
Vehicle care and maintenance 9-39
9
N00943501189 N00943601920
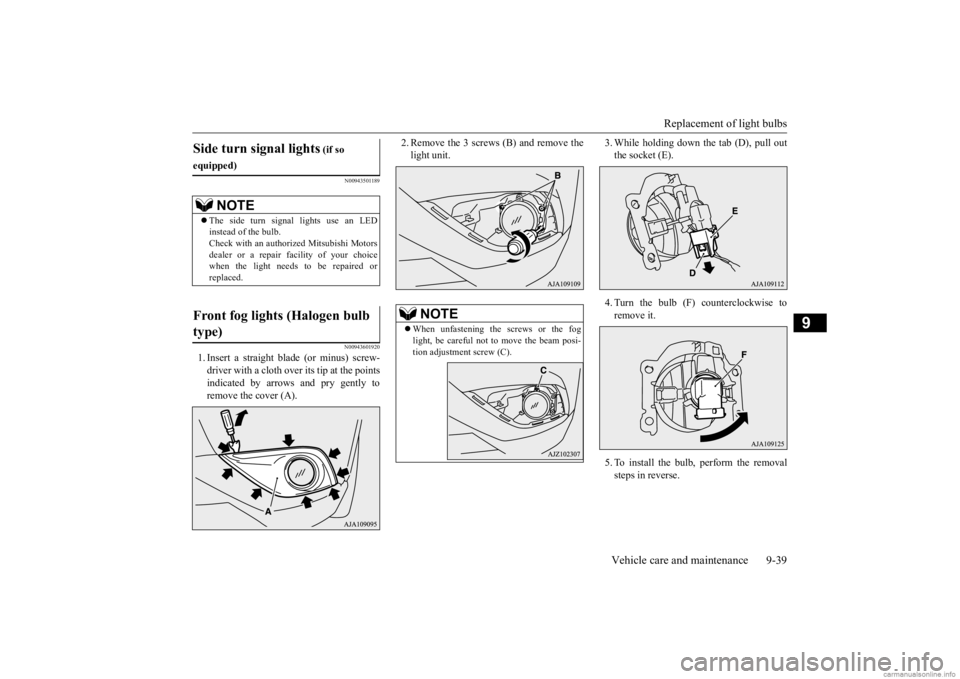
1. Insert a straight blade (or minus) screw- driver with a cloth over its tip at the points indicated by arrows
and pry gently to
remove the cover (A).
2. Remove the 3 screws (B) and remove the light unit.
3. While holding down the tab (D), pull out the socket (E). 4. Turn the bulb (F) counterclockwise to remove it. 5. To install the bulb, perform the removal steps in reverse.
Side turn signal lights
(if so
equipped)
NOTE
The side turn signal lights use an LED instead of the bulb. Check with an authorized Mitsubishi Motors dealer or a repair facility of your choicewhen the light needs to be repaired or replaced.
Front fog lights (Halogen bulb type)
NOTE
When unfastening the screws or the fog light, be careful not to
move the beam posi-
tion adjustment screw (C).
BK0278200US.book 39 ページ 2019年4月10日 水曜日 午前10時59分
Page 413 of 443
Replacement of light bulbs 9-40 Vehicle care and maintenance
9
N00943601988 N00943701598
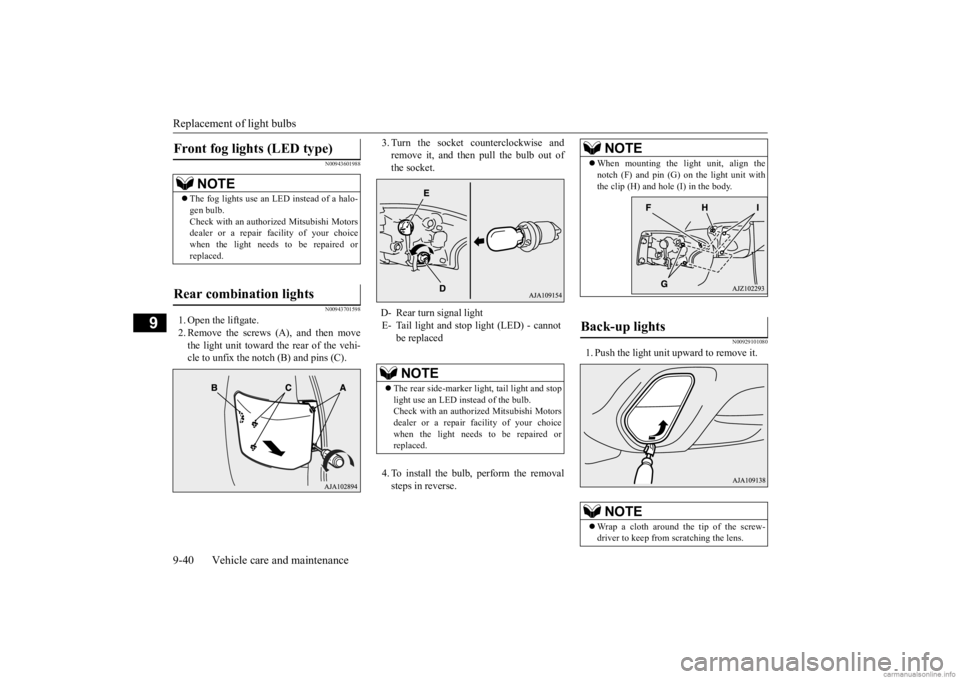
1. Open the liftgate. 2. Remove the screws
(A), and then move
the light unit toward the rear of the vehi- cle to unfix the notch (B) and pins (C).
3. Turn the socket counterclockwise and remove it, and then pull the bulb out ofthe socket. 4. To install the bulb, perform the removal steps in reverse.
N00929101080
1. Push the light unit upward to remove it.
Front fog lights (LED type)
NOTE
The fog lights use an LED instead of a halo- gen bulb.Check with an authorized Mitsubishi Motors dealer or a repair fa
cility of your choice
when the light needs to be repaired orreplaced.
Rear combination lights
D- Rear turn signal light E- Tail light and stop light (LED) - cannot
be replacedNOTE
The rear side-marker light, tail light and stop light use an LED instead of the bulb. Check with an authorized Mitsubishi Motorsdealer or a repair facility of your choice when the light needs to be repaired or replaced.
NOTE
When mounting the light unit, align the notch (F) and pin (G)
on the light unit with
the clip (H) and hole (I) in the body.
Back-up lights
NOTE
Wrap a cloth around the tip of the screw- driver to keep from scratching the lens.
BK0278200US.book 40 ページ 2019年4月10日 水曜日 午前10時59分
Page 414 of 443
Replacement of light bulbs
Vehicle care and maintenance 9-41
9
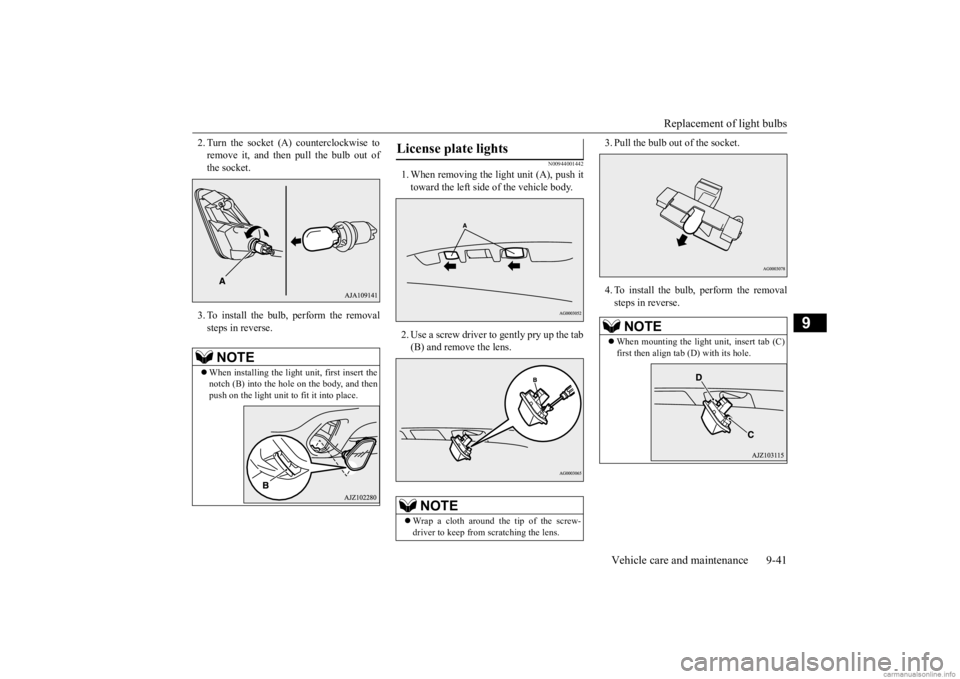
2. Turn the socket (A
) counterclockwise to
remove it, and then pull the bulb out ofthe socket. 3. To install the bulb, perform the removal steps in reverse.
N00944001442
1. When removing the li
ght unit (A), push it
toward the left side of the vehicle body. 2. Use a screw driver to gently pry up the tab (B) and remove the lens.
3. Pull the bulb out of the socket. 4. To install the bulb, perform the removal steps in reverse.
NOTE
When installing the light unit, first insert the notch (B) into the hole on the body, and thenpush on the light unit to fit it into place.
License plate lights
NOTE
Wrap a cloth around the tip of the screw- driver to keep from scratching the lens.
NOTE
When mounting the light unit, insert tab (C) first then align tab (D) with its hole.
BK0278200US.book 41 ページ 2019年4月10日 水曜日 午前10時59分