Locked MITSUBISHI OUTLANDER 2020 Owner's Manual (in English)
[x] Cancel search | Manufacturer: MITSUBISHI, Model Year: 2020, Model line: OUTLANDER, Model: MITSUBISHI OUTLANDER 2020Pages: 443, PDF Size: 60.03 MB
Page 33 of 443
Seats and restraint systems 4-4 Seat and restraint systems
4
N00401601251
Your vehicle has seat
belts and other safety
features that help protect you and your pas- sengers in an accident.Seat belts are the most important safety device. When worn properly, seat belts can reduce the chance of serious injury or deathin various types of crashes. For added protec- tion during a severe fr
ontal collision, your
vehicle has a Supplemental Restraint System (SRS) with airbags for the driver and passen- gers. The seats, head restraints, and doorlocks also are safety equipment, which must be used correctly. Always check the following before you drive: That everyone in your vehicle is properly wearing their seat belt. That infants and small children are prop- erly secured in an appropriate child restraint system in the rear seat. That all doors are fully closed and locked. That seatbacks are upright, with head restraints properly adjusted.
Safety equipment cannot prevent injury or death in all motor ve
hicle accidents. How-
ever, you can help reduce the risk of injury or death, by following the instructions in thismanual.
N00401801497
Position the driver’s seat
as far back as possi-
ble while maintaining a position that stillenables you to fully apply the pedals, easily control the steering wh
eel and safely operate
the vehicle.
Seats and restraint systems
WA R N I N G Do not place objects under the seats. This could prevent the seat from lockingsecurely, and it could
lead to an accident.
It may also cause damage to the seat or other parts.
Front seats
WA R N I N G Do not attempt to adjust the seat while driving. This can cause loss of vehicle con- trol and result
in an accident.
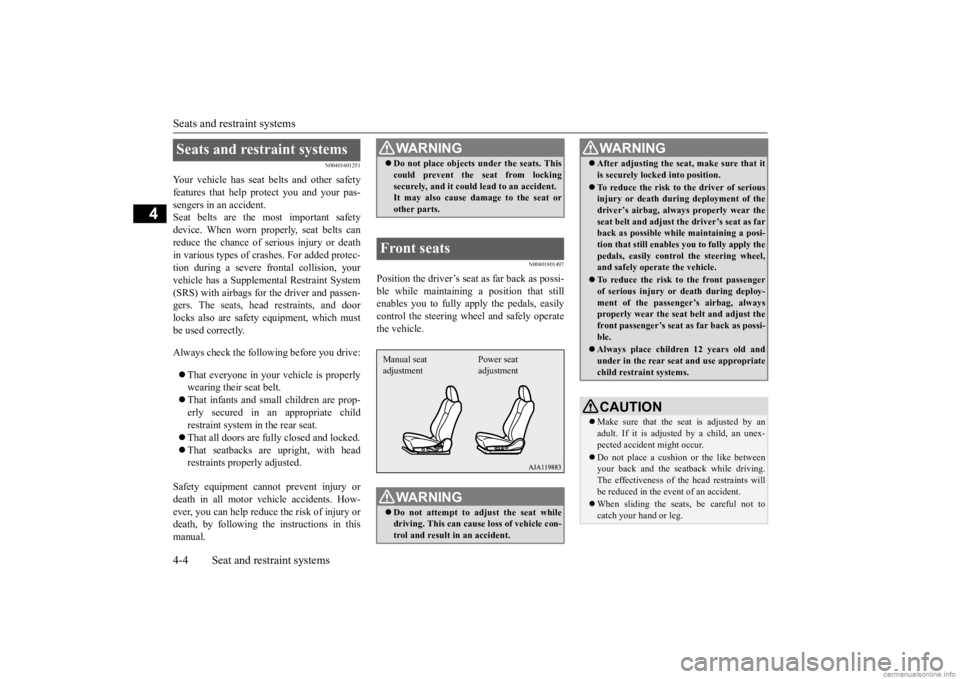
Manual seat adjustment
Power seat adjustment
After adjusting the seat, make sure that it is securely locked into position. To reduce the risk to the driver of serious injury or death duri
ng deployment of the
driver’s airbag, always
properly wear the
seat belt and adjust th
e driver’s seat as far
back as possible while maintaining a posi- tion that still enables
you to fully apply the
pedals, easily control the steering wheel, and safely operate the vehicle. To reduce the risk to the front passenger of serious injury or
death during deploy-
ment of the passeng
er’s airbag, always
properly wear the seat
belt and adjust the
front passenger’s seat as far back as possi- ble. Always place childr
en 12 years old and
under in the rear seat
and use appropriate
child restraint systems.CAUTION Make sure that the seat is adjusted by an adult. If it is adjusted by a child, an unex- pected accident might occur. Do not place a cushion
or the like between
your back and the seatback while driving. The effectiveness of the head restraints will be reduced in the event of an accident. When sliding the seat
s, be careful not to
catch your hand or leg.WA R N I N G
BK0278200US.book 4 ページ 2019年4月10日 水曜日 午前10時59分
Page 34 of 443
Front seats
Seat and restraint systems 4-5
4
N00401901326
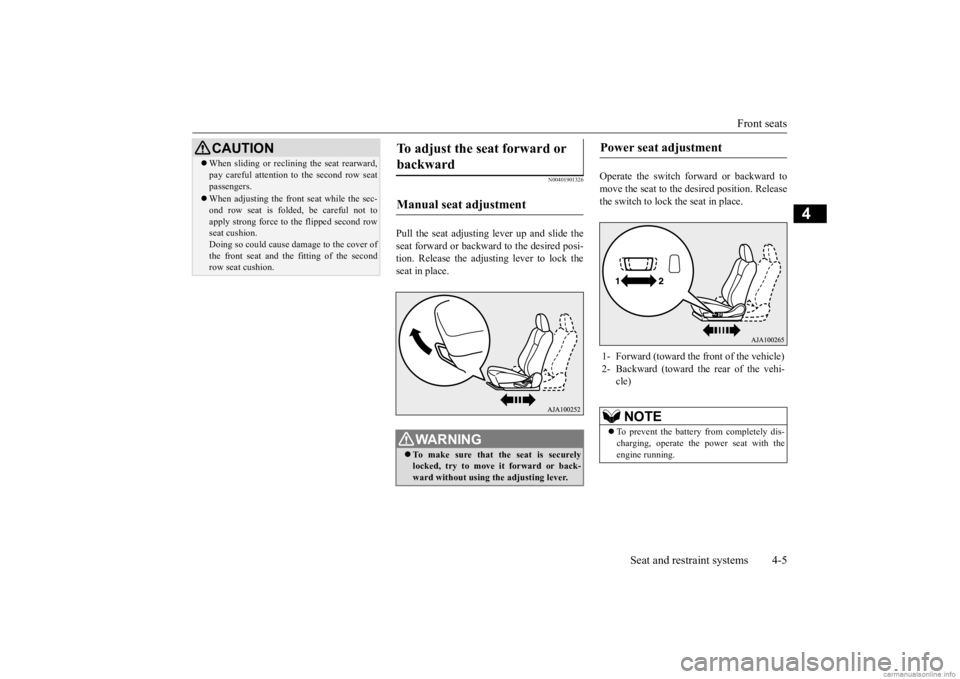
Pull the seat adjusting lever up and slide the seat forward or backward to the desired posi-tion. Release the adjusting lever to lock the seat in place.
Operate the switch forward or backward to move the seat to the de
sired position. Release
the switch to lock the seat in place.
When sliding or reclin
ing the seat rearward,
pay careful attention
to the second row seat
passengers. When adjusting the front seat while the sec- ond row seat is folded, be careful not toapply strong force to the flipped second row seat cushion. Doing so could cause da
mage to the cover of
the front seat and the
fitting of the second
row seat cushion.CAUTION
To adjust the seat forward or backward Manual seat adjustment
WA R N I N G To make sure that the seat is securely locked, try to move
it forward or back-
ward without using
the adjusting lever.
Power seat adjustment 1- Forward (toward the front of the vehicle) 2- Backward (toward the rear of the vehi-
cle)NOTE
To prevent the battery from completely dis- charging, operate the
power seat with the
engine running.
BK0278200US.book 5 ページ 2019年4月10日 水曜日 午前10時59分
Page 38 of 443
Second row seats
Seat and restraint systems 4-9
4
N00402501231
When sitting in the mid
dle seating position of
the second row seat, adju
st the head restraints
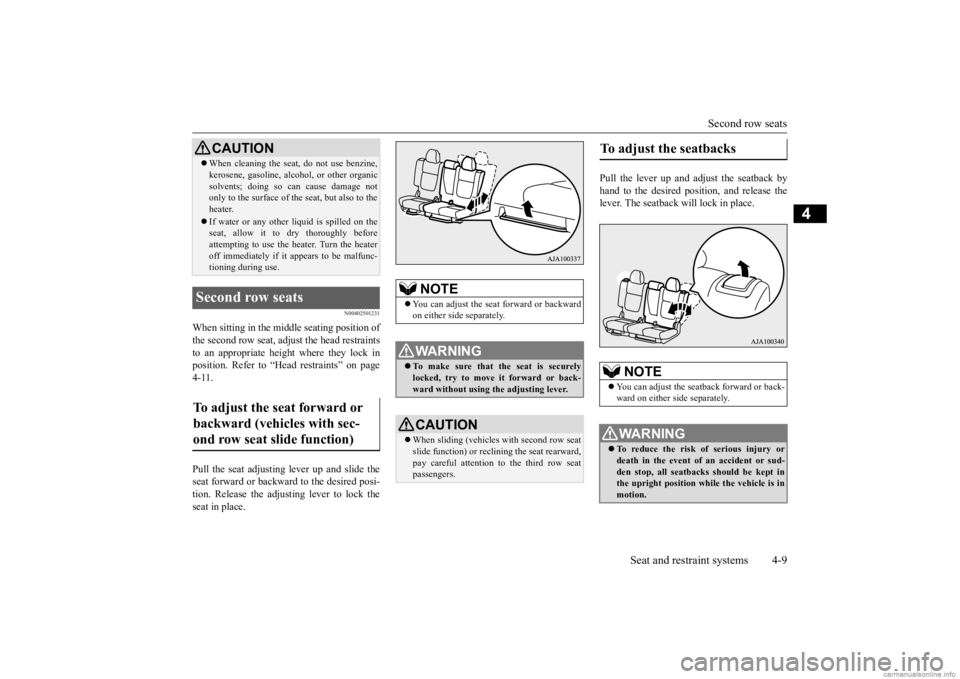
to an appropriate height where they lock inposition. Refer to “Head restraints” on page 4-11. Pull the seat adjusting lever up and slide the seat forward or backwa
rd to the desired posi-
tion. Release the adjusting lever to lock the seat in place.
Pull the lever up and adjust the seatback by hand to the desired posit
ion, and release the
lever. The seatback will lock in place.
When cleaning the seat, do not use benzine, kerosene, gasoli
ne, alcohol, or other organic
solvents; doing so can cause damage notonly to the surface of the seat, but also to the heater. If water or any other liquid is spilled on the seat, allow it to dry thoroughly before attempting to use the heater. Turn the heateroff immediately if it a
ppears to be malfunc-
tioning during use.
Second row seats To adjust the seat forward or backward (vehicles with sec-ond row seat slide function)
CAUTION
NOTE
You can adjust the seat forward or backward on either side separately.WA R N I N G To make sure that the seat is securely locked, try to move
it forward or back-
ward without using
the adjusting lever.
CAUTIONWhen sliding (vehicles with second row seat slide function) or reclin
ing the seat rearward,
pay careful attention to the third row seatpassengers.
To adjust the seatbacks
NOTE
You can adjust the seatback forward or back- ward on either side separately.WA R N I N G To reduce the risk of serious injury or death in the event of
an accident or sud-
den stop, all seatbacks should be kept inthe upright position while the vehicle is in motion.
BK0278200US.book 9 ページ 2019年4月10日 水曜日 午前10時59分
Page 39 of 443
Second row seats 4-10 Seat and restraint systems
4
N00403001318
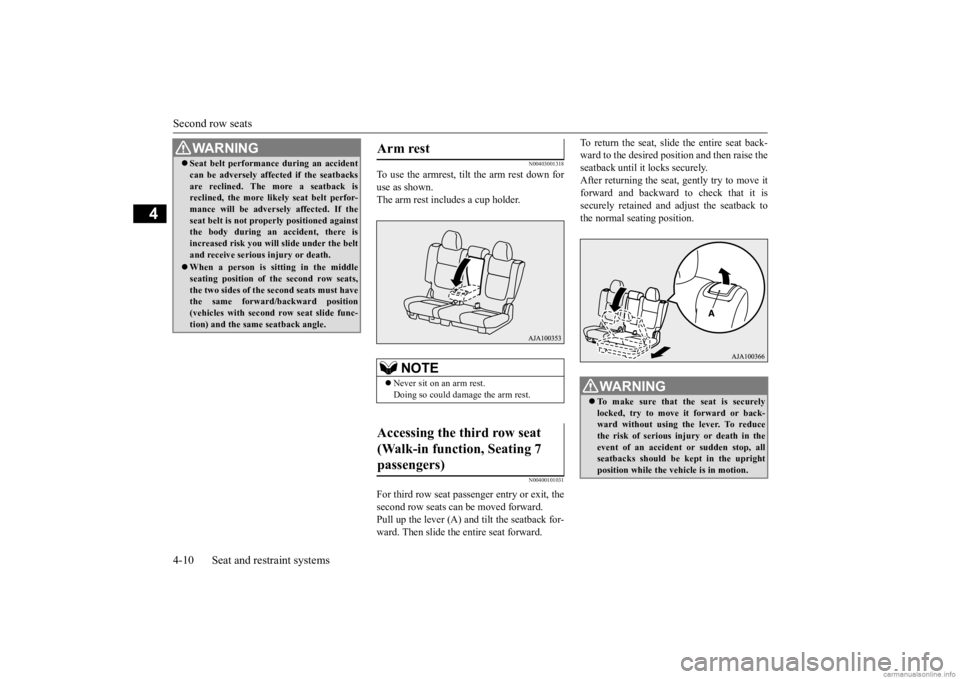
To use the armrest, tilt the arm rest down for use as shown. The arm rest includes a cup holder.
N00400101031
For third row seat passenger entry or exit, thesecond row seats can be moved forward.Pull up the lever (A) and tilt the seatback for- ward. Then slide the entire seat forward.
To return the seat, slide the entire seat back- ward to the desired position and then raise theseatback until it locks securely. After returning the seat, gently try to move it forward and backward to check that it issecurely retained and adjust the seatback to the normal seating position.
Seat belt performance during an accident can be adversely affect
ed if the seatbacks
are reclined. The more a seatback isreclined, the more likely seat belt perfor- mance will be adversely affected. If the seat belt is not proper
ly positioned against
the body during an accident, there is increased risk you will slide under the belt and receive serious
injury or death.
When a person is si
tting in the middle
seating position of
the second row seats,
the two sides of the second seats must have the same forward/backward position (vehicles with second row seat slide func-tion) and the same seatback angle.WA R N I N G
Arm rest
NOTE
Never sit on an arm rest. Doing so could damage the arm rest.
Accessing the third row seat (Walk-in function, Seating 7 passengers)
WA R N I N G To make sure that the seat is securely locked, try to move it forward or back-ward without using the lever. To reduce the risk of serious in
jury or death in the
event of an accident
or sudden stop, all
seatbacks should be kept in the upright position while the vehicle is in motion.
BK0278200US.book 10 ページ 2019年4月10日 水曜日 午前10時59分
Page 41 of 443
Head restraints 4-12 Seat and restraint systems
4
To reduce the risk of injury in an accident, adjust the head restraint height so that thecenter of the restraint
is at your ear level
when seated. Any person too tall for the restraint to reach their ear level when seatedshould raise the restrain
t to the highest locked
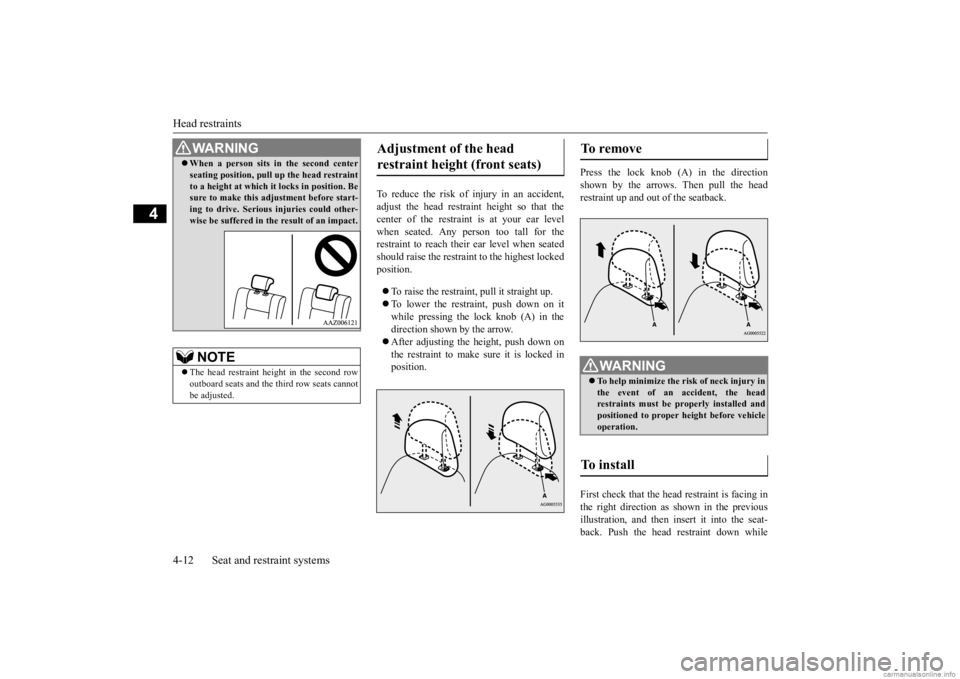
position. To raise the restraint,
pull it straight up.
To lower the restraint, push down on it while pressing the lock knob (A) in the direction shown by the arrow. After adjusting the height, push down on the restraint to make sure it is locked in position.
Press the lock knob (A) in the direction shown by the arrows. Then pull the head restraint up and out of the seatback. First check that the head restraint is facing in the right direction as
shown in the previous
illustration, and then insert it into the seat- back. Push the head restraint down while
When a person sits in the second center seating position, pull
up the head restraint
to a height at which it locks in position. Besure to make this adjustment before start- ing to drive. Serious injuries could other- wise be suffered in the result of an impact.NOTE
The head restraint height in the second row outboard seats and the third row seats cannot be adjusted.WA R N I N G
Adjustment of the head restraint height (front seats)
To remove
WA R N I N G To help minimize the risk of neck injury in the event of an
accident, the head
restraints must be properly installed and positioned to proper height before vehicle operation.
To install
BK0278200US.book 12 ページ 2019年4月10日 水曜日 午前10時59分
Page 42 of 443
Making a cargo area
Seat and restraint systems 4-13
4
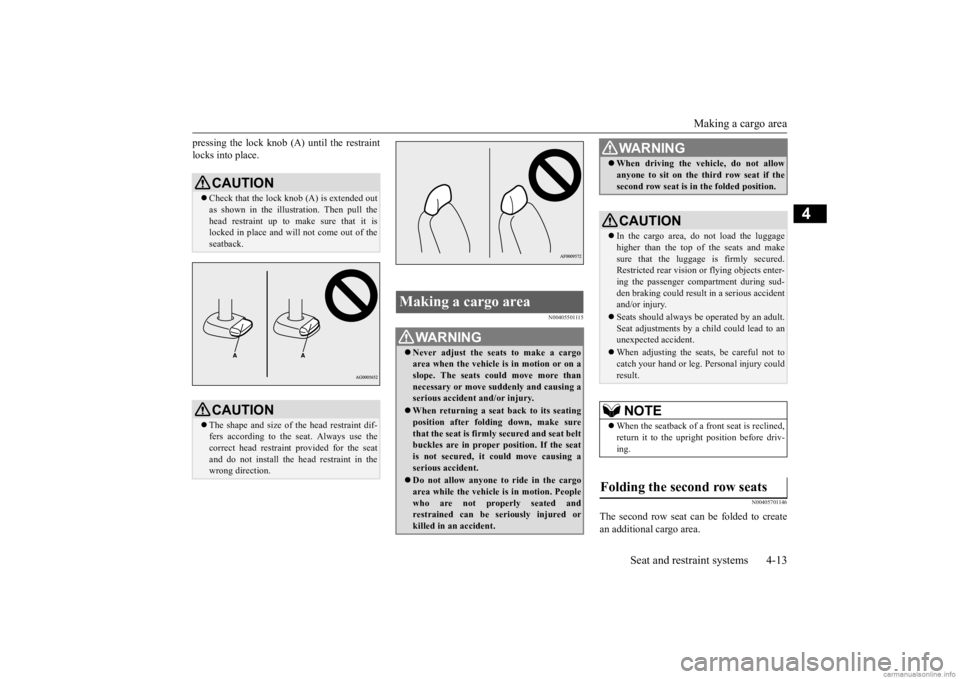
pressing the lock knob (A
) until the restraint
locks into place.
N00405501115
N00405701146
The second row seat can be folded to create an additional cargo area.
CAUTION Check that the lock knob (A) is extended out as shown in the illustration. Then pull the head restraint up to make sure that it is locked in place and will
not come out of the
seatback.CAUTION The shape and size of the head restraint dif- fers according to the seat. Always use the correct head restrain
t provided for the seat
and do not install the he
ad restraint in the
wrong direction.
Making a cargo area
WA R N I N G Never adjust the seats to make a cargo area when the vehicle is
in motion or on a
slope. The seats could move more thannecessary or move suddenly and causing a serious accident
and/or injury.
When returning a seat back to its seating position after folding down, make sure that the seat is firmly secured and seat beltbuckles are in proper position. If the seat is not secured, it could move causing a serious accident. Do not allow anyone to ride in the cargo area while the vehicle
is in motion. People
who are not properly seated and restrained can be seriously injured or killed in an accident.
When driving the vehicle, do not allow anyone to sit on the th
ird row seat if the
second row seat is in the folded position.CAUTION In the cargo area, do not load the luggage higher than the top of the seats and makesure that the luggage is firmly secured. Restricted rear vision
or flying objects enter-
ing the passenger compartment during sud-den braking could result
in a serious accident
and/or injury. Seats should always be
operated by an adult.
Seat adjustments by a child could lead to an unexpected
accident.
When adjusting the seats, be careful not to catch your hand or leg.
Personal injury could
result.NOTE
When the seatback of a front seat is reclined, return it to the upright position before driv- ing.
Folding the second row seats
WA R N I N G
BK0278200US.book 13 ページ 2019年4月10日 水曜日 午前10時59分
Page 46 of 443
Making a flat seat
Seat and restraint systems 4-17
4
N00404801166
The entire interior of the vehicle may be used for sleeping accomm
odations by removing
the head restraints and fully reclining all theseats when the ve
hicle is stopped.
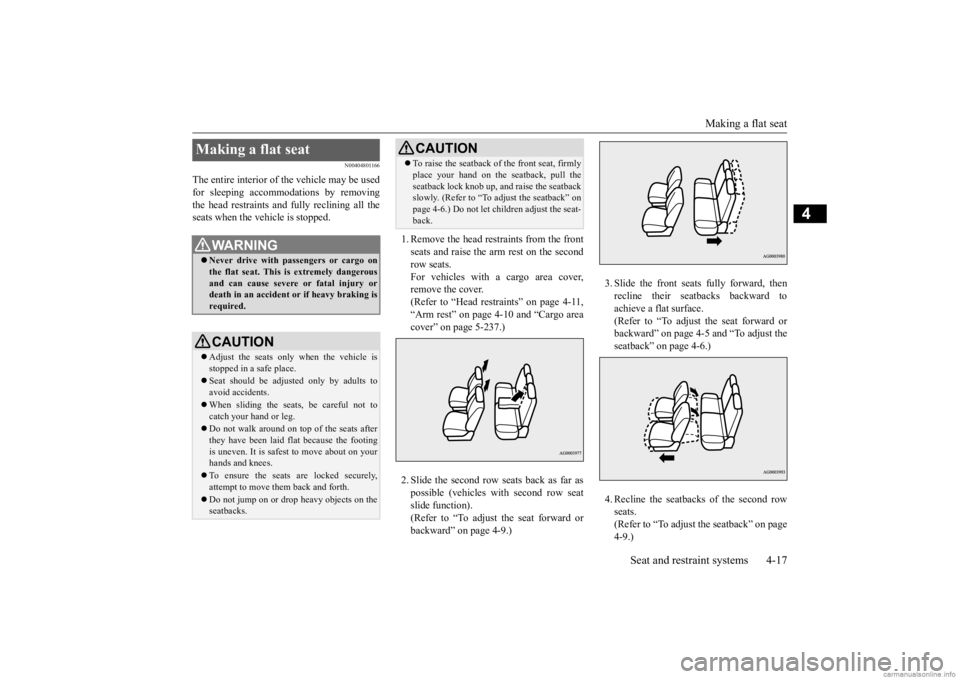
1. Remove the head re
straints from the front
seats and raise the arm rest on the secondrow seats. For vehicles with a cargo area cover, remove the cover.(Refer to “Head restraints” on page 4-11, “Arm rest” on page 4-10 and “Cargo area cover” on page 5-237.) 2. Slide the second row seats back as far as possible (vehicles with second row seat slide function).(Refer to “To adjust the seat forward or backward” on page 4-9.)
3. Slide the front seats fully forward, then recline their seatbacks backward toachieve a flat surface. (Refer to “To adjust the seat forward or backward” on page 4-5 and “To adjust theseatback” on page 4-6.) 4. Recline the seatbacks of the second row seats.(Refer to “To adjust the seatback” on page 4-9.)
Making a flat seat
WA R N I N G Never drive with passengers or cargo on the flat seat. This is extremely dangerousand can cause severe or fatal injury or death in an accident
or if heavy braking is
required.CAUTION Adjust the seats only when the vehicle is stopped in a safe place. Seat should be adjusted only by adults to avoid accidents. When sliding the seat
s, be careful not to
catch your hand or leg. Do not walk around on top of the seats after they have been laid flat because the footingis uneven. It is safe
st to move about on your
hands and knees. To ensure the seats are locked securely, attempt to move them back and forth. Do not jump on or drop heavy objects on the seatbacks.
To raise the seatback of the front seat, firmly place your hand on th
e seatback, pull the
seatback lock knob up, and raise the seatbackslowly. (Refer to “To adjust the seatback” on page 4-6.) Do not let ch
ildren adjust the seat-
back.CAUTION
BK0278200US.book 17 ページ 2019年4月10日 水曜日 午前10時59分
Page 49 of 443
Seat belts 4-20 Seat and restraint systems
4
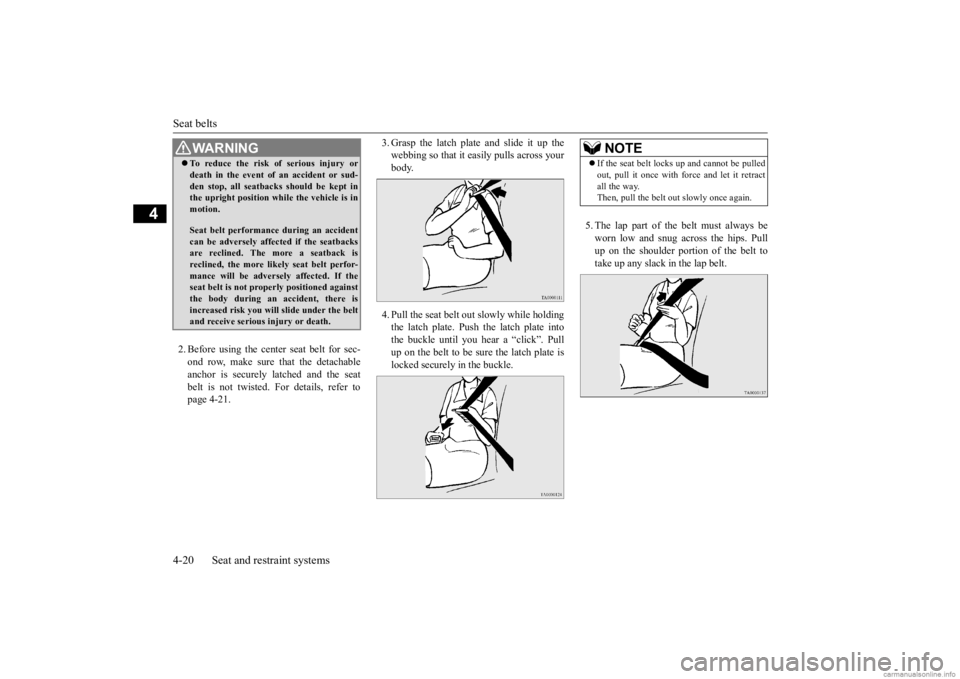
2. Before using the center seat belt for sec- ond row, make sure that the detachable anchor is securely latched and the seat belt is not twisted.
For details, refer to
page 4-21.
3. Grasp the latch plate and slide it up the webbing so that it easily pulls across yourbody. 4. Pull the seat belt out
slowly while holding
the latch plate. Push the latch plate intothe buckle until you he
ar a “click”. Pull
up on the belt to be sure the latch plate is locked securely in the buckle.
5. The lap part of the belt must always be worn low and snug across the hips. Pullup on the shoulder portion of the belt to take up any slack in the lap belt.
WA R N I N G To reduce the risk of serious injury or death in the event of
an accident or sud-
den stop, all seatbacks should be kept inthe upright position while the vehicle is in motion. Seat belt performance during an accident can be adversely affect
ed if the seatbacks
are reclined. The more a seatback isreclined, the more likely seat belt perfor- mance will be adversely affected. If the seat belt is not proper
ly positioned against
the body during an accident, there is increased risk you will slide under the belt and receive serious
injury or death.
NOTE
If the seat belt locks
up and cannot be pulled
out, pull it once with force and let it retractall the way. Then, pull the belt out
slowly once again.
BK0278200US.book 20 ページ 2019年4月10日 水曜日 午前10時59分
Page 53 of 443
Seat belts 4-24 Seat and restraint systems
4
N00418301292
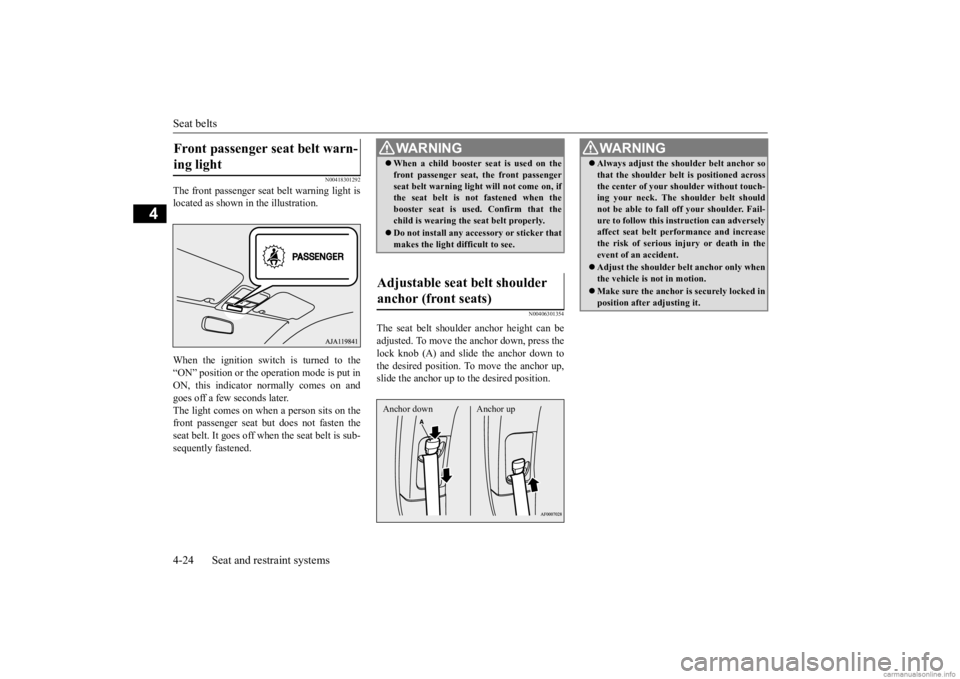
The front passenger seat
belt warning light is
located as shown in the illustration. When the ignition switch is turned to the “ON” position or the ope
ration mode is put in
ON, this indicator
normally comes on and
goes off a few seconds later. The light comes on when a person sits on thefront passenger seat but does not fasten the seat belt. It goes off wh
en the seat belt is sub-
sequently fastened.
N00406301354
The seat belt shoulder
anchor height can be
adjusted. To move the anchor down, press thelock knob (A) and slide the anchor down to the desired position. To
move the anchor up,
slide the anchor up to the desired position.
Front passenger seat belt warn- ing light
WA R N I N G When a child booster se
at is used on the
front passenger seat, the front passengerseat belt warning ligh
t will not come on, if
the seat belt is not fastened when the booster seat is used
. Confirm that the
child is wearing the
seat belt properly.
Do not install any acce
ssory or sticker that
makes the light difficult to see.
Adjustable seat belt shoulder anchor (front seats) Anchor down Anchor up
WA R N I N G Always adjust the shou
lder belt anchor so
that the shoulder belt
is positioned across
the center of your shoulder without touch-ing your neck. The sh
oulder belt should
not be able to fall off your shoulder. Fail- ure to follow this instruction can adverselyaffect seat belt performance and increase the risk of serious in
jury or death in the
event of an accident. Adjust the shoulder be
lt anchor only when
the vehicle is not in motion. Make sure the anchor is securely locked in position after adjusting it.
BK0278200US.book 24 ページ 2019年4月10日 水曜日 午前10時59分
Page 63 of 443
Child restraint systems 4-34 Seat and restraint systems
4
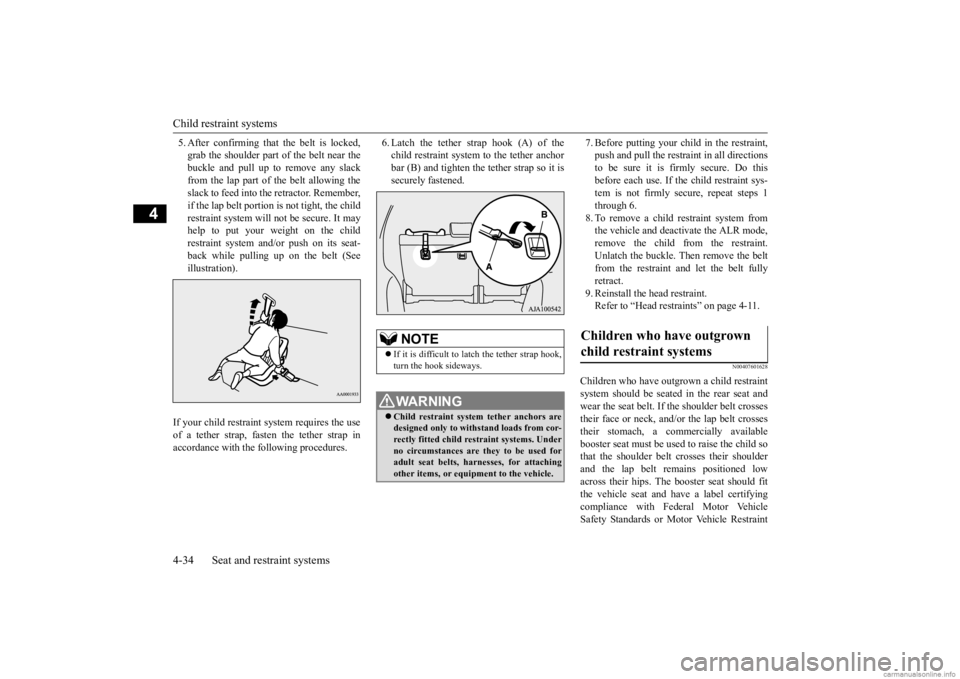
5. After confirming that the belt is locked, grab the shoulder part of the belt near thebuckle and pull up to remove any slack from the lap part of the belt allowing the slack to feed into the retractor. Remember,if the lap belt portion is not tight, the child restraint system will
not be secure. It may
help to put your weight on the childrestraint system and/or push on its seat- back while pulling up on the belt (See illustration).
6. Latch the tether strap hook (A) of the child restraint system to the tether anchorbar (B) and tighten the tether strap so it is securely fastened.
7. Before putting your child in the restraint, push and pull the restraint in all directionsto be sure it is firmly secure. Do this before each use. If
the child restraint sys-
tem is not firmly se
cure, repeat steps 1
through 6. 8. To remove a child restraint system from the vehicle and deactivate the ALR mode,remove the child from the restraint. Unlatch the buckle. Then remove the belt from the restraint and let the belt fully retract. 9. Reinstall the head restraint.Refer to “Head restra
ints” on page 4-11.
N00407601628
Children who have outgrown a child restraint system should be
seated in the rear seat and
wear the seat belt. If the shoulder belt crossestheir face or neck, and/or the lap belt crosses their stomach, a commercially available booster seat must be used
to raise the child so
that the shoulder belt
crosses their shoulder
and the lap belt re
mains positioned low
across their hips. The
booster seat should fit
the vehicle seat and ha
ve a label certifying
compliance with Federal Motor Vehicle Safety Standards or Motor Vehicle Restraint
If your child restraint system requires the use of a tether strap, fasten the tether strap in accordance with the following procedures.
NOTE
If it is difficult to
latch the tether strap hook,
turn the hook sideways.WA R N I N G Child restraint system tether anchors are designed only to with
stand loads from cor-
rectly fitted child restraint systems. Underno circumstances are they to be used for adult seat belts, harnesses, for attaching other items, or equipment to the vehicle.
Children who have outgrown child restraint systems
BK0278200US.book 34 ページ 2019年4月10日 水曜日 午前10時59分