sensor MITSUBISHI OUTLANDER III 2015 Owner's Guide
[x] Cancel search | Manufacturer: MITSUBISHI, Model Year: 2015, Model line: OUTLANDER III, Model: MITSUBISHI OUTLANDER III 2015Pages: 446, PDF Size: 59.52 MB
Page 257 of 446
Wiper and washer switch 5-180 Features and controls
5
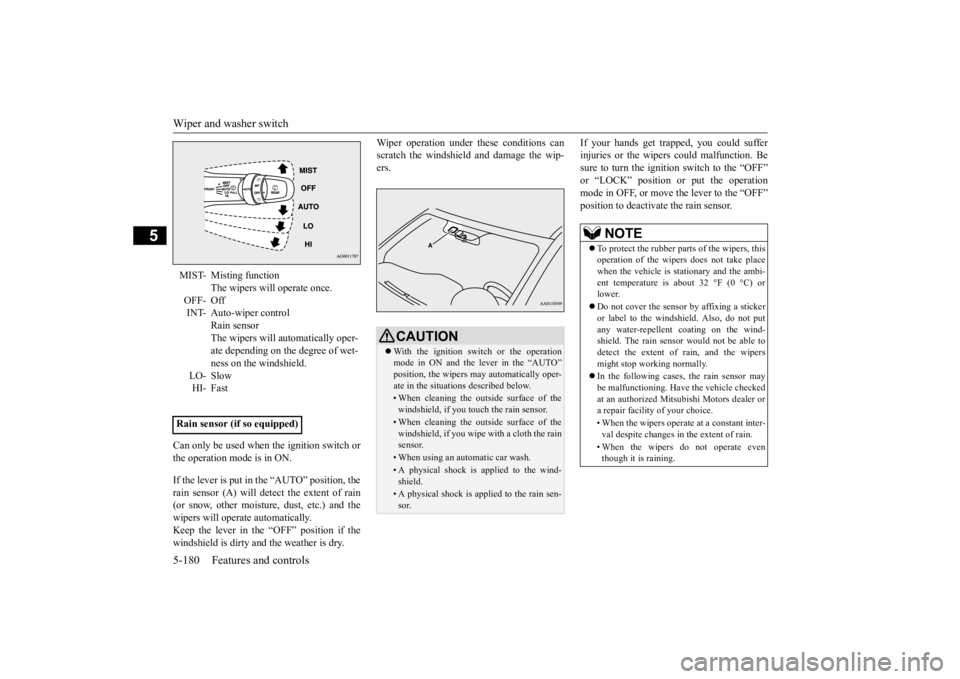
Can only be used when the ignition switch or the operation mode is in ON. If the lever is put in the “AUTO” position, the rain sensor (A) will detect the extent of rain(or snow, other moisture, dust, etc.) and the wipers will operate automatically. Keep the lever in the “OFF” position if thewindshield is dirty a
nd the weather is dry.
Wiper operation under th
ese conditions can
scratch the windshield and damage the wip-ers.
If your hands get trapped, you could suffer injuries or the wipers
could malfunction. Be
sure to turn the ignition switch to the “OFF” or “LOCK” position or put the operation mode in OFF, or move the lever to the “OFF”position to deactivate the rain sensor.
MIST- Misting function
The wipers will operate once.
OFF- Off INT- Auto-wiper control
Rain sensor The wipers will automatically oper- ate depending on the degree of wet-ness on the windshield.
LO- Slow HI- Fast
Rain sensor (if so equipped)
CAUTION With the ignition switch or the operation mode in ON and the lever in the “AUTO” position, the wipers
may automatically oper-
ate in the situati
ons described below.
• When cleaning the outsi
de surface of the
windshield, if you touch the rain sensor.• When cleaning the outsi
de surface of the
windshield, if you wipe with a cloth the rainsensor.• When using an automatic car wash.• A physical shock is
applied to the wind-
shield.• A physical shock is applied to the rain sen-sor.
NOTE
To protect the rubber parts of the wipers, this operation of the wipers
does not take place
when the vehicle is stationary and the ambi- ent temperature is about 32 °F (0 °C) or lower. Do not cover the sensor by affixing a sticker or label to the windshield. Also, do not putany water-repellent
coating on the wind-
shield. The rain sensor would not be able to detect the extent of rain, and the wipersmight stop working normally. In the following cases, the rain sensor may be malfunctioning. Have
the vehicle checked
at an authorized Mitsubishi Motors dealer or a repair facility of your choice. • When the wipers operate
at a constant inter-
val despite changes in the extent of rain. • When the wipers do not operate even though it is raining.
BK0211800US.book 180 ページ 2014年3月12日 水曜日 午後2時42分
Page 258 of 446
Wiper and washer switch
Features and controls 5-181
5
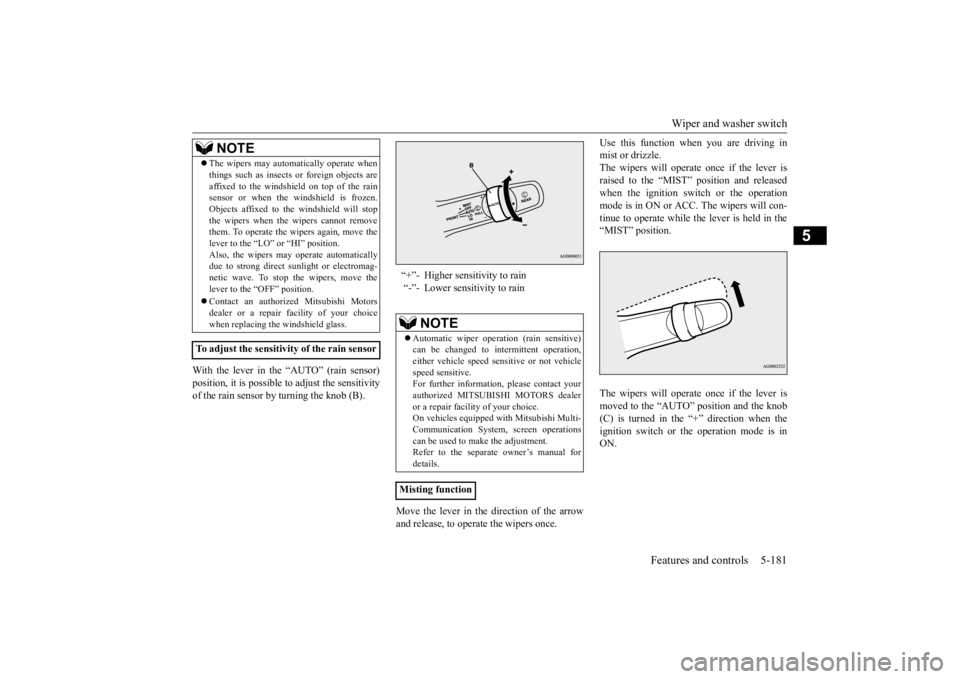
With the lever in the “AUTO” (rain sensor) position, it is possible to adjust the sensitivity of the rain sensor by turning the knob (B).
Move the lever in the direction of the arrow and release, to operate the wipers once.
Use this function when you are driving in mist or drizzle.The wipers will operate once if the lever is raised to the “MIST” position and released when the ignition switch or the operationmode is in ON or ACC.
The wipers will con-
tinue to operate while the lever is held in the “MIST” position. The wipers will operate once if the lever is moved to the “AUTO” position and the knob (C) is turned in the “+” direction when the ignition switch or the
operation mode is in
ON.
The wipers may automatically operate when things such as insects
or foreign objects are
affixed to the windshield on top of the rainsensor or when the windshield is frozen. Objects affixed to th
e windshield
will stop
the wipers when the wipers cannot removethem. To operate the wipers again, move the lever to the “LO” or “HI” position. Also, the wipers may operate automaticallydue to strong direct s
unlight or electromag-
netic wave. To stop the wipers, move the lever to the “OFF” position. Contact an authoriz
ed Mitsubishi Motors
dealer or a repair facility of your choicewhen replacing th
e windshield glass.
To adjust the sensitivity of the rain sensor
NOTE
“+”- Higher sensitivity to rain “-”- Lower sensitivity to rain
NOTE
Automatic wiper operation (rain sensitive) can be changed to in
termittent operation,
either vehicle speed se
nsitive or not vehicle
speed sensitive. For further informati
on, please contact your
authorized MITSUBISHI MOTORS dealer or a repair facility of your choice. On vehicles equipped
with Mitsubishi Multi-
Communication System, screen operations can be used to ma
ke the adjustment.
Refer to the separate
owner’s manual for
details.
Misting function
BK0211800US.book 181 ページ 2014年3月12日 水曜日 午後2時42分
Page 303 of 446
Vehicle preparation before driving 6-4 Driving safety
6
N00629001709
For a safer and more enjoyable trip, always check for the following: Before starting the vehicle, make certain that you and all passengers are seated and wearing their seat
belts properly (with
children in the rear seat, in appropriate restraints), and that all the doors and the liftgate are locked. Move the driver’s seat as far backward as possible, while keep
ing good visibility,
and good control of the steering wheel,brakes, accelerator,
and controls. Check
the instrument panel
indicators and multi-
information display for any possible prob-lem. Similarly, the front
passenger seat should
also be moved as far back as possible. Make sure that infa
nts and small children
are properly restrained in accordance with all laws and regulations.
Check these by selecting the defroster mode, and set the blower swit
ch on high. You should
be able to feel the air blowing against thewindshield. Refer to “Defrosti
ng or defogging (wind-
shield, door windows)” on page 7-13 Check all the tires for heavy tread wear or uneven wear patterns. Look for stones, nails, glass, or other objects
stuck in the tread. Look
for any tread cuts or
sidewall cracks. Check
the wheel nuts for tightness, and the tires (including spare tire) for proper pressure. Replace your tires before they are heavilyworn out. As your vehicle is equi
pped with a tire pres-
sure monitoring system, there is a risk ofdamage to the tire inflation pressure sensors when the tire is replaced on the rim. Tire replacement should, only, be performed by anauthorized Mitsubishi Motors dealer. Have someone watch while you turn all the exterior lights on and off. Also check the turn
signal indicators and hi
gh-beam indicators on
the instrument panel. Check the ground under the vehicle after parking overnight, for
fuel, water, oil, or
other leaks. Make sure
all the fluid levels are
correct. Also, if you
can smell fuel, you need
to find out why imme
diately and have it
fixed.
N00629201134
Even this vehicle’s sa
fety equipment, and
your safest driving, ca
nnot guarantee that you
can avoid an accident or injury. However, ifyou give extra attention to the following areas, you can better protect yourself and your passengers: Drive defensively. Be aware of traffic, road and weather conditions. Leave plenty of stopping distance between your vehicle and the vehicle ahead. Before changing lanes, check your mir- rors, blind spots, and use your turn-signal light. While driving, watch the behavior of other drivers, bicyc
lists, and pedestrians.
Vehicle preparation before driving Seat belts and seats
Defrosters Tires Lights
Fluid leaks Safe driving techniques
BK0211800US.book 4 ページ 2014年3月12日 水曜日 午後2時42分
Page 321 of 446
Automatic climate cont
rol air conditioner
7-6 Comfort controls
7
Dual-zone automatic climate c
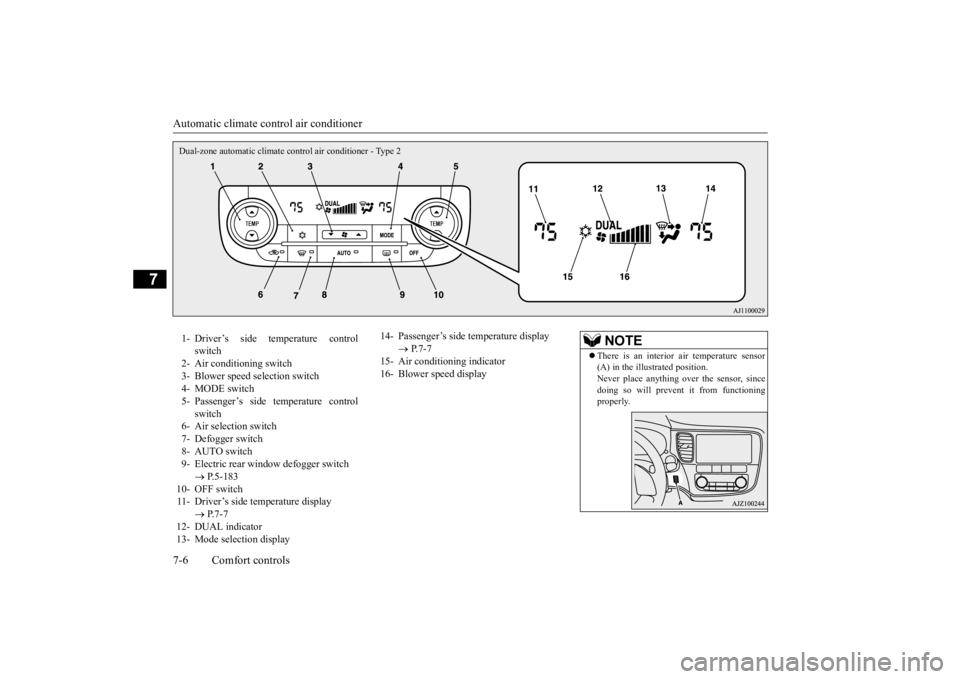
ontrol air conditioner - Type 2
1- Driver’s side temperature control
switch
2- Air conditioning switch 3- Blower speed selection switch 4- MODE switch5- Passenger’s side temperature control
switch
6- Air selection switch7- Defogger switch 8- AUTO switch 9- Electric rear window
defogger switch
P.5-183
10- OFF switch 11- Driver’s side temperature display
P.7-7
12- DUAL indicator 13- Mode selection display
14- Passenger’s side temperature display
P.7-7
15- Air conditioning indicator16- Blower speed display
NOTE
There is an interior air temperature sensor (A) in the illustrated position.Never place anything ov
er the sensor, since
doing so will prevent it from functioning properly.
BK0211800US.book 6 ページ 2014年3月12日 水曜日 午後2時42分
Page 391 of 446
Automatic transaxle fl
uid (if so equipped)
9-10 Vehicle care and maintenance
9
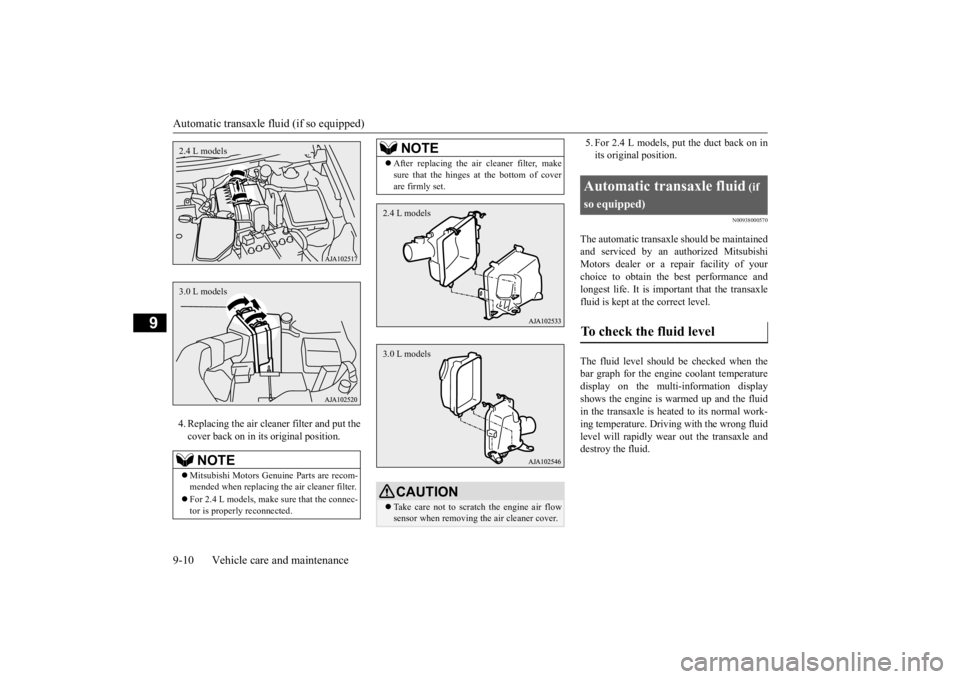
4. Replacing the air clea
ner filter and put the
cover back on in its original position.
5. For 2.4 L models, put the duct back on in its original position.
N00938000570
The automatic transaxle should be maintainedand serviced by an au
thorized Mitsubishi
Motors dealer or a repair facility of your choice to obtain the best performance and longest life. It is impor
tant that the transaxle
fluid is kept at the correct level. The fluid level should be checked when the bar graph for the engine coolant temperaturedisplay on the multi-information display shows the engine is wa
rmed up and the fluid
in the transaxle is heated to its normal work-ing temperature. Driving with the wrong fluid level will rapidly wear
out the transaxle and
destroy the fluid.
NOTE
Mitsubishi Motors Genui
ne Parts are recom-
mended when replacing th
e air cleaner filter.
For 2.4 L models, make sure that the connec- tor is properl
y reconnected.
2.4 L models3.0 L models
After replacing the air cleaner filter, make sure that the hinges at the bottom of coverare firmly set.CAUTION Take care not to scratc
h the engine air flow
sensor when removing
the air cleaner cover.
NOTE
2.4 L models3.0 L models
Automatic transaxle fluid
(if
so equipped)To check the fluid level
BK0211800US.book 10 ページ 2014年3月12日 水曜日 午後2時42分
Page 400 of 446
Tires
Vehicle care and maintenance 9-19
9
Keep your tires inflated to the recom- mended pressures. (See the tire and load-ing information placard attached to the driver’s door sill.) Stay within the recommended load limits. Make sure that the weight of any load in your vehicle is evenly distributed. Drive at safe speeds. After filling your tires to the correct pres- sure, check them for damage and air leaks. Be sure to reinstall the caps on the valve stems.
N00939600241
N00939700141
The following maintenance steps are recom- mended: Check tire pressures regularly. Have regular maintenance done on the wheel balance and front
and rear suspen-
sion alignment. Rotate your tires regularly as described in the “Tire rotation” se
ction on page 9-20.
N00939800184
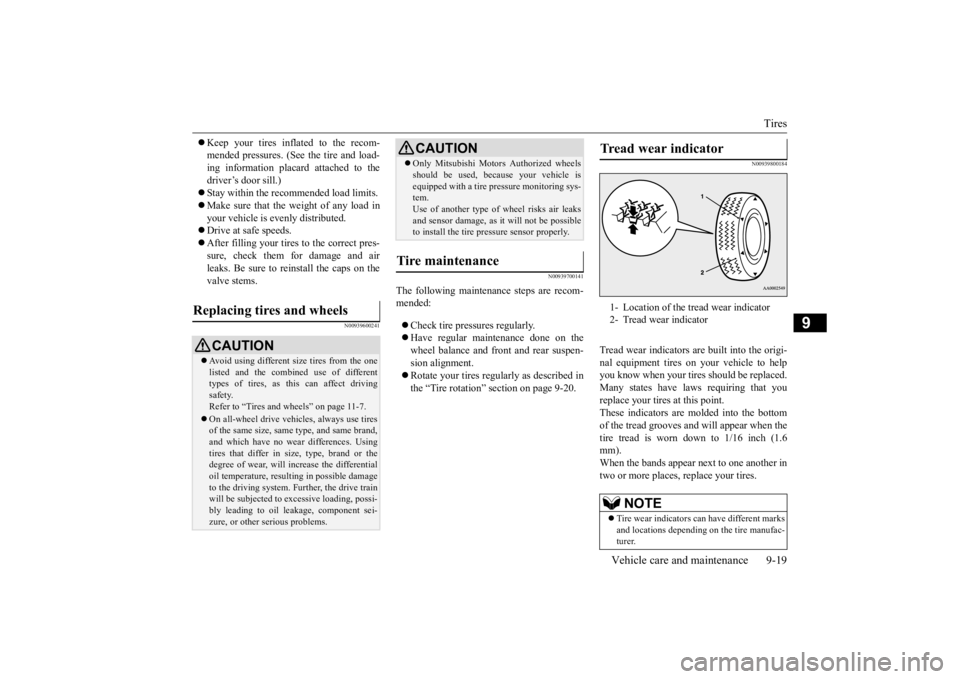
Tread wear indicators ar
e built into the origi-
nal equipment tires on
your vehicle to help
you know when your tires should be replaced. Many states have la
ws requiring that you
replace your tires at this point.These indicators are molded into the bottom of the tread grooves and will appear when the tire tread is worn down to 1/16 inch (1.6mm). When the bands appear next to one another in two or more places
, replace your tires.
Replacing tires and wheels
CAUTIONAvoid using different size tires from the one listed and the combined use of different types of tires, as this can affect driving safety.Refer to “Tires and wheels” on page 11-7. On all-wheel drive vehi
cles, always use tires
of the same size, same
type, and same brand,
and which have no wear differences. Using tires that differ in si
ze, type, brand or the
degree of wear, will increase the differential oil temperature, resulting in possible damage to the driving system. Further, the drive trainwill be subjected to ex
cessive loading, possi-
bly leading to oil leakage, component sei- zure, or other serious problems.
Only Mitsubishi Motors Authorized wheels should be used, beca
use your vehicle is
equipped with a tire pr
essure monitoring sys-
tem. Use of another type of
wheel risks air leaks
and sensor damage, as
it will not be possible
to install the tire pressure sensor properly.
Tire maintenance
CAUTION
Tread wear indicator 1- Location of the tread wear indicator 2- Tread wear indicator
NOTE
Tire wear indicators ca
n have different marks
and locations dependi
ng on the tire manufac-
turer.
BK0211800US.book 19 ページ 2014年3月12日 水曜日 午後2時42分
Page 402 of 446
Brake pedal free play
Vehicle care and maintenance 9-21
9
N00940101139 N00940300293
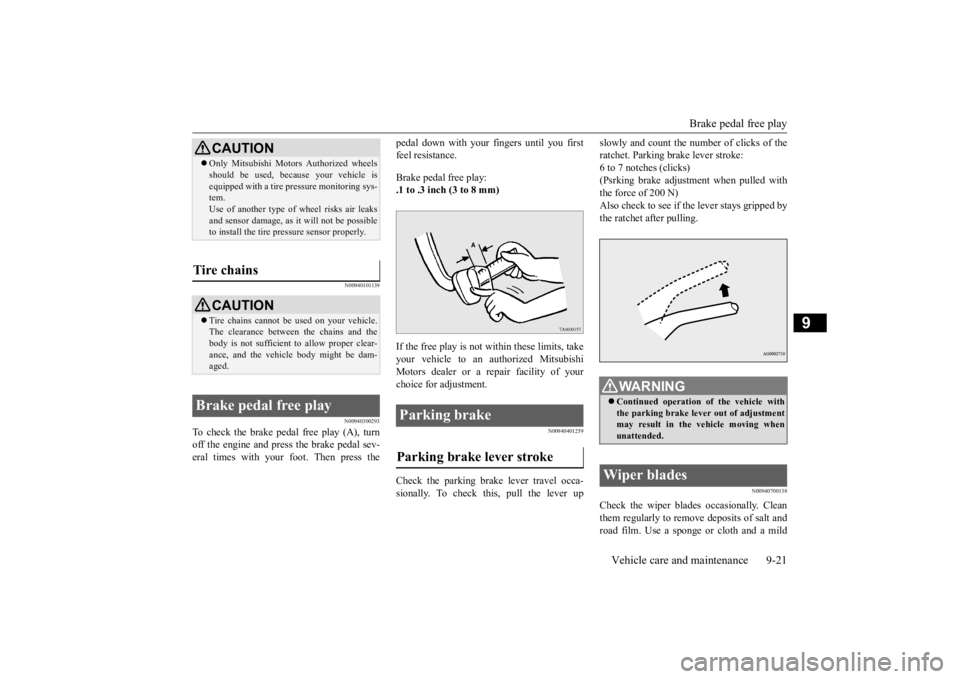
To check the brake pedal free play (A), turn off the engine and press the brake pedal sev- eral times with your
foot. Then press the
pedal down with your fingers until you first feel resistance. Brake pedal free play: .1 to .3 inch (3 to 8 mm) If the free play is not within these limits, take your vehicle to an authorized Mitsubishi Motors dealer or a repair facility of your choice for adjustment.
N00940401259
Check the parking brake lever travel occa- sionally. To check this, pull the lever up
slowly and count the number of clicks of the ratchet. Parking br
ake lever stroke:
6 to 7 notches (clicks) (Psrking brake adjustment when pulled with the force of 200 N)Also check to see if the lever stays gripped by the ratchet after pulling.
N00940700138
Check the wiper blades occasionally. Clean them regularly to rem
ove deposits of salt and
road film. Use a sponge or cloth and a mild
CAUTION Only Mitsubishi Motors Authorized wheels should be used, beca
use your vehicle is
equipped with a tire pr
essure monitoring sys-
tem. Use of another type of wheel risks air leaks and sensor damage, as it
will not be possible
to install the tire pressure sensor properly.
Tire chains
CAUTION Tire chains cannot be used on your vehicle. The clearance between the chains and the body is not sufficient
to allow proper clear-
ance, and the vehicle body might be dam- aged.
Brake pedal free play
Parking brake Parking brake lever stroke
WA R N I N G Continued operation
of the vehicle with
the parking brake leve
r out of adjustment
may result in the vehicle moving when unattended.
Wiper blades
BK0211800US.book 21 ページ 2014年3月12日 水曜日 午後2時42分
Page 409 of 446
Fuses 9-28 Vehicle care and maintenance
9
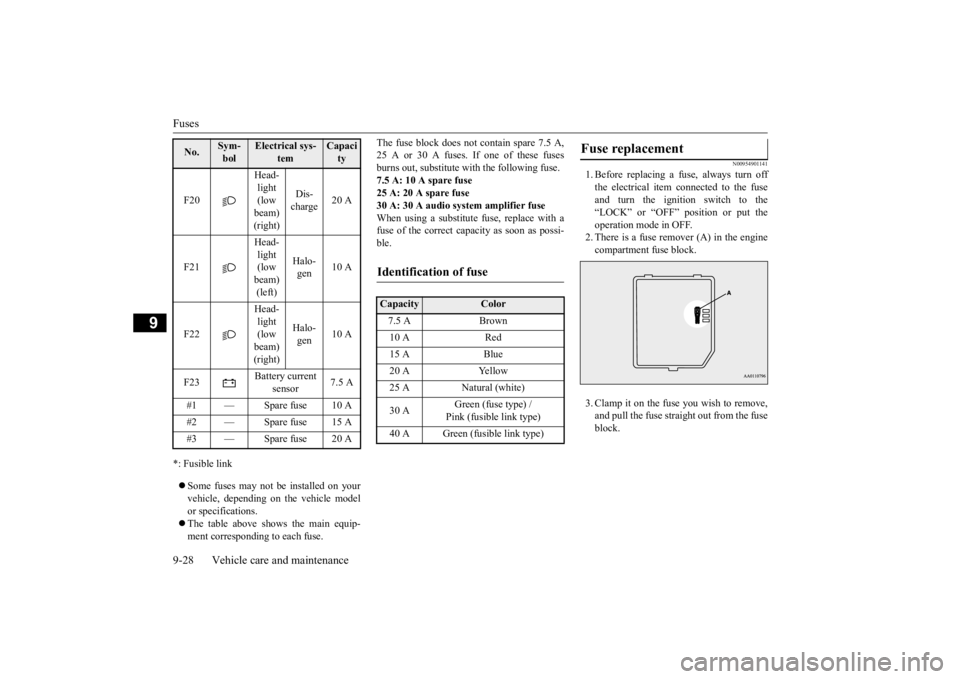
*: Fusible link Some fuses may not be installed on your vehicle, depending on the vehicle model or specifications. The table above shows the main equip- ment corresponding to each fuse.
The fuse block does not contain spare 7.5 A, 25 A or 30 A fuses. If one of these fusesburns out, substitute w
ith the following fuse.
7.5 A: 10 A spare fuse 25 A: 20 A spare fuse30 A: 30 A audio system amplifier fuse When using a substitute
fuse, replace with a
fuse of the correct capa
city as soon as possi-
ble.
N00954901141
1. Before replacing a fuse, always turn off the electrical item
connected to the fuse
and turn the ignition switch to the“LOCK” or “OFF” position or put the operation mode in OFF. 2. There is a fuse remover (A) in the enginecompartment fuse block. 3. Clamp it on the fuse you wish to remove, and pull the fuse straight out from the fuseblock.
F20
Head- light (low beam) (right)
Dis- charge
20 A
F21
Head- light (low beam) (left)
Halo- gen
10 A
F22
Head- light (low beam) (right)
Halo- gen
10 A
F23
Battery current
sensor
7.5 A
#1 — Spare fuse 10 A #2 — Spare fuse 15 A #3 — Spare fuse 20 ANo.
Sym- bol
Electrical sys-
tem
Capacity
Identification of fuse Capacity
Color
7.5 A Brown 10 A Red 15 A Blue 20 A Yellow 25 A Natural (white) 30 A
Green (fuse type) / Pink (fusible link type)
40 A Green (fusible link type)
Fuse replacement
BK0211800US.book 28 ページ 2014年3月12日 水曜日 午後2時42分
Page 422 of 446
Cleaning the outside of your vehicle Vehicle care and maintenance 9-41
9
Salt and other chemical
s used on winter roads
in some geographical ar
eas can have a detri-
mental effect on the vehicle underbody. Youshould flush the underbody with a high pres- sure hose every time you wash the outside of your vehicle.Take special care to
remove mud or other
debris which could trap and hold salt and moisture.After washing your vehicle, wipe off all waterdrops from the rubber parts around the doors to prevent the doors from freezing.
N00946000205
Wax your vehicle once
or twice a year, or
when water does not bead up on the paint.Use a soft cloth to put a small amount of wax on the painted surfaces. After the wax has dried, polish with a dry soft cloth.Do not wax your vehicle
in direct sunlight.
You should wax when the painted surfaces are cool.
CAUTION When washing the underside of your vehicle or the wheels, wear a pair of gloves to pro-tect your hands. If your vehicle has rain
sensor wipers, place
the wiper switch lever in the “OFF” positionto deactivate the rain sensor before washing the vehicle. Otherwise,
the wipers will oper-
ate in the presence of water spray on thewindshield and may get
damaged as a result.
Never spray or splash water on the electrical parts in the engine compartment. This may damage them. Be careful also when washing the underbody to ensure that water does notenter the engine compartment. Avoid automatic car washers that use rotat- ing brushes. These brushes may scratch the paint surface and make it dull. Scratches are more not
iceable on darker col-
ored vehicles. Some hot water wash
ing equipment uses
high pressure and heat to clean your vehicle. Because hot water can da
mage plastics parts
and seep inside your ve
hicle, make sure you
do the following when using such equip- ment:• Keep the washing nozzle at least 28 inches(70 cm) away from the vehicle body.• When washing around the door glass, holdthe nozzle at a distance of more than 28 inches (70 cm) and at a right angle to theglass surface.
Make sure to do the following when using an automatic car wash, with help from eitherthis manual or the car wash operator, toavoid damaging your vehicle:• Fold the outside
rearview mirrors.
• Remove the antenna.• Tape or remove the rear wiper arm assem- bly.• If your vehicle is equi
pped with a roof rails,
check with the car wash operator before using the car wash.• If your vehicle is equipped with the rainsensor wipers, place th
e wiper switch lever
in the “OFF” position to deactivate the rain sensor.
During cold weather
CAUTION
NOTE
When the door is frozen, opening it by force may tear off or cr
ack the rubber gasket
installed around the door. Pour warm waterto melt the ice. Be
sure to thoroughly wipe
off the water after opening the door. To pre- vent freezing of the
weatherstripping on the
doors, hood, etc., treat
with silicone lubri-
cant.
Waxing
CAUTION Waxes containing high abrasive compounds should not be used. These waxes remove rust and stain effectively from the paintwork, but are harmful to the finish
of the paint, because
they also remove paint/clearcoat. They are also harmful to other glossy sur- faces such as the grille, trim, moldings, etc.
BK0211800US.book 41 ページ 2014年3月12日 水曜日 午後2時42分