child restraint MITSUBISHI OUTLANDER PHEV 2016 Owner's Manual (in English)
[x] Cancel search | Manufacturer: MITSUBISHI, Model Year: 2016, Model line: OUTLANDER PHEV, Model: MITSUBISHI OUTLANDER PHEV 2016Pages: 490, PDF Size: 22.02 MB
Page 8 of 490
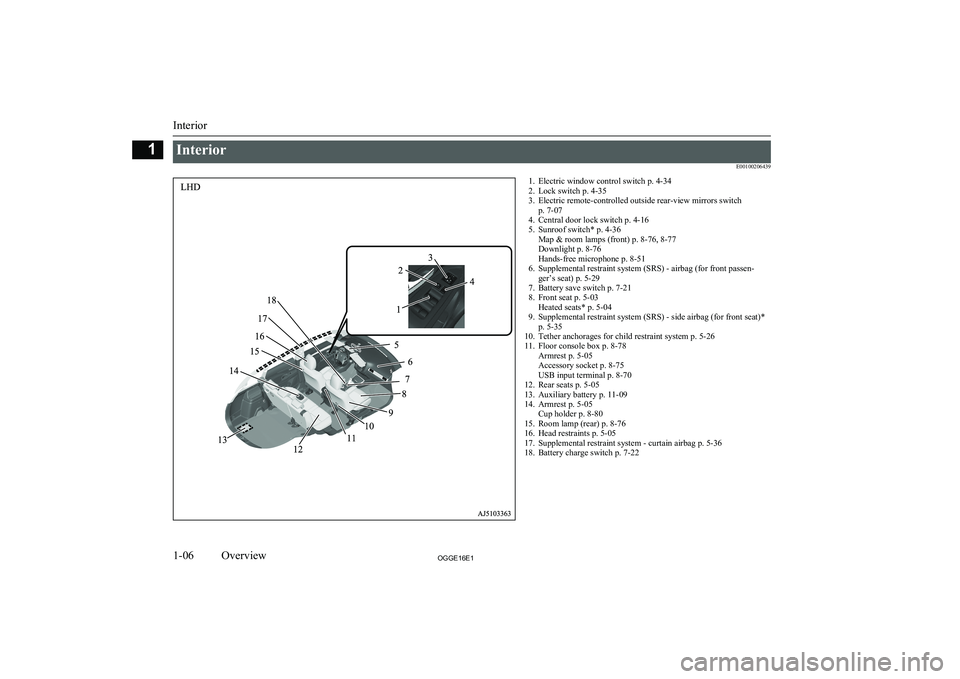
InteriorE001002064391. Electric window control switch p. 4-34
2. Lock switch p. 4-35
3. Electric remote-controlled outside rear-view mirrors switch p. 7-07
4. Central door lock switch p. 4-16
5. Sunroof switch* p. 4-36 Map & room lamps (front) p. 8-76, 8-77
Downlight p. 8-76
Hands-free microphone p. 8-51
6. Supplemental restraint system (SRS) - airbag (for front passen- ger’s seat) p. 5-29
7. Battery save switch p. 7-21
8. Front seat p. 5-03 Heated seats* p. 5-04
9. Supplemental restraint system (SRS) - side airbag (for front seat)* p. 5-35
10. Tether anchorages for child restraint system p. 5-26
11. Floor console box p. 8-78 Armrest p. 5-05
Accessory socket p. 8-75
USB input terminal p. 8-70
12. Rear seats p. 5-05
13. Auxiliary battery p. 11-09
14. Armrest p. 5-05 Cup holder p. 8-80
15. Room lamp (rear) p. 8-76
16. Head restraints p. 5-05
17. Supplemental restraint system - curtain airbag p. 5-36
18. Battery charge switch p. 7-22
Interior
1-06OGGE16E1Overview1
Page 9 of 490
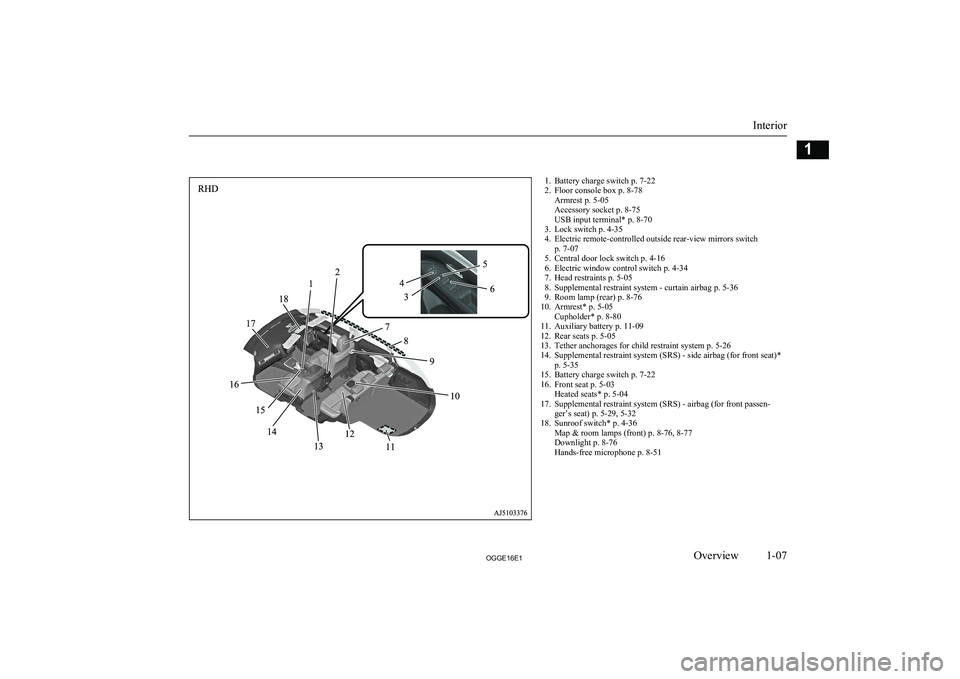
1. Battery charge switch p. 7-22
2. Floor console box p. 8-78 Armrest p. 5-05
Accessory socket p. 8-75
USB input terminal* p. 8-70
3. Lock switch p. 4-35
4. Electric remote-controlled outside rear-view mirrors switch p. 7-07
5. Central door lock switch p. 4-16
6. Electric window control switch p. 4-34
7. Head restraints p. 5-05
8. Supplemental restraint system - curtain airbag p. 5-36
9. Room lamp (rear) p. 8-76
10. Armrest* p. 5-05 Cupholder* p. 8-80
11. Auxiliary battery p. 11-09
12. Rear seats p. 5-05
13. Tether anchorages for child restraint system p. 5-26
14. Supplemental restraint system (SRS) - side airbag (for front seat)* p. 5-35
15. Battery charge switch p. 7-22
16. Front seat p. 5-03 Heated seats* p. 5-04
17. Supplemental restraint system (SRS) - airbag (for front passen- ger’s seat) p. 5-29, 5-32
18. Sunroof switch* p. 4-36 Map & room lamps (front) p. 8-76, 8-77
Downlight p. 8-76
Hands-free microphone p. 8-51
Interior
1-07OGGE16E1Overview1
Page 12 of 490
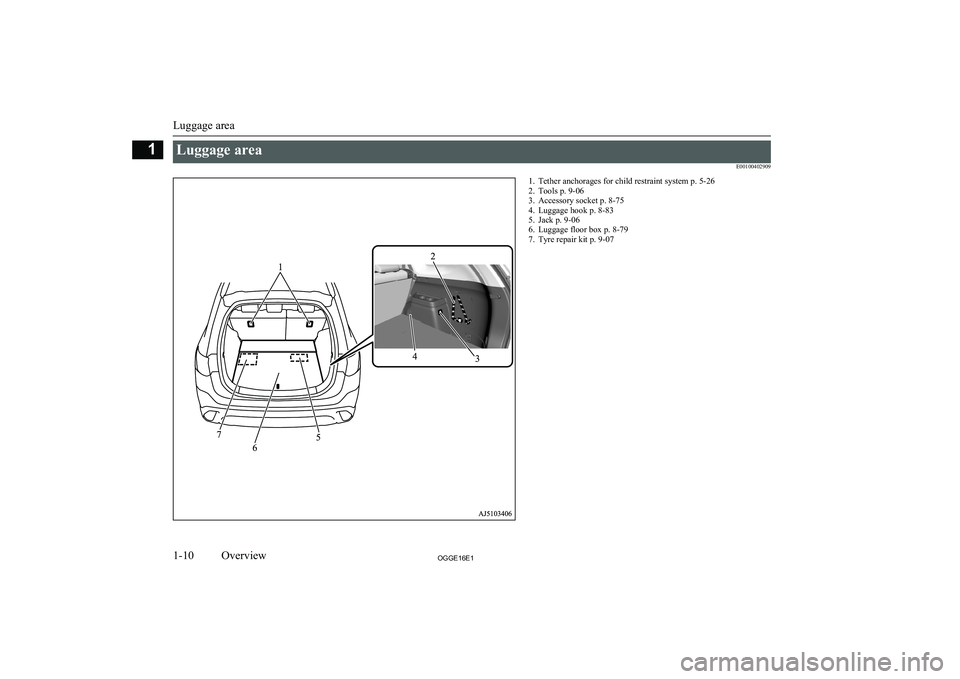
Luggage areaE001004029091. Tether anchorages for child restraint system p. 5-26
2. Tools p. 9-06
3. Accessory socket p. 8-75
4. Luggage hook p. 8-83
5. Jack p. 9-06
6. Luggage floor box p. 8-79
7. Tyre repair kit p. 9-07
Luggage area
1-10OGGE16E1Overview1
Page 97 of 490
Seat arrangement................................................................................. 5-02
Seat adjustment................................................................................... 5-02 Front seats........................................................................................... 5-03
Rear seats............................................................................................ 5-05
Head restraints.....................................................................................5-05
Making a luggage area........................................................................ 5-07
Making a flat seat................................................................................ 5-08
Seat belts............................................................................................. 5-09 Pregnant women restraint....................................................................5-14
Seat belt pretensioner system and force limiter system...................... 5-14
Child restraint......................................................................................5-15 Seat belt inspection............................................................................. 5-28Supplemental restraint system (SRS) - airbag.................................... 5-29Seats and seat belts
OGGE16E15
Page 99 of 490
WARNINGlDo not attempt to adjust the seat while
driving. This can cause loss of vehicle con- trol and result in an accident. After ad-
justments are made, ensure the seating is locked in position by attempting to move
the seat forward and rearward without
using the adjusting mechanism.
l Do not allow people or children to ride in
any area of your vehicle that is not equip- ped with seats and seat belts, and make
sure that everyone travelling in your vehi- cle is in a seat and wearing a seat belt, or
in the case of a child is strapped in a child restraint.
l To minimize the risk of personal injury in
the event of a collision or sudden braking,the seatbacks should always be in the al-
most upright position while the vehicle is in motion. The protection provided by theseat belts may be reduced significantly
when the seatback is reclined. There is greater risk that the passenger will slide
under the seat belt, resulting in serious in- jury, when the seatback is reclined.CAUTIONl Make sure the seat is adjusted by an adult or
with adult supervision for correct and safe operation.CAUTIONl Do not place a cushion or the like between
your back and the seatback while driving.The effectiveness of the head restraints will be reduced in the event of an accident.
l The reclining mechanism of the front seat’s
seatback is spring loaded, causing it to return
to the vertical position when the lock lever is
operated. When using the lever, sit close to the seatback or hold it with your hand to
control its return motion.
l When sliding the seats, be careful not to
catch your hand or foot.
l When adjusting the front seat while the rear
seat is folded, be careful not to apply strongforce to the flipped rear seat cushion.
Doing so could cause damage to the cover of
the front seat and the fitting of the rear seat
cushion.Front seats
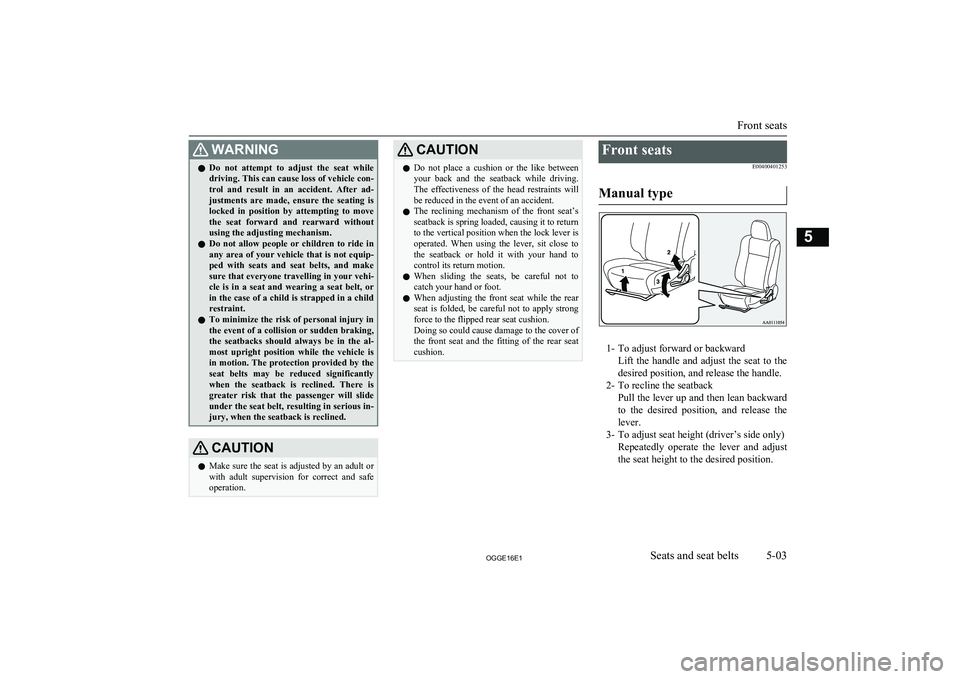
E00400401253
Manual type
1- To adjust forward or backward Lift the handle and adjust the seat to the
desired position, and release the handle.
2- To recline the seatback Pull the lever up and then lean backwardto the desired position, and release the
lever.
3- To adjust seat height (driver’s side only)
Repeatedly operate the lever and adjustthe seat height to the desired position.
Front seats
5-03OGGE16E1Seats and seat belts5
Page 105 of 490
CAUTIONlTo make a flat seat, stop the vehicle in a safe
place.
l Make sure the seat is adjusted by an adult or
with adult supervision for correct and safe
operation.
l Do not walk around on top of the seats after
they have been laid flat.
l To ensure the seats are locked securely, at-
tempt to move them back and forth.
l Do not jump on, or impact the seatbacks
heavily.
l To raise the seatback, put a hand on the seat-
back and raise slowly. Never have a child do
this operation, or an unexpected accident
may result.
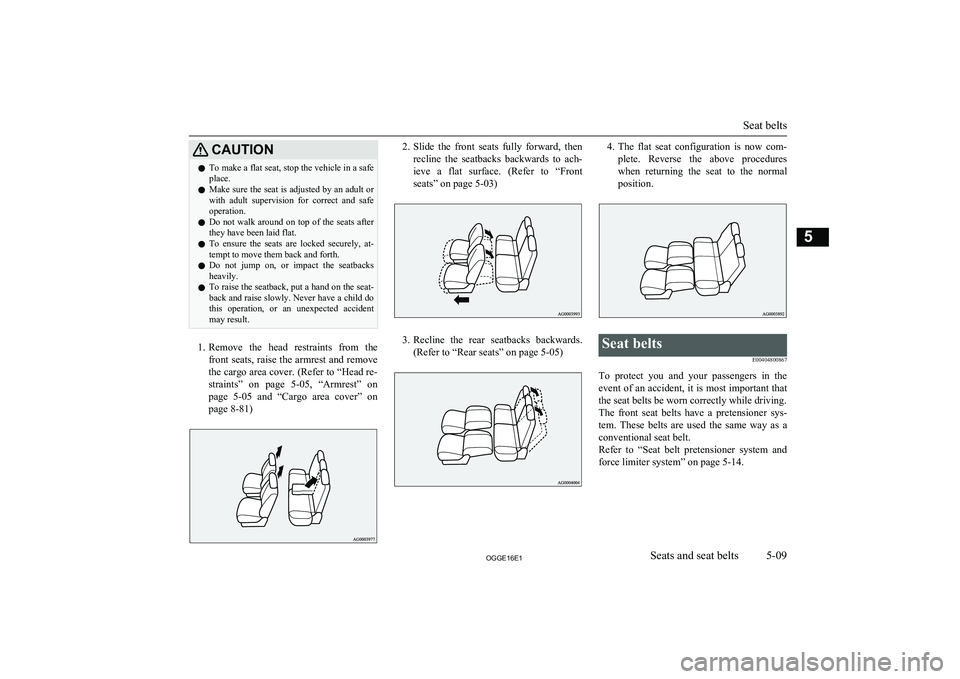
1. Remove the head restraints from the
front seats, raise the armrest and remove
the cargo area cover. (Refer to “Head re-
straints” on page 5-05, “Armrest” on
page 5-05 and “Cargo area cover” on
page 8-81)
2. Slide the front seats fully forward, then
recline the seatbacks backwards to ach- ieve a flat surface. (Refer to “Front
seats” on page 5-03)
3. Recline the rear seatbacks backwards.
(Refer to “Rear seats” on page 5-05)
4. The flat seat configuration is now com-
plete. Reverse the above procedures
when returning the seat to the normal
position.Seat belts
E00404800867
To protect you and your passengers in theevent of an accident, it is most important thatthe seat belts be worn correctly while driving.
The front seat belts have a pretensioner sys- tem. These belts are used the same way as a
conventional seat belt.
Refer to “Seat belt pretensioner system and force limiter system” on page 5-14.
Seat belts
5-09OGGE16E1Seats and seat belts5
Page 106 of 490
WARNINGlSeat belts should always be worn by every
adult who drives or rides in this vehicle,
and by all children who are tall enough to wear seat belts properly.
Other children should always use proper child restraint systems.
l Always place the shoulder belt over your
shoulder and across your chest. Never put
it behind you or under your arm.
l One seat belt should be used by only one
person. Doing otherwise can be danger-
ous.
l The seat belt will provide its wearer with
maximum protection if the recliner seat-
back is placed in fully upright position.
When the seatback is reclined, there is greater risk that the passenger will slide
under the belt, especially in a forward im-
pact accident, and may be injured by the
belt or by striking the instrument panel or seatbacks.
l Remove any twists when using the belt.
l No modifications or additions should be
made by the user which will either pre- vent the seat belt adjusting devices fromoperating to remove slack, or prevent the
seat belt assembly from being adjusted to
remove slack.
l Never hold a child in your arms or on
your lap when riding in this vehicle, even
if you are wearing your seat belt. To do so risks severe or fatal injury to the child in
a collision or sudden stop.WARNINGl Always adjust the belt to a snug fit.
l Always wear the lap portion of the belt
over your hips.3-point type seat belt (with
emergency locking mechanism)
E00404902699
This type of belt requires no length adjust- ment. Once worn, the belt adjusts itself to the
movement of the wearer, but in the event of a sudden or strong shock, the belt automatical-
ly locks to hold the wearer’s body.
NOTEl You can check if the belt locks by pulling it
forward quickly.
l If the seat belt buckles in the rear seating po-
sition are not found, you will find them un-
der the rear seat cushion. Refer to “Making a
luggage area” on page 5-07 for how to put
the seat belt buckles at the proper position.
To fasten
1. Pull the seat belt out slowly while hold-
ing the latch plate.
NOTEl When the seat belts cannot be pulled out in a
locked condition, pull the belts once force-
fully and then return them. After that, pull
the belts out slowly once again.
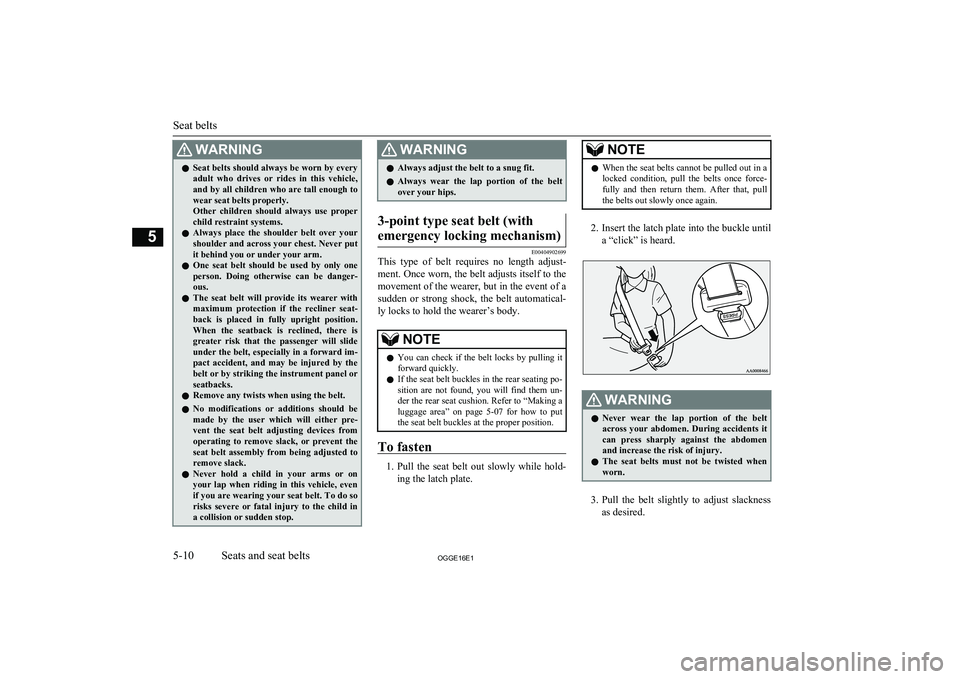
2. Insert the latch plate into the buckle until
a “click” is heard.
WARNINGl Never wear the lap portion of the belt
across your abdomen. During accidents it
can press sharply against the abdomen and increase the risk of injury.
l The seat belts must not be twisted when
worn.
3. Pull the belt slightly to adjust slackness
as desired.
Seat belts
5-10OGGE16E1Seats and seat belts5
Page 110 of 490
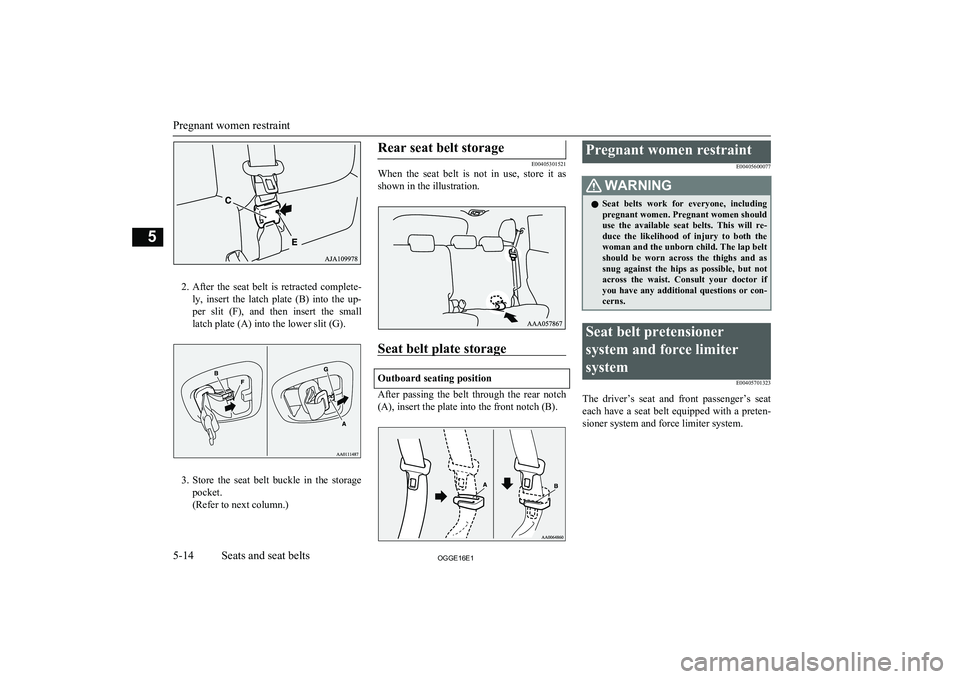
2.After the seat belt is retracted complete-
ly, insert the latch plate (B) into the up-
per slit (F), and then insert the small
latch plate (A) into the lower slit (G).
3. Store the seat belt buckle in the storage
pocket.
(Refer to next column.)
Rear seat belt storage
E00405301521
When the seat belt is not in use, store it as
shown in the illustration.
Seat belt plate storage
Outboard seating position
After passing the belt through the rear notch
(A), insert the plate into the front notch (B).
Pregnant women restraint
E00405600077WARNINGlSeat belts work for everyone, including
pregnant women. Pregnant women should
use the available seat belts. This will re- duce the likelihood of injury to both thewoman and the unborn child. The lap belt
should be worn across the thighs and as snug against the hips as possible, but not
across the waist. Consult your doctor if you have any additional questions or con-
cerns.Seat belt pretensioner
system and force limiter
system E00405701323
The driver’s seat and front passenger’s seateach have a seat belt equipped with a preten- sioner system and force limiter system.
Pregnant women restraint
5-14OGGE16E1Seats and seat belts5
Page 111 of 490
Pretensioner system
E00405802406
When the operation mode of the power
switch is in ON, if there is a frontal impact or a side impact severe enough to injure the
driver and/or front passenger, the pretension- er system will retract their respective seat
belts instantaneously, thus maximizing the seat belt’s effectiveness.
WARNINGl To obtain the best results from your pre-
tensioner seat belt, make sure you have adjusted your seat correctly and wear your seat belt properly.CAUTIONl Installation of audio equipment or repairs in
the vicinity of the pretensioner seat belts or
floor console must be performed in line with MITSUBISHI MOTORS guidelines. It is
important to do so because the work could affect the pretensioner systems.
l If you need to scrap the vehicle, please con-
sult a MITSUBISHI MOTORS Authorized
Service Point.
It is important to do so because unexpected activation of the pretensioner seat belts
could cause injuries.NOTEl The pretensioner seat belts will be activated
if the vehicle suffers a severe impact, even if the seat belts are not worn.
l The pretensioner seat belts are designed to
work only once. After the pretensioner seat
belts have been activated, we recommend you have it replaced by a MITSUBISHI
MOTORS Authorized Service Point.SRS warning
E00405900360
The same warning lamp/display is shared by
the SRS airbags and the pretensioner seat
belts.
Refer to “SRS warning lamp/display” on page 5-38.
Force limiter system
E00406000209
In the event of a collision, each force limitersystem will effectively absorb the load ap- plied to the seat belt to minimize the impact
to the passenger.
Child restraint
E00406403507
When transporting children in your vehicle,some type of child restraint system should al-
ways be used according to the size of the child. This is required by law in most coun-
tries.
The regulations concerning driving with chil-
dren in the front seat may differ from country
to country. You are advised to comply with the relevant regulations.WARNINGl When possible, put children in the rear
seat. Accident statistics indicate that chil- dren of all sizes and ages are safer when
properly restrained in the rear seat rather than in the front seat.
l Holding a child in your arms is no substi-
tute for a restraint system. Failure to use
a proper restraint system can result in se- vere or fatal injury to the child.
l Each child restraint device or fixing is to
be used only by one child.
l When attaching a child restraint system
to the rear seat, prevent the front seat- backs from touching the child restraintsystem.
Otherwise, the child could be seriously in-
jured in the event of hard braking or a
collision.
Child restraint
5-15OGGE16E1Seats and seat belts5
Page 112 of 490
Caution for installing the childrestraint on vehicle with frontpassenger’s airbag
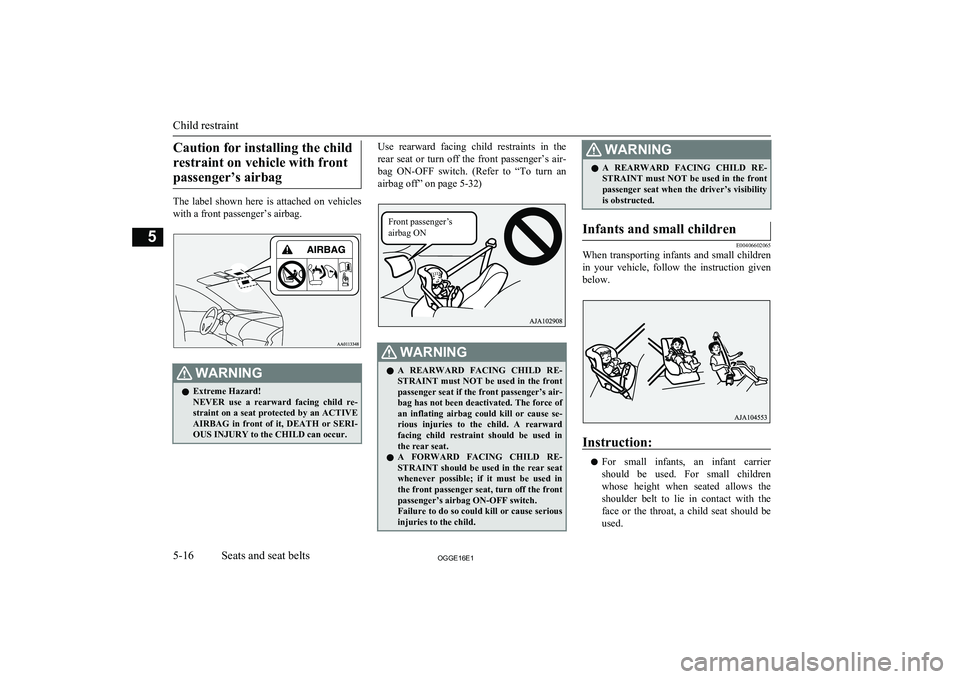
The label shown here is attached on vehicles
with a front passenger’s airbag.
WARNINGl Extreme Hazard!
NEVER use a rearward facing child re- straint on a seat protected by an ACTIVEAIRBAG in front of it, DEATH or SERI- OUS INJURY to the CHILD can occur.Use rearward facing child restraints in the
rear seat or turn off the front passenger’s air- bag ON-OFF switch. (Refer to “To turn an airbag off” on page 5-32)WARNINGl A REARWARD FACING CHILD RE-
STRAINT must NOT be used in the front passenger seat if the front passenger’s air-
bag has not been deactivated. The force of an inflating airbag could kill or cause se-
rious injuries to the child. A rearward facing child restraint should be used in
the rear seat.
l A FORWARD FACING CHILD RE-
STRAINT should be used in the rear seat
whenever possible; if it must be used in the front passenger seat, turn off the front
passenger’s airbag ON-OFF switch.
Failure to do so could kill or cause serious
injuries to the child.WARNINGl A REARWARD FACING CHILD RE-
STRAINT must NOT be used in the front passenger seat when the driver’s visibilityis obstructed.Infants and small children
E00406602065
When transporting infants and small children
in your vehicle, follow the instruction given below.
Instruction:
l For small infants, an infant carrier
should be used. For small children whose height when seated allows the shoulder belt to lie in contact with the
face or the throat, a child seat should be used.
Child restraint
5-16OGGE16E1Seats and seat belts5 Front passenger’s
airbag ON