child lock MITSUBISHI OUTLANDER PHEV 2018 (in English) User Guide
[x] Cancel search | Manufacturer: MITSUBISHI, Model Year: 2018, Model line: OUTLANDER PHEV, Model: MITSUBISHI OUTLANDER PHEV 2018Pages: 538, PDF Size: 25.01 MB
Page 111 of 538
WARNINGlDo not attempt to adjust the seat while
driving. This can cause loss of vehicle con- trol and result in an accident. After ad-
justments are made, ensure the seating is locked in position by attempting to move
the seat forward and rearward without
using the adjusting mechanism.
l Do not allow people or children to ride in
any area of your vehicle that is not equip- ped with seats and seat belts, and make
sure that everyone travelling in your vehi- cle is in a seat and wearing a seat belt, or
in the case of a child is strapped in a child restraint.
l To minimize the risk of personal injury in
the event of a collision or sudden braking,the seatbacks should always be in the al-
most upright position while the vehicle is in motion. The protection provided by theseat belts may be reduced significantly
when the seatback is reclined. There is greater risk that the passenger will slide
under the seat belt, resulting in serious in- jury, when the seatback is reclined.
l Do not place objects under the seats. This
could prevent the seat from locking se-
curely, and it could lead to an accident. It may also cause damage to the seat or oth-
er parts.CAUTIONl Make sure the seat is adjusted by an adult or
with adult supervision for correct and safe operation.
l Do not place a cushion or the like between
your back and the seatback while driving.The effectiveness of the head restraints will
be reduced in the event of an accident.
l The reclining mechanism of the front seat’s
seatback is spring loaded, causing it to return
to the vertical position when the lock lever is
operated. When using the lever, sit close to the seatback or hold it with your hand to
control its return motion.
l When sliding the seats, be careful not to
catch your hand or foot.
l When adjusting the front seat while the rear
seat is folded, be careful not to apply strong force to the flipped rear seat cushion.
Doing so could cause damage to the cover of
the front seat and the fitting of the rear seat cushion.Front seats
E00400401253
Manual type
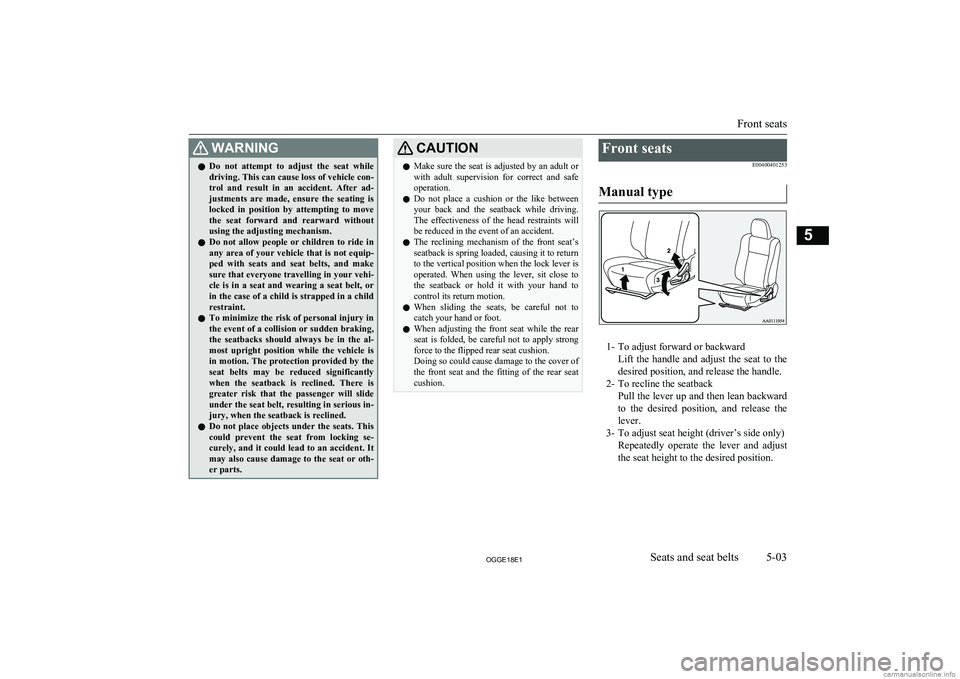
1- To adjust forward or backward Lift the handle and adjust the seat to the
desired position, and release the handle.
2- To recline the seatback Pull the lever up and then lean backwardto the desired position, and release the
lever.
3- To adjust seat height (driver’s side only)
Repeatedly operate the lever and adjustthe seat height to the desired position.
Front seats
5-03OGGE18E1Seats and seat belts5
Page 116 of 538
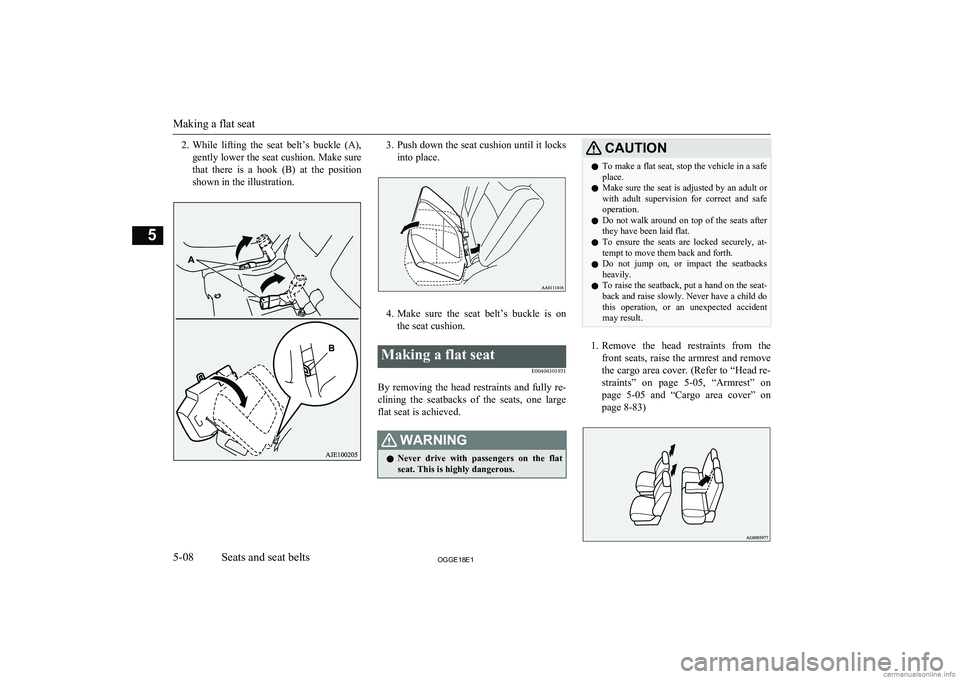
2.While lifting the seat belt’s buckle (A),
gently lower the seat cushion. Make sure that there is a hook (B) at the positionshown in the illustration.3. Push down the seat cushion until it locks
into place.
4. Make sure the seat belt’s buckle is on
the seat cushion.
Making a flat seat
E00404301931
By removing the head restraints and fully re-
clining the seatbacks of the seats, one large flat seat is achieved.
WARNINGl Never drive with passengers on the flat
seat. This is highly dangerous.CAUTIONl To make a flat seat, stop the vehicle in a safe
place.
l Make sure the seat is adjusted by an adult or
with adult supervision for correct and safe
operation.
l Do not walk around on top of the seats after
they have been laid flat.
l To ensure the seats are locked securely, at-
tempt to move them back and forth.
l Do not jump on, or impact the seatbacks
heavily.
l To raise the seatback, put a hand on the seat-
back and raise slowly. Never have a child do
this operation, or an unexpected accident
may result.
1. Remove the head restraints from the
front seats, raise the armrest and remove
the cargo area cover. (Refer to “Head re-
straints” on page 5-05, “Armrest” on
page 5-05 and “Cargo area cover” on
page 8-83)
Making a flat seat
5-08OGGE18E1Seats and seat belts5
Page 129 of 538
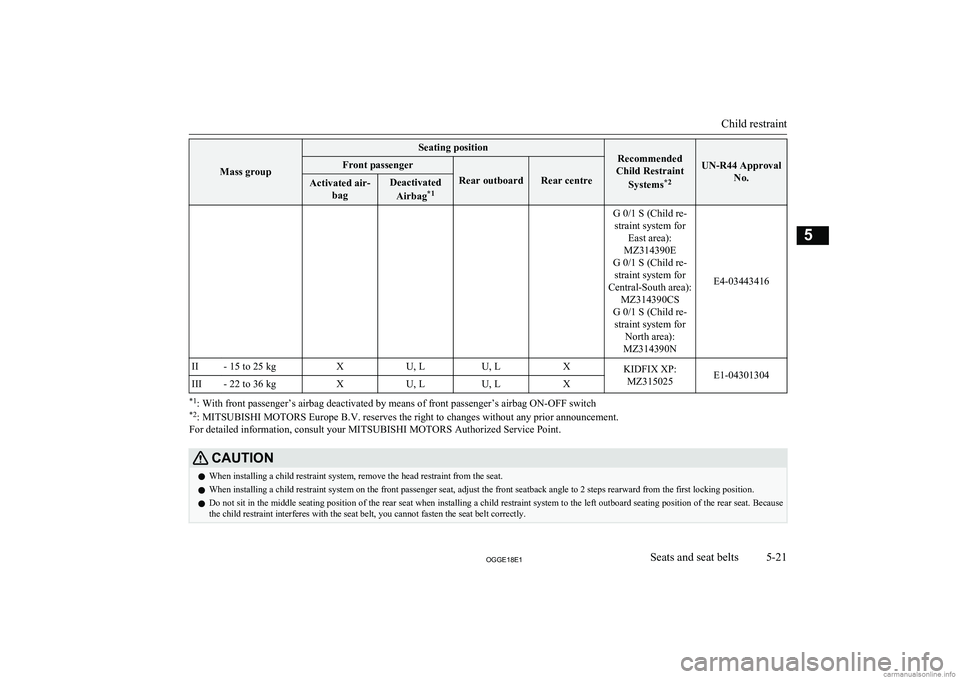
Mass group
Seating positionRecommended
Child Restraint
Systems *2UN-R44 Approval
No.
Front passenger
Rear outboardRear centre
Activated air-bagDeactivated
Airbag *1G 0/1 S (Child re-
straint system for East area):
MZ314390E
G 0/1 S (Child re- straint system for
Central-South area): MZ314390CS
G 0/1 S (Child re- straint system for North area):
MZ314390N
E4-03443416
II- 15 to 25 kgXU, LU, LXKIDFIX XP: MZ315025E1-04301304III- 22 to 36 kgXU, LU, LX
*1 : With front passenger’s airbag deactivated by means of front passenger’s airbag ON-OFF switch
*2 : MITSUBISHI MOTORS Europe B.V. reserves the right to changes without any prior announcement.
For detailed information, consult your MITSUBISHI MOTORS Authorized Service Point.
CAUTIONl When installing a child restraint system, remove the head restraint from the seat.
l When installing a child restraint system on the front passenger seat, adjust the front seatback angle to 2 steps rearward from the first locking position.
l Do not sit in the middle seating position of the rear seat when installing a child restraint system to the left outboard seating position of the rear seat. Because
the child restraint interferes with the seat belt, you cannot fasten the seat belt correctly.
Child restraint
5-21OGGE18E1Seats and seat belts5
Page 133 of 538
NOTElIf it is difficult to latch the tether strap hook
in the rear seat, turn the hook sideways.
6. Push and pull the child restraint system in
all directions to be sure it is secure.
To remove
Remove the child restraint system in accord-ance with the instructions provided by the
child restraint system’s manufacturer.
Installing a child restraint sys-
tem to a 3-point type seat belt (with emergency locking mech-anism)
E00408701816
Installation:
1. Put a child restraint system on the seat in
which you wish to install it, and remove
the head restraint from the seat.
Refer to “Head restraints” on page 5-05.
2. When installing a child restraint system
in the front passenger seat, adjust seat slide to its most rearward position and
adjust the front seatback angle to 2 steps
rearward from the first locking position.
3. Route the belt through the child restraint
according to the child restraint system manufacturer’s instructions, then insert
the latch plate into the buckle.
4. Remove all slack of a lap belt by pulling
the webbing through the belt’s adjust-
ment feature.
3-point type seat belt requires no length adjustment, remove all slack by usingthe locking clip.
5. If your child restraint system has a sup-
port leg, make sure that there is a sup-
port leg at the stable position on the
floor.
6. Before putting the child in the restraint,
push and pull the restraint in all direc- tions to be sure it is secure. Do this be-
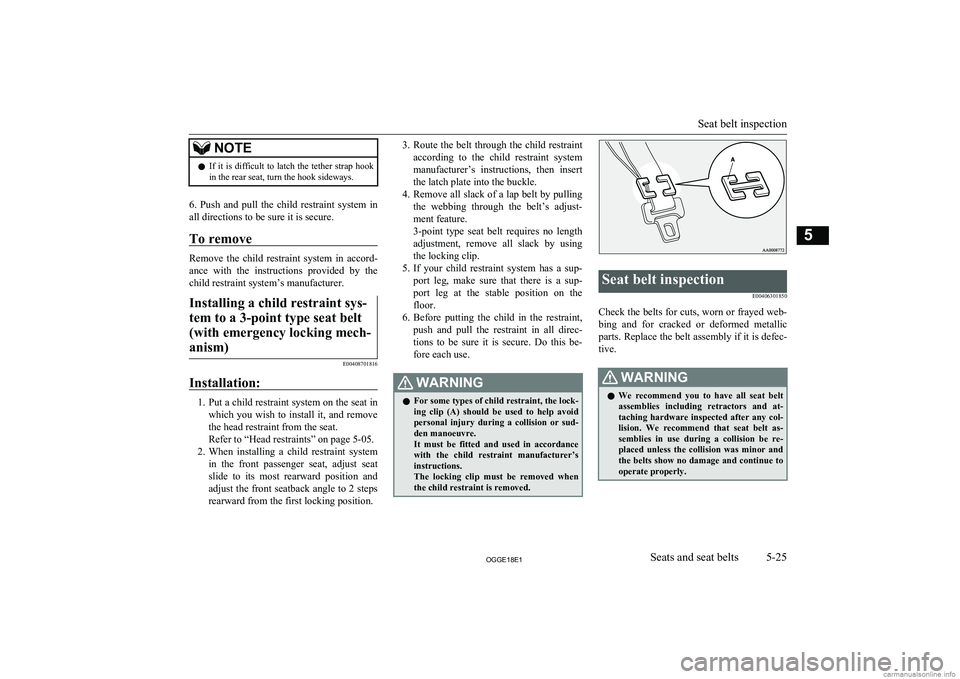
fore each use.WARNINGl For some types of child restraint, the lock-
ing clip (A) should be used to help avoid
personal injury during a collision or sud- den manoeuvre.
It must be fitted and used in accordance with the child restraint manufacturer’s
instructions.
The locking clip must be removed when the child restraint is removed.Seat belt inspection
E00406301850
Check the belts for cuts, worn or frayed web-bing and for cracked or deformed metallic
parts. Replace the belt assembly if it is defec-
tive.
WARNINGl We recommend you to have all seat belt
assemblies including retractors and at-
taching hardware inspected after any col- lision. We recommend that seat belt as-
semblies in use during a collision be re- placed unless the collision was minor and
the belts show no damage and continue to operate properly.
Seat belt inspection
5-25OGGE18E1Seats and seat belts5
Page 420 of 538
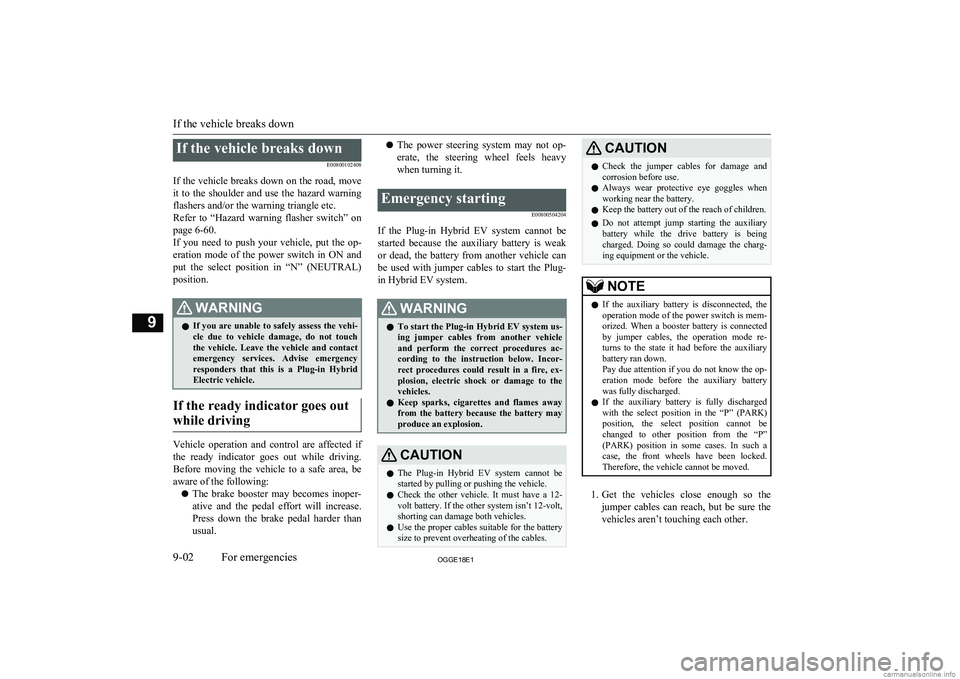
If the vehicle breaks downE00800102408
If the vehicle breaks down on the road, move it to the shoulder and use the hazard warning
flashers and/or the warning triangle etc.
Refer to “Hazard warning flasher switch” on page 6-60.
If you need to push your vehicle, put the op-
eration mode of the power switch in ON and put the select position in “N” (NEUTRAL) position.WARNINGl If you are unable to safely assess the vehi-
cle due to vehicle damage, do not touch
the vehicle. Leave the vehicle and contact emergency services. Advise emergency
responders that this is a Plug-in Hybrid Electric vehicle.
If the ready indicator goes out
while driving
Vehicle operation and control are affected if
the ready indicator goes out while driving.
Before moving the vehicle to a safe area, be aware of the following:
l The brake booster may becomes inoper-
ative and the pedal effort will increase.
Press down the brake pedal harder than usual.
l The power steering system may not op-
erate, the steering wheel feels heavy when turning it.Emergency starting
E00800504204
If the Plug-in Hybrid EV system cannot be
started because the auxiliary battery is weak or dead, the battery from another vehicle can
be used with jumper cables to start the Plug-
in Hybrid EV system.
WARNINGl To start the Plug-in Hybrid EV system us-
ing jumper cables from another vehicle
and perform the correct procedures ac-
cording to the instruction below. Incor-
rect procedures could result in a fire, ex- plosion, electric shock or damage to the
vehicles.
l Keep sparks, cigarettes and flames away
from the battery because the battery may
produce an explosion.CAUTIONl The Plug-in Hybrid EV system cannot be
started by pulling or pushing the vehicle.
l Check the other vehicle. It must have a 12-
volt battery. If the other system isn’t 12-volt, shorting can damage both vehicles.
l Use the proper cables suitable for the battery
size to prevent overheating of the cables.CAUTIONl Check the jumper cables for damage and
corrosion before use.
l Always wear protective eye goggles when
working near the battery.
l Keep the battery out of the reach of children.
l Do not attempt jump starting the auxiliary
battery while the drive battery is being charged. Doing so could damage the charg-
ing equipment or the vehicle.NOTEl If the auxiliary battery is disconnected, the
operation mode of the power switch is mem-
orized. When a booster battery is connected
by jumper cables, the operation mode re- turns to the state it had before the auxiliary
battery ran down.
Pay due attention if you do not know the op- eration mode before the auxiliary battery
was fully discharged.
l If the auxiliary battery is fully discharged
with the select position in the “P” (PARK)
position, the select position cannot be changed to other position from the “P”
(PARK) position in some cases. In such a case, the front wheels have been locked.
Therefore, the vehicle cannot be moved.
1. Get the vehicles close enough so the
jumper cables can reach, but be sure the vehicles aren’t touching each other.
If the vehicle breaks down
9-02OGGE18E1For emergencies9
Page 491 of 538
2
220-240 V AC power supplies.......................... 8-754
4-wheel drive operation.....................................7-23A
Accessory (Installation).....................................2-15
Accessory socket............................................... 8-74
Acoustic Vehicle Alerting System (AVAS)......2-06
Active stability control (ASC)...........................7-40
Adaptive Cruise Control System (ACC)........... 7-52
Air conditioner Automatic climate control air conditioner.... 8-04
Important operation tips for the air conditioner................................................... 8-12
Air purifier.........................................................8-13
Airbag................................................................ 5-26 Caution for installing the child re-straint in vehicles with front pas-
senger’s airbag.....................................5-15,5-28
Anti-lock brake system (ABS).......................... 7-36
Ashtray.............................................................. 8-73
Assist grips........................................................ 8-85
Audio CD player...................................................... 8-13
LW/MW/FM radio........................................ 8-13
Troubleshooting............................................ 8-47
Automatic high-beam system (AHB)................6-54
Auxiliary battery............................................. 11-09
Auxiliary battery charge warning lamp.............6-50
B
Basic knowledge for charging........................... 3-04
Battery charge mode switch.............................. 7-28
Battery save mode switch..................................7-27
Battery Auxiliary battery charge warning lamp........ 6-50
Discharged battery (Emergency starting)..... 9-02
Disposal information for used batteries........ 2-17 Specification............................................... 12-08
Blind Spot Warning (BSW).............................. 7-79
Bluetooth® 2.0 interface................................... 8-49
Bonnet............................................................. 11-04
Bottle holders.................................................... 8-83
Brake assist system............................................7-35
Brake warning lamp.......................................... 6-48
Brake Anti-lock brake............................................. 7-36
Brake auto hold............................................. 7-32
Braking.......................................................... 7-30
Fluid.................................................. 11-08,12-10
Parking brake................................................ 7-03
Bulb capacity .................................................. 11-24
C
Capacities........................................................ 12-10
Card holder................................................8-73,8-81
Cargo area cover................................................8-83
Cargo loads......................................................7-115
Catalytic converter.......................................... 11-03
Caution for installing the child re- straint on vehicles with front passen-
ger’s airbag...................................................... 5-28
Cautions on handling of 4-wheel drive vehicles................................................... 7-24
Central door locks............................................. 4-16
Charging............................................................ 3-02
Charging indicator............................................. 6-48
Charging system specifications....................... 12-07
Charging troubleshooting guide........................ 3-21
Check engine warning lamp.............................. 6-49
Child restraint.................................................... 5-15 Caution for installing the child re-straint in vehicles with front pas-
senger’s airbag.....................................5-15,5-28
Child-protection rear doors............................... 4-18
Cigarette lighter................................................. 8-73
Cleaning Exterior of your vehicle.............................. 10-03Interior of your vehicle............................... 10-02
Coat hook.......................................................... 8-85
Combination headlamps and dipper switch...... 6-52
Coolant (engine)....................................11-06,12-10
Coolant (plug-in hybrid EV system)............... 11-06
Cruise control.................................................... 7-42
Cup holder......................................................... 8-82
D
Daytime running lampsBulb capacity.............................................. 11-24
Demister (rear window).................................... 6-67
Digital clock
Alphabetical index
13- 1
OGGE18E1Alphabetical index
Page 492 of 538
Time Setting.................................................. 8-45
Dimensions...................................................... 12-04
Dipper (High/Low beam change)......................6-54
Disposal information for used batteries............ 2-17
Doors Central door locks......................................... 4-16
Child-protection............................................ 4-18
Dead Lock System........................................ 4-17
Lock and unlock............................................ 4-14
Drive battery......................................................2-04
Driving, alcohol and drugs................................ 7-02
E
Economical driving........................................... 7-02
Electric motor model....................................... 12-02
Electric motor number.....................................12-02
Electric motor specifications........................... 12-08
Electric parking brake....................................... 7-03
Electric power steering system (EPS)............... 7-39
Electric tailgate..................................................4-20
Electric window control.................................... 4-34
Electrical Parking switch...................................7-18
Electronic immobilizer (Anti-theft starting system)................................................ 4-03
Emergency starting............................................9-02
Emergency stop signal system.......................... 7-36
Engine specifications.......................................12-06
Engine Coolant..............................................11-06,12-10Model.......................................................... 12-02
Number....................................................... 12-02
Oil............................................................... 11-05
Oil and oil filter........................................... 12-10
Overheating................................................... 9-04
Specifications.............................................. 12-06
Used engine oils safety instructions and disposal information............................. 2-17
EV charging cable............................................. 3-07
EV cruising range.............................................. 2-05
EV switch.......................................................... 7-25
Exterior and interior lamp operation............... 11-15
F
Fluid capacities and lubricants........................ 12-10
Fluid Brake fluid........................................ 11-08,12-10
Engine coolant.................................. 11-06,12-10
Front Motor fluid........................................ 12-10
Plug-in hybrid EV system coolant.............. 11-06
Transaxle fluid............................................ 12-10
Washer fluid..................................... 11-08,12-10
For persons with electro-medical ap- paratus such as implantable cardiac
pacemaker or implantable cardi-
overter-defibrillator..........................................2-09
Forward Collision Mitigation System (FCM)... 7-64
Front fog lamps Bulb capacity.............................................. 11-24
Indication lamp............................................. 6-48
Replacement................................................ 11-27
Switch........................................................... 6-61
Front Motor fluid ............................................12-10
Front room lamp................................................ 8-78 Bulb capacity.............................................. 11-25
Front seats......................................................... 5-03
Front turn-signal lamps Bulb capacity.............................................. 11-24
Replacement................................................ 11-27
Fuel consumption............................................ 12-09
Fuel Filling the fuel tank....................................... 2-14Fuel selection................................................ 2-13Modification/alterations to the electrical or fuel systems............................. 2-16
Tank capacity................................................ 2-14
Fuses................................................................ 11-16
Fusible links.................................................... 11-15
G
General maintenance....................................... 11-15
General vehicle data........................................ 12-04
Genuine parts.....................................................2-16
Glove box.......................................................... 8-80
Glove box lamp Bulb capacity.............................................. 11-25
H
Hazard warning flasher switch.......................... 6-60
Hazard warning indication lamps......................6-47
Head restraints................................................... 5-05
Headlamp levelling switch................................ 6-59
Headlamp washer switch...................................6-66
Headlamps Bulb capacity.............................................. 11-24
Headlamp flasher.......................................... 6-54 Replacement................................................ 11-25
Switch........................................................... 6-52
Heated mirror.................................................... 7-11
Heated seats....................................................... 5-04
Alphabetical index
13- 2 OGGE18E1Alphabetical index