driver seat adjustment MITSUBISHI OUTLANDER PHEV 2018 Owner's Manual (in English)
[x] Cancel search | Manufacturer: MITSUBISHI, Model Year: 2018, Model line: OUTLANDER PHEV, Model: MITSUBISHI OUTLANDER PHEV 2018Pages: 538, PDF Size: 25.01 MB
Page 4 of 538

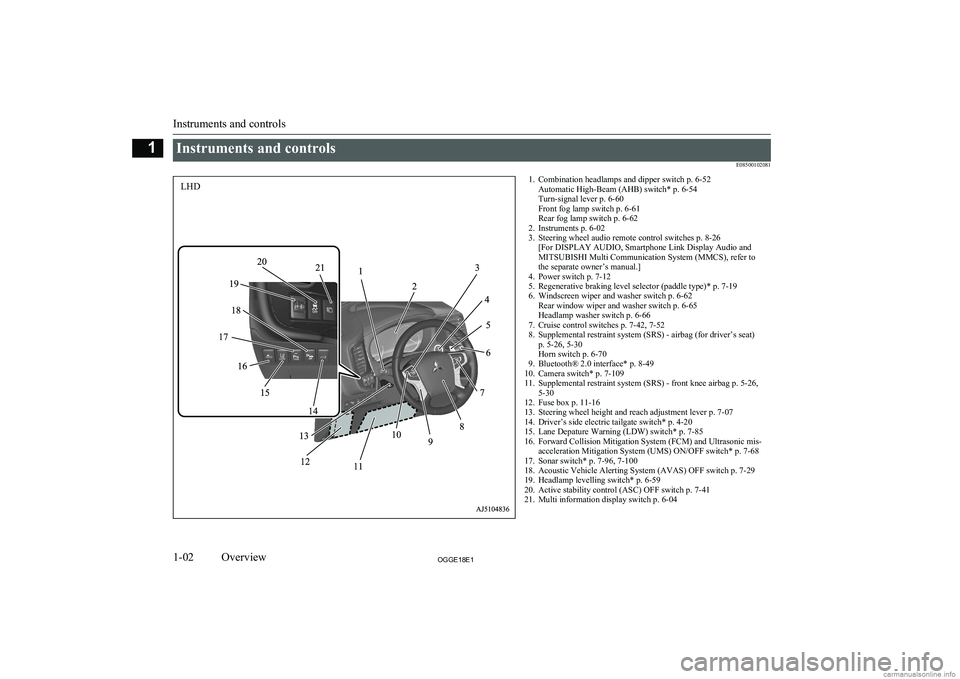
Instruments and controlsE085001020811. Combination headlamps and dipper switch p. 6-52Automatic High-Beam (AHB) switch* p. 6-54
Turn-signal lever p. 6-60
Front fog lamp switch p. 6-61
Rear fog lamp switch p. 6-62
2. Instruments p. 6-02
3. Steering wheel audio remote control switches p. 8-26 [For DISPLAY AUDIO, Smartphone Link Display Audio and
MITSUBISHI Multi Communication System (MMCS), refer to
the separate owner’s manual.]
4. Power switch p. 7-12
5. Regenerative braking level selector (paddle type)* p. 7-19
6. Windscreen wiper and washer switch p. 6-62 Rear window wiper and washer switch p. 6-65
Headlamp washer switch p. 6-66
7. Cruise control switches p. 7-42, 7-52
8. Supplemental restraint system (SRS) - airbag (for driver’s seat) p. 5-26, 5-30
Horn switch p. 6-70
9. Bluetooth® 2.0 interface* p. 8-49
10. Camera switch* p. 7-109
11. Supplemental restraint system (SRS) - front knee airbag p. 5-26, 5-30
12. Fuse box p. 11-16
13. Steering wheel height and reach adjustment lever p. 7-07
14. Driver’s side electric tailgate switch* p. 4-20
15. Lane Depature Warning (LDW) switch* p. 7-85
16. Forward Collision Mitigation System (FCM) and Ultrasonic mis- acceleration Mitigation System (UMS) ON/OFF switch* p. 7-68
17. Sonar switch* p. 7-96, 7-100
18. Acoustic Vehicle Alerting System (AVAS) OFF switch p. 7-29
19. Headlamp levelling switch* p. 6-59
20. Active stability control (ASC) OFF switch p. 7-41
21. Multi information display switch p. 6-04
Instruments and controls
1-02OGGE18E1Overview1LHD
Page 5 of 538

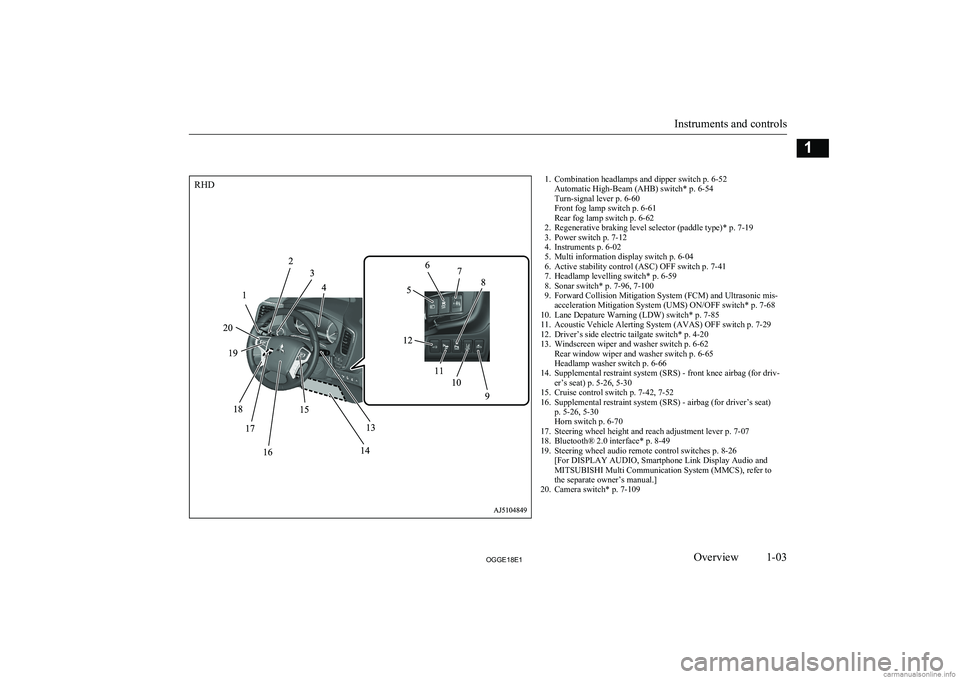
1. Combination headlamps and dipper switch p. 6-52Automatic High-Beam (AHB) switch* p. 6-54
Turn-signal lever p. 6-60
Front fog lamp switch p. 6-61
Rear fog lamp switch p. 6-62
2. Regenerative braking level selector (paddle type)* p. 7-19
3. Power switch p. 7-12
4. Instruments p. 6-02
5. Multi information display switch p. 6-04
6. Active stability control (ASC) OFF switch p. 7-41
7. Headlamp levelling switch* p. 6-59
8. Sonar switch* p. 7-96, 7-100
9. Forward Collision Mitigation System (FCM) and Ultrasonic mis- acceleration Mitigation System (UMS) ON/OFF switch* p. 7-68
10. Lane Depature Warning (LDW) switch* p. 7-85
11. Acoustic Vehicle Alerting System (AVAS) OFF switch p. 7-29
12. Driver’s side electric tailgate switch* p. 4-20
13. Windscreen wiper and washer switch p. 6-62 Rear window wiper and washer switch p. 6-65
Headlamp washer switch p. 6-66
14. Supplemental restraint system (SRS) - front knee airbag (for driv- er’s seat) p. 5-26, 5-30
15. Cruise control switch p. 7-42, 7-52
16. Supplemental restraint system (SRS) - airbag (for driver’s seat) p. 5-26, 5-30
Horn switch p. 6-70
17. Steering wheel height and reach adjustment lever p. 7-07
18. Bluetooth® 2.0 interface* p. 8-49
19. Steering wheel audio remote control switches p. 8-26 [For DISPLAY AUDIO, Smartphone Link Display Audio and
MITSUBISHI Multi Communication System (MMCS), refer to
the separate owner’s manual.]
20. Camera switch* p. 7-109
Instruments and controls
1-03OGGE18E1Overview1RHD
Page 18 of 538

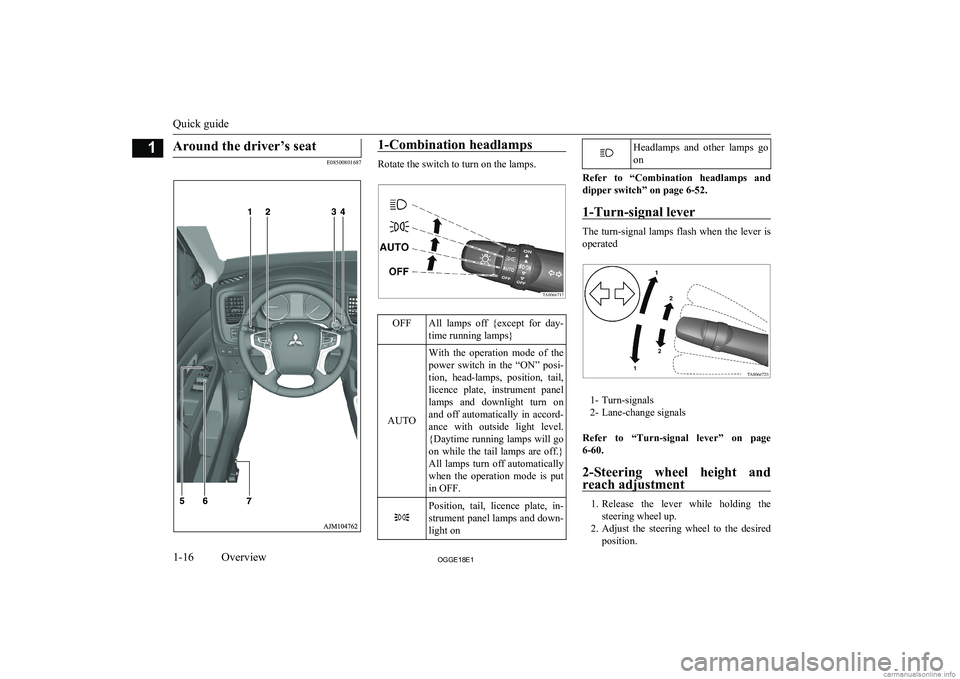
Around the driver’s seat
E08500801687
1-Combination headlamps
Rotate the switch to turn on the lamps.
OFFAll lamps off {except for day-
time running lamps}
AUTO
With the operation mode of the power switch in the “ON” posi-
tion, head-lamps, position, tail, licence plate, instrument panellamps and downlight turn on and off automatically in accord-
ance with outside light level. {Daytime running lamps will go
on while the tail lamps are off.} All lamps turn off automatically
when the operation mode is put
in OFF.Position, tail, licence plate, in-
strument panel lamps and down- light onHeadlamps and other lamps go
on
Refer to “Combination headlamps and dipper switch” on page 6-52.
1-Turn-signal lever
The turn-signal lamps flash when the lever is
operated
1- Turn-signals
2- Lane-change signals
Refer to “Turn-signal lever” on page 6-60.
2-Steering wheel height and
reach adjustment
1. Release the lever while holding the
steering wheel up.
2. Adjust the steering wheel to the desired
position.
Quick guide
1-16OGGE18E1Overview1
Page 110 of 538

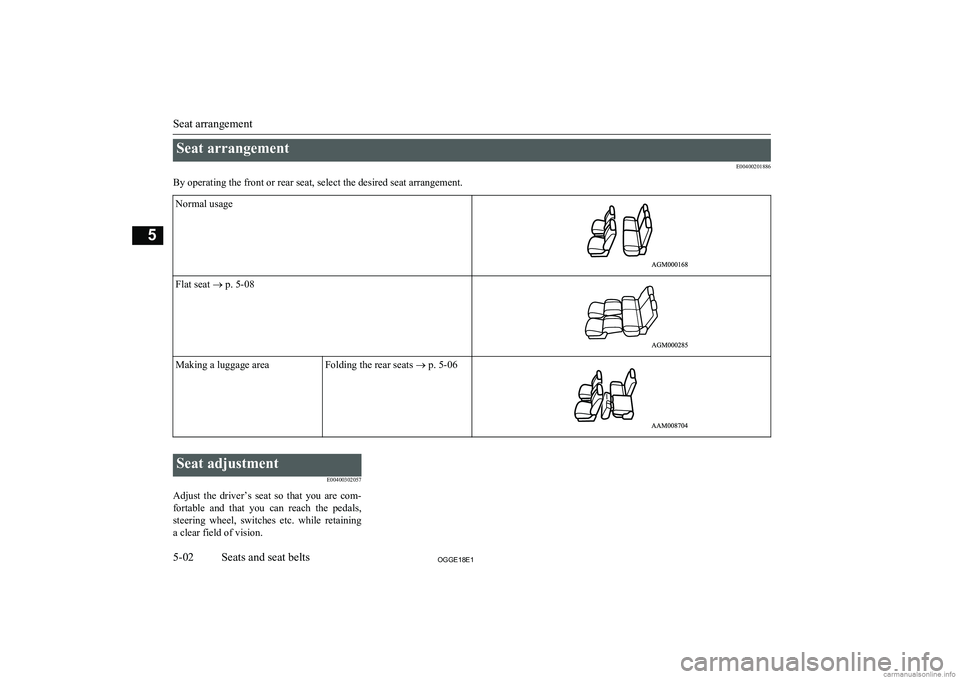
Seat arrangementE00400201886
By operating the front or rear seat, select the desired seat arrangement.Normal usageFlat seat ® p. 5-08Making a luggage areaFolding the rear seats ® p. 5-06
Seat adjustment
E00400302057
Adjust the driver’s seat so that you are com- fortable and that you can reach the pedals,
steering wheel, switches etc. while retaining a clear field of vision.
Seat arrangement
5-02OGGE18E1Seats and seat belts5