seat adjustment MITSUBISHI OUTLANDER SPORT 2017 3.G Owners Manual
[x] Cancel search | Manufacturer: MITSUBISHI, Model Year: 2017, Model line: OUTLANDER SPORT, Model: MITSUBISHI OUTLANDER SPORT 2017 3.GPages: 399, PDF Size: 14.61 MB
Page 11 of 399
If this warning light comes on or
flashes while you’re driving...
2-2 Quick index
2
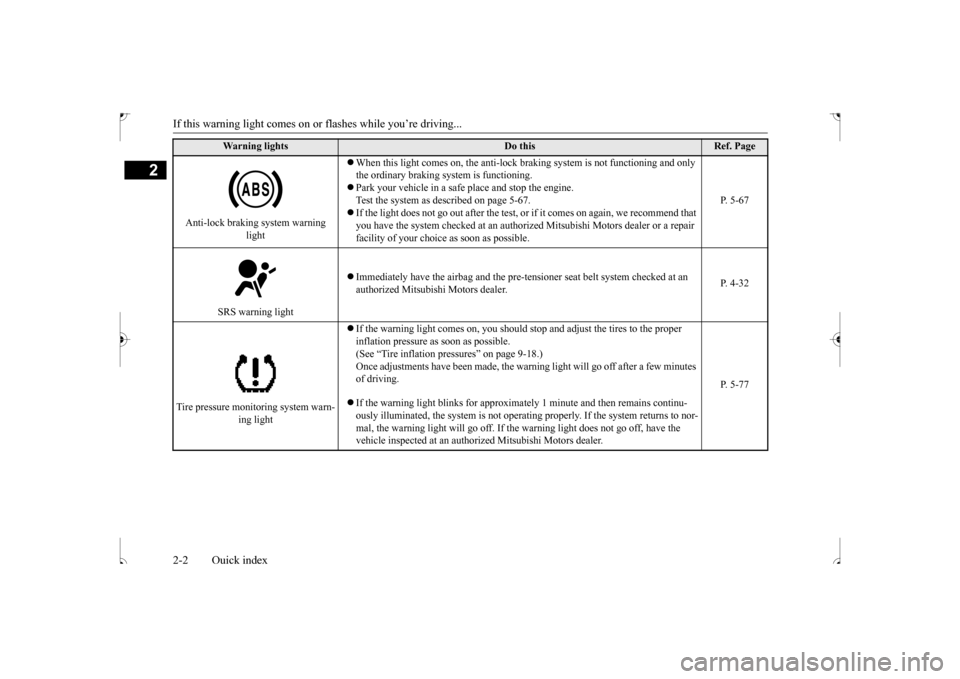
Anti-lock braking system warning
light
When this light comes on, the anti-lock braking system is not functioning and only the ordinary braking system is functioning. Park your vehicle in a safe place and stop the engine. Test the system as described on page 5-67. If the light does not go out after the test, or if it comes on again, we recommend that you have the system checked at an authorized Mitsubishi Motors dealer or a repair facility of your choice as soon as possible.
P. 5-67
SRS warning light
Immediately have the airbag and the pre-te
nsioner seat belt system checked at an
authorized Mitsubishi Motors dealer.
P. 4-32
Tire pressure monitoring system warn-
ing light
If the warning light comes on, you should stop and adjust the tires to the proper inflation pressure as soon as possible. (See “Tire inflation pressures” on page 9-18.)Once adjustments have been made, the warnin
g light will go off after a few minutes
of driving. If the warning light blinks for approxim
ately 1 minute and then remains continu-
ously illuminated, the system is not operatin
g properly. If the system returns to nor-
mal, the warning light will go off. If the warning light does not go off, have the vehicle inspected at an authori
zed Mitsubishi Motors dealer.
P. 5-77
Warning lights
Do this
Ref. Page
BK0239500US.bo
ok 2 ページ 2016年5月13日 金曜日 午前8時53分
Page 24 of 399
Front seats
Seat and restraint systems 4-3
4
Safety equipment cannot prevent injury or death in all motor vehicle accidents. You can help reduce the risk of injury or death, how- ever, by following the
instructions in this
manual.
N00401801468
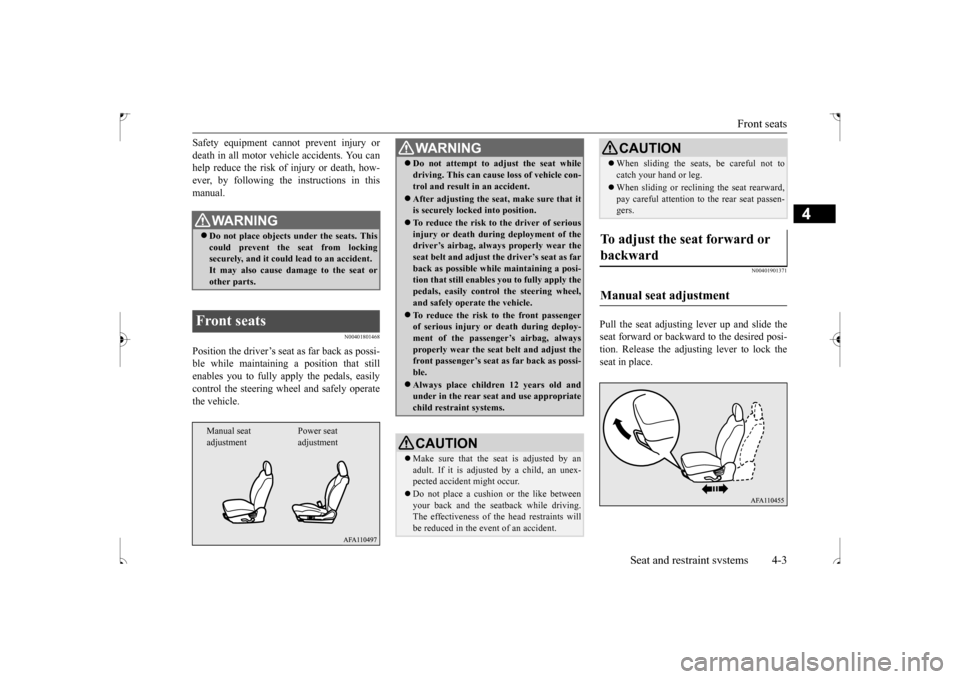
Position the driver’s seat
as far back as possi-
ble while maintaining a position that still enables you to fully apply the pedals, easilycontrol the steering wheel and safely operate the vehicle.
N00401901371
Pull the seat adjusting lever up and slide the seat forward or backward to the desired posi-tion. Release the adjusting lever to lock the seat in place.
WA R N I N G Do not place objects under the seats. This could prevent the seat from locking securely, and it could lead to an accident.It may also cause damage to the seat or other parts.
Front seats Manual seat adjustment
Power seat adjustment
WA R N I N G Do not attempt to adjust the seat while driving. This can cause loss of vehicle con- trol and result in an accident. After adjusting the seat, make sure that it is securely locked into position. To reduce the risk to the driver of serious injury or death during deployment of the driver’s airbag, always properly wear the seat belt and adjust th
e driver’s seat as far
back as possible while maintaining a posi- tion that still enables
you to fully apply the
pedals, easily control the steering wheel,and safely operate the vehicle. To reduce the risk to the front passenger of serious injury or death during deploy- ment of the passenger’s airbag, always properly wear the seat belt and adjust thefront passenger’s seat as far back as possi- ble. Always place children 12 years old and under in the rear seat and use appropriate child restraint systems.CAUTION Make sure that the seat is adjusted by an adult. If it is adjusted by a child, an unex-pected accident might occur. Do not place a cushion or the like between your back and the seatback while driving. The effectiveness of the head restraints will be reduced in the event of an accident.
When sliding the seats, be careful not to catch your hand or leg. When sliding or reclining the seat rearward, pay careful attention to the rear seat passen-gers.
To adjust the seat forward or backward Manual seat adjustment
CAUTION
BK0239500US.bo
ok 3 ページ 2016年5月13日 金曜日 午前8時53分
Page 25 of 399
Front seats 4-4 Seat and restraint systems
4
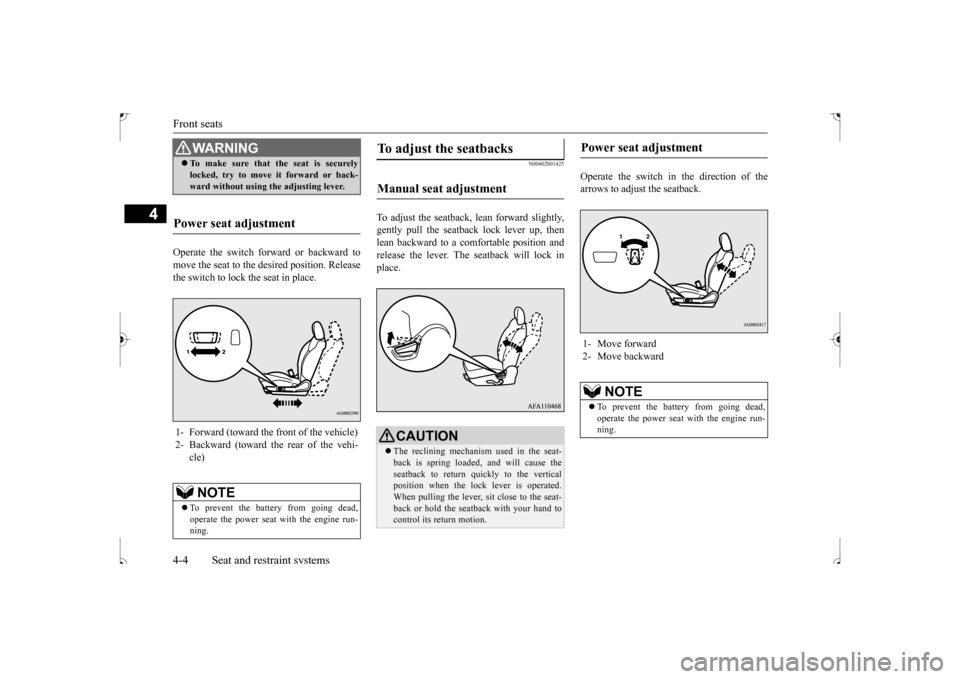
Operate the switch forward or backward to move the seat to the desired position. Releasethe switch to lock the seat in place.
N00402001425
To adjust the seatback,
lean forward slightly,
gently pull the seatb
ack lock lever up, then
lean backward to a comfortable position and release the lever. The seatback will lock in place.
Operate the switch in the direction of the arrows to adjust the seatback.
WA R N I N G To make sure that the seat is securely locked, try to move it forward or back- ward without using the adjusting lever.
Power seat adjustment 1- Forward (toward the front of the vehicle) 2- Backward (toward the rear of the vehi-
cle)NOTE
To prevent the battery from going dead, operate the power seat with the engine run- ning.
To adjust the seatbacks Manual seat adjustment
CAUTION The reclining mechanism used in the seat- back is spring loaded, and will cause the seatback to return quickly to the vertical position when the lock lever is operated.When pulling the lever, sit close to the seat- back or hold the seatback with your hand to control its return motion.
Power seat adjustment 1- Move forward 2- Move backward
NOTE
To prevent the battery from going dead, operate the power seat with the engine run- ning.
BK0239500US.bo
ok 4 ページ 2016年5月13日 金曜日 午前8時53分
Page 26 of 399
Front seats
Seat and restraint systems 4-5
4
N00402101282
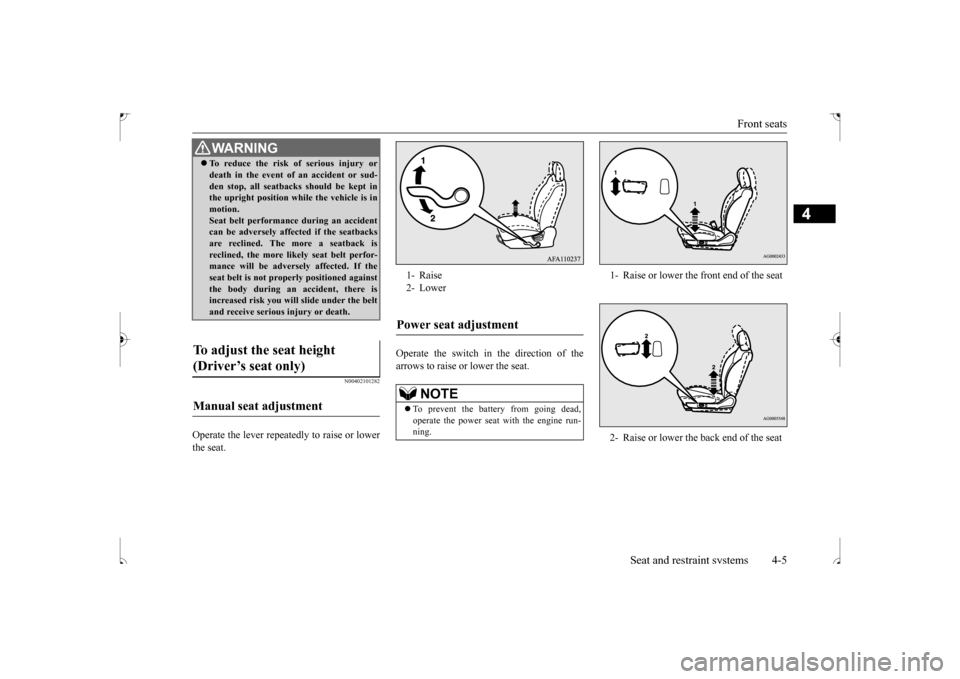
Operate the lever repeatedly to raise or lower the seat.
Operate the switch in the direction of the arrows to raise or lower the seat.
WA R N I N G To reduce the risk of serious injury or death in the event of an accident or sud- den stop, all seatbacks should be kept in the upright position while the vehicle is in motion.Seat belt performance during an accident can be adversely affected if the seatbacks are reclined. The more a seatback isreclined, the more likely seat belt perfor- mance will be adversely affected. If the seat belt is not properly positioned againstthe body during an accident, there is increased risk you will slide under the belt and receive serious injury or death.
To adjust the seat height (Driver’s seat only) Manual seat adjustment
1- Raise 2- LowerPower seat adjustment
NOTE
To prevent the battery from going dead, operate the power seat with the engine run-ning.
1- Raise or lower the front end of the seat 2- Raise or lower the back end of the seat
BK0239500US.bo
ok 5 ページ 2016年5月13日 金曜日 午前8時53分
Page 29 of 399
Head restraints 4-8 Seat and restraint systems
4
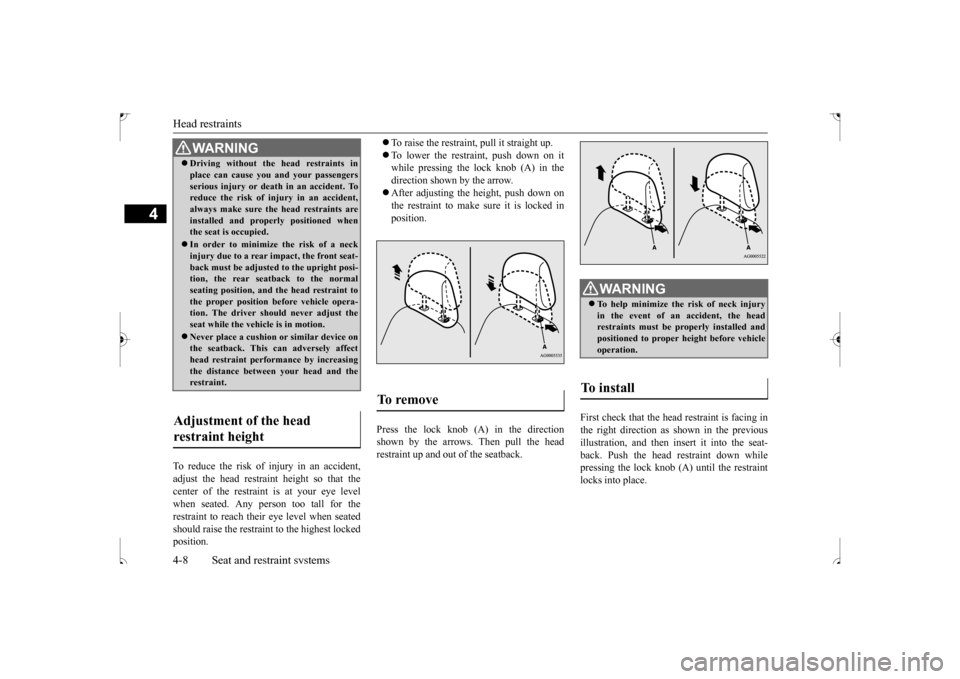
To reduce the risk of injury in an accident, adjust the head restraint height so that thecenter of the restraint is at your eye level when seated. Any person too tall for the restraint to reach their eye level when seatedshould raise the restraint to the highest locked position.
To raise the restraint, pull it straight up. To lower the restraint, push down on it while pressing the lock knob (A) in the direction shown by the arrow. After adjusting the height, push down on the restraint to make sure it is locked in position.
Press the lock knob (A) in the direction shown by the arrows. Then pull the head restraint up and out of the seatback.
First check that the head restraint is facing in the right direction as shown in the previous illustration, and then insert it into the seat-back. Push the head restraint down while pressing the lock knob (A) until the restraint locks into place.
WA R N I N G Driving without the head restraints in place can cause you and your passengers serious injury or death in an accident. To reduce the risk of injury in an accident, always make sure the head restraints areinstalled and properly positioned when the seat is occupied. In order to minimize the risk of a neck injury due to a rear impact, the front seat- back must be adjusted to the upright posi-tion, the rear seatback to the normal seating position, and the head restraint to the proper position before vehicle opera-tion. The driver should never adjust the seat while the vehicle is in motion. Never place a cushion or similar device on the seatback. This can adversely affect head restraint performance by increasingthe distance between your head and the restraint.
Adjustment of the head restraint height
To remove
WA R N I N G To help minimize the risk of neck injury in the event of an accident, the head restraints must be properly installed andpositioned to proper height before vehicle operation.
To install
BK0239500US.bo
ok 8 ページ 2016年5月13日 金曜日 午前8時53分
Page 30 of 399
Extending a luggage compartment Seat and restraint systems 4-9
4
N00405500105
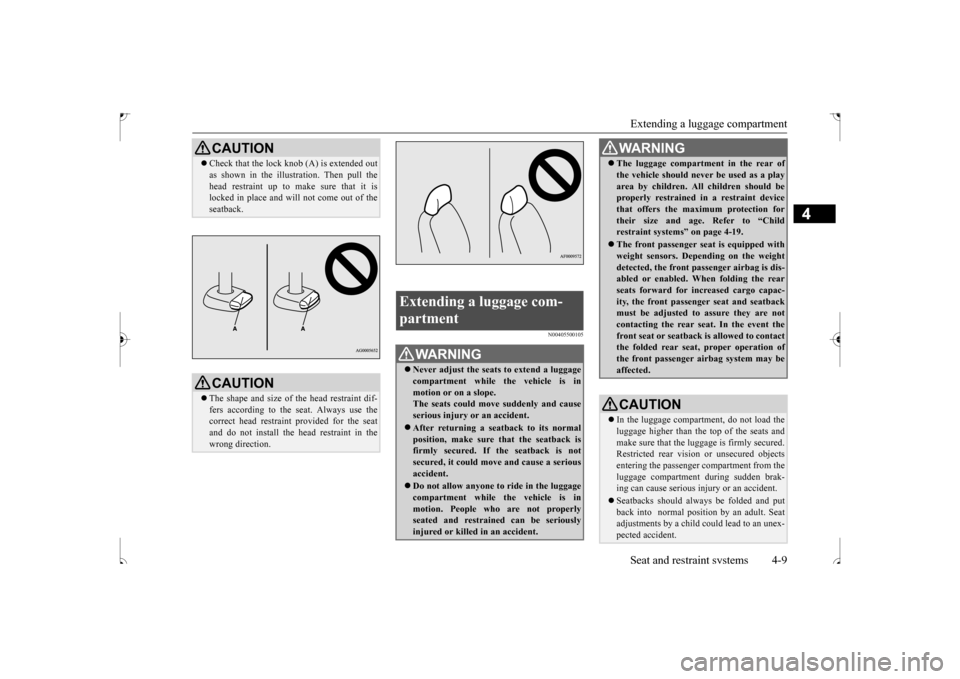
CAUTION Check that the lock knob (A) is extended out as shown in the illustration. Then pull the head restraint up to make sure that it is locked in place and will not come out of the seatback.CAUTION The shape and size of the head restraint dif- fers according to the seat. Always use the correct head restraint provided for the seatand do not install the head restraint in the wrong direction.
Extending a luggage com- partment
WA R N I N G Never adjust the seats to extend a luggage compartment while the vehicle is inmotion or on a slope. The seats could move suddenly and cause serious injury or an accident. After returning a seatback to its normal position, make sure that the seatback isfirmly secured. If the seatback is not secured, it could move and cause a serious accident. Do not allow anyone to
ride in the luggage
compartment while the vehicle is inmotion. People who are not properly seated and restrained can be seriously injured or killed in an accident.
The luggage compartment in the rear of the vehicle should never be used as a play area by children. All children should be properly restrained in a restraint device that offers the maximum protection fortheir size and age. Refer to “Child restraint systems” on page 4-19. The front passenger seat is equipped with weight sensors. Depending on the weight detected, the front passenger airbag is dis-abled or enabled. When folding the rear seats forward for increased cargo capac- ity, the front passenger seat and seatbackmust be adjusted to assure they are not contacting the rear seat. In the event the front seat or seatback is allowed to contactthe folded rear seat, proper operation of the front passenger airbag system may be affected.CAUTION In the luggage compartment, do not load the luggage higher than the top of the seats and make sure that the luggage is firmly secured. Restricted rear vision or unsecured objects entering the passenger compartment from the luggage compartment during sudden brak-ing can cause serious injury or an accident. Seatbacks should always be folded and put back into normal position by an adult. Seat adjustments by a child could lead to an unex- pected accident.WA R N I N G
BK0239500US.bo
ok 9 ページ 2016年5月13日 金曜日 午前8時53分
Page 107 of 399
Outside rearview mirrors 5-44 Features and controls
5
N00512200206
Adjust the outside rearview mirrors only after making any seat adjustme
nts so as to have a
clear view to the rear of the vehicle.
N00549101170
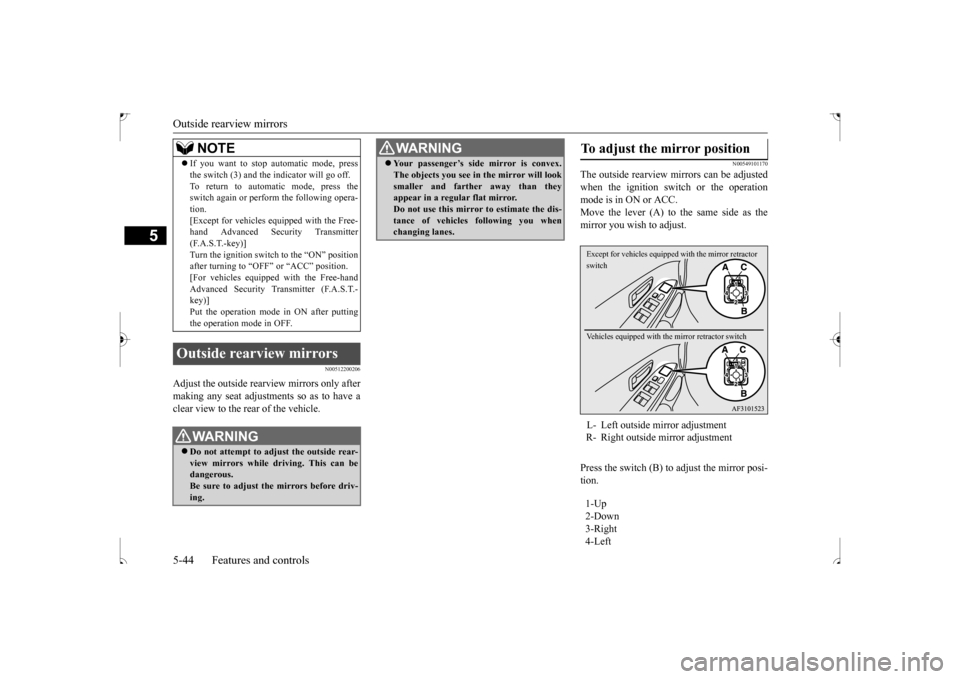
The outside rearview mirrors can be adjustedwhen the ignition switch or the operationmode is in ON or ACC. Move the lever (A) to the same side as the mirror you wish to adjust. Press the switch (B) to adjust the mirror posi- tion.
If you want to stop automatic mode, press the switch (3) and the indicator will go off. To return to automatic mode, press the switch again or perform the following opera- tion.[Except for vehicles equipped with the Free- hand Advanced Security Transmitter (F.A.S.T.-key)]Turn the ignition switch to the “ON” position after turning to “OFF” or “ACC” position. [For vehicles equipped with the Free-handAdvanced Security Transmitter (F.A.S.T.- key)] Put the operation mode in ON after puttingthe operation mode in OFF.
Outside rearview mirrors
WA R N I N G Do not attempt to adjust the outside rear- view mirrors while driving. This can bedangerous. Be sure to adjust the mirrors before driv- ing.NOTE
Your passenger’s side mirror is convex. The objects you see in the mirror will look smaller and farther away than they appear in a regular flat mirror. Do not use this mirror to estimate the dis-tance of vehicles following you when changing lanes.WA R N I N G
To adjust the mirror position L- Left outside mirror adjustment R- Right outside mirror adjustment 1-Up 2-Down3-Right4-LeftExcept for vehicles equipped
with the mirror retractor
switch Vehicles equipped with th
e mirror retractor switch
BK0239500US.bo
ok 44 ページ 2016年5月13日 金曜日 午前8時53分
Page 395 of 399
Alphabetical index 12-2
12
Fluid
.....................
.................
9-9
, 11-5
Selector lever operation
...................
5-51
Selector lever positions
...................
5-54
Sports mode
..................
.................
5-55
Coolant (engine)
..........................
9-7
, 11-5
Cruise control
....................
.................
5-73
Cup holder
....................
...................
5-176
D
Daytime running lights
Bulb capacity
................
.................
9-30
Replacement
.................
.................
9-37
Defogger (rear window)
....................
5-136
Defrosting or defogging (windshield, door windows)
.................
7-8
, 7-13
, 7-18
, 7-24
Dimensions
...................
.....................
11-3
Dimmer (high/low beam change)
.......
5-127
Disc brake pads
.................
.................
9-23
Dome light
Bulb capacity
................
.................
9-32
Doors
Lock
......................
........................
5-28
Power door locks
............................
5-30
Driving during cold weather
..................
6-5
Driving precaution
................
................
6-2
Driving, alcohol and drugs
.....................
6-2
E
Electric rear window defogger switch
..5-136
Electronic immobilizer (Anti-theft starting system)
.....................
................
5-4
, 5-23
Electronically controlled 4WD system
..5-58
Emission-control system maintenance
...
9-22
Engine
Compartment
..................
.................
9-5
Coolant
...................
................
9-7
, 11-5
Hood
.......................
........................
9-3
Oil and oil filter
.......................
9-5
, 11-5
Overheating
....................
.................
8-4
Serial number
.................
................
11-2
Specification
...................
................
11-4
Engine coolant temperature display
.......
5-92
Engine hood
....................
....................
9-3
Engine switch
.....................
................
5-17
Exhaust system
...................
................
9-24
F
Floor console box
..............................
5-175
Floor mat
.........................
....................
6-3
Fluid
Automatic transaxle fluid
.................
11-5
Brake fluid
.....................
................
11-5
Continuously variable transmission (CVT) fluid
...................
...................
9-9
, 11-5
Engine coolant
.........................
9-7
, 11-5
Washer fluid
.........................
9-10
, 11-5
Fluid capacities and lubricants
.............
11-5
Free-hand advanced security transmitter (F.A.S.T.-key)
.................
.................
5-12
Front fog lights
Bulb capacity
................
.................
9-30
Indicators
..................
...................
5-120
Replacement
.................
.................
9-35
Switch
......................
...................
5-130
Front seat adjustment
............................
4-3
Front side-marker lights
Bulb capacity
................
.................
9-30
Replacement
.................
.................
9-34
Front turn signal light
Bulb capacity
................
.................
9-30
Replacement
.................
.................
9-35
Fuel
Filling the fuel tank
...........................
3-3
Fuel economy
...................
................
6-2
Fuel hoses
.....................
.................
9-23
Fuel selection
...................
................
3-2
Tank capacity
................
.................
11-5
Fuses
.........................
........................
9-25
Fusible links
..................
.....................
9-25
G
General maintenance
Maintenance
..................
.................
9-23
General vehicle data
............................
11-3
BK0239500US.bo
ok 2 ページ 2016年5月13日 金曜日 午前8時53分
Page 397 of 399
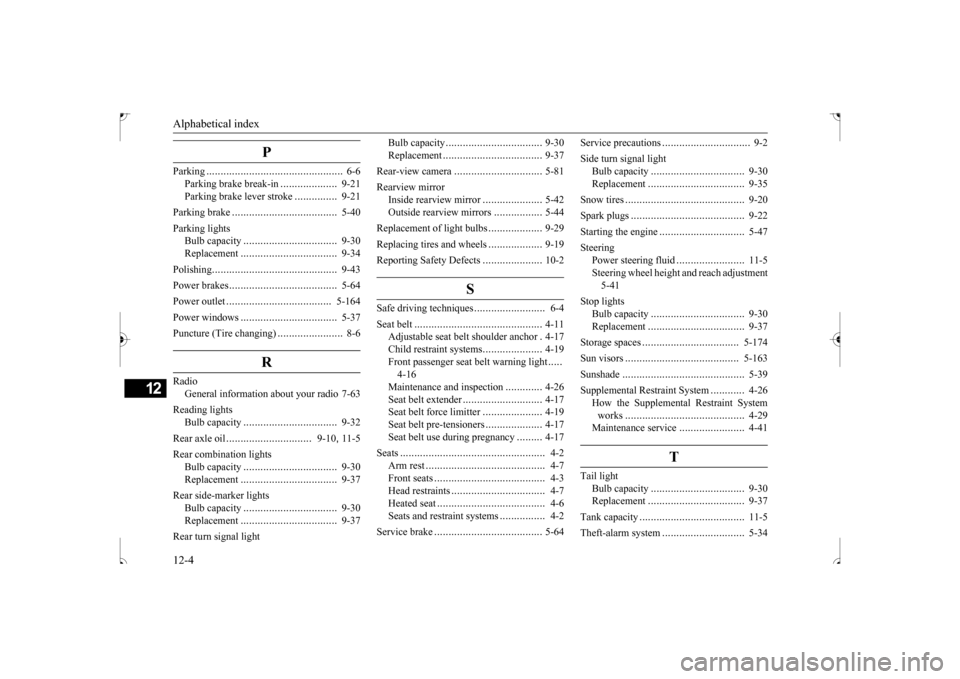
Alphabetical index 12-4
12
P
Parking
.........................
.......................
6-6
Parking brake break-in
....................
9-21
Parking brake lever stroke
...............
9-21
Parking brake
....................
.................
5-40
Parking lights
Bulb capacity
................
.................
9-30
Replacement
.................
.................
9-34
Polishing
.......................
.....................
9-43
Power brakes
.....................
.................
5-64
Power outlet
..................
...................
5-164
Power windows
.................
.................
5-37
Puncture (Tire changing)
.......................
8-6
R
Radio
General information about your radio 7-63
Reading lights
Bulb capacity
................
.................
9-32
Rear axle oil
...............
...............
9-10
, 11-5
Rear combination lights
Bulb capacity
................
.................
9-30
Replacement
.................
.................
9-37
Rear side-marker lights
Bulb capacity
................
.................
9-30
Replacement
.................
.................
9-37
Rear turn signal light
Bulb capacity
..................
................
9-30
Replacement
...................
................
9-37
Rear-view camera
...............
................
5-81
Rearview mirror
Inside rearview mirror
.....................
5-42
Outside rearview mirrors
.................
5-44
Replacement of light bulbs
...................
9-29
Replacing tires and wheels
...................
9-19
Reporting Safety Defects
.....................
10-2
S
Safe driving techniques
.........................
6-4
Seat belt
......................
.......................
4-11
Adjustable seat belt shoulder anchor
.4-17
Child restraint systems
.....................
4-19
Front passenger seat belt warning light
.....
4-16Maintenance and inspection
.............
4-26
Seat belt extender
............................
4-17
Seat belt force limitter
.....................
4-19
Seat belt pre-tensioners
....................
4-17
Seat belt use during pregnancy
.........
4-17
Seats
...........................
........................
4-2
Arm rest
......................
....................
4-7
Front seats
...................
....................
4-3
Head restraints
................
.................
4-7
Heated seat
.....................
.................
4-6
Seats and restraint systems
................
4-2
Service brake
...................
...................
5-64
Service precautions
...............
................
9-2
Side turn signal light
Bulb capacity
................
.................
9-30
Replacement
.................
.................
9-35
Snow tires
.....................
.....................
9-20
Spark plugs
...................
.....................
9-22
Starting the engine
..............................
5-47
Steering
Power steering fluid
........................
11-5
Steering wheel height and reach adjustment5-41
Stop lights
Bulb capacity
................
.................
9-30
Replacement
.................
.................
9-37
Storage spaces
...................
...............
5-174
Sun visors
.....................
...................
5-163
Sunshade
......................
.....................
5-39
Supplemental Restraint System
............
4-26
How the Supplemental Restraint System works
.....................
.....................
4-29
Maintenance service
.......................
4-41
T
Tail light
Bulb capacity
................
.................
9-30
Replacement
.................
.................
9-37
Tank capacity
....................
.................
11-5
Theft-alarm system
.............................
5-34
BK0239500US.bo
ok 4 ページ 2016年5月13日 金曜日 午前8時53分