brake light MITSUBISHI PAJERO IV 2011 User Guide
[x] Cancel search | Manufacturer: MITSUBISHI, Model Year: 2011, Model line: PAJERO IV, Model: MITSUBISHI PAJERO IV 2011Pages: 377, PDF Size: 29.43 MB
Page 165 of 377
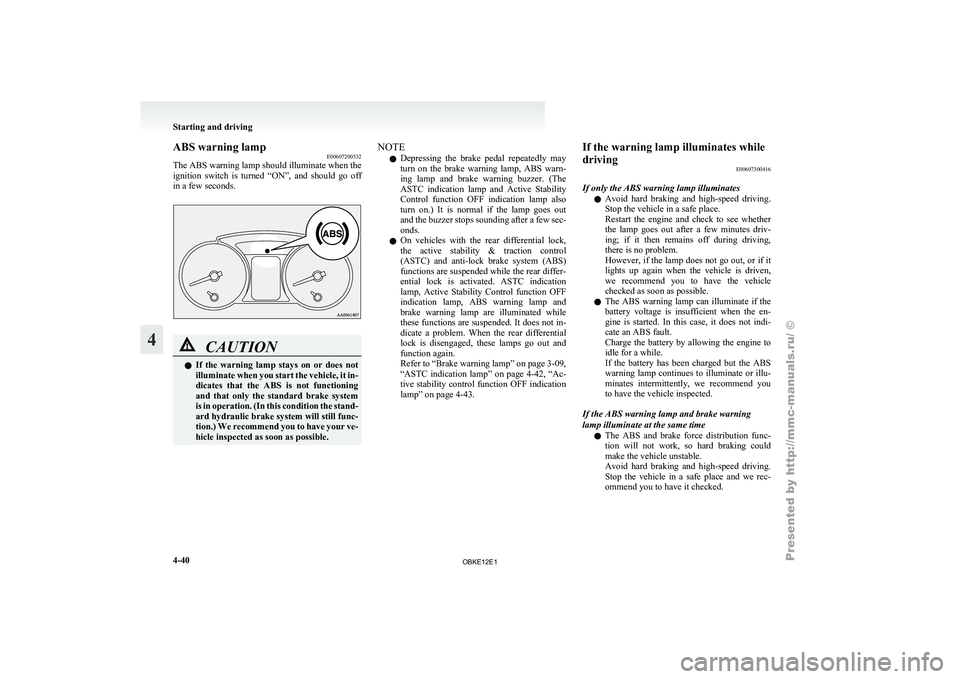
ABS warning lamp
E00607200532
The ABS warning
lamp should illuminate when the
ignition switch is turned “ON”, and should go off
in a few seconds. CAUTION
l
If the
warning
lamp stays on or does not
illuminate when you start the vehicle, it in-
dicates that the ABS is not functioning
and that only the standard brake system
is in operation. (In this condition the stand-
ard hydraulic brake system will still func-
tion.) We recommend you to have your ve-
hicle inspected as soon as possible. NOTE
l Depressing
the brake
pedal repeatedly may
turn on the brake warning lamp, ABS warn-
ing lamp and brake warning buzzer. (The
ASTC indication lamp and Active Stability
Control function OFF indication lamp also
turn on.) It is normal if the lamp goes out
and the buzzer stops sounding after a few sec-
onds.
l On vehicles with the rear differential lock,
the active stability & traction control
(ASTC) and anti-lock brake system (ABS)
functions are suspended while the rear differ-
ential lock is activated. ASTC indication
lamp, Active Stability Control function OFF
indication lamp, ABS warning lamp and
brake warning lamp are illuminated while
these functions are suspended. It does not in-
dicate a problem. When the rear differential
lock is disengaged, these lamps go out and
function again.
Refer to “Brake warning lamp” on page 3-09,
“ASTC indication lamp” on page 4-42, “Ac-
tive stability control function OFF indication
lamp” on page 4-43. If the warning lamp illuminates while
driving
E00607300416
If only the ABS warning lamp illuminates l Avoid
hard
braking
and high-speed driving.
Stop the vehicle in a safe place.
Restart the engine and check to see whether
the lamp goes out after a few minutes driv-
ing; if it then remains off during driving,
there is no problem.
However, if the lamp does not go out, or if it
lights up again when the vehicle is driven,
we recommend you to have the vehicle
checked as soon as possible.
l The ABS warning lamp can illuminate if the
battery voltage is insufficient when the en-
gine is started. In this case, it does not indi-
cate an ABS fault.
Charge the battery by allowing the engine to
idle for a while.
If the battery has been charged but the ABS
warning lamp continues to illuminate or illu-
minates intermittently, we recommend you
to have the vehicle inspected.
If the ABS warning lamp and brake warning
lamp illuminate at the same time l The ABS and brake force distribution func-
tion will not work, so hard braking could
make the vehicle unstable.
Avoid hard braking and high-speed driving.
Stop the vehicle in a safe place and we rec-
ommend you to have it checked. Starting and driving
4-40
4
OBKE12E1
Page 183 of 377
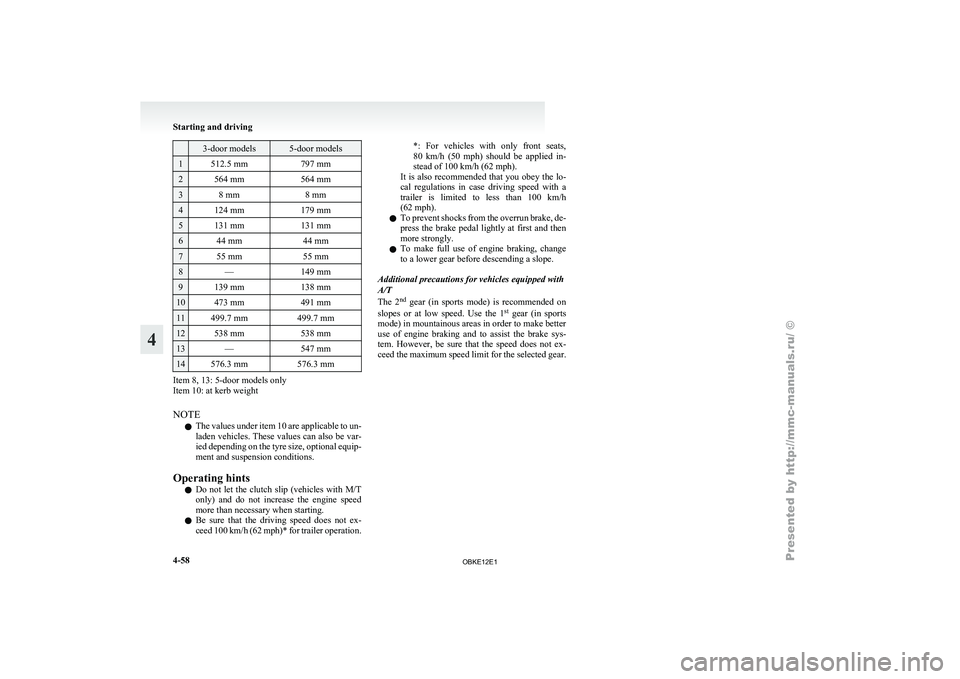
3-door models 5-door models
1 512.5 mm
797 mm2 564 mm
564 mm3 8 mm
8 mm4 124 mm
179 mm5 131 mm
131 mm6 44 mm
44 mm7 55 mm
55 mm8 —
149 mm9 139 mm
138 mm10 473 mm
491 mm11 499.7 mm
499.7 mm12 538 mm
538 mm13 —
547 mm14 576.3 mm
576.3 mmItem 8, 13: 5-door models only
Item 10: at kerb weight
NOTE
l The
values under
item 10 are applicable to un-
laden vehicles. These values can also be var-
ied depending on the tyre size, optional equip-
ment and suspension conditions.
Operating hints l Do not let the clutch slip (vehicles with M/T
only) and do not increase the engine speed
more than necessary when starting.
l Be sure that the driving speed does not ex-
ceed 100 km/h (62 mph)* for trailer operation. *: For vehicles with only front seats,
80
km/h
(50
mph) should be applied in-
stead of 100 km/h (62 mph).
It is also recommended that you obey the lo-
cal regulations in case driving speed with a
trailer is limited to less than 100 km/h
(62 mph).
l To prevent shocks from the overrun brake, de-
press the brake pedal lightly at first and then
more strongly.
l To make full use of engine braking, change
to a lower gear before descending a slope.
Additional precautions for vehicles equipped with
A/T
The 2 nd
gear (in sports mode) is recommended on
slopes or at low speed. Use the 1 st
gear (in sports
mode) in mountainous areas in order to make better
use of engine braking and to assist the brake sys-
tem. However, be sure that the speed does not ex-
ceed the maximum speed limit for the selected gear. Starting and driving
4-58
4
OBKE12E1
Page 189 of 377
CAUTION
l
Normally, use the outside position to keep
the windscreen and
side windows clear
and quickly remove fog or frost from the
windscreen.
If high cooling performance is desired, or
if the outside air is dusty or otherwise con-
taminated use the recirculation position.
Switch to the outside position periodically
to increase ventilation so that the win-
dows do not become fogged up.
l Use of the recirculation position for exten-
ded time may cause the windows to fog up.
NOTE l If
you press
the AUTO switch to select auto-
matic control after manually switching be-
tween outside air and recirculated air, the air
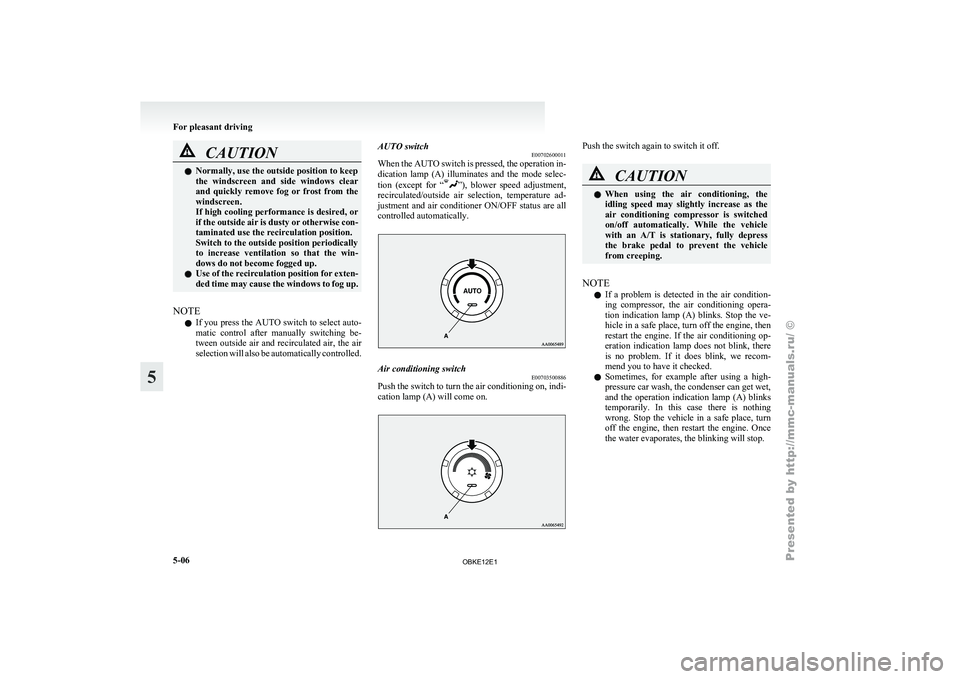
selection will also be automatically controlled. AUTO switch
E00702600011
When the
AUTO
switch is pressed, the operation in-
dication lamp (A) illuminates and the mode selec-
tion (except for “ ”), blower speed adjustment,
recirculated/outside air
selection, temperature ad-
justment and air conditioner ON/OFF status are all
controlled automatically. Air conditioning switch
E00703500886
Push the switch to turn the air conditioning on, indi-
cation lamp (A) will come on. Push the switch again to switch it off.
CAUTION
l
When using
the air conditioning, the
idling speed may slightly increase as the
air conditioning compressor is switched
on/off automatically. While the vehicle
with an A/T is stationary, fully depress
the brake pedal to prevent the vehicle
from creeping.
NOTE l If
a problem
is detected in the air condition-
ing compressor, the air conditioning opera-
tion indication lamp (A) blinks. Stop the ve-
hicle in a safe place, turn off the engine, then
restart the engine. If the air conditioning op-
eration indication lamp does not blink, there
is no problem. If it does blink, we recom-
mend you to have it checked.
l Sometimes, for example after using a high-
pressure car wash, the condenser can get wet,
and the operation indication lamp (A) blinks
temporarily. In this case there is nothing
wrong. Stop the vehicle in a safe place, turn
off the engine, then restart the engine. Once
the water evaporates, the blinking will stop. For pleasant driving
5-06
5
OBKE12E1
Page 191 of 377
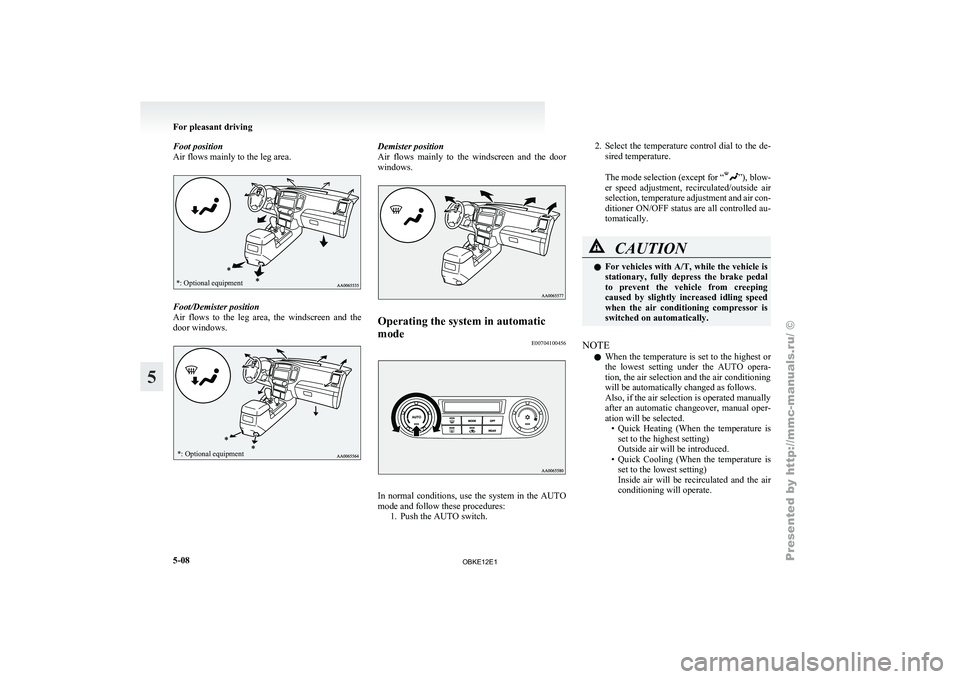
Foot position
Air flows mainly to the leg area.*: Optional equipment
Foot/Demister position
Air flows
to
the leg area, the windscreen and the
door windows.
*: Optional equipment Demister position
Air flows mainly
to the windscreen and the door
windows. Operating the system in automatic
mode
E00704100456 In normal conditions, use the system in the AUTO
mode and follow these procedures:
1. Push the AUTO switch. 2.
Select the
temperature control dial to the de-
sired temperature.
The mode
selection (except for “ ”), blow-
er speed adjustment,
recirculated/outside air
selection, temperature adjustment and air con-
ditioner ON/OFF status are all controlled au-
tomatically. CAUTION
l
For vehicles
with
A/T, while the vehicle is
stationary, fully depress the brake pedal
to prevent the vehicle from creeping
caused by slightly increased idling speed
when the air conditioning compressor is
switched on automatically.
NOTE l When
the temperature
is set to the highest or
the lowest setting under the AUTO opera-
tion, the air selection and the air conditioning
will be automatically changed as follows.
Also, if the air selection is operated manually
after an automatic changeover, manual oper-
ation will be selected. • Quick Heating (When the temperature isset to the highest setting)
Outside air will be introduced.
• Quick Cooling (When the temperature is set to the lowest setting)
Inside air will be recirculated and the air
conditioning will operate. For pleasant driving
5-08
5
OBKE12E1
Page 299 of 377
CAUTION
l
When the vehicle with A/T is to be towed
by another vehicle with all the wheels on
the ground, make sure that the towing
speed and distance given below are never
exceeded, avoiding damage to the trans-
mission.
Petrol-powered vehicles
Towing speed: 50 km/h (31 mph)
Towing distance: 50 km (31 miles)
Diesel-powered vehicles
Towing speed: 30 km/h (19 mph)
Towing distance: 80 km (50 miles)
For the towing speed and the towing dis-
tance, follow the local driving laws and
regulations.
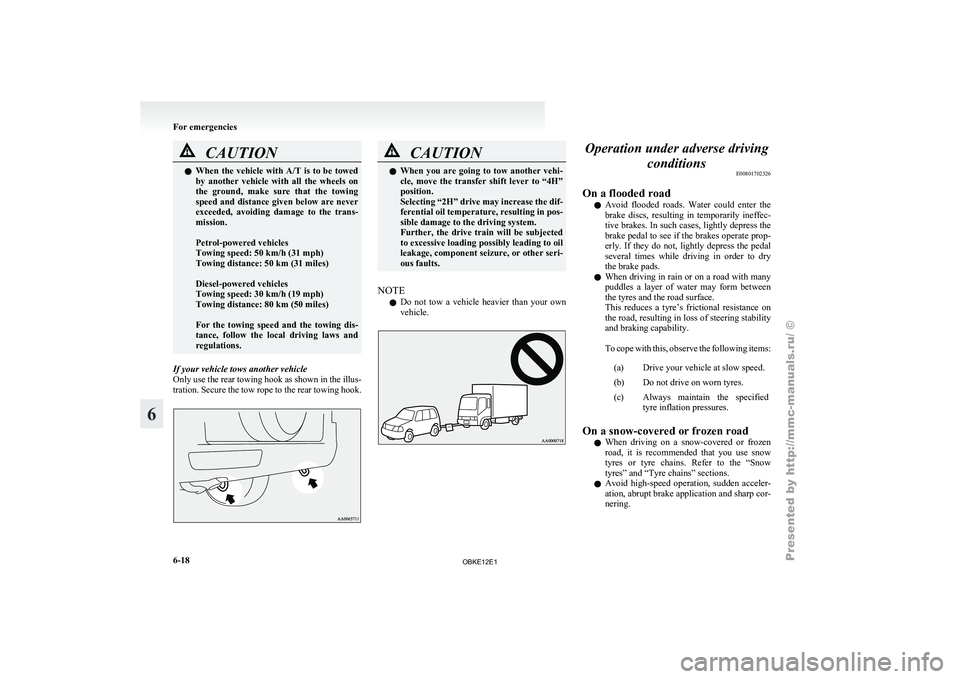
If your vehicle tows another vehicle
Only use the
rear towing hook as shown in the illus-
tration. Secure the tow rope to the rear towing hook. CAUTION
l
When you are
going to tow another vehi-
cle, move the transfer shift lever to “4H”
position.
Selecting “2H” drive may increase the dif-
ferential oil temperature, resulting in pos-
sible damage to the driving system.
Further, the drive train will be subjected
to excessive loading possibly leading to oil
leakage, component seizure, or other seri-
ous faults.
NOTE l Do
not tow
a vehicle heavier than your own
vehicle. Operation under adverse driving
conditions E00801702326
On a flooded road l Avoid flooded
roads.
Water could enter the
brake discs, resulting in temporarily ineffec-
tive brakes. In such cases, lightly depress the
brake pedal to see if the brakes operate prop-
erly. If they do not, lightly depress the pedal
several times while driving in order to dry
the brake pads.
l When driving in rain or on a road with many
puddles a layer of water may form between
the tyres and the road surface.
This reduces a tyre’s frictional resistance on
the road, resulting in loss of steering stability
and braking capability.
To cope with this, observe the following items:
(a) Drive your vehicle at slow speed.
(b) Do not drive on worn tyres.
(c) Always maintain the specified tyre inflation pressures.
On a snow-covered or frozen road l When driving
on
a snow-covered or frozen
road, it is recommended that you use snow
tyres or tyre chains. Refer to the “Snow
tyres” and “Tyre chains” sections.
l Avoid high-speed operation, sudden acceler-
ation, abrupt brake application and sharp cor-
nering. For emergencies
6-18
6
OBKE12E1
Page 305 of 377
CAUTION
l
After washing the vehicle, drive the vehi-
cle slowly while lightly depressing the
brake pedal several times in order to dry
out the brakes.
Leaving the brakes wet could result in re-
duced braking performance. Also, there
is a possibility that they could freeze up
or become inoperative due to rust, render-
ing the vehicle unable to move.
l When using an automatic car wash, pay
attention to the following items, referring
to the operation manual or consulting a
car wash operator. If the following proce-
dure is not followed, it could result in dam-
age to your vehicle.
• The outside mirrors are retracted.
• The wiper arm assembly is taped.
• If your vehicle is equipped with a reardeflector or roof rails, consult a car
wash operator before using the car
wash.
• If your vehicle has rain sensor wipers, place the wiper switch lever in the
“OFF” position to deactivate the rain
sensor.
During cold weather
Salt and other
chemicals spread on the roads in
some areas in winter can have a harmful effect on
the vehicle body. You should therefore wash the ve-
hicle as often as possible in accordance with our
care-instructions. It is recommended to have a pres-
ervative applied and the underfloor protection
checked before and after the cold weather season. After washing your vehicle, wipe off all water-
drops from
the
rubber parts around the doors to pre-
vent the doors from freezing.
NOTE
l To prevent freezing of the weatherstripping
on the doors, bonnet, etc., they should be trea-
ted with silicone spray.
Waxing E00901000560
Waxing the vehicle will help prevent the adherence
of dust and
road chemicals to the paintwork. Apply
a wax solution after washing the vehicle, or at least
once every three months to assist displacing of water.
Do not wax your vehicle in direct sunlight. You
should wax after the surfaces have cooled. CAUTION
l
Waxes containing
high
abrasive com-
pounds should not be used. Such waxes re-
move rust and stains effectively from the
paintwork but they are harmful to the lus-
tre on the painted surface and the plated
surface.
Further, they are harmful to glossy surfa-
ces such as grille, garnish, mouldings, etc.
l Do not use petrol or paint thinners to re-
move road tar or other contamination to
the vehicle surface.
l Do not apply wax on the areas having
black mat coating as it can cause uneven
discolouration, patches, blurs, etc. If
stained with wax, immediately wipe off
with a piece of soft cloth and warm water. CAUTION
l
On vehicles with
a sunroof, be careful
when waxing the area around the sunroof
opening, not to put any wax on the weath-
erstrip (black rubber). If stained with
wax, the weatherstrip cannot maintain a
weatherproof seal with the sunroof.
Polishing E00901100024
The vehicle should only be polished if the paint-
work has become stained or lost its lustre. Matt-fin-
ish parts and
plastic bumpers must not be polished,
polishing these parts will stain them or damage
their finish.
Damaged paint E00901200155
Small cracks and scratches in the paint coat should
be touched up
as soon as possible with
MITSUBISHI touch-up paint to prevent corrosion.
Check body areas facing the road or the tyres care-
fully for damage to the paint coat caused by flying
stones, etc. The paint code number for your vehicle
can be found on the vehicle information code plate.
(Refer to “Vehicle information code plate” on page
9-02.)
Cleaning plastic parts E00901300619
Use a sponge or chamois leather.
If a car
wax adheres on a grey or black rough sur-
face of the bumper, moulding or lamps, the surface
becomes white. In such a case, wipe it off using
lukewarm water and soft cloth or chamois leather. Vehicle care
7-04
7
OBKE12E1
Page 306 of 377
CAUTION
l
Do not use a scrubbing brush or other
hard tools as they may damage the plastic
part surface.
l Do not use wax containing compound (pol-
ishing powder) which may damage the
plastic part surface.
l Do not bring the plastic parts into contact
with petrol, light oil, brake fluids, engine
oils, greases, paint thinners, and sulphu-
ric acid (battery electrolyte) which may
crack, stain or discolour the plastic parts.
If they touch the plastic parts, wipe them
off with soft cloth, chamois or the like
and an aqueous solution of neutral deter-
gent then immediately rinse the affected
parts with water.
Chrome parts E00901400115
In order to prevent spots and corrosion of chrome
parts, wash with
water, dry thoroughly, and apply a
special protective coating. This should be done
more frequently in winter.
Aluminium wheels* E00901500321
1. Remove dirt using a sponge while sprinkling
water on the wheel.
2. Use
neutral detergent on any dirt that cannot
be removed easily with water.
Rinse off the neutral detergent after washing
the wheel.
3. Dry the vehicle thoroughly using a chamois leather or a soft cloth. CAUTION
l
Do not use
a brush or other hard imple-
ment on the wheels.
Doing so could scratch the wheels.
l Do not use any cleaner that contains an
abrasive substance or is acidic or alka-
line. Doing so could cause the coating on
the wheels to peel or become discoloured
or stained.
l Do not directly apply hot water using a
steam cleaner or by any other means.
l Contact with seawater and road deicer
can cause corrosion. Rinse off such sub-
stances as soon as possible.
Window glass E00901600032
The window glass can normally be cleaned using
only a sponge and water.
Glass cleaner can
be used to remove oil, grease,
dead insects, etc. After washing the glass, wipe dry
with a clean, dry, soft cloth. Never use the same
cloth to wipe the window glass as would be used to
wipe the paintwork; wax from the painted surfaces
could adhere to the glass and reduce its transparen-
cy and visibility.
NOTE
l To clean the inside of the backdoor window,
always use a soft cloth and wipe the window
glass along the demister heater element so as
not to cause damage. Wiper blades
E00901700059
Use a soft cloth and glass cleaner to remove grease,
dead insects, etc.,
from the wiper blades. Replace
the wiper blades when they no longer wipe proper-
ly. (Refer to page 8-17.)
Cleaning the sunroof* E00901800180
Clean the inside of the sunroof with a soft cloth.
Hard deposits should
be wiped away with a cloth
dipped in warm, neutral detergent solution. Wipe
away the solution with a sponge dipped in fresh wa-
ter.
NOTE
l The surface treatment on the inside of the
glass may be removed if hard cloth or organ-
ic solvent (benzine, kerosene, thinner, etc.) is
used.
Engine compartment E00902100311
Clean the engine compartment at the beginning and
end of winter.
Pay particular attention to flanges,
crevices and peripheral parts where dust containing
road chemicals and other corrosive materials might
collect.
If salt and other chemicals are used on the roads in
your area, clean the engine compartment at least ev-
ery three months.
Never spray or splash water on the electrical com-
ponents in the engine compartment, as this may
cause damage.
Do not bring the nearby parts, the plastic parts and
so on into contact with sulphuric acid (battery elec-
trolyte) which may crack, stain or discolour them. Vehicle care
7-05 7
OBKE12E1
Page 315 of 377
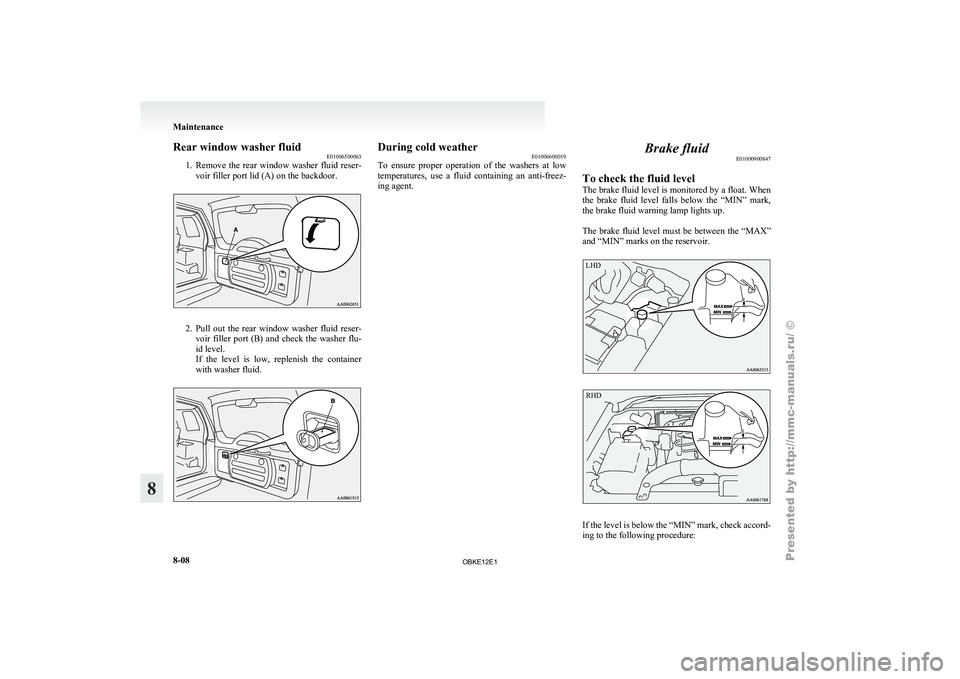
Rear window washer fluid
E01006500063
1. Remove the rear
window washer fluid reser-
voir filler port lid (A) on the backdoor. 2. Pull out the rear window washer fluid reser-
voir filler
port (B) and check the washer flu-
id level.
If the level is low, replenish the container
with washer fluid. During cold weather
E01006600019
To ensure proper
operation of the washers at low
temperatures, use a fluid containing an anti-freez-
ing agent. Brake fluid
E01000900847
To check the fluid level
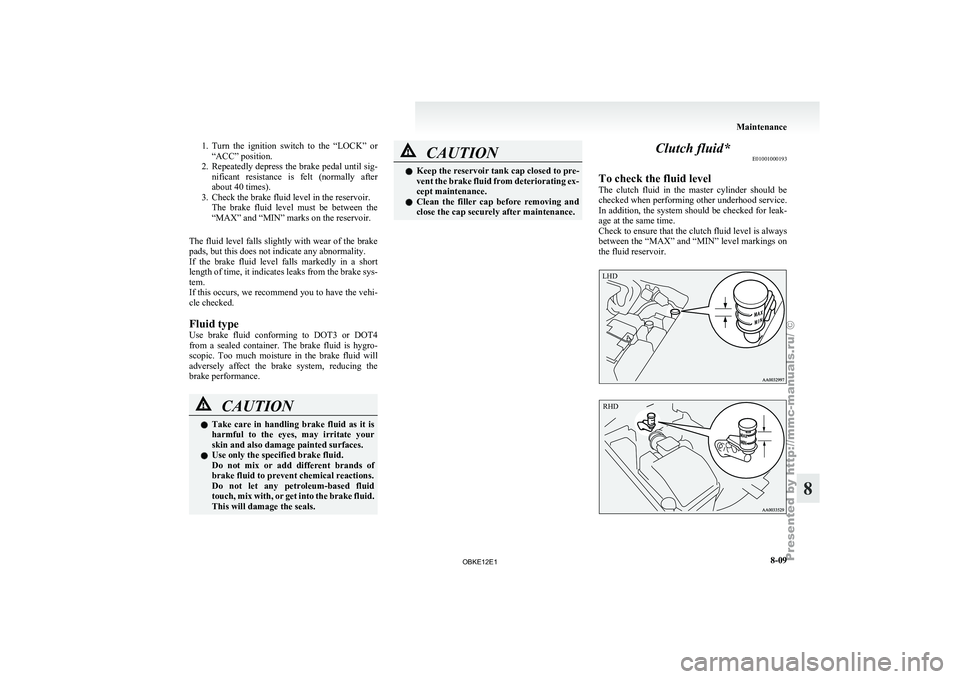
The brake fluid
level is monitored by a float. When
the brake fluid level falls below the “MIN” mark,
the brake fluid warning lamp lights up.
The brake fluid level must be between the “MAX”
and “MIN” marks on the reservoir.
LHD
RHD If the level is below the “MIN” mark, check accord-
ing to the following procedure:Maintenance
8-08
8
OBKE12E1
Page 316 of 377
1. Turn the ignition switch to the “LOCK” or
“ACC” position.
2. Repeatedly
depress the brake pedal until sig-
nificant resistance is felt (normally after
about 40 times).
3. Check the brake fluid level in the reservoir. The brake fluid level must be between the
“MAX” and “MIN” marks on the reservoir.
The fluid level falls slightly with wear of the brake
pads, but this does not indicate any abnormality.
If the brake fluid level falls markedly in a short
length of time, it indicates leaks from the brake sys-
tem.
If this occurs, we recommend you to have the vehi-
cle checked.
Fluid type
Use brake fluid conforming to DOT3 or DOT4
from a sealed container. The brake fluid is hygro-
scopic. Too much moisture in the brake fluid will
adversely affect the brake system, reducing the
brake performance. CAUTION
l
Take care
in
handling brake fluid as it is
harmful to the eyes, may irritate your
skin and also damage painted surfaces.
l Use only the specified brake fluid.
Do not mix or add different brands of
brake fluid to prevent chemical reactions.
Do not let any petroleum-based fluid
touch, mix with, or get into the brake fluid.
This will damage the seals. CAUTION
l
Keep the reservoir tank cap closed to pre-
vent the brake
fluid from deteriorating ex-
cept maintenance.
l Clean the filler cap before removing and
close the cap securely after maintenance. Clutch fluid*
E01001000193
To check the fluid level
The clutch fluid
in the master cylinder should be
checked when performing other underhood service.
In addition, the system should be checked for leak-
age at the same time.
Check to ensure that the clutch fluid level is always
between the “MAX” and “MIN” level markings on
the fluid reservoir.
LHD
RHD Maintenance
8-09 8
OBKE12E1
Page 327 of 377
Engine compartment
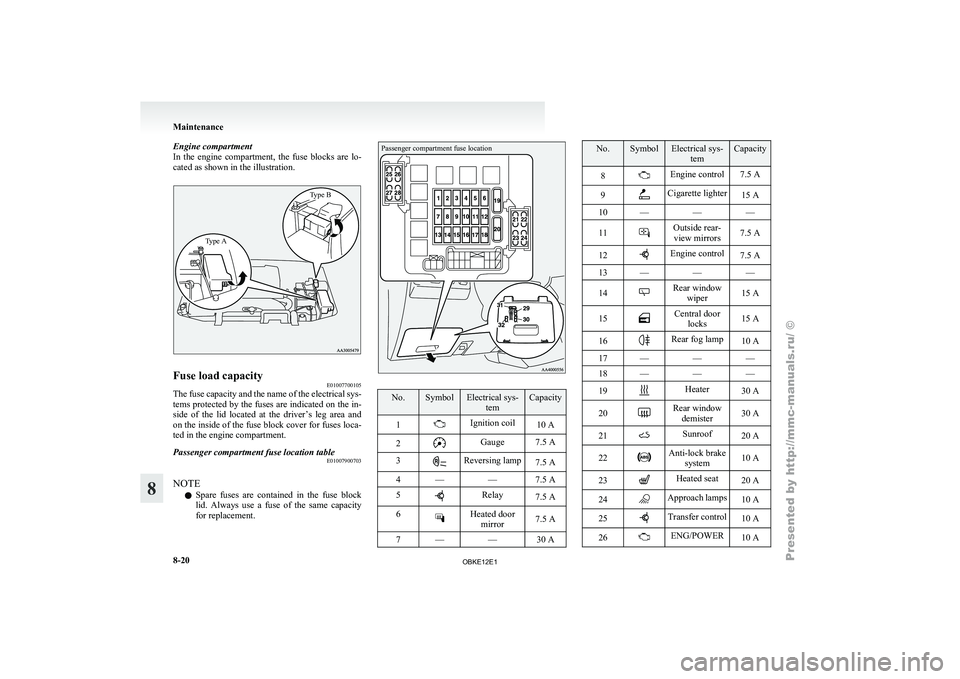
In the engine
compartment, the fuse blocks are lo-
cated as shown in the illustration.
Type A Type BFuse load capacity
E01007700105
The fuse capacity and the name of the electrical sys-
tems protected by
the fuses are indicated on the in-
side of the lid located at the driver’s leg area and
on the inside of the fuse block cover for fuses loca-
ted in the engine compartment.
Passenger compartment fuse location table E01007900703
NOTE l Spare
fuses are
contained in the fuse block
lid. Always use a fuse of the same capacity
for replacement.
Passenger compartment fuse location No. Symbol Electrical sys-
tem Capacity
1 Ignition coil
10 A
2 Gauge 7.5 A
3 Reversing lamp
7.5 A
4 — — 7.5 A
5 Relay
7.5 A
6 Heated door
mirror 7.5 A
7 — — 30 A No. Symbol Electrical sys-
tem Capacity
8 Engine control 7.5 A
9 Cigarette lighter
15 A
10 — — —
11 Outside rear-
view mirrors 7.5 A
12 Engine control
7.5 A
13 — — —
14 Rear window
wiper 15 A
15 Central door
locks 15 A
16 Rear fog lamp
10 A
17 — — —
18 — — —
19 Heater
30 A
20 Rear window
demister 30 A
21 Sunroof
20 A
22 Anti-lock brake
system 10 A
23 Heated seat
20 A
24 Approach lamps
10 A
25 Transfer control
10 A
26 ENG/POWER
10 AMaintenance
8-20
8
OBKE12E1