headlamp MITSUBISHI PAJERO IV 2011 Owners Manual
[x] Cancel search | Manufacturer: MITSUBISHI, Model Year: 2011, Model line: PAJERO IV, Model: MITSUBISHI PAJERO IV 2011Pages: 377, PDF Size: 29.43 MB
Page 3 of 377
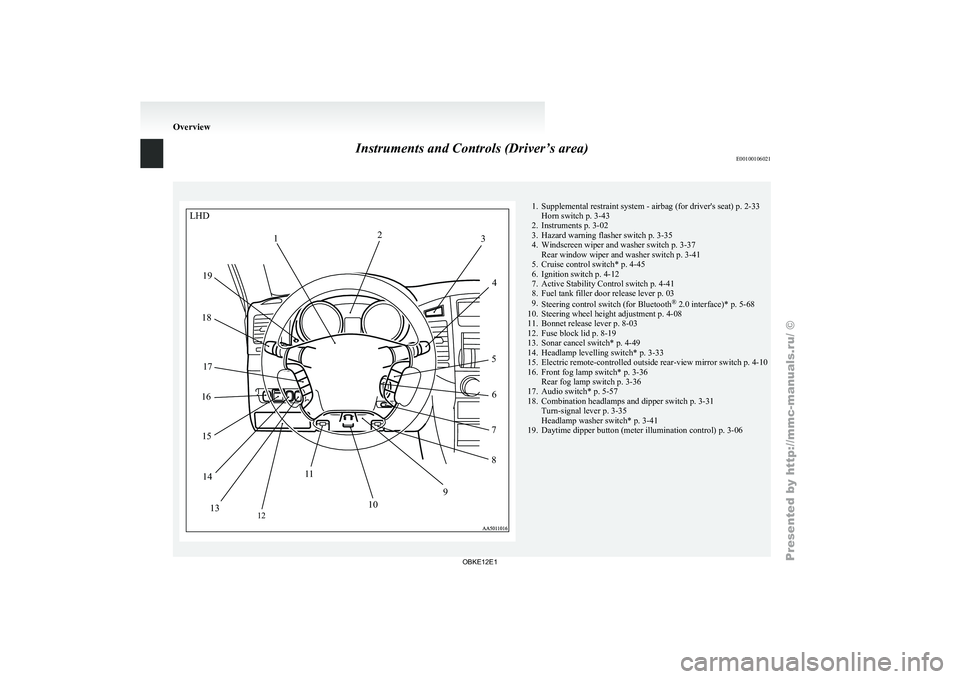
Instruments and Controls (Driver’s area)
E00100106021 1. Supplemental restraint system - airbag (for driver's seat) p. 2-33
Horn switch p. 3-43
2. Instruments p. 3-02
3. Hazard warning flasher switch p. 3-35
4.
Windscreen wiper and washer switch p. 3-37Rear window wiper and washer switch p. 3-41
5. Cruise control switch* p. 4-45
6. Ignition switch p. 4-12
7. Active Stability Control switch p. 4-41
8. Fuel tank filler door release lever p. 03
9. Steering control switch (for Bluetooth ®
2.0 interface)* p. 5-68
10. Steering wheel height adjustment p. 4-08
11. Bonnet release lever p. 8-03
12. Fuse block lid p. 8-19
13. Sonar cancel switch* p. 4-49
14. Headlamp levelling switch* p. 3-33
15. Electric remote-controlled outside rear-view mirror switch p. 4-10
16. Front fog lamp switch* p. 3-36 Rear fog lamp switch p. 3-36
17. Audio switch* p. 5-57
18. Combination headlamps and dipper switch p. 3-31 Turn-signal lever p. 3-35
Headlamp washer switch* p. 3-41
19. Daytime dipper button (meter illumination control) p. 3-06 OverviewLHD
2
1 3
4
5 6
7
8
9
10
1
1
12
13
14
15
16
17
18
19
OBKE12E1
Page 4 of 377
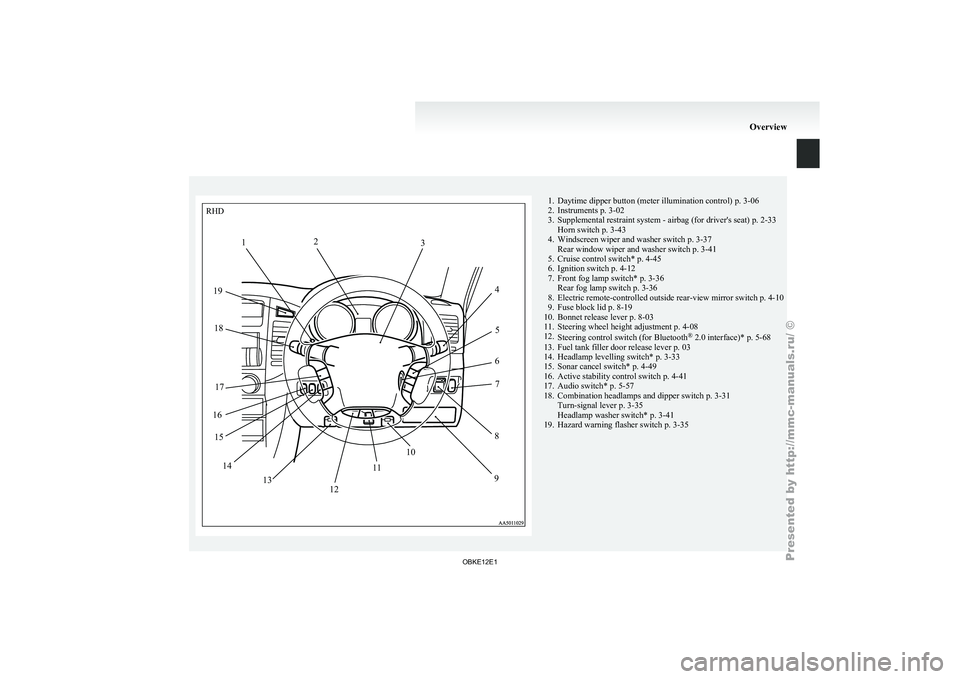
1. Daytime dipper button (meter illumination control) p. 3-06
2. Instruments p. 3-02
3. Supplemental restraint system - airbag (for driver's seat)
p. 2-33
Horn switch p. 3-43
4. Windscreen wiper and washer switch p. 3-37 Rear window wiper and washer switch p. 3-41
5. Cruise control switch* p. 4-45
6. Ignition switch p. 4-12
7. Front fog lamp switch* p. 3-36 Rear fog lamp switch p. 3-36
8. Electric remote-controlled outside rear-view mirror switch p. 4-10
9. Fuse block lid p. 8-19
10. Bonnet release lever p. 8-03
11. Steering wheel height adjustment p. 4-08
12. Steering control switch (for Bluetooth ®
2.0 interface)* p. 5-68
13. Fuel tank filler door release lever p. 03
14. Headlamp levelling switch* p. 3-33
15. Sonar cancel switch* p. 4-49
16. Active stability control switch p. 4-41
17. Audio switch* p. 5-57
18. Combination headlamps and dipper switch p. 3-31 Turn-signal lever p. 3-35
Headlamp washer switch* p. 3-41
19. Hazard warning flasher switch p. 3-35 OverviewRHD
1 2
3
45
6 7
8
9
12 10
1
1
13
14
15
16 17
18
19
OBKE12E1
Page 10 of 377
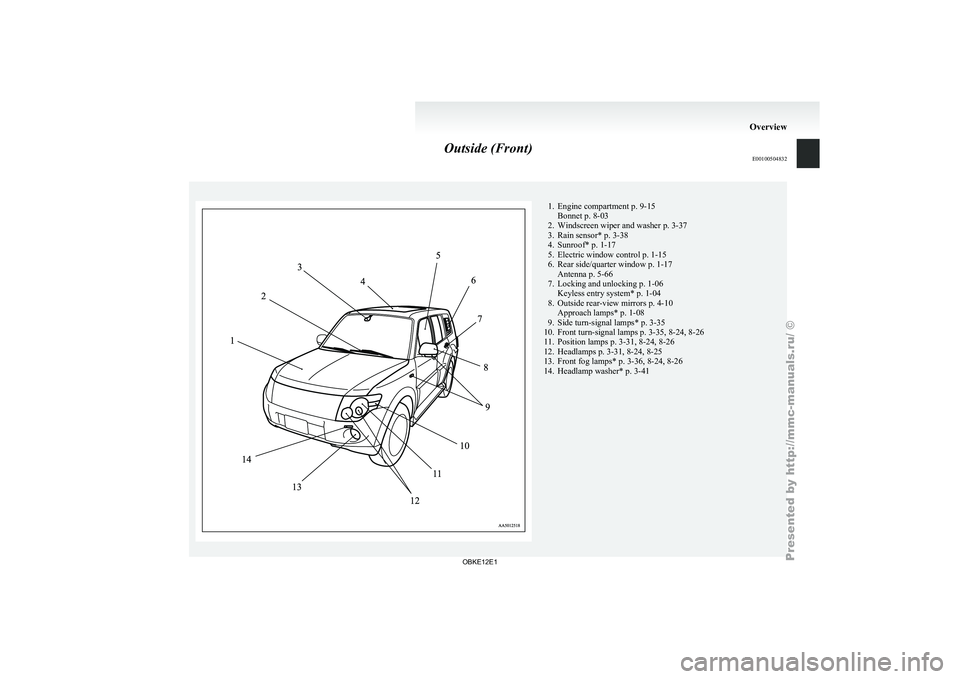
Outside (Front)
E00100504832 1. Engine compartment p. 9-15
Bonnet p. 8-03
2. Windscreen wiper and washer p. 3-37
3. Rain sensor* p. 3-38
4.
Sunroof* p. 1-17
5. Electric window control p. 1-15
6. Rear side/quarter window p. 1-17 Antenna p. 5-66
7. Locking and unlocking p. 1-06 Keyless entry system* p. 1-04
8. Outside rear-view mirrors p. 4-10 Approach lamps* p. 1-08
9. Side turn-signal lamps* p. 3-35
10. Front turn-signal lamps p. 3-35, 8-24, 8-26
11. Position lamps p. 3-31, 8-24, 8-26
12. Headlamps p. 3-31, 8-24, 8-25
13. Front fog lamps* p. 3-36, 8-24, 8-26
14. Headlamp washer* p. 3-41 Overview
OBKE12E1
Page 82 of 377
Instruments...................................................................................
3-02
Indication and warning lamps....................................................... 3-07
Indication lamps ........................................................................... 3-08
Warning lamps .............................................................................. 3-09
Centre information display* ......................................................... 3-11
Combination headlamps and dipper switch ..................................3-31
Headlamp levelling ....................................................................... 3-33
Turn-signal lever........................................................................... 3-35
Hazard warning flasher switch ..................................................... 3-35
Fog lamp switch............................................................................
3-36
Wiper and washer switch .............................................................. 3-37
Wiper de-icer switch* ................................................................... 3-42
Rear window demister switch....................................................... 3-42
Horn switch................................................................................... 3-43Instruments and controls
3
OBKE12E1
Page 88 of 377
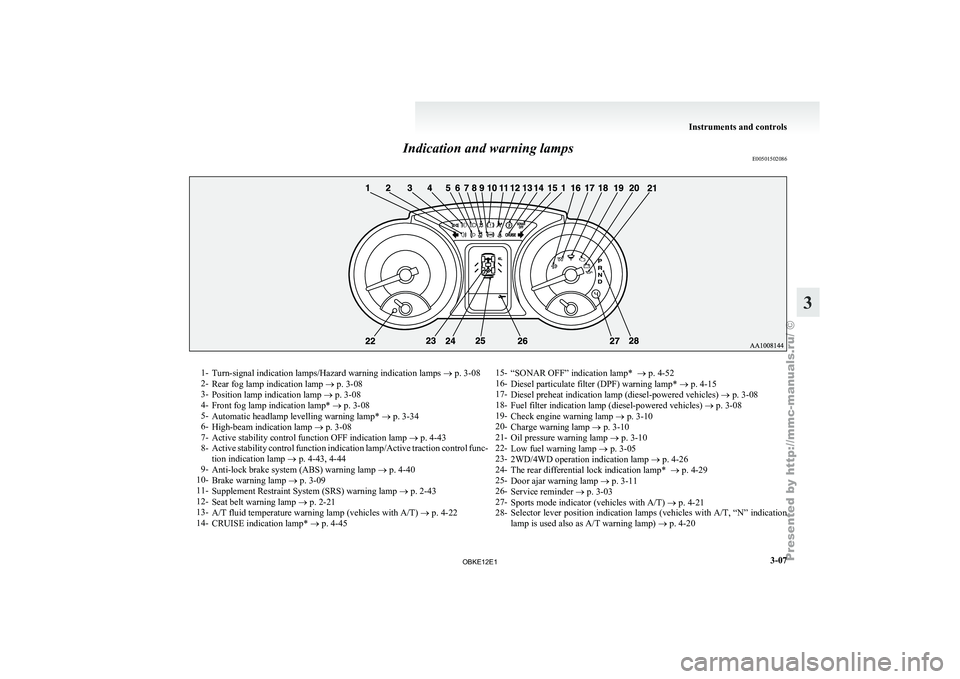
Indication and warning lamps
E005015020861-
Turn-signal indication lamps/Hazard warning indication lamps ® p. 3-08
2- Rear fog lamp indication lamp
® p. 3-08
3- Position lamp indication lamp ® p. 3-08
4- Front fog lamp indication lamp* ® p. 3-08
5- Automatic headlamp levelling warning lamp* ® p. 3-34
6- High-beam indication lamp ® p. 3-08
7- Active stability control function OFF indication lamp ® p. 4-43
8- Active stability control function indication lamp/Active traction control func-
tion indication lamp ® p. 4-43, 4-44
9- Anti-lock brake system (ABS) warning lamp ® p. 4-40
10- Brake warning lamp ® p. 3-09
11- Supplement Restraint System (SRS) warning lamp ® p. 2-43
12- Seat belt warning lamp ® p. 2-21
13- A/T fluid temperature warning lamp (vehicles with A/T) ® p. 4-22
14- CRUISE indication lamp* ® p. 4-45 15-
“SONAR OFF” indication lamp* ® p. 4-52
16- Diesel particulate filter (DPF) warning lamp* ®
p. 4-15
17- Diesel preheat indication lamp (diesel-powered vehicles) ® p. 3-08
18- Fuel filter indication lamp (diesel-powered vehicles) ® p. 3-08
19- Check engine warning lamp ® p. 3-10
20- Charge warning lamp ® p. 3-10
21- Oil pressure warning lamp ® p. 3-10
22- Low fuel warning lamp ® p. 3-05
23- 2WD/4WD operation indication lamp ® p. 4-26
24- The rear differential lock indication lamp* ® p. 4-29
25- Door ajar warning lamp ® p. 3-11
26- Service reminder ® p. 3-03
27- Sports mode indicator (vehicles with A/T) ® p. 4-21
28- Selector lever position indication lamps (vehicles with A/T, “N” indication
lamp is used also as A/T warning lamp) ® p. 4-20 Instruments and controls
3-07 3
OBKE12E1
Page 112 of 377
Combination headlamps and
dipper switch E00506001513
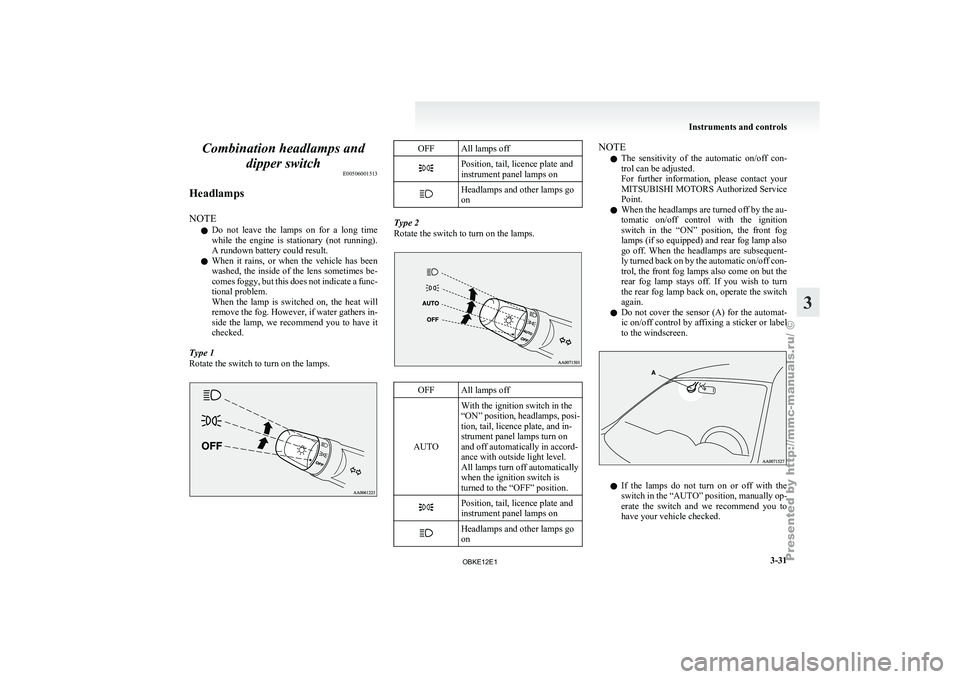
Headlamps
NOTE l Do
not leave
the lamps on for a long time
while the engine is stationary (not running).
A rundown battery could result.
l When it rains, or when the vehicle has been
washed, the inside of the lens sometimes be-
comes foggy, but this does not indicate a func-
tional problem.
When the lamp is switched on, the heat will
remove the fog. However, if water gathers in-
side the lamp, we recommend you to have it
checked.
Type 1
Rotate the switch to turn on the lamps. OFF All lamps off
Position, tail, licence plate and
instrument panel lamps on
Headlamps and other lamps go
on
Type 2
Rotate the switch to turn on the lamps.
OFF All lamps off
AUTO With the ignition switch in the
“ON” position, headlamps,
posi-
tion, tail, licence plate, and in-
strument panel lamps turn on
and off automatically in accord-
ance with outside light level.
All lamps turn off automatically
when the ignition switch is
turned to the “OFF” position. Position, tail, licence plate and
instrument panel lamps on
Headlamps and other lamps go
on NOTE
l The
sensitivity of
the automatic on/off con-
trol can be adjusted.
For further information, please contact your
MITSUBISHI MOTORS Authorized Service
Point.
l When the headlamps are turned off by the au-
tomatic on/off control with the ignition
switch in the “ON” position, the front fog
lamps (if so equipped) and rear fog lamp also
go off. When the headlamps are subsequent-
ly turned back on by the automatic on/off con-
trol, the front fog lamps also come on but the
rear fog lamp stays off. If you wish to turn
the rear fog lamp back on, operate the switch
again.
l Do not cover the sensor (A) for the automat-
ic on/off control by affixing a sticker or label
to the windscreen. l
If
the
lamps
do not turn on or off with the
switch in the “AUTO” position, manually op-
erate the switch and we recommend you to
have your vehicle checked. Instruments and controls
3-31 3
OBKE12E1
Page 113 of 377
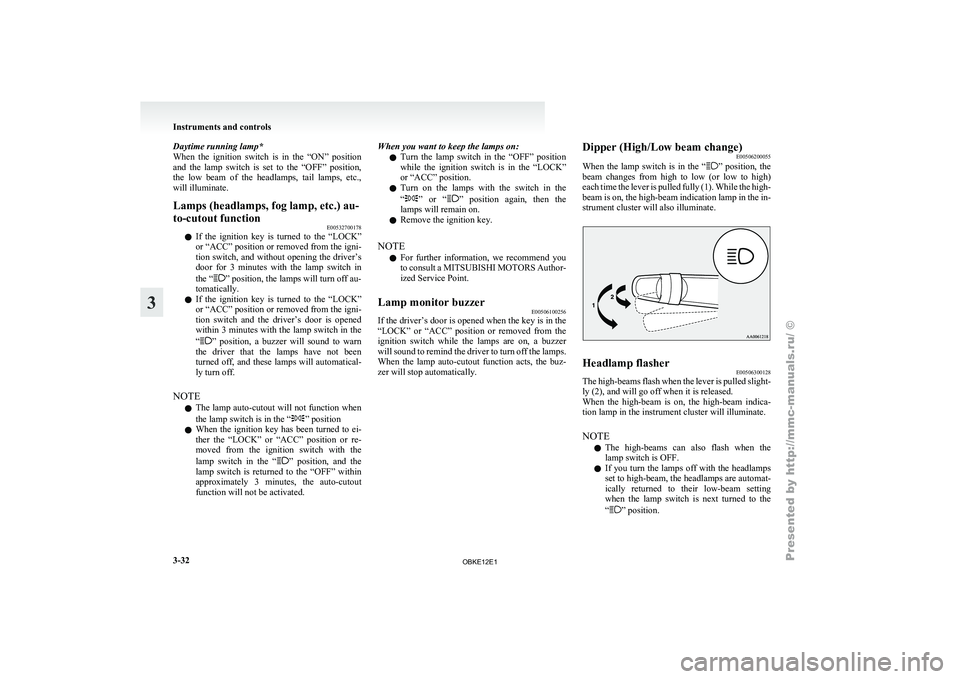
Daytime running lamp*
When the ignition
switch is in the “ON” position
and the lamp switch is set to the “OFF” position,
the low beam of the headlamps, tail lamps, etc.,
will illuminate.
Lamps (headlamps, fog lamp, etc.) au-
to-cutout function E00532700178
l If the ignition
key is turned to the “LOCK”
or “ACC” position or removed from the igni-
tion switch, and without opening the driver’s
door for 3 minutes with the lamp switch in
the “ ” position, the lamps will turn off au-
tomatically.
l If the
ignition
key is turned to the “LOCK”
or “ACC” position or removed from the igni-
tion switch and the driver’s door is opened
within 3 minutes with the lamp switch in the
“ ” position, a buzzer will sound to warn
the driver
that the lamps have not been
turned off, and these lamps will automatical-
ly turn off.
NOTE l The lamp auto-cutout will not function when
the lamp switch is in the “ ” position
l When the
ignition
key has been turned to ei-
ther the “LOCK” or “ACC” position or re-
moved from the ignition switch with the
lamp switch in the “ ” position, and the
lamp switch
is returned to the “OFF” within
approximately 3 minutes, the auto-cutout
function will not be activated. When you want to keep the lamps on:
l Turn the
lamp
switch in the “OFF” position
while the ignition switch is in the “LOCK”
or “ACC” position.
l Turn on the lamps with the switch in the
“ ” or “ ” position again, then the
lamps will remain on.
l Remove the ignition key.
NOTE l For further
information, we recommend you
to consult a MITSUBISHI MOTORS Author-
ized Service Point.
Lamp monitor buzzer E00506100256
If the driver’s door is opened when the key is in the
“LOCK” or “ACC”
position or removed from the
ignition switch while the lamps are on, a buzzer
will sound to remind the driver to turn off the lamps.
When the lamp auto-cutout function acts, the buz-
zer will stop automatically. Dipper (High/Low beam change)
E00506200055
When the lamp
switch is in the “ ” position, the
beam changes
from high to low (or low to high)
each time the lever is pulled fully (1). While the high-
beam is on, the high-beam indication lamp in the in-
strument cluster will also illuminate. Headlamp flasher
E00506300128
The high-beams flash when the lever is pulled slight-
ly (2), and will go off when it is released.
When the high-beam
is on, the high-beam indica-
tion lamp in the instrument cluster will illuminate.
NOTE
l The high-beams can also flash when the
lamp switch is OFF.
l If you turn the lamps off with the headlamps
set to high-beam, the headlamps are automat-
ically returned to their low-beam setting
when the lamp switch is next turned to the
“ ” position.Instruments and controls
3-32
3
OBKE12E1
Page 114 of 377
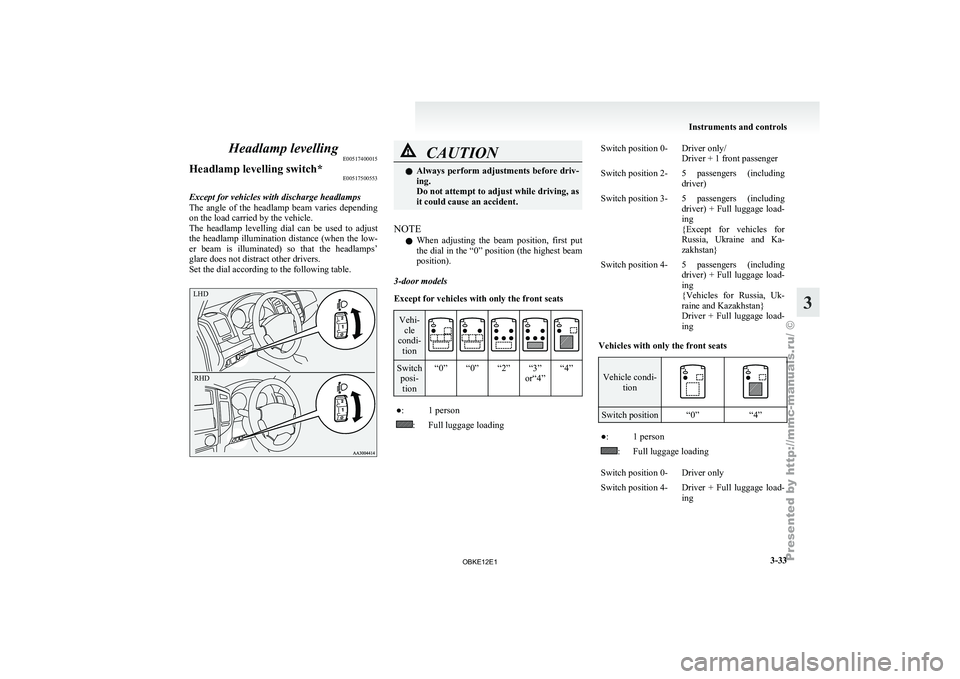
Headlamp levelling
E00517400015
Headlamp levelling switch* E00517500553
Except for vehicles with discharge headlamps
The angle of the headlamp beam varies depending
on the load carried by the vehicle.
The headlamp levelling dial can be used to adjust
the headlamp illumination distance (when the low-
er beam is illuminated) so that the headlamps’
glare does not distract other drivers.
Set the dial according to the following table.
LHD
RHD CAUTION
l
Always perform adjustments
before driv-
ing.
Do not attempt to adjust while driving, as
it could cause an accident.
NOTE l When
adjusting the
beam position, first put
the dial in the “0” position (the highest beam
position).
3-door models
Except for vehicles with only the front seats Vehi-
cle
condi- tion Switch
posi-tion “0” “0” “2” “3”
or“4”“4” ●: 1 person
: Full luggage loadingSwitch position 0- Driver only/
Driver + 1 front passenger
Switch position 2- 5 passengers (including driver)
Switch position 3- 5 passengers (including driver) + Full
luggage load-
ing
{Except for vehicles for
Russia, Ukraine and Ka-
zakhstan}
Switch position 4- 5 passengers (including driver) + Full
luggage load-
ing
{Vehicles for Russia, Uk-
raine and Kazakhstan}
Driver + Full luggage load-
ing
Vehicles with only the front seats Vehicle condi-
tion Switch position “0”
“4” ●: 1 person
: Full luggage loading
Switch position 0- Driver only
Switch position 4- Driver + Full luggage load- ing Instruments and controls
3-33 3
OBKE12E1
Page 115 of 377
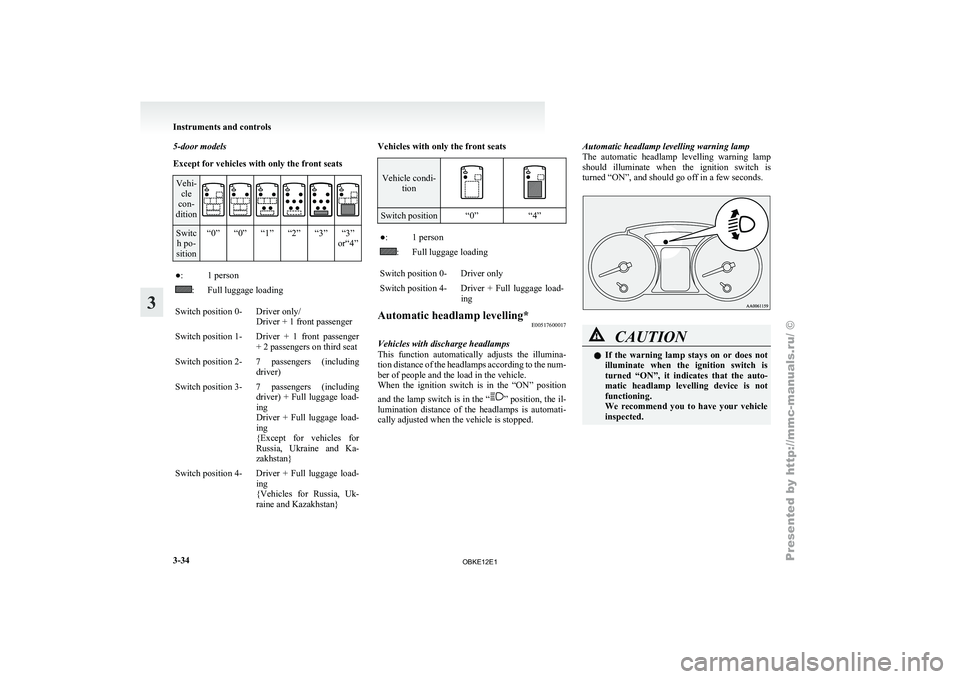
5-door models
Except for vehicles with only the front seats
Vehi-
cle
con-
dition Switc
h po-
sition “0” “0” “1” “2” “3” “3”
or“4”●: 1 person
: Full luggage loading
Switch position 0- Driver only/ Driver + 1 front passenger
Switch position 1- Driver + 1 front passenger + 2 passengers on third seat
Switch position 2- 7 passengers (including driver)
Switch position 3- 7 passengers (including driver) + Full
luggage load-
ing
Driver + Full luggage load-
ing
{Except for vehicles for
Russia, Ukraine and Ka-
zakhstan}
Switch position 4- Driver + Full luggage load- ing
{Vehicles for Russia,
Uk-
raine and Kazakhstan} Vehicles with only the front seats Vehicle condi-
tion Switch position “0”
“4” ●: 1 person
: Full luggage loading
Switch position 0- Driver only
Switch position 4- Driver + Full luggage load- ing
Automatic headlamp levelling* E00517600017
Vehicles with discharge headlamps
This function automatically
adjusts the illumina-
tion distance of the headlamps according to the num-
ber of people and the load in the vehicle.
When the ignition switch is in the “ON” position
and the lamp switch is in the “ ” position, the il-
lumination distance
of the headlamps is automati-
cally adjusted when the vehicle is stopped. Automatic headlamp levelling warning lamp
The automatic
headlamp
levelling warning lamp
should illuminate when the ignition switch is
turned “ON”, and should go off in a few seconds. CAUTION
l
If the
warning
lamp stays on or does not
illuminate when the ignition switch is
turned “ON”, it indicates that the auto-
matic headlamp levelling device is not
functioning.
We recommend you to have your vehicle
inspected. Instruments and controls
3-34
3
OBKE12E1
Page 117 of 377
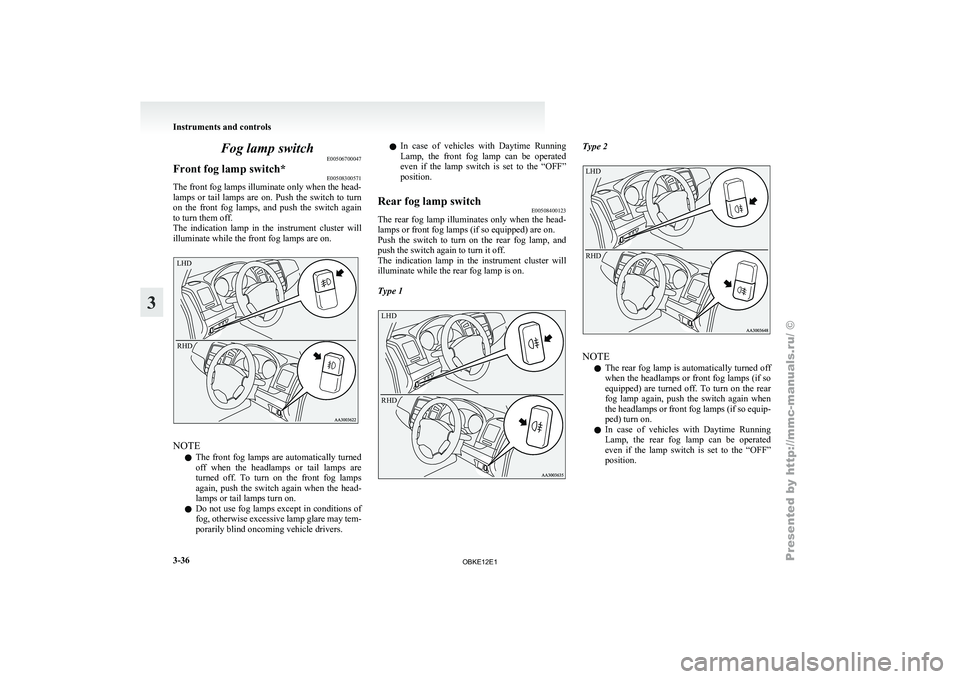
Fog lamp switch
E00506700047
Front fog lamp switch* E00508300571
The front fog lamps illuminate only when the head-
lamps or tail
lamps are on. Push the switch to turn
on the front fog lamps, and push the switch again
to turn them off.
The indication lamp in the instrument cluster will
illuminate while the front fog lamps are on.
LHD
RHD NOTE
l The
front fog
lamps are automatically turned
off when the headlamps or tail lamps are
turned off. To turn on the front fog lamps
again, push the switch again when the head-
lamps or tail lamps turn on.
l Do not use fog lamps except in conditions of
fog, otherwise excessive lamp glare may tem-
porarily blind oncoming vehicle drivers. l
In
case
of
vehicles with Daytime Running
Lamp, the front fog lamp can be operated
even if the lamp switch is set to the “OFF”
position.
Rear fog lamp switch E00508400123
The rear fog lamp illuminates only when the head-
lamps or front fog lamps (if so equipped) are on.
Push the switch
to turn on the rear fog lamp, and
push the switch again to turn it off.
The indication lamp in the instrument cluster will
illuminate while the rear fog lamp is on.
Type 1
LHD
RHD Type 2
LHD
RHD
NOTE
l The
rear fog
lamp is automatically turned off
when the headlamps or front fog lamps (if so
equipped) are turned off. To turn on the rear
fog lamp again, push the switch again when
the headlamps or front fog lamps (if so equip-
ped) turn on.
l In case of vehicles with Daytime Running
Lamp, the rear fog lamp can be operated
even if the lamp switch is set to the “OFF”
position. Instruments and controls
3-36
3
OBKE12E1