inflation pressure MITSUBISHI PAJERO IV 2011 Owners Manual
[x] Cancel search | Manufacturer: MITSUBISHI, Model Year: 2011, Model line: PAJERO IV, Model: MITSUBISHI PAJERO IV 2011Pages: 377, PDF Size: 29.43 MB
Page 11 of 377
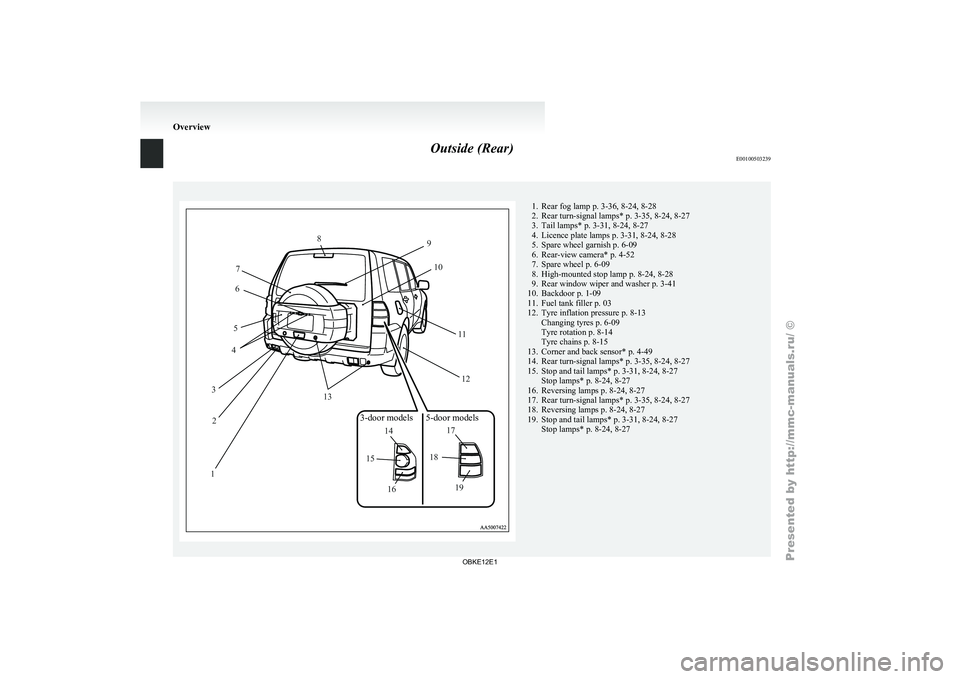
Outside (Rear)
E0010050323912
3 4
5 6
7 8
9
10
1112
13
14
15
16 17
18
19
3-door models 5-door models 1. Rear fog lamp p. 3-36, 8-24, 8-28
2. Rear turn-signal lamps*
p. 3-35, 8-24, 8-27
3.
Tail lamps* p. 3-31, 8-24, 8-27
4. Licence plate lamps p. 3-31, 8-24, 8-28
5. Spare wheel garnish p. 6-09
6. Rear-view camera* p. 4-52
7. Spare wheel p. 6-09
8. High-mounted stop lamp p. 8-24, 8-28
9. Rear window wiper and washer p. 3-41
10. Backdoor p. 1-09
11. Fuel tank filler p. 03
12. Tyre inflation pressure p. 8-13 Changing tyres p. 6-09
Tyre rotation p. 8-14
Tyre chains p. 8-15
13. Corner and back sensor* p. 4-49
14. Rear turn-signal lamps* p. 3-35, 8-24, 8-27
15. Stop and tail lamps* p. 3-31, 8-24, 8-27 Stop lamps* p. 8-24, 8-27
16. Reversing lamps p. 8-24, 8-27
17. Rear turn-signal lamps* p. 3-35, 8-24, 8-27
18. Reversing lamps p. 8-24, 8-27
19. Stop and tail lamps* p. 3-31, 8-24, 8-27 Stop lamps* p. 8-24, 8-27 Overview
OBKE12E1
Page 127 of 377
Economical driving
E00600100561
For economical driving,
there are some technical re-
quirements that have to be met. The prerequisite
for low fuel consumption is a properly adjusted en-
gine. In order to achieve longer life of the vehicle
and the most economical operation, we recommend
you to have the vehicle checked at regular intervals
in accordance with the service standards.
Fuel economy and generation of exhaust gas and
noise are highly influenced by personal driving hab-
its as well as the particular operating conditions.
The following points should be observed in order
to minimize wear of brakes, tyres and engine as
well as to reduce environmental pollution.
Starting
Avoid rapid acceleration and sudden starts; such op-
eration will result in higher fuel consumption.
Shifting
Shift only at an appropriate speed and engine
speed. Always use the highest gear possible.
The transfer shift lever should be set to “2H” when
driving on normal roads and express ways to obtain
best possible fuel economy.
City traffic
Frequent starting and stopping increases the aver-
age fuel consumption. Use roads with smooth traf-
fic flow whenever possible. When driving on con-
gested roads, avoid use of a low gear at high en-
gine speeds.
Idling
The vehicle consumes fuel even during idling.
Avoid extended idling whenever possible. Speed
At higher
vehicle
speed, more fuel is consumed.
Avoid driving at full speed. Even a slight release of
the accelerator pedal will save a significant amount
of fuel.
Tyre inflation pressure
Check the tyre inflation pressures at regular inter-
vals. Low tyre inflation pressure increases road re-
sistance and fuel consumption. In addition, low
tyre pressures adversely affect tyre wear and driv-
ing stability.
Load
Do not drive with unnecessary articles in the lug-
gage compartment. Especially during city driving
where frequent starting and stopping is necessary,
the increased weight of the vehicle will greatly af-
fect fuel consumption. Also avoid driving with un-
necessary luggage or carriers, etc., on the roof; the
increased air resistance will increase fuel consump-
tion.
Cold engine starting
Starting of a cold engine consumes more fuel.
Unnecessary fuel consumption is also caused by
keeping a hot engine running. After the engine is
started, commence driving as soon as possible.
Air conditioning
The use of the air conditioning will increase the
fuel consumption. Driving, alcohol and drugs
E00600200067
Driving after drinking
alcohol is one of the most fre-
quent causes of accidents.
Your driving ability can be seriously impaired even
with blood alcohol levels far below the legal mini-
mum. If you have been drinking, don’t drive. Ride
with a designated non-drinking driver, call a cab or
a friend, or use public transportation. Drinking cof-
fee or taking a cold shower will not make you sober.
Similarly, prescription and nonprescription drugs af-
fect your alertness, perception and reaction time.
Consult with your doctor or pharmacist before driv-
ing while under the influence of any of these medi-
cations. WARNING
l NEVER DRINK AND DRIVE.
Your perceptions
are
less accurate, your
reflexes are slower and your judgment is
impaired. Starting and driving
4-02
4
OBKE12E1
Page 160 of 377
Inspection and maintenance
following rough road operation E00606700048
After operating the
vehicle in rough road condi-
tions, be sure to perform the following inspection
and maintenance procedures:
l Check that the vehicle has not been damaged
by rocks, gravel, etc.
l Carefully wash the vehicle with water.
After washing, drive the vehicle slowly
while lightly depressing the brake pedal in or-
der to dry out the brakes. If the brakes still
do not function properly, we recommend you
to have the brakes checked as soon as possible
l Remove the insects, dried grass, etc. clog-
ging the radiator core.
l After crossing a stream, be sure to have the
following items inspected at a MITSUBISHI
MOTORS Authorized Service Point and take
the necessary measures.
• Check the brake system and, if necessary,have it serviced.
• Check the engine, transmission, transfer, and differential oil or grease level and tur-
bidity. If the oil or grease is milky, it indi-
cates water contamination. Replace it
with new oil or grease.
• Grease the propeller shaft.
• Check the inside of the vehicle. If ingress of water is found, dry the carpet etc.
• Inspect the headlamps. If the headlamp bulb is flooded with water, we recom-
mend you to have it drained. Cautions on handling of 4-wheel
drive vehicles E00606800401
Tyres and wheels
Since the driving
torque can be applied to the 4
wheels, the performance of the vehicle when oper-
ating in 4-wheel drive is greatly affected by the con-
dition of the tyres.
Pay close attention to the tyres.
l Install specified tyres on all wheels. Refer to
“Tyres and wheels” on page 9-12.
l Be sure to fit all 4 tyres and wheels of the
same size and type.
When replacement of any of the tyres or
wheels is necessary, replace all of them.
l All tyres should be rotated whenever the
wear difference between the front and rear
tyres is recognizable.
Good vehicle performance cannot be expected if
there is a difference in wear between tyres. Refer to
“Tyre rotation” on page 8-14. l Check the tyre inflation pressure regularly.
l If the tyre inflation pressure is inappropriate,
the transfer gear may make some noise and
shock while changing the drive mode. CAUTION
l
Always use tyres
of the same size, same
type, and same brand, and which have no
wear differences. Using tyres which differ
in size, type, brand or the degree of wear
will cause excessive loading, resulting in
possible damage to the drive system.
Towing
If towing is
necessary, we recommend you to have
it done by your MITSUBISHI MOTORS Author-
ized Service Point or a commercial tow truck service.
In the following cases, transport the vehicle using a
tow truck.
l The engine runs but the vehicle does not
move or abnormal noise is produced.
l Inspection of the vehicle’s underside reveals
that oil or some other fluid is leaking.
Only when you cannot receive a towing service
from a MITSUBISHI MOTORS Authorized Serv-
ice Point or commercial tow truck service, tow
your vehicle carefully in accordance with the in-
structions given in “Towing” on page 6-15. Starting and driving
4-35 4
OBKE12E1
Page 291 of 377
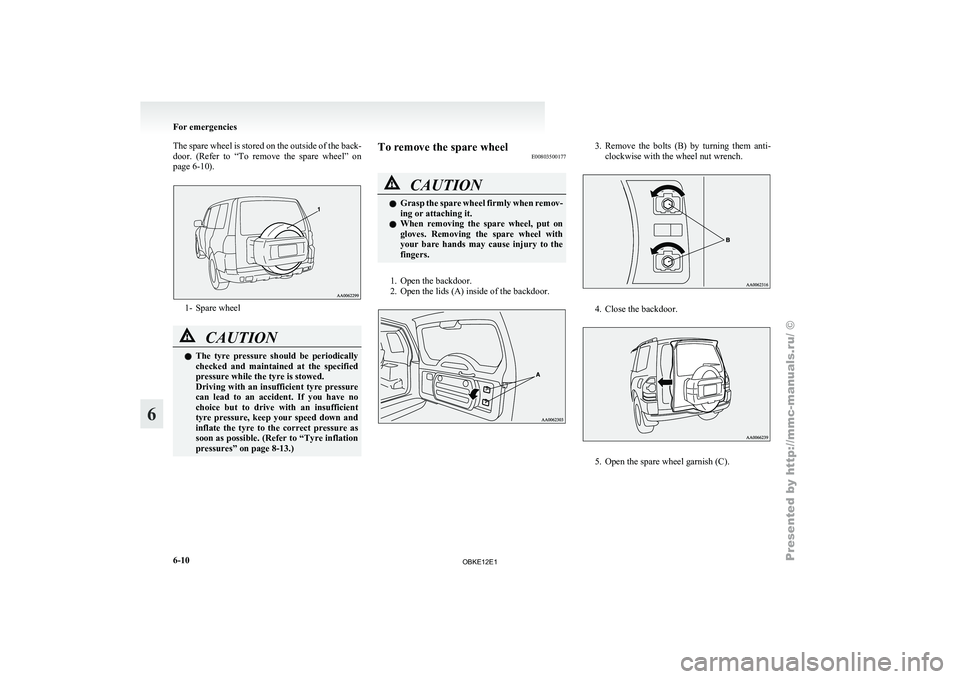
The spare wheel is stored on the outside of the back-
door. (Refer to
“To remove the spare wheel” on
page 6-10). 1- Spare wheel
CAUTION
l
The tyre pressure
should be periodically
checked and maintained at the specified
pressure while the tyre is stowed.
Driving with an insufficient tyre pressure
can lead to an accident. If you have no
choice but to drive with an insufficient
tyre pressure, keep your speed down and
inflate the tyre to the correct pressure as
soon as possible. (Refer to “Tyre inflation
pressures” on page 8-13.) To remove the spare wheel
E00803500177 CAUTION
l
Grasp the
spare
wheel firmly when remov-
ing or attaching it.
l When removing the spare wheel, put on
gloves. Removing the spare wheel with
your bare hands may cause injury to the
fingers.
1. Open the backdoor.
2. Open the lids (A) inside of the backdoor. 3. Remove the bolts (B) by turning them anti-
clockwise with the wheel nut wrench. 4. Close the backdoor.
5. Open the spare wheel garnish (C).For emergencies
6-10
6
OBKE12E1
Page 295 of 377
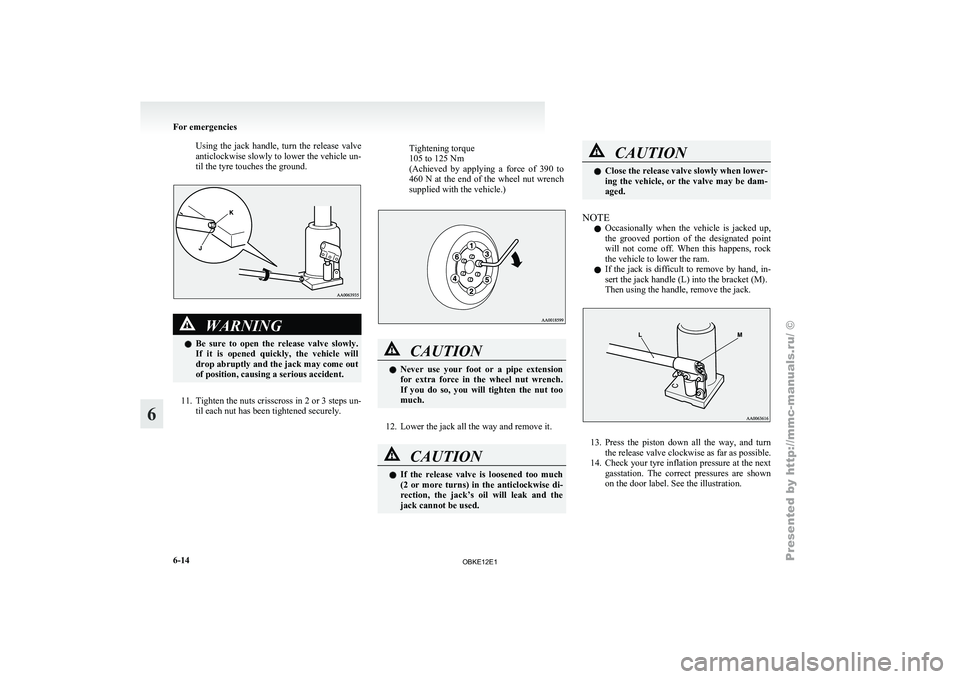
Using the jack handle, turn the release valve
anticlockwise slowly to lower the vehicle un-
til the tyre touches the ground.
WARNING
l Be sure
to open the release valve slowly.
If it is opened quickly, the vehicle will
drop abruptly and the jack may come out
of position, causing a serious accident.
11. Tighten the nuts crisscross in 2 or 3 steps un-
til each nut has been tightened securely.
Tightening torque
105 to 125 Nm
(Achieved by
applying
a force of 390 to
460 N at the end of the wheel nut wrench
supplied with the vehicle.) CAUTION
l
Never use
your
foot or a pipe extension
for extra force in the wheel nut wrench.
If you do so, you will tighten the nut too
much.
12. Lower the jack all the way and remove it. CAUTION
l
If the
release
valve is loosened too much
(2 or more turns) in the anticlockwise di-
rection, the jack’s oil will leak and the
jack cannot be used. CAUTION
l
Close the release
valve slowly when lower-
ing the vehicle, or the valve may be dam-
aged.
NOTE l Occasionally
when the
vehicle is jacked up,
the grooved portion of the designated point
will not come off. When this happens, rock
the vehicle to lower the ram.
l If the jack is difficult to remove by hand, in-
sert the jack handle (L) into the bracket (M).
Then using the handle, remove the jack. 13. Press the piston down all the way, and turn
the release valve clockwise as far as possible.
14. Check
your tyre inflation pressure at the next
gasstation. The correct pressures are shown
on the door label. See the illustration. For emergencies
6-14
6
OBKE12E1
Page 299 of 377
CAUTION
l
When the vehicle with A/T is to be towed
by another vehicle with all the wheels on
the ground, make sure that the towing
speed and distance given below are never
exceeded, avoiding damage to the trans-
mission.
Petrol-powered vehicles
Towing speed: 50 km/h (31 mph)
Towing distance: 50 km (31 miles)
Diesel-powered vehicles
Towing speed: 30 km/h (19 mph)
Towing distance: 80 km (50 miles)
For the towing speed and the towing dis-
tance, follow the local driving laws and
regulations.
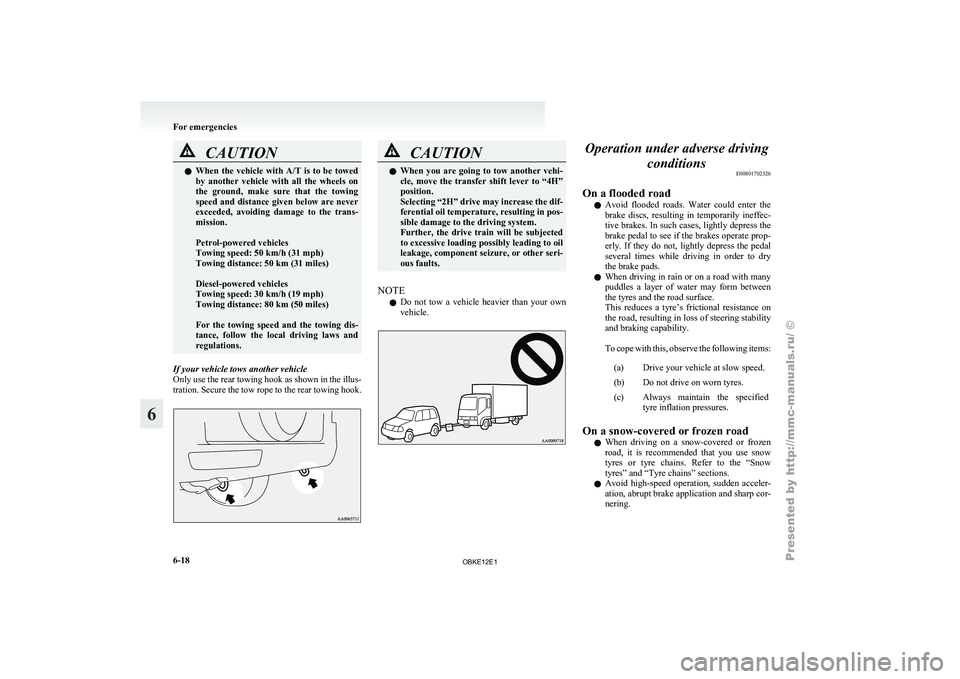
If your vehicle tows another vehicle
Only use the
rear towing hook as shown in the illus-
tration. Secure the tow rope to the rear towing hook. CAUTION
l
When you are
going to tow another vehi-
cle, move the transfer shift lever to “4H”
position.
Selecting “2H” drive may increase the dif-
ferential oil temperature, resulting in pos-
sible damage to the driving system.
Further, the drive train will be subjected
to excessive loading possibly leading to oil
leakage, component seizure, or other seri-
ous faults.
NOTE l Do
not tow
a vehicle heavier than your own
vehicle. Operation under adverse driving
conditions E00801702326
On a flooded road l Avoid flooded
roads.
Water could enter the
brake discs, resulting in temporarily ineffec-
tive brakes. In such cases, lightly depress the
brake pedal to see if the brakes operate prop-
erly. If they do not, lightly depress the pedal
several times while driving in order to dry
the brake pads.
l When driving in rain or on a road with many
puddles a layer of water may form between
the tyres and the road surface.
This reduces a tyre’s frictional resistance on
the road, resulting in loss of steering stability
and braking capability.
To cope with this, observe the following items:
(a) Drive your vehicle at slow speed.
(b) Do not drive on worn tyres.
(c) Always maintain the specified tyre inflation pressures.
On a snow-covered or frozen road l When driving
on
a snow-covered or frozen
road, it is recommended that you use snow
tyres or tyre chains. Refer to the “Snow
tyres” and “Tyre chains” sections.
l Avoid high-speed operation, sudden acceler-
ation, abrupt brake application and sharp cor-
nering. For emergencies
6-18
6
OBKE12E1
Page 320 of 377
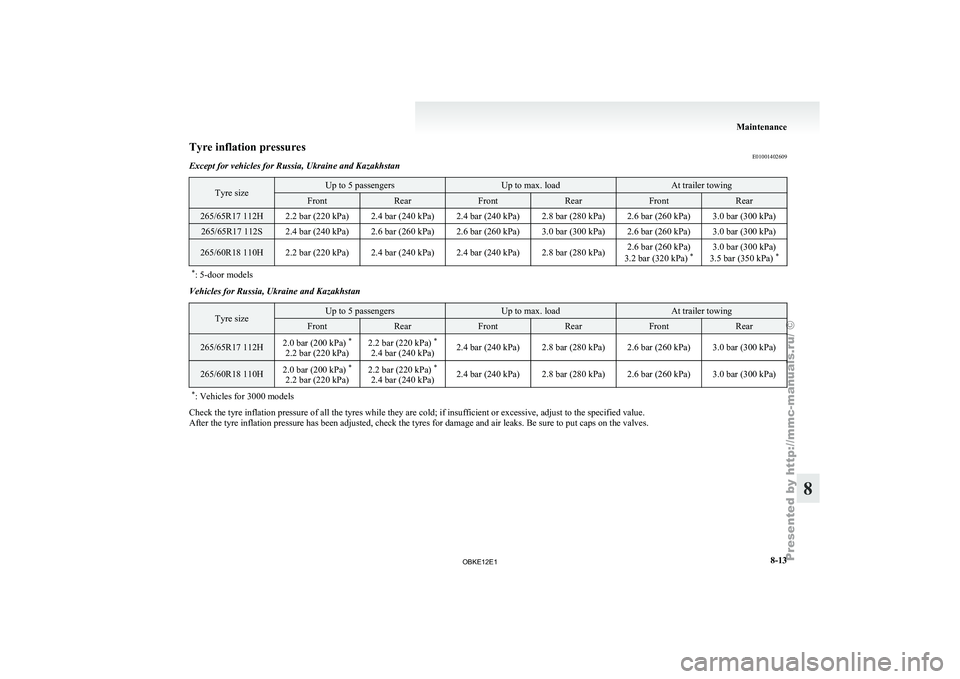
Tyre inflation pressures
E01001402609
Except for vehicles for Russia, Ukraine and Kazakhstan Tyre size Up to 5 passengers Up to max. load At trailer towing
Front Rear Front Rear Front Rear
265/65R17 112H 2.2 bar (220 kPa) 2.4 bar (240 kPa) 2.4 bar (240 kPa) 2.8 bar (280 kPa) 2.6 bar (260 kPa) 3.0 bar (300 kPa)
265/65R17 112S 2.4 bar (240 kPa) 2.6 bar (260 kPa) 2.6 bar (260 kPa) 3.0 bar (300 kPa) 2.6 bar (260 kPa) 3.0 bar (300 kPa)
265/60R18 110H 2.2 bar (220 kPa) 2.4 bar (240 kPa) 2.4 bar (240 kPa) 2.8 bar (280 kPa)
2.6 bar (260 kPa)
3.2 bar (320 kPa) *3.0 bar (300 kPa)
3.5 bar (350 kPa) *
* : 5-door models Vehicles for Russia, Ukraine and Kazakhstan
Tyre size Up to 5 passengers Up to max. load At trailer towing
Front Rear Front Rear Front Rear
265/65R17 112H
2.0 bar (200 kPa)
*
2.2 bar (220 kPa) 2.2 bar (220 kPa)
*
2.4 bar (240 kPa) 2.4 bar (240 kPa) 2.8 bar (280 kPa) 2.6 bar (260 kPa) 3.0 bar (300 kPa)265/60R18 110H
2.0 bar (200 kPa)
*
2.2 bar (220 kPa) 2.2 bar (220 kPa)
*
2.4 bar (240 kPa) 2.4 bar (240 kPa) 2.8 bar (280 kPa) 2.6 bar (260 kPa) 3.0 bar (300 kPa)
* : Vehicles for 3000 models Check the tyre inflation pressure of all the tyres while they are cold; if insufficient or excessive, adjust to the specified value.
After the tyre inflation pressure has been adjusted, check the tyres for damage and air leaks. Be sure to put caps on the valves. Maintenance
8-13 8
OBKE12E1
Page 361 of 377
Seat belt 2-20
Adjustable seat belt anchor 2-21Child restraint 2-23
Force limiter system 2-23
Inspection 2-33
Pregnant women restraint
2-22
Pretensioner system 2-23
Rear/second, third seat belt storage 2-22
Seat belt reminder/warning lamp 2-21
Seats Adjustment 2-05
Armrest 2-08,2-10
Front seats 2-05
Head restraints 2-11
Heated seats 2-08
Lumbar support 2-07
Making a flat seat 2-18
Making a luggage area 2-12
Rear seats 2-09
Seat arrangement 2-03
Second seats 2-09
Third seat 2-11
Security alarm system 1-10
Service precaution 8-02
Service reminder 3-02,3-03
Side airbag system 2-40
Side box 5-93
Snow tyres 8-15
Spark plug 9-11
Specifications 9-02
Starting 4-14
Steering Power steering fluid 8-10,9-15
Power steering system 4-41
Steering wheel height adjustment 4-08
Steering wheel lock 4-13
Steering wheel remote control switch 5-57
Stop lamps Bulb capacity 8-24 Replacement 8-27
Storage spaces 5-91
Sun visors 5-84
Sunglasses holder 5-94
Sunroof 1-17 Lock switch 1-18
Safety mechanism 1-18
Sunshade 1-19
Super select 4WD II 4-24
Supplemental restraint system 2-33 How the Supplemental Restraint System
works 2-34
Servicing 2-43
Warning lamp 2-43
T Tachometer 3-02
Tail lamps
Bulb capacity 8-24
Replacement 8-27
Tank capacity
03
Third seat 2-11
Tools 6-07 Storage 6-07
Towing 6-15
Trailer towing 4-57
Transfer oil 9-15
Transmission Automatic transmission 4-19
Manual transmission 4-16
Tripmeter 3-02
Turn-signal indication lamps 3-08
Turn-signal lever 3-35
Tyres 8-12 How to change a tyre 6-09
Inflation pressures 8-13
Rotation 8-14
Size (tyre and wheel) 9-12 Snow tyres 8-15
Spare wheel information 6-09
Tyre chains 8-15
U USB input terminal 5-82
Used engine
oils
safety instructions and disposal in-
formation 06
V Vanity mirror 5-84
Vanity mirror lamps
Bulb capacity 8-24
Replacement 8-31
Vehicle care precautions
7-02
Vehicle dimensions 9-04
Vehicle identification number 9-02
Vehicle identification number plate 9-02
Vehicle information code plate 9-02
Vehicle labeling 9-02
Vehicle performance 9-06
Vehicle weight 9-07
Ventilators 5-02
W Warning lamps 3-09
Washer
Fluid 8-07,9-15
Switch 3-37,3-41
Washing 7-03
Water temperature gauge 3-05
Waxing 7-04
Weatherstripping 8-19
Weight 9-07
Wheel condition
8-14
Wheel Alphabetical index
4
OBKE12E1