remove seats MITSUBISHI PAJERO IV 2011 Owners Manual
[x] Cancel search | Manufacturer: MITSUBISHI, Model Year: 2011, Model line: PAJERO IV, Model: MITSUBISHI PAJERO IV 2011Pages: 377, PDF Size: 29.43 MB
Page 49 of 377
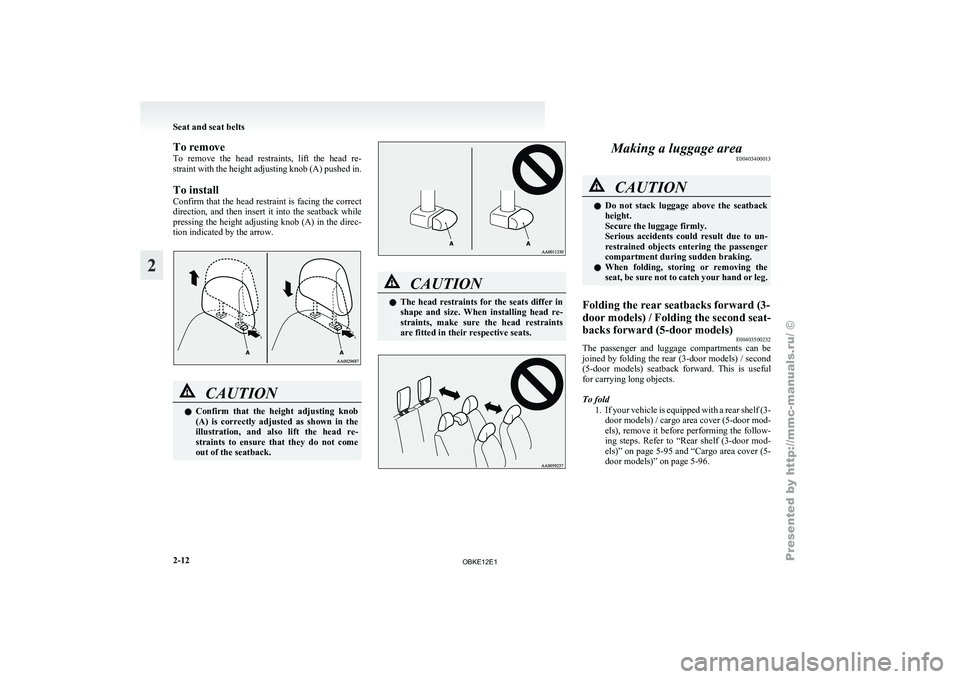
To remove
To remove
the
head restraints, lift the head re-
straint with the height adjusting knob (A) pushed in.
To install
Confirm that the head restraint is facing the correct
direction, and then insert it into the seatback while
pressing the height adjusting knob (A) in the direc-
tion indicated by the arrow. CAUTION
l
Confirm that
the
height adjusting knob
(A) is correctly adjusted as shown in the
illustration, and also lift the head re-
straints to ensure that they do not come
out of the seatback. CAUTION
l
The head
restraints
for the seats differ in
shape and size. When installing head re-
straints, make sure the head restraints
are fitted in their respective seats. Making a luggage area
E00403400013 CAUTION
l
Do not
stack
luggage above the seatback
height.
Secure the luggage firmly.
Serious accidents could result due to un-
restrained objects entering the passenger
compartment during sudden braking.
l When folding, storing or removing the
seat, be sure not to catch your hand or leg.
Folding the rear seatbacks forward (3-
door models) /
Folding the second seat-
backs forward (5-door models) E00403500232
The passenger and luggage compartments can be
joined by folding
the rear (3-door models) / second
(5-door models) seatback forward. This is useful
for carrying long objects.
To fold
1. If your vehicle is equipped with a rear shelf (3-door models) / cargo area cover (5-door mod-
els), remove it before performing the follow-
ing steps. Refer to “Rear shelf (3-door mod-
els)” on page 5-95 and “Cargo area cover (5-
door models)” on page 5-96. Seat and seat belts
2-12
2
OBKE12E1
Page 50 of 377
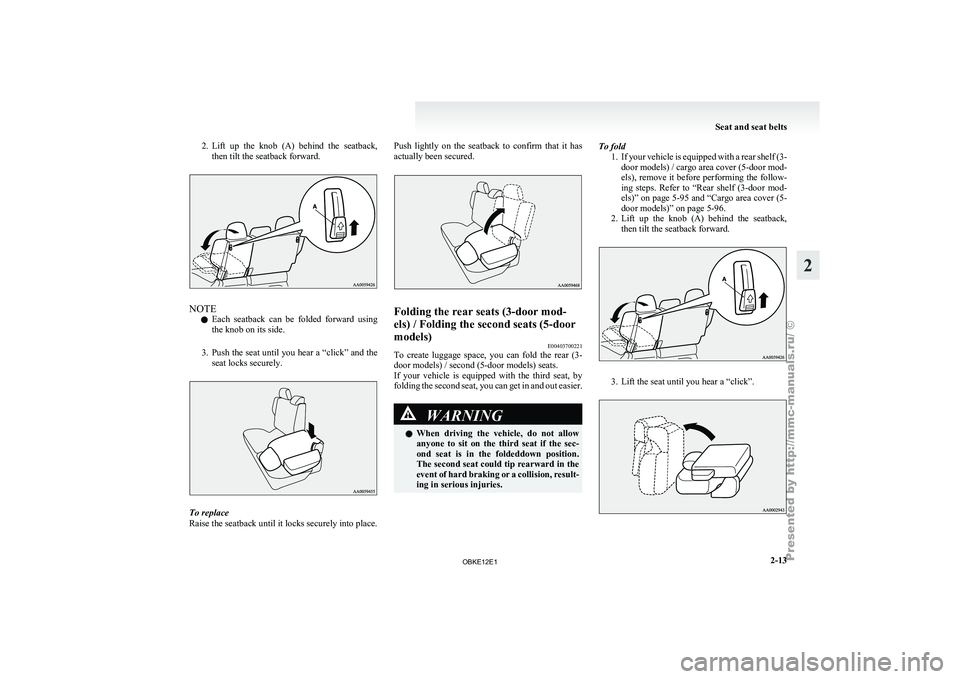
2. Lift up the knob (A) behind the seatback,
then tilt the seatback forward. NOTE
l Each
seatback can
be folded forward using
the knob on its side.
3. Push the seat until you hear a “click” and the seat locks securely. To replace
Raise the seatback until it locks securely into place. Push lightly on the seatback to confirm that it has
actually been secured.
Folding the rear seats (3-door mod-
els) / Folding the second seats (5-door
models)
E00403700221
To create luggage space, you can fold the rear (3-
door models) / second (5-door models) seats.
If your vehicle
is equipped with the third seat, by
folding the second seat, you can get in and out easier. WARNING
l When driving
the
vehicle, do not allow
anyone to sit on the third seat if the sec-
ond seat is in the foldeddown position.
The second seat could tip rearward in the
event of hard braking or a collision, result-
ing in serious injuries. To fold
1. If your vehicle
is equipped with a rear shelf (3-
door models) / cargo area cover (5-door mod-
els), remove it before performing the follow-
ing steps. Refer to “Rear shelf (3-door mod-
els)” on page 5-95 and “Cargo area cover (5-
door models)” on page 5-96.
2. Lift up the knob (A) behind the seatback, then tilt the seatback forward. 3. Lift the seat until you hear a “click”. Seat and seat belts
2-13 2
OBKE12E1
Page 55 of 377
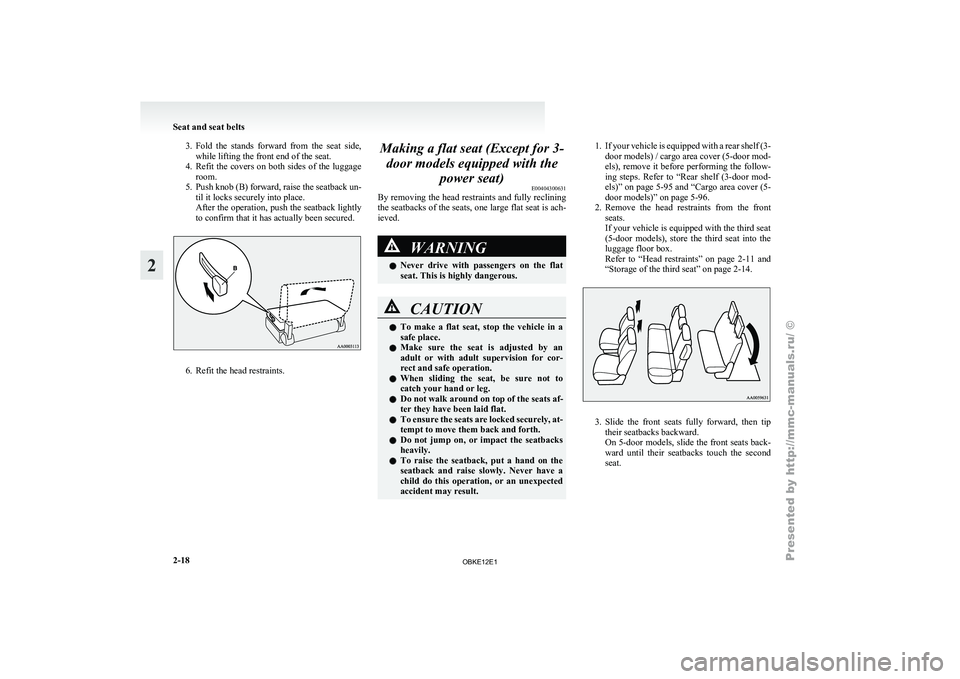
3. Fold the stands forward from the seat side,
while lifting the front end of the seat.
4. Refit
the covers on both sides of the luggage
room.
5. Push knob (B) forward, raise the seatback un- til it locks securely into place.
After the operation, push the seatback lightly
to confirm that it has actually been secured. 6. Refit the head restraints. Making a flat seat (Except for 3-
door models equipped with the power seat) E00404300631
By removing the
head restraints and fully reclining
the seatbacks of the seats, one large flat seat is ach-
ieved. WARNING
l Never drive
with
passengers on the flat
seat. This is highly dangerous. CAUTION
l
To make a
flat seat, stop the vehicle in a
safe place.
l Make sure the seat is adjusted by an
adult or with adult supervision for cor-
rect and safe operation.
l When sliding the seat, be sure not to
catch your hand or leg.
l Do not walk around on top of the seats af-
ter they have been laid flat.
l To ensure the seats are locked securely, at-
tempt to move them back and forth.
l Do not jump on, or impact the seatbacks
heavily.
l To raise the seatback, put a hand on the
seatback and raise slowly. Never have a
child do this operation, or an unexpected
accident may result. 1. If your vehicle is equipped with a rear shelf (3-
door models)
/ cargo area cover (5-door mod-
els), remove it before performing the follow-
ing steps. Refer to “Rear shelf (3-door mod-
els)” on page 5-95 and “Cargo area cover (5-
door models)” on page 5-96.
2. Remove the head restraints from the front seats.
If your vehicle is equipped with the third seat
(5-door models), store the third seat into the
luggage floor box.
Refer to “Head restraints” on page 2-11 and
“Storage of the third seat” on page 2-14. 3. Slide the front seats fully forward, then tip
their seatbacks backward.
On 5-door
models, slide the front seats back-
ward until their seatbacks touch the second
seat. Seat and seat belts
2-18
2
OBKE12E1
Page 56 of 377
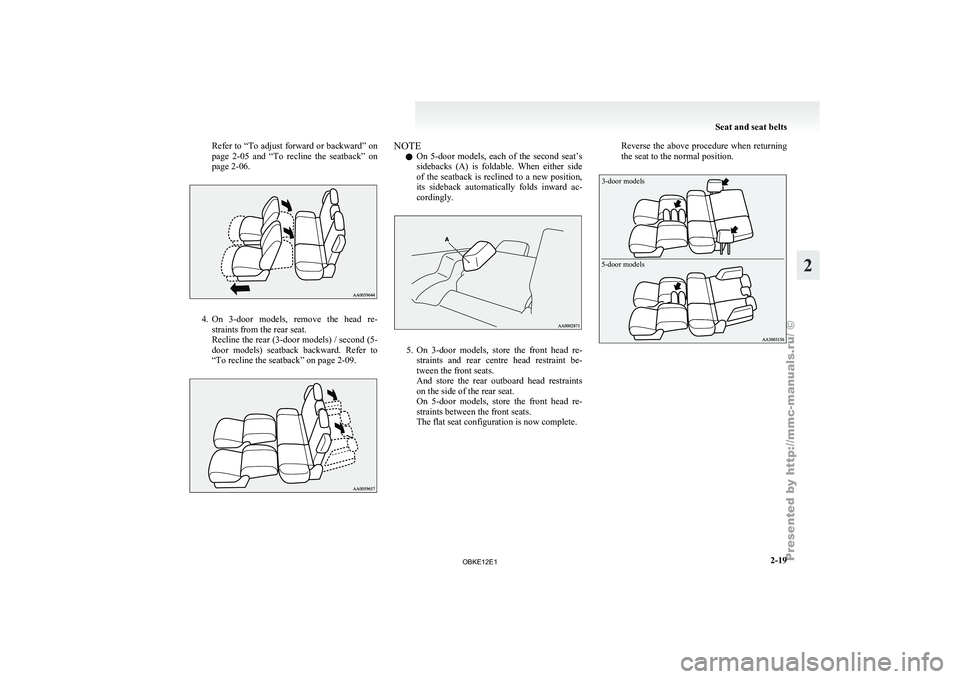
Refer to “To adjust forward
or backward” on
page 2-05 and “To recline the seatback” on
page 2-06. 4. On 3-door models, remove the head re-
straints from the rear seat.
Recline the
rear (3-door models) / second (5-
door models) seatback backward. Refer to
“To recline the seatback” on page 2-09. NOTE
l On
5-door models,
each of the second seat’s
sidebacks (A) is foldable. When either side
of the seatback is reclined to a new position,
its sideback automatically folds inward ac-
cordingly. 5. On 3-door models, store the front head re-
straints and
rear centre head restraint be-
tween the front seats.
And store the rear outboard head restraints
on the side of the rear seat.
On 5-door models, store the front head re-
straints between the front seats.
The flat seat configuration is now complete. Reverse the above procedure when returning
the seat to the normal position.
5-door models
3-door models Seat and seat belts
2-19 2
OBKE12E1
Page 68 of 377
Installing a child restraint system to
the lower anchorage (ISOFIX child re-
straint mountings) and tether anchor-
age*
E00408900387
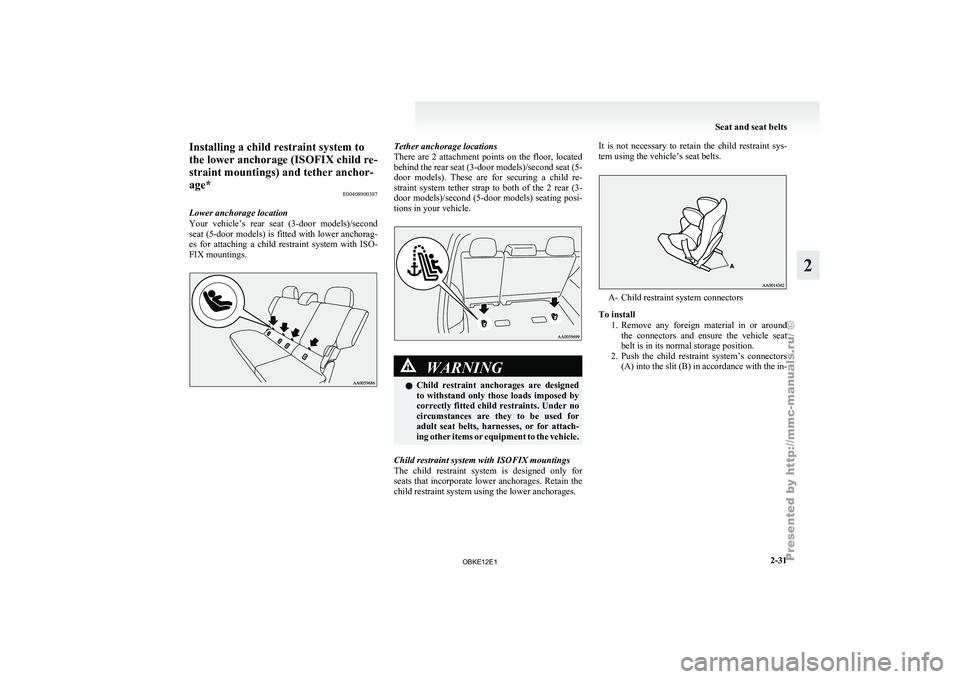
Lower anchorage location
Your vehicle’s rear
seat (3-door models)/second
seat (5-door models) is fitted with lower anchorag-
es for attaching a child restraint system with ISO-
FIX mountings. Tether anchorage locations
There are 2
attachment points on the floor, located
behind the rear seat (3-door models)/second seat (5-
door models). These are for securing a child re-
straint system tether strap to both of the 2 rear (3-
door models)/second (5-door models) seating posi-
tions in your vehicle. WARNING
l Child restraint
anchorages
are designed
to withstand only those loads imposed by
correctly fitted child restraints. Under no
circumstances are they to be used for
adult seat belts, harnesses, or for attach-
ing other items or equipment to the vehicle.
Child restraint system with ISOFIX mountings
The child restraint
system is designed only for
seats that incorporate lower anchorages. Retain the
child restraint system using the lower anchorages. It is not necessary to retain the child restraint sys-
tem using the vehicle’s seat belts.
A- Child restraint system connectors
To install 1. Remove any foreign
material in or around
the connectors and ensure the vehicle seat
belt is in its normal storage position.
2. Push the child restraint system’s connectors (A) into the slit (B) in accordance with the in- Seat and seat belts
2-31 2
OBKE12E1
Page 303 of 377
Vehicle care precautions
E00900100825
In order to
maintain the value of your vehicle, it is
necessary to perform regular maintenance using the
proper procedures. Always maintain your vehicle
in compliance with environmental pollution control
regulations. Carefully select the materials used for
washing, etc., to be sure that they do not contain cor-
rosives. If in doubt, we recommend you to consult
a specialist for selection of these materials. CAUTION
l
Cleaning products
can
be dangerous. Al-
ways follow the instructions of the clean-
ing product supplier.
l To avoid damage, never use the following
to clean your vehicle:
• Petrol
• Paint Thinner
• Benzine
• Kerosene
• Turpentine
• Naphtha
• Lacquer Thinner
• Carbon Tetrachloride
• Nail Polish Remover
• Acetone Cleaning the interior of your
vehicle E00900200464
After cleaning the
interior of your vehicle with wa-
ter, cleaner or similar, wipe and dry in a shady, well-
ventilated area. CAUTION
l
Do not
use
organic substances (solvents,
benzine, kerosene, alcohol, petrol, etc.) or
alkaline or acidic solutions.
These chemicals can cause discolouring,
staining or cracking of the surface.
If you use cleaners or polishing agents,
make sure their ingredients do not in-
clude the substances mentioned above.
Plastic, vinyl leather, fabric and
flocked parts E00900300377
1. Gently wipe off with gauze or other soft
cloth soaked
with a 3 % aqueous solution of
neutral detergent.
2. Dip cloth in fresh water and wring out well. Using this cloth, wipe off the detergent thor-
oughly. NOTE
l Do
not use
cleaners, conditioners, and protec-
tants containing silicons or wax.
Such products, when applied to the instru-
ment panels or other parts, may cause reflec-
tions on the windscreen and obscure vision.
Also, if such products get on the switches of
the electrical accessories, it may lead to fail-
ure of these accessories.
Upholstery E00900500063
1. To maintain the value of your new vehicle,
handle the
upholstery carefully and keep the
interior clean.
Use a vacuum cleaner and brush to clean the
seats. If stained, vinyl and synthetic leather
should be cleaned with an appropriate clean-
er, and cloth fabrics can be cleaned with ei-
ther upholstery cleaner or a 3 % solution of
neutral detergent in lukewarm water.
2. Clean the carpeting with a vacuum cleaner and remove any stains with carpet cleaner.
Oil and grease can be removed by lightly dab-
bing with a clean colourfast cloth and stain re-
mover.
Genuine leather* E00900600716
1. Gently wipe off with gauze or other soft
cloth soaked
with a 5 % aqueous solution of
neutral detergent.
2. Dip cloth in fresh water and wring it out well. Using this cloth, wipe off the detergent
thoroughly.
3. Apply leather protecting agent to the genuine leather surface. Vehicle care
7-02
7
OBKE12E1