battery MITSUBISHI TRITON 2011 User Guide
[x] Cancel search | Manufacturer: MITSUBISHI, Model Year: 2011, Model line: TRITON, Model: MITSUBISHI TRITON 2011Pages: 369, PDF Size: 26.15 MB
Page 115 of 369
Combination headlamps and
dipper switch E00506002129
Headlamps
NOTE l Do
not leave the headlamps
and other lamps
on for a long time while the engine is station-
ary (not running). A run-down battery could
result.
l When it rains or when the vehicle has been
washed, the inside of the lens sometimes be-
comes foggy. This is the same phenomenon
as when window glass mists up on a humid
day, and does not indicate a functional prob-
lem. When the lamp is switched on, the heat
will remove the fog. However, if water gath-
ers inside the lamp, we recommend you to
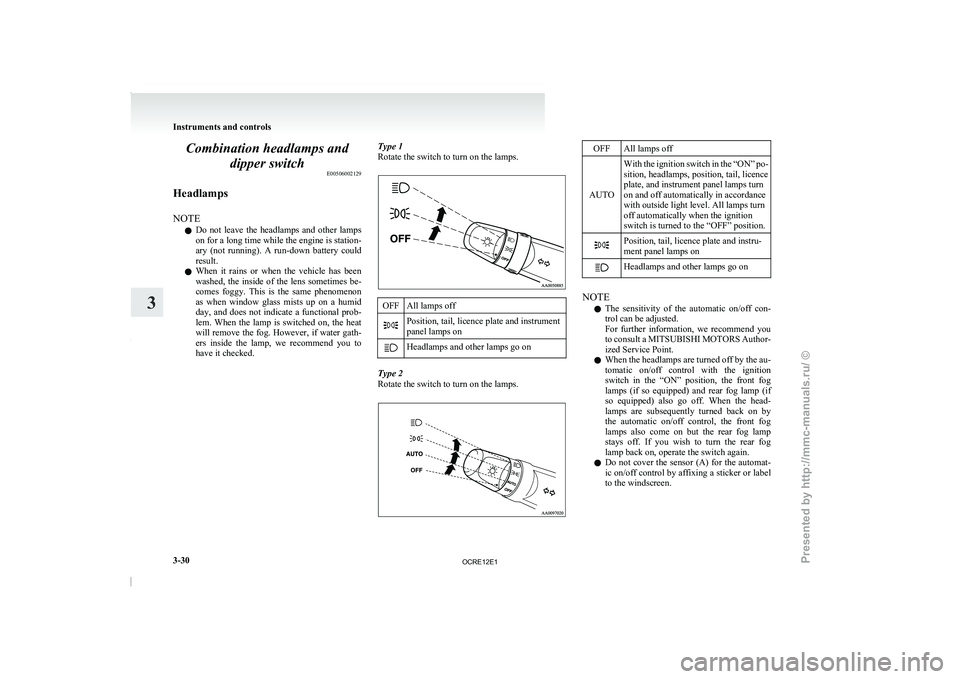
have it checked. Type 1
Rotate the switch to turn on the lamps. OFF All lamps off
Position, tail, licence plate and instrument
panel lamps on
Headlamps and other lamps go on
Type 2
Rotate the switch to turn on the lamps. OFF All lamps off
AUTO With the ignition switch in the “ON” po-
sition, headlamps, position, tail, licence
plate, and instrument panel lamps turn
on and off automatically in accordance
with outside light level. All lamps turn
off automatically when the ignition
switch is turned to the “OFF” position. Position, tail, licence plate and instru-
ment panel lamps on
Headlamps and other lamps go on
NOTE
l The
sensitivity of the automatic
on/off con-
trol can be adjusted.
For further information, we recommend you
to consult a MITSUBISHI MOTORS Author-
ized Service Point.
l When the headlamps are turned off by the au-
tomatic on/off control with the ignition
switch in the “ON” position, the front fog
lamps (if so equipped) and rear fog lamp (if
so equipped) also go off. When the head-
lamps are subsequently turned back on by
the automatic on/off control, the front fog
lamps also come on but the rear fog lamp
stays off. If you wish to turn the rear fog
lamp back on, operate the switch again.
l Do not cover the sensor (A) for the automat-
ic on/off control by affixing a sticker or label
to the windscreen. Instruments and controls
3-30
3
OCRE12E1
Presented by http://mmc-manuals.ru/ \251
Page 119 of 369
l
It is possible to
activate the following func-
tions. For further information, we recom-
mend you to consult a MITSUBISHI
MOTORS Authorized Service Point. • Flashing of the turn-signal lamps and theindication lamp in the instrument cluster
when the lever is operated with the igni-
tion switch in the “ACC” position
• Flashing of the turn-signal lamps and the indication lamp in the instrument cluster
three times when you move the lever to
(2) slightly then release it
• The time required to operate the lever for the 3-flash function can be adjusted. Hazard warning flasher switch
E00506600903
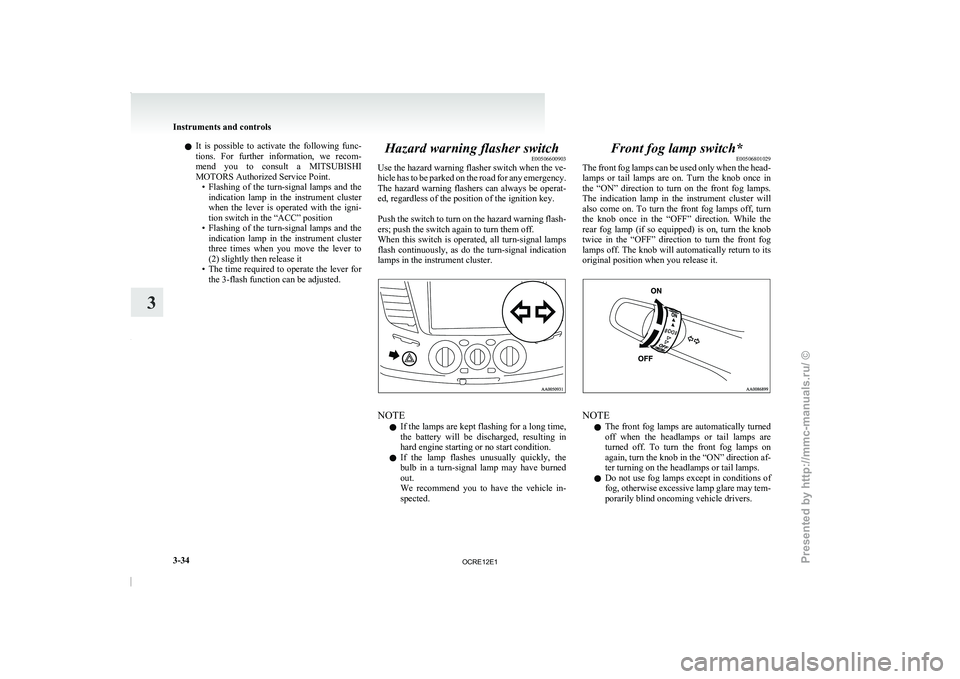
Use the hazard warning flasher
switch when the ve-
hicle has to be parked on the road for any emergency.
The hazard warning flashers can always be operat-
ed, regardless of the position of the ignition key.
Push the switch to turn on the hazard warning flash-
ers; push the switch again to turn them off.
When this switch is operated, all turn-signal lamps
flash continuously, as do the turn-signal indication
lamps in the instrument cluster. NOTE
l If
the lamps are kept
flashing for a long time,
the battery will be discharged, resulting in
hard engine starting or no start condition.
l If the lamp flashes unusually quickly, the
bulb in a turn-signal lamp may have burned
out.
We recommend you to have the vehicle in-
spected. Front fog lamp switch*
E00506801029
The front fog lamps
can
be used only when the head-
lamps or tail lamps are on. Turn the knob once in
the “ON” direction to turn on the front fog lamps.
The indication lamp in the instrument cluster will
also come on. To turn the front fog lamps off, turn
the knob once in the “OFF” direction. While the
rear fog lamp (if so equipped) is on, turn the knob
twice in the “OFF” direction to turn the front fog
lamps off. The knob will automatically return to its
original position when you release it. NOTE
l The
front fog lamps are
automatically turned
off when the headlamps or tail lamps are
turned off. To turn the front fog lamps on
again, turn the knob in the “ON” direction af-
ter turning on the headlamps or tail lamps.
l Do not use fog lamps except in conditions of
fog, otherwise excessive lamp glare may tem-
porarily blind oncoming vehicle drivers. Instruments and controls
3-34
3
OCRE12E1
Presented by http://mmc-manuals.ru/ \251
Page 137 of 369
NOTE
l If
your vehicle is equipped
with the Daytime
Running Lamp, when the ignition switch is
in the “ON”, the headlamp low beams etc.
are turned on.
Refer to “Headlamps” on page 3-30.
l Your vehicle is equipped with an electronic
immobilizer.
To start the engine, the ID code which the
transponder inside the key sends must match
the one registered in the immobilizer comput-
er.
Refer to “Electronic immobilizer” on page
1-03.
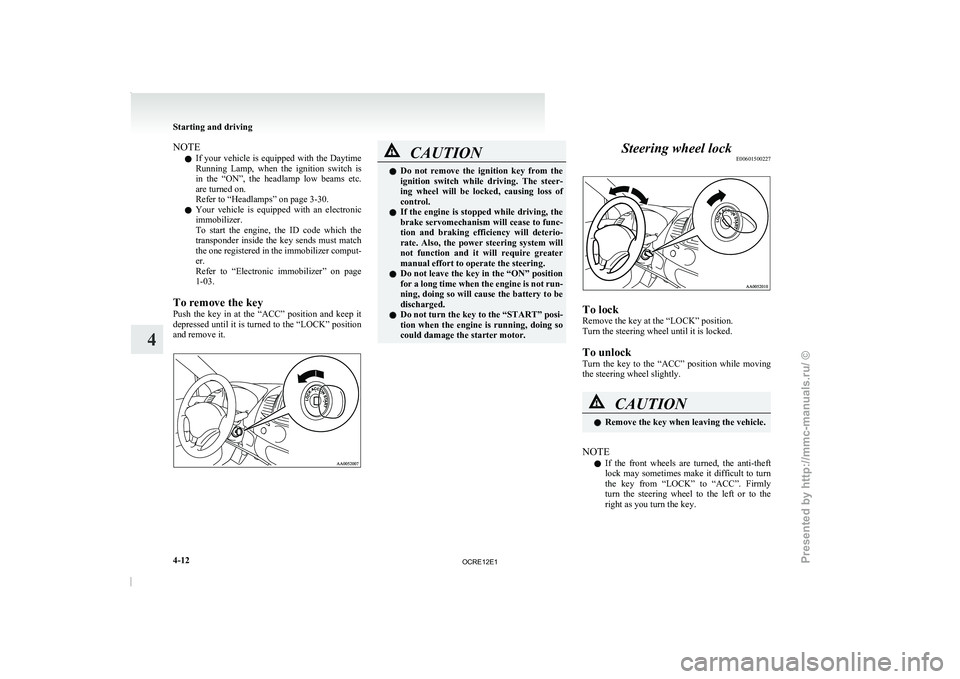
To remove the key
Push the key in at the “ACC” position and keep it
depressed until it is turned to the “LOCK” position
and remove it. CAUTION
l
Do not remove the ignition
key from the
ignition switch while driving. The steer-
ing wheel will be locked, causing loss of
control.
l If the engine is stopped while driving, the
brake servomechanism will cease to func-
tion and braking efficiency will deterio-
rate. Also, the power steering system will
not function and it will require greater
manual effort to operate the steering.
l Do not leave the key in the “ON” position
for a long time when the engine is not run-
ning, doing so will cause the battery to be
discharged.
l Do not turn the key to the “START” posi-
tion when the engine is running, doing so
could damage the starter motor. Steering wheel lock
E00601500227 To lock
Remove the key at the “LOCK” position.
Turn the steering wheel until it is locked.
To unlock
Turn the key to
the
“ACC” position while moving
the steering wheel slightly. CAUTION
l
Remove the key when leaving the vehicle.
NOTE l If
the front wheels are
turned, the anti-theft
lock may sometimes make it difficult to turn
the key from “LOCK” to “ACC”. Firmly
turn the steering wheel to the left or to the
right as you turn the key. Starting and driving
4-12
4
OCRE12E1
Presented by http://mmc-manuals.ru/ \251
Page 138 of 369
Starting
E00601600404
Tips for starting l Do not operate the
starter
motor continuous-
ly for anything longer than 10 seconds; do-
ing so could run down the battery. If the en-
gine does not start, turn the ignition switch
back to “LOCK” position, wait a few sec-
onds, and then try again.
Trying repeatedly with the starter motor still
turning will damage the starter mechanism.
l If the engine cannot be started because the
battery is weak or dead, refer to the “Emer-
gency starting” section for instructions on
starting the engine.
l The engine is well warmed up if the coolant
temperature gauge needle starts to move (the
engine speed decreases). Extended warming-
up operation will result in excessive fuel con-
sumption. WARNING
l Never
run
the engine
in
a closed or poor-
ly ventilated area any longer than is nee-
ded to move your vehicle in or out of the
area. Carbon monoxide gases are odour-
less and can be fatal. CAUTION
l
Never attempt to start the
engine by push-
ing or pulling the vehicle. Especially the
automatic transmission, since the struc-
ture is different from a manual transmis-
sion, it is not possible to start the engine
by using this technique. Never attempt
this or it could damage the automatic
transmission.
l Do not run the engine at high rpm or
drive the vehicle at high speed until the en-
gine has had a chance to warm up.
l Release the ignition key as soon as the en-
gine starts to avoid damaging the starter
motor.
l Do not stop the engine immediately after
high-speed or uphill driving. First allow
the engine to idle to give the turbocharg-
er a chance to cool down.
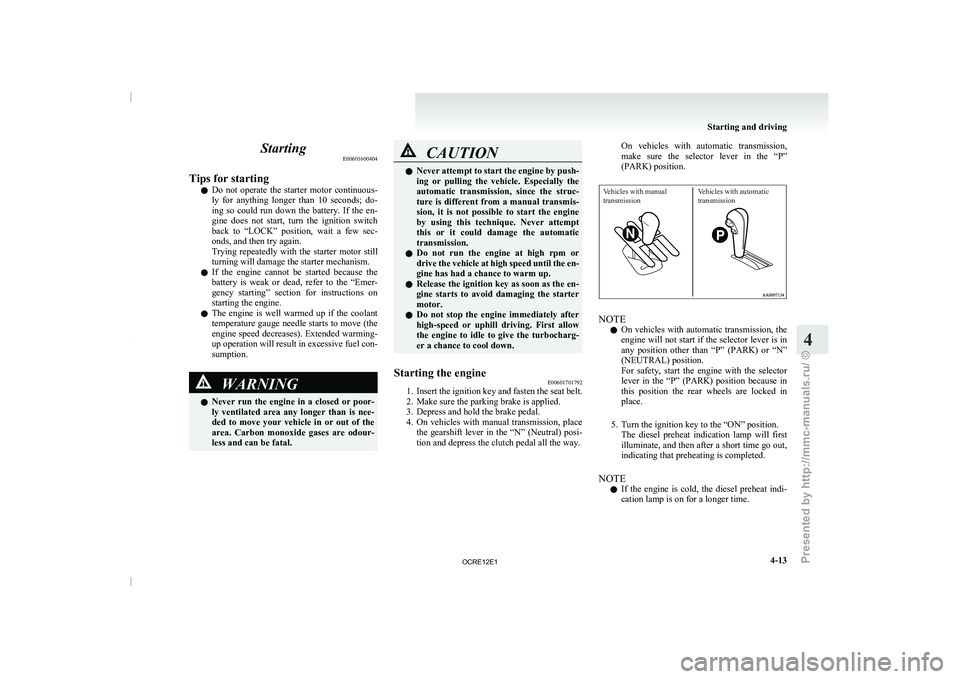
Starting the engine E00601701792
1. Insert the ignition key and fasten the seat belt.
2. Make sure the parking brake is applied.
3. Depress and hold the brake pedal.
4. On
vehicles with manual transmission, place
the gearshift lever in the “N” (Neutral) posi-
tion and depress the clutch pedal all the way. On vehicles with automatic transmission,
make
sure
the selector
lever
in the “P”
(PARK) position.
Vehicles with manual
transmission Vehicles with automatic
transmission NOTE
l On
vehicles with automatic transmission,
the
engine will not start if the selector lever is in
any position other than “P” (PARK) or “N”
(NEUTRAL) position.
For safety, start the engine with the selector
lever in the “P” (PARK) position because in
this position the rear wheels are locked in
place.
5. Turn the ignition key to the “ON” position. The diesel preheat indication lamp will first
illuminate, and then after a short time go out,
indicating that preheating is completed.
NOTE l If the engine is cold, the diesel preheat indi-
cation lamp is on for a longer time. Starting and driving
4-13 4
OCRE12E1
Presented by http://mmc-manuals.ru/ \251
Page 142 of 369
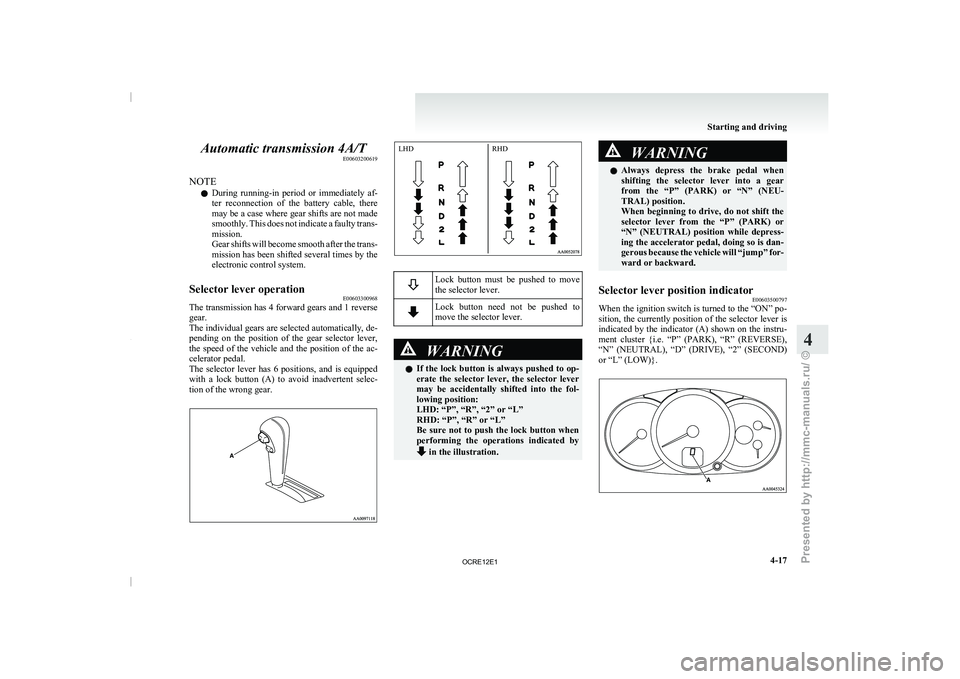
Automatic transmission 4A/T
E00603200619
NOTE l During
running-in period or immediately
af-
ter reconnection of the battery cable, there
may be a case where gear shifts are not made
smoothly. This does not indicate a faulty trans-
mission.
Gear shifts will become smooth after the trans-
mission has been shifted several times by the
electronic control system.
Selector lever operation E00603300968
The transmission has 4 forward gears and 1 reverse
gear.
The individual gears are selected
automatically, de-
pending on the position of the gear selector lever,
the speed of the vehicle and the position of the ac-
celerator pedal.
The selector lever has 6 positions, and is equipped
with a lock button (A) to avoid inadvertent selec-
tion of the wrong gear. Lock button must be pushed to move
the selector lever.
Lock button need not be pushed to
move the selector lever.
WARNING
l If the lock button is
always pushed to op-
erate the selector lever, the selector lever
may be accidentally shifted into the fol-
lowing position:
LHD: “P”, “R”, “2” or “L”
RHD: “P”, “R” or “L”
Be sure not to push the lock button when
performing the operations indicated by in the illustration. WARNING
l Always depress the brake pedal
when
shifting the selector lever into a gear
from the “P” (PARK) or “N” (NEU-
TRAL) position.
When beginning to drive, do not shift the
selector lever from the “P” (PARK) or
“N” (NEUTRAL) position while depress-
ing the accelerator pedal, doing so is dan-
gerous because the vehicle will “jump” for-
ward or backward.
Selector lever position indicator E00603500797
When the ignition switch is turned to the “ON” po-
sition, the currently
position of
the selector lever is
indicated by the indicator (A) shown on the instru-
ment cluster {i.e. “P” (PARK), “R” (REVERSE),
“N” (NEUTRAL), “D” (DRIVE), “2” (SECOND)
or “L” (LOW)}. Starting and driving
4-17 4 LHD
RHD
OCRE12E1
Presented by http://mmc-manuals.ru/ \251
Page 146 of 369
When the automatic transmission makes no speed
change
E00604800478
If the transmission does not
change speeds while
driving, or your vehicle does not pick up enough
speed when starting on an uphill slope, it may be
that there is something unusual happening in the
transmission, causing a safety device to activate.
We recommend you to have your checked as soon
as possible.
NOTE
l When the selector lever position indicator in
the instrument panel blinks, it means that
there is an abnormal condition in the trans-
mission. Refer to “When the selector lever po-
sition indicator blinks” on page 4-19. Automatic transmission Sports
Mode 5A/T E00603200576
NOTE l During
running-in period or immediately
af-
ter reconnection of the battery cable, there
may be a case where gear shifts are not made
smoothly. This does not indicate a faulty trans-
mission.
Gear shifts will become smooth after the trans-
mission has been shifted several times by the
electronic control system.
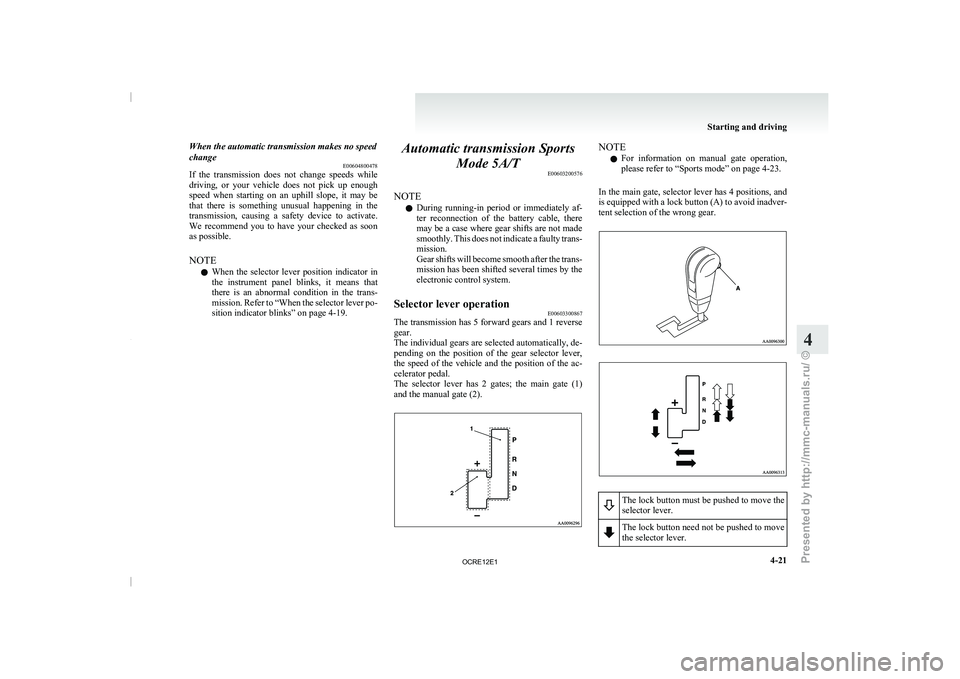
Selector lever operation E00603300867
The transmission has 5 forward gears and 1 reverse
gear.
The individual gears are selected
automatically, de-
pending on the position of the gear selector lever,
the speed of the vehicle and the position of the ac-
celerator pedal.
The selector lever has 2 gates; the main gate (1)
and the manual gate (2). NOTE
l For
information on manual gate
operation,
please refer to “Sports mode” on page 4-23.
In the main gate, selector lever has 4 positions, and
is equipped with a lock button (A) to avoid inadver-
tent selection of the wrong gear. The lock button must be pushed to move the
selector lever.
The lock button need not be pushed to move
the selector lever. Starting and driving
4-21 4
OCRE12E1
Presented by http://mmc-manuals.ru/ \251
Page 171 of 369
If the warning lamp illuminates while
driving
E00607300663
If only the ABS warning lamp illuminates l Avoid hard braking and
high-speed
driving.
Stop the vehicle in a safe place.
Restart the engine and check to see whether
the lamp goes out after a few minutes driv-
ing; if it then remains off during driving,
there is no problem.
However, if the lamp does not go out, or if it
lights up again when the vehicle is driven,
we recommend you to have the vehicle
checked as soon as possible.
l The ABS warning lamp can illuminate if the
battery voltage is insufficient when the en-
gine is started. In this case, it does not indi-
cate an ABS fault.
Charge the battery by allowing the engine to
idle for a while.
If the battery has been charged but the ABS
warning lamp continues to illuminate or illu-
minates intermittently, have the vehicle in-
spected.
If the ABS warning lamp and brake warning
lamp illuminate at the same time l The ABS and brake force distribution func-
tion may not work, so hard braking could
make the vehicle unstable.
Avoid hard braking and high-speed driving.
Stop the vehicle in a safe place and contact a
MITSUBISHI MOTORS Authorized Service
Point. NOTE
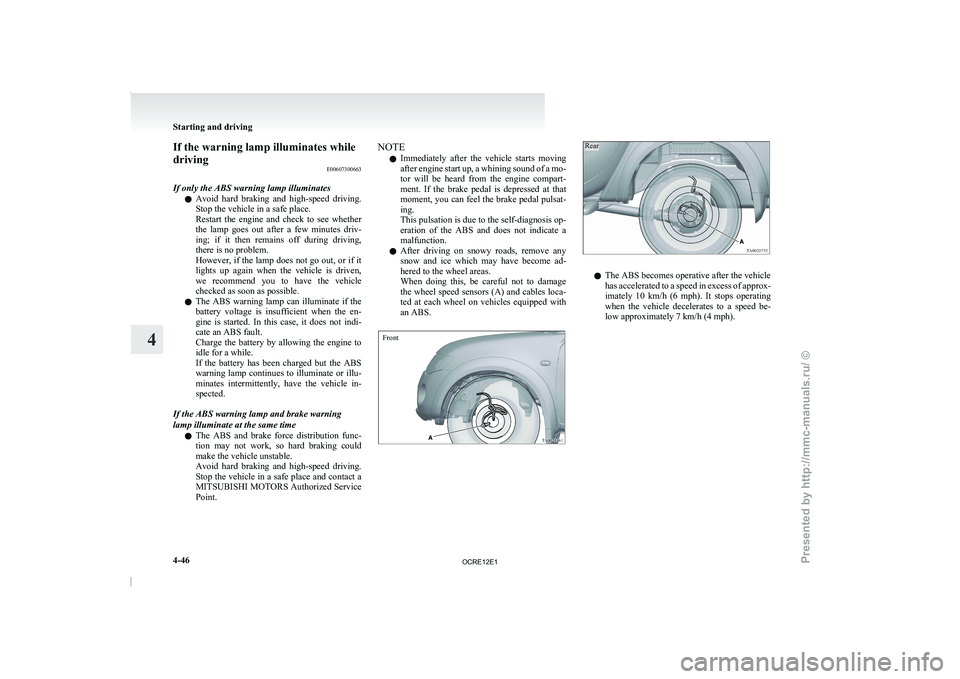
l Immediately
after the vehicle starts
moving
after engine start up, a whining sound of a mo-
tor will be heard from the engine compart-
ment. If the brake pedal is depressed at that
moment, you can feel the brake pedal pulsat-
ing.
This pulsation is due to the self-diagnosis op-
eration of the ABS and does not indicate a
malfunction.
l After driving on snowy roads, remove any
snow and ice which may have become ad-
hered to the wheel areas.
When doing this, be careful not to damage
the wheel speed sensors (A) and cables loca-
ted at each wheel on vehicles equipped with
an ABS.
Front
Rear l
The ABS becomes operative after the vehicle
has accelerated to a
speed
in excess of approx-
imately 10 km/h (6 mph). It stops operating
when the vehicle decelerates to a speed be-
low approximately 7 km/h (4 mph). Starting and driving
4-46
4
OCRE12E1
Presented by http://mmc-manuals.ru/ \251
Page 175 of 369
Cruise control*
E00609100779
Cruise control is an automatic
speed control system
that keeps a set speed. It can be activated at about
40 km/h (25 mph) or more. CAUTION
l
When you do not
wish
to drive at a set
speed, turn off the cruise control for safety.
l Do not use cruise control when driving
conditions will not allow you to stay at
the same speed, such as in heavy traffic
or on roads that are winding, icy, snow-
covered, wet, slippery, on a steep down-
hill slope.
l On vehicles with manual transmission, do
not move the gearshift lever to the “N”
(Neutral) position while driving at a set
speed without depressing the clutch ped-
al. The engine will run too fast and might
be damaged.
NOTE l Cruise
control may not be
able to keep your
speed on uphills or downhills.
l Your speed may decrease on a steep uphill.
You may use the accelerator pedal if you
want to stay at your set speed.
l Your speed may increase to more than the
set speed on a steep downhill. You must use
the brake to control your speed. As a result,
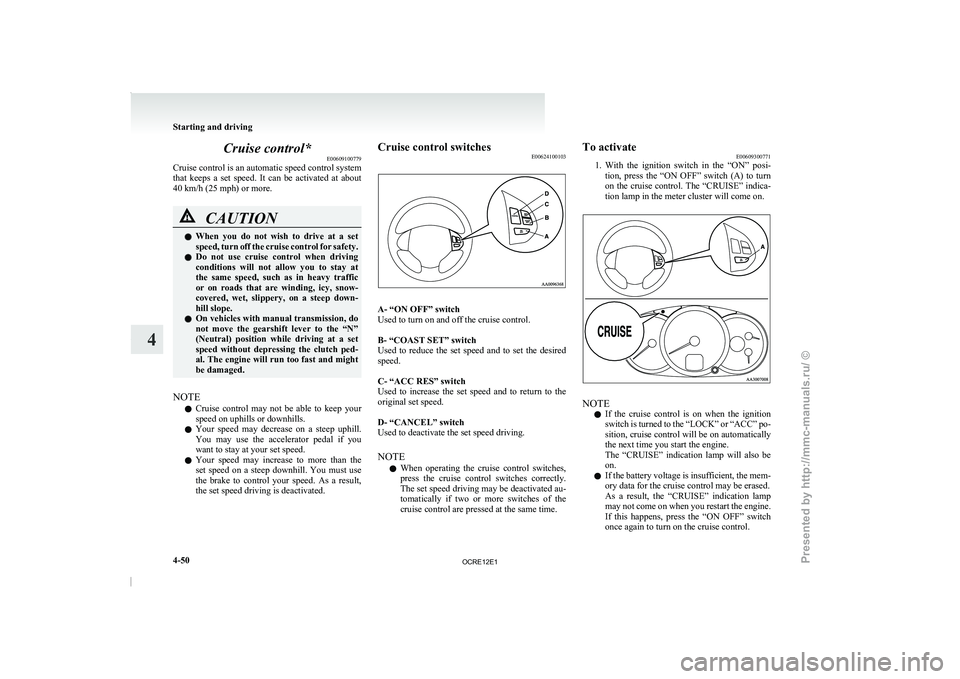
the set speed driving is deactivated. Cruise control switches
E00624100103 A- “ON OFF” switch
Used to turn on and off the cruise control.
B- “COAST SET” switch
Used to reduce the
set
speed and to set the desired
speed.
C- “ACC RES” switch
Used to increase the set speed and to return to the
original set speed.
D- “CANCEL” switch
Used to deactivate the set speed driving.
NOTE
l When operating the cruise control switches,
press the cruise control switches correctly.
The set speed driving may be deactivated au-
tomatically if two or more switches of the
cruise control are pressed at the same time. To activate
E00609300771
1. With the ignition
switch in
the “ON” posi-
tion, press the “ON OFF” switch (A) to turn
on the cruise control. The “CRUISE” indica-
tion lamp in the meter cluster will come on. NOTE
l If
the cruise control is
on when the ignition
switch is turned to the “LOCK” or “ACC” po-
sition, cruise control will be on automatically
the next time you start the engine.
The “CRUISE” indication lamp will also be
on.
l If the battery voltage is insufficient, the mem-
ory data for the cruise control may be erased.
As a result, the “CRUISE” indication lamp
may not come on when you restart the engine.
If this happens, press the “ON OFF” switch
once again to turn on the cruise control. Starting and driving
4-50
4
OCRE12E1
Presented by http://mmc-manuals.ru/ \251
Page 223 of 369
CAUTION
l
Do not operate the connected audio equip-
ment while driving.
This could distract you and an accident
might occur.
NOTE l The
connected audio equipment cannot
be op-
erated with the vehicle’s audio system.
l Depending on the connected audio equip-
ment, it may produce noise from the speakers.
l Use the connected audio equipment’s own
power source, such as its battery.
Noise may be produced from the speakers if
the connected audio equipment is used while
charging it using the accessory socket of the
vehicle.
l Do not activate the external audio input
mode when no audio equipment is connected.
Otherwise, noise may be produced from the
speakers.
l Connect audio equipment when the external
audio input mode is deactivated or lower the
vehicle’s speaker volume before connecting it.
Noise may be produced from the speakers if
audio equipment is connected after the exter-
nal audio input mode is activated.
l For information on how to connect and oper-
ate the audio equipment, refer to the owner’s
manual for the equipment. Steering wheel remote control
switch* E00710000955
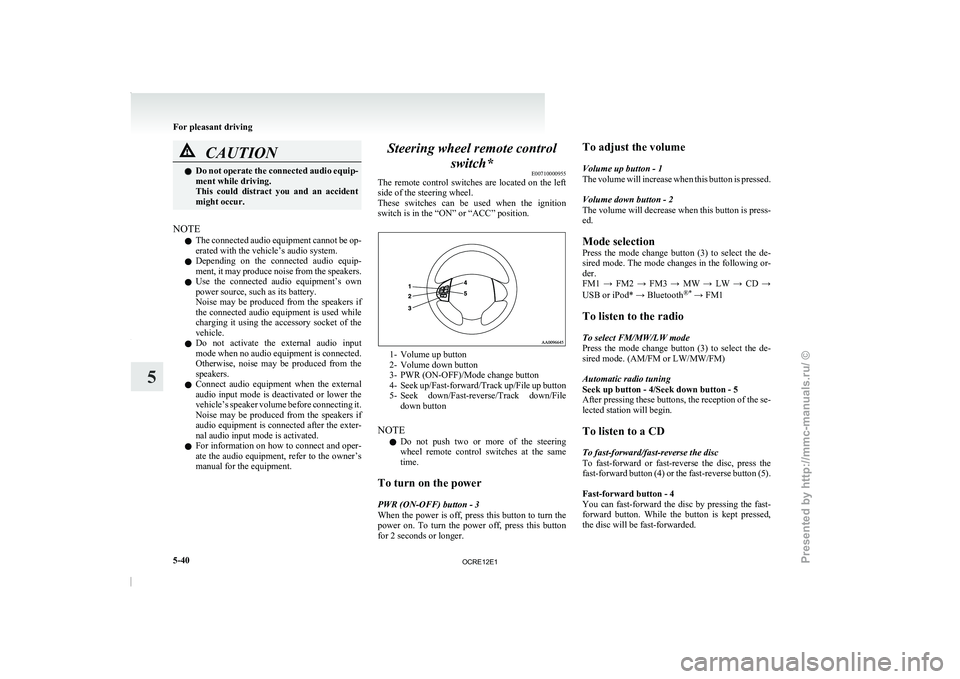
The remote control switches are
located on the left
side of the steering wheel.
These switches can be used when the ignition
switch is in the “ON” or “ACC” position. 1- Volume up button
2-
Volume down button
3- PWR (ON-OFF)/Mode change button
4- Seek up/Fast-forward/Track
up/File up button
5- Seek down/Fast-reverse/Track down/File down button
NOTE l Do not push two or more of the steering
wheel remote control switches at the same
time.
To turn on the power
PWR (ON-OFF) button - 3
When the power is off, press this button to turn the
power on. To turn the power off, press this button
for 2 seconds or longer. To adjust the volume
Volume up button - 1
The volume will increase
when
this button is pressed.
Volume down button - 2
The volume will decrease when this button is press-
ed.
Mode selection
Press the mode change button (3) to select the de-
sired mode. The mode changes in the following or-
der.
FM1 → FM2 → FM3 → MW → LW → CD →
USB or iPod* → Bluetooth ®*
→ FM1
To listen to the radio
To select FM/MW/LW mode
Press the mode change button (3) to select the de-
sired mode. (AM/FM or LW/MW/FM)
Automatic radio tuning
Seek up button - 4/Seek down button - 5
After pressing these buttons, the reception of the se-
lected station will begin.
To listen to a CD
To fast-forward/fast-reverse the disc
To fast-forward or fast-reverse the disc, press the
fast-forward button (4) or the fast-reverse button (5).
Fast-forward button - 4
You can fast-forward the disc by pressing the fast-
forward button. While the button is kept pressed,
the disc will be fast-forwarded.
For pleasant driving
5-40
5
OCRE12E1
Presented by http://mmc-manuals.ru/ \251
Page 235 of 369
WARNING
l Although the Bluetooth ®
2.0 interface al-
lows you to make hands-free calls, if you
choose to use the cellular phone while driv-
ing, you must not allow yourself to be dis-
tracted from the safe operation of your ve-
hicle. Anything, including cellular phone
usage, that distracts you from the safe op-
eration of your vehicle increases your
risk of an accident.
l Refer to and comply with all state and lo-
cal laws in your area regarding cellular
phone usage while driving.
NOTE l The Bluetooth ®
2.0 interface cannot
be used
if the Bluetooth ®
device has a flat battery or
the device power is turned off.
l Hands-free calls will not be possible if your
phone does not have service available.
l If you place the Bluetooth ®
device in the car-
go area, you may not be able to use the Blue-
tooth ®
2.0 interface.
l Some Bluetooth ®
devices are not compatible
with the Bluetooth ®
2.0 interface.
l For details on the Bluetooth ®
2.0 interface,
you can see them by accessing the
MITSUBISHI MOTORS website.
Please read and agree on the “Warning about
Links to the Web Sites of Other Companies”
because it connects to other than
MITSUBISHI MOTORS website.
http://www.mitsubishi-motors.com/en/prod-
ucts/index.html
Steering control switch ® p. 5-52 Voice recognition function
® p. 5-53
Useful voice commands ® p. 5-53
Speaker enrollment function ® p. 5-54
Connecting the Bluetooth®
2.0 interface and Blue-
tooth® device ® p. 5-55
Operating a music player connected via Blue-
tooth® ® p. 5-58
How to make or receive hands-free
calls ® p. 5-58
Phone book function ® p. 5-60
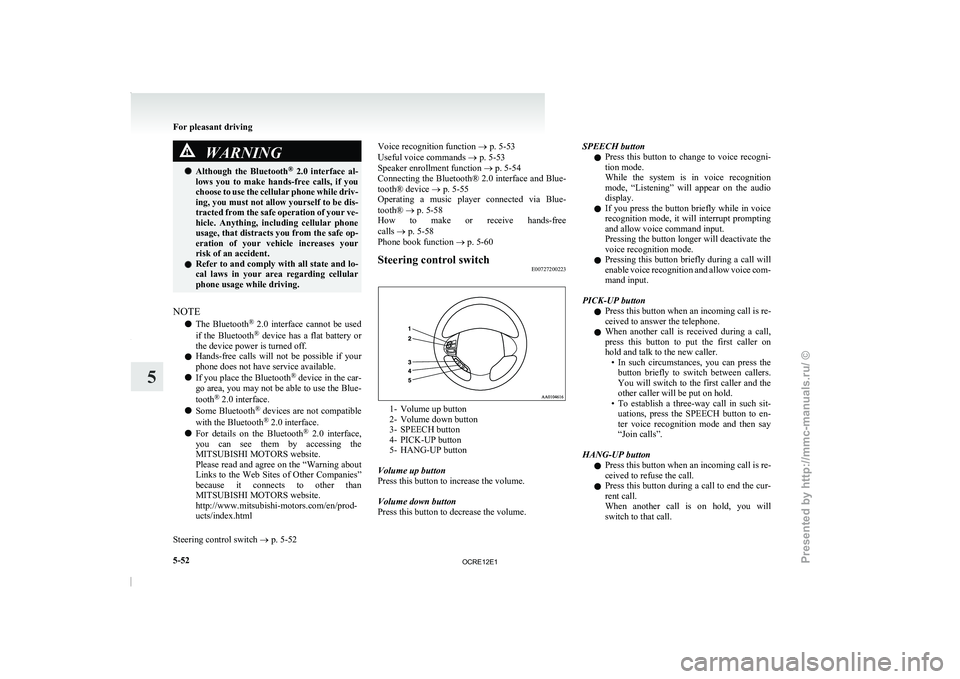
Steering control switch E00727200223 1- Volume up button
2- Volume down button
3- SPEECH button
4- PICK-UP button
5-
HANG-UP button
Volume up button
Press this button to increase the volume.
Volume down button
Press this button to decrease the volume. SPEECH button
l Press
this button to
change
to voice recogni-
tion mode.
While the system is in voice recognition
mode, “Listening” will appear on the audio
display.
l If you press the button briefly while in voice
recognition mode, it will interrupt prompting
and allow voice command input.
Pressing the button longer will deactivate the
voice recognition mode.
l Pressing this button briefly during a call will
enable voice recognition and allow voice com-
mand input.
PICK-UP button l Press this button when an incoming call is re-
ceived to answer the telephone.
l When another call is received during a call,
press this button to put the first caller on
hold and talk to the new caller.
• In such circumstances, you can press thebutton briefly to switch between callers.
You will switch to the first caller and the
other caller will be put on hold.
• To establish a three-way call in such sit- uations, press the SPEECH button to en-
ter voice recognition mode and then say
“Join calls”.
HANG-UP button l Press this button when an incoming call is re-
ceived to refuse the call.
l Press this button during a call to end the cur-
rent call.
When another call is on hold, you will
switch to that call. For pleasant driving
5-52
5
OCRE12E1
Presented by http://mmc-manuals.ru/ \251