change time MITSUBISHI TRITON 2011 Owner's Manual
[x] Cancel search | Manufacturer: MITSUBISHI, Model Year: 2011, Model line: TRITON, Model: MITSUBISHI TRITON 2011Pages: 369, PDF Size: 26.15 MB
Page 217 of 369
To play from a USB memory device
E00762500366
1. Press the PWR button (1)
to turn on the au-
dio system. The system turns on in the last
mode used.
2. Connect your USB memory device to the USB input terminal.
Refer to “How to connect a USB memory de-
vice” on page 5-67.
3. Press the CD button (11) several times to switch to the USB mode. The mode changes
as follows every time the CD button is pressed.
CD mode → USB mode → Bluetooth ®
mode*
NOTE l If your vehicle is equipped with Auxiliary Au-
dio connector (RCA), pressing and holding
the CD button for 2 seconds or more
switches the system to the AUX mode.
4. Once the device is selected, playback starts and “USB” appears on the display.
NOTE l Depending on the condition of your USB de-
vice, it may take a longer time before the play-
back starts.
5. To stop the playback, change over to a differ- ent mode.
NOTE l To adjust the volume and tone, refer to “To
adjust the volume” and “To adjust the tone”. Supported compressed music files
E00758300305
This audio can play MP3,
WMA, AAC and WAV
files recorded in a USB memory device. This audio
supports up to 65,535 files in 700 folders on 8 levels.
Folder selection order/file playback order (exam-
ple)
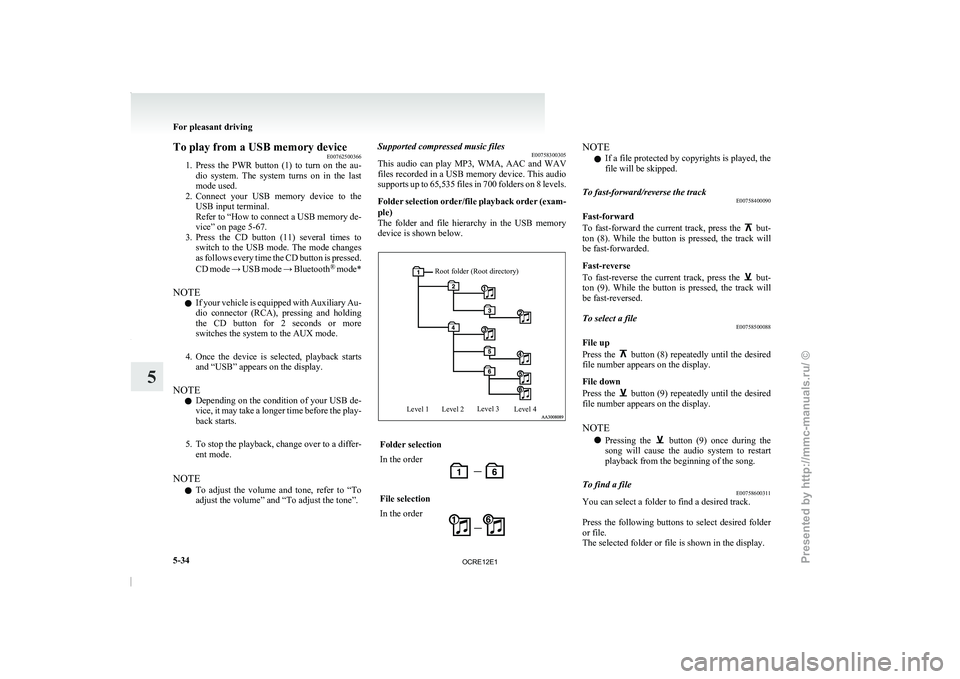
The folder and file hierarchy in the USB memory
device is shown below.
Root folder (Root directory)
Level 1 Level 2 Level 3
Level 4 Folder selection
In the order
File selection
In the order NOTE
l If a file protected by copyrights is played, the
file will be skipped.
To fast-forward/reverse the track E00758400090
Fast-forward
To fast-forward the current track,
press the but-
ton (8). While the button
is pressed, the track will
be fast-forwarded.
Fast-reverse
To fast-reverse the current track, press the but-
ton (9). While the button
is pressed, the track will
be fast-reversed.
To select a file E00758500088
File up
Press the button (8) repeatedly until the desired
file number appears on the display.
File down
Press the button (9) repeatedly until the desired
file number appears on the display.
NOTE
l Pressing
the button (9) once during the
song will cause the audio
system to restart
playback from the beginning of the song.
To find a file E00758600311
You can select a folder to find a desired track.
Press the following buttons to
select desired folder
or file.
The selected folder or file is shown in the display. For pleasant driving
5-34
5
OCRE12E1
Presented by http://mmc-manuals.ru/ \251
Page 218 of 369
button (12)
:To start this mode or cancel
the selection. button (8)
or button (9)
: To show the folder or file. button (13)
: To select the folder or file.
NOTE l If
no operation is performed
for 10 seconds
or more or another button is operated after
the button or button has been pressed,
searching of the desired file is cancelled.
l If no operation is
performed
for 5 seconds or
more after the file is displayed, playback
starts.
To play the same file repeatedly E00758700093
Press the RPT button (6) to show “RPT” in the dis-
play.
To exit this mode, press the button again.
To play the files in the same folder repeatedly E00758800094
Press and hold the RPT button (6) until you hear a
beep to show “F-RPT” in the display.
All files in the current folder are played repeatedly.
To exit this mode, press the button again.
To play a folder in random order E00758900095
Press the RDM button (7) to show “F-RDM” in the
display.
The audio randomly selects files
from the current
folder and plays the selected files.
To exit this mode, press the button again. To play all folders in random order
E00759000093
Press and hold the RDM
button (7) until you hear a
beep to show “RDM” in the display.
The audio randomly selects files from all folders
and plays the selected files.
To exit this mode, press the button again.
To switch the display E00759300155
The display changes as follows every time the
TEXT button (4) is pressed during playback.
Folder title → File title → Normal display
ID3 tag information
1. Press and hold the TEXT button (4) until youhear a beep to show “TAG” in the display.
2. The display changes
as follows every time
the TEXT button (4) is pressed briefly.
Album title → Track title → Artist name →
Genre (vehicles with Bluetooth ®
2.0 inter-
face) → Normal display
Example
File title NOTE
l Press
and hold the TEXT
button (4) again un-
til you hear a beep, and the tag information
display returns to the folder title display.
l Up to 16 characters are shown in the display
at once. If the title is cut off in the middle,
press the PAGE button (5). The next charac-
ters are displayed every time this button is
pressed.
l If no title is stored, “NO TITLE” is shown in
the display.
l Characters that cannot be displayed are sub-
stituted by “ ”.
To play USB memory device tracks
via voice operation (vehicles with
Blue-
tooth ®
2.0 interface)
E00759400130
Desired tracks can be selected and played from
your USB memory device by
“Artist”, “Album”,
“Playlist” and “Genre” using voice commands.
For information concerning the voice recognition
function or speaker enrollment function, refer to
“Bluetooth ®
2.0 interface” on page 5-51.
The playback sequence of tracks is the same as
when an iPod is connected. Refer to the “To play
iPod tracks via voice operation” on page 5-30. For pleasant driving
5-35 5
OCRE12E1
Presented by http://mmc-manuals.ru/ \251
Page 221 of 369
To listen to tracks from a device con-
nected via Bluetooth
®
E00762700225
1. Press the PWR button (1)
to turn on the au-
dio system. The system turns on in the last
mode used.
2. Press the CD button (8) several times to
switch to the BT-A (Bluetooth ®
) mode. The
mode changes as follows every time the CD
button is pressed.
CD mode → USB (iPod) mode → Blue-
tooth ®
mode
NOTE l For vehicles equipped with Auxiliary Audio
connector (RCA), pressing and holding the
CD button for 2 seconds or more switches
the system to the AUX mode.
3. Connect your Bluetooth ®
device.
Refer to “Connecting the Bluetooth® 2.0 in-
terface and Bluetooth® device” on page
5-55.
4. Playback starts automatically.
NOTE l Depending on the connected device, the play-
back may not start automatically.
In this case, operate the connected device to
start the playback.
To stop the playback (if supported by the device) E00762800079
To stop the playback, press and hold the button
(9) until you hear a beep.
To restart the playback, press the button (10).To pause the playback (if supported by the device)
E00762900083
To pause the playback, press the button (9).
To restart the playback, press the button (10).
To fast-forward/reverse the track (if supported by
the device) E00765600010
Fast-forward
To fast-forward the current
track,
press the but-
ton (6). While the button
is pressed, the track will
be fast-forwarded.
Fast-reverse
To fast-reverse the current track, press the but-
ton (7). While the button
is pressed, the track will
be fast-reversed.
To select a track (if supported by the device) E00763000094
Track up
Press the button (6) repeatedly until the desired
track number appears on the display.
Track down
Press the button (7) repeatedly until the desired
track number appears on the display.
NOTE
l Pressing
the button (7) once during the
song will cause the audio
system to restart
playback from the beginning of the song.
To play the same track or all tracks repeatedly (if
supported by the device) E00763100079
Press the RPT button (4) several times to show
“1-RPT” (same track repeat mode)
or “A-RPT” (all
tracks repeat mode) in the display. The mode changes as follows every time the RPT
button is pressed.
1-RPT mode → A-RPT mode → mode off
To exit these mode,
press
the RPT button several
times until the 1-RPT indicator or the A-RPT indi-
cator goes off.
To play tracks in random order (if supported by
the device) E00763200070
Press the RDM button (5) to show “RDM” in the
display.
The system randomly selects and
plays tracks from
all tracks in the Bluetooth ®
device.
To exit this mode, press the button again.
To switch the display (if supported by the device) E00763400072
The display changes as follows every time the
TEXT button (2) is pressed briefly.
Album title → Title name
→ Artist name → Genre
→ Normal display
Example
Album title For pleasant driving
5-38
5
OCRE12E1
Presented by http://mmc-manuals.ru/ \251
Page 223 of 369
CAUTION
l
Do not operate the connected audio equip-
ment while driving.
This could distract you and an accident
might occur.
NOTE l The
connected audio equipment cannot
be op-
erated with the vehicle’s audio system.
l Depending on the connected audio equip-
ment, it may produce noise from the speakers.
l Use the connected audio equipment’s own
power source, such as its battery.
Noise may be produced from the speakers if
the connected audio equipment is used while
charging it using the accessory socket of the
vehicle.
l Do not activate the external audio input
mode when no audio equipment is connected.
Otherwise, noise may be produced from the
speakers.
l Connect audio equipment when the external
audio input mode is deactivated or lower the
vehicle’s speaker volume before connecting it.
Noise may be produced from the speakers if
audio equipment is connected after the exter-
nal audio input mode is activated.
l For information on how to connect and oper-
ate the audio equipment, refer to the owner’s
manual for the equipment. Steering wheel remote control
switch* E00710000955
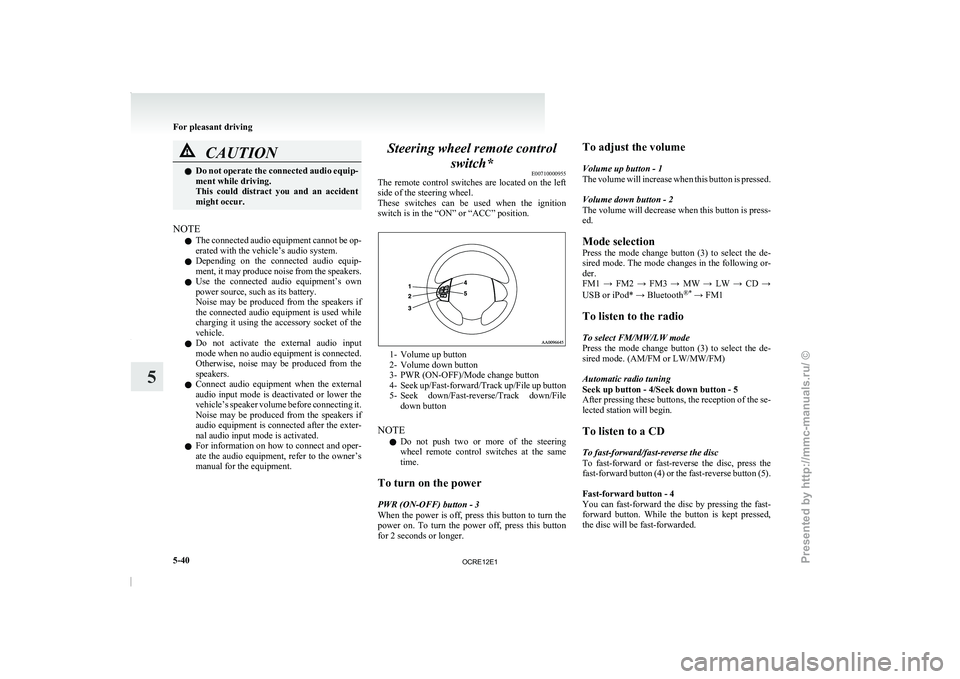
The remote control switches are
located on the left
side of the steering wheel.
These switches can be used when the ignition
switch is in the “ON” or “ACC” position. 1- Volume up button
2-
Volume down button
3- PWR (ON-OFF)/Mode change button
4- Seek up/Fast-forward/Track
up/File up button
5- Seek down/Fast-reverse/Track down/File down button
NOTE l Do not push two or more of the steering
wheel remote control switches at the same
time.
To turn on the power
PWR (ON-OFF) button - 3
When the power is off, press this button to turn the
power on. To turn the power off, press this button
for 2 seconds or longer. To adjust the volume
Volume up button - 1
The volume will increase
when
this button is pressed.
Volume down button - 2
The volume will decrease when this button is press-
ed.
Mode selection
Press the mode change button (3) to select the de-
sired mode. The mode changes in the following or-
der.
FM1 → FM2 → FM3 → MW → LW → CD →
USB or iPod* → Bluetooth ®*
→ FM1
To listen to the radio
To select FM/MW/LW mode
Press the mode change button (3) to select the de-
sired mode. (AM/FM or LW/MW/FM)
Automatic radio tuning
Seek up button - 4/Seek down button - 5
After pressing these buttons, the reception of the se-
lected station will begin.
To listen to a CD
To fast-forward/fast-reverse the disc
To fast-forward or fast-reverse the disc, press the
fast-forward button (4) or the fast-reverse button (5).
Fast-forward button - 4
You can fast-forward the disc by pressing the fast-
forward button. While the button is kept pressed,
the disc will be fast-forwarded.
For pleasant driving
5-40
5
OCRE12E1
Presented by http://mmc-manuals.ru/ \251
Page 236 of 369
l
If this button is
pressed in the voice recogni-
tion mode, the voice recognition mode will
be deactivated.
NOTE l When you press the SPEECH button to enter
voice recognition mode with a cellular phone
paired to the system, current information on
the cellular phone, such as “remaining bat-
tery life,” “signal strength” or “roaming,”
will be displayed on the audio display.*
*: Some cellular phones will not send this in-
formation to the Bluetooth ®
2.0 interface.
l Call waiting and three-way calls can be used
by the Bluetooth ®
2.0 interface, only if it is
possible to use those services with your cellu-
lar phone.
Voice recognition function E00727300471
The Bluetooth ®
2.0 interface is equipped
with a
voice recognition function.
Simply say voice commands and you can perform
various operations and make or receive hands-free
calls.
With the Bluetooth ®
2.0 interface, voice recogni-
tion is possible for English, French, Spanish, Ital-
ian, German, Dutch, Portuguese and Russian. The
factory setting is English. NOTE
l If
the voice command that
you say differs
from the predefined command or cannot be
recognised due to ambient noise or some oth-
er reason, the Bluetooth ®
2.0 interface will
ask you for the voice command again up to 3
times.
l For best performance and further reduction
of ambient noise, the vehicle windows
should be closed while engaging the voice rec-
ognition function.
l Depending on the selected language, some
functions may not be available.
Selecting the Language 1. Press the SPEECH button.
2. Say “Setup”.
3. Say “Language.”
4. The voice guide will say “Select a language:English, French, Spanish, Italian, German,
Dutch, Portuguese or Russian” Say the de-
sired language. (Example: Say “English.”)
5. The voice guide will say “English (French, Spanish, Italian, German, Dutch, Portuguese
or Russian) selected. Is this correct?” Say
“Yes.”
Answer “No” to return to Step 4.
NOTE l The voice guide will repeat the same mes-
sage twice. The first message is in the cur-
rent language, and the second message is in
the selected language.
l If many entries are registered in the vehicle
phone book, changing the language will take
longer. l
Changing the language deletes
the mobile
phone book imported to the Bluetooth ®
2.0
interface. If you wish to use it, you will have
to import it again.
6. When the voice guide says “English (French, Spanish, Italian, German, Dutch, Portuguese
or Russian) selected,” the language change
process will be completed and the system
will return to the main menu.
Useful voice commands E00760000019
Help function E00760100010
The Bluetooth ®
2.0 interface is equipped
with a
help function. If you say “Help” when the system
is waiting for a voice command input, the system
will tell you a list of the commands that can be
used under the circumstances.
Cancelling E00760200011
There are two cancel functions.
If you are
at the
main menu, say “Cancel” to exit
from the Bluetooth ®
2.0 interface.
If you are anywhere else within the system, say
“Cancel” to return to the main menu.
Confirmation function setting E00760400013
The Bluetooth ®
2.0 interface is equipped
with a con-
firmation function.
With the confirmation function activated, you are
given more opportunities than normal to confirm a
command when making various settings to the Blue-
tooth ®
2.0 interface. This allows you to decrease
the possibility that a setting is accidentally changed.
The confirmation function can be turned on or off
by following the steps below. For pleasant driving
5-53 5
OCRE12E1
Presented by http://mmc-manuals.ru/ \251
Page 237 of 369
1. Press the SPEECH button.
2. Say “Setup”.
3. Say “Confirmation prompts”.
4. The voice
guide will say “Confirmation
prompts are
confirmation prompts
Answer “Yes” to change the setting or an-
swer “No” to keep the current setting.
5. The voice guide will say “Confirmation prompts are
will return to the main menu.
Security function E00760500131
It is possible to use a password as a security func-
tion by setting a password
of your choice for the
Bluetooth ®
2.0 interface.
When the security function is turned on, it is neces-
sary to make a voice input of a 4-digit password in
order to use all functions of the Bluetooth ®
2.0 in-
terface, except for reception.
Setting the password
Use the following procedure to turn on the security
function by setting a password. 1. Press the SPEECH button.
2. Say “Setup”.
3. Say “Password.”
4. The voice guide will say “Password is disa-bled. Would you like to enable it?” Answer
“Yes.”
Answer “No” to cancel the setting of the pass-
word and return to the main menu.
5. The voice guide will say “Please say a 4-dig- it password. Remember this password. It will
be required to use this system”.
Say a 4-digit number which you want to set
as a password. 6. For confirmation purposes, the voice guide
will say “Password <4-digit
password>. Is
this correct?” Answer “Yes.”
Answer “No” to return to the password input
in Step 5.
7. When the registration of the password is com- pleted, the voice guide will say “Password is
enabled” and the system will return to the
main menu.
NOTE l Password will be required to access the sys-
tem after the next ignition cycle.
l It is required for a little time after engine
stop that the entered password is actually re-
corded in the system.
If the ignition switch is made to “ACC” or
“ON” or the engine is started immediately af-
ter engine stop, there is a case when the en-
tered password is not recorded in the system.
At this time, please try to enter the password
again.
Entering the password
If a password has been set and the security function
is enabled, the voice guide will say “Hands-free sys-
tem is locked. State the password to continue”
when the SPEECH button is pressed to enter voice
recognition mode. Say the 4-digit password num-
ber to enter the password.
If the entered password is wrong, the voice guide
will say “<4- digit password>, Incorrect password.
Please try again”. Enter the correct password.
NOTE l You can re-enter the password as many times
as you want. l
If
you have forgotten your password, say
“Cancel” to quit the voice input mode and
then check with a MITSUBISHI MOTORS
Authorized Service Point.
Disabling the password
Use the following procedure to turn off the security
function by disabling the password.
NOTE l System must be unlocked to disable the pass-
word.
1. Press the SPEECH button.
2. Say “Setup”.
3. Say “Password.”
4. The voice guide will say “Password is ena- bled. Would you like to disable it?”
Answer “Yes.” Answer “No” to cancel the
disabling of the password and return to the
main menu.
5. When the disabling of the password is com- pleted, the voice guide will say “Password is
disabled” and the system will return to the
main menu.
Speaker enrollment function E00727400209
The Bluetooth ®
2.0 interface can use
the speaker en-
rollment function to create a voice model for one
person per language.
This makes it easier for the Bluetooth ®
2.0 inter-
face to recognise voice commands said by you.
You can turn a voice model registered with the
speaker enrollment function on and off whenever
you want. For pleasant driving
5-54
5
OCRE12E1
Presented by http://mmc-manuals.ru/ \251
Page 239 of 369
NOTE
l Pairing
is required only when
the device is
used for the first time. Once the device has
been paired with the Bluetooth ®
2.0 inter-
face, you only need to bring the device into
the vehicle next time and the device will au-
tomatically connect to the Bluetooth ®
2.0 in-
terface (if supported by the device).
Up to 7 Bluetooth ®
devices can be paired with the
Bluetooth ®
2.0 interface.
If multiple paired Bluetooth ®
devices are available
in the vehicle, the cellular phone or music player
most recently connected is automatically connected
to the Bluetooth ®
2.0 interface.
You can also change a Bluetooth ®
device to be con-
nected.
To pair
To pair a Bluetooth ®
device with the Bluetooth ®
2.0 interface, follow the steps below. 1. Stop your vehicle in a safe area, put the gear-shift lever in the “N” (Neutral) position
(M/T), or the selector lever in the “P”
(PARK) position (A/T), and pull the parking
brake lever.
NOTE l You cannot pair Bluetooth ®
devices with the
Bluetooth ®
2.0 interface unless the vehicle is
parked. Before pairing a Bluetooth ®
device
with the Bluetooth ®
2.0 interface, confirm
that the vehicle is parked in a safe location.
2. Press the SPEECH button.
3. Say “Setup”. 4. Say “Pairing options.”
5. The
voice guide will
say
“Select one of the
following: pair, edit, delete, or list.” Say
“Pair.”
NOTE l If 7 devices have already been paired, the
voice guide will say “Maximum devices
paired” and then the system will end the pair-
ing process. To register a new device, delete
one device and then repeat the pairing process.
(Refer to “Deleting a device” on page 5-57.)
6. The voice guide will say “Please say a 4-dig- it pairing code.” Say a 4-digit number.
When the confirmation function is on, the sys-
tem will confirm whether the number said is
acceptable. Answer “Yes.”
Answer “No” to return to pairing code selec-
tion.
NOTE l Some Bluetooth ®
devices require a specific
pairing code.
Please refer to the device manual for pairing
code requirements. l
The
pairing code entered here is only used
for the Bluetooth ®
connection certification.
It is any 4-digit number the user would like
to select.
Remember the pairing code as it needs to be
keyed into the Bluetooth ®
device later in the
pairing process.
Depending on the connection settings of the
Bluetooth ®
device, this code may have to be
entered each time you connect the Blue-
tooth ®
device to the Bluetooth ®
2.0 inter-
face. For the default connection settings, re-
fer to the instructions for the device.
7. The voice guide will say “Start pairing proce- dure on the device. See the device manual
for instructions.” Enter in the Bluetooth ®
de-
vice the 4-digit number you have registered
in Step 6.
NOTE l According to the corresponding device to
Bluetooth ®
, it might take a few minutes to
pair the Bluetooth ®
device with the Blue-
tooth ®
2.0 interface.
l If the Bluetooth ®
2.0 interface cannot recog-
nize the Bluetooth ®
device, the voice guide
will say “Pairing has timed out” and the pair-
ing process will be cancelled.
Confirm that the device you are pairing sup-
ports Bluetooth ®
, and try pairing it again.
l If you enter the wrong number, the voice
guide will say “Pairing failed” and the pair-
ing process will be cancelled. Confirm the
number is right, and try pairing it again. For pleasant driving
5-56
5
OCRE12E1
Presented by http://mmc-manuals.ru/ \251
Page 240 of 369
8. The voice guide will say “Please say the
name of the device after the beep.” You can
assign a desired name for the Bluetooth ®
de-
vice and register it as a device tag. Say the
name you want to register after the beep.
NOTE l When the confirmation function is on, after
repeating the device tag you have said, the
voice guide will ask “Is this correct?” An-
swer “Yes.”
To change the device tag, answer “No” and
then say the device tag again.
9. The voice guide will say “Pairing complete,” after which a beep will be played and the pair-
ing process will end.
Selecting a device E00760700016
If multiple paired Bluetooth ®
devices
are available
in the
vehicle, the cellular phone or music player
most recently connected is automatically connected
to the Bluetooth ®
2.0 interface.
You can connect to the other cellular phone or mu-
sic player by following setting change procedures.
To select a cellular phone
1. Press the SPEECH button.
2. Say “Setup”.
3. Say “Select phone.”
4. After the voice guide says “Please say,” thenumbers of the cellular phones and device
tags of corresponding cellular phones will be
read out in order, starting with the cellular
phone that has been most recently connected.
Say the number of the cellular phone that
you want to connect to. When the confirmation function is on, the sys-
tem
will ask
you again
whether the phone
that you want to connect to is correct. An-
swer “Yes” to continue and connect to the cel-
lular phone.
Answer “No,” and the voice guide will say
“Please say.” Say the number of the phone
that you want to connect to.
NOTE l You can connect to a phone at any time by
pressing the SPEECH button and saying the
number, even before all of the paired num-
bers and device tags of corresponding cellu-
lar phones are read out by the system.
5. The selected phone will be connected to the Bluetooth ®
2.0 interface. The voice guide
will say “
system will return to the main menu.
To select a music player 1. Press the SPEECH button.
2. Say “Setup”.
3. Say “Select music player.”
4. After the voice guide says “Please say,” thenumbers of the music players and device tags
of corresponding music players will be read
out in order, starting with the music player
that has been most recently connected.
Say the number of the music player that you
want to connect to.
When the confirmation function is on, the sys-
tem will ask you again whether the music
player that you want to connect to is correct.
Answer “Yes” to continue and connect to the
music player. Answer “No,” and the voice guide will say
“Please say.” Say the number
of the music
player that you want to connect to.
NOTE l You can connect to a music player at any
time by pressing the SPEECH button and say-
ing the number, even before all of the paired
numbers and device tags of corresponding mu-
sic players are read out by the system.
5. The selected music player will be connected to the Bluetooth ®
2.0 interface.
The voice guide will say “
ted” and then the system will return to the
main menu.
Deleting a device
Use the following procedure to delete a paired Blue-
tooth ®
device from the Bluetooth ®
2.0 interface.
1. Press the SPEECH button.
2. Say “Setup”.
3. Say “Pairing options.”
4. The voice guide will say “Select one of the following: pair, edit, delete, or list.” Say “De-
lete.”
5. After the voice guide says “Please say,” the numbers of the devices and device tags of cor-
responding devices will be read out in order,
starting with the device that has been most re-
cently connected. After it completes reading
all pairs, the voice guide will say “or all.”
Say the number of the device that you want
to delete from the system.
If you want to delete all paired phones from
the system, say “All.” For pleasant driving
5-57 5
OCRE12E1
Presented by http://mmc-manuals.ru/ \251
Page 243 of 369
l
If the name you
selected has matching data
in the mobile phone book but no telephone
number is registered under the selected loca-
tion, the voice guide will say “{home/work/
mobile/other} not found for
you like to try again?”
Answer “Yes,” and the system will return to
Step 3.
Answer “No,” and the call will be cancelled.
Start over again from Step 1.
6. The voice guide will say “Calling
telephone number.
NOTE l When the confirmation function is on, the sys-
tem will ask if the name and location of the
receiver are correct.
If the name is correct, answer “Yes.”
To change the name or location to call, an-
swer “No.” The system will return to Step 3.
Redialing
You can redial the last number called, based on the
history of dialed calls in the paired cellular phone.
Use the following procedure to redial. 1. Press the SPEECH button.
2. Say “Redial.”
SEND function E00761300035
During a call, press the SPEECH button to enter
voice recognition mode, then say
“
SEND” to generate DTMF tones. For example, if during a call you need to simulate
the press of a
phone
button as a response to an auto-
mated system, press the SPEECH button and speak
“1 2 3 4 pound SEND” and the 1234# will be sent
on your cellular phone.
Receiving calls E00761600012
If an incoming phone call is received while the ig-
nition switch is in the “ACC” or “ON” position, the
audio system will be automatically
turned on and
switched to the incoming call, even when the audio
system was originally off.
The voice guide announcement for the incoming
call will be output from the front passenger’s seat
speaker.
If the CD player or radio was playing when the in-
coming call was received, the audio system will
mute the sound from the CD player or radio and out-
put only the incoming call.
To receive the call, press the PICK-UP button on
the steering wheel control switch.
When the call is over, the audio system will return
to its previous state.
MUTE function E00760300041
At any time during a call, you can mute the vehicle
microphone.
Pressing the SPEECH button and
then saying
“Mute” during a call will turn ON the MUTE func-
tion and mute the microphone.
Saying “Mute off” in the same way will turn off
the MUTE function and cancel the mute on the mi-
crophone. Switching between hands-free mode and private
mode
E00761400036
The Bluetooth ®
2.0 interface can
switch between
Hands-free mode (Hands-free calls) and private
mode (calls using cellular phone).
If you press the SPEECH button and say “Transfer
call” during a Hands-free call, you can stop the
Hands-free mode and talk in private mode.
To return to Hands-free mode, press the SPEECH
button again and say “Transfer call”.
Phone book function E00763700017
The Bluetooth ®
2.0 interface has 2
types of unique
phone books that are different from the phone book
stored in the cellular phone. They are the vehicle
phone book and the mobile phone book.
These phone books are used to register telephone
numbers and to make calls to desired numbers via
the voice recognition function.
NOTE
l Disconnecting the battery cable will not de-
lete information registered in the phone book.
Vehicle phone book E00763800177
This phone book is used when making calls with
the voice recognition function.
Up to 32 names can
be registered in the vehicle
phone book per language.
Also, each entry has 4 locations associated with:
home, work, mobile and other. You can register
one telephone number for each location.
You can register a desired name as a name for any
phone book entry registered in the vehicle phone
book. For pleasant driving
5-60
5
OCRE12E1
Presented by http://mmc-manuals.ru/ \251
Page 245 of 369
3. The voice guide will say “Select one of the
following: new entry, edit number, edit
name, list names, delete, erase all, or import
contact.” Say “Import contact.”
4. The voice guide will say “Would you like to import a single entry or all contacts?” Say
“Single entry.”
The Bluetooth ®
2.0 interface will become
ready to receive transferred phone book data.
NOTE l If the maximum number of entries are al-
ready registered, the voice guide will say
“The phone book is full. Would you like to
delete a name?” Say “Yes” if you want to de-
lete a registered name.
Say “No,” to return to the main menu.
5. After the voice guide says “Ready to receive a contact from the phone. Only a home, a
work, and a mobile number can be impor-
ted,” the Bluetooth ®
2.0 interface will re-
ceive the phone book data from the Blue-
tooth ®
compatible cellular phone.
6. Operate the Bluetooth ®
compatible cellular
phone to set it up so that the phone book en-
try you want to register in the vehicle phone
book can be transferred to the Bluetooth ®
2.0
interface. NOTE
l If
the Bluetooth ®
2.0 interface
cannot recog-
nise the Bluetooth ®
compatible cellular
phone or the connection takes too much
time, the voice guide will say “Import con-
tact has timed out” and then the system will
cancel the registration. In such case, start
over again from Step 1.
l Pressing the HANG-UP button or pressing
and holding the SPEECH button will cancel
the registration.
7. When the reception is complete, the voice guide will say “
source> numbers have been imported. What
name would you like to use for these num-
bers?”
Say the name you want to register for this
phone book entry.
NOTE l If the entered name is already used for other
phone book entry or similar to a name used
for other phone book entry, that name cannot
be registered.
8. The voice guide will say “Adding
tem will ask if the name is correct. Answer
“Yes.”
Answer “No,” and the voice guide will say
“Name please.” Register a different name.
9. The voice guide will say “Numbers saved.” 10. The voice guide will say “Would you like to
import another contact?”
Answer “Yes” if you
want to continue with
the registration. You can continue to register
a new phone book entry from Step 5.
Answer “No,” to return to the main menu.
To change the content registered in the vehicle
phone book
You can change or delete a name or telephone num-
ber registered in the vehicle phone book.
You can also listen to the list of names registered
in the vehicle phone book.
NOTE l The system must have at least one entry.
[Editing a telephone number] 1. Press the SPEECH button.
2. Say “Phone book.”
3. The voice guide will say “Select one of thefollowing: new entry, edit number, edit
name, list names, delete, erase all, or import
contact.” Say “Edit number.”
4. The voice guide will say “Please say the name of the entry you would like to edit, or
say list names.” Say the name of the phone
book entry you want to edit.
NOTE l Say “List names,” and the names registered
in the phone book will be read out in order.
Refer to “Listening to the list of registered
names” on page 5-60. For pleasant driving
5-62
5
OCRE12E1
Presented by http://mmc-manuals.ru/ \251