bonnet MITSUBISHI TRITON 2011 Owners Manual
[x] Cancel search | Manufacturer: MITSUBISHI, Model Year: 2011, Model line: TRITON, Model: MITSUBISHI TRITON 2011Pages: 369, PDF Size: 26.15 MB
Page 3 of 369
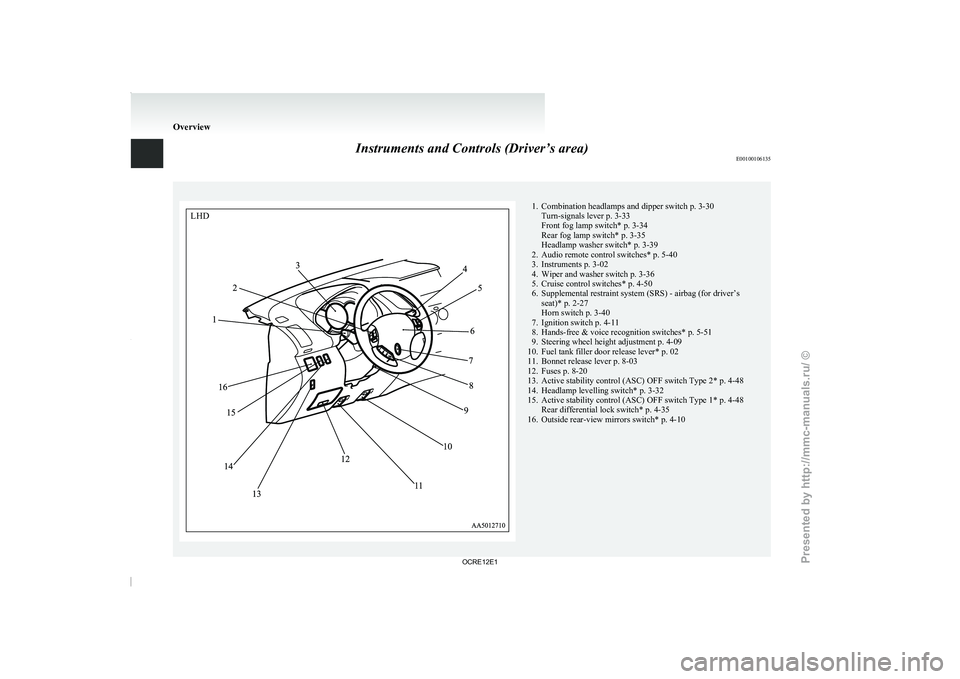
Instruments and Controls (Driver’s area)
E00100106135 1. Combination headlamps and dipper switch p. 3-30
Turn-signals lever p. 3-33
Front fog lamp switch* p. 3-34
Rear fog lamp switch* p. 3-35
Headlamp washer switch* p. 3-39
2. Audio remote control switches* p. 5-40 3. Instruments p. 3-02
4. Wiper and washer switch p. 3-36
5.
Cruise control switches* p. 4-50
6. Supplemental restraint system (SRS) - airbag (for driver’s seat)* p. 2-27
Horn switch p. 3-40
7. Ignition switch p. 4-11
8. Hands-free & voice recognition switches* p. 5-51
9. Steering wheel height adjustment p. 4-09
10. Fuel tank filler door release lever* p. 02
11. Bonnet release lever p. 8-03
12. Fuses p. 8-20
13. Active stability control (ASC) OFF switch Type 2* p. 4-48
14. Headlamp levelling switch* p. 3-32
15. Active stability control (ASC) OFF switch Type 1* p. 4-48 Rear differential lock switch* p. 4-35
16. Outside rear-view mirrors switch* p. 4-10 OverviewLHD
OCRE12E1
Presented by http://mmc-manuals.ru/ \251
Page 4 of 369
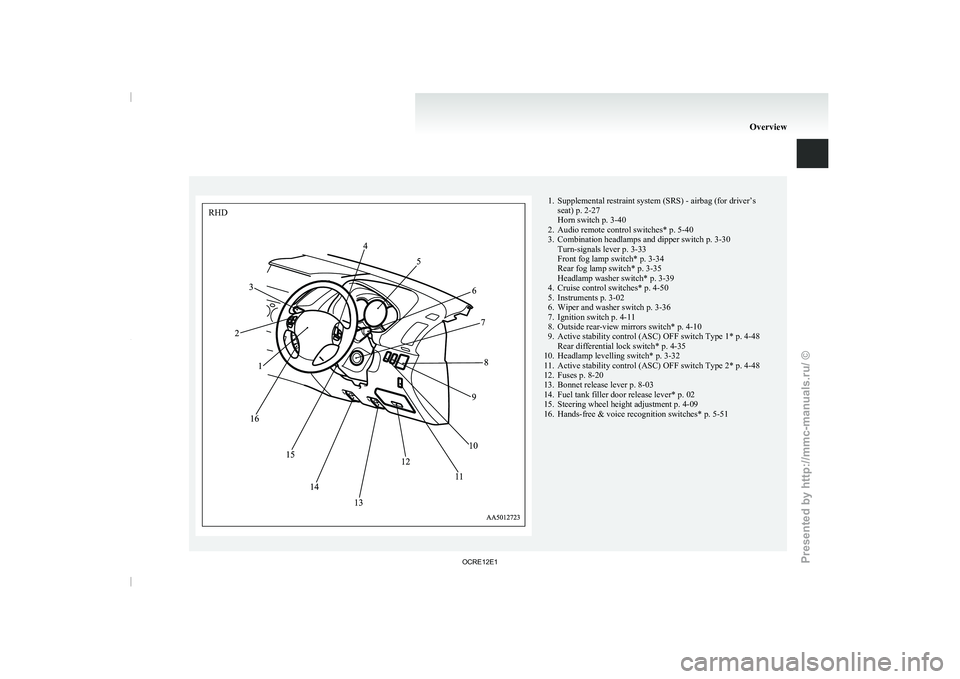
1. Supplemental restraint system (SRS) - airbag (for driver’s
seat) p. 2-27
Horn switch p. 3-40
2. Audio remote control switches* p. 5-40
3. Combination headlamps and dipper switch p. 3-30
Turn-signals lever p. 3-33
Front fog lamp switch* p. 3-34
Rear fog lamp switch* p. 3-35
Headlamp washer switch* p. 3-39
4.
Cruise control switches* p. 4-50
5. Instruments p. 3-02
6. Wiper and washer switch p. 3-36
7. Ignition switch p. 4-11
8. Outside rear-view mirrors switch* p. 4-10
9. Active stability control (ASC) OFF switch Type 1* p. 4-48 Rear differential lock switch* p. 4-35
10. Headlamp levelling switch* p. 3-32
11. Active stability control (ASC) OFF switch Type 2* p. 4-48
12. Fuses p. 8-20
13. Bonnet release lever p. 8-03
14. Fuel tank filler door release lever* p. 02
15. Steering wheel height adjustment p. 4-09
16. Hands-free & voice recognition switches* p. 5-51 OverviewRHD
OCRE12E1
Presented by http://mmc-manuals.ru/ \251
Page 17 of 369
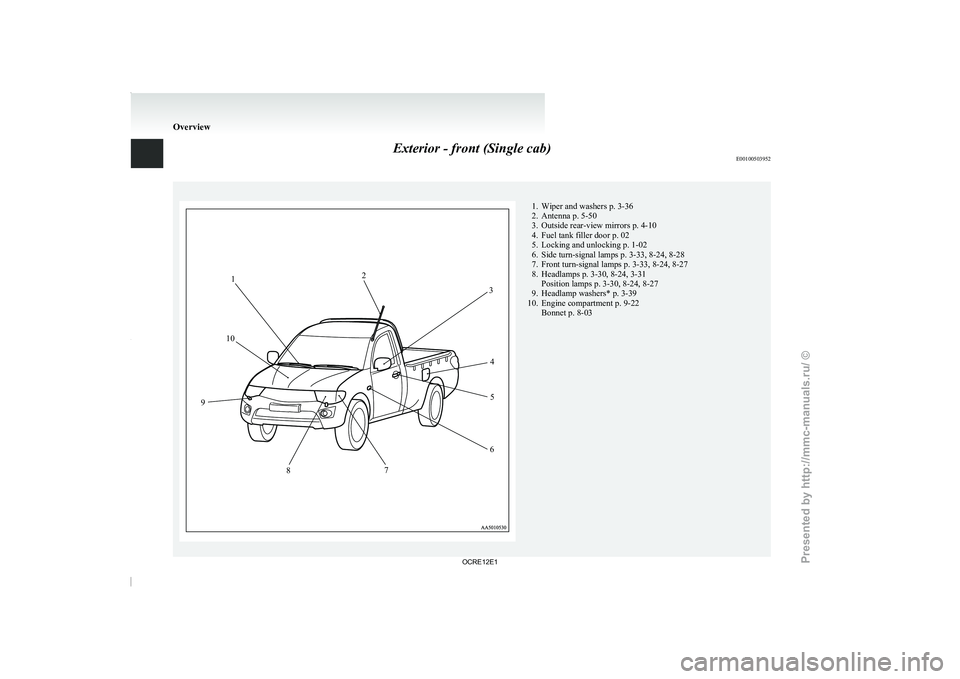
Exterior - front (Single cab)
E00100503952 1. Wiper and washers p. 3-36
2. Antenna p. 5-50
3. Outside rear-view mirrors p. 4-10
4. Fuel tank filler door
p. 02
5.
Locking and unlocking p. 1-02
6. Side turn-signal lamps p. 3-33, 8-24, 8-28
7. Front turn-signal lamps p. 3-33, 8-24, 8-27
8. Headlamps p. 3-30, 8-24, 3-31 Position lamps p. 3-30, 8-24, 8-27
9. Headlamp washers* p. 3-39
10. Engine compartment p. 9-22 Bonnet p. 8-03 Overview1
2
3
45
6
7
8
9
10
OCRE12E1
Presented by http://mmc-manuals.ru/ \251
Page 19 of 369
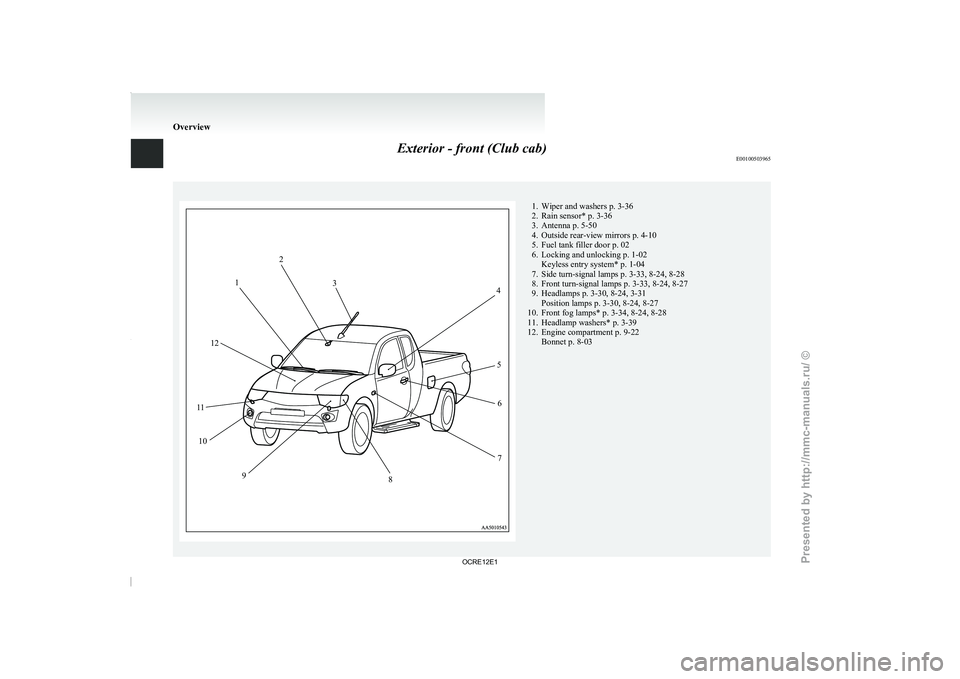
Exterior - front (Club cab)
E00100503965 1. Wiper and washers p. 3-36
2. Rain sensor* p. 3-36
3. Antenna p. 5-50
4. Outside rear-view mirrors p. 4-10
5.
Fuel tank filler door
p. 02
6. Locking and unlocking p. 1-02 Keyless entry system* p. 1-04
7. Side turn-signal lamps p. 3-33, 8-24, 8-28
8. Front turn-signal lamps p. 3-33, 8-24, 8-27
9. Headlamps p. 3-30, 8-24, 3-31 Position lamps p. 3-30, 8-24, 8-27
10. Front fog lamps* p. 3-34, 8-24, 8-28
11. Headlamp washers* p. 3-39
12. Engine compartment p. 9-22 Bonnet p. 8-03 Overview1
2
3 4
5 6
7
8
9
10
1
1 12
OCRE12E1
Presented by http://mmc-manuals.ru/ \251
Page 21 of 369
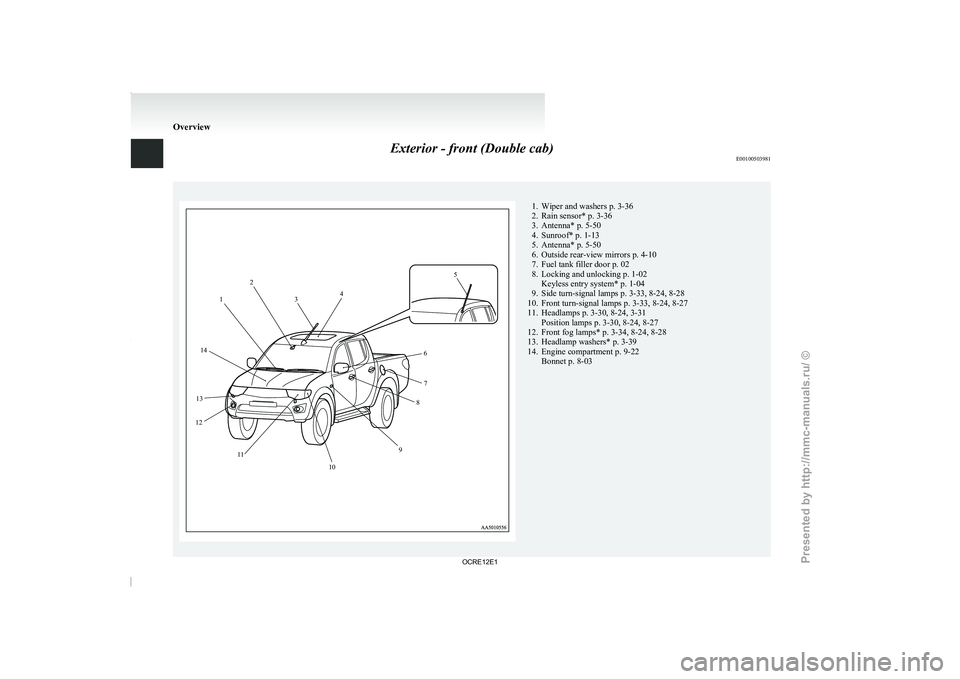
Exterior - front (Double cab)
E00100503981 1. Wiper and washers p. 3-36
2. Rain sensor* p. 3-36
3. Antenna* p. 5-50
4. Sunroof* p. 1-13
5.
Antenna* p. 5-50
6.
Outside rear-view mirrors p. 4-10
7. Fuel tank filler door p. 02
8. Locking and unlocking p. 1-02 Keyless entry system* p. 1-04
9. Side turn-signal lamps p. 3-33, 8-24, 8-28
10. Front turn-signal lamps p. 3-33, 8-24, 8-27
11. Headlamps p. 3-30, 8-24, 3-31 Position lamps p. 3-30, 8-24, 8-27
12. Front fog lamps* p. 3-34, 8-24, 8-28
13. Headlamp washers* p. 3-39
14. Engine compartment p. 9-22 Bonnet p. 8-03 Overview1
2
3 4 5
6 7
8
9
10
1
1
13
14
12
OCRE12E1
Presented by http://mmc-manuals.ru/ \251
Page 269 of 369
CAUTION
l
Do not attempt to start the engine by pull-
ing or pushing the vehicle.
It could damage your vehicle.
l Always wear protective eye goggles when
working near the battery.
l Keep the battery out of the reach of chil-
dren.
NOTE l On
vehicles with anti-lock brake
system, if
the vehicle is put in motion without fully
charging the battery, it might cause the loss
of smooth engine operation and the antilock
brake warning lamp to illuminate.
Refer to “Anti-lock brake system (ABS)” on
page 4-44. Engine overheating
E00800601985
If the water temperature gauge
indication remains
in the overheating zone for a long time, the engine
may be overheating. If this occurs, take the follow-
ing corrective measures: 1. Stop the vehicle in a safe place.
2. Check whether steam is coming from the en-gine compartment.
[If steam does not come from the engine com-
partment]
With the engine still running, raise the bon-
net to ventilate the engine compartment.
[If steam is coming from the engine compart-
ment]
Stop the engine, and when the steam stops,
raise the bonnet to ventilate the engine com-
partment. Restart the engine. WARNING
l Do not open the
bonnet
while steam is com-
ing from the engine compartment. It
could cause steam or hot water to spurt
out, causing burns. Hot water could spurt
out even when there is no steam coming
out, and some parts will be very hot. Be
very careful when opening the bonnet.
l Be careful of hot steam, which could be
blowing off the reserve tank cap.
l Do not attempt to remove the radiator
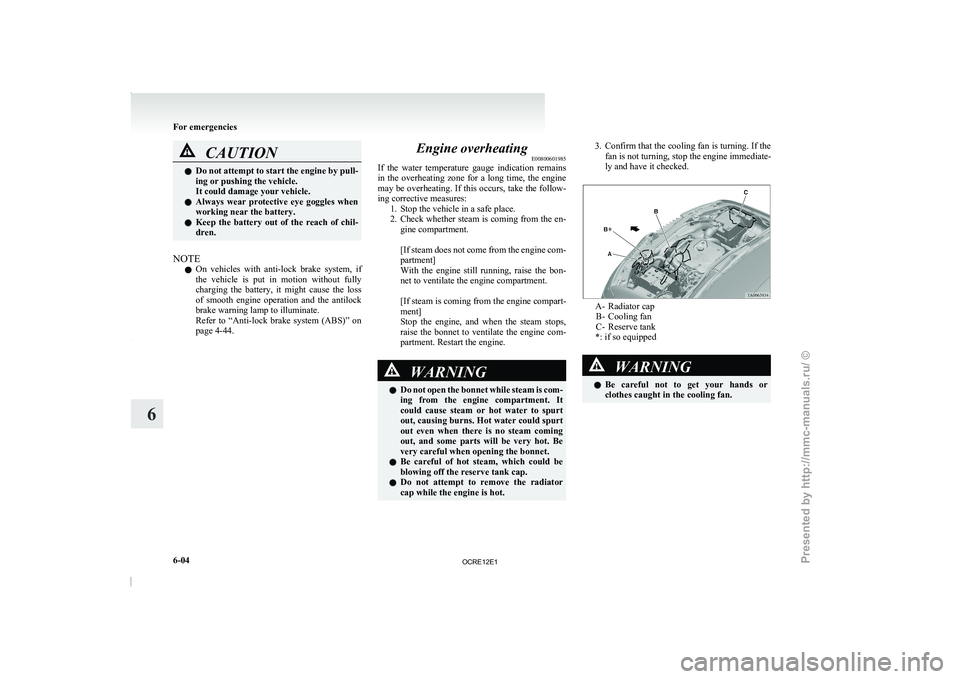
cap while the engine is hot. 3. Confirm that the cooling fan is turning. If the
fan is not turning, stop the engine immediate-
ly and have it checked. A- Radiator cap
B- Cooling fan
C- Reserve tank
*: if so equipped WARNING
l Be careful not to
get your hands or
clothes caught in the cooling fan. For emergencies
6-04
6
OCRE12E1
Presented by http://mmc-manuals.ru/ \251
Page 294 of 369
NOTE
l If
genuine leather is wet
with water or is wash-
ed in water, wipe off water as quickly as pos-
sible with a dry, soft cloth. If left damp, mil-
dew may grow.
l The genuine leather surface may be damaged
if a nylon brush or synthetic fibre is rubbed
hard against it.
l Organic solvents such as benzine, kerosene,
alcohol and petrol, acid or alkaline solvents
may discolour the genuine leather surface.
Be sure to use neutral detergents.
l Remove dirty patches or oil substances quick-
ly as they can stain genuine leather.
l The genuine leather surface may harden and
shrink if it is exposed to direct sun for long
hours. When your vehicle is parked, place it
in the shade as much as possible.
l When the temperature of the vehicle interior
rises in summer, vinyl products left on the
genuine leather seat may deteriorate and
stick to the seat. Cleaning the exterior of your
vehicle E00900700010
If the following is
left
on your vehicle, it may
cause corrosion, discolouration and stains, wash
the vehicle as soon as possible.
l Seawater, anti-freeze for road use.
l Soot and dust, iron powder from factories,
chemical substance (acids, alkalis, coal-tar,
etc.).
l Droppings from birds, carcasses of insects,
tree sap, etc.
Washing E00900902016
Chemicals contained in the dirt and dust picked up
from the road surface can
damage the paint coat
and body of your vehicle if left in prolonged contact.
Frequent washing and waxing is the best way to pro-
tect your vehicle from this damage. This will also
be effective in protecting it from environmental el-
ements such as rain, snow, salt air, etc.
Do not wash the vehicle in direct sunlight. Park the
vehicle in the shade and spray it with water to re-
move dust. Next, using an ample amount of clean
water and a car washing brush or sponge, wash the
vehicle from top to bottom.
Use a mild car washing soap if necessary. Rinse
thoroughly and wipe dry with a soft cloth. After
washing the vehicle, carefully clean the joints and
flanges of the doors, bonnet, etc., where dirt is like-
ly to remain. CAUTION
l
When washing the under side
of your ve-
hicle or wheel, be careful not to injure
your hands.
l Refrain from using a car wash as its brush-
es may scratch the paint surface, causing
it to lose its gloss.
Scratches will be especially visible on
darker coloured vehicles.
l Never spray or splash water on the electri-
cal components in the engine compart-
ment, as this may adversely affect engine
starting.
Exercise caution also when washing the
underbody; be careful not to spray water
into the engine compartment.
l Some types of hot water washing equip-
ment apply high pressure and heat to the
vehicle. They may cause heat distortion
and damage to the vehicle resin parts and
may result in flooding of the vehicle inte-
rior. Therefore; observe the following.
• Maintain a distance of approx. 50 cmor more between the vehicle body and
the washing nozzle.
• When washing around the door glass, hold the nozzle at a distance of more
than 50 cm and at right angles to the
glass surface. Vehicle care
7-03 7
OCRE12E1
Presented by http://mmc-manuals.ru/ \251
Page 295 of 369
CAUTION
l
After washing the vehicle, drive the vehi-
cle slowly while lightly depressing the
brake pedal several times in order to dry
out the brakes.
Leaving the brakes wet could result in re-
duced braking performance. Also, there
is a possibility that they could freeze up
or become inoperative due to rust, render-
ing the vehicle unable to move.
l When using an automatic car wash, pay
attention to the following items, referring
to the operation manual or consulting a
car wash operator. If the following proce-
dure is not followed, it could result in dam-
age to your vehicle.
• The outside mirrors are retracted.
• If your vehicle is equipped with the pil-lar antenna, it can be retracted.
• If your vehicle is equipped with the roof antenna, it can be removed.
During cold weather
Salt and other chemicals spread
on the roads in
some areas in winter can have a harmful effect on
the vehicle body. You should therefore wash the ve-
hicle as often as possible in accordance with our
care-instructions. It is recommended to have a pres-
ervative applied and the underfloor protection
checked before and after the cold weather season.
After washing your vehicle, wipe off all water-
drops from the rubber parts around the doors to pre-
vent the doors from freezing. NOTE
l To
prevent freezing
of the
weatherstripping
on the doors, bonnet, etc., they should be trea-
ted with silicone spray.
Waxing E00901000687
Waxing the vehicle will help prevent the adherence
of dust and road chemicals
to the paintwork. Apply
a wax solution after washing the vehicle, or at least
once every three months to assist displacing of water.
Do not wax your vehicle in direct sunlight. You
should wax after the surfaces have cooled. CAUTION
l
Waxes containing high abrasive
com-
pounds
should not be used. Such waxes re-
move rust and stains effectively from the
paintwork but they are harmful to the lus-
tre on the painted surface and the plated
surface.
Further, they are harmful to glossy surfa-
ces such as grille, garnish, mouldings, etc.
l Do not use petrol or paint thinners to re-
move road tar or other contamination to
the vehicle surface.
l Do not apply wax on the areas having
black mat coating as it can cause uneven
discolouration, patches, blurs, etc. If
stained with wax, immediately wipe off
with a piece of soft cloth and warm water. CAUTION
l
On vehicles with a sunroof,
be careful
when waxing the area around the sunroof
opening, not to put any wax on the weath-
erstrip (black rubber). If stained with
wax, the weatherstrip cannot maintain a
weatherproof seal with the sunroof.
Polishing E00901100011
The vehicle should only be polished if the paint-
work has become stained or lost its lustre. Matt-fin-
ish parts and
plastic bumpers
must not be polished,
polishing these parts will stain them or damage
their finish.
Damaged paint E00901200155
Small cracks and scratches in the paint coat should
be touched up as soon
as possible with
MITSUBISHI touch-up paint to prevent corrosion.
Check body areas facing the road or the tyres care-
fully for damage to the paint coat caused by flying
stones, etc. The paint code number for your vehicle
can be found on the vehicle information code plate.
(Refer to “Vehicle labeling” on page 9-02.)
Cleaning plastic parts E00901300446
Use a sponge or chamois leather.
If a car wax adheres
on a grey or black rough sur-
face of the bumper, moulding or lamps, the surface
becomes white. In such a case, wipe it off using
lukewarm water and soft cloth or chamois leather. Vehicle care
7-04
7
OCRE12E1
Presented by http://mmc-manuals.ru/ \251
Page 298 of 369
Service precautions
....................................................................... 8-02
Catalytic converter ........................................................................ 8-02
Bonnet...........................................................................................8-03
Engine oil ......................................................................................8-04
Engine coolant .............................................................................. 8-06
Automatic transmission fluid*......................................................8-07 Washer fluid ................................................................................. 8-08
Brake fluid .................................................................................... 8-08
Clutch fluid* ................................................................................. 8-09
Power steering fluid ...................................................................... 8-09
Battery .......................................................................................... 8-10
Tyres............................................................................................. 8-11
Clutch pedal free play* ................................................................. 8-15
Brake pedal free play .................................................................... 8-16
Parking brake lever stroke ............................................................ 8-16
Wiper blades ................................................................................. 8-17
General maintenance .................................................................... 8-18
For cold and snowy weather ......................................................... 8-19
Fusible links
.................................................................................. 8-19
Fuses............................................................................................. 8-20
Replacement of lamp bulbs .......................................................... 8-23Maintenance
8
OCRE12E1
Presented by http://mmc-manuals.ru/ \251
Page 300 of 369
The catalytic converter itself gets hot quickly, and
may be damaged if overheated.
The following
points should be noted in order to prevent the igni-
tion of unburned fuel within the catalytic converter.
l Do not drive with an extremely low fuel lev-
el; running out of fuel could cause damage to
the catalytic converter.
l Do not switch OFF the ignition switch while
driving.
l Do not attempt to start the engine by pushing
the vehicle. If the battery is weak or dis-
charged, use another battery to start the en-
gine.
l Do not idle the engine for prolonged periods
during very rough idle or malfunctioning op-
erating conditions.
l Do not race the engine when turning off the
ignition switch. This will cause the catalytic
converter to be damaged due to contact with
unburnt fuel.
l Stop driving the vehicle if you think the per-
formance is noticeably low, or if the engine
has a malfunction such as with the ignition,
etc.
If it is impractical to stop driving immediate-
ly, reduce the speed and drive for only a
short time. We recommend you to have your
vehicle inspected as soon as possible.
l In unusual situations involving major engine
problems, a burnt smell may indicate severe
and abnormal catalyst overheating.
If this occurs, the vehicle should be stopped
in a safe place, the engine switched off and
the vehicle allowed to cool. Once the engine
is cool, a service, including a tune-up to man-
ufacturer’s specifications, should be obtained
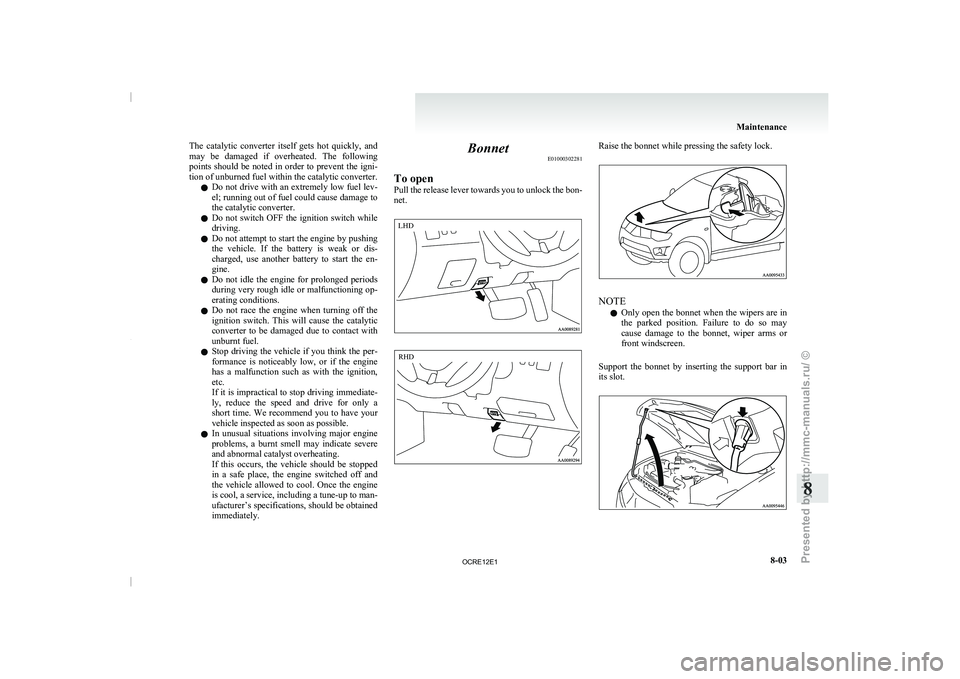
immediately. Bonnet
E01000302281
To open
Pull the release lever towards
you to unlock the bon-
net. Raise the bonnet while pressing the safety lock.
NOTE
l Only
open the bonnet when
the wipers are in
the parked position. Failure to do so may
cause damage to the bonnet, wiper arms or
front windscreen.
Support the bonnet by inserting the support bar in
its slot. Maintenance
8-03 8LHD RHD
OCRE12E1
Presented by http://mmc-manuals.ru/ \251