ECU NISSAN 350Z 2003 Z33 Owners Manual
[x] Cancel search | Manufacturer: NISSAN, Model Year: 2003, Model line: 350Z, Model: NISSAN 350Z 2003 Z33Pages: 227, PDF Size: 2.39 MB
Page 8 of 227
FRONT MANUAL SEAT
ADJUSTMENT
WARNING
IDo not adjust the driver's seat while
driving so full attention may be given
to vehicle operation. The seat may
move suddenly and could cause loss
of control of the vehicle.
IAfter adjustment, gently rock in the
seat to make sure it is securely
locked.
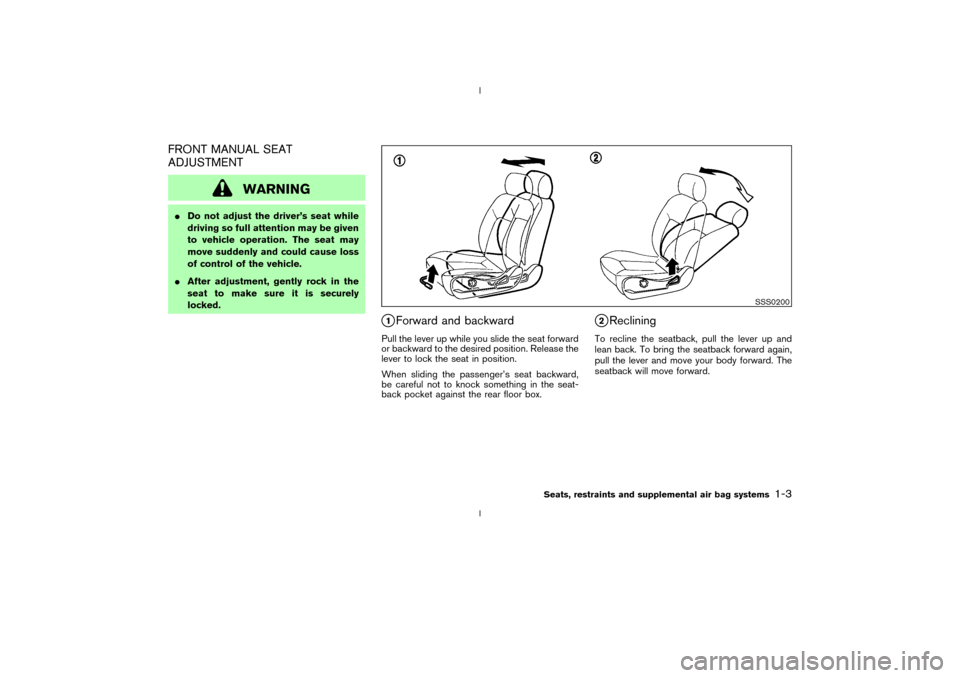
q1Forward and backward
Pull the lever up while you slide the seat forward
or backward to the desired position. Release the
lever to lock the seat in position.
When sliding the passenger's seat backward,
be careful not to knock something in the seat-
back pocket against the rear floor box.
q2Reclining
To recline the seatback, pull the lever up and
lean back. To bring the seatback forward again,
pull the lever and move your body forward. The
seatback will move forward.
SSS0200
Seats, restraints and supplemental air bag systems
1-3
Z
02.9.13/Z33-D/V5.0
X
Page 28 of 227
ceive neck or other serious injuries.
You could also slide under the lap
belt and receive serious internal inju-
ries.
IFor most effective protection when
the vehicle is in motion, the seat
should be upright. Always sit well
back in the seat and adjust the seat
belt properly.
Fastening the seat belts1. Adjust the seat.
2. Slowly pull the seat belt out of the retractor
and insert the tongue into the buckle until it
clicks.
The retractor is designed to lock during a
sudden stop or on impact. A slow pulling
motion will permit the belt to move, and
allow you some freedom of movement in
the seat.
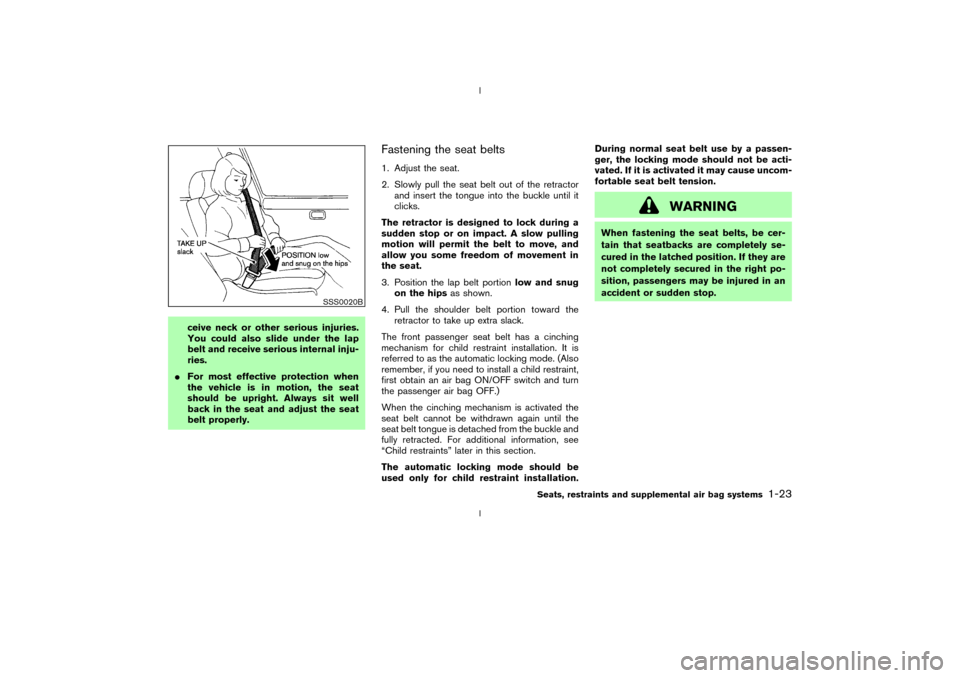
3. Position the lap belt portionlow and snug
on the hipsas shown.
4. Pull the shoulder belt portion toward the
retractor to take up extra slack.
The front passenger seat belt has a cinching
mechanism for child restraint installation. It is
referred to as the automatic locking mode. (Also
remember, if you need to install a child restraint,
first obtain an air bag ON/OFF switch and turn
the passenger air bag OFF.)
When the cinching mechanism is activated the
seat belt cannot be withdrawn again until the
seat belt tongue is detached from the buckle and
fully retracted. For additional information, see
ªChild restraintsº later in this section.
The automatic locking mode should be
used only for child restraint installation.During normal seat belt use by a passen-
ger, the locking mode should not be acti-
vated. If it is activated it may cause uncom-
fortable seat belt tension.
WARNING
When fastening the seat belts, be cer-
tain that seatbacks are completely se-
cured in the latched position. If they are
not completely secured in the right po-
sition, passengers may be injured in an
accident or sudden stop.
SSS0020B
Seats, restraints and supplemental air bag systems
1-23
Z
02.9.13/Z33-D/V5.0
X
Page 30 of 227

WARNING
IOnly NISSAN seat belt extenders,
made by the same company which
made the original equipment belts,
should be used with NISSAN seat
belts.
IPersons who can use the standard
seat belt should not use an extender.
Such unnecessary use could result in
serious personal injury in the event
of an accident.
INever use seat belt extenders to in-
stall child restraints. If the child re-
straint is not secured properly, the
child could be seriously injured in a
collision or a sudden stop. (Also re-
member never to use a child restraint
unless an air bag ON/OFF switch has
been installed and is being used
properly.)SEAT BELT MAINTENANCEITo clean the seat belt webbings,apply a
mild soap solution or any solution recom-mended for cleaning upholstery or carpets.
Then brush the webbing, wipe it with a cloth
and allow it to dry in the shade. Do not allow
the seat belts to retract until they are com-
pletely dry.
IIf dirt builds up in the shoulder belt guide of
the seat belt anchors, the seat belts may
retract slowly. Wipe the shoulder belt guide
with a clean, dry cloth.
IPeriodically check to see that the seat
belt and the metal componentssuch as
buckles, tongues, retractors, flexible wires
and anchors work properly. If loose parts,
deterioration, cuts or other damage on the
webbing is found, the entire belt assembly
should be replaced.
PRECAUTIONS ON CHILD
RESTRAINTS
WARNING
The information in this section is pro-
vided only for those owners who have
received permission to install an air bag
ON/OFF switch and the switch has been
installed. See ªObtaining an air bag
ON/OFF switchº earlier in this manual.
Never let children 12 or under ride in this
vehicle unless an air bag ON/OFF
switch is installed and it is being prop-
erly used.
WARNING
IInfants and small children should al-
ways be placed in an appropriate
child restraint while riding in the ve-
hicle. Failure to use a child restraint
can result in serious injury or death.
IInfants and small children should
never be carried on your lap. It is notCHILD RESTRAINTS
Seats, restraints and supplemental air bag systems
1-25
Z
02.9.13/Z33-D/V5.0
X
Page 31 of 227
possible for even the strongest adult
to resist the forces of a severe acci-
dent. The child could be crushed be-
tween the adult and parts of the ve-
hicle. Also, do not put the same seat
belt around both your child and your-
self.
INever install a child restraint in the
front seat unless an air bag ON/OFF
switch has been installed and the air
bag has been turned OFF. An inflat-
ing supplemental air bag could seri-
ously injure or kill your child.
IAn improperly installed child re-
straint could lead to serious injury or
death in an accident.
In general, child restraints are designed to be
installed with the lap portion of a three-point type
seat belt.
The proper restraint depends on the child's size.
Generally, infants (up to about 1 year and less
than 20 lb (9 kg) should be placed in rear facing
child restraints. Front facing child restraints are
available for children who outgrow rear facing
child restraints.Child restraints for infants and children of various
sizes are offered by several manufacturers.
When selecting any child restraint, keep the
following points in mind:
Ichoose only a restraint with a label certifying
that it complies with Federal Motor Vehicle
Safety Standard 213 or Canadian Motor
Vehicle Safety Standard 213.
Icheck the child restraint in your vehicle to be
sure it is compatible with the vehicle's seat
and seat belt system.
Iif the child restraint is compatible with your
vehicle, place your child in the child restraint
and check the various adjustments to be sure
the child restraint is compatible with your
child. Always follow all recommended proce-
dures.
All US states and Canadian provinces re-
quire that infants and small children be
restrained in approved child restraints at
all times while the vehicle is being oper-
ated.
WARNING
IImproper use of a child restraint can
result in increased injuries for boththe infant or child and other occu-
pants in the vehicle.
IFollow all of the child restraint manu-
facturer's instructions for installation
and use. When purchasing a child
restraint, be sure to select one which
will fit your child and vehicle. It may
not be possible to properly install
some types of child restraints in your
vehicle.
IIf the child restraint is not anchored
properly, the risk of a child being
injured in a collision or a sudden stop
greatly increases.
IAdjustable seatbacks should be po-
sitioned to fit the child restraint, but
as upright as possible.
IAfter attaching the child restraint,
test it before you place the child in it.
Tilt it from side to side. Try to tug it
forward and check to see if the belt
holds the restraint in place. If the
restraint is not secure, tighten the
belt as necessary, or put the restraint
in another seat and test it again.
1-26
Seats, restraints and supplemental air bag systems
Z
02.9.13/Z33-D/V5.0
X
Page 32 of 227
IFor a front facing child restraint,
check to make sure the shoulder belt
does not go in front of the child's face
or neck. If it does, put the shoulder
belt behind the child restraint. If you
must install a front facing child re-
straint in the front seat, see instruc-
tions later in this section.
IWhen your child restraint is not in
use, keep it secured with a seat belt
to prevent it from being thrown
around in case of a sudden stop or
accident.
CAUTION
Remember that a child restraint left in a
closed vehicle can become very hot.
Check the seating surface and buckles
before placing your child in the child
restraint.
TOP TETHER STRAP CHILD
RESTRAINTAn anchor for a child restraint with a top tether is
provided in this vehicle.However, a child
restraint of this type should not be used in
this vehicle unless an air bag ON/OFF
switch has been installed and is being
properly used.See ªObtaining an air bag
ON/OFF switchº earlier in this manual.
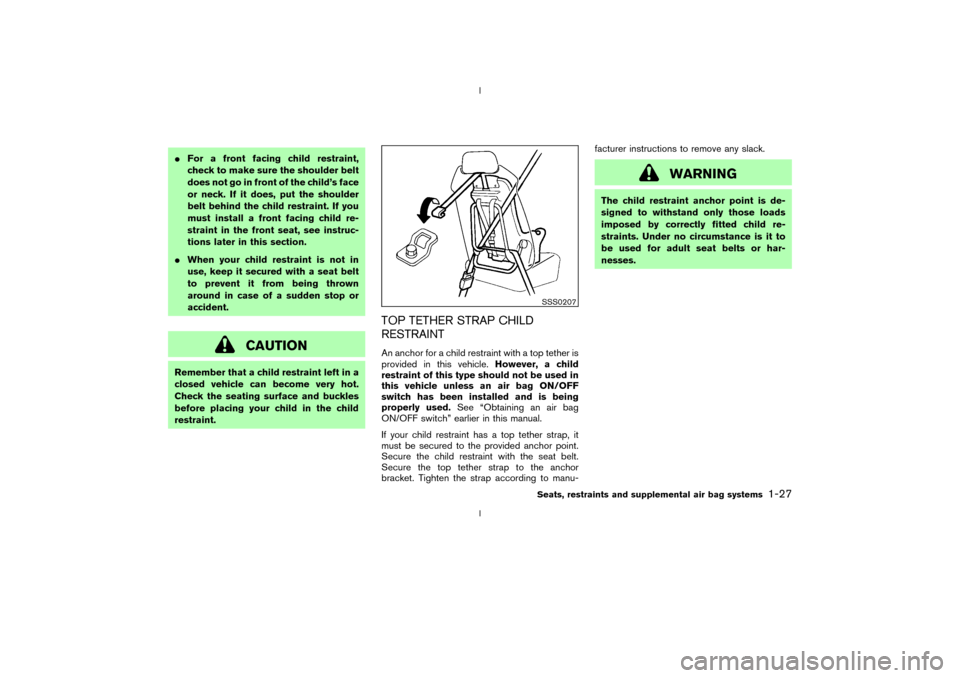
If your child restraint has a top tether strap, it
must be secured to the provided anchor point.
Secure the child restraint with the seat belt.
Secure the top tether strap to the anchor
bracket. Tighten the strap according to manu-facturer instructions to remove any slack.
WARNING
The child restraint anchor point is de-
signed to withstand only those loads
imposed by correctly fitted child re-
straints. Under no circumstance is it to
be used for adult seat belts or har-
nesses.
SSS0207Seats, restraints and supplemental air bag systems
1-27
Z
02.9.13/Z33-D/V5.0
X
Page 33 of 227
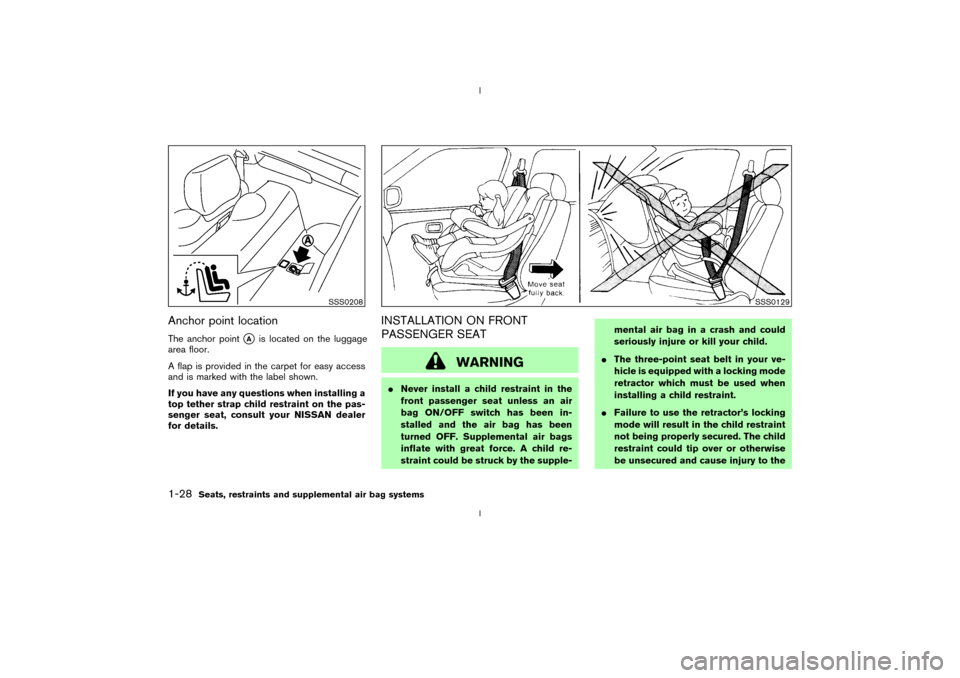
Anchor point locationThe anchor point
qA
is located on the luggage
area floor.
A flap is provided in the carpet for easy access
and is marked with the label shown.
If you have any questions when installing a
top tether strap child restraint on the pas-
senger seat, consult your NISSAN dealer
for details.
INSTALLATION ON FRONT
PASSENGER SEAT
WARNING
INever install a child restraint in the
front passenger seat unless an air
bag ON/OFF switch has been in-
stalled and the air bag has been
turned OFF. Supplemental air bags
inflate with great force. A child re-
straint could be struck by the supple-mental air bag in a crash and could
seriously injure or kill your child.
IThe three-point seat belt in your ve-
hicle is equipped with a locking mode
retractor which must be used when
installing a child restraint.
IFailure to use the retractor's locking
mode will result in the child restraint
not being properly secured. The child
restraint could tip over or otherwise
be unsecured and cause injury to the
SSS0208
SSS0129
1-28
Seats, restraints and supplemental air bag systems
Z
02.9.13/Z33-D/V5.0
X
Page 35 of 227
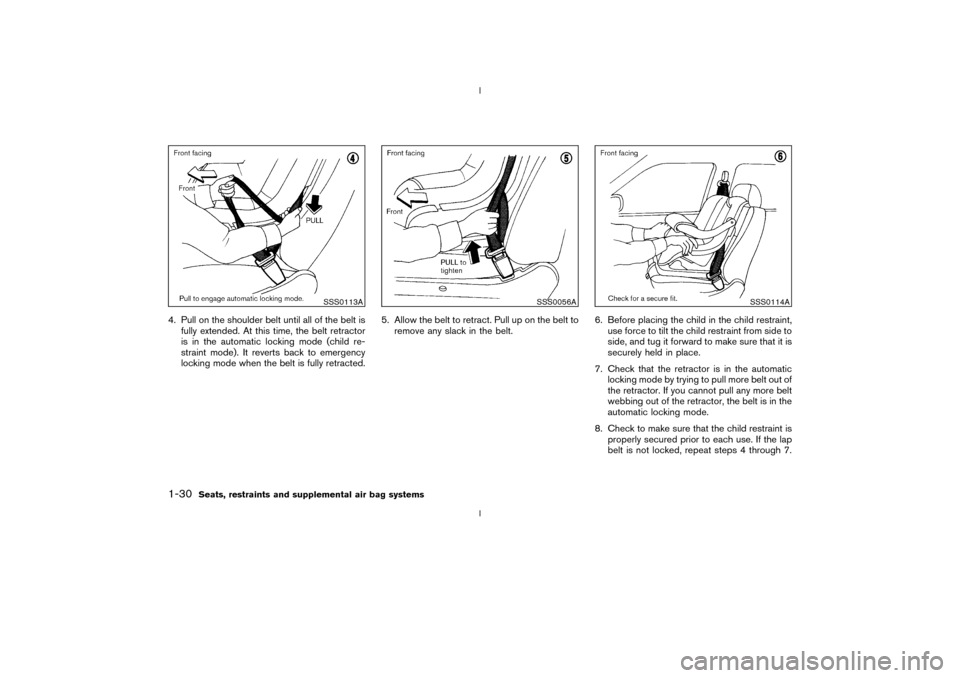
4. Pull on the shoulder belt until all of the belt is
fully extended. At this time, the belt retractor
is in the automatic locking mode (child re-
straint mode). It reverts back to emergency
locking mode when the belt is fully retracted.5. Allow the belt to retract. Pull up on the belt to
remove any slack in the belt.6. Before placing the child in the child restraint,
use force to tilt the child restraint from side to
side, and tug it forward to make sure that it is
securely held in place.
7. Check that the retractor is in the automatic
locking mode by trying to pull more belt out of
the retractor. If you cannot pull any more belt
webbing out of the retractor, the belt is in the
automatic locking mode.
8. Check to make sure that the child restraint is
properly secured prior to each use. If the lap
belt is not locked, repeat steps 4 through 7.
SSS0113A
SSS0056A
SSS0114A
1-30
Seats, restraints and supplemental air bag systems
Z
02.9.13/Z33-D/V5.0
X
Page 37 of 227
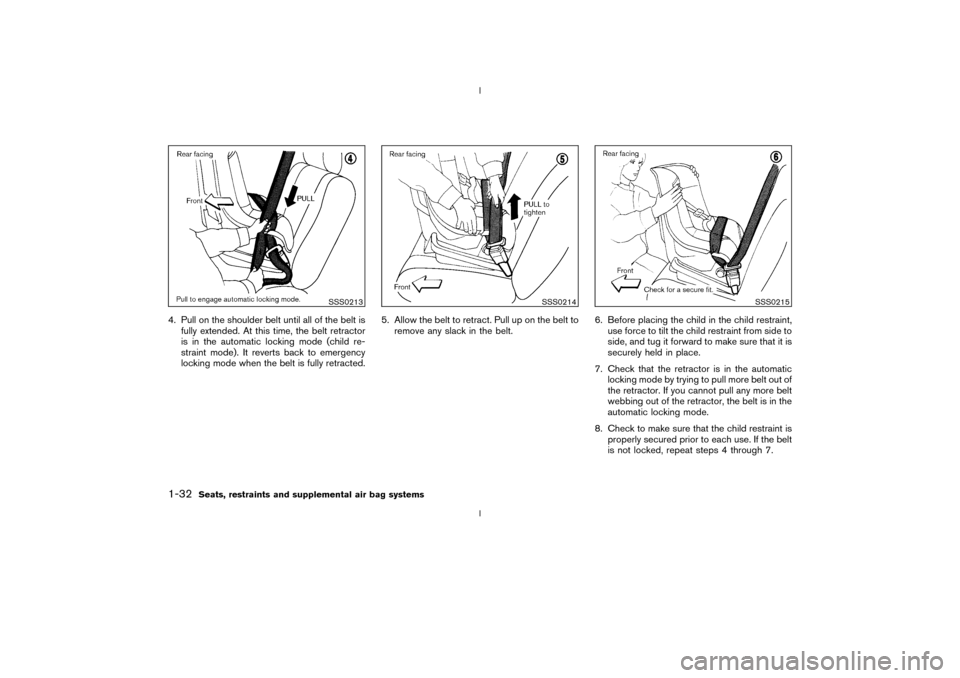
4. Pull on the shoulder belt until all of the belt is
fully extended. At this time, the belt retractor
is in the automatic locking mode (child re-
straint mode). It reverts back to emergency
locking mode when the belt is fully retracted.5. Allow the belt to retract. Pull up on the belt to
remove any slack in the belt.6. Before placing the child in the child restraint,
use force to tilt the child restraint from side to
side, and tug it forward to make sure that it is
securely held in place.
7. Check that the retractor is in the automatic
locking mode by trying to pull more belt out of
the retractor. If you cannot pull any more belt
webbing out of the retractor, the belt is in the
automatic locking mode.
8. Check to make sure that the child restraint is
properly secured prior to each use. If the belt
is not locked, repeat steps 4 through 7.
SSS0213
SSS0214
SSS0215
1-32
Seats, restraints and supplemental air bag systems
Z
02.9.13/Z33-D/V5.0
X
Page 39 of 227

2 Instruments and controlsInstrument panel ..................................................................... 2-2
Meters and gauges ............................................................... 2-3
Speedometer and odometer ......................................... 2-4
Tachometer ........................................................................ 2-5
Engine coolant temperature gauge ............................. 2-5
Fuel gauge ......................................................................... 2-6
Engine oil pressure gauge ............................................. 2-6
Volt meter ......................................................................... 2-7
Trip computer .................................................................. 2-8
Warning/indicator lights and audible reminders ......... 2-11
Checking bulbs .............................................................. 2-11
Warning lights ................................................................ 2-11
Indicator lights ................................................................ 2-14
Audible reminders.......................................................... 2-16
Security systems.................................................................. 2-16
Vehicle security system................................................ 2-17
Nissan Vehicle Immobilizer System (NVIS) ............ 2-18
Windshield wiper and washer switch ............................ 2-19
Rear window wiper and washer switch ........................ 2-20
Rear window and outside mirror (if so equipped)
defroster switch ................................................................... 2-21
Headlight and turn signal switch..................................... 2-21
Xenon headlights (if so equipped) ............................ 2-21
Headlight switch ............................................................ 2-22Turn signal switch ......................................................... 2-23
Instrument brightness control ..................................... 2-23
Daytime running light system (Canada only) .......... 2-23
Hazard warning flasher switch ......................................... 2-24
Horn ........................................................................................ 2-24
Heated seats (if so equipped) ......................................... 2-25
Vehicle dynamic control (VDC) off switch
(if so equipped).................................................................... 2-26
Traction control system (TCS) off switch
(if so equipped).................................................................... 2-26
Clock ...................................................................................... 2-27
Adjusting the time ......................................................... 2-27
Power outlet.......................................................................... 2-27
Cigarette lighter and ashtray (accessory) .................... 2-28
Storage ................................................................................. 2-29
Instrument pocket (Except for Navigation system
equipped models) ........................................................ 2-29
Sunglasses holder ......................................................... 2-29
Tray.................................................................................... 2-30
Cup holders .................................................................... 2-30
Console box .................................................................... 2-31
Rear floor box ................................................................. 2-32
Rear parcel box .............................................................. 2-32
Windows................................................................................ 2-33
Z
02.9.13/Z33-D/V5.0
X
Page 51 of 227
Automatic transmission check
warning light (A/T models)
When the ignition switch is turned ON, the light
comes on for 2 seconds. If the light blinks for
approximately 8 seconds, it may indicate the
automatic transmission system is not functioning
properly. Have your NISSAN dealer check and
repair the transmission.
or
Brake warning light
This light functions for both the parking brake
and the foot brake systems.
Parking brake indicator:
When the ignition key is in the ON position, the
light comes on when the parking brake is ap-
plied.
Low brake fluid warning light:
The light warns of a low brake fluid level. If the
light comes on while the engine is running with
the parking brake not applied, stop the vehicle
and perform the following:
1. Check the brake fluid level. Add brake fluid as
necessary. See ªBrake and clutch fluidº in the
ª8. Maintenance and do-it-yourselfº section.
WARNING
IYour brake system may not be work-
ing properly if the warning light is on.
Driving could be dangerous. If you
judge it to be safe, drive carefully to
the nearest service station for re-
pairs. Otherwise, have your vehicle
towed because driving it could be
dangerous.
IPressing the brake pedal with the
engine stopped and/or low brake
fluid level may increase your stop-
ping distance and braking will re-
quire greater pedal effort as well as
greater pedal travel.
IIf the brake fluid level is below the
MIN mark on the brake fluid reser-
voir, do not drive until the brake sys-
tem has been checked at a NISSAN
dealer.
2. If the brake fluid level is correct, have the
warning system checked by a NISSAN
dealer. Avoid high speed driving and abrupt
braking.
If both the brake warning light and the anti-lock brake warning light come on simulta-
neously, it may indicate the anti-lock brake
system is not functioning properly. See ªAnti-
lock brake warning lightº earlier in this sec-
tion.
Charge warning light
If the light comes on while the engine is running,
it may indicate that the charging system is not
functioning properly. Turn the engine off and
check the alternator belt. If the belt is loose,
broken, missing or if the light remains on, see
your NISSAN dealer immediately.
CAUTION
Do not continue driving if the belt is
loose, broken or missing.
Door open warning light
This light comes on when any of the doors
and/or rear hatch are not closed securely while
the ignition key is ON.
Engine oil pressure warning
light
This light warns of low engine oil pressure. If the
light flickers or comes on during normal driving,
pull off the road in a safe area, stop the engine
2-12
Instruments and controls
Z
02.9.13/Z33-D/V5.0
X