child lock NISSAN 350Z 2003 Z33 Owners Manual
[x] Cancel search | Manufacturer: NISSAN, Model Year: 2003, Model line: 350Z, Model: NISSAN 350Z 2003 Z33Pages: 227, PDF Size: 2.39 MB
Page 28 of 227
ceive neck or other serious injuries.
You could also slide under the lap
belt and receive serious internal inju-
ries.
IFor most effective protection when
the vehicle is in motion, the seat
should be upright. Always sit well
back in the seat and adjust the seat
belt properly.
Fastening the seat belts1. Adjust the seat.
2. Slowly pull the seat belt out of the retractor
and insert the tongue into the buckle until it
clicks.
The retractor is designed to lock during a
sudden stop or on impact. A slow pulling
motion will permit the belt to move, and
allow you some freedom of movement in
the seat.
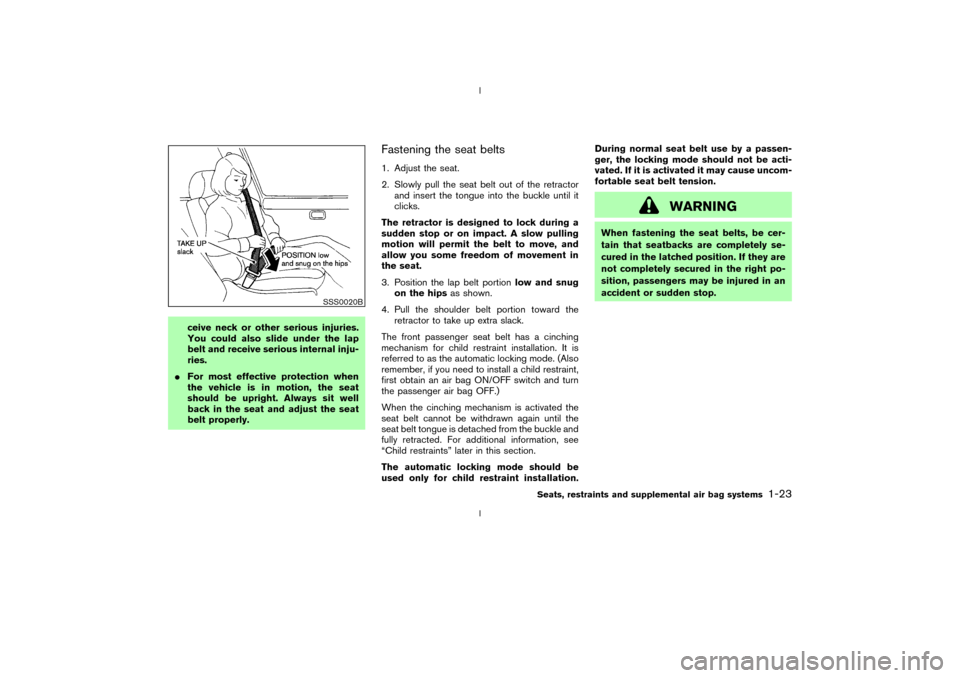
3. Position the lap belt portionlow and snug
on the hipsas shown.
4. Pull the shoulder belt portion toward the
retractor to take up extra slack.
The front passenger seat belt has a cinching
mechanism for child restraint installation. It is
referred to as the automatic locking mode. (Also
remember, if you need to install a child restraint,
first obtain an air bag ON/OFF switch and turn
the passenger air bag OFF.)
When the cinching mechanism is activated the
seat belt cannot be withdrawn again until the
seat belt tongue is detached from the buckle and
fully retracted. For additional information, see
ªChild restraintsº later in this section.
The automatic locking mode should be
used only for child restraint installation.During normal seat belt use by a passen-
ger, the locking mode should not be acti-
vated. If it is activated it may cause uncom-
fortable seat belt tension.
WARNING
When fastening the seat belts, be cer-
tain that seatbacks are completely se-
cured in the latched position. If they are
not completely secured in the right po-
sition, passengers may be injured in an
accident or sudden stop.
SSS0020B
Seats, restraints and supplemental air bag systems
1-23
Z
02.9.13/Z33-D/V5.0
X
Page 33 of 227
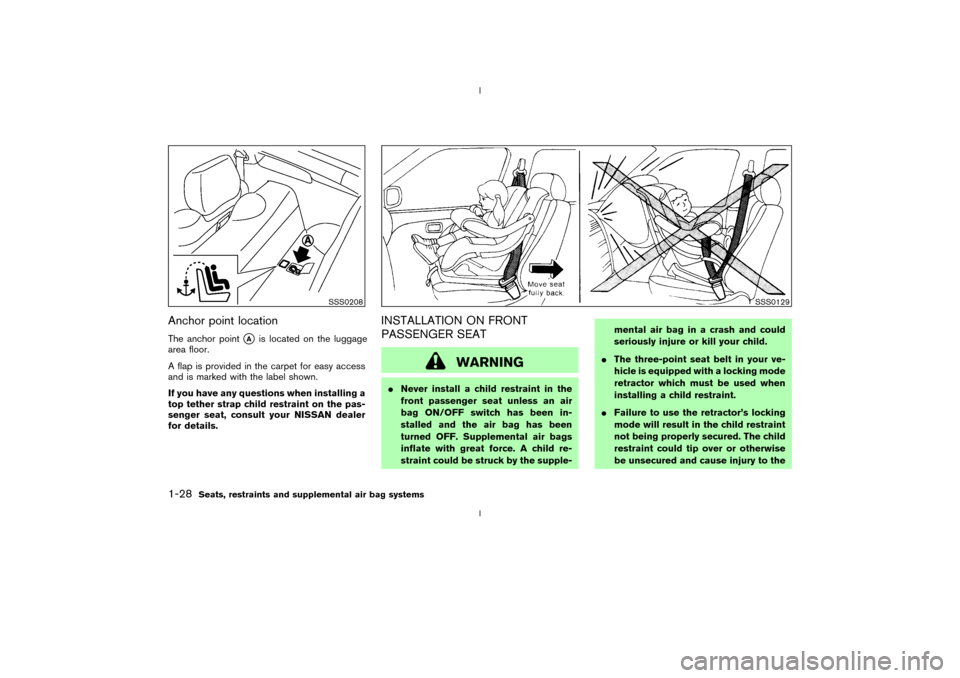
Anchor point locationThe anchor point
qA
is located on the luggage
area floor.
A flap is provided in the carpet for easy access
and is marked with the label shown.
If you have any questions when installing a
top tether strap child restraint on the pas-
senger seat, consult your NISSAN dealer
for details.
INSTALLATION ON FRONT
PASSENGER SEAT
WARNING
INever install a child restraint in the
front passenger seat unless an air
bag ON/OFF switch has been in-
stalled and the air bag has been
turned OFF. Supplemental air bags
inflate with great force. A child re-
straint could be struck by the supple-mental air bag in a crash and could
seriously injure or kill your child.
IThe three-point seat belt in your ve-
hicle is equipped with a locking mode
retractor which must be used when
installing a child restraint.
IFailure to use the retractor's locking
mode will result in the child restraint
not being properly secured. The child
restraint could tip over or otherwise
be unsecured and cause injury to the
SSS0208
SSS0129
1-28
Seats, restraints and supplemental air bag systems
Z
02.9.13/Z33-D/V5.0
X
Page 35 of 227
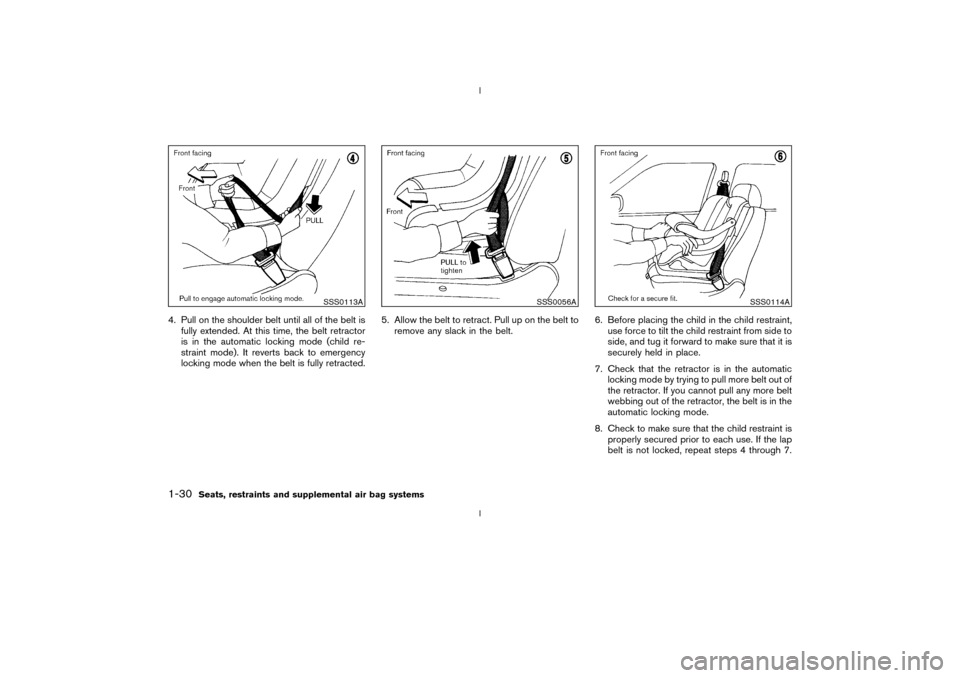
4. Pull on the shoulder belt until all of the belt is
fully extended. At this time, the belt retractor
is in the automatic locking mode (child re-
straint mode). It reverts back to emergency
locking mode when the belt is fully retracted.5. Allow the belt to retract. Pull up on the belt to
remove any slack in the belt.6. Before placing the child in the child restraint,
use force to tilt the child restraint from side to
side, and tug it forward to make sure that it is
securely held in place.
7. Check that the retractor is in the automatic
locking mode by trying to pull more belt out of
the retractor. If you cannot pull any more belt
webbing out of the retractor, the belt is in the
automatic locking mode.
8. Check to make sure that the child restraint is
properly secured prior to each use. If the lap
belt is not locked, repeat steps 4 through 7.
SSS0113A
SSS0056A
SSS0114A
1-30
Seats, restraints and supplemental air bag systems
Z
02.9.13/Z33-D/V5.0
X
Page 36 of 227
After the child restraint is removed and the seat
belt is allowed to wind back into the retractor,
the automatic locking mode (child restraint
mode) is canceled; the seat belt only locks
during a sudden stop or impact.
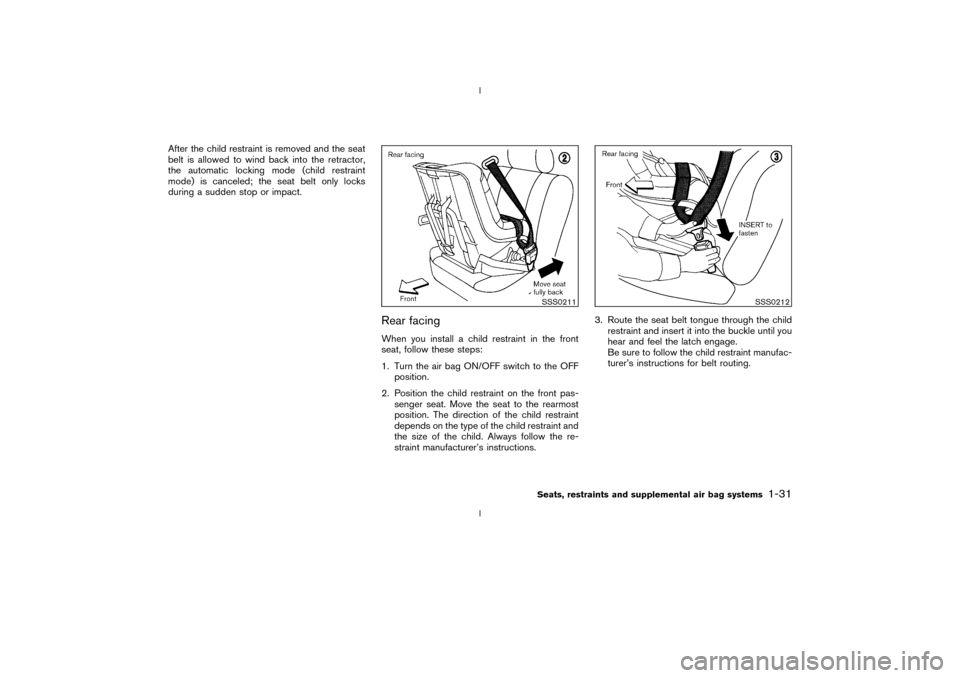
Rear facingWhen you install a child restraint in the front
seat, follow these steps:
1. Turn the air bag ON/OFF switch to the OFF
position.
2. Position the child restraint on the front pas-
senger seat. Move the seat to the rearmost
position. The direction of the child restraint
depends on the type of the child restraint and
the size of the child. Always follow the re-
straint manufacturer's instructions.3. Route the seat belt tongue through the child
restraint and insert it into the buckle until you
hear and feel the latch engage.
Be sure to follow the child restraint manufac-
turer's instructions for belt routing.
SSS0211
SSS0212
Seats, restraints and supplemental air bag systems
1-31
Z
02.9.13/Z33-D/V5.0
X
Page 37 of 227
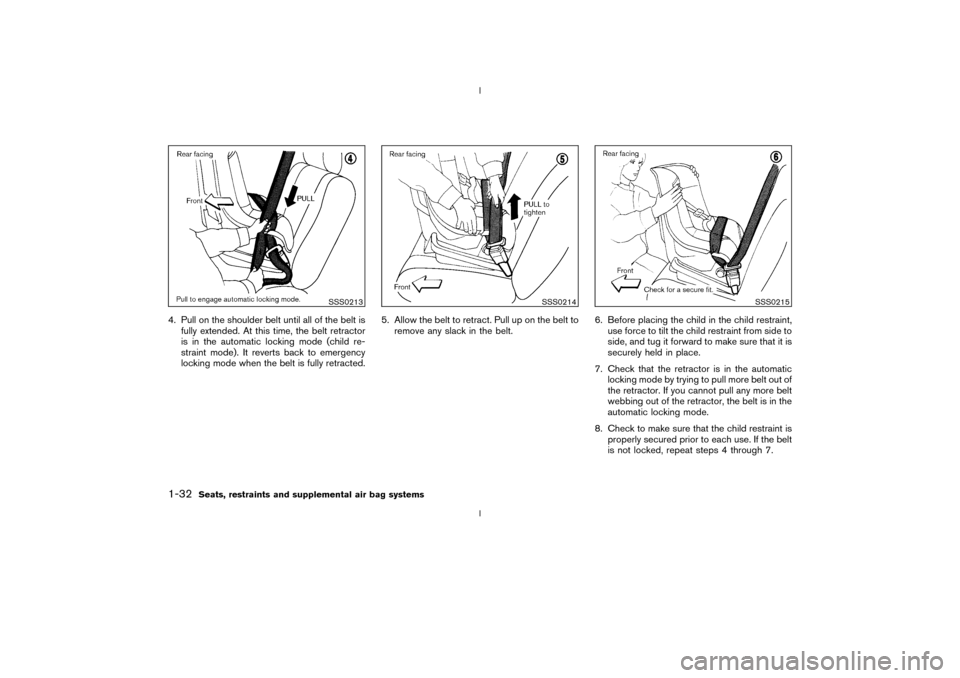
4. Pull on the shoulder belt until all of the belt is
fully extended. At this time, the belt retractor
is in the automatic locking mode (child re-
straint mode). It reverts back to emergency
locking mode when the belt is fully retracted.5. Allow the belt to retract. Pull up on the belt to
remove any slack in the belt.6. Before placing the child in the child restraint,
use force to tilt the child restraint from side to
side, and tug it forward to make sure that it is
securely held in place.
7. Check that the retractor is in the automatic
locking mode by trying to pull more belt out of
the retractor. If you cannot pull any more belt
webbing out of the retractor, the belt is in the
automatic locking mode.
8. Check to make sure that the child restraint is
properly secured prior to each use. If the belt
is not locked, repeat steps 4 through 7.
SSS0213
SSS0214
SSS0215
1-32
Seats, restraints and supplemental air bag systems
Z
02.9.13/Z33-D/V5.0
X
Page 38 of 227

After the child restraint is removed and the seat
belt is allowed to wind back into the retractor,
the automatic locking mode (child restraint
mode) is canceled; the seat belt only locks
during a sudden stop or impact.
Seats, restraints and supplemental air bag systems
1-33
Z
02.9.13/Z33-D/V5.0
X
Page 72 of 227
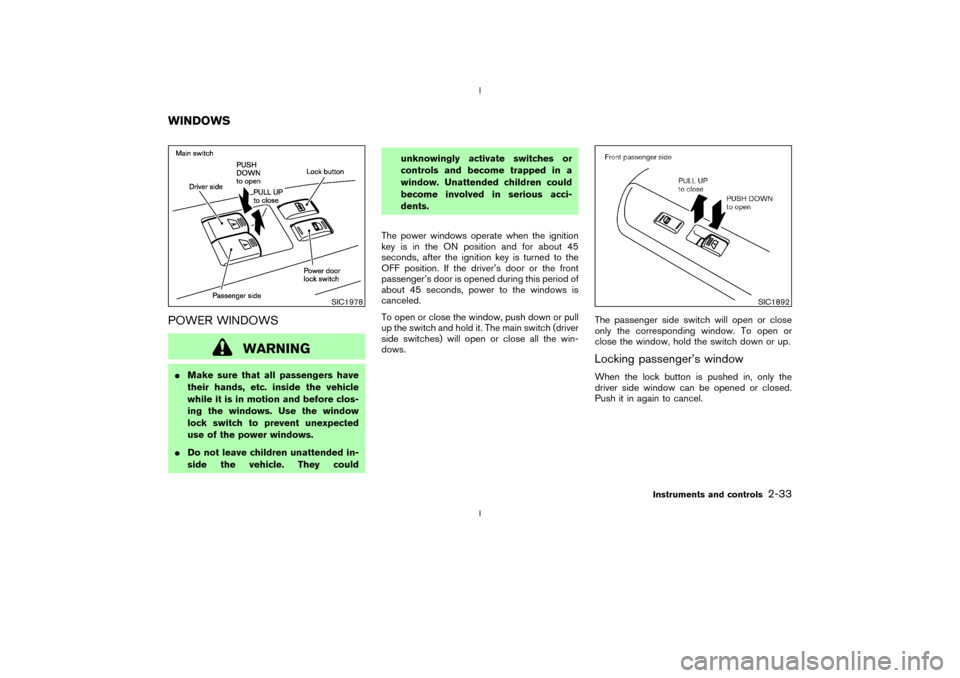
POWER WINDOWS
WARNING
IMake sure that all passengers have
their hands, etc. inside the vehicle
while it is in motion and before clos-
ing the windows. Use the window
lock switch to prevent unexpected
use of the power windows.
IDo not leave children unattended in-
side the vehicle. They couldunknowingly activate switches or
controls and become trapped in a
window. Unattended children could
become involved in serious acci-
dents.
The power windows operate when the ignition
key is in the ON position and for about 45
seconds, after the ignition key is turned to the
OFF position. If the driver's door or the front
passenger's door is opened during this period of
about 45 seconds, power to the windows is
canceled.
To open or close the window, push down or pull
up the switch and hold it. The main switch (driver
side switches) will open or close all the win-
dows.The passenger side switch will open or close
only the corresponding window. To open or
close the window, hold the switch down or up.
Locking passenger's windowWhen the lock button is pushed in, only the
driver side window can be opened or closed.
Push it in again to cancel.
SIC1978
SIC1892
WINDOWS
Instruments and controls
2-33
Z
02.9.13/Z33-D/V5.0
X
Page 83 of 227
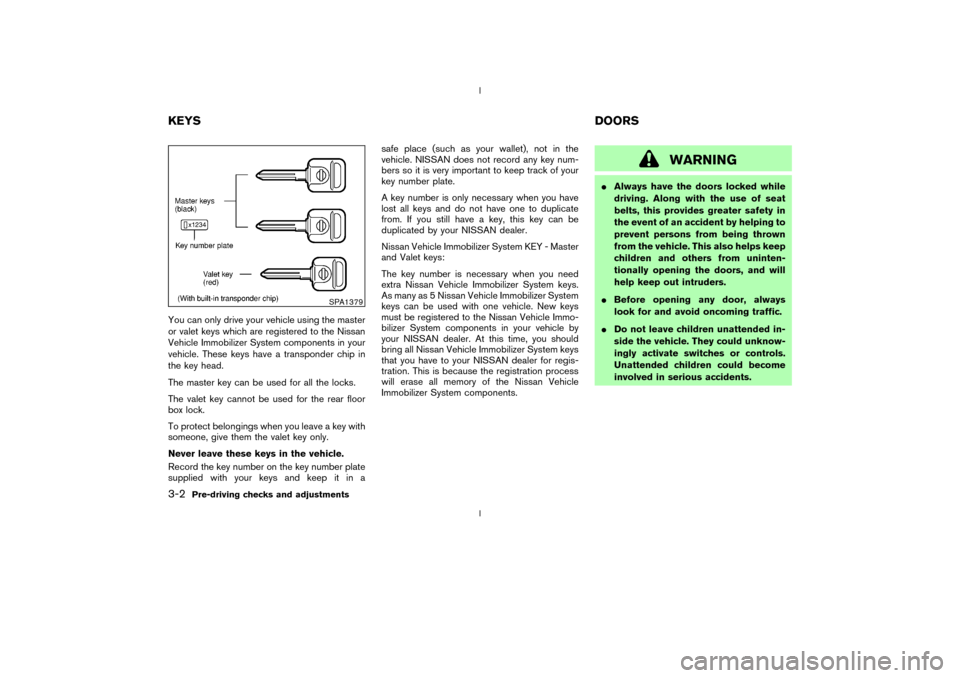
You can only drive your vehicle using the master
or valet keys which are registered to the Nissan
Vehicle Immobilizer System components in your
vehicle. These keys have a transponder chip in
the key head.
The master key can be used for all the locks.
The valet key cannot be used for the rear floor
box lock.
To protect belongings when you leave a key with
someone, give them the valet key only.
Never leave these keys in the vehicle.
Record the key number on the key number plate
supplied with your keys and keep it in asafe place (such as your wallet), not in the
vehicle. NISSAN does not record any key num-
bers so it is very important to keep track of your
key number plate.
A key number is only necessary when you have
lost all keys and do not have one to duplicate
from. If you still have a key, this key can be
duplicated by your NISSAN dealer.
Nissan Vehicle Immobilizer System KEY - Master
and Valet keys:
The key number is necessary when you need
extra Nissan Vehicle Immobilizer System keys.
As many as 5 Nissan Vehicle Immobilizer System
keys can be used with one vehicle. New keys
must be registered to the Nissan Vehicle Immo-
bilizer System components in your vehicle by
your NISSAN dealer. At this time, you should
bring all Nissan Vehicle Immobilizer System keys
that you have to your NISSAN dealer for regis-
tration. This is because the registration process
will erase all memory of the Nissan Vehicle
Immobilizer System components.
WARNING
IAlways have the doors locked while
driving. Along with the use of seat
belts, this provides greater safety in
the event of an accident by helping to
prevent persons from being thrown
from the vehicle. This also helps keep
children and others from uninten-
tionally opening the doors, and will
help keep out intruders.
IBefore opening any door, always
look for and avoid oncoming traffic.
IDo not leave children unattended in-
side the vehicle. They could unknow-
ingly activate switches or controls.
Unattended children could become
involved in serious accidents.
SPA1379
KEYSDOORS3-2
Pre-driving checks and adjustments
Z
02.9.13/Z33-D/V5.0
X
Page 173 of 227
CAUTION
The dipstick must be inserted in place to
prevent oil spillage from the dipstick
hole while filling the engine with oil.
See ªCapacities and recommended fuel/
lubricantsº in the ª9. Technical and consumer
informationº section for drain and refill capac-
ity. The drain and refill capacity depends on
the oil temperature and drain time. Use these
specifications for reference only. Always use
the dipstick to determine the proper amount
of oil in the engine.
10.Start the engine and check for leakage
around the drain plug and the oil filter. Cor-
rect as required.
11.Turn the engine off and wait more than 10
minutes. Check the oil level with the dipstick.
Add engine oil if necessary.After the operation1. Install the engine undercover into position as
the following steps.
a. Pull the center of the small plastic clip out.
b. Hold the engine undercover into position.
c. Insert the clip through the undercover into thehole in the frame, then push the center of the
clip in to lock the clip in place.
d. Install the other bolts that hold the under-
cover in place. Be careful not to strip the
bolts or over-tighten them.
2. Lower the vehicle carefully to the ground.
3. Dispose of waste oil and filter properly.
WARNING
IProlonged and repeated contact with
used engine oil may cause skin can-
cer.
ITry to avoid direct skin contact with
used oil. If skin contact is made,
wash thoroughly with soap or hand
cleaner as soon as possible.
IKeep used engine oil out of reach of
children.When checking or replacement is required, we
recommend your NISSAN dealer for servicing.
CAUTION
IUse only Genuine Nissan ATF Matic
Fluid J. Do not mix with other fluids.
IUsing automatic transmission fluid
other than Genuine Nissan ATF Matic
Fluid J will cause deterioration in
driveability and automatic transmis-
sion durability, and may damage the
automatic transmission, which is not
covered by the NISSAN new vehicle
limited warranty.
The specified automatic transmission fluid is
also described on caution labels located in the
engine compartment.AUTOMATIC TRANSMISSION
FLUID
8-12
Maintenance and do-it-yourself
Z
02.9.13/Z33-D/V5.0
X
Page 176 of 227
WARNING
Anti-freeze is poisonous and should be
stored carefully in marked containers
out of the reach of children.
CAUTION
Do not substitute engine anti-freeze
coolant for window washer solution.
This may result in damage to the paint.IKeep the battery surface clean and dry. Any
corrosion should be washed off with a solu-
tion of baking soda and water.
IMake certain the terminal connections are
clean and securely tightened.
IIf the vehicle is not to be used for 30 days or
longer, disconnect the (Ð) negative battery
terminal to prevent discharging it.
CAUTION
When the battery cable is removed from
the battery terminal, do not close either
of front doors. The automatic window
adjusting function will not work, and the
side roof panel may be damaged.
To disconnect the negative (þ) battery ter-
minal, perform the procedure in the follow-
ing order.
Otherwise, the window and the side roof
panel may contact and be damaged.
1. Close the windows.
2. Open the hood.
3. Close and lock all the doors.4. Disconnect the negative (þ) battery ter-
minal.
5. Securely close the hood.
To connect the negative (þ) battery termi-
nal, perform the procedure in the following
order. Otherwise, the window and the side
roof panel may contact and be damaged.
1. Unlock and open the driver side door.
Do not close the door.
2. Open the hood.
3. Connect the negative (þ) battery termi-
nal. Then close the hood.
4. Fully open the driver side door window.
5. Close the driver side door and the win-
dow.
WARNING
IDo not expose the battery to flames
or electrical sparks. Hydrogen gas
generated by battery action is explo-
sive. Do not allow battery fluid to
contact your skin, eyes, fabrics, or
painted surfaces. After touching a
battery or battery cap, do not touch
BATTERY
Maintenance and do-it-yourself
8-15
Z
02.9.13/Z33-D/V5.0
X