transmission NISSAN 370Z 2014 Owners Manual
[x] Cancel search | Manufacturer: NISSAN, Model Year: 2014, Model line: 370Z, Model: NISSAN 370Z 2014Pages: 428, PDF Size: 1.87 MB
Page 70 of 428
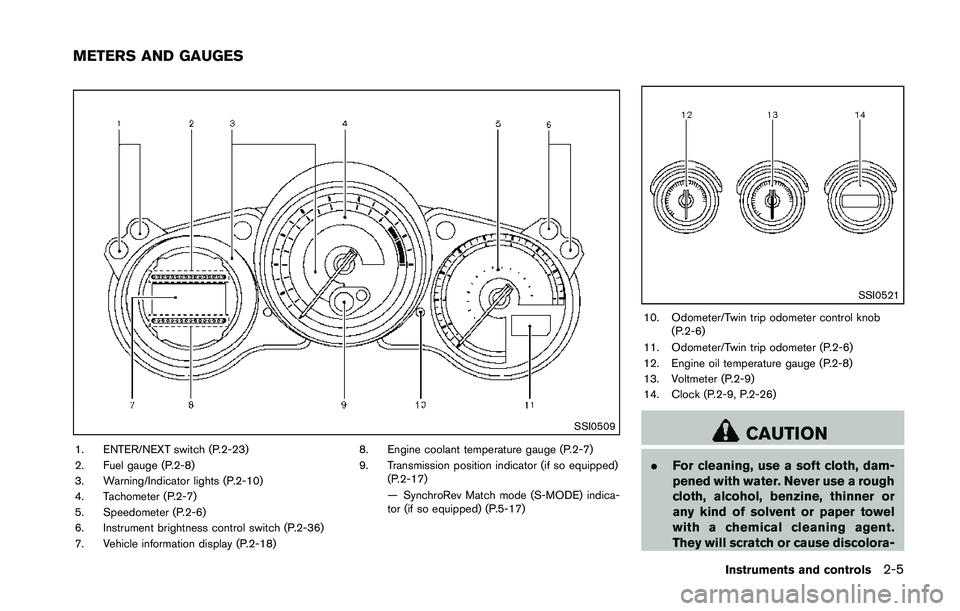
SSI0509
1. ENTER/NEXT switch (P.2-23)
2. Fuel gauge (P.2-8)
3. Warning/Indicator lights (P.2-10)
4. Tachometer (P.2-7)
5. Speedometer (P.2-6)
6. Instrument brightness control switch (P.2-36)
7. Vehicle information display (P.2-18)8. Engine coolant temperature gauge (P.2-7)
9. Transmission position indicator (if so equipped)
(P.2-17)
— SynchroRev Match mode (S-MODE) indica-
tor (if so equipped) (P.5-17)
Page 87 of 428
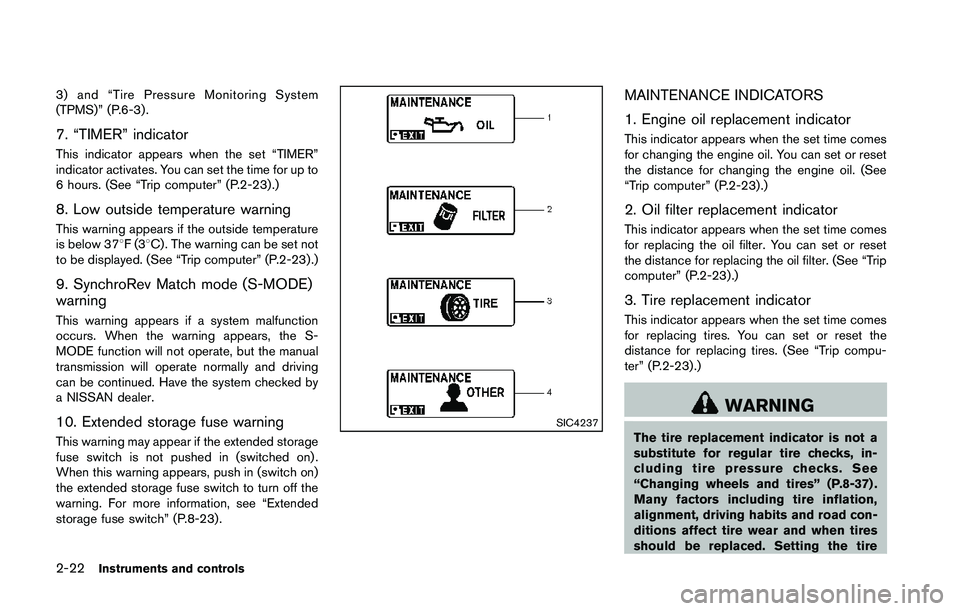
3) and “Tire Pressure Monitoring System
(TPMS)” (P.6-3) .
7. “TIMER” indicator
This indicator appears when the set “TIMER”
indicator activates. You can set the time for up to
6 hours. (See “Trip computer” (P.2-23) .)
8. Low outside temperature warning
This warning appears if the outside temperature
is below 378F(38C) . The warning can be set not
to be displayed. (See “Trip computer” (P.2-23) .)
9. SynchroRev Match mode (S-MODE)
warning
This warning appears if a system malfunction
occurs. When the warning appears, the S-
MODE function will not operate, but the manual
transmission will operate normally and driving
can be continued. Have the system checked by
a NISSAN dealer.
10. Extended storage fuse warning
This warning may appear if the extended storage
fuse switch is not pushed in (switched on) .
When this warning appears, push in (switch on)
the extended storage fuse switch to turn off the
warning. For more information, see “Extended
storage fuse switch” (P.8-23) .
Page 295 of 428
WARNING
Do not operate the push-button ignition
switch while driving the vehicle except
in an emergency. (The engine will stop
when the ignition switch is pushed 3
consecutive times or the ignition switch
is pushed and held for more than 2
seconds.) If the engine stops while the
vehicle is being driven, this could lead
to a crash and serious injury.
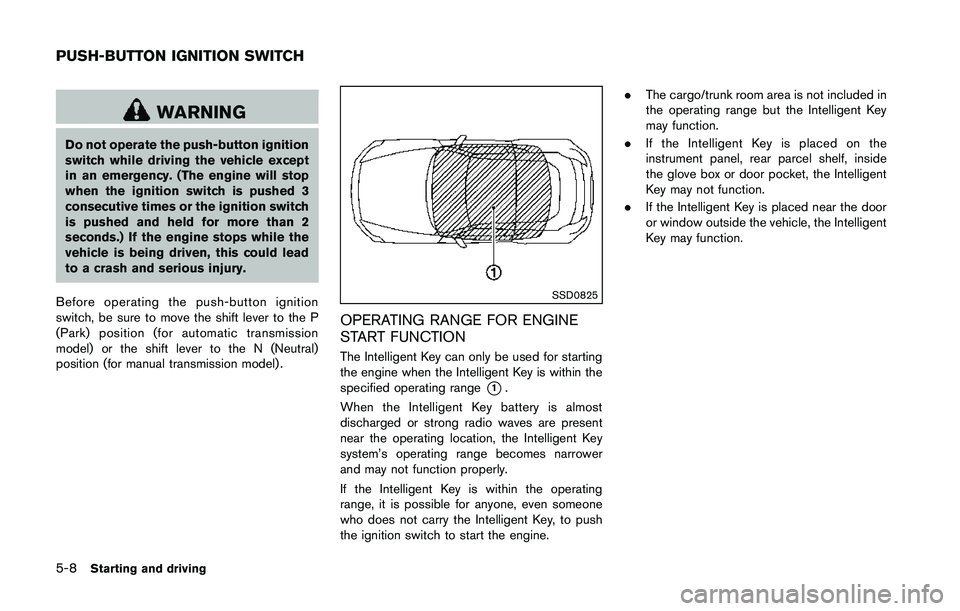
Before operating the push-button ignition
switch, be sure to move the shift lever to the P
(Park) position (for automatic transmission
model) or the shift lever to the N (Neutral)
position (for manual transmission model) .
Page 298 of 428
.Make sure the area around the vehicle is
clear.
. Check fluid levels such as engine oil, cool-
ant, brake fluid and window washer fluid as
frequently as possible, or at least whenever
you refuel.
. Check that all windows and lights are clean.
. Visually inspect tires for their appearance
and condition. Also check tires for proper
inflation.
. Lock all doors.
. Position seat and adjust head restraints.
. Adjust inside and outside mirrors.
. Fasten seat belts and ask all passengers to
do likewise.
. Check the operation of warning lights when
the ignition switch is pushed to the ON
position. (See “Warning/indicator lights and
audible reminders” (P.2-10) .) 1. Apply the parking brake.
2.
Automatic Transmission (AT) model:
Move the shift lever to the P (Park) or N
(Neutral) position. (P is recommended.)
The starter is designed not to operate unless
the shift lever is in either of the above
positions.
Manual Transmission (MT) model:
Move the shift lever to the N (Neutral)
position. Depress the clutch pedal fully to
the floor.
The starter is designed not to operate unless
the clutch pedal is fully depressed.
The Intelligent Key must be carried
when operating the ignition switch.
3. Push the ignition switch to the ON position. Depress the brake pedal (AT model) or the
clutch pedal (MT model) and push the
ignition switch to start the engine.
To start the engine immediately, push and
release the ignition switch while depressing
the brake pedal with the ignition switch in
any position.
.If the engine is very hard to start inextremely cold weather or when restart-
ing, depress the accelerator pedal a little
(approximately 1/3 to the floor) and while
holding, crank the engine. Release the accelerator pedal when the engine starts.
.If the engine is very hard to start because
it is flooded, depress the accelerator
pedal all the way to the floor and hold it.
Push the ignition switch to the ON
position to start cranking the engine.
After 5 or 6 seconds, stop cranking by
pushing the ignition switch to OFF. After
cranking the engine, release the accel-
erator pedal. Crank the engine with your
foot off the accelerator pedal by
depressing the brake pedal and pushing
the push-button ignition switch to start
the engine. If the engine starts, but fails
to run, repeat the above procedure.
Page 299 of 428
moderate speed for a short distance first,
especially in cold weather. In cold weather,
keep the engine running for a minimum of 2 -
3 minutes before shutting it off. Starting and
stopping the engine over a short period of
time may make the vehicle more difficult to
start.
When racing the engine up to 4,500 rpm or
more under no load condition, the engine
will enter the fuel cut mode.
5. To stop the engine, shift the shift lever to the P (Park) position (AT model) or move the
shift lever to the N (Neutral) position (MT
model) , and push the ignition switch to the
OFF position.
NOTE:
Care should be taken to avoid situations
that can lead to potential battery discharge
and potential no-start conditions such as:
1. Installation or extended use of electro-
nic accessories that consume battery
power when the engine is not running
(Phone chargers, GPS, DVD players,
etc.)
2. Vehicle is not driven regularly and/or
only driven short distances.
In these cases, the battery may need to be
charged to maintain battery health.AUTOMATIC TRANSMISSION
7 speed automatic transmission
The automatic transmission in your vehicle is
electronically controlled by a transmission con-
trol module to produce maximum efficiency and
smooth operation.
Shown on the following pages are the recom-
mended operating procedures for this transmis-
sion. Follow these procedures for maximum
vehicle performance and driving enjoyment.
Starting the vehicle
After starting the engine, fully depress the foot
brake pedal and push the shift lever button
before shifting the shift lever to the R (Reverse) ,
N (Neutral) , D (Drive) or Manual shift mode
position. Be sure the vehicle is fully stopped
before attempting to shift the shift lever.
This automatic transmission model is de-
signed so that the foot brake pedal must
be depressed before shifting from P (Park)
to any drive position while the ignition
switch position is ON.
The shift lever cannot be moved out of the
P (Park) position and into any of the other
gear positions if the ignition switch is
pushed to the LOCK, OFF or ACC position. 1. Keep the foot brake pedal depressed and
push the shift lever button to shift into a
driving gear.
2. Release the parking brake and foot brake, then gradually start the vehicle in motion.
Page 303 of 428
SSD0829
Shift lock release
If the battery charge is low or discharged, the
shift lever may not be moved from the P (Park)
position even with the brake pedal depressed
and the shift lever button pushed.
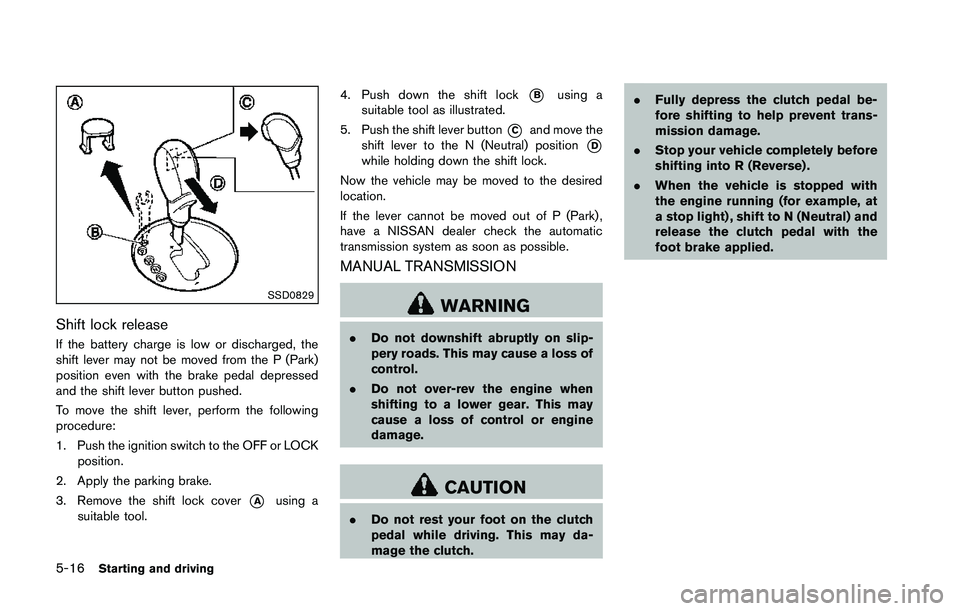
To move the shift lever, perform the following
procedure:
1. Push the ignition switch to the OFF or LOCKposition.
2. Apply the parking brake.
3. Remove the shift lock cover
*Ausing a
suitable tool. 4. Push down the shift lock
*Busing a
suitable tool as illustrated.
5. Push the shift lever button
*Cand move the
shift lever to the N (Neutral) position
*Dwhile holding down the shift lock.
Now the vehicle may be moved to the desired
location.
If the lever cannot be moved out of P (Park) ,
have a NISSAN dealer check the automatic
transmission system as soon as possible.
MANUAL TRANSMISSION
Page 325 of 428
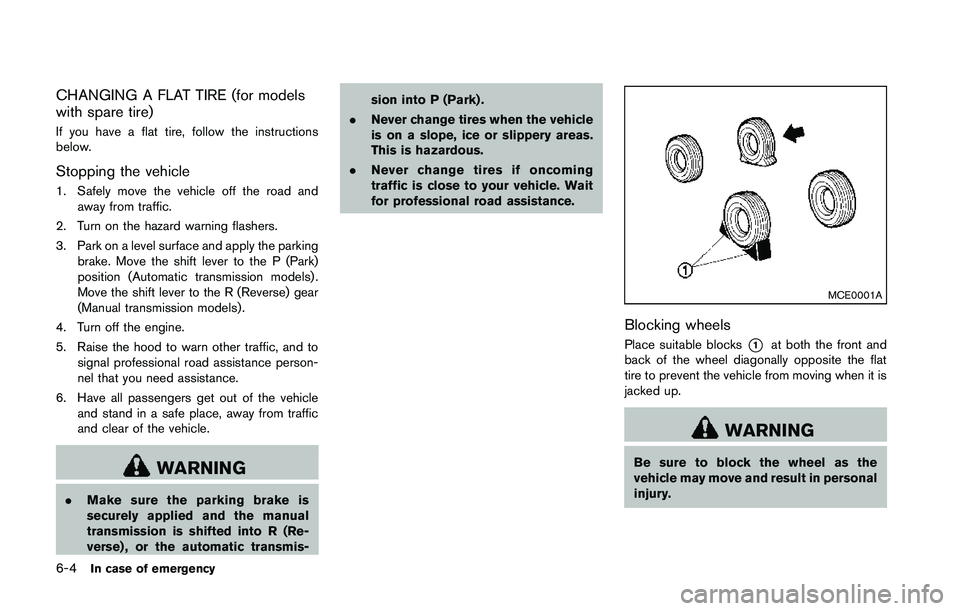
CHANGING A FLAT TIRE (for models
with spare tire)
If you have a flat tire, follow the instructions
below.
Stopping the vehicle
1. Safely move the vehicle off the road andaway from traffic.
2. Turn on the hazard warning flashers.
3. Park on a level surface and apply the parking brake. Move the shift lever to the P (Park)
position (Automatic transmission models) .
Move the shift lever to the R (Reverse) gear
(Manual transmission models) .
4. Turn off the engine.
5. Raise the hood to warn other traffic, and to signal professional road assistance person-
nel that you need assistance.
6. Have all passengers get out of the vehicle and stand in a safe place, away from traffic
and clear of the vehicle.
Page 330 of 428
CAUTION
.To avoid the emergency tire punc-
ture kit being damaged during sto-
rage or use:
— Only use the emergency tire
puncture repair kit on your ve-
hicle. Do not use it on other
vehicles.
— Only use the kit to inflate the tires of your vehicle and to
check the vehicle’s tire pressure.
— Only plug the compressor into a 12V DC car power point.
— Keep the kit free of water and dirt.
— Do not disassemble or modify the kit.
— Do not drop the kit or allow hard impacts to the kit.
. Do not use the emergency tire
puncture repair kit under the follow-
ing conditions. Contact a NISSAN
dealer or professional road assis-
tance. — when the sealant has passed its
expiration date (shown on the
label attached to the bottle)
— when the cut or the puncture is approximately 0.25 in (6 mm) or
longer
— when the tire sidewall is da- maged
— when the vehicle has been dri- ven with extremely low tire
pressure
— when the tire has come off the inside or the outside of the
wheel.
— when the tire wheel is damaged
— when two or more tires are flat
Stopping the vehicle
1. Safely move the vehicle off the road and away from traffic.
2. Turn on the hazard warning flashers.
3. Park on a level surface and apply the parking brake.
4. Automatic Transmission models:
Move the shift lever to the P (Park) position. Manual Transmission models:
Move the shift lever to the R (Reverse)
position.
5. Turn off the engine.
6. Raise the hood to warn other traffic and to signal professional road assistance person-
nel that you need assistance.
7. Have all passengers get out of the vehicle and stand in a safe place, away from traffic
and clear of the vehicle.
Page 343 of 428
.Always pull the cable straight out
from the front of the vehicle. Never
pull on the vehicle at an angle.
. Pulling devices should be routed so
they do not touch any part of the
suspension, steering, brake or cool-
ing systems.
. Pulling devices such as ropes or
canvas straps are not recommended
for use in vehicle towing or recov-
ery.
Rocking a stuck vehicle
If your vehicle is stuck in sand, snow, mud, etc.,
use the following procedure:
1. Turn off the Vehicle Dynamic Control (VDC)
system.
2. Make sure the area in front and behind the vehicle is clear of obstructions.
3. Turn the steering wheel right and left to clear an area around the front tires.
4. Slowly rock the vehicle forward and back- ward.
.Shift back and forth between R (Reverse)
and D (Drive) (automatic transmission
models) or 1st and R (Reverse) (manual
transmission models) .
.Apply the accelerator as little as possibleto maintain the rocking motion.
.Release the accelerator pedal beforeshifting between R (Reverse) and D
(Drive) (automatic transmission models)
or 1st and R (Reverse) (manual transmis-
sion models) .
.Do not spin the tires above 35 MPH (55 km/h).
5. If the vehicle cannot be freed after a few tries, contact a professional towing service
to remove the vehicle.
Page 420 of 428
10 Index
A
ABS (Anti-lock Braking System) ............................ 5-27
Advanced air bag system ......................................... 1-33
Air bag systemAdvanced air bag system .................................. 1-33
Front passenger air bag and status light....... 1-35
Front-seat mounted side-impact supplemental
air bag system....................................................... 1-38
Roof-mounted curtain side-impact
supplemental air bag system ............................ 1-38
Air bag warning labels............................................... 1-40
Air bag warning light...................................... 1-40, 2-14
Air cleaner housing filter ........................................... 8-19
Air conditioner Air conditioner operation.................................... 4-24
Air conditioner service ........................................ 4-30
Air conditioner specification label.................... 9-13
Air conditioning system refrigerant and
lubricant recommendations....................... 4-30, 9-7
In-cabin microfilter ............................................... 4-30
Air deflectors................................................................ 9-17
Alarm, How to stop alarm (see vehicle
security system)........................................................... 2-29
Alcohol, drugs and driving.......................................... 5-7
Antenna.......................................................................... 4-74
Anti-lock Braking System (ABS) ............................ 5-27
Anti-lock braking system (ABS) warning light..... 2-11
Appearance care Exterior appearance care ...................................... 7-2
Interior appearance care ....................................... 7-5
Audible reminders....................................................... 2-17
Audio operation precautions.................................... 4-31
Audio system................................................................ 4-31 Steering wheel audio controls.......................... 4-73 Autochanger
Compact Disc (CD) ............................................ 4-49
Autolight system.......................................................... 2-34
Automatic Air conditioner (Type A) ..................................... 4-25
Air conditioner (Type B) ..................................... 4-28
Automatic adjusting function
(front windows)..................................................... 2-47
Automatic transmission fluid (ATF).................. 8-12
Door locks................................................................. 3-5
Driving with automatic transmission................ 5-12
AUX (Auxiliary) button.................................... 4-46, 4-51
Auxiliary input jacks .................................................... 4-70
Avoiding collision and rollover ................................... 5-6
B
Battery............................................................................ 8-15 Battery saver system........................................... 2-35
Intelligent Key........................................................ 8-24
Variable voltage control system........................ 8-17
Before starting the engine........................................ 5-11
Belts (See drive belts)............................................... 8-18
Bluetooth
®hands-free phone system
(models with navigation system)............................. 4-76
Bluetooth
®hands-free phone system
(models without navigation system) ....................... 4-86
Bluetooth
®streaming audio ..................................... 4-63
Booster seats............................................................... 1-24
Brake Anti-lock Braking System (ABS) ..................... 5-27
Brake and clutch fluid......................................... 8-13
Brake fluid.............................................................. 8-13
Brake system......................................................... 5-26
Parking brake operation ..................................... 5-20
Warning light......................................................... 2-11 Break-in schedule ....................................................... 5-23
Brightness control......................................................... 4-7
Display ON/OFF button ........................................ 4-7
Instrument panel................................................... 2-36
Bulb check/instrument panel ................................... 2-11
Bulb replacement........................................................ 8-26
C
Cabin air filter............................................................... 4-30
Capacities and recommended fuel/lubricants ....... 9-2
Car phone or CB radio ............................................. 4-75
Cargo cover.................................................................. 2-44
Catalytic converter, Three way catalyst................... 5-3
CD/CF/USB memory care and cleaning .............. 4-72
Center multi-function control panel (models with
navigation system) ........................................................ 4-3
Child restraints............................................................. 1-18 Booster seats........................................................ 1-24
Precautions on child restraints......................... 1-18
Top tether strap.................................................... 1-19
Child safety................................................................... 1-15
Chimes Audible reminders................................................ 2-17
Seat belt warning light and chime................... 2-14
Circuit breaker, Fusible link...................................... 8-22
Cleaning exterior and interior............................ 7-2, 7-5
Clock..................................................................... 2-9, 2-26
Clutch fluid.................................................................... 8-13
Cockpit ............................................................................ 2-3
Cold weather driving.................................................. 5-32
Compact Disc (CD) changer (See
audio system)............................................................... 4-49
Compact Disc (CD) player (See
audio system)................................................... 4-45, 4-54
Compact spare tire..................................................... 8-39