maintenance NISSAN 370Z 2019 Owner´s Manual
[x] Cancel search | Manufacturer: NISSAN, Model Year: 2019, Model line: 370Z, Model: NISSAN 370Z 2019Pages: 460, PDF Size: 2.26 MB
Page 1 of 460
2019 370Z
OWNER’S MANUAL
and MAINTENANCE INFORMATION
For your safety, read carefully and keep in this vehicle.
Page 2 of 460
WARNING
Operating, servicing and main-
taining a passenger vehicle or
off-highway motor vehicle can
expose you to chemicals in-
cluding engine exhaust, carbon
monoxide, phthalates, and
lead, which are known to the
State of California to cause
cancer and birth defects or
other reproductive harm. To
minimize exposure, avoid
breathing exhaust, do not idle
the engine except as neces-
sary, service your vehicle in a
well-ventilated area and wear
gloves or wash your hands
frequently when servicing your
vehicle. For more information
go to www.P65Warnings.ca.
gov/passenger-vehicle.
This manual was prepared to help you
understand the operation and mainte-
nance of your vehicle so that you may
enjoy many miles of driving pleasure.
Please read through this manual before
operating your vehicle.
A separate Warranty Information Book-
let explains details about the warranties
covering your vehicle. Additionally, a
separate Customer Care/Lemon Law
Booklet (U.S. only) will explain how to
resolve any concerns you may have
with your vehicle, as well as clarify your
rights under your state’s lemon law.
In addition to factory installed options,
your vehicle may also be equipped with
additional accessories installed by NISSAN
or by your NISSAN dealer prior to delivery.
It is important that you familiarize your-
self with all disclosures, warnings, cau-
tions and instructions concerning proper
use of such accessories prior to operating
the vehicle and/or accessory. See a
NISSAN dealer for details concerning the
particular accessories with which your
vehicle is equipped.
Your NISSAN dealer knows your vehicle
best. When you require any service or
have any questions, we will be glad to
assist you with the extensive resources
available to us.READ FIRST — THEN DRIVE SAFELY
Before driving your vehicle, read your
Owner’s Manual carefully. This will ensure
familiarity with controls and maintenance
requirements, assisting you in the safe
operation of your vehicle.
WARNING
IMPORTANT SAFETY INFORMATION
REMINDERS!
Follow these important driving rules
to help ensure a safe and comforta-
ble trip for you and your passengers!
.NEVER drive under the influence
of alcohol or drugs.
. ALWAYS observe posted speed
limits and never drive too fast
for conditions.
. ALWAYS give your full attention to
driving and avoid using vehicle
features or taking other actions
that could distract you.
. ALWAYS use your seat belts and
appropriate child restraint sys-
tems.
. ALWAYS provide information
about the proper use of vehicle
safety features to all occupants
CALIFORNIA PROPOSITION
65 WARNINGForeword
Page 7 of 460
Illustrated table of contents0
Safety — Seats, seat belts and supplemental restraint
system1
Instruments and controls
Pre-driving checks and adjustments
Center display, heater, air conditioner, audio, phone and
voice recognition systems
Starting and driving
In case of emergency
Appearance and care
Do-it-yourself
Maintenance and schedules
Technical and consumer information
2
3
4
5
6
7
8
9
10
Table of
Contents
Index11
Page 12 of 460
0-4Illustrated table of contents
JVC0933X
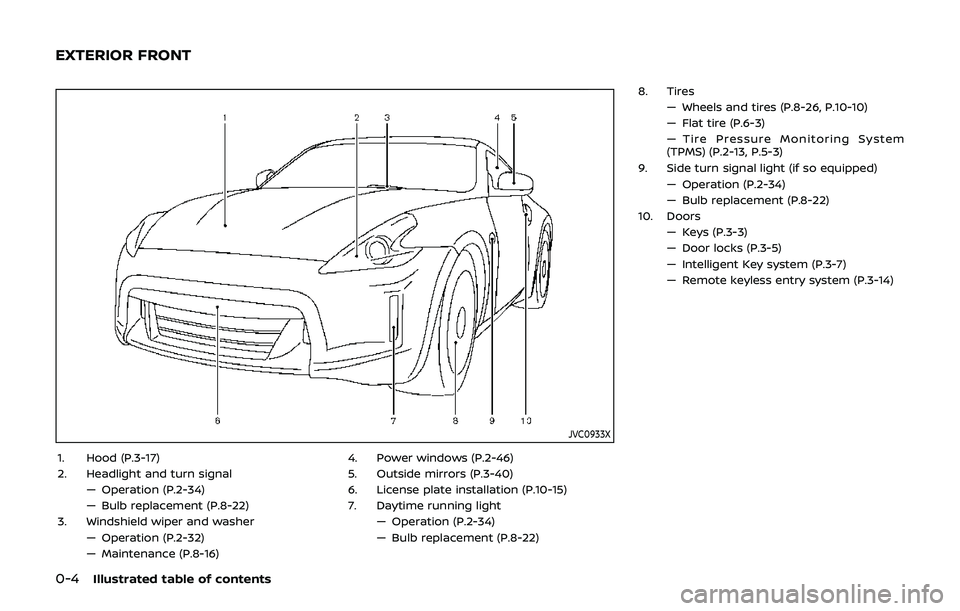
1. Hood (P.3-17)
2. Headlight and turn signal— Operation (P.2-34)
— Bulb replacement (P.8-22)
3. Windshield wiper and washer — Operation (P.2-32)
— Maintenance (P.8-16) 4. Power windows (P.2-46)
5. Outside mirrors (P.3-40)
6. License plate installation (P.10-15)
7. Daytime running light
— Operation (P.2-34)
— Bulb replacement (P.8-22) 8. Tires
— Wheels and tires (P.8-26, P.10-10)
— Flat tire (P.6-3)
— Tire Pressure Monitoring System
(TPMS) (P.2-13, P.5-3)
9. Side turn signal light (if so equipped) — Operation (P.2-34)
— Bulb replacement (P.8-22)
10. Doors — Keys (P.3-3)
— Door locks (P.3-5)
— Intelligent Key system (P.3-7)
— Remote keyless entry system (P.3-14)
EXTERIOR FRONT
Page 23 of 460
1 Safety — Seats, seat belts and supple-mental restraint system
Seats ........................................................................\
............................... 1-2
Front seats ........................................................................\
.......... 1-3
Head restraints/headrests .................................................... 1-6
Adjustable head
restraint/headrest components ................................ 1-7
Remove (if so equipped) .................................................. 1-7
Install (if so equipped) ........................................................ 1-7
Adjust (if so equipped) ....................................................... 1-8
Front-seat Active Head Restraints (if
so equipped) ........................................................................\
...... 1-9
Seat belts ........................................................................\
................. 1-10 Precautions on seat belt usage .............................. 1-10
Pregnant women ................................................................ 1-12
Injured persons ..................................................................... 1-12
Three-point type seat belt .......................................... 1-12
Seat belt extenders ........................................................... 1-15
Seat belt maintenance ................................................... 1-15
Child safety ........................................................................\
............. 1-16 Infants ........................................................................\
.................. 1-16
Small children (for Coupe models) ....................... 1-16
Larger children ...................................................................... 1-17
For Roadster models ....................................................... 1-18 Child restraints ........................................................................\
... 1-19
Precautions on child restraints ............................. 1-19
Top tether strap child restraint (for
Coupe models) ................................................................... 1-20
Forward-facing child restraint installation
using the seat belts (for Coupe models) ....... 1-22
Installing top tether strap (for
Coupe models) ................................................................... 1-26
Booster seats ....................................................................... 1-26
Supplemental restraint system ..................................... 1-30
Precautions on supplemental
restraint system ................................................................ 1-30
NISSAN Advanced Air Bag System
(front seats) ........................................................................\
... 1-36
Front seat-mounted side-impact and roof/
door-mounted curtain side-impact and
rollover (if so equipped) supplemental air
bag systems ........................................................................\
. 1-41
Seat belts with pretensioners
(front seats) ........................................................................\
... 1-43
Supplemental air bag warning labels .............. 1-44
Supplemental air bag warning light ................. 1-44
Repair and replacement procedure .................. 1-45
Page 37 of 460
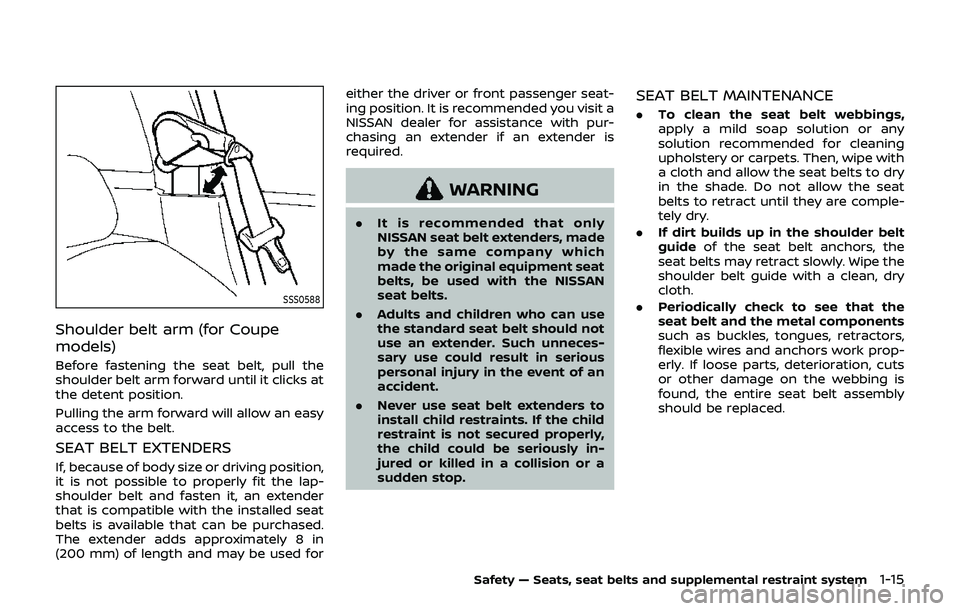
SSS0588
Shoulder belt arm (for Coupe
models)
Before fastening the seat belt, pull the
shoulder belt arm forward until it clicks at
the detent position.
Pulling the arm forward will allow an easy
access to the belt.
SEAT BELT EXTENDERS
If, because of body size or driving position,
it is not possible to properly fit the lap-
shoulder belt and fasten it, an extender
that is compatible with the installed seat
belts is available that can be purchased.
The extender adds approximately 8 in
(200 mm) of length and may be used foreither the driver or front passenger seat-
ing position. It is recommended you visit a
NISSAN dealer for assistance with pur-
chasing an extender if an extender is
required.
WARNING
.
It is recommended that only
NISSAN seat belt extenders, made
by the same company which
made the original equipment seat
belts, be used with the NISSAN
seat belts.
. Adults and children who can use
the standard seat belt should not
use an extender. Such unneces-
sary use could result in serious
personal injury in the event of an
accident.
. Never use seat belt extenders to
install child restraints. If the child
restraint is not secured properly,
the child could be seriously in-
jured or killed in a collision or a
sudden stop.
SEAT BELT MAINTENANCE
.To clean the seat belt webbings,
apply a mild soap solution or any
solution recommended for cleaning
upholstery or carpets. Then, wipe with
a cloth and allow the seat belts to dry
in the shade. Do not allow the seat
belts to retract until they are comple-
tely dry.
. If dirt builds up in the shoulder belt
guide of the seat belt anchors, the
seat belts may retract slowly. Wipe the
shoulder belt guide with a clean, dry
cloth.
. Periodically check to see that the
seat belt and the metal components
such as buckles, tongues, retractors,
flexible wires and anchors work prop-
erly. If loose parts, deterioration, cuts
or other damage on the webbing is
found, the entire seat belt assembly
should be replaced.
Safety — Seats, seat belts and supplemental restraint system1-15
Page 67 of 460
.The supplemental air bag warning
light remains on after approximately
7 seconds.
. The supplemental air bag warning
light flashes intermittently.
. The supplemental air bag warning
light does not come on at all.
Under these conditions, the air bag and/
or pretensioner systems may not operate
properly. They must be checked and
repaired. It is recommended you visit a
NISSAN dealer for this service.
WARNING
If the supplemental air bag warning
light is on, it could mean that the
front air bag, side air bag, curtain air
bag and/or pretensioner systems
will not operate in an accident. To
help avoid injury to yourself or
others, have your vehicle checked
as soon as possible. It is recom-
mended you visit a NISSAN dealer
for this service.
REPAIR AND REPLACEMENT PRO-
CEDURE
The front air bags, side air bags, curtain
air bags and pretensioners are designed
to activate on a one-time-only basis. As a
reminder, unless it is damaged, the sup-
plemental air bag warning light will re-
main illuminated after inflation has
occurred. These systems should be re-
paired and/or replaced as soon as possi-
ble. It is recommended you visit a NISSAN
dealer for this service.
When maintenance work is required on
the vehicle, the front air bags, side air
bags, curtain air bags, pretensioners and
related parts should be pointed out to the
person conducting the maintenance. The
ignition switch should always be in the
LOCK position when working under the
hood or inside the vehicle.
WARNING
. Once a front air bag, side air bag,
or curtain air bag has inflated, the
air bag module will not function
again and must be replaced. Ad-
ditionally, the activated preten-
sioner must also be replaced. The
air bag module and pretensioner
system should be replaced. It is recommended you visit a NISSAN
dealer for this service. The air bag
module and pretensioner system
cannot be repaired.
. The front air bag, side air bag and
curtain air bag systems and the
pretensioner system should be
inspected if there is any damage
to the front end or side portion of
the vehicle. It is recommended
you visit a NISSAN dealer for this
service.
. If you need to dispose of the
supplemental air bag or preten-
sioner systems or scrap the vehi-
cle, it is recommended you visit a
NISSAN dealer. Correct supple-
mental air bag and seat belt
pretensioner system disposal
procedures are set forth in the
appropriate NISSAN Service Man-
ual. Incorrect disposal procedures
could cause personal injury.
Safety — Seats, seat belts and supplemental restraint system1-45
Page 69 of 460
2 Instruments and controls
Cockpit ........................................................................\
.......................... 2-3
Instrument panel ........................................................................\
.. 2-4
Meters and gauges ..................................................................... 2-5Speedometer and odometer ........................................ 2-6
Tachometer ........................................................................\
........ 2-7
Engine coolant temperature gauge ....................... 2-7
Fuel gauge ........................................................................\
........... 2-8
Triple meter ........................................................................\
........ 2-8
Warning lights, indicator lights and
audible reminders ..................................................................... 2-10
Checking lights ..................................................................... 2-11
Warning lights ........................................................................\
2-11
Indicator lights ...................................................................... 2-15
Audible reminders .............................................................. 2-18
Vehicle information display ............................................... 2-19 Operational indicators .................................................... 2-20
Warnings and alerts .......................................................... 2-21
Maintenance indicators ................................................. 2-23
Trip computer ........................................................................\
2-23
Security systems ........................................................................\
2-29
Vehicle Security System ................................................ 2-29
NISSAN Vehicle Immobilizer System .................... 2-30
Wiper and washer switch .................................................... 2-32
Rear window defroster switch ........................................ 2-33 Headlight and turn signal switch ................................ 2-34
Xenon headlights ............................................................. 2-34
Headlight switch ............................................................... 2-34
Turn signal switch ........................................................... 2-37
Fog light switch (if so equipped) ......................... 2-38
Horn ........................................................................\
............................. 2-38
Heated seats (if so equipped) ......................................... 2-38
Climate controlled seats (if so equipped) ............. 2-40
Vehicle Dynamic Control (VDC) OFF switch ........ 2-41
Power outlet ........................................................................\
......... 2-42
Storage ........................................................................\
...................... 2-43 Instrument pocket (except for navigation
system equipped models) ......................................... 2-43
Cup holders ........................................................................\
... 2-43
Glove box ........................................................................\
........ 2-44
Console box ........................................................................\
.. 2-44
Rear parcel box .................................................................. 2-45
Cargo cover (if so equipped) ................................... 2-45
Windows ........................................................................\
................... 2-46 Power windows ................................................................. 2-46
Interior lights ........................................................................\
........ 2-50 Map lights ........................................................................\
....... 2-50
Interior light control switch ..................................... 2-50
Vanity mirror lights ................................................................. 2-51
Page 84 of 460
2-16Instruments and controls
Front passenger air bag sta-
tus light
The front passenger air bag status light
(), located on the center of the instru-
ment panel, will be lit and the passenger
front air bag will be OFF depending on
how the front passenger seat is being
used.
For front passenger air bag status light
operation, see “NISSAN Advanced Air Bag
System (front seats)” (P.1-36) of this man-
ual.
High beam indicator light
This light comes on when the headlight
high beam is on and goes out when the
low beam is selected.
Malfunction Indicator Light
(MIL)
If the malfunction indicator light comes
on steady or blinks while the engine is
running, it may indicate a potential emis-
sion control malfunction.
The malfunction indicator light may also
come on steady if the fuel-filler cap is
loose or missing, or if the vehicle runs out
of fuel. Check to make sure the fuel-filler
cap is installed and closed tightly, and
that the vehicle has at least 3 US gallons (11.4 liters) of fuel in the fuel tank.
After a few driving trips, the
light
should turn off if no other potential
emission control system malfunction ex-
ists.
If this indicator light remains on for 20
seconds and then blinks for 10 seconds
when the engine is not running, it indi-
cates that the vehicle is not ready for an
emission control system inspection/
maintenance test. (See “Readiness for
Inspection/Maintenance (I/M) test” (P.10-
25).)
Operation:
The malfunction indicator light will come
on in one of two ways:
. Malfunction indicator light on steady
— An emission control system mal-
function has been detected. Check
the fuel-filler cap if the LOOSE FUEL
CAP warning appears in the vehicle
information display. If the fuel-filler
cap is loose or missing, tighten or
install the cap and continue to drive
the vehicle. The
light should turn
off after a few driving trips. If the
light does not turn off after a few
driving trips, have the vehicle in-
spected. It is recommended you visit
a NISSAN dealer for this service. You
do not need to have your vehicle towed to the dealer.
. Malfunction indicator light blinking —
An engine misfire has been detected
which may damage the emission
control system.
To reduce or avoid emission control
system damage:
1) Do not drive at speeds above 45
MPH (72 km/h).
2) Avoid hard acceleration or decel- eration.
3) Avoid steep uphill grades.
4) If possible, reduce the amount of cargo being hauled or towed.
The malfunction indicator light may
stop blinking and remain on.
Have the vehicle inspected. It is re-
commended you visit a NISSAN dealer
for this service. You do not need to
have your vehicle towed to the dealer.
CAUTION
Continued vehicle operation without
having the emission control system
checked and repaired as necessary
could lead to poor driveability, re-
duced fuel economy, and possible
damage to the emission control sys-
tem.
Page 91 of 460
MAINTENANCE INDICATORS
1. Engine oil replacement indicator
This indicator appears when the set time
comes for changing the engine oil. You
can set or reset the distance for changing
the engine oil. (See “Trip computer” (P.2-
23).)
2. Oil filter replacement indicator
This indicator appears when the set time
comes for replacing the oil filter. You can
set or reset the distance for replacing the
oil filter. (See “Trip computer” (P.2-23).)
3. Tire replacement indicator
This indicator appears when the set time
comes for replacing tires. You can set or
reset the distance for replacing tires. (See
“Trip computer” (P.2-23).)
WARNING
The tire replacement indicator is not
a substitute for regular tire checks,
including tire pressure checks. See
“Changing wheels and tires” (P.8-34).
Many factors including tire inflation,
alignment, driving habits and road
conditions affect tire wear and when
tires should be replaced. Setting the
tire replacement indicator for a cer-tain driving distance does not mean
your tires will last that long. Use the
tire replacement indicator as a guide
only and always perform regular tire
checks. Failure to perform regular
tire checks, including tire pressure
checks could result in tire failure.
Serious vehicle damage could occur
and may lead to a collision, which
could result in serious personal in-
jury or death.
4. “OTHER” indicator
This indicator appears when the set time
comes for replacing items other than the
engine oil, oil filter and tires. You can set
or reset the distance for replacing the
items. (See “Trip computer” (P.2-23).)
Models with navigation system:
More maintenance reminders are also
available on the center display. (See
“How to use INFO button” (P.4-8).)WAC0051X
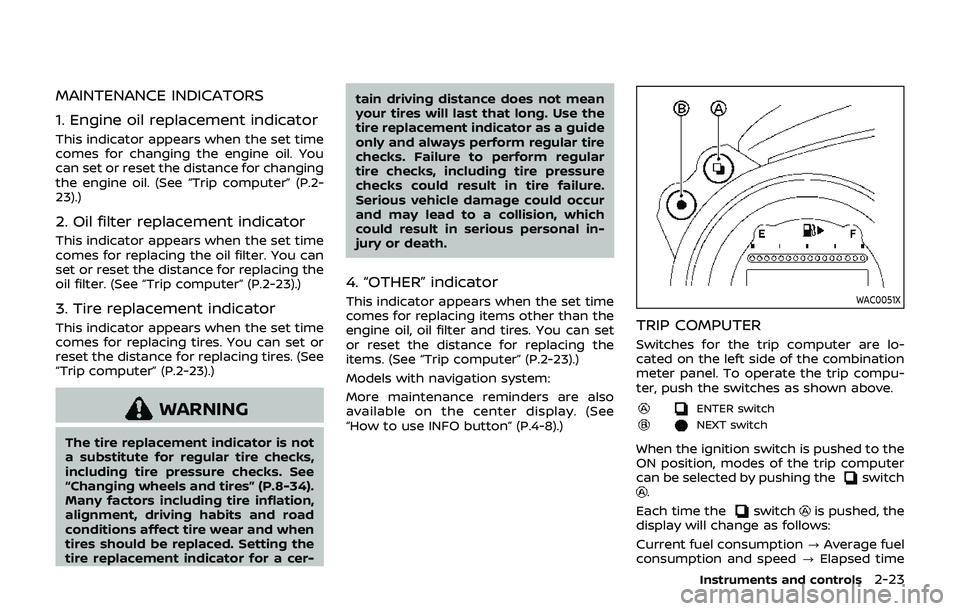
TRIP COMPUTER
Switches for the trip computer are lo-
cated on the left side of the combination
meter panel. To operate the trip compu-
ter, push the switches as shown above.
ENTER switch
NEXT switch
When the ignition switch is pushed to the
ON position, modes of the trip computer
can be selected by pushing the
switch.
Each time the
switchis pushed, the
display will change as follows:
Current fuel consumption ?Average fuel
consumption and speed ?Elapsed time
Instruments and controls2-23