transmission NISSAN 370Z 2020 Owner´s Manual
[x] Cancel search | Manufacturer: NISSAN, Model Year: 2020, Model line: 370Z, Model: NISSAN 370Z 2020Pages: 455, PDF Size: 2.22 MB
Page 88 of 455
2-20Instruments and controls
JVI0351X
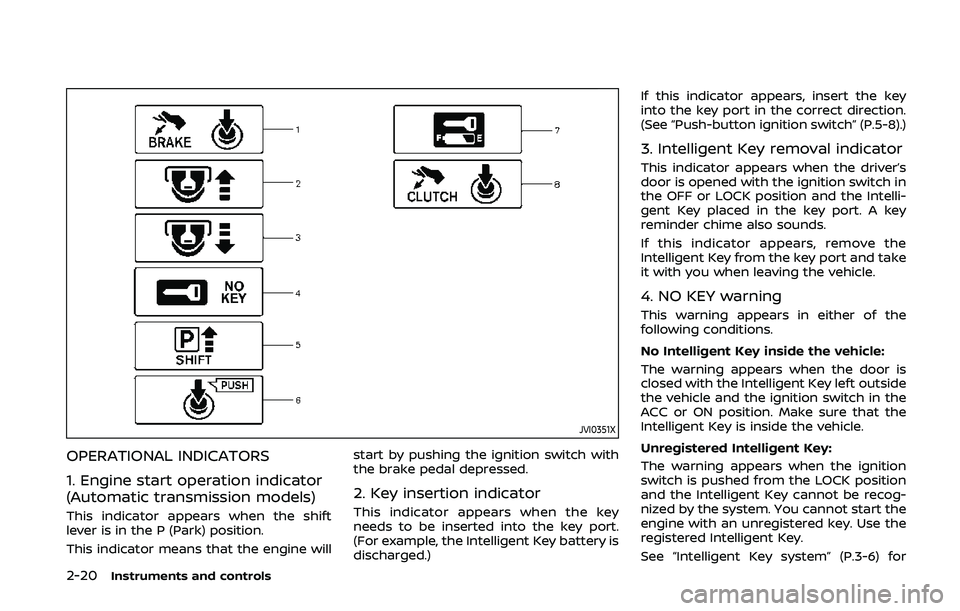
OPERATIONAL INDICATORS
1. Engine start operation indicator
(Automatic transmission models)
This indicator appears when the shift
lever is in the P (Park) position.
This indicator means that the engine willstart by pushing the ignition switch with
the brake pedal depressed.
2. Key insertion indicator
This indicator appears when the key
needs to be inserted into the key port.
(For example, the Intelligent Key battery is
discharged.)If this indicator appears, insert the key
into the key port in the correct direction.
(See “Push-button ignition switch” (P.5-8).)
3. Intelligent Key removal indicator
This indicator appears when the driver’s
door is opened with the ignition switch in
the OFF or LOCK position and the Intelli-
gent Key placed in the key port. A key
reminder chime also sounds.
If this indicator appears, remove the
Intelligent Key from the key port and take
it with you when leaving the vehicle.
4. NO KEY warning
This warning appears in either of the
following conditions.
No Intelligent Key inside the vehicle:
The warning appears when the door is
closed with the Intelligent Key left outside
the vehicle and the ignition switch in the
ACC or ON position. Make sure that the
Intelligent Key is inside the vehicle.
Unregistered Intelligent Key:
The warning appears when the ignition
switch is pushed from the LOCK position
and the Intelligent Key cannot be recog-
nized by the system. You cannot start the
engine with an unregistered key. Use the
registered Intelligent Key.
See “Intelligent Key system” (P.3-6) for
Page 89 of 455
more details.
5. SHIFT “P” warning (Automatic
Transmission models)
This warning appears when the ignition
switch is pushed to stop the engine with
the shift lever in any position except the P
(Park) position.
If this warning appears, move the shift
lever to the P (Park) position or push the
ignition switch to the ON position.
An inside warning chime will also sound.
(See “Intelligent Key system” (P.3-6).)
6. “PUSH” warning (Automatic
Transmission models)
This warning appears when the shift lever
is moved to the P (Park) position with the
ignition switch in the ACC position after
the SHIFT “P” warning appears.
To push the ignition switch to the OFF
position, perform the following proce-
dure:
SHIFT “P” warning?(Move the shift lever
to “P”) ?PUSH warning ?(Push the
ignition switch ?ignition switch position
is turned to ON) ?PUSH warning ?
(Push the ignition switch ?ignition
switch position is turned to OFF)
7. Intelligent Key battery discharge
indicator
This indicator appears when the Intelli-
gent Key battery is running out of power.
If this indicator appears, replace the
battery with a new one. (See “Intelligent
Key battery replacement” (P.8-20).)
8. Engine start operation indicator
(Manual Transmission models)
This indicator means that the engine will
start by pushing the ignition switch with
the clutch pedal depressed.
Instruments and controls2-21
Page 91 of 455
COLD tire pressure shown on the recom-
mended COLD tire pressure shown on the
Tire and Loading Information label. (See
“Tire Pressure Monitoring System (TPMS)”
(P.5-3) and “Tire Pressure Monitoring Sys-
tem (TPMS)” (P.6-3).
7. “TIMER” indicator
This indicator appears when the set
“TIMER” indicator activates. You can set
the time for up to 6 hours. (See “Trip
computer” (P.2-25).)
8. Low outside temperature warn-
ing
This warning appears if the outside tem-
perature is below 37°F (3°C). The warning
can be set not to be displayed. (See “Trip
computer” (P.2-25).)
9. SynchroRev Match mode (S-
MODE) warning
This warning appears if a system mal-
function occurs. When the warning ap-
pears, the S-MODE function will not
operate, but the manual transmission will
operate normally and driving can be
continued. Have the system checked. It
is recommended you visit a NISSAN dealer
for this service.
10. Extended storage fuse warning
This warning may appear if the extended
storage fuse switch is not pushed in
(switched on). When this warning ap-
pears, push in (switch on) the extended
storage fuse switch to turn off the warn-
ing. For more information, see “Extended
storage fuse switch” (P.8-19).
Instruments and controls2-23
Page 124 of 455
2-56Instruments and controls
PROGRAMMING HomeLink® FOR
CANADIAN CUSTOMERS AND GATE
OPENERS
Canadian radio-frequency laws require
transmitter signals to “time-out” (or quit)
after several seconds of transmission –
which may not be long enough for
HomeLink® to pick up the signal during
programming. Similar to this Canadian
law, some U.S. gate operators are de-
signed to “time-out” in the same manner.
If you live in Canada or you are having
difficulties programming a gate operator
or garage door opener by using the
“Programming HomeLink®” procedures,
replace “Programming HomeLink®” Step
2 with the following:
NOTE:
When programming a garage door
opener, etc., unplug the device during
the “cycling” process to prevent possi-
ble damage to the garage door opener
components.
Step 2: Using both hands, simultaneously
press and hold the desired HomeLink®
button and the hand-held transmitter
button. During programming, your hand-
held transmitter may automatically stop
transmitting. Continue to press and hold
the desired HomeLink® button while you
press and re-press (“cycle”) your hand-held transmitter every two seconds until
the frequency signal has been learned.
The HomeLink® indicator light will flash
slowly and then rapidly after several
seconds upon successful programming.
DO NOT
release until the HomeLink®
indicator light flashes slowly and then
rapidly. When the indicator light flashes
rapidly, both buttons may be released.
The rapid flashing indicates successful
programming.
Proceed with “Programming HomeLink®”
step 3 to complete.
Remember to plug the device back in
when programming is completed.
OPERATING THE HomeLink® UNI-
VERSAL TRANSCEIVER
The HomeLink® Universal Transceiver,
after it is programmed, can be used to
activate the programmed device. To op-
erate, simply press and release the appro-
priate programmed HomeLink® Universal
Transceiver button. The amber indicator
light will illuminate while the signal is
being transmitted.
For convenience, the hand-held transmit-
ter of the device may also be used at any
time.
PROGRAMMING TROUBLESHOOT-
ING
If the HomeLink® does not quickly learn
the hand-held transmitter information:
. replace the hand-held transmitter
batteries with new batteries.
. position the hand-held transmitter
with its battery area facing away from
the HomeLink® surface.
. press and hold both the HomeLink®
and hand-held transmitter buttons
without interruption.
. position the hand-held transmitter 1-3
in (26-76 mm) away from the
HomeLink® surface. Hold the transmit-
ter in that position for up to 15
seconds. If HomeLink® is not pro-
grammed within that time, try holding
the transmitter in another position -
keeping the indicator light in view at
all times.
If you have any questions or are having
difficulty programming your HomeLink®
buttons, refer to the HomeLink® web site
at: www.homelink.com or 1-800-355-3515.
Page 137 of 455

.All doors are closed, and
. The shift lever is in the P (Park)
position (Automatic Transmission
models).
WARNING SIGNALS
To help prevent the vehicle from moving
unexpectedly by erroneous operation of
the Intelligent Key listed on the following
chart or to help prevent the vehicle from
being stolen, chime or beep sounds inside
and outside the vehicle and a warning
displays in the vehicle information display.
When a chime or beep sounds or the
warning displays, be sure to check the
vehicle and Intelligent Key.
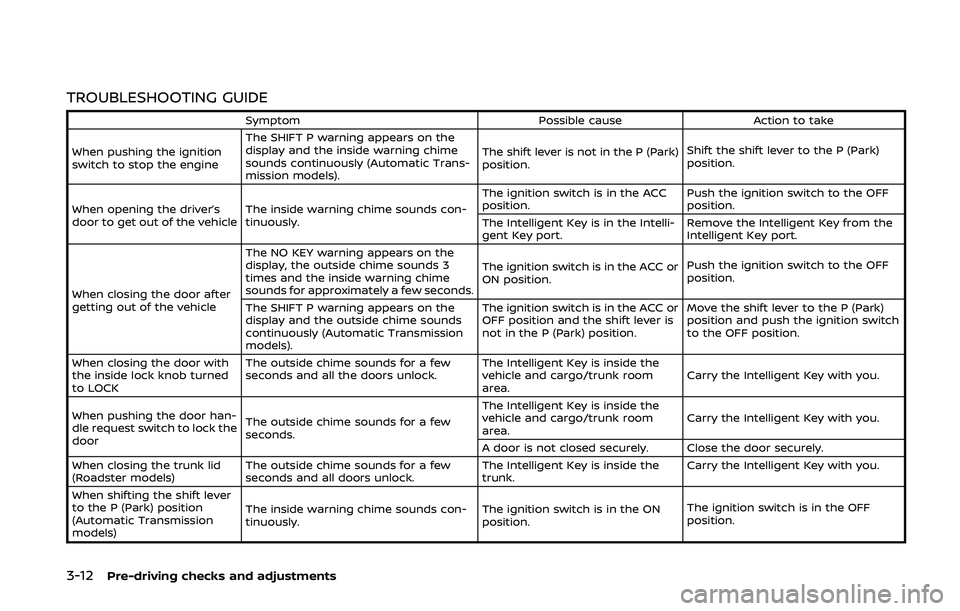
See “Troubleshooting guide” (P.3-12) and
“Vehicle information display” (P.2-19).
Pre-driving checks and adjustments3-11
Page 138 of 455
3-12Pre-driving checks and adjustments
TROUBLESHOOTING GUIDE
SymptomPossible causeAction to take
When pushing the ignition
switch to stop the engine The SHIFT P warning appears on the
display and the inside warning chime
sounds continuously (Automatic Trans-
mission models).
The shift lever is not in the P (Park)
position.
Shift the shift lever to the P (Park)
position.
When opening the driver’s
door to get out of the vehicle The inside warning chime sounds con-
tinuously. The ignition switch is in the ACC
position.
Push the ignition switch to the OFF
position.
The Intelligent Key is in the Intelli-
gent Key port. Remove the Intelligent Key from the
Intelligent Key port.
When closing the door after
getting out of the vehicle The NO KEY warning appears on the
display, the outside chime sounds 3
times and the inside warning chime
sounds for approximately a few seconds.
The ignition switch is in the ACC or
ON position.
Push the ignition switch to the OFF
position.
The SHIFT P warning appears on the
display and the outside chime sounds
continuously (Automatic Transmission
models). The ignition switch is in the ACC or
OFF position and the shift lever is
not in the P (Park) position.
Move the shift lever to the P (Park)
position and push the ignition switch
to the OFF position.
When closing the door with
the inside lock knob turned
to LOCK The outside chime sounds for a few
seconds and all the doors unlock.
The Intelligent Key is inside the
vehicle and cargo/trunk room
area.Carry the Intelligent Key with you.
When pushing the door han-
dle request switch to lock the
door The outside chime sounds for a few
seconds. The Intelligent Key is inside the
vehicle and cargo/trunk room
area.
Carry the Intelligent Key with you.
A door is not closed securely. Close the door securely.
When closing the trunk lid
(Roadster models) The outside chime sounds for a few
seconds and all doors unlock. The Intelligent Key is inside the
trunk.Carry the Intelligent Key with you.
When shifting the shift lever
to the P (Park) position
(Automatic Transmission
models) The inside warning chime sounds con-
tinuously.
The ignition switch is in the ON
position.The ignition switch is in the OFF
position.
Page 154 of 455
3-28Pre-driving checks and adjustments
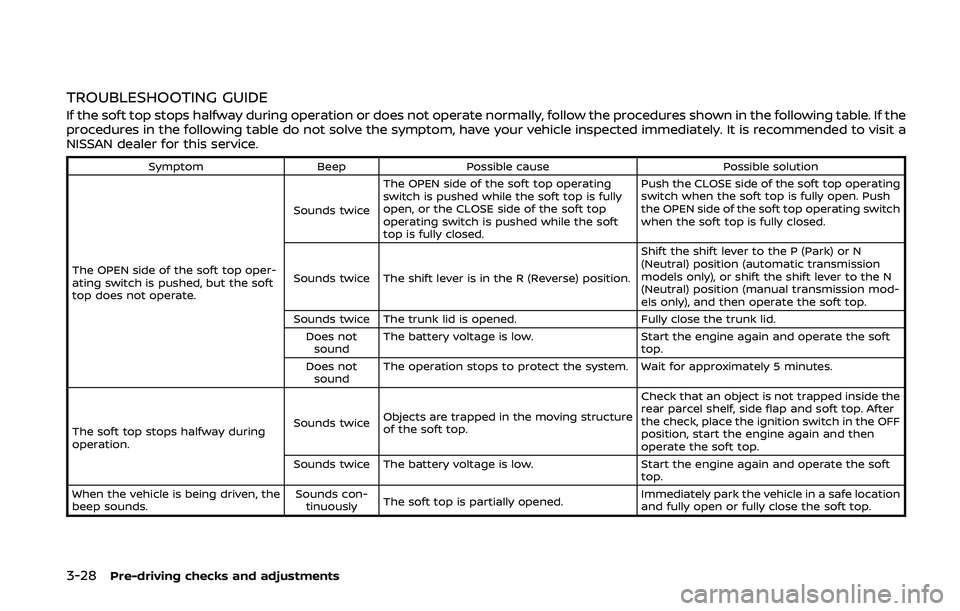
TROUBLESHOOTING GUIDE
If the soft top stops halfway during operation or does not operate normally, follow the procedures shown in the following table. If the
procedures in the following table do not solve the symptom, have your vehicle inspected immediately. It is recommended to visit a
NISSAN dealer for this service.
SymptomBeepPossible cause Possible solution
The OPEN side of the soft top oper-
ating switch is pushed, but the soft
top does not operate. Sounds twice
The OPEN side of the soft top operating
switch is pushed while the soft top is fully
open, or the CLOSE side of the soft top
operating switch is pushed while the soft
top is fully closed. Push the CLOSE side of the soft top operating
switch when the soft top is fully open. Push
the OPEN side of the soft top operating switch
when the soft top is fully closed.
Sounds twice The shift lever is in the R (Reverse) position. Shift the shift lever to the P (Park) or N
(Neutral) position (automatic transmission
models only), or shift the shift lever to the N
(Neutral) position (manual transmission mod-
els only), and then operate the soft top.
Sounds twice The trunk lid is opened. Fully close the trunk lid.
Does not sound The battery voltage is low.
Start the engine again and operate the soft
top.
Does not sound The operation stops to protect the system. Wait for approximately 5 minutes.
The soft top stops halfway during
operation. Sounds twice
Objects are trapped in the moving structure
of the soft top. Check that an object is not trapped inside the
rear parcel shelf, side flap and soft top. After
the check, place the ignition switch in the OFF
position, start the engine again and then
operate the soft top.
Sounds twice The battery voltage is low. Start the engine again and operate the soft
top.
When the vehicle is being driven, the
beep sounds. Sounds con-
tinuously The soft top is partially opened. Immediately park the vehicle in a safe location
and fully open or fully close the soft top.
Page 194 of 455
4-26Center display, heater, air conditioner, audio, phone and voice recognition systems
SAA1897
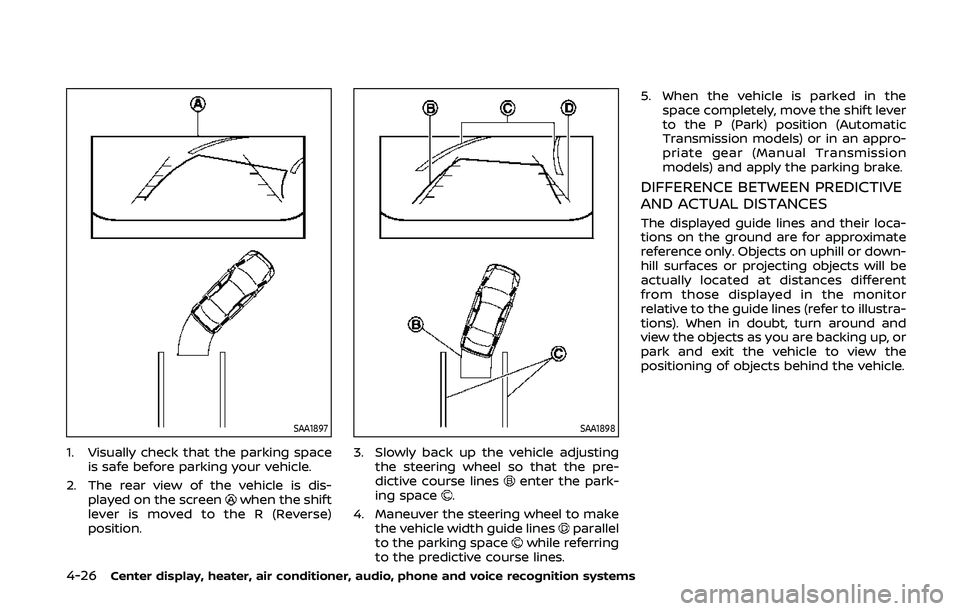
1. Visually check that the parking spaceis safe before parking your vehicle.
2. The rear view of the vehicle is dis- played on the screen
when the shift
lever is moved to the R (Reverse)
position.
SAA1898
3. Slowly back up the vehicle adjusting the steering wheel so that the pre-
dictive course lines
enter the park-
ing space.
4. Maneuver the steering wheel to make the vehicle width guide lines
parallel
to the parking spacewhile referring
to the predictive course lines. 5. When the vehicle is parked in the
space completely, move the shift lever
to the P (Park) position (Automatic
Transmission models) or in an appro-
priate gear (Manual Transmission
models) and apply the parking brake.
DIFFERENCE BETWEEN PREDICTIVE
AND ACTUAL DISTANCES
The displayed guide lines and their loca-
tions on the ground are for approximate
reference only. Objects on uphill or down-
hill surfaces or projecting objects will be
actually located at distances different
from those displayed in the monitor
relative to the guide lines (refer to illustra-
tions). When in doubt, turn around and
view the objects as you are backing up, or
park and exit the vehicle to view the
positioning of objects behind the vehicle.
Page 270 of 455
4-102Center display, heater, air conditioner, audio, phone and voice recognition systems
“Select Phone”
Use the Select Phone command to select
from a list of phones connected to the
vehicle. The system will list the names
assigned to each phone and then prompt
you for the phone you wish to select. Only
one phone can be active at a time.
“Delete Phone”
Use the Delete Phone command to delete
a phone that is connected to the vehicle.
The system will list the names assigned to
each phone and then prompt you for the
phone you wish to delete. Deleting a
phone from the vehicle will also delete
that phonebook for that phone.
“Bluetooth Off”
Use the Bluetooth Off command to pre-
vent a wireless connection to your phone.
“Replace phone”
This can be used to reconnect a new
phone with the vehicle you have changed
your cellular phone.
SPEAKER ADAPTATION (SA) MODE
Speaker Adaptation allows up to two out-
of dialect users to train the system to
improve recognition accuracy. By repeat-
ing a number of commands, the users
can create a voice model of their own
voice that is stored in the system. The
system is capable of storing a differentspeaker adaptation model for each con-
nected phone.
Training procedure
1. Position the vehicle in a reasonably
quiet outdoor location.
2. Sit in the driver’s seat with the engine running, the parking brake on, and the
transmission in Park.
3. Push and hold the
button for
more than 5 seconds.
4. The system announces: “Press the PHONE SEND (
) button for the
hands-free phone system to enter
the speaker adaptation mode or press
the PHONE END (
) button to select
a different language.”
5. Push the
button.
For information on selecting a differ-
ent language, see “Choosing a lan-
guage” (P.4-96).
6. If the connected phone is already in use, the system will prompt you to
overwrite. Follow the instructions pro-
vided by the system.
7. When preparation is complete and you are ready to begin, push the
button.
8. The SA mode will be explained. Follow the instructions provided by the sys-
tem. 9. When training is finished, the system
will tell you an adequate number of
phrases have been recorded.
10. The system will announce that speak- er adaptation has been completed
and the system is ready.
The SA mode will stop if:
. The
button is pressed for more
than 5 seconds in SA mode.
. The vehicle is driven during SA mode.
. The ignition switch is placed in the
OFF or LOCK position.
Training phrases
During the SA mode, the system instructs
you to say the following phrases.
(The system will prompt you for each
phrase.)
.phonebook transfer entry
. dial 3 0 4 2 9
. delete call back number
. Incoming
. Transfer entry
. 8 pause 9 3 2 pause 7
. delete all entries
. call 7 2 4 0 9
. phonebook delete entry
. next entry
Page 299 of 455
5 Starting and driving
Precautions when starting and driving ...................... 5-2Exhaust gas (carbon monoxide) ................................ 5-2
Three-way catalyst ............................................................... 5-3
Tire Pressure Monitoring System (TPMS) ........... 5-3
Avoiding collision and rollover .................................... 5-6
Off-road recovery .................................................................. 5-6
Rapid air pressure loss ...................................................... 5-6
Drinking alcohol/drugs and driving ........................ 5-7
Push-button ignition switch ................................................ 5-8 Operating range for engine start function ....... 5-8
Push-button ignition switch operation ................ 5-9
Push-button ignition switch positions ................. 5-9
Emergency engine shut off ........................................ 5-10
Intelligent Key battery discharge ........................... 5-10
Before starting the engine ................................................. 5-11
Starting the engine .................................................................. 5-11
Driving the vehicle .................................................................... 5-12 Automatic transmission ................................................ 5-12
Manual Transmission ....................................................... 5-17
Parking brake ........................................................................\
....... 5-21
Cruise control ........................................................................\
....... 5-22 Precautions on cruise control .................................. 5-22
Cruise control operations ............................................ 5-23
Break-in schedule ..................................................................... 5-24
Fuel efficient driving tips ..................................................... 5-24 Increasing fuel economy .................................................... 5-25
Parking/parking on hills ...................................................... 5-26
Power steering ........................................................................\
.... 5-27
Brake system ........................................................................\
....... 5-27
Braking precautions ....................................................... 5-27
Parking brake break-in ................................................ 5-28
Brake assist ........................................................................\
........... 5-28 Brake assist ........................................................................\
... 5-28
Anti-lock Braking System (ABS) ............................ 5-28
Vehicle Dynamic Control (VDC) system .................. 5-30
Performance dampers (NISMO models) ................. 5-32
Cold weather driving ............................................................. 5-33 Freeing a frozen door lock ....................................... 5-33
Antifreeze ........................................................................\
........ 5-33
Battery ........................................................................\
............... 5-33
Draining of coolant water ......................................... 5-33
Tire equipment ................................................................... 5-33
Special winter equipment ......................................... 5-33
Driving on snow or ice ................................................. 5-33
Engine block heater (if so equipped) ............... 5-34
Active noise cancellation/Active sound
enhancement (if so equipped) ....................................... 5-35 Active noise cancellation ........................................... 5-35
Active sound enhancement ..................................... 5-35