warning lights NISSAN 370Z 2020 Owner´s Manual
[x] Cancel search | Manufacturer: NISSAN, Model Year: 2020, Model line: 370Z, Model: NISSAN 370Z 2020Pages: 455, PDF Size: 2.22 MB
Page 103 of 455
To defog/defrost the rear window glass
and outside mirrors, start the engine and
push the switch
on. The indicator lightwill come on. Push the switch again to
turn the defroster off.
It will automatically turn off in approxi-
mately 15 minutes.
CAUTION
. When cleaning the inner side of
the rear window, be careful not to
scratch or damage the rear win-
dow defroster.
. Do not use the rear window
defroster switch while the soft
top is being operated or fully
opened. The heat may damage
the top material and/or compo-
nents (for Roadster models).
XENON HEADLIGHTS
WARNING
HIGH VOLTAGE
. When xenon headlights are on,
they produce a high voltage. To
prevent an electric shock, never
attempt to modify or disassem-
ble. Always have your xenon
headlights replaced by a certified
service technician.
. Xenon headlights provide consid-
erably more light than conven-
tional headlights. If they are not
correctly aimed, they might tem-
porarily blind an oncoming driver
or the driver ahead of you and
cause a serious accident. If head-
lights are not aimed correctly, it is
recommended you immediately
take your vehicle to a NISSAN
dealer and have the headlights
adjusted correctly.
When the xenon headlight is initially
turned on, its brightness or color varies
slightly. However, the color and bright-
ness will soon stabilize. .
The life of xenon headlights will be
shortened by frequent on-off opera-
tion. It is generally desirable not to
turn off the headlights for short
intervals (for example, when the
vehicle stops at a traffic signal).
. If the xenon headlight bulb is close
to burning out, the brightness will
drastically decrease, the light will
start blinking, or the color of the
light will become reddish. If one or
more of the above signs appear, it is
recommended you visit a NISSAN
dealer.
Instruments and controls2-35
HEADLIGHT AND TURN SIGNAL SWITCH
Page 106 of 455
2-38Instruments and controls
if the headlights turn off auto-
matically.
Daytime running light system
The daytime running lights automatically
illuminate when the engine is started with
the parking brake released. The daytime
running lights operate with the headlight
switch in the OFF position or in the
position. Turn the headlight switch to theposition for full illumination when
driving at night. However, the daytime
running lights will turn off.
If the parking brake is applied before the
engine is started, the daytime running
lights do not illuminate. The daytime
running lights illuminate once the parking
brake is released. The daytime running
lights will remain on until the ignition
switch is pushed to the OFF position.
WARNING
When the daytime running light sys-
tem is active, tail lights on your
vehicle are not on. It is necessary at
dusk to turn on your headlights.
Failure to do so could cause an
accident injuring yourself and
others.
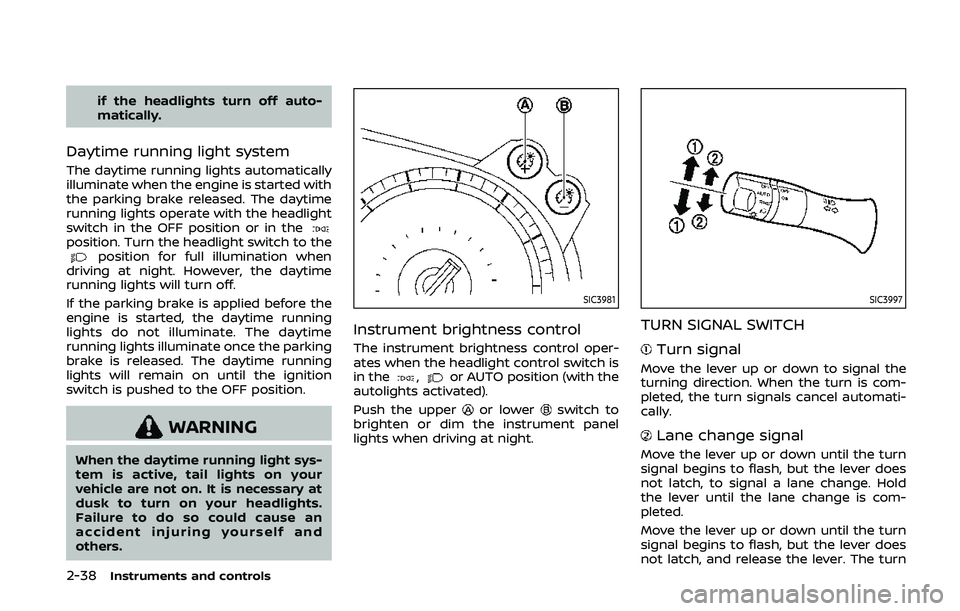
SIC3981
Instrument brightness control
The instrument brightness control oper-
ates when the headlight control switch is
in the
,or AUTO position (with the
autolights activated).
Push the upper
or lowerswitch to
brighten or dim the instrument panel
lights when driving at night.
SIC3997
TURN SIGNAL SWITCH
Turn signal
Move the lever up or down to signal the
turning direction. When the turn is com-
pleted, the turn signals cancel automati-
cally.
Lane change signal
Move the lever up or down until the turn
signal begins to flash, but the lever does
not latch, to signal a lane change. Hold
the lever until the lane change is com-
pleted.
Move the lever up or down until the turn
signal begins to flash, but the lever does
not latch, and release the lever. The turn
Page 140 of 455
3-14Pre-driving checks and adjustments
Locking doors, rear hatch/trunk lid
and fuel-filler door
1. Push the ignition switch to the OFFposition and make sure you carry the
Intelligent Key with you.*
2. Close all the doors and the rear hatch/ trunk lid.
3. Push the LOCK
buttonon the
Intelligent Key.
4. All the doors, the rear hatch/trunk lid and fuel-filler door will lock.
5. The hazard indicator flashes twice and the horn chirps once.
*: Doors and the rear hatch/trunk lid will
lock with the Intelligent Key while the
ignition switch is in the ACC or ON
position.
Unlocking doors, rear hatch/trunk
lid and fuel-filler door
1. Push the UNLOCKbuttonon
the Intelligent Key once.
2. The hazard indicator flashes once. The driver’s door and fuel-filler door will
unlock.
3. Push the UNLOCK
button on the
Intelligent Key again within 60 sec-
onds.
4. The hazard indicator flashes once again. All the doors and the rear hatch/trunk lid will unlock.
All doors and the rear hatch/trunk lid will
be locked automatically unless one of the
following operations is performed within 1
minute after pushing the UNLOCK
button on the Intelligent Key while the
doors are locked. If during this 1-minute
time period, the UNLOCK
button on
the Intelligent Key is pushed, all doors and
the rear hatch/trunk lid will be locked
automatically after another 1 minute.
. Opening any door
. Pushing the ignition switch
. Inserting the Intelligent Key into the
Intelligent Key port
Opening windows
The UNLOCKbutton operation also
allows you to open a window that is
equipped with the automatic open/close
function. (See “Power windows” (P.2-48).)
To open the window, push the UNLOCK
buttonon the Intelligent Key for
about 3 seconds after the door is un-
locked.
To stop opening, release the UNLOCK
button.
Window cannot be closed using the
Intelligent Key.
Using panic alarm
If you are near your vehicle and feel
threatened, you may activate the alarm
to call attention as follows:
1. Push the PANIC
buttonon the
Intelligent Key for more than 1 sec-
ond.
2. The theft warning alarm and head- lights will stay on for 25 seconds.
3. The panic alarm stops when:
.It has run for 25 seconds, or.Any of the buttons on the Intelligent Key are pushed. (Note: PANIC but-
ton should be pushed for more
than 1 second.)
Setting hazard indicator and horn
mode
This vehicle is set in hazard indicator and
horn mode when you first receive the
vehicle.
In hazard indicator and horn mode, when
the LOCK
buttonis pushed, the
hazard indicator flashes twice and the
horn chirps once. When the UNLOCK
buttonis pushed, the hazard indicator
flashes once.
If horns are not necessary, the system
can be switched to the hazard indicator
mode.
Page 165 of 455
Automatic anti-glare type
The inside mirror is designed so that it
automatically changes reflection accord-
ing to the intensity of the headlights of
the following vehicle.
The anti-glare system will be automati-
cally turned on when the ignition switch is
pushed to the ON position.
When the anti-glare system is turned on,
the indicator light
will illuminate and
excessive glare from the headlights of the
vehicle behind you will be reduced.
While the shift lever is in the R (Reverse)
position, the automatic anti-glare func-
tion does not operate.
Type A:
Push the
switchfor 3 seconds to
make the inside mirror operate normally
and the indicator light will turn off. Push
the
switchagain for 3 seconds to
turn the system on.
When the shift lever is moved into the R
(Reverse) position, the monitor display
shows the view to the rear of the vehicle.
(See “RearView monitor (mirror display
type)” (P.4-17).)
Do not hang any objects on the mirror
or apply glass cleaner. Doing so will
reduce the sensitivity of the sensor
,
resulting in improper operation. Type B:
Push the
*switch
to make the inside
mirror operate normally. The indicator
light will turn off. Push the I switch
to
turn the system on.
When the shift lever is moved into the R
(Reverse) position, the monitor display
shows the view to the rear of the vehicle.
(See “RearView monitor (mirror display
type)” (P.4-17).)
Do not allow any object to cover the
sensors
or apply glass cleaner on
them. Doing so will reduce the sensitiv-
ity of the sensor, resulting in improper
operation.
For the HomeLink® Universal Transceiver
operation, see “HomeLink® Universal
Transceiver” (P.2-54).
OUTSIDE MIRRORS
WARNING
Objects viewed in the outside mirror
on the passenger side are closer
than they appear. Be careful when
moving to the right. Using only this
mirror could cause an accident. Use
the inside mirror or glance over your
shoulder to properly judge distances
to other objects.
Pre-driving checks and adjustments3-39
Page 309 of 455
.Make sure the area around the vehicle
is clear.
. Check fluid levels such as engine oil,
coolant, brake fluid and window
washer fluid as frequently as possible,
or at least whenever you refuel.
. Check that all windows and lights are
clean.
. Visually inspect tires for their appear-
ance and condition. Also check tires
for proper inflation.
. Lock all doors.
. Position seat and adjust head re-
straints.
. Adjust inside and outside mirrors.
. Fasten seat belts and ask all passen-
gers to do likewise.
. Check the operation of warning lights
when the ignition switch is pushed to
the ON position. (See “Warning lights,
indicator lights and audible remin-
ders” (P.2-10).) 1. Apply the parking brake.
2.
Automatic Transmission (AT) model:
Move the shift lever to the P (Park) or N
(Neutral) position. (P is recommended.)
The starter is designed not to operate
unless the shift lever is in either of the
above positions.
Manual Transmission (MT) model:
Move the shift lever to the N (Neutral)
position. Depress the clutch pedal fully
to the floor.
The starter is designed not to operate
unless the clutch pedal is fully de-
pressed.
The Intelligent Key must be carried
when operating the ignition switch.
3. Push the ignition switch to the ON position. Firmly depress the brake
pedal (AT model) or the clutch pedal
(MT model) and push the ignition
switch to start the engine.
To start the engine immediately, push
and release the ignition switch while
depressing the brake pedal or the
clutch pedal with the ignition switch
in any position.
.If the engine is very hard to start inextremely cold weather or when
restarting, depress the accelerator
pedal a little (approximately 1/3 to the floor) and while holding, crank
the engine. Release the accelerator
pedal when the engine starts.
.If the engine is very hard to start
because it is flooded, depress the
accelerator pedal all the way to the
floor and hold it. Push the ignition
switch to the ON position to start
cranking the engine. After 5 or 6
seconds, stop cranking by pushing
the ignition switch to OFF. After
cranking the engine, release the
accelerator pedal. Crank the engine
with your foot off the accelerator
pedal by depressing the brake
pedal and pushing the push-button
ignition switch to start the engine.
If the engine starts, but fails to run,
repeat the above procedure.
CAUTION
Do not operate the starter for more
than 15 seconds at a time. If the
engine does not start, push the
ignition switch to OFF and wait 10
seconds before cranking again,
otherwise the starter could be da-
maged.
Starting and driving5-11
BEFORE STARTING THE ENGINE STARTING THE ENGINE
Page 336 of 455
6-2In case of emergency
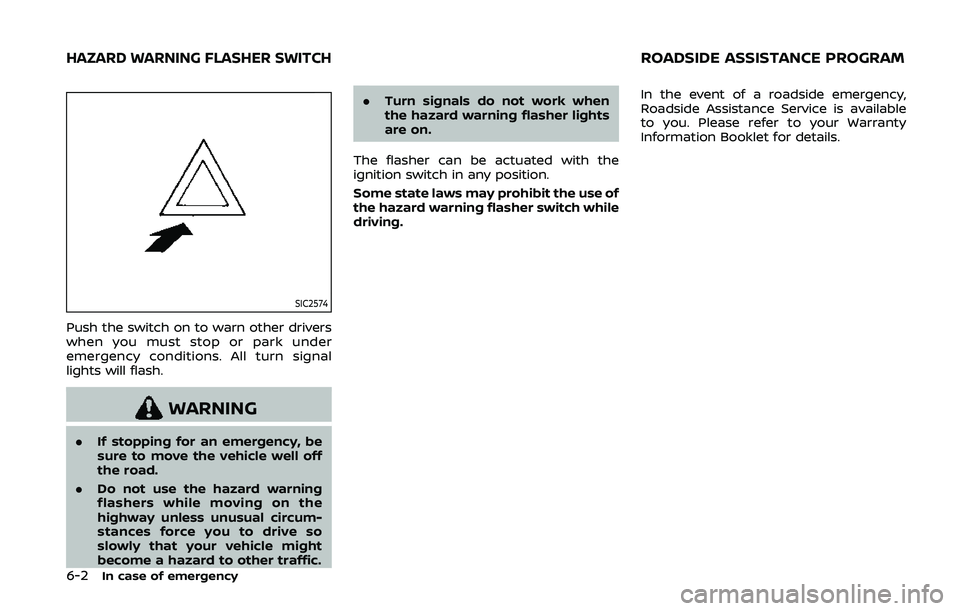
SIC2574
Push the switch on to warn other drivers
when you must stop or park under
emergency conditions. All turn signal
lights will flash.
WARNING
.If stopping for an emergency, be
sure to move the vehicle well off
the road.
. Do not use the hazard warning
flashers while moving on the
highway unless unusual circum-
stances force you to drive so
slowly that your vehicle might
become a hazard to other traffic. .
Turn signals do not work when
the hazard warning flasher lights
are on.
The flasher can be actuated with the
ignition switch in any position.
Some state laws may prohibit the use of
the hazard warning flasher switch while
driving. In the event of a roadside emergency,
Roadside Assistance Service is available
to you. Please refer to your Warranty
Information Booklet for details.
HAZARD WARNING FLASHER SWITCHROADSIDE ASSISTANCE PROGRAM
Page 337 of 455
To shut off the engine in an emergency
situation while driving, perform the fol-
lowing procedure:
.Rapidly push the push-button ignition
switch 3 consecutive times in less
than 1.5 seconds, or
. Push and hold the push-button igni-
tion switch for more than 2 seconds.TIRE PRESSURE MONITORING SYS-
TEM (TPMS)
This vehicle is equipped with the Tire
Pressure Monitoring System (TPMS). It
monitors tire pressure of all tires except
the spare. When the low tire pressure
warning light is lit and the CHECK TIRE
PRESSURE warning appears on the vehi-
cle information display, one or more of
your tires is significantly under-inflated. If
the vehicle is being driven with low tire
pressure, the TPMS will activate and warn
you of it by the low tire pressure warning
light. This system will activate only when
the vehicle is driven at speeds above 16
MPH (25 km/h). For more details, see
“Warning lights, indicator lights and audi-
ble reminders” (P.2-10) and “Tire Pressure
Monitoring System (TPMS)” (P.5-3).
WARNING
.If the low tire pressure warning
light illuminates while driving,
avoid sudden steering maneu-
vers or abrupt braking, reduce
vehicle speed, pull off the road
to a safe location and stop the
vehicle as soon as possible. Driv-
ing with under-inflated tires may
permanently damage the tires
and increase the likelihood of tire failure. Serious vehicle damage
could occur and may lead to an
accident and could result in ser-
ious personal injury. Check the
tire pressure for all four tires.
Adjust the tire pressure to the
recommended COLD tire pressure
shown on the Tire and Loading
Information label to turn the low
tire pressure warning light OFF. If
the light still illuminates while
driving after adjusting the tire
pressure, a tire may be flat or
the TPMS may be malfunctioning.
If you have a flat tire, replace it
with a spare tire (if so equipped)
or repair it with the tire puncture
repair kit (if so equipped) as soon
as possible. If no tire is flat and all
tires are properly inflated, it is
recommended you consult a
NISSAN dealer.
. Since the spare tire is not
equipped with the TPMS, when a
spare tire is mounted or a wheel
is replaced, the TPMS will not
function and the low tire pressure
warning light will flash for ap-
proximately 1 minute. The light
will remain on after 1 minute.
Have your tires replaced and/or
TPMS system reset as soon as
In case of emergency6-3
EMERGENCY ENGINE SHUT OFF FLAT TIRE
Page 369 of 455
8 Do-it-yourself
Maintenance precautions ...................................................... 8-2
Engine compartment check locations ........................ 8-3VQ37VHR engine model .................................................. 8-3
Engine cooling system ............................................................. 8-4 Checking engine coolant level .................................... 8-5
Changing engine coolant ................................................ 8-5
Engine oil ........................................................................\
..................... 8-6 Checking engine oil level ................................................. 8-6
Changing engine oil and filter ..................................... 8-6
Automatic Transmission Fluid (ATF) ............................. 8-8
Power steering fluid ................................................................... 8-8
Brake and clutch fluid ............................................................... 8-9 Brake fluid ........................................................................\
............ 8-9
Clutch fluid (Manual
transmission models) ...................................................... 8-10
Window washer fluid .............................................................. 8-10
Battery ........................................................................\
........................ 8-11 Jump starting ........................................................................\
. 8-13
Variable voltage control system ................................... 8-13
Drive belts ........................................................................\
................ 8-14
Spark plugs ........................................................................\
............. 8-14 Replacing spark plugs ..................................................... 8-15
Air cleaner ........................................................................\
............... 8-15 Windshield wiper blades ..................................................... 8-16
Cleaning ........................................................................\
........... 8-16
Replacing ........................................................................\
........ 8-16
Brakes ........................................................................\
........................ 8-17 Self-adjusting brakes ..................................................... 8-17
Brake pad wear warning ............................................ 8-17
Fuses ........................................................................\
........................... 8-18 Engine compartment .................................................... 8-18
Passenger compartment ........................................... 8-19
Intelligent Key battery replacement .......................... 8-20
Lights ........................................................................\
.......................... 8-22 Coupe ........................................................................\
................ 8-22
Roadster ........................................................................\
.......... 8-23
Headlights ........................................................................\
...... 8-23
Exterior and interior lights ........................................ 8-24
Wheels and tires ........................................................................\
8-26
Tire pressure ........................................................................\
8-26
Tire labeling ........................................................................\
.. 8-30
Types of tires ....................................................................... 8-32
Tire chains ........................................................................\
...... 8-33
Changing wheels and tires ...................................... 8-34
Emergency tire puncture repair kit (if
so equipped) ........................................................................\
. 8-37
Page 392 of 455
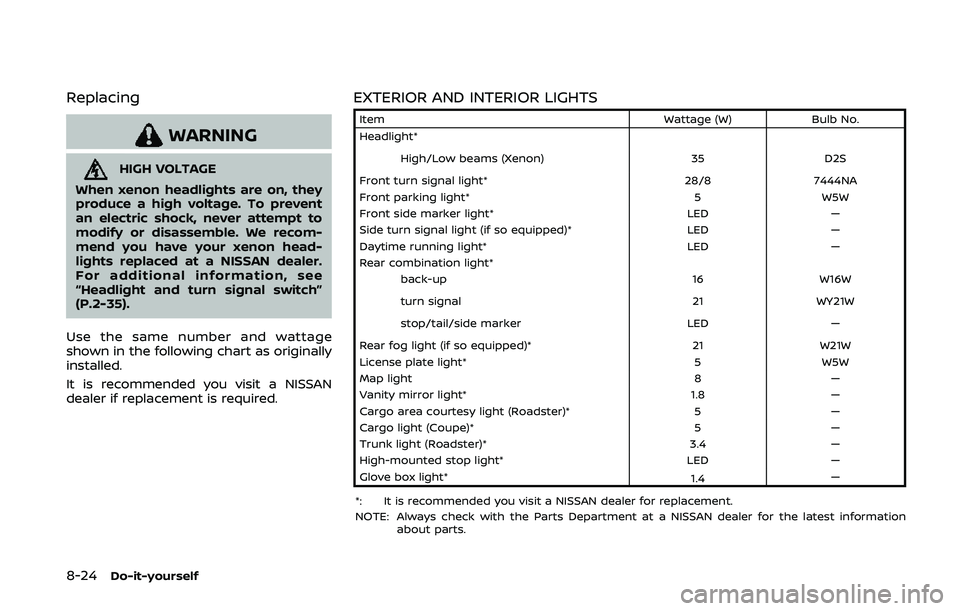
8-24Do-it-yourself
Replacing
WARNING
HIGH VOLTAGE
When xenon headlights are on, they
produce a high voltage. To prevent
an electric shock, never attempt to
modify or disassemble. We recom-
mend you have your xenon head-
lights replaced at a NISSAN dealer.
For additional information, see
“Headlight and turn signal switch”
(P.2-35).
Use the same number and wattage
shown in the following chart as originally
installed.
It is recommended you visit a NISSAN
dealer if replacement is required.
EXTERIOR AND INTERIOR LIGHTS
Item Wattage (W)Bulb No.
Headlight*
High/Low beams (Xenon) 35D2S
Front turn signal light* 28/87444NA
Front parking light* 5W5W
Front side marker light* LED—
Side turn signal light (if so equipped)* LED—
Daytime running light* LED—
Rear combination light*
back-up 16W16W
turn signal 21WY21W
stop/tail/side marker LED—
Rear fog light (if so equipped)* 21W21W
License plate light* 5W5W
Map light 8—
Vanity mirror light* 1.8—
Cargo area courtesy light (Roadster)* 5—
Cargo light (Coupe)* 5—
Trunk light (Roadster)* 3.4—
High-mounted stop light* LED—
Glove box light* 1.4—
*: It is recommended you visit a NISSAN dealer for replacement.
NOTE: Always check with the Parts Department at a NISSAN dealer for the latest information about parts.
Page 410 of 455
9-4Maintenance and schedules
so equipped) hold securely in all latched
positions.
Seat belts:Check that all parts of the seat
belt system (for example, buckles, an-
chors, adjuster and retractors) operate
properly and smoothly, and are installed
securely. Check the belt webbing for cuts,
fraying, wear or damage.
Steering wheel: Check for changes in the
steering conditions, such as excessive
free play, hard steering or strange noises.
Warning lights and chimes: Make sure
that all warning lights and chimes are
operating properly.
Windshield defroster: Check that the air
comes out of the defroster outlets prop-
erly and in sufficient quantity when oper-
ating the heater or air conditioner.
Windshield wiper and washer*: Check
that the wipers and washer operate
properly and that the wipers do not
streak.
Under the hood and vehicle
The maintenance items listed here should
be checked periodically (for example,
each time you check the engine oil or
refuel).
Battery*: Check the fluid level in each cell.
It should be between the MAX and MIN
lines. Vehicles operated in high tempera- tures or under severe condition require
frequent checks of the battery fluid level.
NOTE:
Care should be taken to avoid situations
that can lead to potential battery dis-
charge and potential no-start condi-
tions such as:
1.
Installation or extended use of elec-
tronic accessories that consume
battery power when the engine is
not running (Phone chargers, GPS,
DVD players, etc.)
2. Vehicle is not driven regularly and/
or only driven short distances.
In these cases, the battery may need to
be charged to maintain battery health.
Brake and clutch fluid levels*: Make sure
that the brake and clutch fluid levels are
between the MAX and MIN lines on the
reservoir.
Engine coolant level*: Check the coolant
level when the engine is cold.
Engine drive belts*: Make sure that no
belt is frayed, worn, cracked or oily.
Engine oil level*: Check the level after
parking the vehicle on a level spot and
turning off the engine. Wait more than 15
minutes for the oil to drain back into the
oil pan.
Exhaust system: Make sure there are no loose supports, cracks or holes. If the
sound of the exhaust seems unusual or
there is a smell of exhaust fumes, im-
mediately have the exhaust system in-
spected. It is recommended you visit a
NISSAN dealer for this service. (See “Pre-
cautions when starting and driving” (P.5-
2) for exhaust gas (carbon monoxide).)
Fluid leaks:
Check under the vehicle for
fuel, oil, water or other fluid leaks after the
vehicle has been parked for a while. Water
dripping from the air conditioner after use
is normal. If you should notice any leaks
or if gasoline fumes are evident, check for
the cause and have it corrected immedi-
ately.
Power steering fluid level* and lines:
Check the level when the fluid is cold, with
the engine off. Check the lines for proper
attachment, leaks, cracks, etc.
Radiator and hoses: Check the front of
the radiator and clean off any dirt, insects,
leaves, etc., that may have accumulated.
Make sure the hoses have no cracks,
deformation, rot or loose connections.
Underbody: The underbody is frequently
exposed to corrosive substances such as
those used on icy roads or to control
dust. It is very important to remove these
substances, otherwise rust will form on
the floor pan, frame, fuel lines and around
the exhaust system. At the end of winter,