mirror NISSAN 370Z 2020 Owner´s Manual
[x] Cancel search | Manufacturer: NISSAN, Model Year: 2020, Model line: 370Z, Model: NISSAN 370Z 2020Pages: 455, PDF Size: 2.22 MB
Page 12 of 455
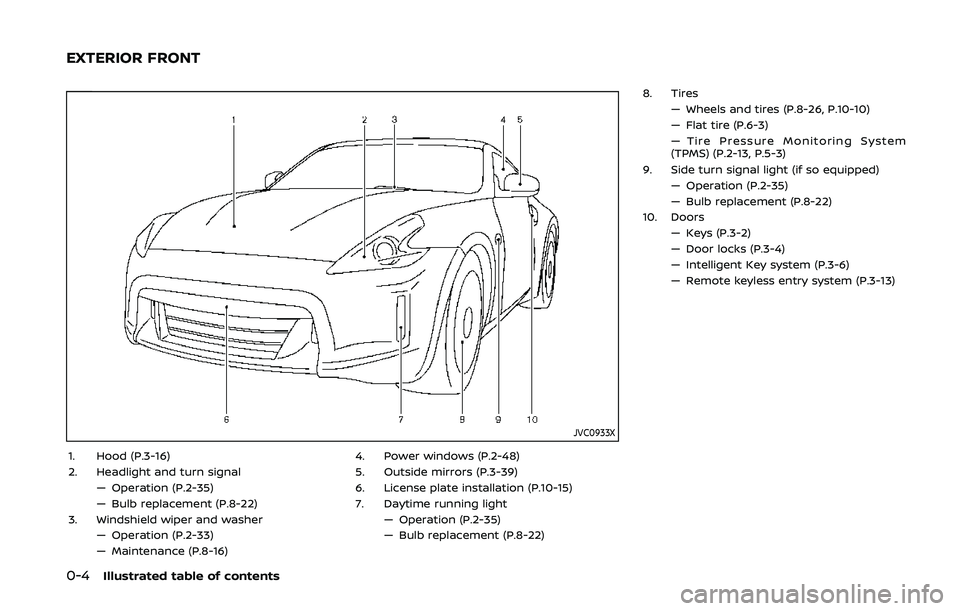
0-4Illustrated table of contents
JVC0933X
1. Hood (P.3-16)
2. Headlight and turn signal— Operation (P.2-35)
— Bulb replacement (P.8-22)
3. Windshield wiper and washer — Operation (P.2-33)
— Maintenance (P.8-16) 4. Power windows (P.2-48)
5. Outside mirrors (P.3-39)
6. License plate installation (P.10-15)
7. Daytime running light
— Operation (P.2-35)
— Bulb replacement (P.8-22) 8. Tires
— Wheels and tires (P.8-26, P.10-10)
— Flat tire (P.6-3)
— Tire Pressure Monitoring System
(TPMS) (P.2-13, P.5-3)
9. Side turn signal light (if so equipped) — Operation (P.2-35)
— Bulb replacement (P.8-22)
10. Doors — Keys (P.3-2)
— Door locks (P.3-4)
— Intelligent Key system (P.3-6)
— Remote keyless entry system (P.3-13)
EXTERIOR FRONT
Page 16 of 455
0-8Illustrated table of contents
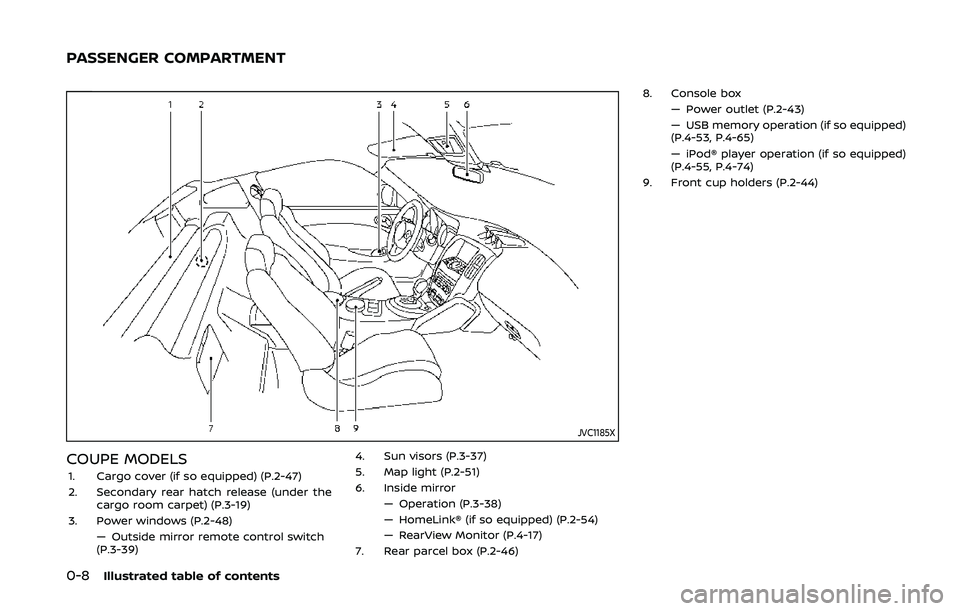
JVC1185X
COUPE MODELS1. Cargo cover (if so equipped) (P.2-47)
2. Secondary rear hatch release (under thecargo room carpet) (P.3-19)
3. Power windows (P.2-48) — Outside mirror remote control switch
(P.3-39) 4. Sun visors (P.3-37)
5. Map light (P.2-51)
6. Inside mirror
— Operation (P.3-38)
— HomeLink® (if so equipped) (P.2-54)
— RearView Monitor (P.4-17)
7. Rear parcel box (P.2-46) 8. Console box
— Power outlet (P.2-43)
— USB memory operation (if so equipped)
(P.4-53, P.4-65)
— iPod® player operation (if so equipped)
(P.4-55, P.4-74)
9. Front cup holders (P.2-44)
PASSENGER COMPARTMENT
Page 17 of 455
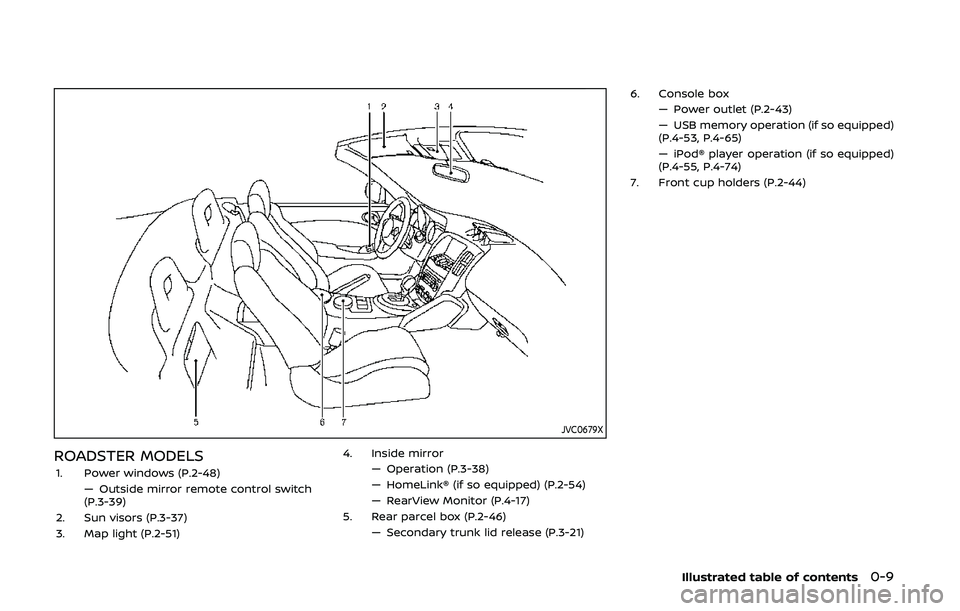
JVC0679X
ROADSTER MODELS1. Power windows (P.2-48)— Outside mirror remote control switch
(P.3-39)
2. Sun visors (P.3-37)
3. Map light (P.2-51) 4. Inside mirror
— Operation (P.3-38)
— HomeLink® (if so equipped) (P.2-54)
— RearView Monitor (P.4-17)
5. Rear parcel box (P.2-46) — Secondary trunk lid release (P.3-21) 6. Console box
— Power outlet (P.2-43)
— USB memory operation (if so equipped)
(P.4-53, P.4-65)
— iPod® player operation (if so equipped)
(P.4-55, P.4-74)
7. Front cup holders (P.2-44)
Illustrated table of contents0-9
Page 69 of 455
2 Instruments and controls
Cockpit ........................................................................\
.......................... 2-3
Instrument panel ........................................................................\
.. 2-4
Meters and gauges ..................................................................... 2-5Speedometer and odometer ........................................ 2-6
Tachometer ........................................................................\
........ 2-7
Engine coolant temperature gauge ....................... 2-7
Fuel gauge ........................................................................\
........... 2-8
Triple meter ........................................................................\
........ 2-8
Warning lights, indicator lights and
audible reminders ..................................................................... 2-10
Checking lights ..................................................................... 2-11
Warning lights ........................................................................\
2-11
Indicator lights ...................................................................... 2-15
Audible reminders .............................................................. 2-18
Vehicle information display ............................................... 2-19 Operational indicators .................................................... 2-20
Warnings and alerts .......................................................... 2-22
Maintenance indicators ................................................. 2-24
Trip computer ........................................................................\
2-25
Security systems ........................................................................\
2-30
Vehicle Security System ................................................ 2-30
NISSAN Vehicle Immobilizer System .................... 2-32
Wiper and washer switch .................................................... 2-33
Rear window defroster switch ........................................ 2-34 Headlight and turn signal switch ................................ 2-35
Xenon headlights ............................................................. 2-35
Headlight switch ............................................................... 2-36
Turn signal switch ........................................................... 2-38
Fog light switch (if so equipped) ......................... 2-39
Horn ........................................................................\
............................. 2-39
Heated seats (if so equipped) ......................................... 2-40
Climate controlled seats (if so equipped) ............. 2-41
Vehicle Dynamic Control (VDC) OFF switch ........ 2-42
Power outlet ........................................................................\
......... 2-43
Storage ........................................................................\
...................... 2-44 Instrument pocket (except for navigation
system equipped models) ......................................... 2-44
Cup holders ........................................................................\
... 2-44
Glove box ........................................................................\
........ 2-45
Console box ........................................................................\
.. 2-46
Rear parcel box .................................................................. 2-46
Cargo cover (if so equipped) ................................... 2-47
Windows ........................................................................\
................... 2-48 Power windows ................................................................. 2-48
Interior lights ........................................................................\
........ 2-51 Map lights ........................................................................\
....... 2-51
Interior light control switch ..................................... 2-51
Vanity mirror lights ................................................................. 2-52
Page 103 of 455
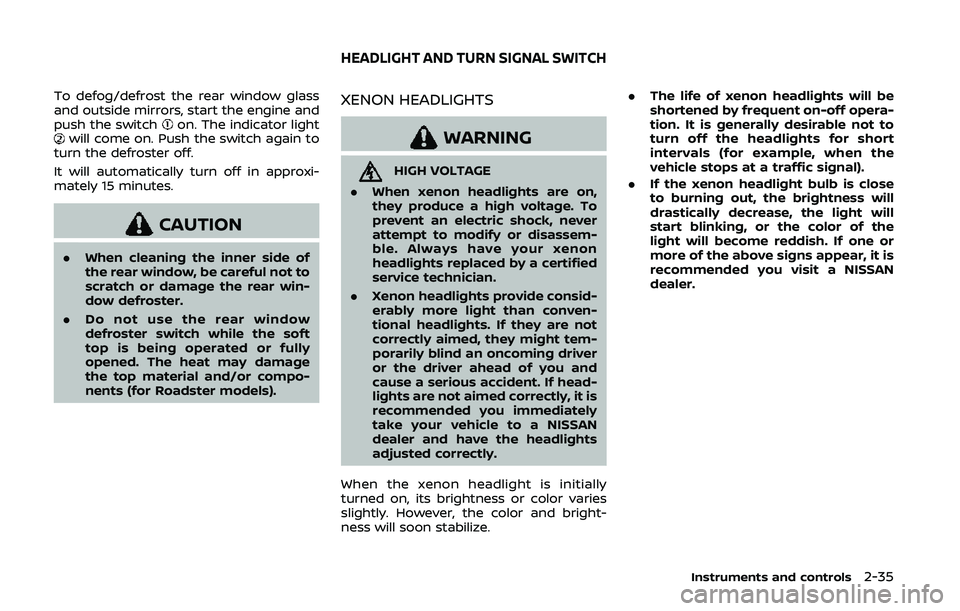
To defog/defrost the rear window glass
and outside mirrors, start the engine and
push the switch
on. The indicator lightwill come on. Push the switch again to
turn the defroster off.
It will automatically turn off in approxi-
mately 15 minutes.
CAUTION
. When cleaning the inner side of
the rear window, be careful not to
scratch or damage the rear win-
dow defroster.
. Do not use the rear window
defroster switch while the soft
top is being operated or fully
opened. The heat may damage
the top material and/or compo-
nents (for Roadster models).
XENON HEADLIGHTS
WARNING
HIGH VOLTAGE
. When xenon headlights are on,
they produce a high voltage. To
prevent an electric shock, never
attempt to modify or disassem-
ble. Always have your xenon
headlights replaced by a certified
service technician.
. Xenon headlights provide consid-
erably more light than conven-
tional headlights. If they are not
correctly aimed, they might tem-
porarily blind an oncoming driver
or the driver ahead of you and
cause a serious accident. If head-
lights are not aimed correctly, it is
recommended you immediately
take your vehicle to a NISSAN
dealer and have the headlights
adjusted correctly.
When the xenon headlight is initially
turned on, its brightness or color varies
slightly. However, the color and bright-
ness will soon stabilize. .
The life of xenon headlights will be
shortened by frequent on-off opera-
tion. It is generally desirable not to
turn off the headlights for short
intervals (for example, when the
vehicle stops at a traffic signal).
. If the xenon headlight bulb is close
to burning out, the brightness will
drastically decrease, the light will
start blinking, or the color of the
light will become reddish. If one or
more of the above signs appear, it is
recommended you visit a NISSAN
dealer.
Instruments and controls2-35
HEADLIGHT AND TURN SIGNAL SWITCH
Page 120 of 455
2-52Instruments and controls
.doors are unlocked by pushing the
UNLOCK button on the Intelligent Key
or door handle request switch with
the ignition switch in the LOCK posi-
tion
— remain on for about 15 seconds.
. any door is opened and then closed
with the ignition switch in the LOCK
position
— remain on for about 15 seconds.
. any door is opened with the ignition
switch in the ACC or ON position
— remain on while the door is opened.
When the door is closed, the lights
go off.
The lights will also turn off after a
period of time when the lights remain
illuminated after the ignition switch has
been pushed to the OFF or LOCK posi-
tion to prevent the battery from becom-
ing discharged.
Models with navigation system:
When the auto interior illumination is set
to the OFF position (see “Vehicle informa-
tion and settings (models with navigation
system)” (P.4-8)), the lights will illuminate
under the following condition:
. any door is opened with the ignition
switch in any position — remain on while the door is opened.
When the door is closed, the lights
go off.
OFF position
When the switch is in the OFF position,
the lights will not illuminate, regardless of
the condition.
CAUTION
Do not use for extended periods of
time with the engine stopped. This
could result in a discharged battery.
SIC3869
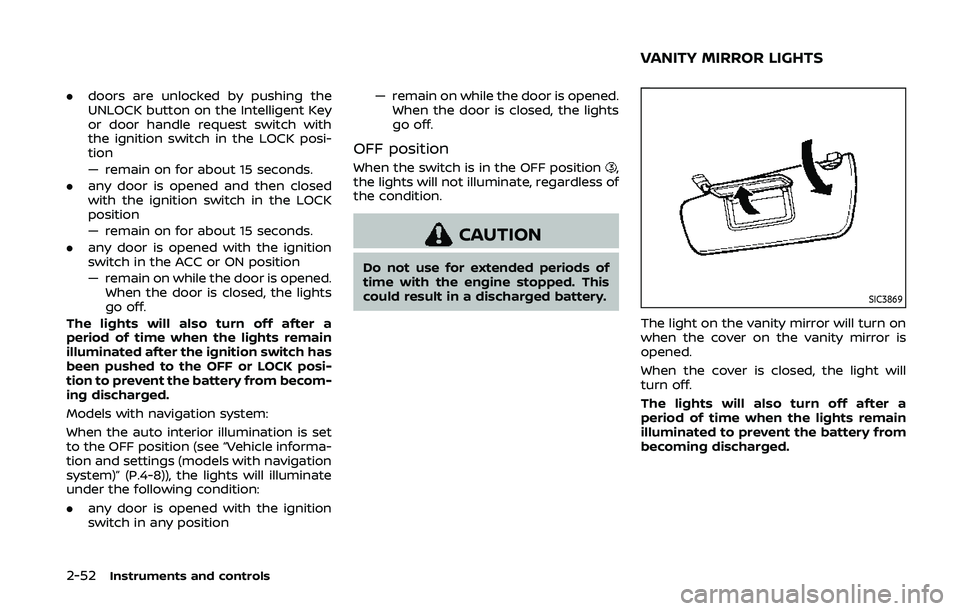
The light on the vanity mirror will turn on
when the cover on the vanity mirror is
opened.
When the cover is closed, the light will
turn off.
The lights will also turn off after a
period of time when the lights remain
illuminated to prevent the battery from
becoming discharged.
VANITY MIRROR LIGHTS
Page 127 of 455
3 Pre-driving checks and adjustments
Keys ........................................................................\
................................. 3-2Intelligent Key ........................................................................\
... 3-2
Valet hand-off ........................................................................\
... 3-3
Doors ........................................................................\
.............................. 3-4 Locking with mechanical key ...................................... 3-4
Locking with inside lock knob ..................................... 3-4
Locking with power door lock switch ................... 3-5
Automatic door locks ......................................................... 3-5
Intelligent Key system .............................................................. 3-6 Intelligent Key operating range ................................ 3-7
Door locks/unlocks precaution ................................ 3-8
Intelligent Key operation ................................................. 3-9
Battery saver system ....................................................... 3-10
Warning signals .................................................................... 3-11
Troubleshooting guide ................................................... 3-12
Remote keyless entry system ......................................... 3-13
How to use remote keyless entry system ...... 3-13
Hood ........................................................................\
............................. 3-16
Rear hatch (Coupe models) .............................................. 3-17 Rear hatch opener switch ........................................... 3-17
Rear hatch release switch ........................................... 3-18
Secondary rear hatch release .................................. 3-19
Trunk lid (Roadster models) .............................................. 3-19
Trunk lid opener switch ................................................. 3-20
Trunk release power cancel switch ..................... 3-20 Interior trunk lid release ............................................. 3-20
Secondary trunk lid release ..................................... 3-21
Soft top (Roadster models) .............................................. 3-22
Before operating the top ........................................... 3-22
When operating the top ............................................. 3-24
Opening the top ................................................................ 3-26
Closing the top ................................................................... 3-26
Opening the top using the
Intelligent Key ...................................................................... 3-27
Troubleshooting guide ................................................ 3-28
If the top does not open or
close electrically ................................................................ 3-29
Care of the soft top and the
vehicle body ........................................................................\
.. 3-32
Front, side and rear unique parts
(NISMO models) ........................................................................\
.. 3-33
Fuel-filler door ........................................................................\
..... 3-34 Opening the fuel-filler door ...................................... 3-34
Fuel-filler cap ....................................................................... 3-35
Tilt steering ........................................................................\
............ 3-37
Manual operation ............................................................. 3-37
Sun visors ........................................................................\
................ 3-37
Mirrors ........................................................................\
........................ 3-38
Inside mirror ........................................................................\
. 3-38
Outside mirrors .................................................................. 3-39
Vanity mirror ........................................................................\
3-41
Page 164 of 455
3-38Pre-driving checks and adjustments
CAUTION
.Do not store the main sun visor
before storing the extension sun
visor.
. Do not pull the extension sun
visor forcedly downwards.
1. To block out glare from the front, swing down the main sun visor
.
2. To block glare from the side, remove the main sun visor from the center
mount and swing it to the side
.
3. Draw out the extension sun visor
(if
so equipped) from the main sun visor
to block further glare.SPA2447
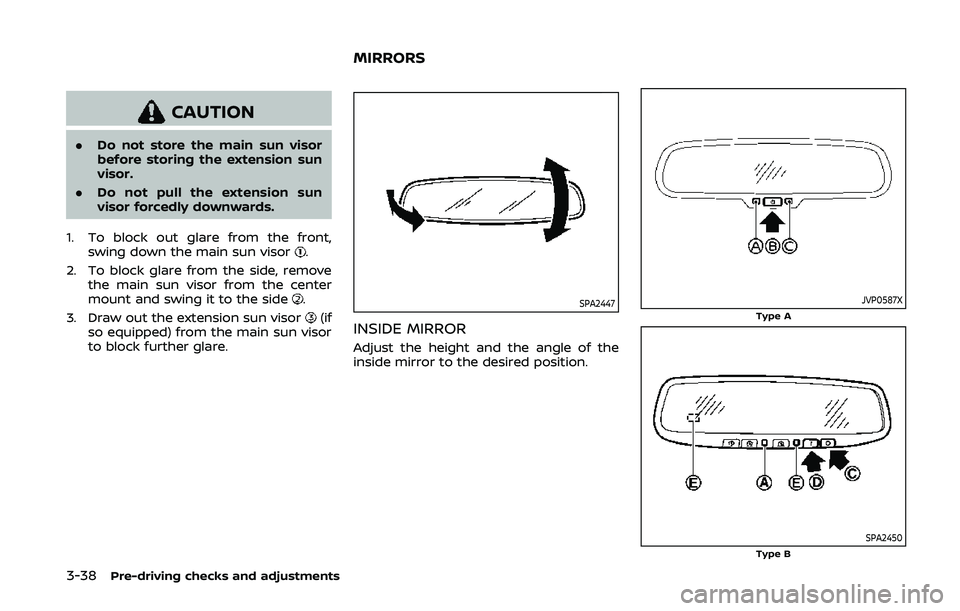
INSIDE MIRROR
Adjust the height and the angle of the
inside mirror to the desired position.
JVP0587XType A
SPA2450Type B
MIRRORS
Page 165 of 455
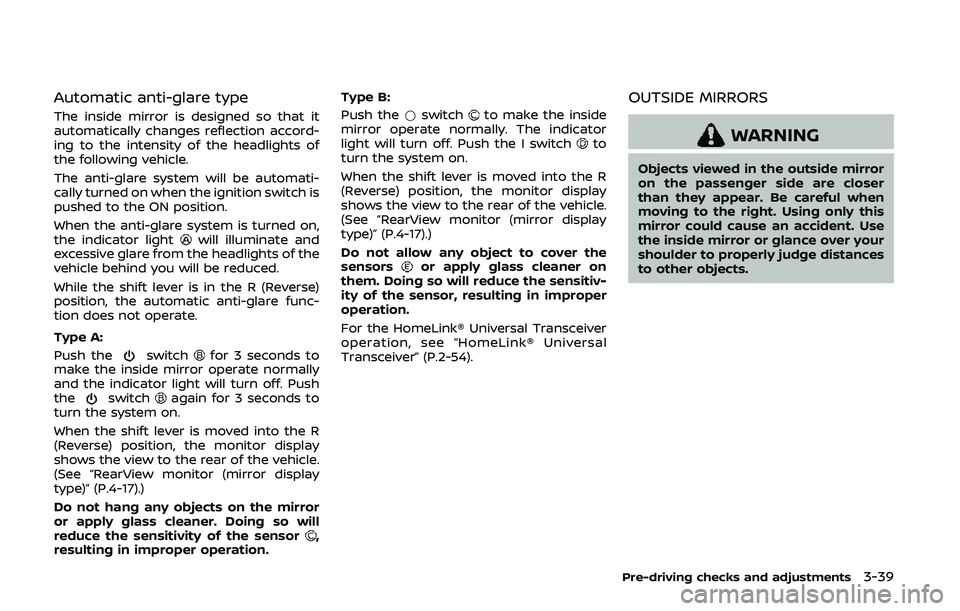
Automatic anti-glare type
The inside mirror is designed so that it
automatically changes reflection accord-
ing to the intensity of the headlights of
the following vehicle.
The anti-glare system will be automati-
cally turned on when the ignition switch is
pushed to the ON position.
When the anti-glare system is turned on,
the indicator light
will illuminate and
excessive glare from the headlights of the
vehicle behind you will be reduced.
While the shift lever is in the R (Reverse)
position, the automatic anti-glare func-
tion does not operate.
Type A:
Push the
switchfor 3 seconds to
make the inside mirror operate normally
and the indicator light will turn off. Push
the
switchagain for 3 seconds to
turn the system on.
When the shift lever is moved into the R
(Reverse) position, the monitor display
shows the view to the rear of the vehicle.
(See “RearView monitor (mirror display
type)” (P.4-17).)
Do not hang any objects on the mirror
or apply glass cleaner. Doing so will
reduce the sensitivity of the sensor
,
resulting in improper operation. Type B:
Push the
*switch
to make the inside
mirror operate normally. The indicator
light will turn off. Push the I switch
to
turn the system on.
When the shift lever is moved into the R
(Reverse) position, the monitor display
shows the view to the rear of the vehicle.
(See “RearView monitor (mirror display
type)” (P.4-17).)
Do not allow any object to cover the
sensors
or apply glass cleaner on
them. Doing so will reduce the sensitiv-
ity of the sensor, resulting in improper
operation.
For the HomeLink® Universal Transceiver
operation, see “HomeLink® Universal
Transceiver” (P.2-54).
OUTSIDE MIRRORS
WARNING
Objects viewed in the outside mirror
on the passenger side are closer
than they appear. Be careful when
moving to the right. Using only this
mirror could cause an accident. Use
the inside mirror or glance over your
shoulder to properly judge distances
to other objects.
Pre-driving checks and adjustments3-39
Page 166 of 455
3-40Pre-driving checks and adjustments
SPA2319
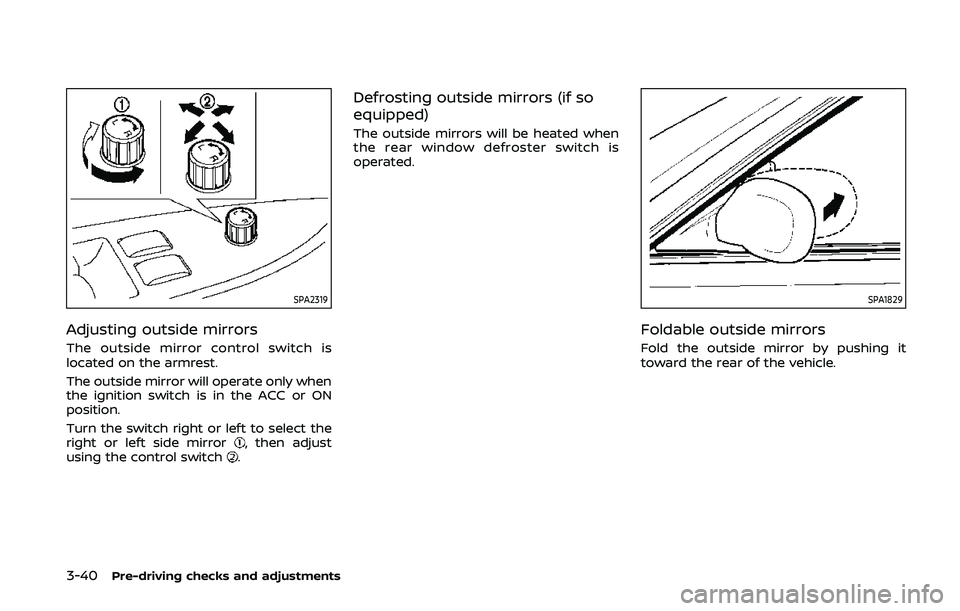
Adjusting outside mirrors
The outside mirror control switch is
located on the armrest.
The outside mirror will operate only when
the ignition switch is in the ACC or ON
position.
Turn the switch right or left to select the
right or left side mirror
, then adjust
using the control switch.
Defrosting outside mirrors (if so
equipped)
The outside mirrors will be heated when
the rear window defroster switch is
operated.
SPA1829
Foldable outside mirrors
Fold the outside mirror by pushing it
toward the rear of the vehicle.