recommended oil NISSAN 370Z 2020 Owner´s Manual
[x] Cancel search | Manufacturer: NISSAN, Model Year: 2020, Model line: 370Z, Model: NISSAN 370Z 2020Pages: 455, PDF Size: 2.22 MB
Page 77 of 455
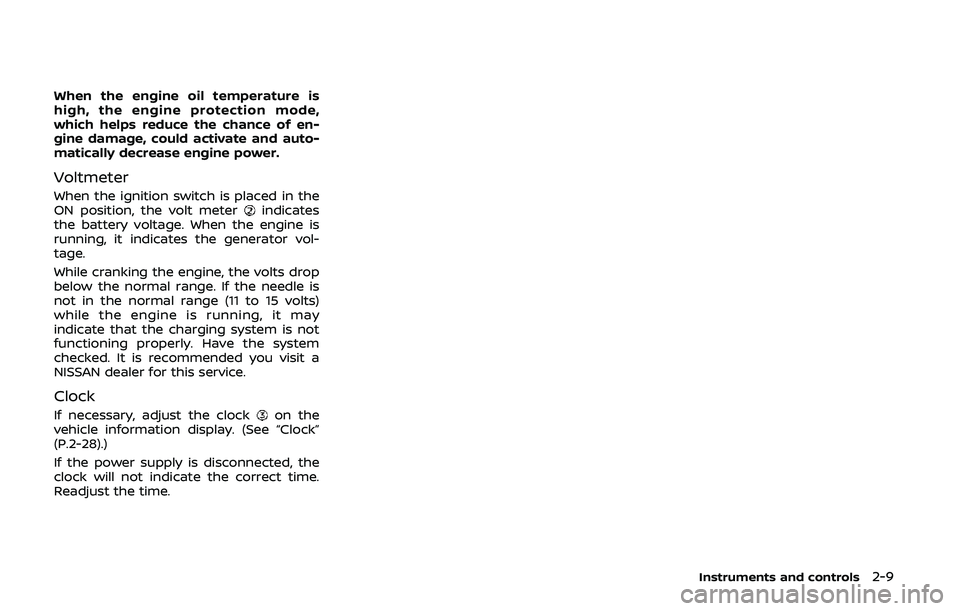
When the engine oil temperature is
high, the engine protection mode,
which helps reduce the chance of en-
gine damage, could activate and auto-
matically decrease engine power.
Voltmeter
When the ignition switch is placed in the
ON position, the volt meterindicates
the battery voltage. When the engine is
running, it indicates the generator vol-
tage.
While cranking the engine, the volts drop
below the normal range. If the needle is
not in the normal range (11 to 15 volts)
while the engine is running, it may
indicate that the charging system is not
functioning properly. Have the system
checked. It is recommended you visit a
NISSAN dealer for this service.
Clock
If necessary, adjust the clockon the
vehicle information display. (See “Clock”
(P.2-28).)
If the power supply is disconnected, the
clock will not indicate the correct time.
Readjust the time.
Instruments and controls2-9
Page 80 of 455
2-12Instruments and controls
system checked, and if necessary re-
paired. It is recommended you visit a
NISSAN dealer for this service. (See “Anti-
lock Braking System (ABS) warning light”
(P.2-11).)
WARNING
.Your brake system may not be
working properly if the warning
light is on. Driving could be dan-
gerous. If you judge it to be safe,
drive carefully to the nearest
service station for repairs. Other-
wise, have your vehicle towed
because driving it could be dan-
gerous.
. Pressing the brake pedal with the
engine stopped and/or low brake
fluid level may increase your
stopping distance and braking
will require greater pedal effort
as well as pedal travel.
. If the brake fluid level is below the
minimum or MIN mark on the
brake fluid reservoir, do not drive
until the brake system has been
checked. It is recommended you
visit a NISSAN dealer for this
service.
Charge warning light
If the light comes on while the engine is
running, it may indicate the charging
system is not functioning properly. Turn
the engine off and check the alternator
belt. If the belt is loose, broken, missing or
if the light remains on, have your vehicle
serviced immediately. It is recommended
you visit a NISSAN dealer for this service.
CAUTION
Do not continue driving if the alter-
nator belt is loose, broken or miss-
ing.
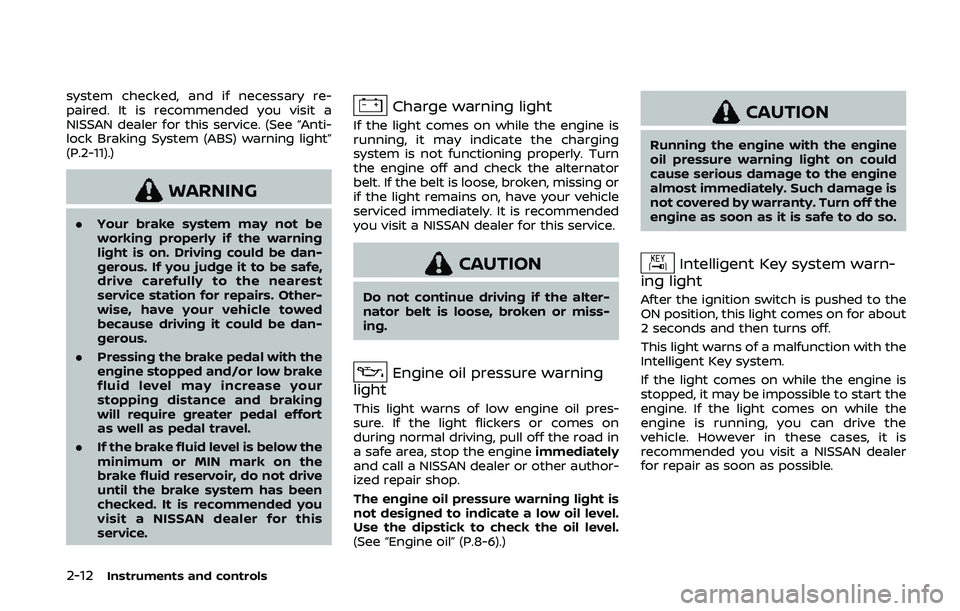
Engine oil pressure warning
light
This light warns of low engine oil pres-
sure. If the light flickers or comes on
during normal driving, pull off the road in
a safe area, stop the engine immediately
and call a NISSAN dealer or other author-
ized repair shop.
The engine oil pressure warning light is
not designed to indicate a low oil level.
Use the dipstick to check the oil level.
(See “Engine oil” (P.8-6).)
CAUTION
Running the engine with the engine
oil pressure warning light on could
cause serious damage to the engine
almost immediately. Such damage is
not covered by warranty. Turn off the
engine as soon as it is safe to do so.
Intelligent Key system warn-
ing light
After the ignition switch is pushed to the
ON position, this light comes on for about
2 seconds and then turns off.
This light warns of a malfunction with the
Intelligent Key system.
If the light comes on while the engine is
stopped, it may be impossible to start the
engine. If the light comes on while the
engine is running, you can drive the
vehicle. However in these cases, it is
recommended you visit a NISSAN dealer
for repair as soon as possible.
Page 178 of 455
4-10Center display, heater, air conditioner, audio, phone and voice recognition systems
SAA2481
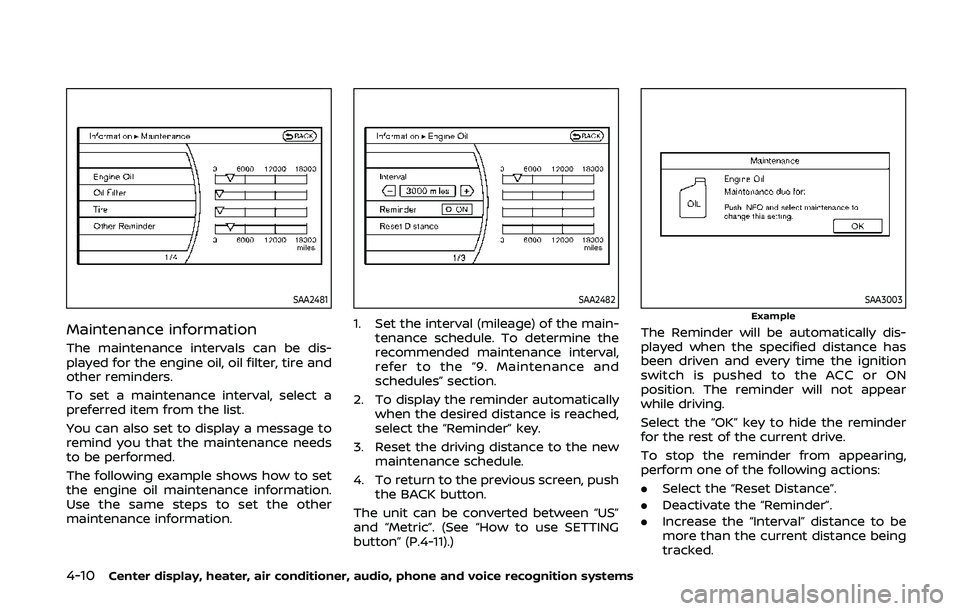
Maintenance information
The maintenance intervals can be dis-
played for the engine oil, oil filter, tire and
other reminders.
To set a maintenance interval, select a
preferred item from the list.
You can also set to display a message to
remind you that the maintenance needs
to be performed.
The following example shows how to set
the engine oil maintenance information.
Use the same steps to set the other
maintenance information.
SAA2482
1. Set the interval (mileage) of the main-tenance schedule. To determine the
recommended maintenance interval,
refer to the “9. Maintenance and
schedules” section.
2. To display the reminder automatically when the desired distance is reached,
select the “Reminder” key.
3. Reset the driving distance to the new maintenance schedule.
4. To return to the previous screen, push the BACK button.
The unit can be converted between “US”
and “Metric”. (See “How to use SETTING
button” (P.4-11).)
SAA3003Example
The Reminder will be automatically dis-
played when the specified distance has
been driven and every time the ignition
switch is pushed to the ACC or ON
position. The reminder will not appear
while driving.
Select the “OK” key to hide the reminder
for the rest of the current drive.
To stop the reminder from appearing,
perform one of the following actions:
. Select the “Reset Distance”.
. Deactivate the “Reminder”.
. Increase the “Interval” distance to be
more than the current distance being
tracked.
Page 309 of 455
.Make sure the area around the vehicle
is clear.
. Check fluid levels such as engine oil,
coolant, brake fluid and window
washer fluid as frequently as possible,
or at least whenever you refuel.
. Check that all windows and lights are
clean.
. Visually inspect tires for their appear-
ance and condition. Also check tires
for proper inflation.
. Lock all doors.
. Position seat and adjust head re-
straints.
. Adjust inside and outside mirrors.
. Fasten seat belts and ask all passen-
gers to do likewise.
. Check the operation of warning lights
when the ignition switch is pushed to
the ON position. (See “Warning lights,
indicator lights and audible remin-
ders” (P.2-10).) 1. Apply the parking brake.
2.
Automatic Transmission (AT) model:
Move the shift lever to the P (Park) or N
(Neutral) position. (P is recommended.)
The starter is designed not to operate
unless the shift lever is in either of the
above positions.
Manual Transmission (MT) model:
Move the shift lever to the N (Neutral)
position. Depress the clutch pedal fully
to the floor.
The starter is designed not to operate
unless the clutch pedal is fully de-
pressed.
The Intelligent Key must be carried
when operating the ignition switch.
3. Push the ignition switch to the ON position. Firmly depress the brake
pedal (AT model) or the clutch pedal
(MT model) and push the ignition
switch to start the engine.
To start the engine immediately, push
and release the ignition switch while
depressing the brake pedal or the
clutch pedal with the ignition switch
in any position.
.If the engine is very hard to start inextremely cold weather or when
restarting, depress the accelerator
pedal a little (approximately 1/3 to the floor) and while holding, crank
the engine. Release the accelerator
pedal when the engine starts.
.If the engine is very hard to start
because it is flooded, depress the
accelerator pedal all the way to the
floor and hold it. Push the ignition
switch to the ON position to start
cranking the engine. After 5 or 6
seconds, stop cranking by pushing
the ignition switch to OFF. After
cranking the engine, release the
accelerator pedal. Crank the engine
with your foot off the accelerator
pedal by depressing the brake
pedal and pushing the push-button
ignition switch to start the engine.
If the engine starts, but fails to run,
repeat the above procedure.
CAUTION
Do not operate the starter for more
than 15 seconds at a time. If the
engine does not start, push the
ignition switch to OFF and wait 10
seconds before cranking again,
otherwise the starter could be da-
maged.
Starting and driving5-11
BEFORE STARTING THE ENGINE STARTING THE ENGINE
Page 323 of 455
.Recirculating the cool air in thecabin when the A/C is on reduces
cooling load.
4. Drive at economical speeds and dis- tances.
.Observing the speed limit and notexceeding 60 MPH (97 km/h)
(where legally allowed) can improve
fuel efficiency due to reduced aero-
dynamic drag.
.Maintaining a safe following dis-tance behind other vehicles re-
duces unnecessary braking.
.Safely monitoring traffic to antici- pate changes in speed permits
reduced braking and smooth accel-
eration changes.
.Select a gear range suitable to roadconditions.
5. Use cruise control.
.Using cruise control during highway driving helps maintain a steady
speed.
.Cruise control is particularly effec-tive in providing fuel savings when
driving on flat terrains.
6. Plan for the shortest route.
.Utilize a map or navigation system to determine the best route to save
time. 7. Avoid idling.
.Shutting off your engine when safe
for stops exceeding 30-60 seconds
saves fuel and reduces emissions.
8. Buy an automated pass for toll roads.
.Automated passes permit drivers to use special lanes to maintain cruis-
ing speed through the toll and
avoid stopping and starting.
9. Winter warm up.
.Limit idling time to minimize impact to fuel economy.
.Vehicles typically need no morethan 30 seconds of idling at start-
up to effectively circulate the en-
gine oil before driving.
.Your vehicle will reach its ideal
operating temperature more
quickly while driving versus idling.
10. Keeping your vehicle cool.
.Park your vehicle in a covered parking area or in the shade when-
ever possible.
.When entering a hot vehicle, open- ing the windows will help to reduce
the inside temperature faster, re-
sulting in reduced demand on your
A/C system. .
Keep your engine tuned up.
. Follow the recommended scheduled
maintenance.
. Keep the tires inflated to the correct
pressure. Low tire pressure increases
tire wear and lowers fuel economy.
. Keep the wheels in correct alignment.
Improper alignment increases tire
wear and lowers fuel economy.
. Use the recommended viscosity en-
gine oil. (See “Engine oil and oil filter
recommendation” (P.10-7).)
Starting and driving5-25
INCREASING FUEL ECONOMY
Page 342 of 455
6-8In case of emergency
aligned with the pin on the brake
rotor.
3. With the wheel nut wrench, tighten wheel nuts alternately and evenly in
the sequence illustrated (
,,,,)
until they are tight.
4. Lower the vehicle slowly until the tire touches the ground. Then, with the
wheel nut wrench, tighten the wheel
nuts securely in the sequence as
illustrated. Lower the vehicle comple-
tely.
WARNING
.Incorrect wheel nuts or impro-
perly tightened wheel nuts can
cause the wheel to become loose
or come off. This could cause an
accident.
. Do not use oil or grease on the
wheel studs or nuts. This could
cause the nuts to become loose.
. Retighten the wheel nuts when
the vehicle has been driven for
600 miles (1,000 km) (also in
cases of a flat tire, etc.).
. As soon as possible, tighten the
wheel nuts to the specified torque
with a torque wrench. Wheel nut tightening torque:
80 ft-lb (108 N·m)
The wheel nuts must be kept tigh-
tened to specification at all times. It
is recommended that wheel nuts be
tightened to specifications at each
lubrication interval.
. Adjust tire pressure to the COLD
pressure.
COLD pressure:
After the vehicle has been parked for
three hours or more or driven less
than 1 mile (1.6 km).
COLD tire pressures are shown on
the Tire and Loading Information
label affixed to the driver side center
pillar.
Stowing the damaged tire and
tools
Coupe models:
1. Securely store the damaged tire and
jacking tools in the storage area.
2. Place the spare tire cover and the cargo room carpet over the damaged
tire.
3. Close the rear hatch.
SCE0845
Roadster models:
Securely store the jacking tools in the
storage area.
Place the spare tire cover and trunk room
carpet back in the trunk, and then close
the trunk lid.
Securely store the damaged tire accord-
ing to the following procedure as illu-
strated.
1. Put the damaged tire in the plastic bag
stored in the trunk.
2. Move the passenger seat forward, and then place the damaged tire
wrapped in the plastic bag behind
the seat.
Page 362 of 455
7-4Appearance and care
.If glass cleaner gets on the soft
top, immediately wash it off with
clean water.
. Do not apply direct water pres-
sure, such as high pressured
water from household hoses, on
the lining of the soft top and
vehicle body, as this may cause
water to leak into the inside of
your vehicle.
After cleaning, always be sure the top and
its storage are completely drybefore
opening the top. Opening the top while
it is wet or damp may cause interior water
damage, water stains or mildew on the
top.
WAXING
Regular waxing protects the paint surface
and helps retain new vehicle appearance.
Polishing is recommended to remove
built-up wax residue and to avoid a
weathered appearance before reapplying
wax.
A NISSAN dealer can assist you in choos-
ing the proper product.
. Wax your vehicle only after a thorough
washing. Follow the instructions sup-
plied with the wax. .
Do not use a wax containing any
abrasives, cutting compounds or clea-
ners that may damage the vehicle
finish.
Machine compound or aggressive polish-
ing on a base coat/clear coat paint finish
may dull the finish or leave swirl marks.
REMOVING SPOTS
Remove tar and oil spots, industrial dust,
insects, and tree sap as quickly as possi-
ble from the paint surface to avoid lasting
damage or staining. Special cleaning
products are available at a NISSAN dealer
or any automotive accessory stores.
UNDERBODY
In areas where road salt is used in winter,
the underbody must be cleaned regularly.
This will prevent dirt and salt from build-
ing up and causing the acceleration of
corrosion on the underbody and suspen-
sion. Before the winter period and again
in the spring, the underseal must be
checked and, if necessary, re-treated.
GLASS
Use glass cleaner to remove smoke and
dust film from the glass surfaces. It is
normal for glass to become coated with a
film after the vehicle is parked in the hot
sun. Glass cleaner and a soft cloth will
easily remove this film.
CAUTION
. When cleaning the inside of the
windows, do not use sharp-
edged tools, abrasive cleaners or
chlorine-based disinfectant clea-
ners. They could damage the
electrical conductors, radio an-
tenna elements or rear window
defroster elements.
. If glass cleaner gets on the soft
top, immediately wash it off with
clean water (Roadster models).
WHEELS
Wash the wheels when washing the
vehicle to maintain their appearance.
.Clean the inner side of the wheels
when the wheel is changed or the
underside of the vehicle is washed.
. Inspect wheel rims regularly for dents
or corrosion. Such damage may cause
loss of pressure or poor seal at the tire
bead.
. NISSAN recommends that the road
wheels be waxed to protect against
road salt in areas where it is used
during winter.
Page 363 of 455
CAUTION
Do not use abrasive cleaners when
washing the wheels.
Aluminum alloy wheels
Wash regularly with a sponge dampened
in a mild soap solution, especially during
winter months in areas where road salt is
used. Salt could discolor the wheels if not
removed.
CAUTION
Follow the directions below to avoid
staining or discoloring the wheels:
.Do not use a cleaner that uses
strong acid or alkali contents to
clean the wheels.
. Do not apply wheel cleaners to
the wheels when they are hot.
The wheel temperature should be
the same as ambient tempera-
ture.
. Rinse the wheel to completely
remove the cleaner within 15
minutes after the cleaner is ap-
plied.
CHROME PARTS
Clean chrome parts regularly with a non-
abrasive chrome polish to maintain the
finish.
TIRE DRESSING
NISSAN does not recommend the use of
tire dressings. Tire manufacturers apply a
coating to the tires to help reduce dis-
coloration of the rubber. If a tire dressing
is applied to the tires, it may react with
the coating and form a compound. This
compound may come off the tire while
driving and stain the vehicle paint.
If you choose to use a tire dressing, take
the following precautions:
.Use a water-based tire dressing. The
coating on the tire dissolves more
easily with an oil-based tire dressing.
. Apply a light coat of tire dressing to
help prevent it from entering the tire
tread/grooves (where it would be
difficult to remove).
. Wipe off excess tire dressing using a
dry towel. Make sure the tire dressing
is completely removed from the tire
tread/grooves.
. Allow the tire dressing to dry as
recommended by tire dressing manu-
facturer. Occasionally remove loose dust from the
interior trim, plastic parts and seats using
a vacuum cleaner or soft bristled brush.
Wipe the vinyl and leather surfaces with a
clean, soft cloth dampened in mild soap
solution, then wipe clean with a dry soft
cloth.
Regular care and cleaning is required in
order to maintain the appearance of the
leather.
Before using any fabric protector, read
the manufacturer’s recommendations.
Some fabric protectors contain chemicals
that may stain or bleach the seat materi-
al.
Use a cloth dampened only with water, to
clean the meter and gauge lens.
WARNING
Do not use water or acidic cleaners
(hot steam cleaners) on the seat. This
can damage the seat or occupant
classification sensor. This can also
affect the operation of the air bag
system and result in serious perso-
nal injury.
Appearance and care7-5
CLEANING INTERIOR
Page 364 of 455
7-6Appearance and care
CAUTION
.Never use benzine, thinner, or any
similar material.
. For cleaning, use a soft cloth,
dampened with water. Never use
a rough cloth, alcohol, benzine,
thinner or any kind of solvent or
paper towel with a chemical
cleaning agent. They will scratch
or cause discoloration to the lens.
. Do not spray any liquid such as
water on the meter lens. Spraying
liquid may cause the system to
malfunction.
. Small dirt particles can be abra-
sive and damaging to the leather
surfaces and should be removed
promptly. Do not use saddle soap,
car waxes, polishes, oils, cleaning
fluids, solvents, detergents or
ammonia-based cleaners as they
may damage the leather’s natural
finish.
. Only use fabric protectors ap-
proved by NISSAN.
. Do not use glass or plastic cleaner
on meter or gauge lens covers. It
may damage the lens cover. .
For models with patterned seat-
backs, do not apply direct pres-
sure at high temperatures, such
as with an iron, on the pattern of
the seatback. This may cause the
pattern to disappear from the
seatback.
AIR FRESHENERS
Most air fresheners use a solvent that
could affect the vehicle interior. If you use
an air freshener, take the following pre-
cautions:
.Hanging-type air fresheners can
cause permanent discoloration when
they contact vehicle interior surfaces.
Place the air freshener in a location
that allows it to hang free and not
contact an interior surface.
. Liquid-type air fresheners typically clip
on the vents. These products can
cause immediate damage and disco-
loration when spilled on interior sur-
faces.
Carefully read and follow the manufac-
turer’s instructions before using air fresh-
eners.
FLOOR MATS
WARNING
To avoid potential pedal interference
that may result in a collision, injury
or death:
. NEVER place a floor mat on top of
another floor mat in the driver
front position or install them up-
side down or backwards.
. It is recommended that you use
only genuine NISSAN floor mats
or equivalent floor mats that are
specifically designed for use in
your vehicle model and model
year.
. Properly position the mats in the
floorwell using the floor mat po-
sitioning hook. See “Floor mat
installation” (P.7-7).
. Make sure the floor mat does not
interfere with pedal operation.
. Periodically check the floor mats
to make sure they are properly
installed.
. After cleaning the vehicle interior,
check the floor mats to make
sure they are properly installed.
Page 370 of 455
8-2Do-it-yourself
When performing any inspection or main-
tenance work on your vehicle, always
take care to prevent serious accidental
injury to yourself or damage to the
vehicle. The following are general precau-
tions which should be closely observed.
WARNING
.Park the vehicle on a level sur-
face, apply the parking brake
securely and block the wheels to
prevent the vehicle from moving.
For manual transmission models,
move the shift lever to N (Neutral).
For automatic transmission mod-
els, move the shift lever to P
(Park).
. Be sure the ignition switch is in
the OFF or LOCK position when
performing any parts replace-
ment or repairs.
. Never connect or disconnect the
battery or any transistorized
component while the ignition
switch is in the ON position.
. Never leave the engine or auto-
matic transmission related com-
ponent harnesses disconnected
while the ignition switch is in the
ON position. .
If you must work with the engine
running, keep your hands, cloth-
ing, hair and tools away from
moving fans, belts and any other
moving parts.
. It is advisable to secure or re-
move any loose clothing and
remove any jewelry, such as
rings, watches, etc. before work-
ing on your vehicle.
. Always wear eye protection
whenever you work on your ve-
hicle.
. If you must run the engine in an
enclosed space such as a garage,
be sure there is proper ventilation
for exhaust gases to escape.
. Never get under the vehicle while
it is supported only by a jack. If it
is necessary to work under the
vehicle, support it with safety
stands.
. Keep smoking materials, flame
and sparks away from fuel tank
and the battery.
. Your vehicle is equipped with an
automatic engine cooling fan. It
may come on at any time without
warning, even if the ignition key is
in the OFF position and the en-
gine is not running. To avoid injury, always disconnect the ne-
gative battery cable before work-
ing near the fan.
. Because the fuel lines are under
high pressure even when the
engine is off, it is recommended
you visit a NISSAN dealer for
service of the fuel filter or fuel
lines.
CAUTION
.Do not work under the hood while
the engine is hot. Turn the engine
off and wait until it cools down.
. Avoid direct contact with used
engine oil and coolant. Impro-
perly disposed engine oil, coolant,
and/or other vehicle fluids can
damage the environment. Always
conform to local regulations for
disposal of vehicle fluid.
This “8. Do-it-yourself” section gives in-
structions regarding only those items
which are relatively easy for an owner to
perform.
A genuine NISSAN Service Manual is also
available. (See “Owner’s Manual/Service
Manual order information” (P.10-26).)
MAINTENANCE PRECAUTIONS