steering wheel NISSAN 370Z COUPE 2011 User Guide
[x] Cancel search | Manufacturer: NISSAN, Model Year: 2011, Model line: 370Z COUPE, Model: NISSAN 370Z COUPE 2011Pages: 419, PDF Size: 3.61 MB
Page 96 of 419
Black plate (92,1)
Model "Z34-D" EDITED: 2010/ 7/ 27
.Turn signals do not work when the
hazard warning flasher lights are
on.
The flasher can be actuated with the ignition
switch in any position.
Some state laws may prohibit the use of
the hazard warning flasher switch while
driving.
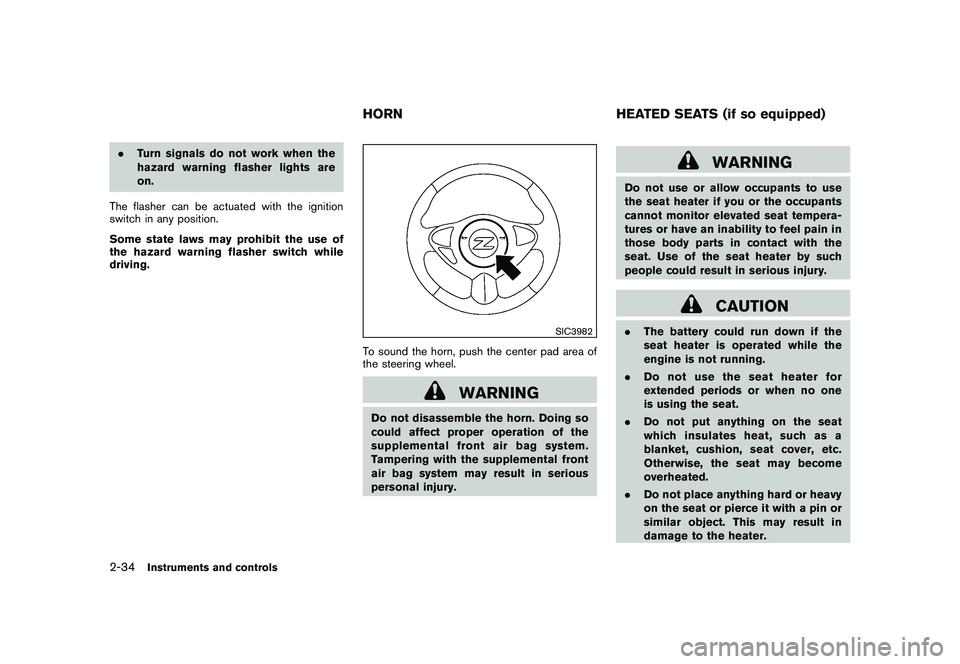
SIC3982
To sound the horn, push the center pad area of
the steering wheel.
WARNING
Do not disassemble the horn. Doing so
could affect proper operation of the
supplemental front air bag system.
Tampering with the supplemental front
air bag system may result in serious
personal injury.
WARNING
Do not use or allow occupants to use
the seat heater if you or the occupants
cannot monitor elevated seat tempera-
tures or have an inability to feel pain in
those body parts in contact with the
seat. Use of the seat heater by such
people could result in serious injury.
CAUTION
. The battery could run down if the
seat heater is operated while the
engine is not running.
. Do not use the seat heater for
extended periods or when no one
is using the seat.
. Do not put anything on the seat
which insulates heat, such as a
blanket, cushion, seat cover, etc.
Otherwise, the seat may become
overheated.
. Do not place anything hard or heavy
on the seat or pierce it with a pin or
similar object. This may result in
damage to the heater.
HORN HEATED SEATS (if so equipped)
2-34
Instruments and controls
Page 121 of 419
Black plate (117,1)
Model "Z34-D" EDITED: 2010/ 7/ 27
computer.
. When the vehicle is parked near a parking
meter.
In such cases, correct the operating conditions
before using the Intelligent Key function or use
the mechanical key.
Although the life of the battery varies depending
on the operating conditions, the battery’s life is
approximately 2 years. If the battery is dis-
charged, replace it with a new one.
When the Intelligent Key battery is almost
discharged, insert the Intelligent Key into the
Intelligent Key port to start the engine. Replace
the discharged battery with a new one as soon
as possible. For more details, see “PUSH-
BUTTON IGNITION SWITCH” in the “5. Start-
ing and driving” section.
Since the Intelligent Key is continuously receiv-
ing radio waves, if the key is left near equipment
which transmits strong radio waves, such as
signals from a TV and personal computer, the
battery life may become shorter.
For information regarding replacement of a
battery, see “INTELLIGENT KEY BATTERY
REPLACEMENT” in the “8. Maintenance and
do-it-yourself” section.
For models with a steering wheel lock mechan-
ism: Because the steering wheel is locked electrically, unlocking the steering wheel with
the ignition switch in the LOCK position is
impossible when the vehicle battery is comple-
tely discharged. Pay special attention that the
vehicle battery is not completely discharged.
As many as 4 Intelligent Keys can be registered
and used with one vehicle. For information about
the purchase and use of additional Intelligent
Keys, contact a NISSAN dealer.
CAUTION
.
Do not allow the Intelligent Key,
which contains electrical compo-
nents, to come into contact with
water or salt water. This could affect
the system function.
. Do not drop the Intelligent Key.
. Do not strike the Intelligent Key
sharply against another object.
. Do not change or modify the Intel-
ligent Key.
. Wetting may damage the Intelligent
Key. If the Intelligent Key gets wet,
immediately wipe until it is comple-
tely dry.
. If the outside temperature is below
148F( �108 C) , the battery of the Intelligent Key may not function
properly.
. Do not place the Intelligent Key for
an extended period in an area where
temperatures exceed 140 8F (60 8C) .
. Do not attach the Intelligent Key
with a key holder that contains a
magnet.
. Do not place the Intelligent Key near
equipment that produces a mag-
netic field, such as a TV, audio
equipment, personal computer or
cellular phone.
If an Intelligent Key is lost or stolen, NISSAN
recommends erasing the ID code of that
Intelligent Key from the vehicle. This may prevent
the unauthorized use of the Intelligent Key to
operate the vehicle. For information regarding
the erasing procedure, contact a NISSAN deal-
er.
The Intelligent Key function can be disabled. For
information about disabling the Intelligent Key
function, contact a NISSAN dealer.
Pre-driving checks and adjustments
3-7
Page 150 of 419
Black plate (146,1)
Model "Z34-D" EDITED: 2010/ 7/ 27
WARNING
.Do not adjust the steering wheel
while driving. You could lose control
of your vehicle and cause an acci-
dent.
. Do not adjust the steering wheel
any closer to you than is necessary
for proper steering operation and
comfort. The driver’s air bag inflates
with great force. If you are unrest-
rained, leaning forward, sitting side-
ways or out of position in any way,
you are at greater risk of injury or
death in a crash. You may also
receive serious or fatal injuries from
the air bag if you are up against it
when it inflates. Always sit back
against the seatback and as far
away as practical from the steering
wheel. Always use the seat belts.
SPA2583
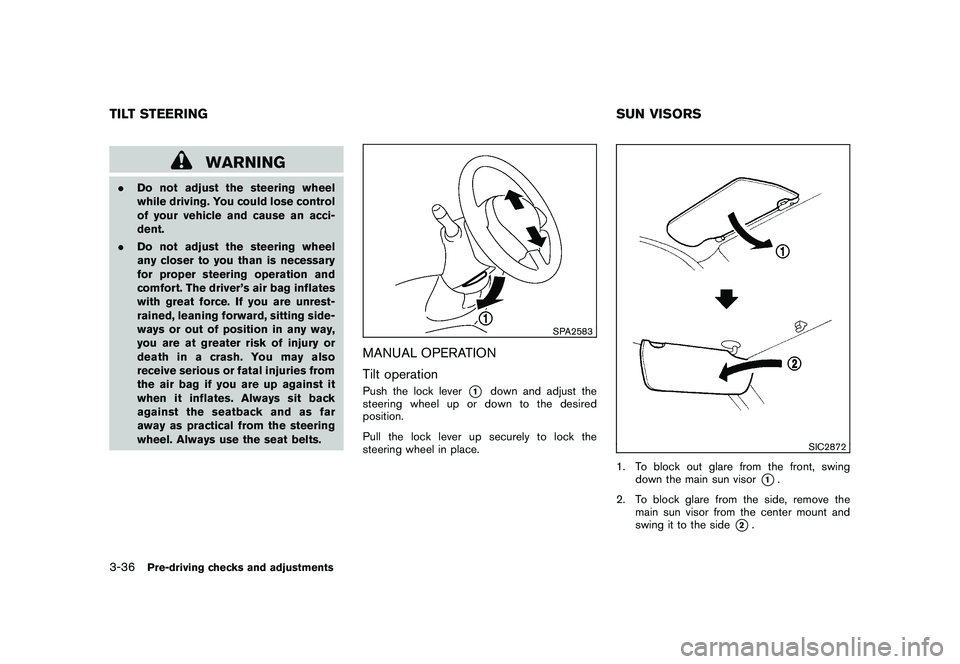
MANUAL OPERATION
Tilt operationPush the lock lever
*1
down and adjust the
steering wheel up or down to the desired
position.
Pull the lock lever up securely to lock the
steering wheel in place.
SIC2872
1. To block out glare from the front, swing down the main sun visor
*1.
2. To block glare from the side, remove the main sun visor from the center mount and
swing it to the side
*2.
TILT STEERING SUN VISORS3-36
Pre-driving checks and adjustments
Page 154 of 419
Black plate (13,1)
4
Center display, heater, air conditioner,
audio, phone and voice recognition systems
Model "Z34-D" EDITED: 2010/ 7/ 28
Safety note....................................................... 4-2
Center multi-function control panel
(models with navigation system) ............................ 4-2
How to use multi-function controller ................... 4-3
How to use touch screen ................................. 4-3
Menu options ................................................ 4-5
How to select menus on the screen ................... 4-6
Vehicle information and settings
(models with navigation system) ............................ 4-6
How to use STATUS button .............................. 4-6
How to use brightness control and display ON/
OFF button ................................................... 4-6
How to use INFO button. ................................. 4-6
How to use SETTING button .......................... 4-10
RearView monitor (models with navigation
system) .......................................................... 4-17
How to read displayed lines ............................ 4-18
How to park with predicted course lines ............ 4-18
Difference between predicted and actual
distances ................................................... 4-20
How to adjust screen .................................... 4-22
Operating tips ............................................. 4-22
Ventilators ...................................................... 4-23
Center ventilators ......................................... 4-23
Side ventilators ............................................ 4-23
Heater and air conditioner .................................. 4-24
Automatic air conditioner (Type A) .................... 4-25Automatic air conditioner (Type B)
.................... 4-27
Operating tips ............................................. 4-29
In-cabin microfilter ........................................ 4-29
Servicing air conditioner ................................ 4-30
Audio system .................................................. 4-30
Audio operation precautions ........................... 4-30
FM-AM radio with Compact Disc (CD) player . .... 4-42
FM-AM-SAT radio with Compact Disc (CD)
changer (models without navigation system) . . . .... 4-47
FM-AM-SAT radio with Compact Disc (CD)
player (models with navigation system) .............. 4-51
DVD (Digital Versatile Disc) player operation
(models with navigation system) ...................... 4-55
USB memory operation
(models with navigation system) ...................... 4-58
Bluetooth
®streaming audio
(models with navigation system) ...................... 4-62
iPod
®player operation
(models with navigation system) ...................... 4-67
Music Box
®(models with navigation system) . . . .... 4-69
Auxiliary input jacks
(models with navigation system) ...................... 4-75
CD/DVD/USB memory care and cleaning .......... 4-76
Steering-wheel-mounted controls for audio ........ 4-77
Antenna ..................................................... 4-79
Car phone or CB radio ...................................... 4-80
Page 159 of 419
Black plate (155,1)
Model "Z34-D" EDITED: 2010/ 7/ 27
.Space:
Inserts a space.
. Delete:
Deletes the last character that has been
input with one touch. Push and hold the
button to delete all of the characters.
. OK:
Completes character inputs.Touch screen maintenanceIf you clean the display screen, use a dry, soft
cloth. If additional cleaning is necessary, use a
small amount of neutral detergent with a soft
cloth. Never spray the screen with water or
detergent. Dampen the cloth first, and then wipe
the screen.
SAA2143
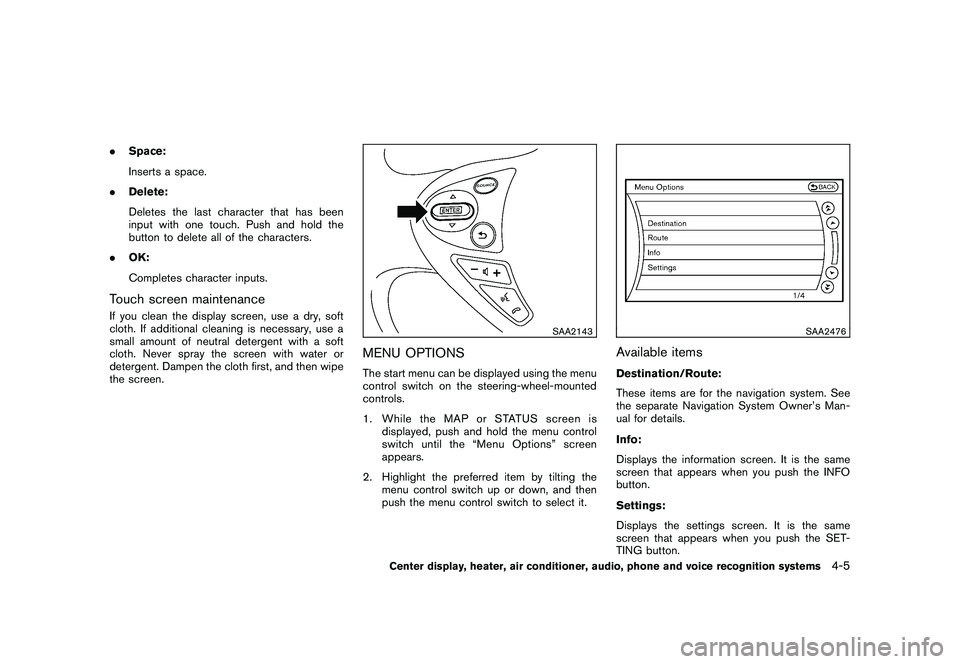
MENU OPTIONSThe start menu can be displayed using the menu
control switch on the steering-wheel-mounted
controls.
1. While the MAP or STATUS screen is
displayed, push and hold the menu control
switch until the “Menu Options” screen
appears.
2. Highlight the preferred item by tilting the menu control switch up or down, and then
push the menu control switch to select it.
SAA2476
Available itemsDestination/Route:
These items are for the navigation system. See
the separate Navigation System Owner’s Man-
ual for details.
Info:
Displays the information screen. It is the same
screen that appears when you push the INFO
button.
Settings:
Displays the settings screen. It is the same
screen that appears when you push the SET-
TING button.
Center display, heater, air conditioner, audio, phone and voice recognition systems
4-5
Page 172 of 419
Black plate (168,1)
Model "Z34-D" EDITED: 2010/ 7/ 27
SAA1896
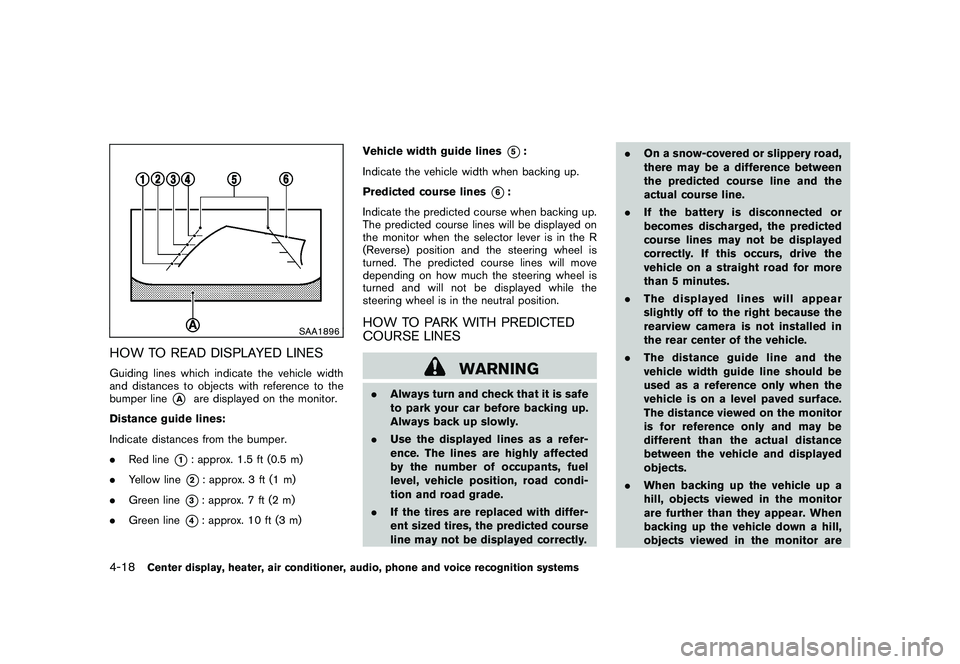
HOW TO READ DISPLAYED LINESGuiding lines which indicate the vehicle width
and distances to objects with reference to the
bumper line
*A
are displayed on the monitor.
Distance guide lines:
Indicate distances from the bumper.
. Red line
*1: approx. 1.5 ft (0.5 m)
. Yellow line*2: approx. 3 ft (1 m)
. Green line
*3: approx. 7 ft (2 m)
. Green line
*4: approx. 10 ft (3 m) Vehicle width guide lines
*5:
Indicate the vehicle width when backing up.
Predicted course lines
*6:
Indicate the predicted course when backing up.
The predicted course lines will be displayed on
the monitor when the selector lever is in the R
(Reverse) position and the steering wheel is
turned. The predicted course lines will move
depending on how much the steering wheel is
turned and will not be displayed while the
steering wheel is in the neutral position.
HOW TO PARK WITH PREDICTED
COURSE LINES
WARNING
. Always turn and check that it is safe
to park your car before backing up.
Always back up slowly.
. Use the displayed lines as a refer-
ence. The lines are highly affected
by the number of occupants, fuel
level, vehicle position, road condi-
tion and road grade.
. If the tires are replaced with differ-
ent sized tires, the predicted course
line may not be displayed correctly. .
On a snow-covered or slippery road,
there may be a difference between
the predicted course line and the
actual course line.
. If the battery is disconnected or
becomes discharged, the predicted
course lines may not be displayed
correctly. If this occurs, drive the
vehicle on a straight road for more
than 5 minutes.
. The displayed lines will appear
slightly off to the right because the
rearview camera is not installed in
the rear center of the vehicle.
. The distance guide line and the
vehicle width guide line should be
used as a reference only when the
vehicle is on a level paved surface.
The distance viewed on the monitor
is for reference only and may be
different than the actual distance
between the vehicle and displayed
objects.
. When backing up the vehicle up a
hill, objects viewed in the monitor
are further than they appear. When
backing up the vehicle down a hill,
objects viewed in the monitor are
4-18
Center display, heater, air conditioner, audio, phone and voice recognition systems
Page 173 of 419
Black plate (169,1)
Model "Z34-D" EDITED: 2010/ 7/ 27
closer than they appear. Use the
inside mirror or glance over your
shoulder to properly judge dis-
tances to other objects.
The vehicle width and predicted course
lines are wider than the actual width and
course.
SAA1897
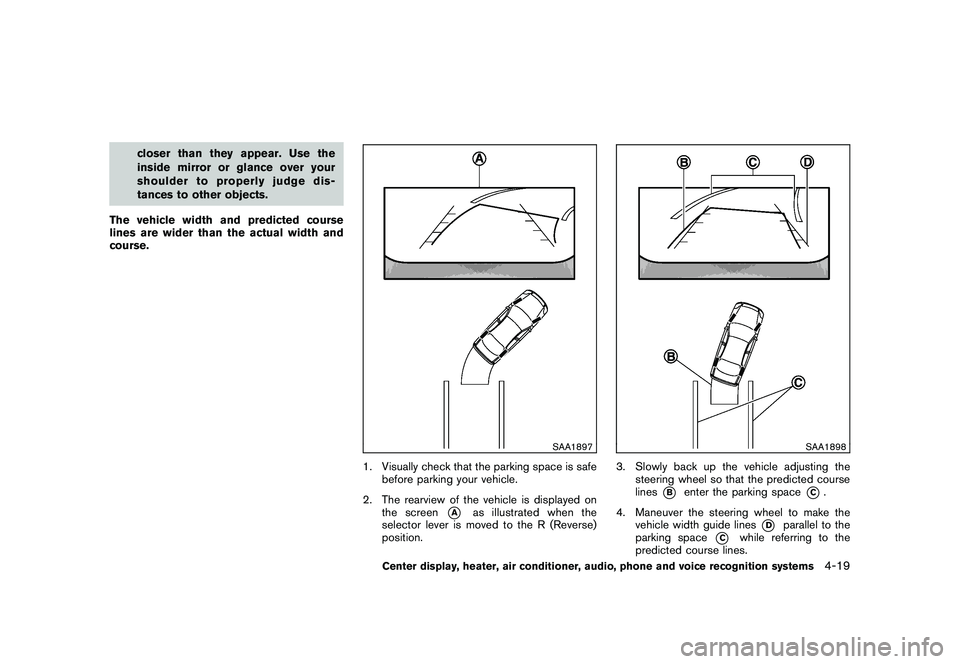
1. Visually check that the parking space is safe before parking your vehicle.
2. The rearview of the vehicle is displayed on the screen
*A
as illustrated when the
selector lever is moved to the R (Reverse)
position.
SAA1898
3. Slowly back up the vehicle adjusting the steering wheel so that the predicted course
lines
*B
enter the parking space
*C.
4. Maneuver the steering wheel to make the vehicle width guide lines
*D
parallel to the
parking space
*C
while referring to the
predicted course lines.
Center display, heater, air conditioner, audio, phone and voice recognition systems
4-19
Page 224 of 419
Black plate (220,1)
Model "Z34-D" EDITED: 2010/ 7/ 27
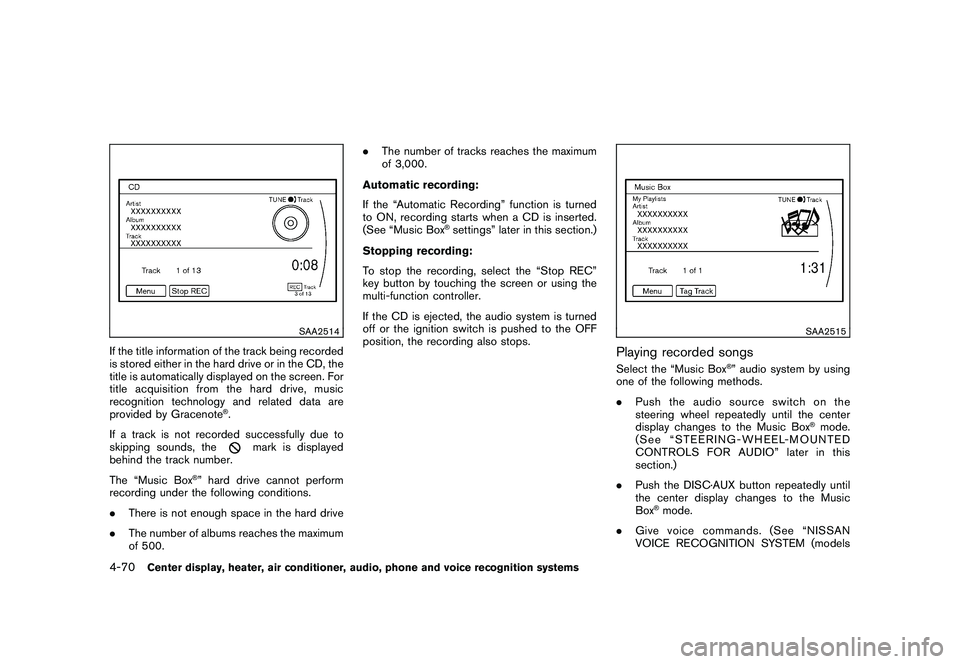
SAA2514
If the title information of the track being recorded
is stored either in the hard drive or in the CD, the
title is automatically displayed on the screen. For
title acquisition from the hard drive, music
recognition technology and related data are
provided by Gracenote
®.
If a track is not recorded successfully due to
skipping sounds, the
mark is displayed
behind the track number.
The “Music Box
®” hard drive cannot perform
recording under the following conditions.
. There is not enough space in the hard drive
. The number of albums reaches the maximum
of 500. .
The number of tracks reaches the maximum
of 3,000.
Automatic recording:
If the “Automatic Recording” function is turned
to ON, recording starts when a CD is inserted.
(See “Music Box
®settings” later in this section.)
Stopping recording:
To stop the recording, select the “Stop REC”
key button by touching the screen or using the
multi-function controller.
If the CD is ejected, the audio system is turned
off or the ignition switch is pushed to the OFF
position, the recording also stops.
SAA2515
Playing recorded songsSelect the “Music Box
®” audio system by using
one of the following methods.
. Push the audio source switch on the
steering wheel repeatedly until the center
display changes to the Music Box
®mode.
(See “STEERING-WHEEL-MOUNTED
CONTROLS FOR AUDIO” later in this
section.)
. Push the DISC·AUX button repeatedly until
the center display changes to the Music
Box
®mode.
. Give voice commands. (See “NISSAN
VOICE RECOGNITION SYSTEM (models
4-70
Center display, heater, air conditioner, audio, phone and voice recognition systems
Page 231 of 419
Black plate (227,1)
Model "Z34-D" EDITED: 2010/ 7/ 27
alcohol intended for industrial use.
. A new disc may be rough on the inner and
outer edges. Remove the rough edges by
rubbing the inner and outer edges with the
side of a pen or pencil as illustrated.
USB memory.Never touch the terminal portion of the USB
memory.
. Do not place heavy objects on the USB
memory.
. Do not store the USB memory in highly
humid locations.
. Do not expose the USB memory to direct
sunlight.
. Do not spill any liquids on the USB memory.
Refer to the USB memory Owner’s Manual for
the details.
SAA2555
With navigation system
SAA2556
Without navigation system
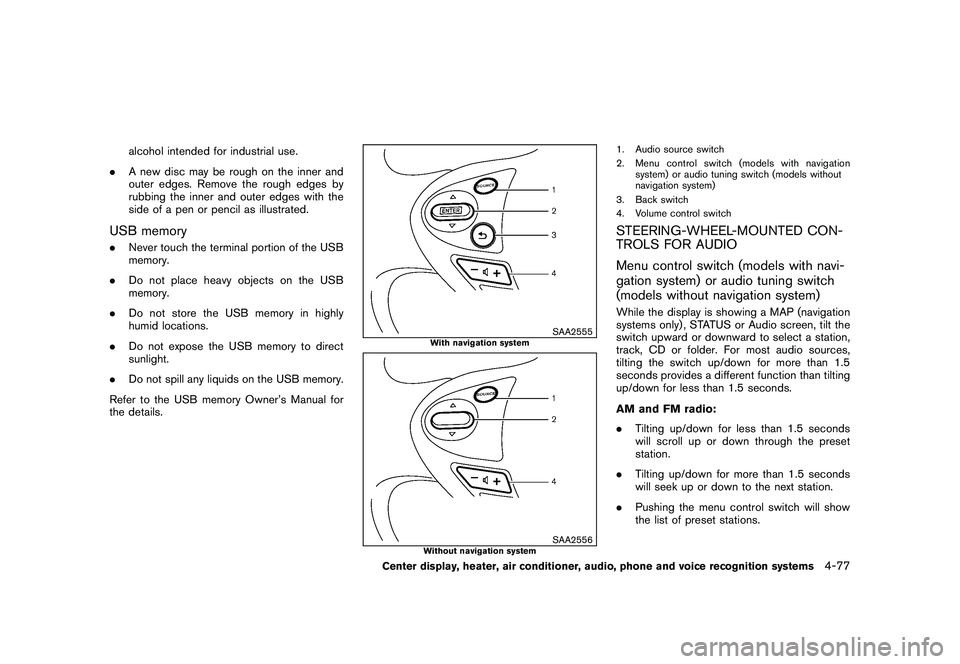
1. Audio source switch
2. Menu control switch (models with navigation system) or audio tuning switch (models without
navigation system)
3. Back switch
4. Volume control switchSTEERING-WHEEL-MOUNTED CON-
TROLS FOR AUDIO
Menu control switch (models with navi-
gation system) or audio tuning switch
(models without navigation system)While the display is showing a MAP (navigation
systems only) , STATUS or Audio screen, tilt the
switch upward or downward to select a station,
track, CD or folder. For most audio sources,
tilting the switch up/down for more than 1.5
seconds provides a different function than tilting
up/down for less than 1.5 seconds.
AM and FM radio:
. Tilting up/down for less than 1.5 seconds
will scroll up or down through the preset
station.
. Tilting up/down for more than 1.5 seconds
will seek up or down to the next station.
. Pushing the menu control switch will show
the list of preset stations.
Center display, heater, air conditioner, audio, phone and voice recognition systems
4-77
Page 240 of 419
Black plate (236,1)
Model "Z34-D" EDITED: 2010/ 7/ 27
.Voicetag
Confirm and store the voicetag. Voicetags
allow easy dialing using the NISSAN Voice
Recognition system. (See “NISSAN VOICE
RECOGNITION SYSTEM (models with na-
vigation system)” later in this section.)
To delete an entry, select the “Delete” key at
step 3.
SAA2524
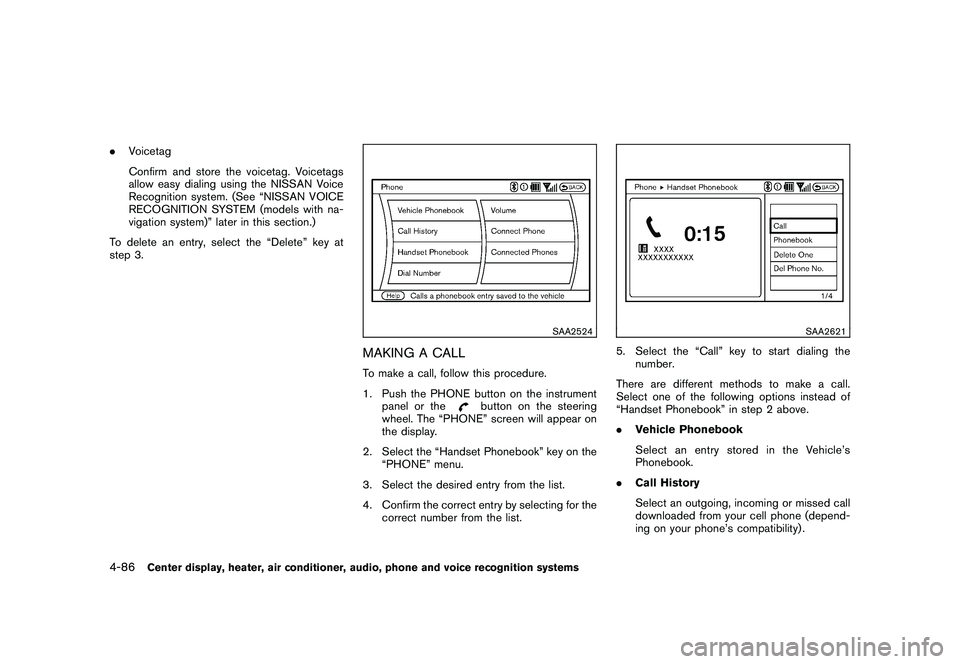
MAKING A CALLTo make a call, follow this procedure.
1. Push the PHONE button on the instrument panel or the
button on the steering
wheel. The “PHONE” screen will appear on
the display.
2. Select the “Handset Phonebook” key on the “PHONE” menu.
3. Select the desired entry from the list.
4. Confirm the correct entry by selecting for the correct number from the list.
SAA2621
5. Select the “Call” key to start dialing thenumber.
There are different methods to make a call.
Select one of the following options instead of
“Handset Phonebook” in step 2 above.
. Vehicle Phonebook
Select an entry stored in the Vehicle’s
Phonebook.
. Call History
Select an outgoing, incoming or missed call
downloaded from your cell phone (depend-
ing on your phone’s compatibility) .
4-86
Center display, heater, air conditioner, audio, phone and voice recognition systems