maintenance NISSAN 370Z COUPE 2012 Owners Manual
[x] Cancel search | Manufacturer: NISSAN, Model Year: 2012, Model line: 370Z COUPE, Model: NISSAN 370Z COUPE 2012Pages: 427, PDF Size: 3.25 MB
Page 2 of 427
![NISSAN 370Z COUPE 2012 Owners Manual Black plate (3,1)
[ Edit: 2011/ 12/ 1 Model: Z34-D ]
GUID-6FD1BAC8-D72F-42F1-9D6D-31D5644BADCDWelcome to the growing family of new NISSAN
owners. This vehicle is delivered to you with
confidence. It w NISSAN 370Z COUPE 2012 Owners Manual Black plate (3,1)
[ Edit: 2011/ 12/ 1 Model: Z34-D ]
GUID-6FD1BAC8-D72F-42F1-9D6D-31D5644BADCDWelcome to the growing family of new NISSAN
owners. This vehicle is delivered to you with
confidence. It w](/img/5/58159/w960_58159-1.png)
Black plate (3,1)
[ Edit: 2011/ 12/ 1 Model: Z34-D ]
GUID-6FD1BAC8-D72F-42F1-9D6D-31D5644BADCDWelcome to the growing family of new NISSAN
owners. This vehicle is delivered to you with
confidence. It was produced using the latest
techniques and strict quality control.
This manual was prepared to help you under-
stand the operation and maintenance of your
vehicle so that you may enjoy many miles of
driving pleasure. Please read through this
manual before operating your vehicle.
A separate Warranty Information Booklet
explains details about the warranties cov-
ering your vehicle. The NISSAN Service
and Maintenance Guide explains details
about maintaining and servicing your ve-
hicle. Additionally, a separate Customer
Care/Lemon Law Booklet (U.S. only) will
explain how to resolve any concerns you
may have with your vehicle, as well as
clarify your rights under your state’s lemon
law.
In addition to factory installed options, your
vehicle may also be equipped with additional
accessories installed by NISSAN or by your
NISSAN dealer prior to delivery. It is important
that you familiarize yourself with all disclosures,
warnings, cautions and instructions concerning
proper use of such accessories prior to operat-
ing the vehicle and/or accessory. See a NISSAN
dealer for details concerning the particularaccessories with which your vehicle is
equipped.
Your NISSAN dealer knows your vehicle best.
When you require any service or have any
questions, we will be glad to assist you with the
extensive resources available to us.
READ FIRST — THEN DRIVE SAFELYGUID-971144CA-C60D-402E-ACEF-63930E92B084Before driving your vehicle, read your Owner’s
Manual carefully. This will ensure familiarity with
controls and maintenance requirements, assist-
ing you in the safe operation of your vehicle.
WARNING
IMPORTANT SAFETY INFORMATION
REMINDERS FOR SAFETY!
Follow these important driving rules to
help ensure a safe and comfortable trip
for you and your passengers!
.
NEVER drive under the influence of
alcohol or drugs.
. ALWAYS observe posted speed lim-
its and never drive too fast for
conditions.
. ALWAYS give your full attention to
driving and avoid using vehicle
features or taking other actions that could distract you.
. ALWAYS use your seat belts and
appropriate child restraint systems.
. ALWAYS provide information about
the proper use of vehicle safety
features to all occupants of the
vehicle.
. ALWAYS review this Owner’s Man-
ual for important safety information.
MODIFICATION OF YOUR VEHI-
CLE
This vehicle should not be modified.
Modification could affect its performance,
safety or durability, and may even violate
governmental regulations. In addition,
damage or performance problems result-
ing from modification will not be covered
under the NISSAN warranties.
WHEN READING THE MANUALGUID-62C6F7B0-411D-42DD-98D0-C442EBF92C72This manual includes information for all
options available on this model. Therefore,
you may find some information that does
not apply to your vehicle.
All information, specifications and illustrations in
this manual are those in effect at the time of
Foreword
Page 7 of 427
Illustrated table of contents0
Safety — Seats, seat belts and supplemental
restraint system1
Instruments and controls
Pre-driving checks and adjustments
Center display, heater, air conditioner, audio, phone
and voice recognition systems
Starting and driving
In case of emergency
Appearance and care
Maintenance and do-it-yourself
Technical and consumer information
Index
2
3
4
5
6
7
8
9
10
Table of
Contents
Page 12 of 427
0-4Illustrated table of contents
SSI0594
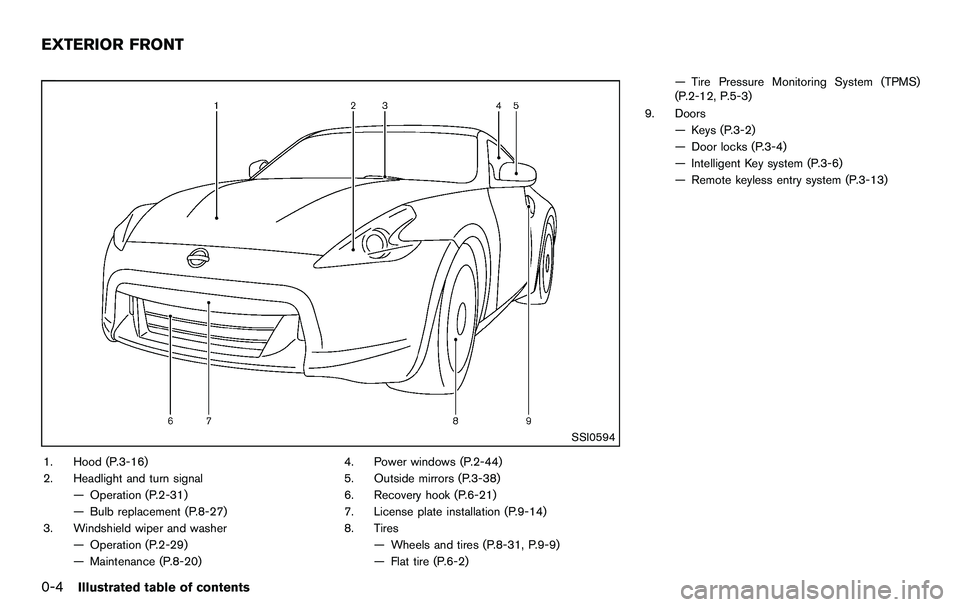
1. Hood (P.3-16)
2. Headlight and turn signal— Operation (P.2-31)
— Bulb replacement (P.8-27)
3. Windshield wiper and washer — Operation (P.2-29)
— Maintenance (P.8-20) 4. Power windows (P.2-44)
5. Outside mirrors (P.3-38)
6. Recovery hook (P.6-21)
7. License plate installation (P.9-14)
8. Tires
— Wheels and tires (P.8-31, P.9-9)
— Flat tire (P.6-2) — Tire Pressure Monitoring System (TPMS)
(P.2-12, P.5-3)
9. Doors — Keys (P.3-2)
— Door locks (P.3-4)
— Intelligent Key system (P.3-6)
— Remote keyless entry system (P.3-13)
EXTERIOR FRONT
Page 23 of 427
1 Safety — Seats, seat belts and supplementalrestraint system
Seats ........................................................................\
.................... 1-2
Front seats ........................................................................\
.... 1-2
Head restraints .................................................................... 1-5
Seat belts ........................................................................\
............ 1-9 Precautions on seat belt usage ....................................... 1-9
Pregnant women .............................................................. 1-11
Injured persons ................................................................. 1-11
Three-point type seat belt .............................................. 1-11
Seat belt extenders .......................................................... 1-14
Seat belt maintenance .................................................... 1-14
Child safety ........................................................................\
...... 1-15 Infants ........................................................................\
.......... 1-15
Small children (for Coupe models) ............................. 1-15
Larger children .................................................................. 1-16
For Roadster models ....................................................... 1-17
Child restraints ........................................................................\
1-18
Precautions on child restraints ..................................... 1-18 Top tether strap child restraint
(for Coupe models) ....................................................... 1-19
Forward-facing child restraint installation using the
seat belts (for Coupe models) ................................... 1-20
Installing top tether strap (for Coupe models) ....... 1-24
Booster seats .................................................................. 1-24
Supplemental restraint system ........................................... 1-28 Precautions on supplemental restraint system ....... 1-28
NISSAN Advanced Air Bag System
(front seats) ..................................................................... 1-33
Front seat-mounted side-impact and roof/
door-mounted curtain side-impact supplemental air
bag systems .................................................................... 1-38
Seat belts with pretensioners (front seats) ............. 1-39
Supplemental air bag warning labels ....................... 1-40
Supplemental air bag warning light .......................... 1-41
Repair and replacement procedure .......................... 1-41
Page 36 of 427
1-14Safety — Seats, seat belts and supplemental restraint system
SSS0588
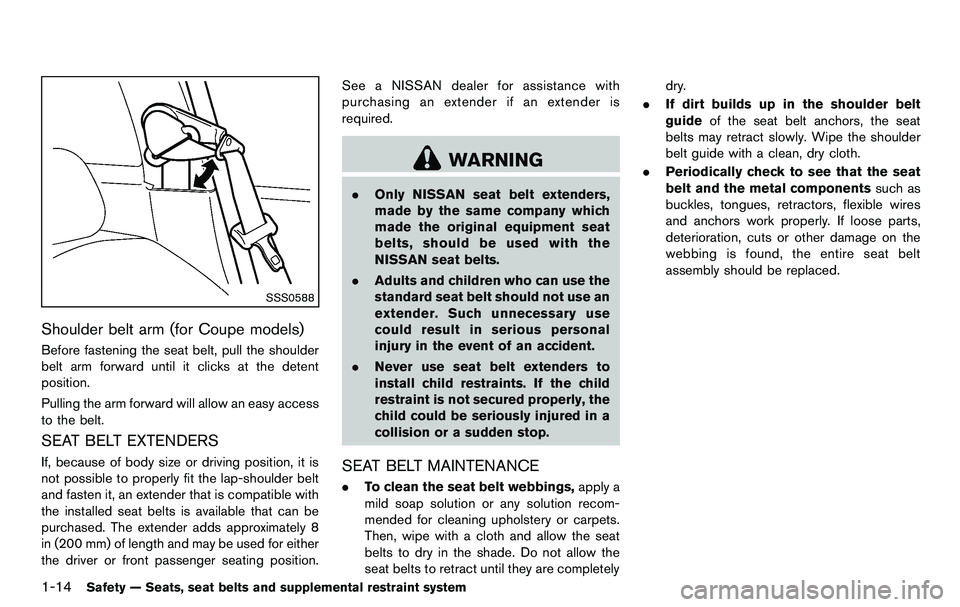
Shoulder belt arm (for Coupe models)
Before fastening the seat belt, pull the shoulder
belt arm forward until it clicks at the detent
position.
Pulling the arm forward will allow an easy access
to the belt.
SEAT BELT EXTENDERS
If, because of body size or driving position, it is
not possible to properly fit the lap-shoulder belt
and fasten it, an extender that is compatible with
the installed seat belts is available that can be
purchased. The extender adds approximately 8
in (200 mm) of length and may be used for either
the driver or front passenger seating position.See a NISSAN dealer for assistance with
purchasing an extender if an extender is
required.
WARNING
.
Only NISSAN seat belt extenders,
made by the same company which
made the original equipment seat
belts, should be used with the
NISSAN seat belts.
. Adults and children who can use the
standard seat belt should not use an
extender. Such unnecessary use
could result in serious personal
injury in the event of an accident.
. Never use seat belt extenders to
install child restraints. If the child
restraint is not secured properly, the
child could be seriously injured in a
collision or a sudden stop.
SEAT BELT MAINTENANCE
.To clean the seat belt webbings, apply a
mild soap solution or any solution recom-
mended for cleaning upholstery or carpets.
Then, wipe with a cloth and allow the seat
belts to dry in the shade. Do not allow the
seat belts to retract until they are completely dry.
. If dirt builds up in the shoulder belt
guide of the seat belt anchors, the seat
belts may retract slowly. Wipe the shoulder
belt guide with a clean, dry cloth.
. Periodically check to see that the seat
belt and the metal components such as
buckles, tongues, retractors, flexible wires
and anchors work properly. If loose parts,
deterioration, cuts or other damage on the
webbing is found, the entire seat belt
assembly should be replaced.
Page 63 of 427
SPA1097
SUPPLEMENTAL AIR BAG WARNING
LIGHT
The supplemental air bag warning light, display-
ing
in the instrument panel, monitors the
circuits of the supplemental front-impact air bag,
front seat-mounted side-impact supplemental
air bag, roof-mounted (Coupe models) or door-
mounted (Roadster models) curtain side-impact
supplemental air bag, and seat belt pretensioner
systems. The monitored circuits include the air
bag systems, pretensioners and all related
wiring.
When the ignition switch is in the ON position,
the supplemental air bag warning light illumi-
nates for about 7 seconds and then turns off. This means the system is operational.
If any of the following conditions occur, the front
air bag, side air bag, curtain air bag and
pretensioner systems need servicing:
.
The supplemental air bag warning light
remains on approximately 7 seconds after
the ignition switch is pushed to the ON
position.
. The supplemental air bag warning light
flashes intermittently.
. The supplemental air bag warning light does
not come on at all.
Under these conditions, the front air bag, side air
bag, curtain air bag or pretensioner systems may
not operate properly. They must be checked and
repaired. Take your vehicle to the nearest
NISSAN dealer.
WARNING
If the supplemental air bag warning
light is on, it could mean that the front
air bag, side air bag, curtain air bag
and/or pretensioner systems will not
operate in an accident. To help avoid
injury to yourself or others, have your
vehicle checked by a NISSAN dealer as
soon as possible.
REPAIR AND REPLACEMENT PRO-
CEDURE
The front air bags, side air bags, curtain air bags
and pretensioners are designed to activate on a
one-time-only basis. As a reminder, unless it is
damaged, the supplemental air bag warning light
will remain illuminated after inflation has oc-
curred. Repair and replacement of these sys-
tems should be done only by a NISSAN dealer.
When maintenance work is required on the
vehicle, the front air bags, side air bags, curtain
air bags, pretensioners and related parts should
be pointed out to the person conducting the
maintenance. The ignition switch should always
be in the LOCK position when working under
the hood or inside the vehicle.
WARNING
. Once a front air bag, side air bag, or
curtain air bag has inflated, the air
bag module will not function again
and must be replaced. Additionally,
the activated pretensioner must
also be replaced. The air bag mod-
ule and pretensioner system should
be replaced by a NISSAN dealer.
The air bag module and preten-
sioner system cannot be repaired.
Safety — Seats, seat belts and supplemental restraint system1-41
Page 65 of 427
2 Instruments and controls
Cockpit ........................................................................\
................ 2-3
Instrument panel ........................................................................\
2-4
Meters and gauges ................................................................... 2-5
Speedometer and odometer ............................................ 2-6
Tachometer ........................................................................\
... 2-6
Engine coolant temperature gauge ................................ 2-7
Fuel gauge ........................................................................\
.... 2-7
Triple meter ........................................................................\
... 2-8
Warning/indicator lights and audible reminders ............... 2-9 Checking bulbs ................................................................. 2-10
Warning lights ................................................................... 2-10
Indicator lights ................................................................... 2-14
Audible reminders ............................................................ 2-16
Vehicle information display .................................................. 2-17 Operational indicators ..................................................... 2-18
Warnings and alerts ........................................................ 2-20
Maintenance indicators ................................................... 2-21
Trip computer .................................................................... 2-22
Security systems .................................................................... 2-27 Vehicle Security System ................................................. 2-27
NISSAN Vehicle Immobilizer System .......................... 2-28
Windshield wiper and washer switch ............................... 2-29
Rear window defroster switch ............................................ 2-31
Headlight and turn signal switch ....................................... 2-31 Xenon headlights .............................................................. 2-31 Headlight switch ............................................................ 2-32
Turn signal switch .......................................................... 2-35
Fog light switch (if so equipped) .............................. 2-35
Hazard warning flasher switch ........................................... 2-35
Horn ........................................................................\
.................. 2-36
Heated seats (if so equipped) ........................................... 2-36
Climate controlled seats (if so equipped) ...................... 2-38
Vehicle Dynamic Control (VDC) OFF switch ................. 2-39
Power outlet ........................................................................\
.... 2-39
Storage ........................................................................\
............ 2-40
Instrument pocket (except for navigation system
equipped models) .......................................................... 2-40
Cup holders ..................................................................... 2-40
Glove box ........................................................................\
. 2-41
Console box .................................................................... 2-42
Rear parcel box .............................................................. 2-42
Cargo cover (if so equipped) ..................................... 2-43
Windows ........................................................................\
......... 2-44 Power windows .............................................................. 2-44
Interior lights ........................................................................\
... 2-46
Map lights ........................................................................\
2-46
Interior light control switch .......................................... 2-47
Vanity mirror lights ................................................................. 2-48
Cargo area courtesy light (Roadster models) ............... 2-48
Cargo light (Coupe models) .............................................. 2-48>
Page 78 of 427
2-14Instruments and controls
Vehicle Dynamic Control (VDC)
warning light
The light will blink when the VDC system or the
traction control system is operating, thus alerting
the driver that the vehicle is nearing its traction
limits. The road surface may be slippery.
When the vehicle dynamic control warning light
illuminates when the vehicle dynamic control
system is turned on, this light alerts the driver to
the fact that the vehicle dynamic control
system’s fail-safe mode is operating, for example
the vehicle dynamic control system may not be
functioning properly. Have the system checked
by a NISSAN dealer. If a malfunction occurs in
the system, the vehicle dynamic control system
function will be canceled but the vehicle is still
driveable. For additional information, see “Vehi-
cle Dynamic Control (VDC) system” (P.5-28) of
this manual.
INDICATOR LIGHTS
Cruise indicator light
Cruise main switch indicator:
This light illuminates when the cruise control
main switch is pushed. The light turns off when
the main switch is pushed again. When the
cruise main switch indicator light illuminates, the
cruise control system is operational. (See
“Cruise control” (P.5-21).)
Cruise malfunction:
If the cruise indicator light blinks while the
engine is running, it may indicate the cruise
control system is not functioning properly. Have
the system checked by a NISSAN dealer. (See
“Cruise control” (P.5-21).)
Front passenger air bag status light
The front passenger air bag status light (),
located on the center of the instrument panel,
will be lit and the passenger front air bag will be
OFF depending on how the front passenger
seat is being used.
For front passenger air bag status light opera-
tion, see “NISSAN Advanced Air Bag System
(front seats)” (P.1-33) of this manual.
High beam indicator light
This light comes on when the headlight high
beam is on and goes out when the low beam is
selected.
Low beam indicator light
The light illuminates when the headlight switch is
turned to the
position.
Malfunction Indicator Light (MIL)
If the malfunction indicator light comes on
steady or blinks while the engine is running, it
may indicate a potential emission control mal-
function.
The malfunction indicator light may also come on
steady if the fuel-filler cap is loose or missing, or
if the vehicle runs out of fuel. Check to make
sure the fuel-filler cap is installed and closed
tightly, and that the vehicle has at least 3 US
gallons (14 liters) of fuel in the fuel tank.
After a few driving trips, the
light should
turn off if no other potential emission control
system malfunction exists.
If this indicator light remains on for 20 seconds
and then blinks for 10 seconds when the engine
is not running, it indicates that the vehicle is not
ready for an emission control system inspection/
maintenance test. (See “Readiness for Inspec-
tion/Maintenance (I/M) test” (P.9-23) .)
Page 85 of 427
7. Low outside temperature warning
This warning appears if the outside temperature
is below 378F(38C) . The warning can be set not
to be displayed. (See “Trip computer” (P.2-22) .)
8. SynchroRev Match mode (S-MODE)
warning
This warning appears if a system malfunction
occurs. When the warning appears, the S-
MODE function will not operate, but the manual
transmission will operate normally and driving
can be continued. Have the system checked by
a NISSAN dealer.
SIC4237
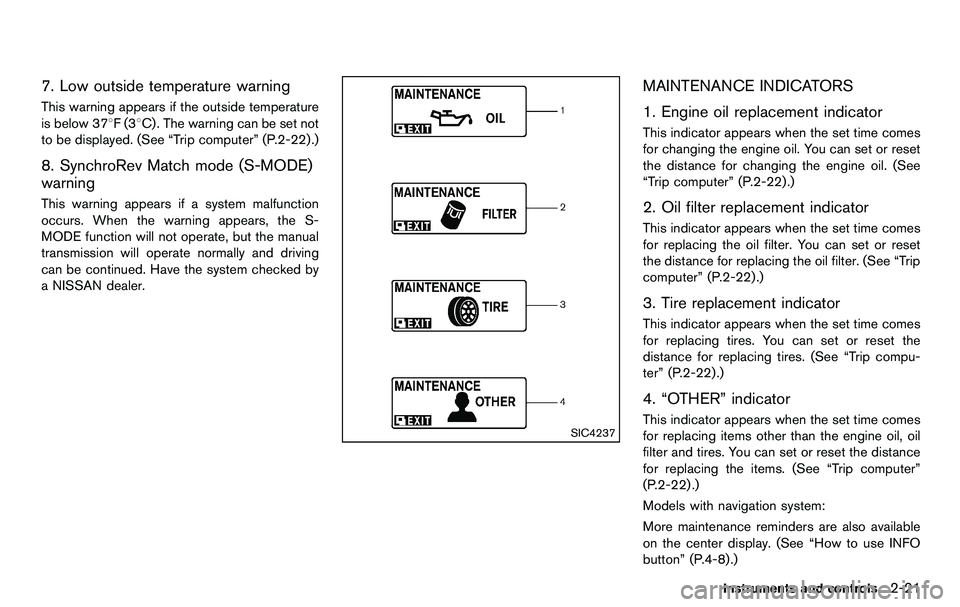
MAINTENANCE INDICATORS
1. Engine oil replacement indicator
This indicator appears when the set time comes
for changing the engine oil. You can set or reset
the distance for changing the engine oil. (See
“Trip computer” (P.2-22) .)
2. Oil filter replacement indicator
This indicator appears when the set time comes
for replacing the oil filter. You can set or reset
the distance for replacing the oil filter. (See “Trip
computer” (P.2-22).)
3. Tire replacement indicator
This indicator appears when the set time comes
for replacing tires. You can set or reset the
distance for replacing tires. (See “Trip compu-
ter” (P.2-22) .)
4. “OTHER” indicator
This indicator appears when the set time comes
for replacing items other than the engine oil, oil
filter and tires. You can set or reset the distance
for replacing the items. (See “Trip computer”
(P.2-22) .)
Models with navigation system:
More maintenance reminders are also available
on the center display. (See “How to use INFO
button” (P.4-8).)
Instruments and controls2-21
Page 89 of 427
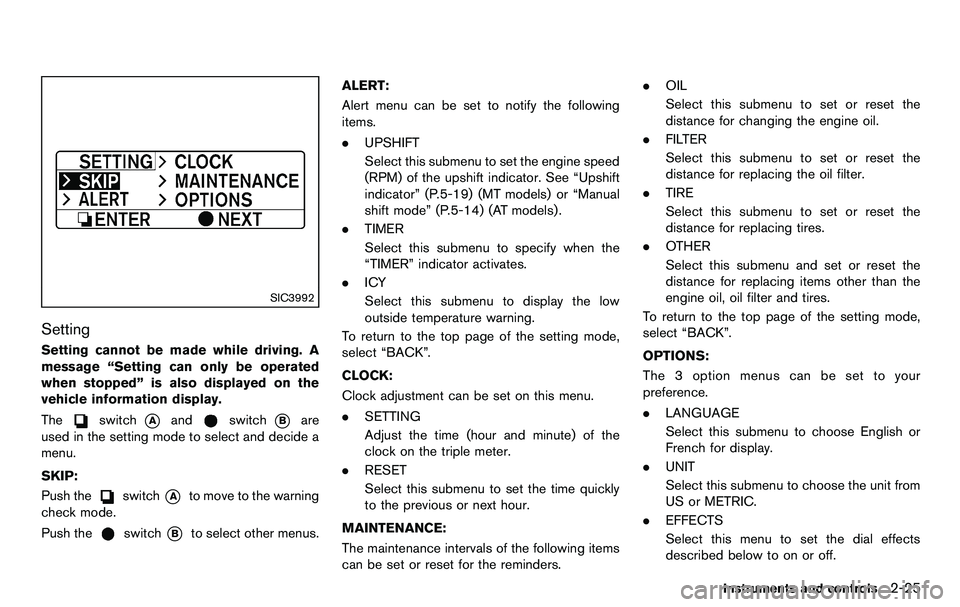
SIC3992
Setting
Setting cannot be made while driving. A
message “Setting can only be operated
when stopped” is also displayed on the
vehicle information display.
The
switch*Aandswitch*Bare
used in the setting mode to select and decide a
menu.
SKIP:
Push the
switch*Ato move to the warning
check mode.
Push the
switch*Bto select other menus. ALERT:
Alert menu can be set to notify the following
items.
. UPSHIFT
Select this submenu to set the engine speed
(RPM) of the upshift indicator. See “Upshift
indicator” (P.5-19) (MT models) or “Manual
shift mode” (P.5-14) (AT models) .
. TIMER
Select this submenu to specify when the
“TIMER” indicator activates.
. ICY
Select this submenu to display the low
outside temperature warning.
To return to the top page of the setting mode,
select “BACK”.
CLOCK:
Clock adjustment can be set on this menu.
. SETTING
Adjust the time (hour and minute) of the
clock on the triple meter.
. RESET
Select this submenu to set the time quickly
to the previous or next hour.
MAINTENANCE:
The maintenance intervals of the following items
can be set or reset for the reminders. .
OIL
Select this submenu to set or reset the
distance for changing the engine oil.
. FILTER
Select this submenu to set or reset the
distance for replacing the oil filter.
. TIRE
Select this submenu to set or reset the
distance for replacing tires.
. OTHER
Select this submenu and set or reset the
distance for replacing items other than the
engine oil, oil filter and tires.
To return to the top page of the setting mode,
select “BACK”.
OPTIONS:
The 3 option menus can be set to your
preference.
. LANGUAGE
Select this submenu to choose English or
French for display.
. UNIT
Select this submenu to choose the unit from
US or METRIC.
. EFFECTS
Select this menu to set the dial effects
described below to on or off.
Instruments and controls2-25