instrument panel NISSAN 370Z COUPE 2015 Z34 Quick Reference Guide
[x] Cancel search | Manufacturer: NISSAN, Model Year: 2015, Model line: 370Z COUPE, Model: NISSAN 370Z COUPE 2015 Z34Pages: 24, PDF Size: 3.63 MB
Page 2 of 24
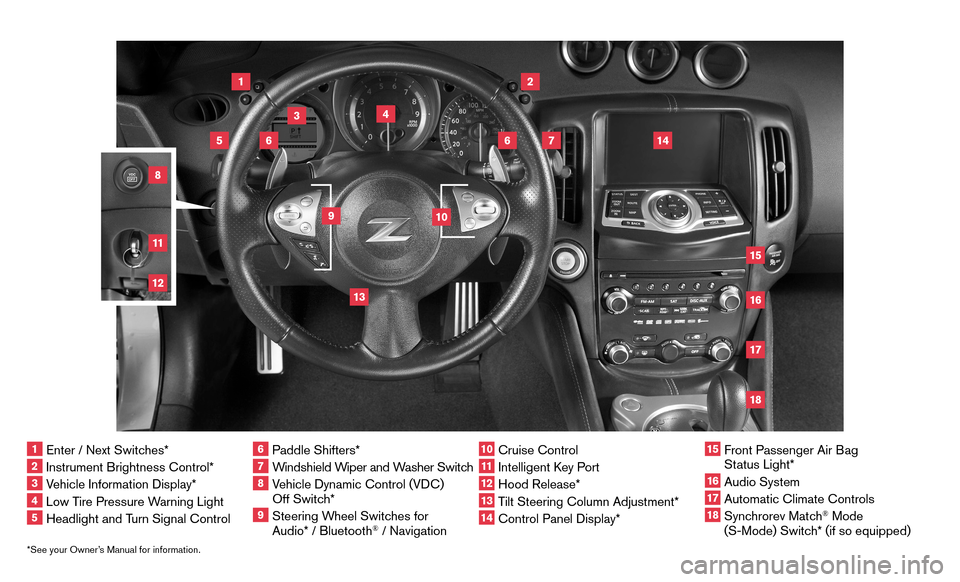
*See your Owner’s Manual for information.1 Enter / Next Switches*2 Instrument Brightness Control*3 Vehicle Information Display*4 Low Tire Pressure Warning Light5 Headlight and Turn Signal Control
6 Paddle Shifters*7 Windshield Wiper and Washer Switch8 Vehicle Dynamic Control (VDC)
Off Switch* 9 Steering Wheel Switches for
Audio* / Bluetooth
® / Navigation
10 Cruise Control11 Intelligent Key Port 12 Hood Release*13 Tilt Steering Column Adjustment*14 Control Panel Display*
15 Front Passenger Air Bag
Status Light*
16 Audio System17 Automatic Climate Controls18 Synchrorev Match
® Mode
(S-Mode) Switch* (if so equipped)
2
3
1
4
6
6
15
5
13
16
14
9
7
10
1718
81211
Page 7 of 24
5
Offset (min) – The time can be adjusted by increasing or decreasing per minute.
Clock Format – Choose either the 12-hour clock display or the 24-hour clock display.
Daylight Savings Time – Turn this item to ON for daylight savings time application.
Time Zone – Choose the time zone.
For more information, refer to the “Other settings (section 7)” of your Multi Function Display Owner’s Manual.
For more information, refer to the “Instruments and controls (section 2)” or the “Center display, heater, air conditioner, audio, phone and voice recognition systems (section 4)” of your Owner’s Manual.
ENGINE OIL TEMPERATURE GAUGE
Performance driving patterns or extended driving
at elevated ambient temperatures may result in
increased engine oil temperature during operation.
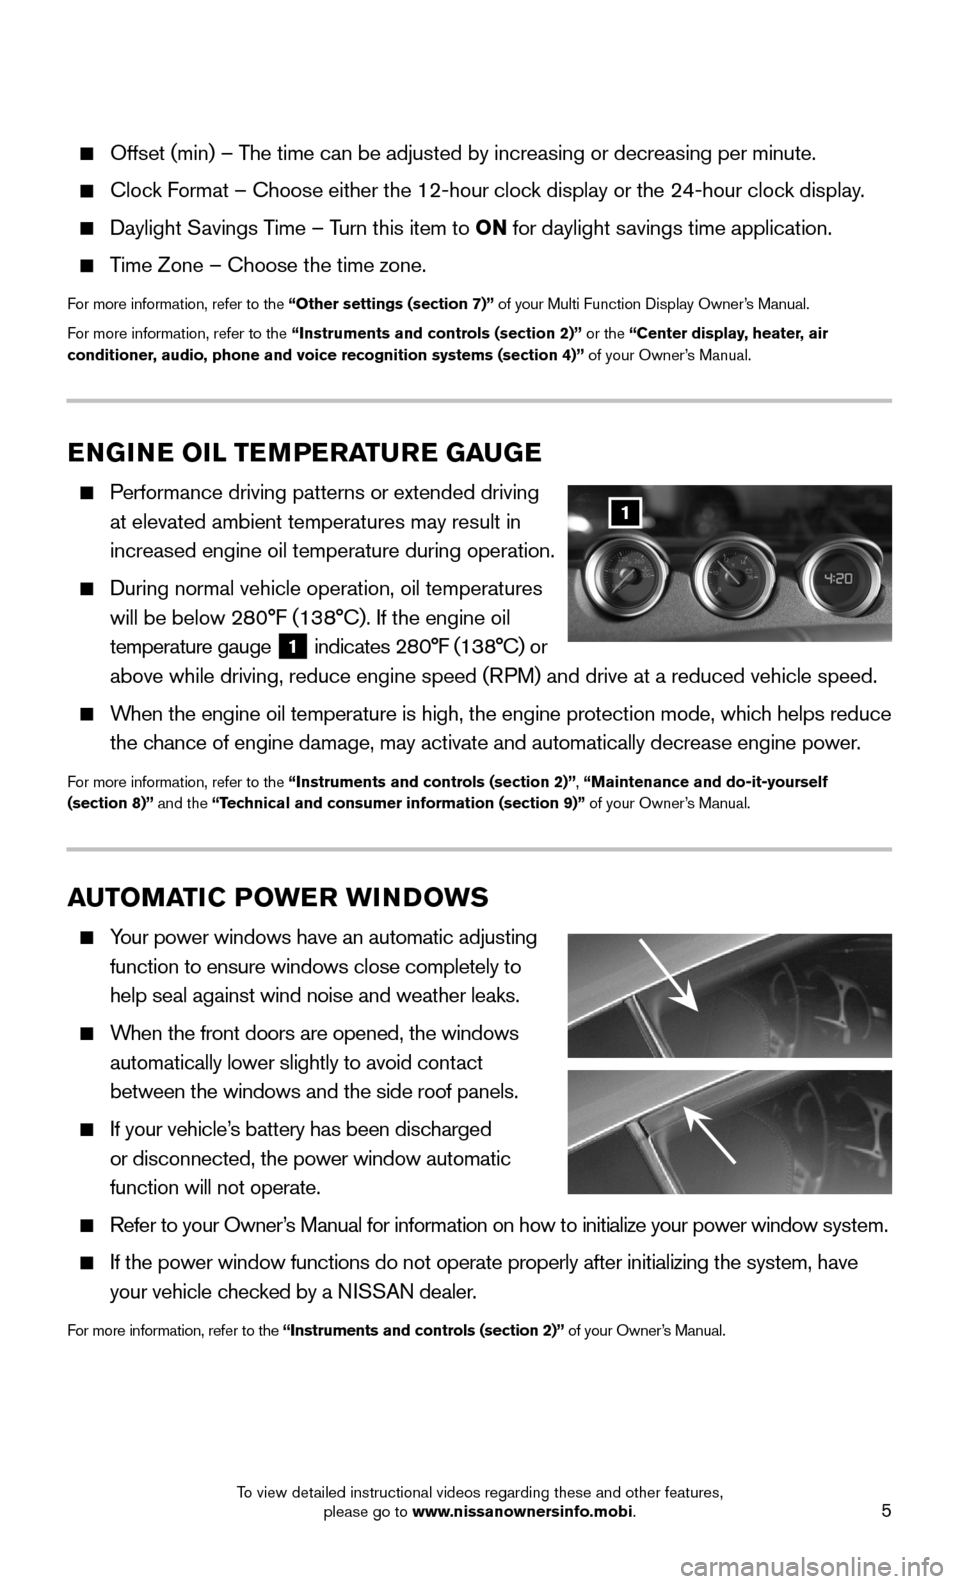
During normal vehicle operation, oil temperatures
will be below 280°F (138°C). If the engine oil
temperature gauge 1 indicates 280°F (138°C) or
above while driving, reduce engine speed (RPM) and drive at a reduced vehicle speed.
When the engine oil temperature is high, the engine protection mode, whic\
h helps reduce
the chance of engine damage, may activate and automatically decrease engine p\
ower.
For more information, refer to the “Instruments and controls (section 2)”, “Maintenance and do-it-yourself (section 8)” and the “Technical and consumer information (section 9)” of your Owner’s Manual.
1
AUTOMATIC POWER WINDOWS
Your power windows have an automatic adjusting
function to ensure windows close completely to
help seal against wind noise and weather leaks.
When the front doors are opened, the windows
automatically lower slightly to avoid contact
between the windows and the side roof panels.
If your vehicle’s battery has been discharged
or disconnected, the power window automatic
function will not operate.
Refer to your Owner’s Manual for information on how to initialize your power window system.
If the power window functions do not operate properly after initializing\
the system, have
your vehicle checked by a NISSAN dealer.
For more information, refer to the “Instruments and controls (section 2)” of your Owner’s Manual.
To view detailed instructional videos regarding these and other features, please go to www.nissanownersinfo.mobi.
Page 11 of 24
9
STARTING/STOPPING THE ENGINE
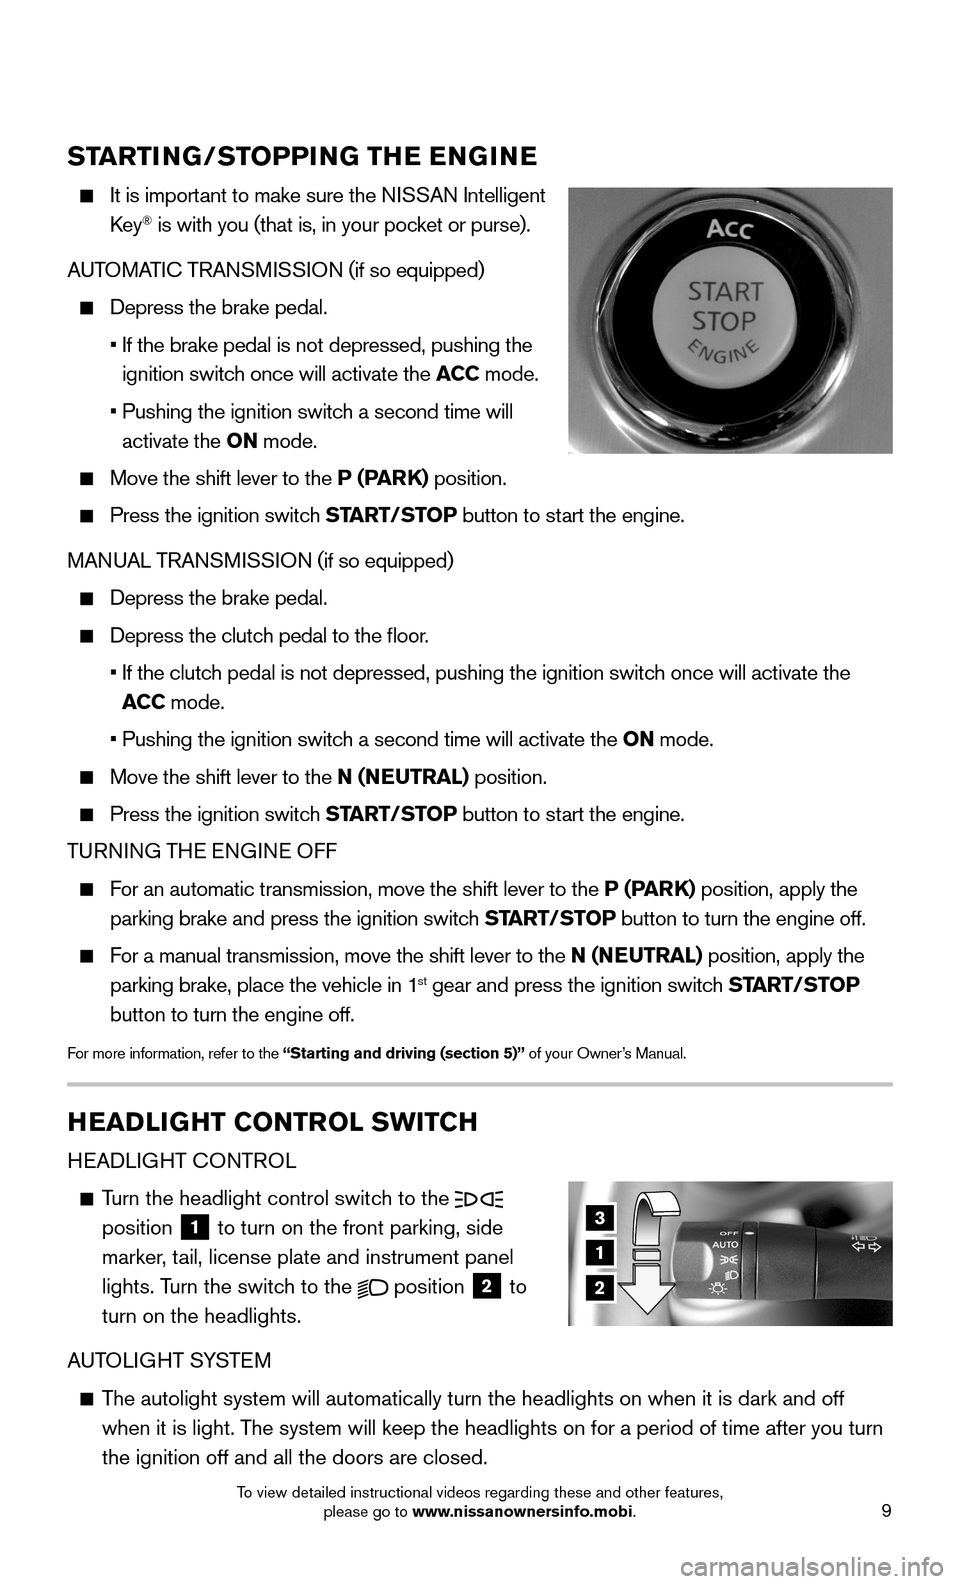
It is important to make sure the NISSAN Intelligent
Key® is with you (that is, in your pocket or purse).
AUTOMATIC TRANSMISSION (if so equipped)
Depress the brake pedal.
• If the brake pedal is not depressed, pushing the
ignition switch once will activate the ACC mode.
• Pushing the ignition switch a second time will
activate the ON mode.
Move the shift lever to the P (PARK) position.
Press the ignition switch START/STOP button to start the engine.
MANUAL TRANSMISSION (if so equipped)
Depress the brake pedal.
Depress the clutch pedal to the floor.
• If the clutch pedal is not depressed, pushing the ignition switch once will activate the
ACC mode.
• Pushing the ignition switch a second time will activate the ON mode.
Move the shift lever to the N (NEUTRAL) position.
Press the ignition switch START/STOP button to start the engine.
TURNING THE ENGINE OFF
For an automatic transmission, move the shift lever to the P (PARK) position, apply the
parking brake and press the ignition switch START/STOP button to turn the engine off.
For a manual transmission, move the shift lever to the N (NEUTRAL) position, apply the
parking brake, place the vehicle in 1st gear and press the ignition switch START/STOP
button to turn the engine off.
For more information, refer to the “Starting and driving (section 5)” of your Owner’s Manual.
3
1
2
HEADLIGHT CONTROL SWITCH
HEADLIGHT CONTROL
Turn the headlight control switch to the position 1 to turn on the front parking, side
marker, tail, license plate and instrument panel
lights. Turn the switch to the position 2 to
turn on the headlights.
AUTOLIGHT SYSTEM
The autolight system will automatically turn the headlights on when it is\
dark and off
when it is light. The system will keep the headlights on for a period of time after you tur\
n
the ignition off and all the doors are closed.
To view detailed instructional videos regarding these and other features, please go to www.nissanownersinfo.mobi.
Page 12 of 24
10
FIRST DRIVE FEATURES
To activate the autolight system, turn the headlight control switch to the AUTO position 3 then push the ignition switch to ON. To deactivate the autolight system, turn the
headlight control switch to the OFF, position 1 or position 2.
HIGH BEAM SELECT
Push the headlight control switch forward 4 to
select the high beam function. The blue indicator
light illuminates in the instrument panel. Pull
the headlight switch back to the original position to
select the low beam. The blue indicator light
will extinguish.
Pull and release the headlight control switch 5 to
flash the headlight high beams on and off.
LANE CHANGE SIGNAL
To signal a lane change, move the lever up or down to the point where the lights
begin flashing.
If the lever is moved back, right after moving up or down, the light will flash 3 times.
For more information, refer to the “Instruments and controls (section 2)” of your Owner’s Manual.
WINDSHIELD WIPER AND WASHER SWITCH
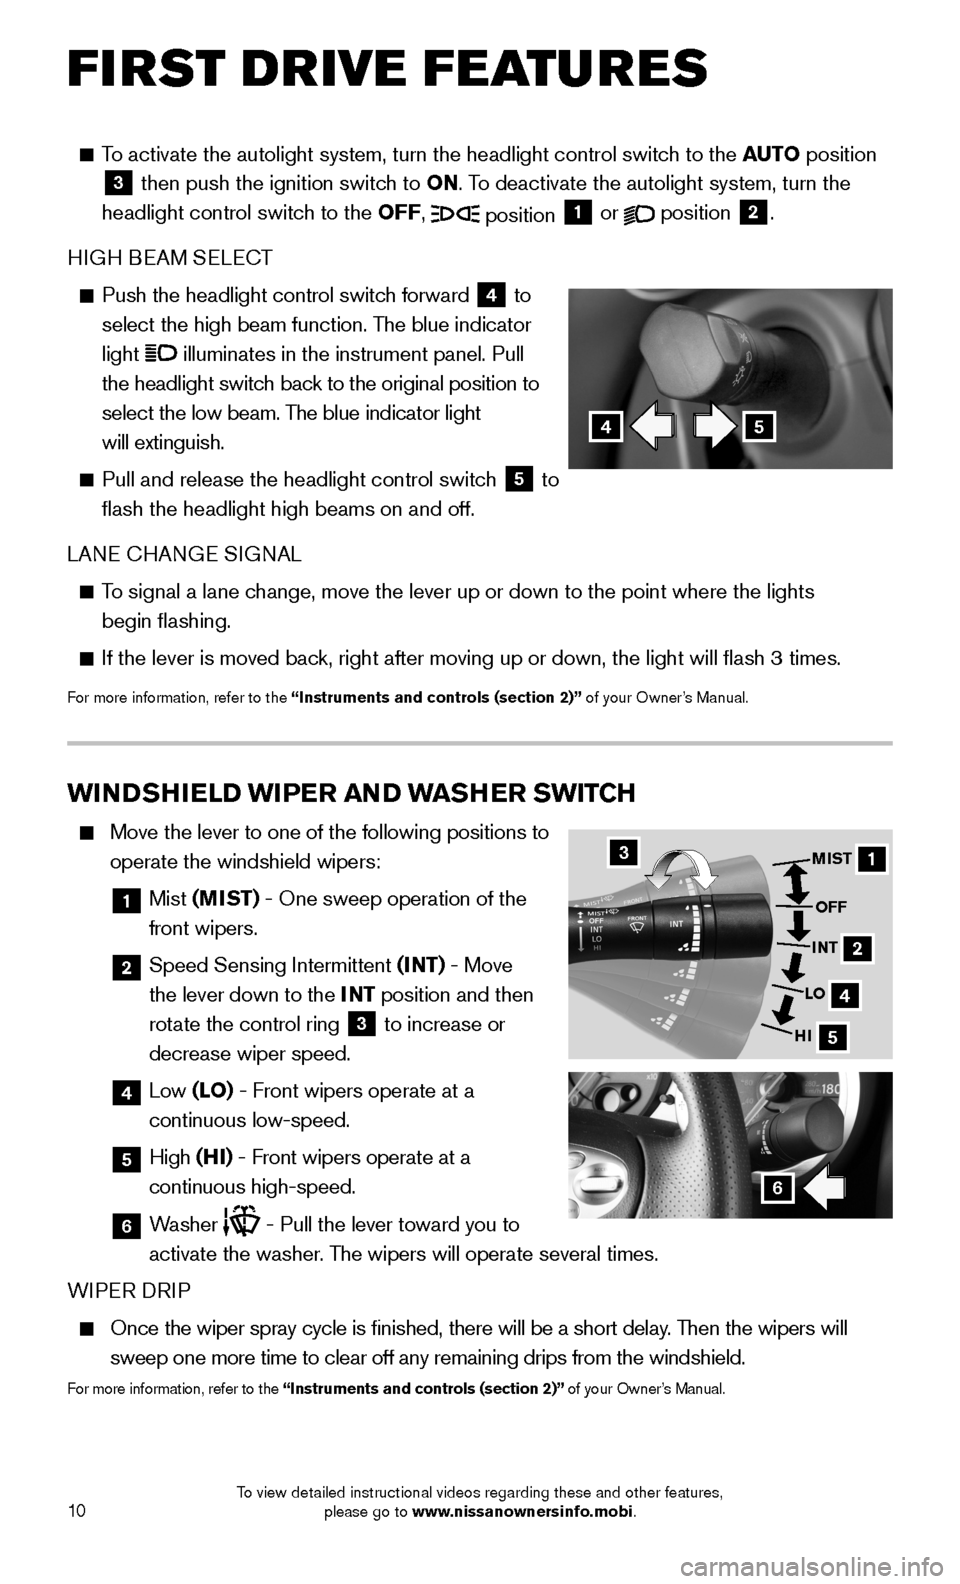
Move the lever to one of the following positions to
operate the windshield wipers:
1 Mist (MIST) - One sweep operation of the
front wipers.
2 Speed Sensing Intermittent (INT) - Move
the lever down to the INT position and then
rotate the control ring 3 to increase or
decrease wiper speed.
4 Low (LO) - Front wipers operate at a
continuous low-speed.
5 High (HI) - Front wipers operate at a
continuous high-speed.
6 Washer - Pull the lever toward you to
activate the washer. The wipers will operate several times.
WIPER DRIP
Once the wiper spray cycle is finished, there will be a short delay. Then the wipers will
sweep one more time to clear off any remaining drips from the windshield\
.
For more information, refer to the “Instruments and controls (section 2)” of your Owner’s Manual.
31
2
4
5
MIST
OFF
INT
LO
HI
6
45
To view detailed instructional videos regarding these and other features, please go to www.nissanownersinfo.mobi.
Page 15 of 24
13
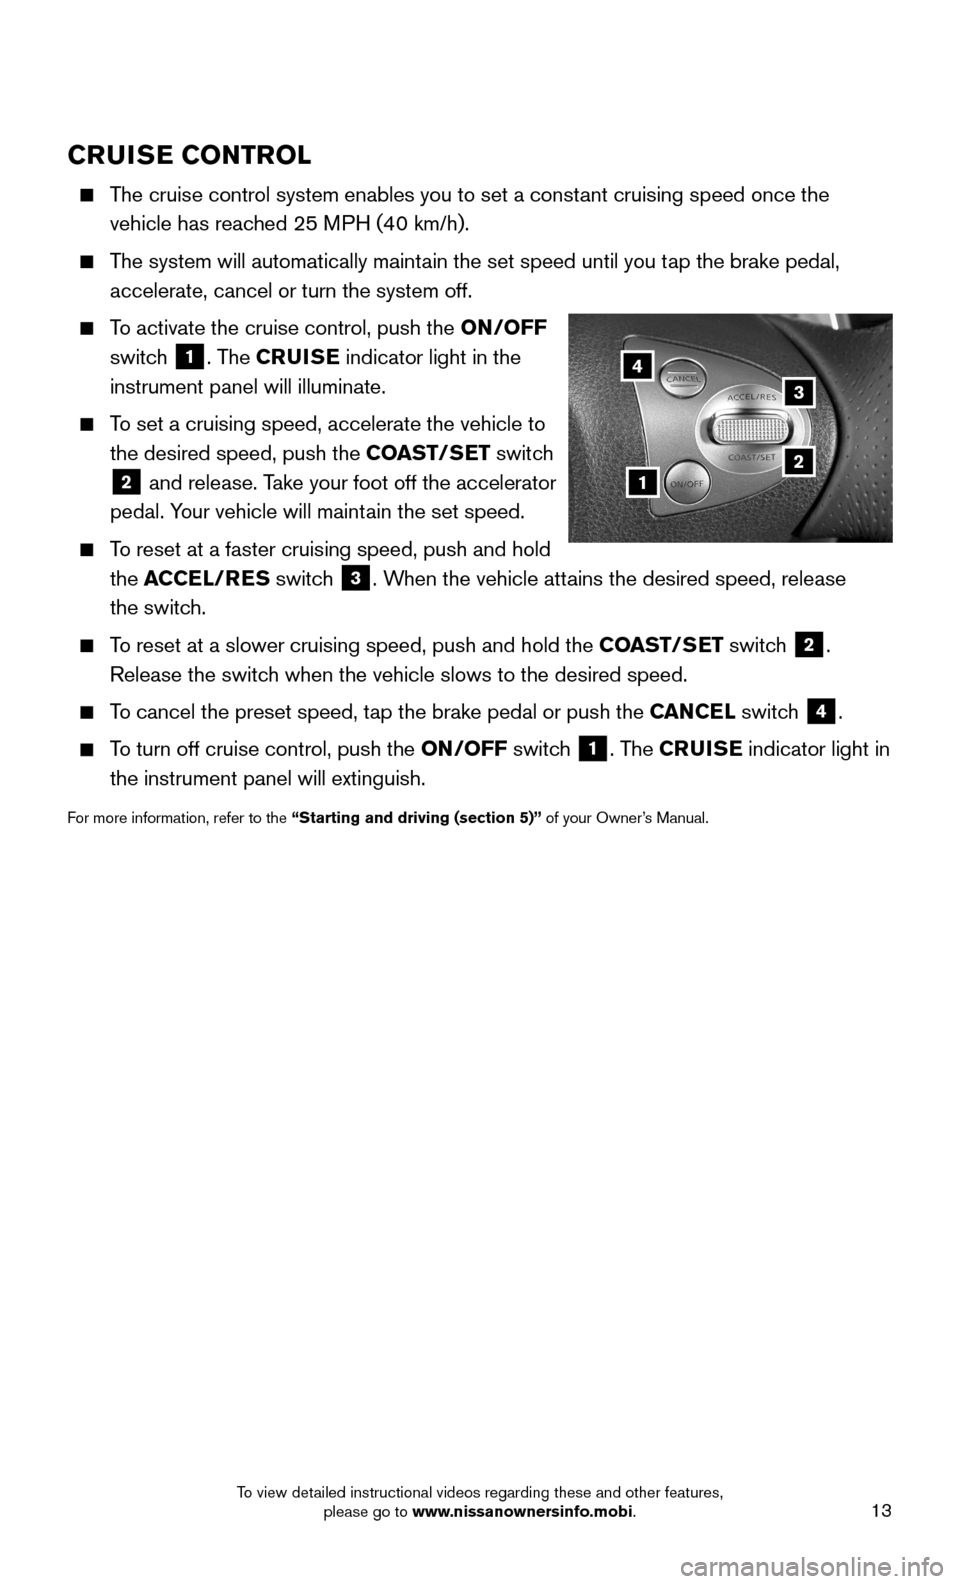
CRUISE CONTROL
The cruise control system enables you to set a constant cruising speed once the
vehicle has reached 25 MPH (40 km/h).
The system will automatically maintain the set speed until you tap the brake pedal,
accelerate, cancel or turn the system off.
To activate the cruise control, push the ON/OFF
switch 1. The CRUISE indicator light in the
instrument panel will illuminate.
To set a cruising speed, accelerate the vehicle to
the desired speed, push the COAST/SET switch
2 and release. Take your foot off the accelerator
pedal. Your vehicle will maintain the set speed.
To reset at a faster cruising speed, push and hold
the ACCEL/RES switch 3. When the vehicle attains the desired speed, release
the switch.
To reset at a slower cruising speed, push and hold the COAST/SET switch 2.
Release the switch when the vehicle slows to the desired speed.
To cancel the preset speed, tap the brake pedal or push the CANCEL switch 4.
To turn off cruise control, push the ON/OFF switch 1. The CRUISE indicator light in
the instrument panel will extinguish.
For more information, refer to the “Starting and driving (section 5)” of your Owner’s Manual.
1
3
2
4
To view detailed instructional videos regarding these and other features, please go to www.nissanownersinfo.mobi.
Page 17 of 24
15
The “Help” command can be used to hear a list
of available commands at any time.
Reduce background noise as much as possible
by closing windows and pointing HVAC vents
away from the ceiling.
Speak naturally without long pauses and without
raising your voice.
When speaking Phonebook names, please be
aware some phones require the last name to be spoken before the first name. For
example, “Michael Smith” may be spoken as “Smith Michael”.
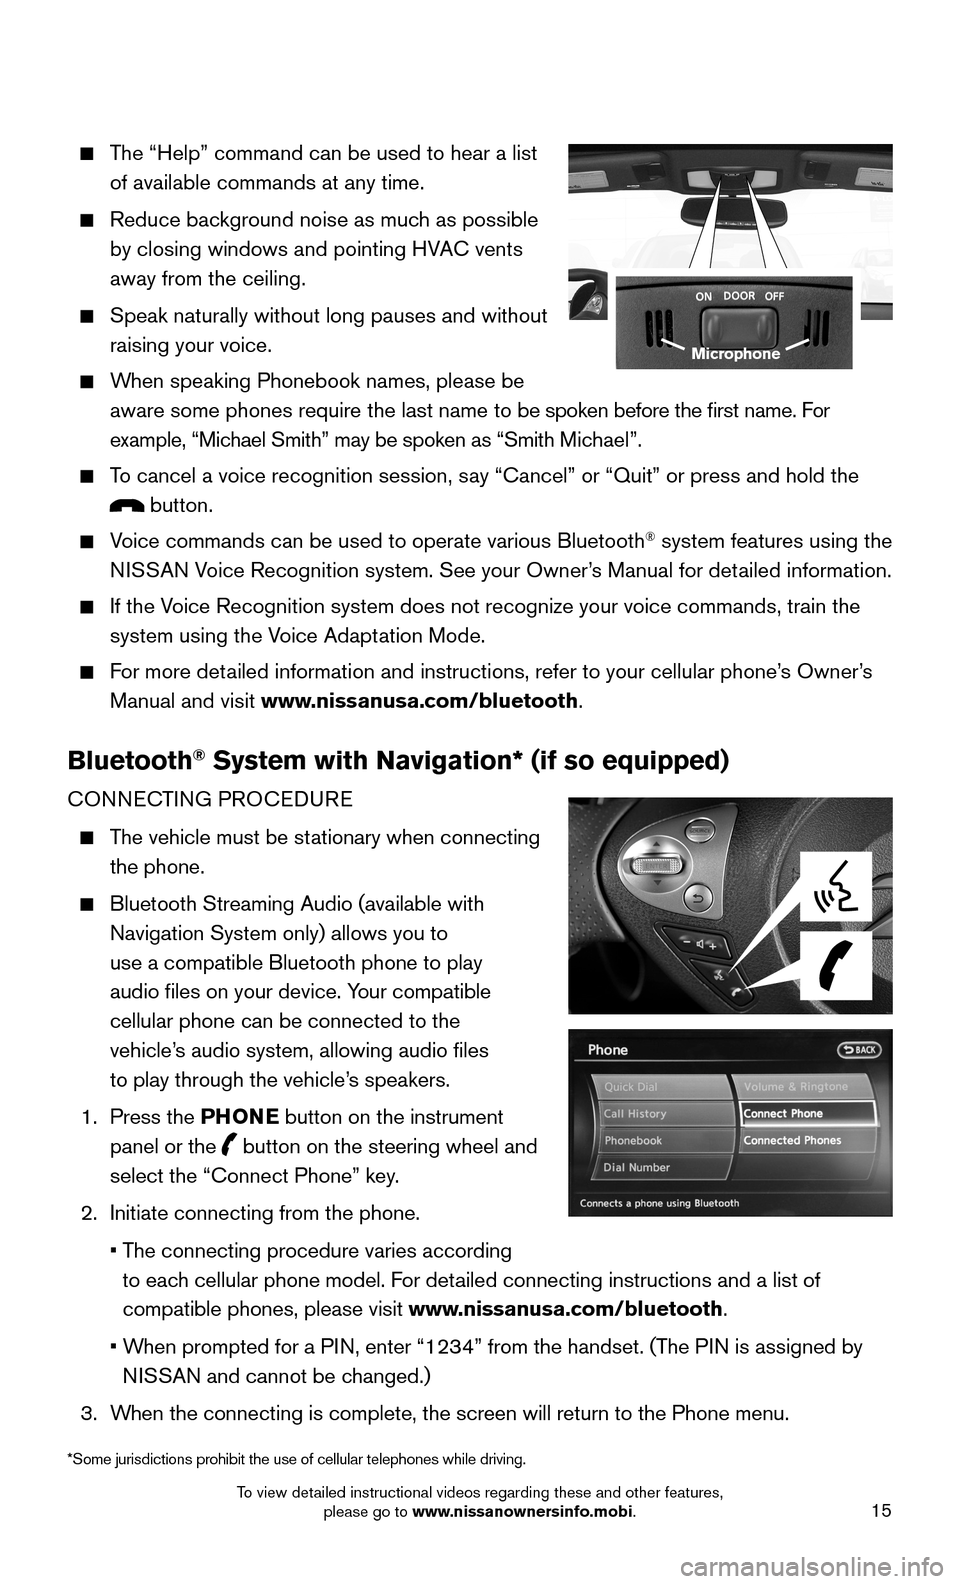
To cancel a voice recognition session, say “Cancel” or “Quit” or press and hold the
button.
Voice commands can be used to operate various Bluetooth® system features using the
NISSAN Voice Recognition system. See your Owner’s Manual for detailed information.
If the Voice Recognition system does not recognize your voice commands, train th\
e
system using the Voice Adaptation Mode.
For more detailed information and instructions, refer to your cellular phone’s Owner’s
Manual and visit www.nissanusa.com/bluetooth.
Bluetooth® System with Navigation* (if so equipped)
CONNECTING PROCEDURE
The vehicle must be stationary when connecting
the phone.
Bluetooth Streaming Audio (available with
Navigation System only) allows you to
use a compatible Bluetooth phone to play
audio files on your device. Your compatible
cellular phone can be connected to the
vehicle’s audio system, allowing audio files
to play through the vehicle’s speakers.
1. Press the PHONE button on the instrument
panel or the button on the steering wheel and
select the “Connect Phone” key.
2. Initiate connecting from the phone.
• The connecting procedure varies according
to each cellular phone model. For detailed connecting instructions and a list of
compatible phones, please visit www.nissanusa.com/bluetooth.
• When prompted for a PIN, enter “1234” from the handset. (The PIN is assigned by
NISSAN and cannot be changed.)
3. When the connecting is complete, the screen will return to the Phone menu\
.
Microphone
*Some jurisdictions prohibit the use of cellular telephones while drivin\
g.
To view detailed instructional videos regarding these and other features, please go to www.nissanownersinfo.mobi.
Page 18 of 24
16
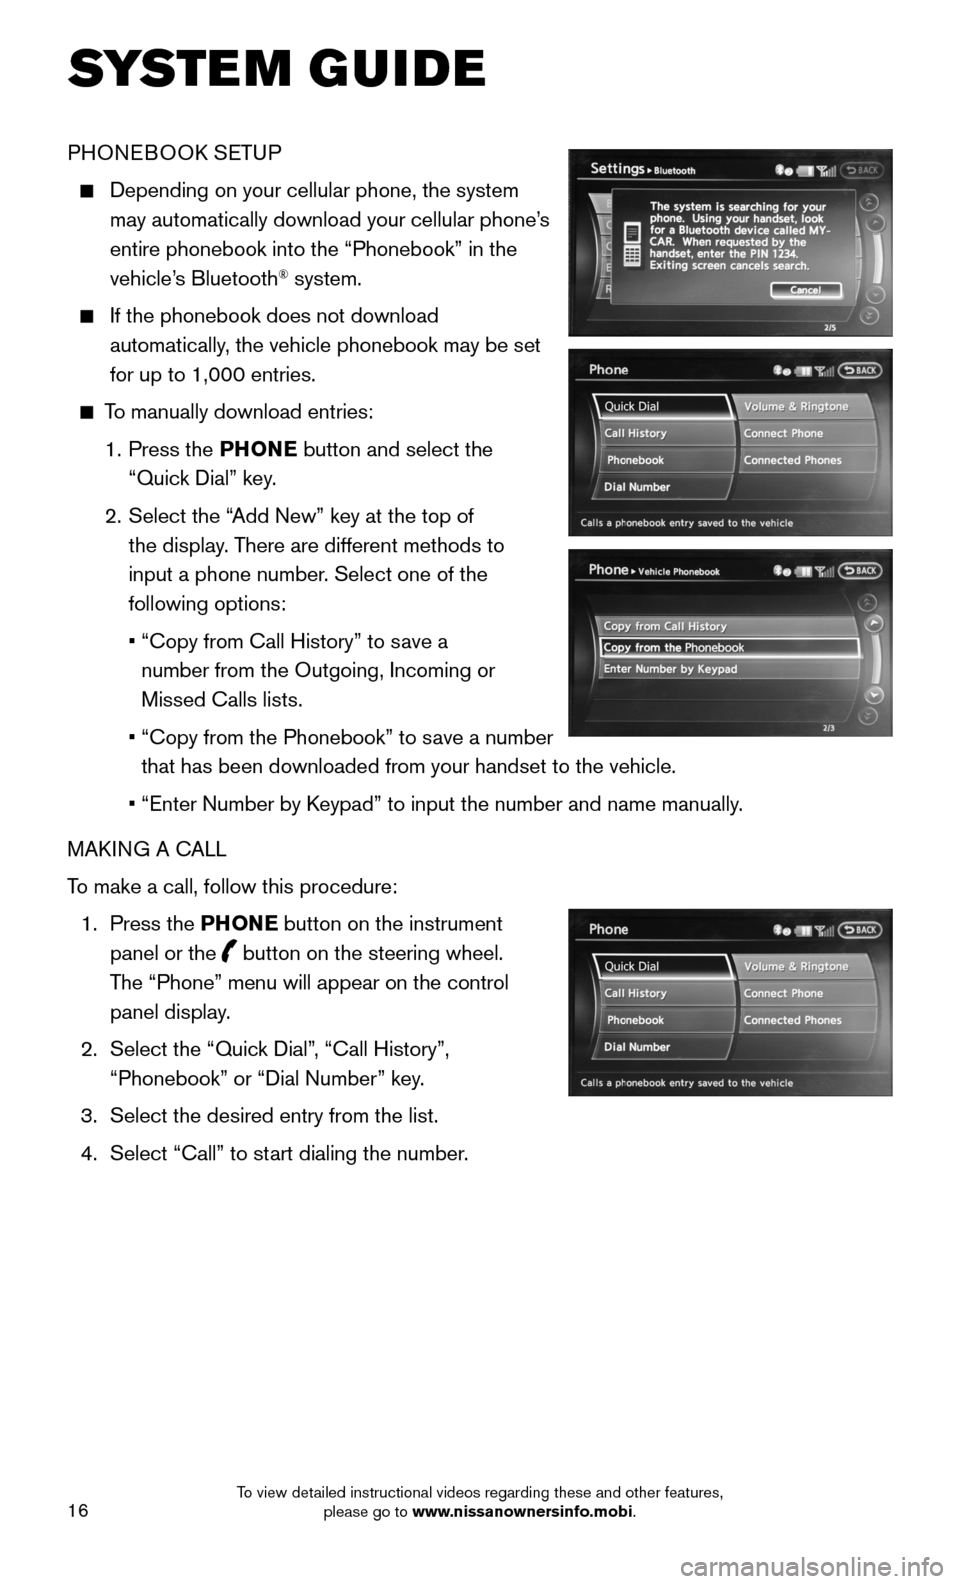
PHONEBOOK SETUP
Depending on your cellular phone, the system
may automatically download your cellular phone’s
entire phonebook into the “Phonebook” in the
vehicle’s Bluetooth® system.
If the phonebook does not download
automatically, the vehicle phonebook may be set
for up to 1,000 entries.
To manually download entries:
1. Press the PHONE button and select the
“Quick Dial” key.
2. Select the “Add New” key at the top of
the display. There are different methods to
input a phone number. Select one of the
following options:
• “Copy from Call History” to save a
number from the Outgoing, Incoming or
Missed Calls lists.
• “Copy from the Phonebook” to save a number
that has been downloaded from your handset to the vehicle.
• “Enter Number by Keypad” to input the number and name manually.
MAKING A CALL
To make a call, follow this procedure:
1. Press the PHONE button on the instrument
panel or the button on the steering wheel.
The “Phone” menu will appear on the control
panel display.
2. Select the “Quick Dial”, “Call History”,
“Phonebook” or “Dial Number” key.
3. Select the desired entry from the list.
4. Select “Call” to start dialing the number.
SYSTEM GUIDE
To view detailed instructional videos regarding these and other features, please go to www.nissanownersinfo.mobi.
Page 19 of 24
17
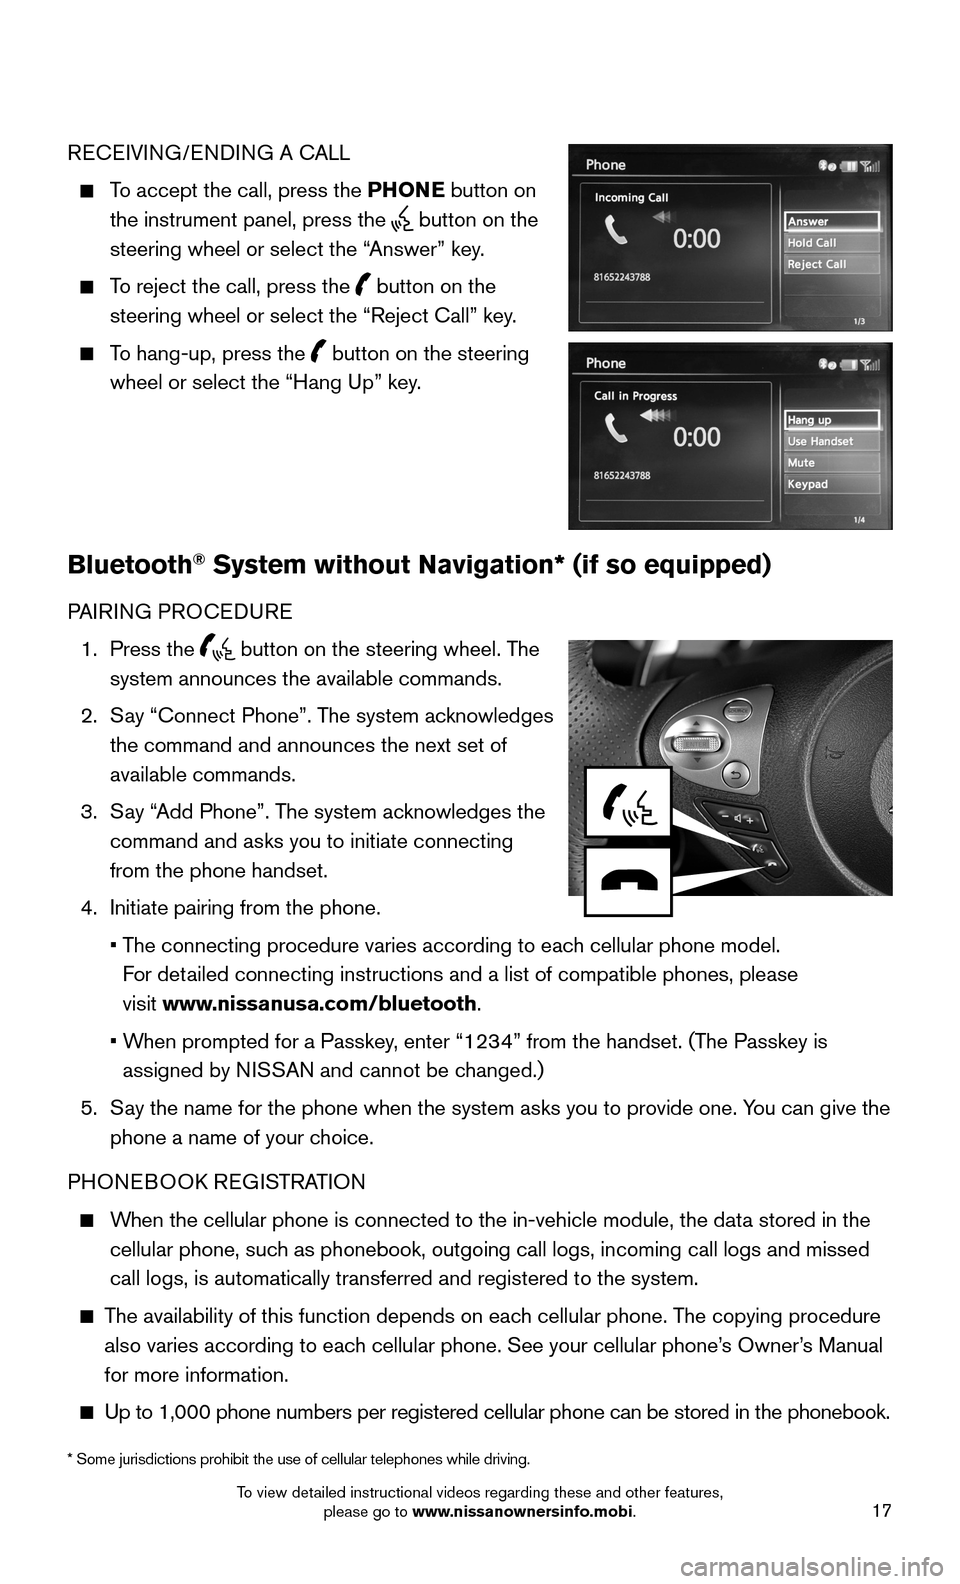
RECEIVING/ENDING A CALL
To accept the call, press the PHONE button on
the instrument panel, press the button on the
steering wheel or select the “Answer” key.
To reject the call, press the button on the
steering wheel or select the “Reject Call” key.
To hang-up, press the button on the steering
wheel or select the “Hang Up” key.
Bluetooth® System without Navigation* (if so equipped)
PAIRING PROCEDURE
1. Press the button on the steering wheel. The
system announces the available commands.
2. Say “Connect Phone”. The system acknowledges
the command and announces the next set of
available commands.
3. Say “Add Phone”. The system acknowledges the
command and asks you to initiate connecting
from the phone handset.
4. Initiate pairing from the phone.
• The connecting procedure varies according to each cellular phone model.
For detailed connecting instructions and a list of compatible phones, please
visit www.nissanusa.com/bluetooth.
• When prompted for a Passkey, enter “1234” from the handset. (The Passkey is
assigned by NISSAN and cannot be changed.)
5. Say the name for the phone when the system asks you to provide one. You can give the
phone a name of your choice.
PHONEBOOK REGISTRATION
When the cellular phone is connected to the in-vehicle module, the data stored in the
cellular phone, such as phonebook, outgoing call logs, incoming call logs and missed
call logs, is automatically transferred and registered to the system.
The availability of this function depends on each cellular phone. The copying procedure
also varies according to each cellular phone. See your cellular phone’s Owner’s Manual
for more information.
Up to 1,000 phone numbers per registered cellular phone can be stored in\
the phonebook.
* Some jurisdictions prohibit the use of cellular telephones while drivi\
ng.
To view detailed instructional videos regarding these and other features, please go to www.nissanownersinfo.mobi.