child seat NISSAN 370Z ROADSTER 2010 User Guide
[x] Cancel search | Manufacturer: NISSAN, Model Year: 2010, Model line: 370Z ROADSTER, Model: NISSAN 370Z ROADSTER 2010Pages: 409, PDF Size: 3.56 MB
Page 37 of 409
Black plate (35,1)
Model "Z34-D" EDITED: 2009/ 9/ 10
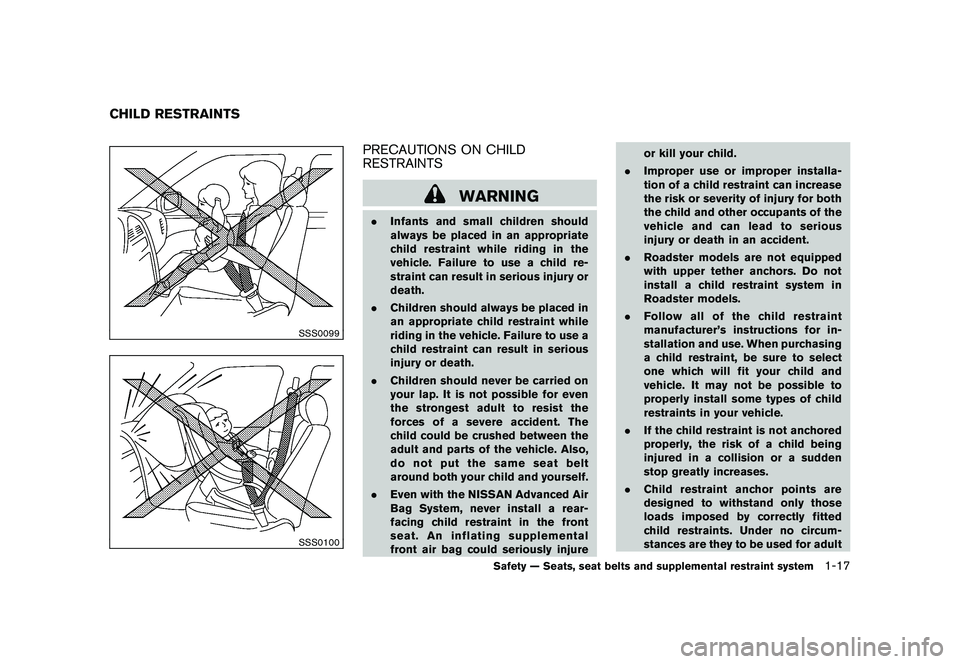
SSS0099SSS0100
PRECAUTIONS ON CHILD
RESTRAINTS
WARNING
.Infants and small children should
always be placed in an appropriate
child restraint while riding in the
vehicle. Failure to use a child re-
straint can result in serious injury or
death.
. Children should always be placed in
an appropriate child restraint while
riding in the vehicle. Failure to use a
child restraint can result in serious
injury or death.
. Children should never be carried on
your lap. It is not possible for even
the strongest adult to resist the
forces of a severe accident. The
child could be crushed between the
adult and parts of the vehicle. Also,
do not put the same seat belt
around both your child and yourself.
. Even with the NISSAN Advanced Air
Bag System, never install a rear-
facing child restraint in the front
seat. An inflating supplemental
front air bag could seriously injure or kill your child.
. Improper use or improper installa-
tion of a child restraint can increase
the risk or severity of injury for both
the child and other occupants of the
vehicle and can lead to serious
injury or death in an accident.
. Roadster models are not equipped
with upper tether anchors. Do not
install a child restraint system in
Roadster models.
. Follow all of the child restraint
manufacturer’s instructions for in-
stallation and use. When purchasing
a child restraint, be sure to select
one which will fit your child and
vehicle. It may not be possible to
properly install some types of child
restraints in your vehicle.
. If the child restraint is not anchored
properly, the risk of a child being
injured in a collision or a sudden
stop greatly increases.
. Child restraint anchor points are
designed to withstand only those
loads imposed by correctly fitted
child restraints. Under no circum-
stances are they to be used for adult
CHILD RESTRAINTS
Safety — Seats, seat belts and supplemental restraint system
1-17
Page 38 of 409
Black plate (36,1)
Model "Z34-D" EDITED: 2009/ 9/ 10
seat belts or harnesses.
. Adjustable seatbacks should be
positioned to fit the child restraint,
but as upright as possible.
. After attaching the child restraint,
test it before you place the child in
it. Push it from side to side while
holding the seat by the seat belt
path. The child restraint should not
move more than 1 inch (25 mm) from
side to side. Try to tug it forward and
check to see if the belt holds the
restraint in place. If the restraint is
not secure, tighten the belt as
necessary, or put the restraint in
another seat and test it again. You
may need to try a different child
restraint. Not all child restraints fit
in all types of vehicles.
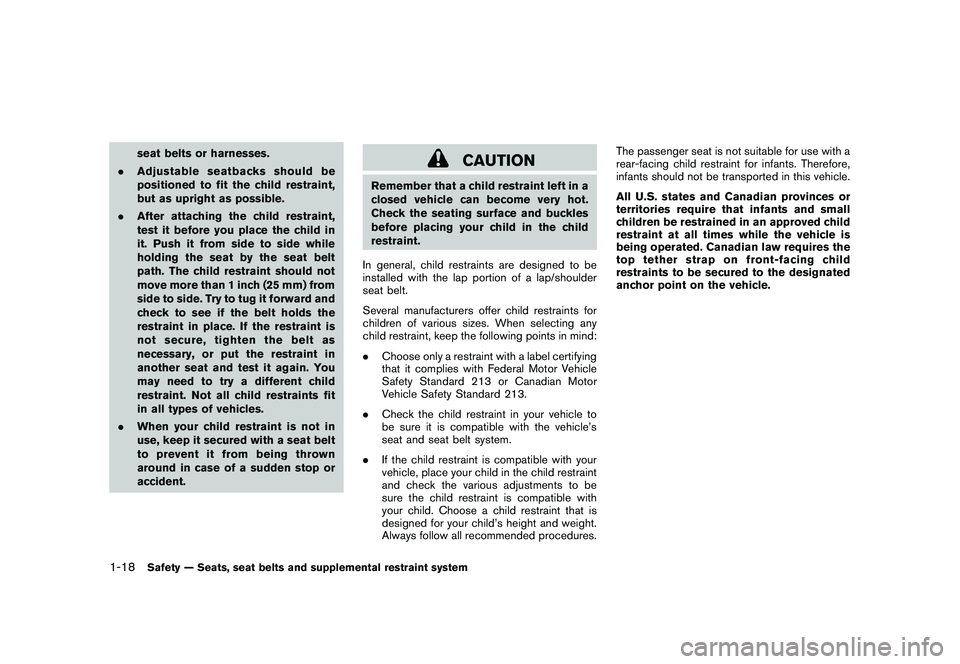
. When your child restraint is not in
use, keep it secured with a seat belt
to prevent it from being thrown
around in case of a sudden stop or
accident.
CAUTION
Remember that a child restraint left in a
closed vehicle can become very hot.
Check the seating surface and buckles
before placing your child in the child
restraint.
In general, child restraints are designed to be
installed with the lap portion of a lap/shoulder
seat belt.
Several manufacturers offer child restraints for
children of various sizes. When selecting any
child restraint, keep the following points in mind:
. Choose only a restraint with a label certifying
that it complies with Federal Motor Vehicle
Safety Standard 213 or Canadian Motor
Vehicle Safety Standard 213.
. Check the child restraint in your vehicle to
be sure it is compatible with the vehicle’s
seat and seat belt system.
. If the child restraint is compatible with your
vehicle, place your child in the child restraint
and check the various adjustments to be
sure the child restraint is compatible with
your child. Choose a child restraint that is
designed for your child’s height and weight.
Always follow all recommended procedures. The passenger seat is not suitable for use with a
rear-facing child restraint for infants. Therefore,
infants should not be transported in this vehicle.
All U.S. states and Canadian provinces or
territories require that infants and small
children be restrained in an approved child
restraint at all times while the vehicle is
being operated. Canadian law requires the
top tether strap on front-facing child
restraints to be secured to the designated
anchor point on the vehicle.
1-18
Safety — Seats, seat belts and supplemental restraint system
Page 39 of 409
Black plate (37,1)
Model "Z34-D" EDITED: 2009/ 9/ 10
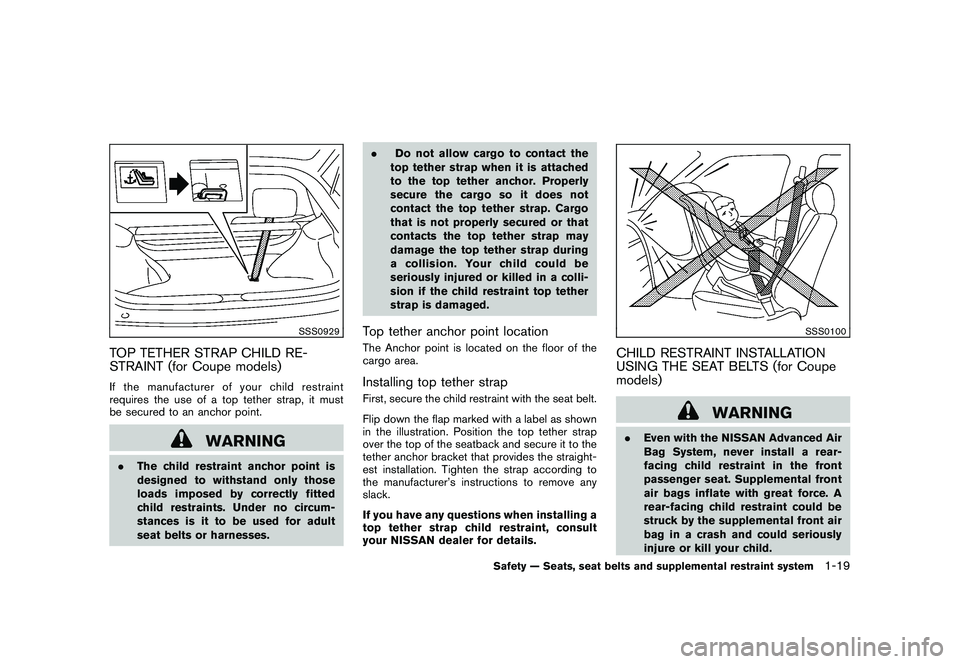
SSS0929
TOP TETHER STRAP CHILD RE-
STRAINT (for Coupe models)If the manufacturer of your child restraint
requires the use of a top tether strap, it must
be secured to an anchor point.
WARNING
.The child restraint anchor point is
designed to withstand only those
loads imposed by correctly fitted
child restraints. Under no circum-
stances is it to be used for adult
seat belts or harnesses. .
Do not allow cargo to contact the
top tether strap when it is attached
to the top tether anchor. Properly
secure the cargo so it does not
contact the top tether strap. Cargo
that is not properly secured or that
contacts the top tether strap may
damage the top tether strap during
a collision. Your child could be
seriously injured or killed in a colli-
sion if the child restraint top tether
strap is damaged.
Top tether anchor point locationThe Anchor point is located on the floor of the
cargo area.Installing top tether strapFirst, secure the child restraint with the seat belt.
Flip down the flap marked with a label as shown
in the illustration. Position the top tether strap
over the top of the seatback and secure it to the
tether anchor bracket that provides the straight-
est installation. Tighten the strap according to
the manufacturer’s instructions to remove any
slack.
If you have any questions when installing a
top tether strap child restraint, consult
your NISSAN dealer for details.
SSS0100
CHILD RESTRAINT INSTALLATION
USING THE SEAT BELTS (for Coupe
models)
WARNING
. Even with the NISSAN Advanced Air
Bag System, never install a rear-
facing child restraint in the front
passenger seat. Supplemental front
air bags inflate with great force. A
rear-facing child restraint could be
struck by the supplemental front air
bag in a crash and could seriously
injure or kill your child.
Safety — Seats, seat belts and supplemental restraint system
1-19
Page 40 of 409
Black plate (38,1)
Model "Z34-D" EDITED: 2009/ 9/ 10
.The three-point seat belt in your
vehicle is equipped with an Auto-
matic Locking Retractor (ALR) which
must be used when installing a child
restraint.
. Failure to use the ALR will result in
the child restraint not being prop-
erly secured. The restraint could tip
over or otherwise be unsecured and
cause injury to the child in a sudden
stop or collision.
The instructions in this section apply to child
restraint installation using the vehicle seat belts
in the front passenger seat.
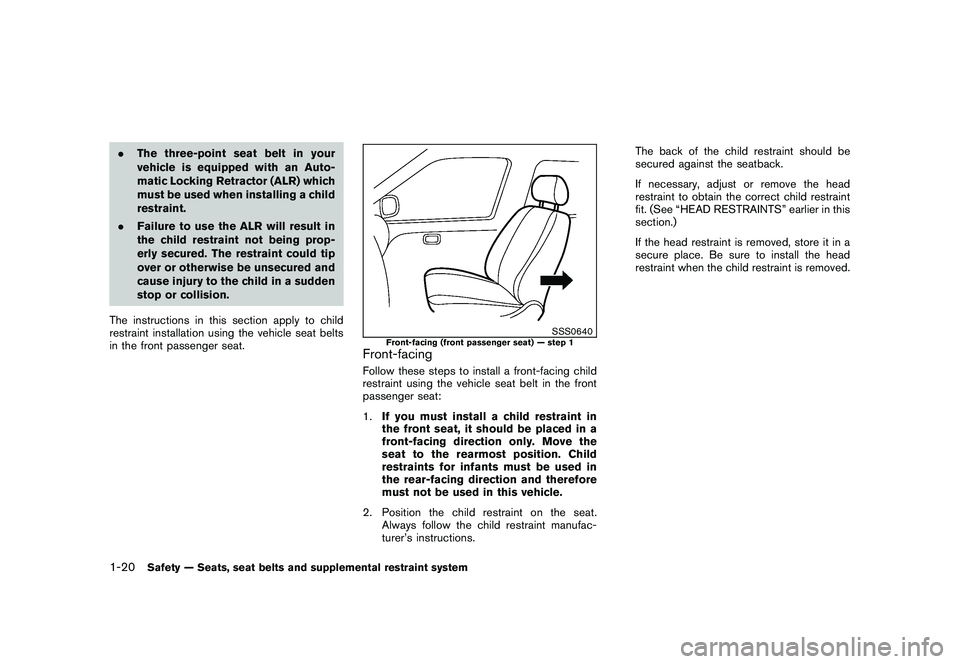
SSS0640
Front-facing (front passenger seat) — step 1
Front-facingFollow these steps to install a front-facing child
restraint using the vehicle seat belt in the front
passenger seat:
1. If you must install a child restraint in
the front seat, it should be placed in a
front-facing direction only. Move the
seat to the rearmost position. Child
restraints for infants must be used in
the rear-facing direction and therefore
must not be used in this vehicle.
2. Position the child restraint on the seat. Always follow the child restraint manufac-
turer’s instructions. The back of the child restraint should be
secured against the seatback.
If necessary, adjust or remove the head
restraint to obtain the correct child restraint
fit. (See “HEAD RESTRAINTS” earlier in this
section.)
If the head restraint is removed, store it in a
secure place. Be sure to install the head
restraint when the child restraint is removed.
1-20
Safety — Seats, seat belts and supplemental restraint system
Page 41 of 409
Black plate (39,1)
Model "Z34-D" EDITED: 2009/ 9/ 10
SSS0360B
Front-facing — step 3
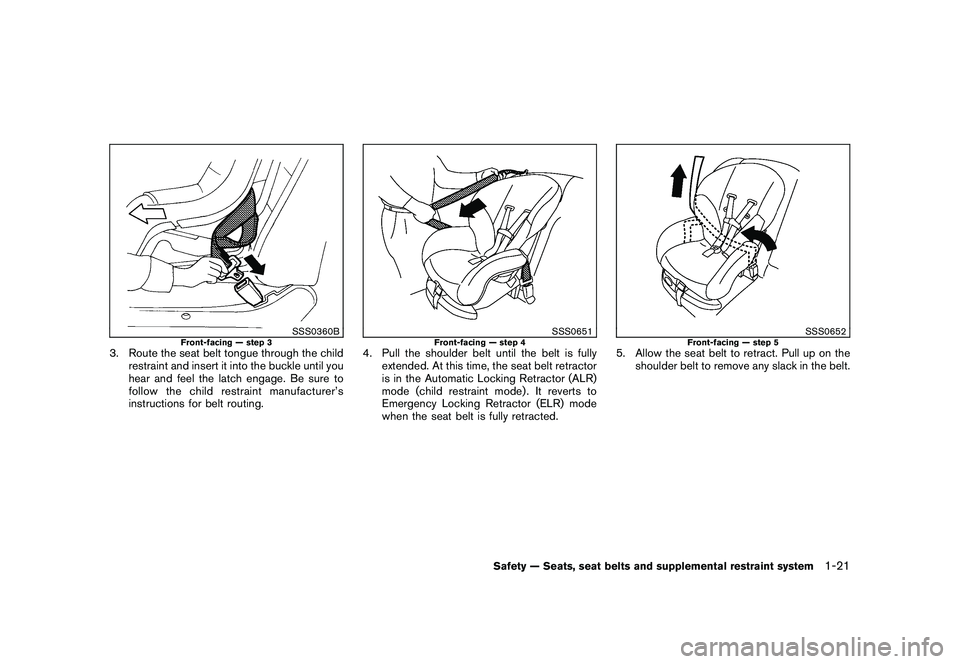
3. Route the seat belt tongue through the childrestraint and insert it into the buckle until you
hear and feel the latch engage. Be sure to
follow the child restraint manufacturer’s
instructions for belt routing.
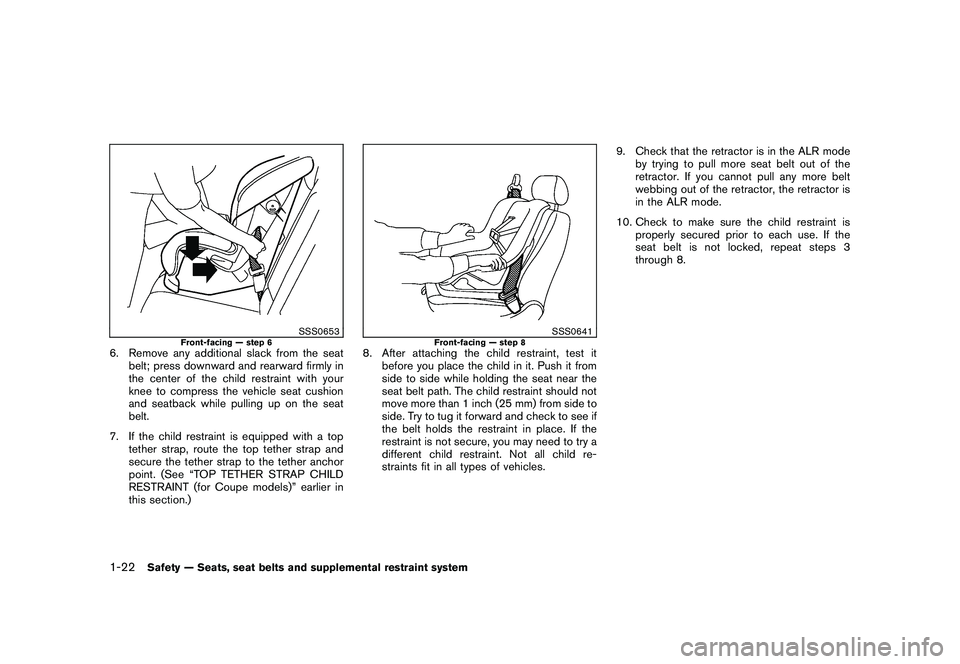
SSS0651
Front-facing — step 4
4. Pull the shoulder belt until the belt is fullyextended. At this time, the seat belt retractor
is in the Automatic Locking Retractor (ALR)
mode (child restraint mode) . It reverts to
Emergency Locking Retractor (ELR) mode
when the seat belt is fully retracted.
SSS0652
Front-facing — step 5
5. Allow the seat belt to retract. Pull up on theshoulder belt to remove any slack in the belt.
Safety — Seats, seat belts and supplemental restraint system
1-21
Page 42 of 409
Black plate (40,1)
Model "Z34-D" EDITED: 2009/ 9/ 10
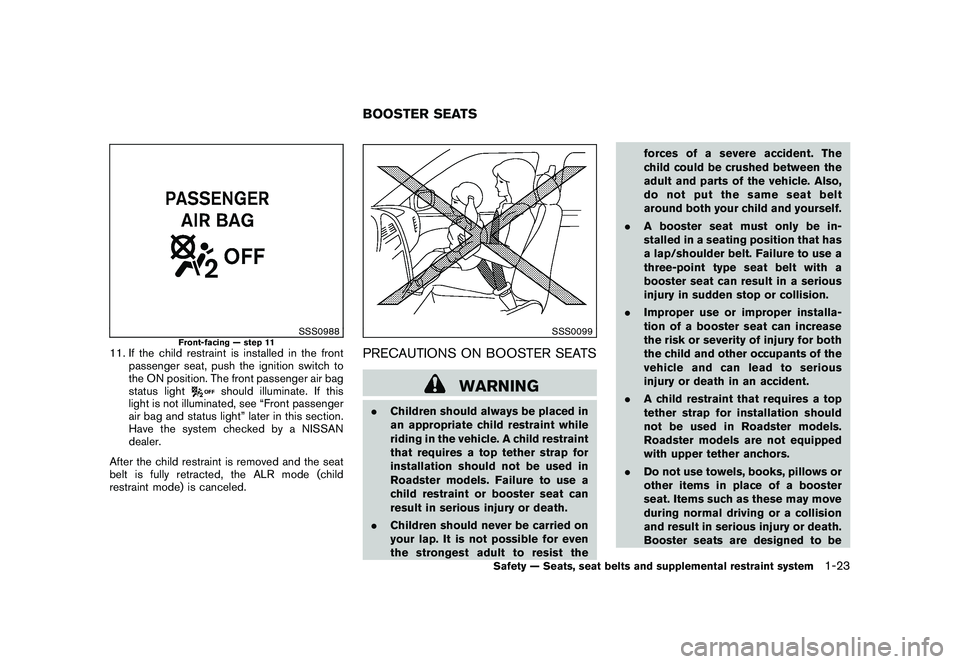
SSS0653
Front-facing — step 6
6. Remove any additional slack from the seatbelt; press downward and rearward firmly in
the center of the child restraint with your
knee to compress the vehicle seat cushion
and seatback while pulling up on the seat
belt.
7. If the child restraint is equipped with a top tether strap, route the top tether strap and
secure the tether strap to the tether anchor
point. (See “TOP TETHER STRAP CHILD
RESTRAINT (for Coupe models)” earlier in
this section.)
SSS0641
Front-facing — step 8
8. After attaching the child restraint, test itbefore you place the child in it. Push it from
side to side while holding the seat near the
seat belt path. The child restraint should not
move more than 1 inch (25 mm) from side to
side. Try to tug it forward and check to see if
the belt holds the restraint in place. If the
restraint is not secure, you may need to try a
different child restraint. Not all child re-
straints fit in all types of vehicles. 9. Check that the retractor is in the ALR mode
by trying to pull more seat belt out of the
retractor. If you cannot pull any more belt
webbing out of the retractor, the retractor is
in the ALR mode.
10. Check to make sure the child restraint is properly secured prior to each use. If the
seat belt is not locked, repeat steps 3
through 8.
1-22
Safety — Seats, seat belts and supplemental restraint system
Page 43 of 409
Black plate (41,1)
Model "Z34-D" EDITED: 2009/ 9/ 10
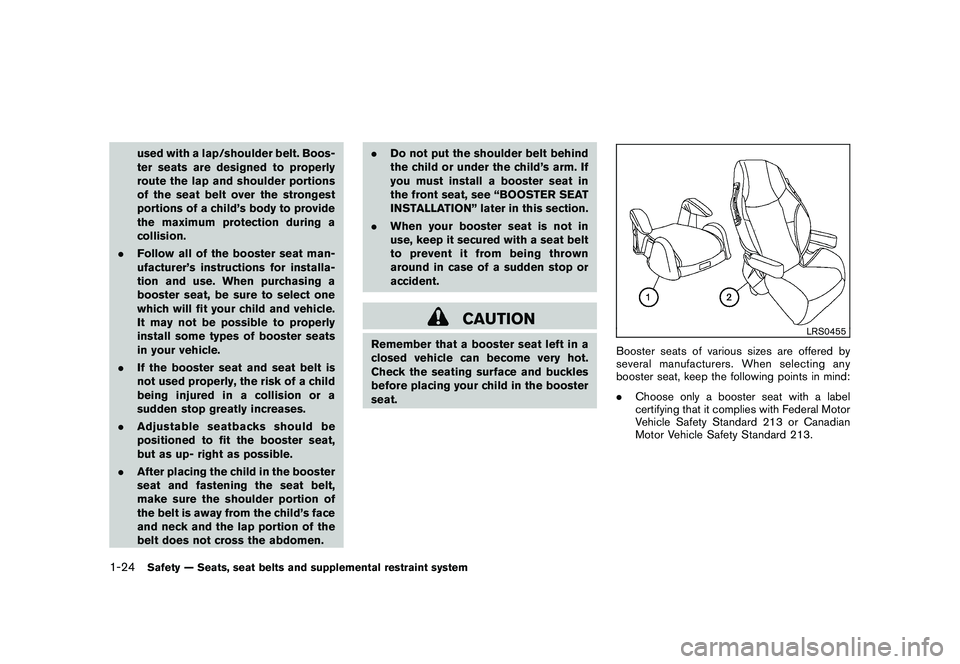
SSS0988
Front-facing — step 11
11. If the child restraint is installed in the frontpassenger seat, push the ignition switch to
the ON position. The front passenger air bag
status light
should illuminate. If this
light is not illuminated, see “Front passenger
air bag and status light” later in this section.
Have the system checked by a NISSAN
dealer.
After the child restraint is removed and the seat
belt is fully retracted, the ALR mode (child
restraint mode) is canceled.
SSS0099
PRECAUTIONS ON BOOSTER SEATS
WARNING
. Children should always be placed in
an appropriate child restraint while
riding in the vehicle. A child restraint
that requires a top tether strap for
installation should not be used in
Roadster models. Failure to use a
child restraint or booster seat can
result in serious injury or death.
. Children should never be carried on
your lap. It is not possible for even
the strongest adult to resist the forces of a severe accident. The
child could be crushed between the
adult and parts of the vehicle. Also,
do not put the same seat belt
around both your child and yourself.
. A booster seat must only be in-
stalled in a seating position that has
a lap/shoulder belt. Failure to use a
three-point type seat belt with a
booster seat can result in a serious
injury in sudden stop or collision.
. Improper use or improper installa-
tion of a booster seat can increase
the risk or severity of injury for both
the child and other occupants of the
vehicle and can lead to serious
injury or death in an accident.
. A child restraint that requires a top
tether strap for installation should
not be used in Roadster models.
Roadster models are not equipped
with upper tether anchors.
. Do not use towels, books, pillows or
other items in place of a booster
seat. Items such as these may move
during normal driving or a collision
and result in serious injury or death.
Booster seats are designed to beBOOSTER SEATS
Safety — Seats, seat belts and supplemental restraint system
1-23
Page 44 of 409
Black plate (42,1)
Model "Z34-D" EDITED: 2009/ 9/ 10
used with a lap/shoulder belt. Boos-
ter seats are designed to properly
route the lap and shoulder portions
of the seat belt over the strongest
portions of a child’s body to provide
the maximum protection during a
collision.
. Follow all of the booster seat man-
ufacturer’s instructions for installa-
tion and use. When purchasing a
booster seat, be sure to select one
which will fit your child and vehicle.
It may not be possible to properly
install some types of booster seats
in your vehicle.
. If the booster seat and seat belt is
not used properly, the risk of a child
being injured in a collision or a
sudden stop greatly increases.
. Adjustable seatbacks should be
positioned to fit the booster seat,
but as up- right as possible.
. After placing the child in the booster
seat and fastening the seat belt,
make sure the shoulder portion of
the belt is away from the child’s face
and neck and the lap portion of the
belt does not cross the abdomen. .
Do not put the shoulder belt behind
the child or under the child’s arm. If
you must install a booster seat in
the front seat, see “BOOSTER SEAT
INSTALLATION” later in this section.
. When your booster seat is not in
use, keep it secured with a seat belt
to prevent it from being thrown
around in case of a sudden stop or
accident.
CAUTION
Remember that a booster seat left in a
closed vehicle can become very hot.
Check the seating surface and buckles
before placing your child in the booster
seat.
LRS0455
Booster seats of various sizes are offered by
several manufacturers. When selecting any
booster seat, keep the following points in mind:
.Choose only a booster seat with a label
certifying that it complies with Federal Motor
Vehicle Safety Standard 213 or Canadian
Motor Vehicle Safety Standard 213.
1-24
Safety — Seats, seat belts and supplemental restraint system
Page 45 of 409
Black plate (43,1)
Model "Z34-D" EDITED: 2009/ 9/ 10
SSS0363
.Check the booster seat in your vehicle to be
sure it is compatible with the vehicle’s seat
and seat belt system.
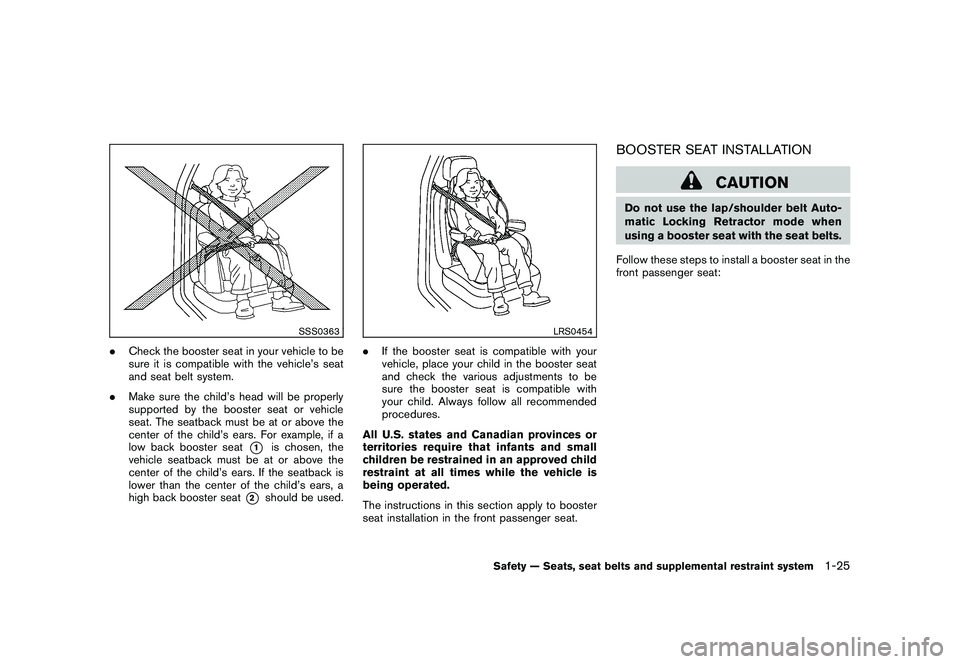
. Make sure the child’s head will be properly
supported by the booster seat or vehicle
seat. The seatback must be at or above the
center of the child’s ears. For example, if a
low back booster seat
*1
is chosen, the
vehicle seatback must be at or above the
center of the child’s ears. If the seatback is
lower than the center of the child’s ears, a
high back booster seat
*2
should be used.
LRS0454
. If the booster seat is compatible with your
vehicle, place your child in the booster seat
and check the various adjustments to be
sure the booster seat is compatible with
your child. Always follow all recommended
procedures.
All U.S. states and Canadian provinces or
territories require that infants and small
children be restrained in an approved child
restraint at all times while the vehicle is
being operated.
The instructions in this section apply to booster
seat installation in the front passenger seat.
BOOSTER SEAT INSTALLATION
CAUTION
Do not use the lap/shoulder belt Auto-
matic Locking Retractor mode when
using a booster seat with the seat belts.
Follow these steps to install a booster seat in the
front passenger seat:
Safety — Seats, seat belts and supplemental restraint system
1-25
Page 46 of 409
Black plate (44,1)
Model "Z34-D" EDITED: 2009/ 9/ 10
SSS0640
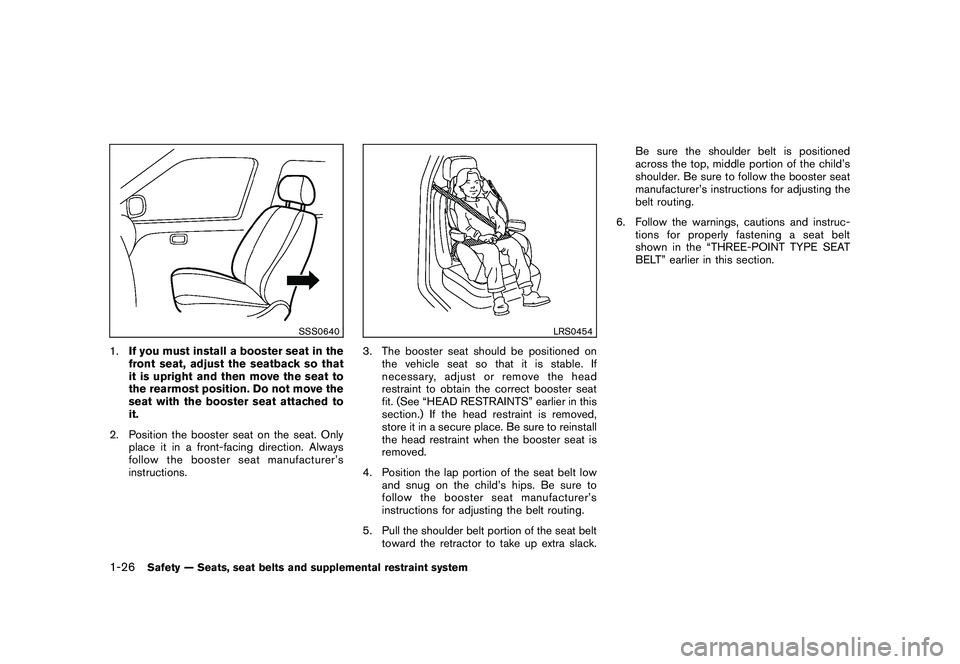
1.If you must install a booster seat in the
front seat, adjust the seatback so that
it is upright and then move the seat to
the rearmost position. Do not move the
seat with the booster seat attached to
it.
2. Position the booster seat on the seat. Only place it in a front-facing direction. Always
follow the booster seat manufacturer’s
instructions.
LRS0454
3. The booster seat should be positioned onthe vehicle seat so that it is stable. If
necessary, adjust or remove the head
restraint to obtain the correct booster seat
fit. (See “HEAD RESTRAINTS” earlier in this
section.) If the head restraint is removed,
store it in a secure place. Be sure to reinstall
the head restraint when the booster seat is
removed.
4. Position the lap portion of the seat belt low and snug on the child’s hips. Be sure to
follow the booster seat manufacturer’s
instructions for adjusting the belt routing.
5. Pull the shoulder belt portion of the seat belt toward the retractor to take up extra slack. Be sure the shoulder belt is positioned
across the top, middle portion of the child’s
shoulder. Be sure to follow the booster seat
manufacturer’s instructions for adjusting the
belt routing.
6. Follow the warnings, cautions and instruc- tions for properly fastening a seat belt
shown in the “THREE-POINT TYPE SEAT
BELT” earlier in this section.
1-26
Safety — Seats, seat belts and supplemental restraint system