oil dipstick NISSAN 370Z ROADSTER 2011 Owners Manual
[x] Cancel search | Manufacturer: NISSAN, Model Year: 2011, Model line: 370Z ROADSTER, Model: NISSAN 370Z ROADSTER 2011Pages: 419, PDF Size: 3.61 MB
Page 21 of 419
Black plate (15,1)
Model "Z34-D" EDITED: 2010/ 7/ 27
SSI0510
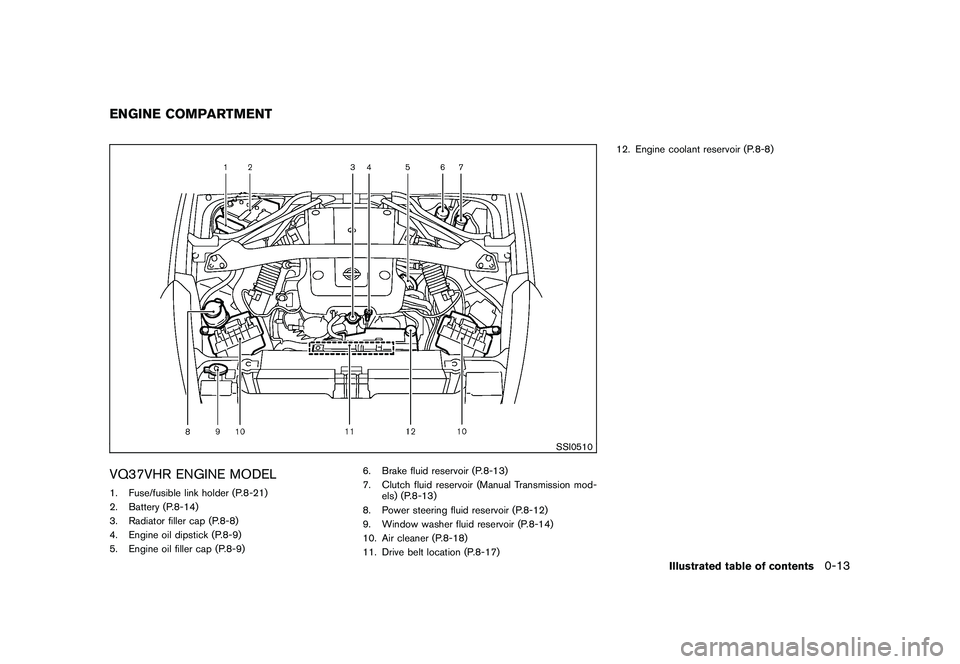
VQ37VHR ENGINE MODEL1. Fuse/fusible link holder (P.8-21)
2. Battery (P.8-14)
3. Radiator filler cap (P.8-8)
4. Engine oil dipstick (P.8-9)
5. Engine oil filler cap (P.8-9)6. Brake fluid reservoir (P.8-13)
7. Clutch fluid reservoir (Manual Transmission mod-
els) (P.8-13)
8. Power steering fluid reservoir (P.8-12)
9. Window washer fluid reservoir (P.8-14)
10. Air cleaner (P.8-18)
11. Drive belt location (P.8-17) 12. Engine coolant reservoir (P.8-8)ENGINE COMPARTMENT
Illustrated table of contents
0-13
Page 72 of 419
Black plate (68,1)
Model "Z34-D" EDITED: 2010/ 7/ 27
Charge warning light
If the light comes on while the engine is running,
it may indicate the charging system is not
functioning properly. Turn the engine off and
check the alternator belt. If the belt is loose,
broken, missing or if the light remains on, see a
NISSAN dealer immediately.
CAUTION
Do not continue driving if the alternator
belt is loose, broken or missing.
Engine oil pressure warning light
This light warns of low engine oil pressure. If the
light flickers or comes on during normal driving,
pull off the road in a safe area, stop the engine
immediatelyand call a NISSAN dealer or other
authorized repair shop.
The engine oil pressure warning light is
not designed to indicate a low oil level.
Use the dipstick to check the oil level. (See
“ENGINE OIL” in the “8. Maintenance and do-it-
yourself” section.)
CAUTION
Running the engine with the engine oil pressure warning light on could cause
serious damage to the engine almost
immediately. Such damage is not cov-
ered by warranty. Turn off the engine as
soon as it is safe to do so.
Intelligent Key system warning light
After the ignition switch is pushed to the ON
position, this light comes on for about 2 seconds
and then turns off.
This light warns of a malfunction with the
electrical steering lock system (if so equipped)
or the Intelligent Key system.
If the light comes on while the engine is
stopped, it may be impossible to free the
steering lock (if so equipped) or to start the
engine. If the light comes on while the engine is
running, you can drive the vehicle. However in
these cases, contact a NISSAN dealer for repair
as soon as possible.
Low tire pressure warning light
Your vehicle is equipped with a Tire Pressure
Monitoring System (TPMS) that monitors the tire
pressure of all tires except the spare.
The low tire pressure warning light warns of low
tire pressure or indicates that the TPMS is notfunctioning properly.
After the ignition switch is pushed ON, this light
illuminates for about 1 second and turns off.
Low tire pressure warning:
If the vehicle is being driven with low tire
pressure, the warning light will illuminate.
When the low tire pressure warning light
illuminates, you should stop and adjust the tire
pressure to the recommended COLD tire
pressure shown on the Tire and Loading
Information label. The low tire pressure warning
light does not automatically turn off when the tire
pressure is adjusted. After the tire is inflated to
the recommended pressure, the vehicle must be
driven at speeds above 16 MPH (25 km/h) to
activate the TPMS and turn off the low tire
pressure warning light. Use a tire pressure
gauge to check the tire pressure.
For additional information, see “TIRE PRES-
SURE MONITORING SYSTEM (TPMS)” in the
“5. Starting and driving” section and “TIRE
PRESSURE MONITORING SYSTEM (TPMS)”
in the “6. In case of emergency” section.
TPMS malfunction:
If the TPMS is not functioning properly, the low
tire pressure warning light will flash for approxi-
mately 1 minute when the ignition switch is
pushed ON. The light will remain on after the 1
2-10
Instruments and controls
Page 351 of 419
Black plate (351,1)
Model "Z34-D" EDITED: 2010/ 7/ 27
SSI0510
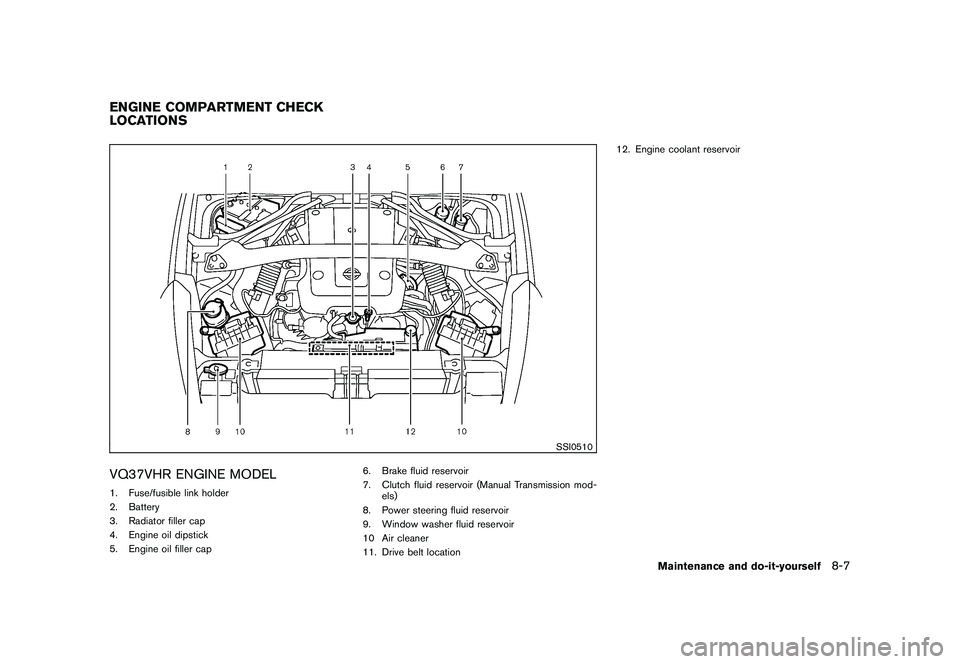
VQ37VHR ENGINE MODEL1. Fuse/fusible link holder
2. Battery
3. Radiator filler cap
4. Engine oil dipstick
5. Engine oil filler cap6. Brake fluid reservoir
7. Clutch fluid reservoir (Manual Transmission mod-
els)
8. Power steering fluid reservoir
9. Window washer fluid reservoir
10 Air cleaner
11. Drive belt location 12. Engine coolant reservoirENGINE COMPARTMENT CHECK
LOCATIONS
Maintenance and do-it-yourself
8-7
Page 353 of 419
Black plate (353,1)
Model "Z34-D" EDITED: 2010/ 7/ 27
SDI2043
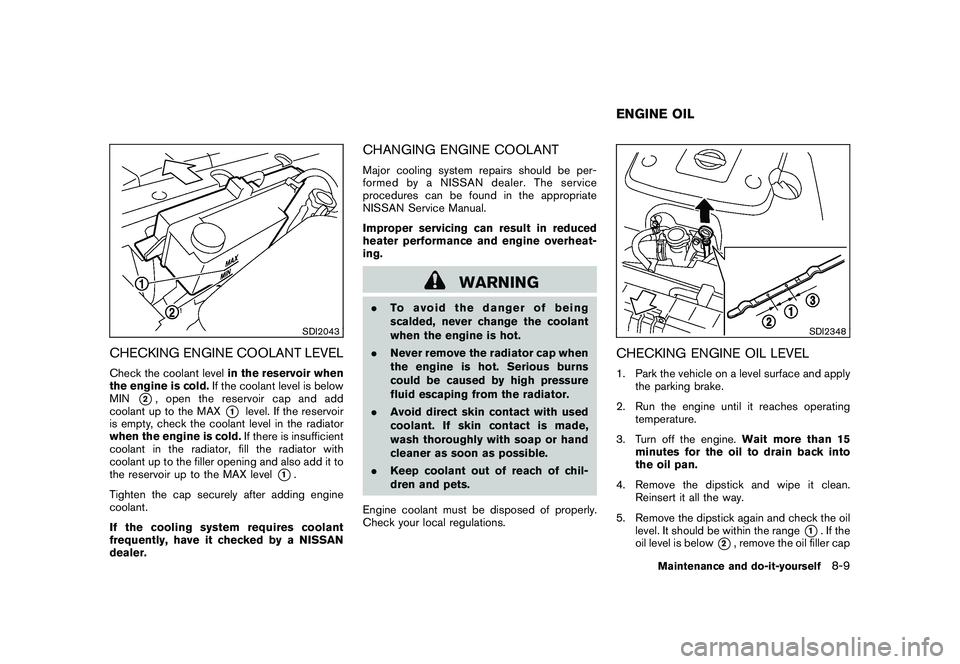
CHECKING ENGINE COOLANT LEVELCheck the coolant levelin the reservoir when
the engine is cold. If the coolant level is below
MIN
*2, open the reservoir cap and add
coolant up to the MAX
*1
level. If the reservoir
is empty, check the coolant level in the radiator
when the engine is cold. If there is insufficient
coolant in the radiator, fill the radiator with
coolant up to the filler opening and also add it to
the reservoir up to the MAX level
*1.
Tighten the cap securely after adding engine
coolant.
If the cooling system requires coolant
frequently, have it checked by a NISSAN
dealer.
CHANGING ENGINE COOLANTMajor cooling system repairs should be per-
formed by a NISSAN dealer. The service
procedures can be found in the appropriate
NISSAN Service Manual.
Improper servicing can result in reduced
heater performance and engine overheat-
ing.
WARNING
. To avoid the danger of being
scalded, never change the coolant
when the engine is hot.
. Never remove the radiator cap when
the engine is hot. Serious burns
could be caused by high pressure
fluid escaping from the radiator.
. Avoid direct skin contact with used
coolant. If skin contact is made,
wash thoroughly with soap or hand
cleaner as soon as possible.
. Keep coolant out of reach of chil-
dren and pets.
Engine coolant must be disposed of properly.
Check your local regulations.
SDI2348
CHECKING ENGINE OIL LEVEL1. Park the vehicle on a level surface and apply the parking brake.
2. Run the engine until it reaches operating temperature.
3. Turn off the engine. Wait more than 15
minutes for the oil to drain back into
the oil pan.
4. Remove the dipstick and wipe it clean. Reinsert it all the way.
5. Remove the dipstick again and check the oil level. It should be within the range
*1. If the
oil level is below
*2, remove the oil filler cap
ENGINE OIL
Maintenance and do-it-yourself
8-9
Page 354 of 419
Black plate (354,1)
Model "Z34-D" EDITED: 2010/ 7/ 27
and pour recommended oil through the
opening.Do not overfill
*3.
6. Recheck oil level with the dipstick.
It is normal to add some oil between oil
maintenance intervals or during the break-
in period, depending on the severity of
operating conditions.
CAUTION
Oil level should be checked regularly.
Operating the engine with an insuffi-
cient amount of oil can damage the
engine, and such damage is not cov-
ered by warranty.CHANGING ENGINE OIL AND FILTER
Vehicle set-up1. Park the vehicle on a level surface and apply the parking brake.
2. Run the engine until it reaches operating temperature.
3. Turn the engine off and wait more than 15 minutes.
4. Raise and support the vehicle using a suitable floor jack and safety jack stands.
.Place the safety jack stands under the vehicle jack-up points.
. A suitable adapter should be attached to
the jack stand saddle.
5. Remove the plastic engine undercover. a. Remove the small plastic clips at thecenter of the undercover.
b. Then remove the bolts that hold the undercover in place.
CAUTION
Make sure the correct lifting and sup-
port points are used to avoid vehicle
damage.
SDI2335
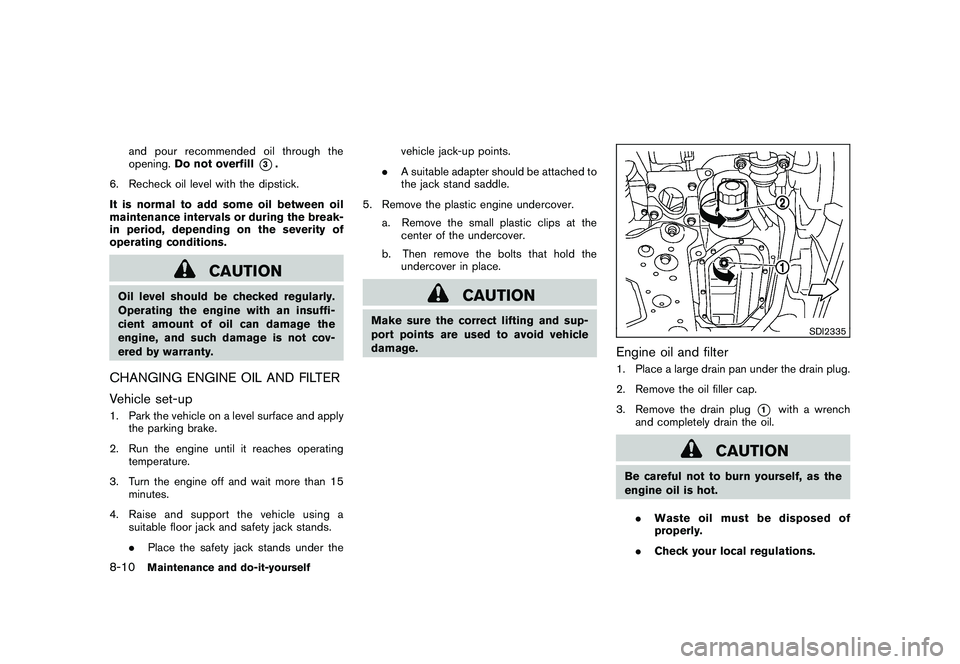
Engine oil and filter1. Place a large drain pan under the drain plug.
2. Remove the oil filler cap.
3. Remove the drain plug
*1
with a wrench
and completely drain the oil.
CAUTION
Be careful not to burn yourself, as the
engine oil is hot.
. Waste oil must be disposed of
properly.
. Check your local regulations.
8-10
Maintenance and do-it-yourself
Page 355 of 419
Black plate (355,1)
Model "Z34-D" EDITED: 2010/ 7/ 27
(Perform steps 4 to 7 only when the engine
oil filter change is needed.)
4. Loosen the oil filter
*2
with an oil filter
wrench. Remove the oil filter by turning it by
hand.
5. Wipe the engine oil filter mounting surface with a clean rag.
CAUTION
Be sure to remove any old rubber
gasket remaining on the mounting sur-
face of the engine. Failure to do so
could lead to engine damage.
6. Coat the gasket on the new filter with clean engine oil.
7. Screw in the oil filter clockwise until a slight resistance is felt, then tighten additionally
more than 2/3 turn.
Oil filter tightening torque:11 to 15 ft-lb
(14.7 to 20.5 N·m)
8. Clean and re-install the drain plug with a new washer. Securely tighten the drain plug
with a wrench.
Drain plug tightening torque:22 to 29 ft-lb
(29 to 39 N·m) Do not use excessive force.
9. Refill engine with recommended oil through the oil filler opening, and install the oil filler
cap securely.
See “CAPACITIES AND RECOMMENDED
FUEL/LUBRICANTS” in the “9. Technical
and consumer information” section for drain
and refill capacity. The drain and refill
capacity depends on the oil temperature
and drain time. Use these specifications for
reference only. Always use the dipstick to
determine the proper amount of oil in the
engine.
10. Start the engine and check for leakage around the drain plug and the oil filter.
Correct as required.
11. Turn the engine off and wait more than 15 minutes. Check the oil level with the dipstick.
Add engine oil if necessary.
After the operation1. Install the engine undercover into position as
the following steps.
a. Pull the center of the small plastic clipout.
b. Hold the engine undercover into posi- tion. c. Insert the clip through the undercover
into the hole in the frame, then push the
center of the clip in to lock the clip in
place.
d. Install the bolts that hold the undercover in place. Be careful not to strip the bolts
or over-tighten them.
2. Lower the vehicle carefully to the ground.
3. Dispose of waste oil and filter properly.
WARNING
. Prolonged and repeated contact
with used engine oil may cause skin
cancer.
. Try to avoid direct skin contact with
used oil. If skin contact is made,
wash thoroughly with soap or hand
cleaner as soon as possible.
. Keep used engine oil out of reach of
children.
Maintenance and do-it-yourself
8-11